MERCEDES-BENZ GLC COUPE 2016 Owners Manual
Manufacturer: MERCEDES-BENZ, Model Year: 2016, Model line: GLC COUPE, Model: MERCEDES-BENZ GLC COUPE 2016Pages: 389, PDF Size: 7.34 MB
Page 311 of 389
Vehicle occupants could be struck in the
event of sudden braking or an accident, for
instance, if you:
R transport other heavy or sharp-edged
objects in the skibag
R do not secure the skibag with the lashing
straps
There is a risk of accident and injury.
Store only skis in the skibag. Always secure
the skibag with the lashing straps so that it
cannot move around.
A maximum of four pairs of skis or two snow-
boards can be transported in the ski/snow-
board bag.
Securing the ski/snowboard bag in the
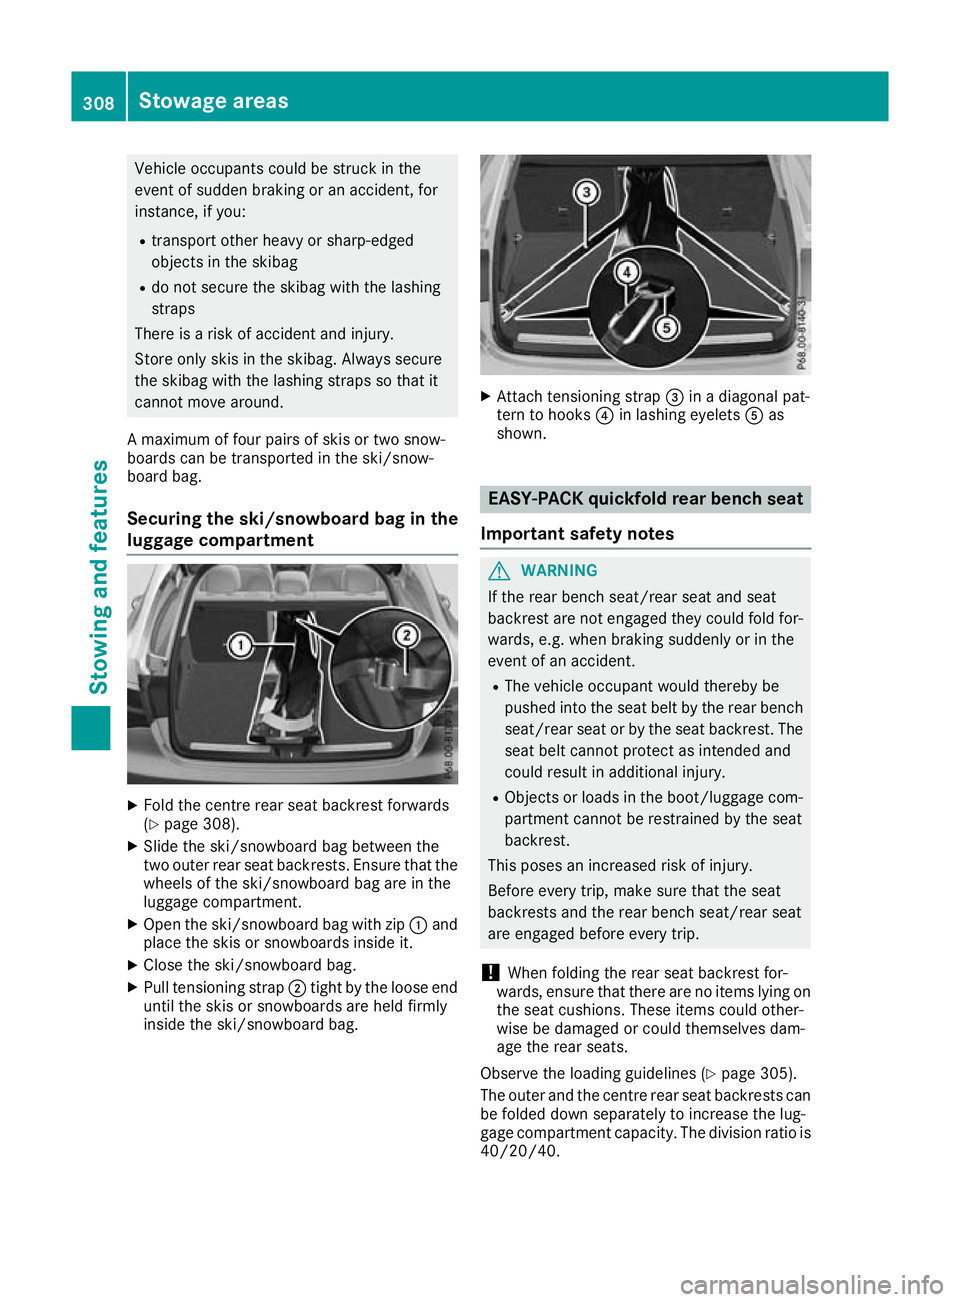
luggage compartment X
Fold the centre rear seat backrest forwards
(Y page 308).
X Slide the ski/snowboard bag between the
two outer rear seat backrests. Ensure that the
wheels of the ski/snowboard bag are in the
luggage compartment.
X Open the ski/snowboard bag with zip :and
place the skis or snowboards inside it.
X Close the ski/snowboard bag.
X Pull tensioning strap ;tight by the loose end
until the skis or snowboards are held firmly
inside the ski/snowboard bag. X
Attach tensioning strap =in a diagonal pat-
tern to hooks ?in lashing eyelets Aas
shown. EASY-PACK quickfold rear bench seat
Important safety notes G
WARNING
If the rear bench seat/rear seat and seat
backrest are not engaged they could fold for- wards, e.g. when braking suddenly or in the
event of an accident.
R The vehicle occupant would thereby be
pushed into the seat belt by the rear bench
seat/rear seat or by the seat backrest. The
seat belt cannot protect as intended and
could result in additional injury.
R Objects or loads in the boot/luggage com-
partment cannot be restrained by the seat
backrest.
This poses an increased risk of injury.
Before every trip, make sure that the seat
backrests and the rear bench seat/rear seat
are engaged before every trip.
! When folding the rear seat backrest for-
wards, ensure that there are no items lying on the seat cushions. These items could other-
wise be damaged or could themselves dam-
age the rear seats.
Observe the loading guidelines (Y page 305).
The outer and the centre rear seat backrests can be folded down separately to increase the lug-
gage compartment capacity. The division ratio is
40/20/40. 308
Stowage areasStowing and features
Page 312 of 389
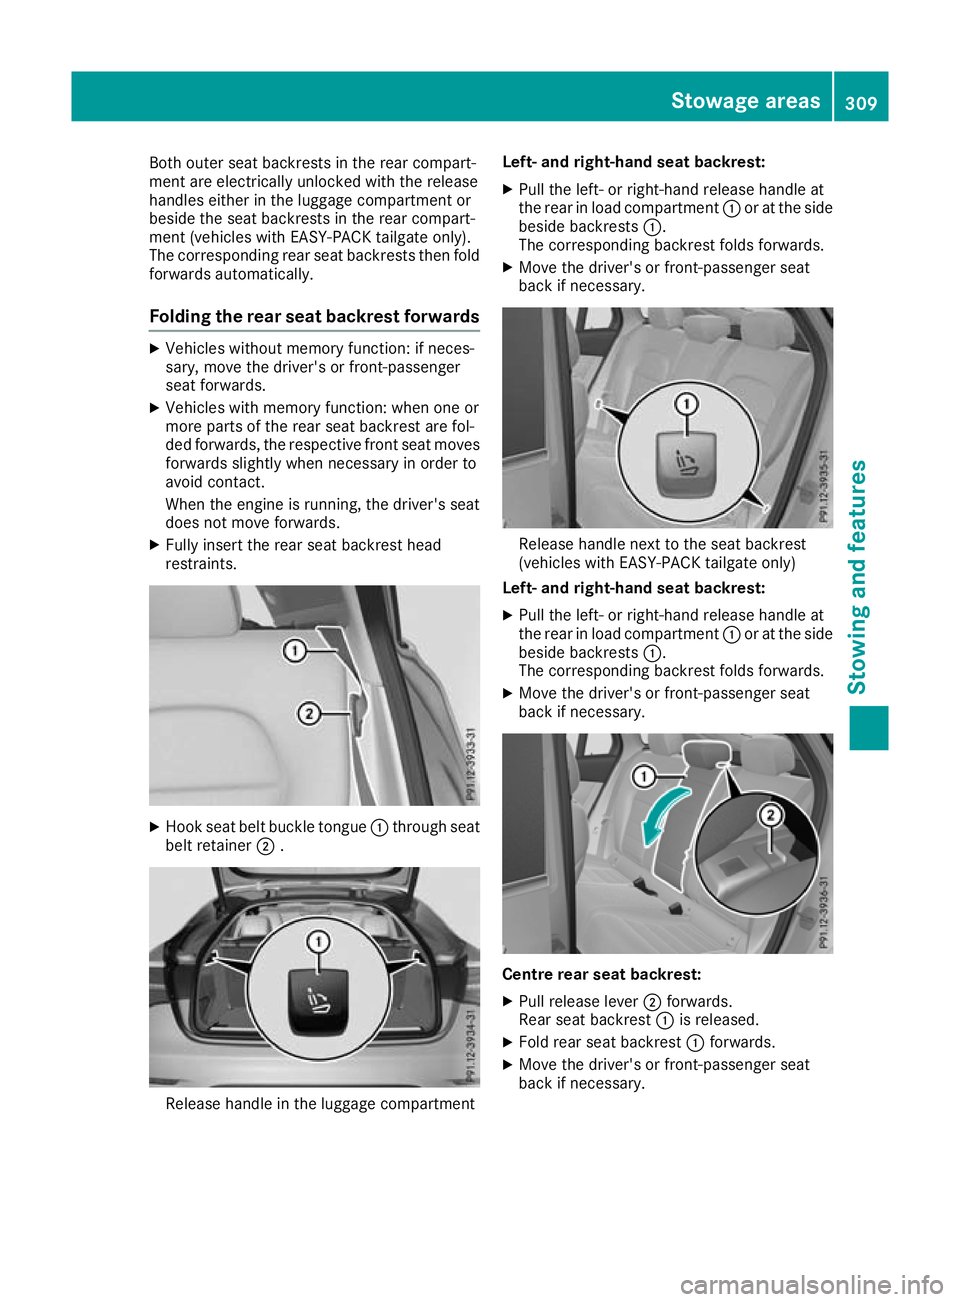
Both outer seat backrests in the rear compart-
ment are electrically unlocked with the release
handles either in the luggage compartment or
beside the seat backrests in the rear compart-
ment (vehicles with EASY-PACK tailgate only).
The corresponding rear seat backrests then fold forwards automatically.
Folding the rear seat backrest forwards X
Vehicles without memory function: if neces-
sary, move the driver's or front-passenger
seat forwards.
X Vehicles with memory function: when one or
more parts of the rear seat backrest are fol-
ded forwards, the respective front seat moves
forwards slightly when necessary in order to
avoid contact.
When the engine is running, the driver's seat
does not move forwards.
X Fully insert the rear seat backrest head
restraints. X
Hook seat belt buckle tongue :through seat
belt retainer ;. Release handle in the luggage compartment Left- and right-hand seat backrest:
X Pull the left- or right-hand release handle at
the rear in load compartment :or at the side
beside backrests :.
The corresponding backrest folds forwards.
X Move the driver's or front-passenger seat
back if necessary. Release handle next to the seat backrest
(vehicles with EASY-PACK tailgate only)
Left- and right-hand seat backrest:
X Pull the left- or right-hand release handle at
the rear in load compartment :or at the side
beside backrests :.
The corresponding backrest folds forwards.
X Move the driver's or front-passenger seat
back if necessary. Centre rear seat backrest:
X Pull release lever ;forwards.
Rear seat backrest :is released.
X Fold rear seat backrest :forwards.
X Move the driver's or front-passenger seat
back if necessary. Stowage areas
309Stowing and features Z
Page 313 of 389
Folding the rear seat backrest back
!
Make sure that the seat belt does not
become trapped when folding the rear seat
backrest back. Otherwise, it could be dam-
aged. Left- and right-hand seat backrest:
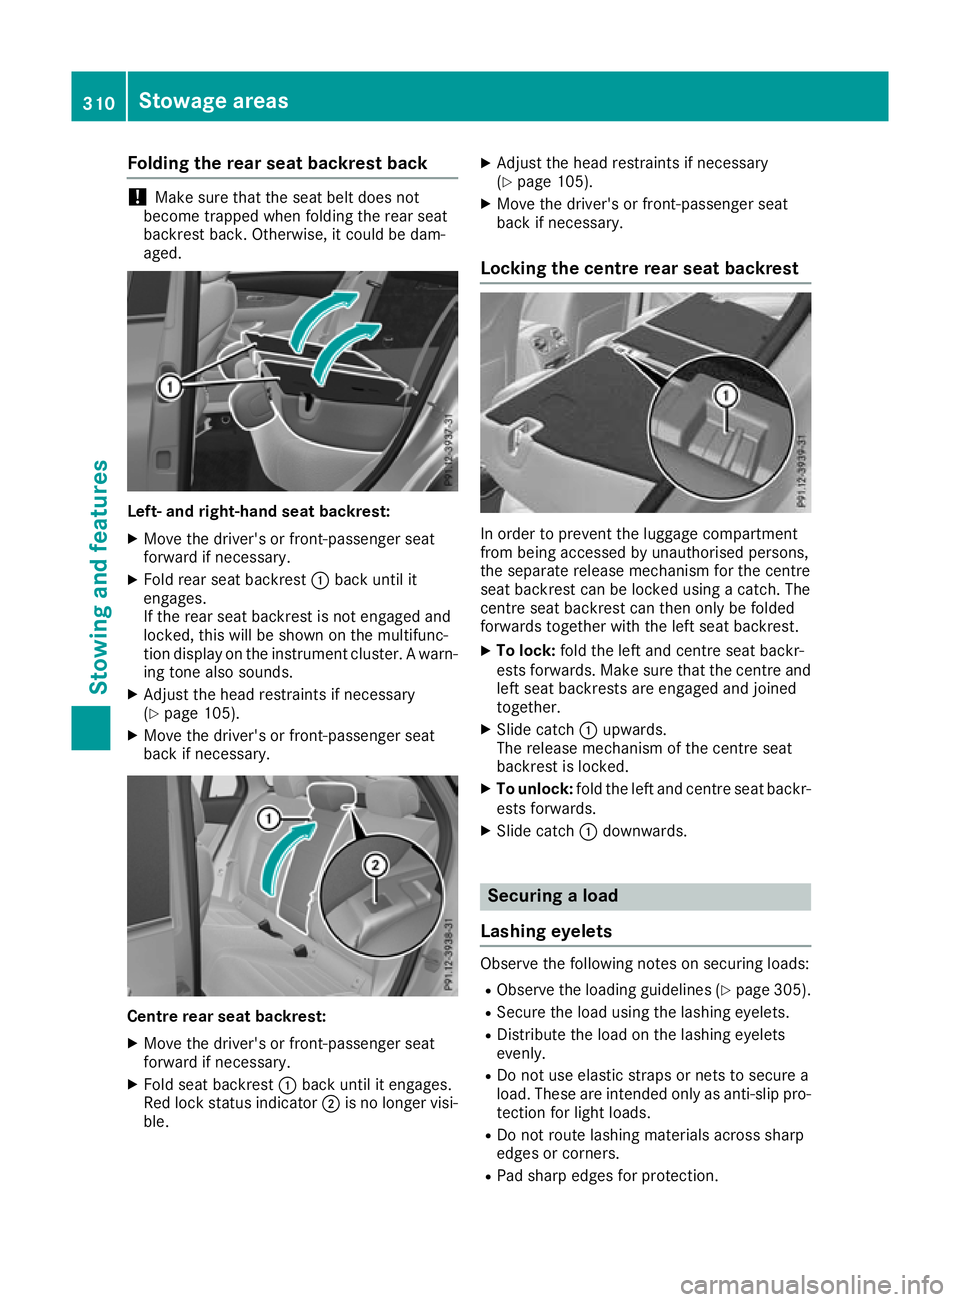
X Move the driver's or front-passenger seat
forward if necessary.
X Fold rear seat backrest :back until it
engages.
If the rear seat backrest is not engaged and
locked, this will be shown on the multifunc-
tion display on the instrument cluster. A warn- ing tone also sounds.
X Adjust the head restraints if necessary
(Y page 105).
X Move the driver's or front-passenger seat
back if necessary. Centre rear seat backrest:
X Move the driver's or front-passenger seat
forward if necessary.
X Fold seat backrest :back until it engages.
Red lock status indicator ;is no longer visi-
ble. X
Adjust the head restraints if necessary
(Y page 105).
X Move the driver's or front-passenger seat
back if necessary.
Locking the centre rear seat backrest In order to prevent the luggage compartment
from being accessed by unauthorised persons,
the separate release mechanism for the centre
seat backrest can be locked using a catch. The
centre seat backrest can then only be folded
forwards together with the left seat backrest.
X To lock: fold the left and centre seat backr-
ests forwards. Make sure that the centre and left seat backrests are engaged and joined
together.
X Slide catch :upwards.
The release mechanism of the centre seat
backrest is locked.
X To unlock: fold the left and centre seat backr-
ests forwards.
X Slide catch :downwards. Securing a load
Lashing eyelets Observe the following notes on securing loads:
R Observe the loading guidelines (Y page 305).
R Secure the load using the lashing eyelets.
R Distribute the load on the lashing eyelets
evenly.
R Do not use elastic straps or nets to secure a
load. These are intended only as anti-slip pro-
tection for light loads.
R Do not route lashing materials across sharp
edges or corners.
R Pad sharp edges for protection. 310
Stowage areasStowing and featu
res
Page 314 of 389
:
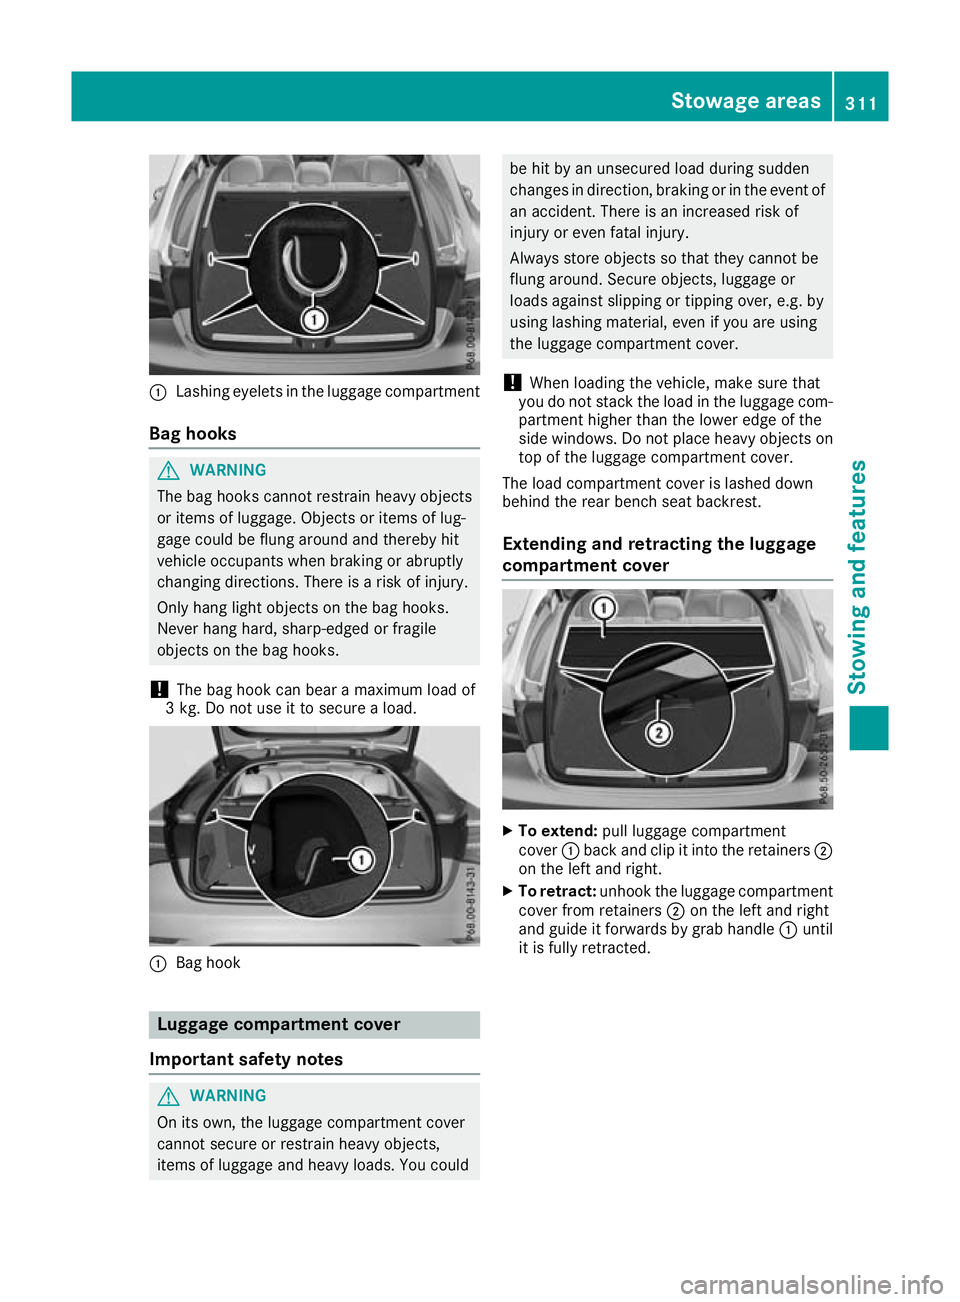
Lashing eyelets in the luggage compartment
Bag hooks G
WARNING
The bag hooks cannot restrain heavy objects
or items of luggage. Objects or items of lug-
gage could be flung around and thereby hit
vehicle occupants when braking or abruptly
changing directions. There is a risk of injury.
Only hang light objects on the bag hooks.
Never hang hard, sharp-edged or fragile
objects on the bag hooks.
! The bag hook can bear a maximum load of
3 kg. Do not use it to secure a load. :
Bag hook Luggage compartment cover
Important safety notes G
WARNING
On its own, the luggage compartment cover
cannot secure or restrain heavy objects,
items of luggage and heavy loads. You could be hit by an unsecured load during sudden
changes in direction, braking or in the event of
an accident. There is an increased risk of
injury or even fatal injury.
Always store objects so that they cannot be
flung around. Secure objects, luggage or
loads against slipping or tipping over, e.g. by
using lashing material, even if you are using
the luggage compartment cover.
! When loading the vehicle, make sure that
you do not stack the load in the luggage com- partment higher than the lower edge of the
side windows. Do not place heavy objects ontop of the luggage compartment cover.
The load compartment cover is lashed down
behind the rear bench seat backrest.
Extending and retracting the luggage
compartment cover X
To extend: pull luggage compartment
cover :back and clip it into the retainers ;
on the left and right.
X To retract: unhook the luggage compartment
cover from retainers ;on the left and right
and guide it forwards by grab handle :until
it is fully retracted. Stowage areas
311Stowing and features Z
Page 315 of 389
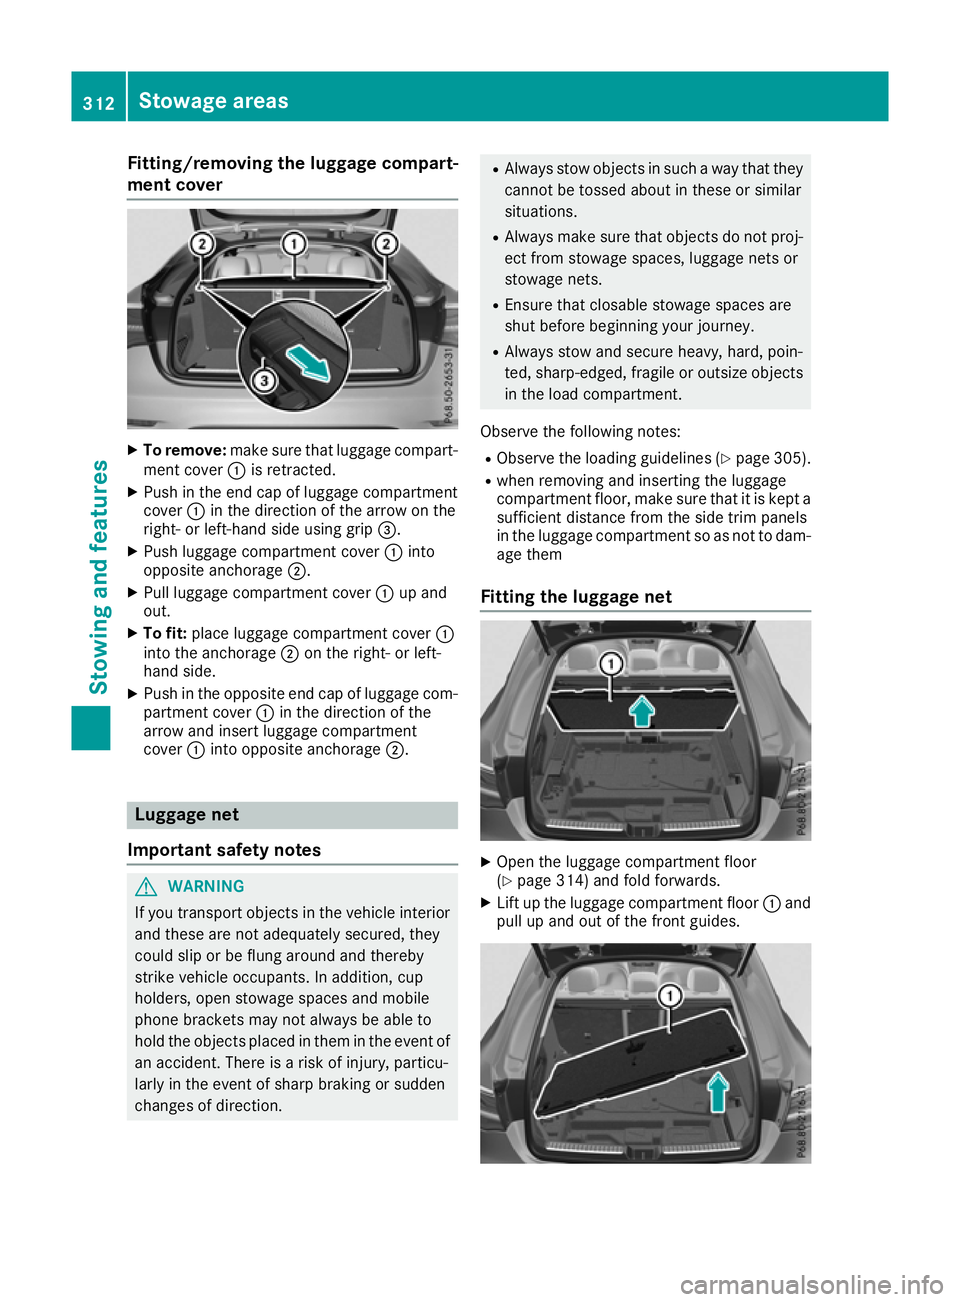
Fitting/removing the luggage compart-
ment cover X
To remove: make sure that luggage compart-
ment cover :is retracted.
X Push in the end cap of luggage compartment
cover :in the direction of the arrow on the
right- or left-hand side using grip =.
X Push luggage compartment cover :into
opposite anchorage ;.
X Pull luggage compartment cover :up and
out.
X To fit: place luggage compartment cover :
into the anchorage ;on the right- or left-
hand side.
X Push in the opposite end cap of luggage com-
partment cover :in the direction of the
arrow and insert luggage compartment
cover :into opposite anchorage ;.Luggage net
Important safety notes G
WARNING
If you transport objects in the vehicle interior and these are not adequately secured, they
could slip or be flung around and thereby
strike vehicle occupants. In addition, cup
holders, open stowage spaces and mobile
phone brackets may not always be able to
hold the objects placed in them in the event of an accident. There is a risk of injury, particu-
larly in the event of sharp braking or sudden
changes of direction. R
Always stow objects in such a way that they
cannot be tossed about in these or similar
situations.
R Always make sure that objects do not proj-
ect from stowage spaces, luggage nets or
stowage nets.
R Ensure that closable stowage spaces are
shut before beginning your journey.
R Always stow and secure heavy, hard, poin-
ted, sharp-edged, fragile or outsize objects in the load compartment.
Observe the following notes:
R Observe the loading guidelines (Y page 305).
R when removing and inserting the luggage
compartment floor, make sure that it is kept a
sufficient distance from the side trim panels
in the luggage compartment so as not to dam- age them
Fitting the luggage net X
Open the luggage compartment floor
(Y page 314) and fold forwards.
X Lift up the luggage compartment floor :and
pull up and out of the front guides. 312
Stowage areasStowing and featu
res
Page 316 of 389
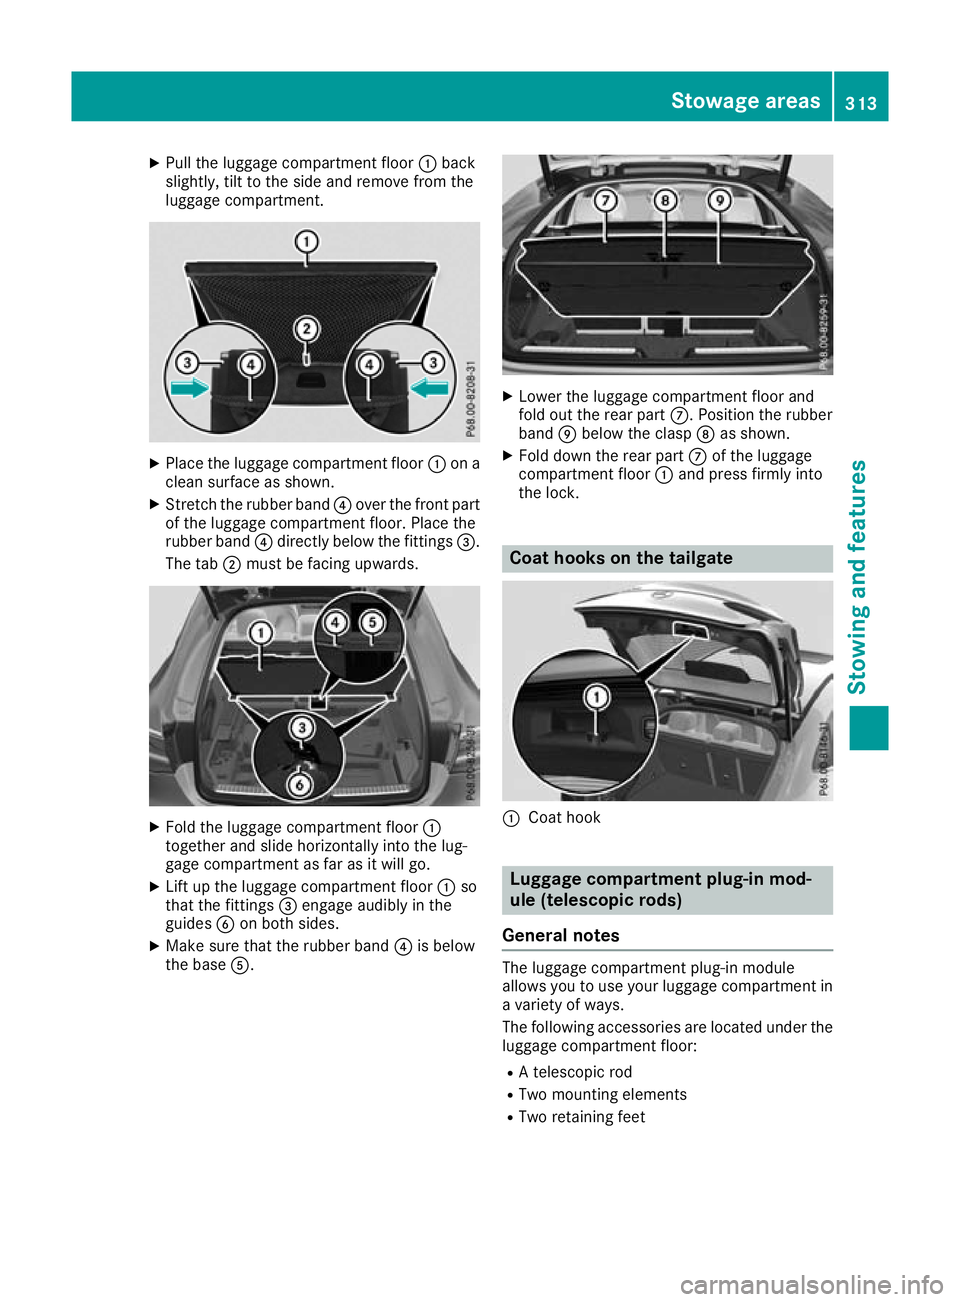
X
Pull the luggage compartment floor :back
slightly, tilt to the side and remove from the
luggage compartment. X
Place the luggage compartment floor :on a
clean surface as shown.
X Stretch the rubber band ?over the front part
of the luggage compartment floor. Place the
rubber band ?directly below the fittings =.
The tab ;must be facing upwards. X
Fold the luggage compartment floor :
together and slide horizontally into the lug-
gage compartment as far as it will go.
X Lift up the luggage compartment floor :so
that the fittings =engage audibly in the
guides Bon both sides.
X Make sure that the rubber band ?is below
the base A. X
Lower the luggage compartment floor and
fold out the rear part C. Position the rubber
band Ebelow the clasp Das shown.
X Fold down the rear part Cof the luggage
compartment floor :and press firmly into
the lock. Coat hooks on the tailgate
:
Coat hook Luggage compartment plug-in mod-
ule (telescopic rods)
General notes The luggage compartment plug-in module
allows you to use your luggage compartment in
a variety of ways.
The following accessories are located under the
luggage compartment floor:
R A telescopic rod
R Two mounting elements
R Two retaining feet Stowage areas
313Stowing and features Z
Page 317 of 389
Important safety notes
G
WARNING
If you drive when the luggage compartment
floor is open, objects could be flung around,
thus striking vehicle occupants. There is a risk of injury, especially when braking or abruptly
changing directions.
Always close the luggage compartment floor
before a journey.
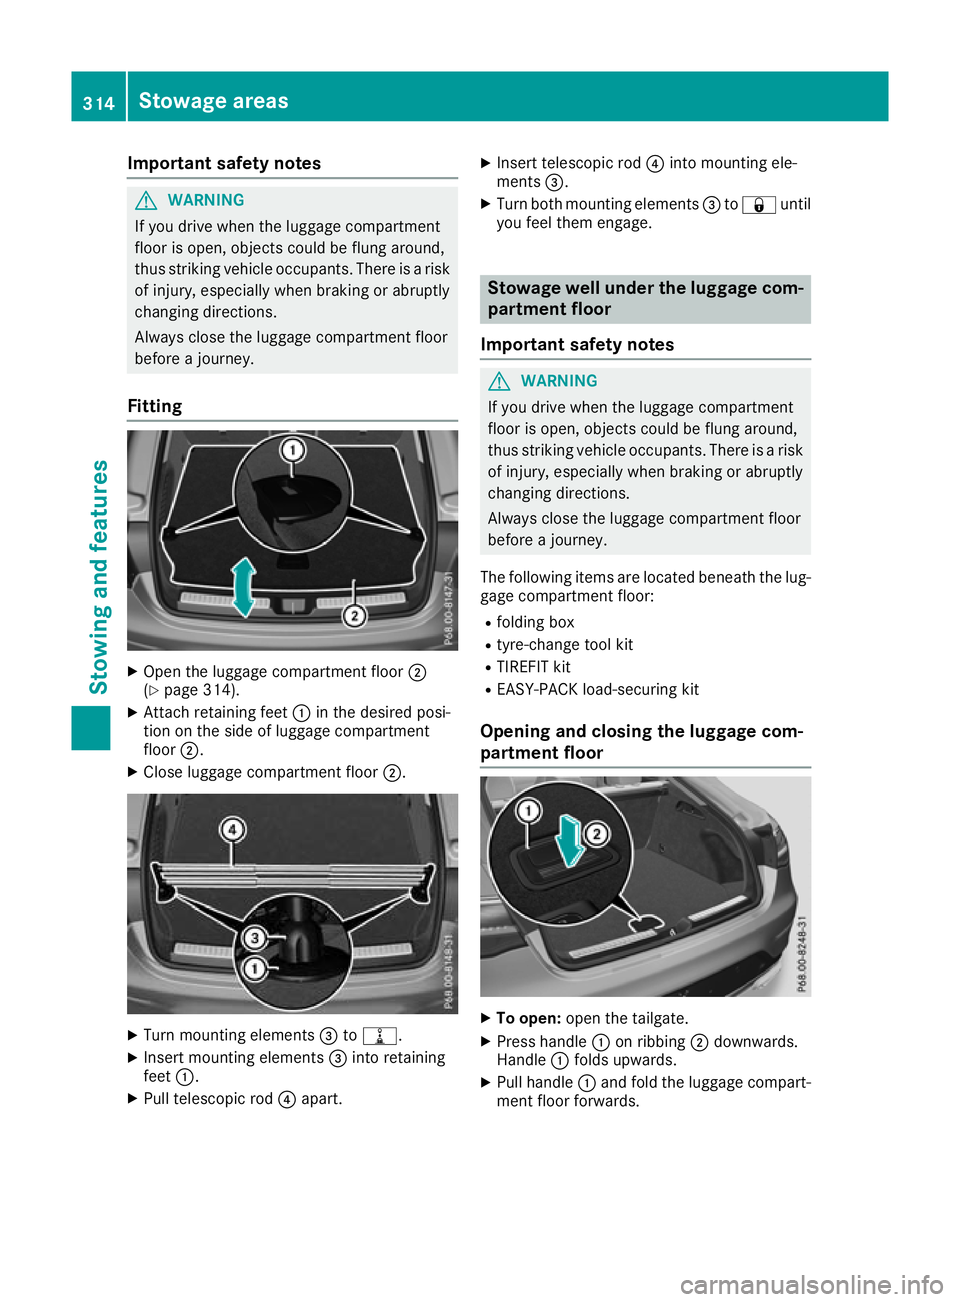
Fitting X
Open the luggage compartment floor ;
(Y page 314).
X Attach retaining feet :in the desired posi-
tion on the side of luggage compartment
floor ;.
X Close luggage compartment floor ;.X
Turn mounting elements =to=.
X Insert mounting elements =into retaining
feet :.
X Pull telescopic rod ?apart. X
Insert telescopic rod ?into mounting ele-
ments =.
X Turn both mounting elements =to& until
you feel them engage. Stowage well under the luggage com-
partment floor
Important safety notes G
WARNING
If you drive when the luggage compartment
floor is open, objects could be flung around,
thus striking vehicle occupants. There is a risk of injury, especially when braking or abruptly
changing directions.
Always close the luggage compartment floor
before a journey.
The following items are located beneath the lug-
gage compartment floor:
R folding box
R tyre-change tool kit
R TIREFIT kit
R EASY-PACK load-securing kit
Opening and closing the luggage com-
partment floor X
To open: open the tailgate.
X Press handle :on ribbing ;downwards.
Handle :folds upwards.
X Pull handle :and fold the luggage compart-
ment floor forwards. 314
Stowage areasStowing and featu
res
Page 318 of 389
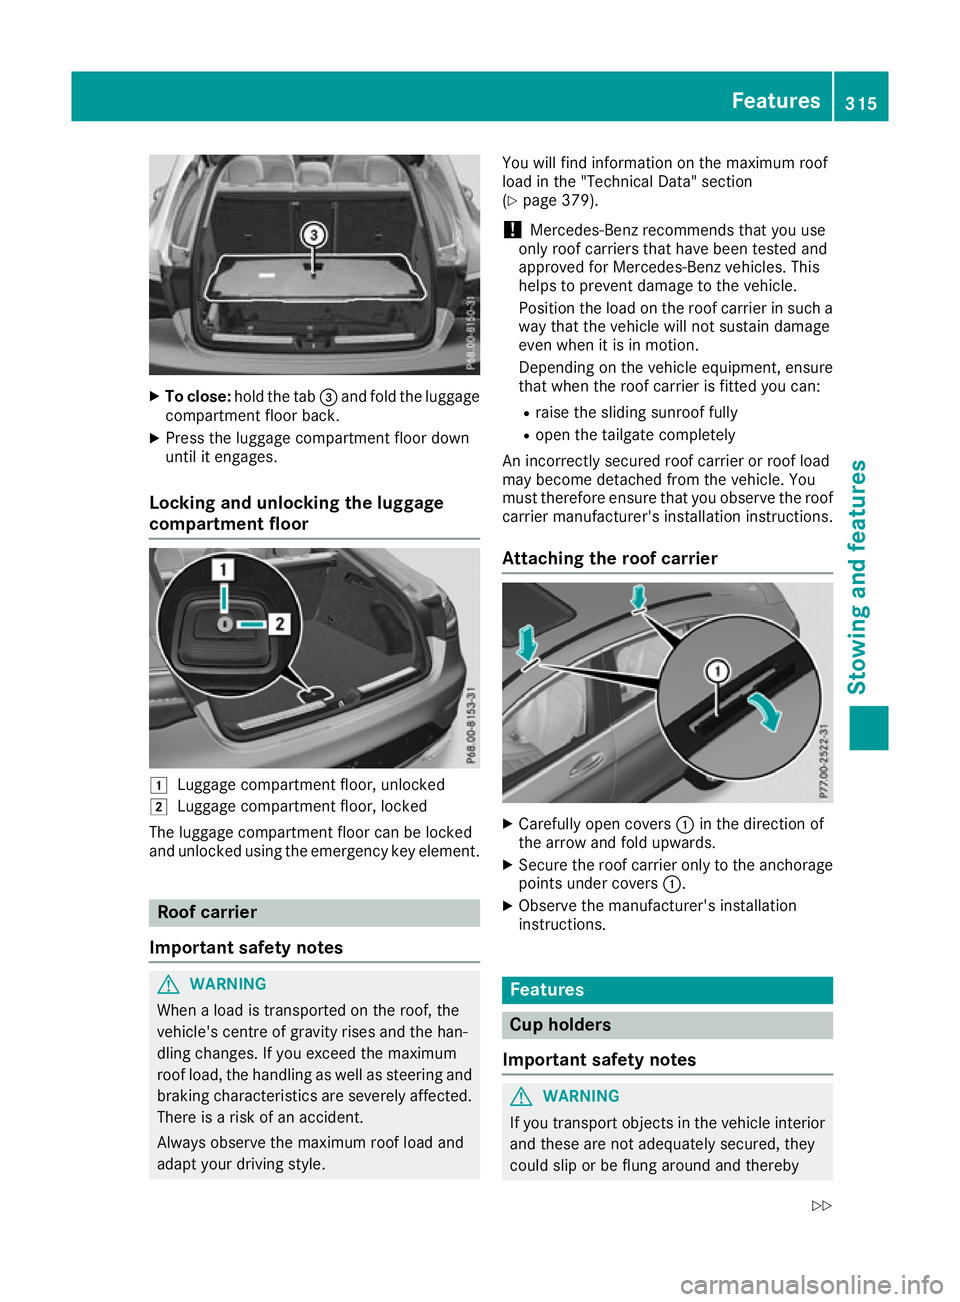
X
To close: hold the tab =and fold the luggage
compartment floor back.
X Press the luggage compartment floor down
until it engages.
Locking and unlocking the luggage
compartment floor 1
Luggage compartment floor, unlocked
2 Luggage compartment floor, locked
The luggage compartment floor can be locked
and unlocked using the emergency key element. Roof carrier
Important safety notes G
WARNING
When a load is transported on the roof, the
vehicle's centre of gravity rises and the han-
dling changes. If you exceed the maximum
roof load, the handling as well as steering and braking characteristics are severely affected.
There is a risk of an accident.
Always observe the maximum roof load and
adapt your driving style. You will find information on the maximum roof
load in the "Technical Data" section
(Y
page 379).
! Mercedes-Benz recommends that you use
only roof carriers that have been tested and
approved for Mercedes-Benz vehicles. This
helps to prevent damage to the vehicle.
Position the load on the roof carrier in such a way that the vehicle will not sustain damage
even when it is in motion.
Depending on the vehicle equipment, ensure
that when the roof carrier is fitted you can:
R raise the sliding sunroof fully
R open the tailgate completely
An incorrectly secured roof carrier or roof load
may become detached from the vehicle. You
must therefore ensure that you observe the roof carrier manufacturer's installation instructions.
Attaching the roof carrier X
Carefully open covers :in the direction of
the arrow and fold upwards.
X Secure the roof carrier only to the anchorage
points under covers :.
X Observe the manufacturer's installation
instructions. Features
Cup holders
Important safety notes G
WARNING
If you transport objects in the vehicle interior and these are not adequately secured, they
could slip or be flung around and thereby Features
315Stowing an d features
Z
Page 319 of 389
strike vehicle occupants. In addition, cup
holders, open stowage spaces and mobile
phone brackets may not always be able to
hold the objects placed in them in the event of an accident. There is a risk of injury, particu-
larly in the event of sharp braking or sudden
changes of direction.
R Always stow objects in such a way that they
cannot be tossed about in these or similar
situations.
R Always make sure that objects do not proj-
ect from stowage spaces, luggage nets or
stowage nets.
R Ensure that closable stowage spaces are
shut before beginning your journey.
R Always stow and secure heavy, hard, poin-
ted, sharp-edged, fragile or outsize objects in the load compartment.
! Only use the cup holders for containers of
the right size and which have lids. The drinks
could otherwise spill.
! Do not expose drinks bottles in the cup
holder in the centre console to continuous,
strong and direct sunlight. The passenger
compartment in the area of the centre con-
sole can otherwise be damaged by the con-
centrated and reflected sunlight.
Observe the loading guidelines (Y page 305).
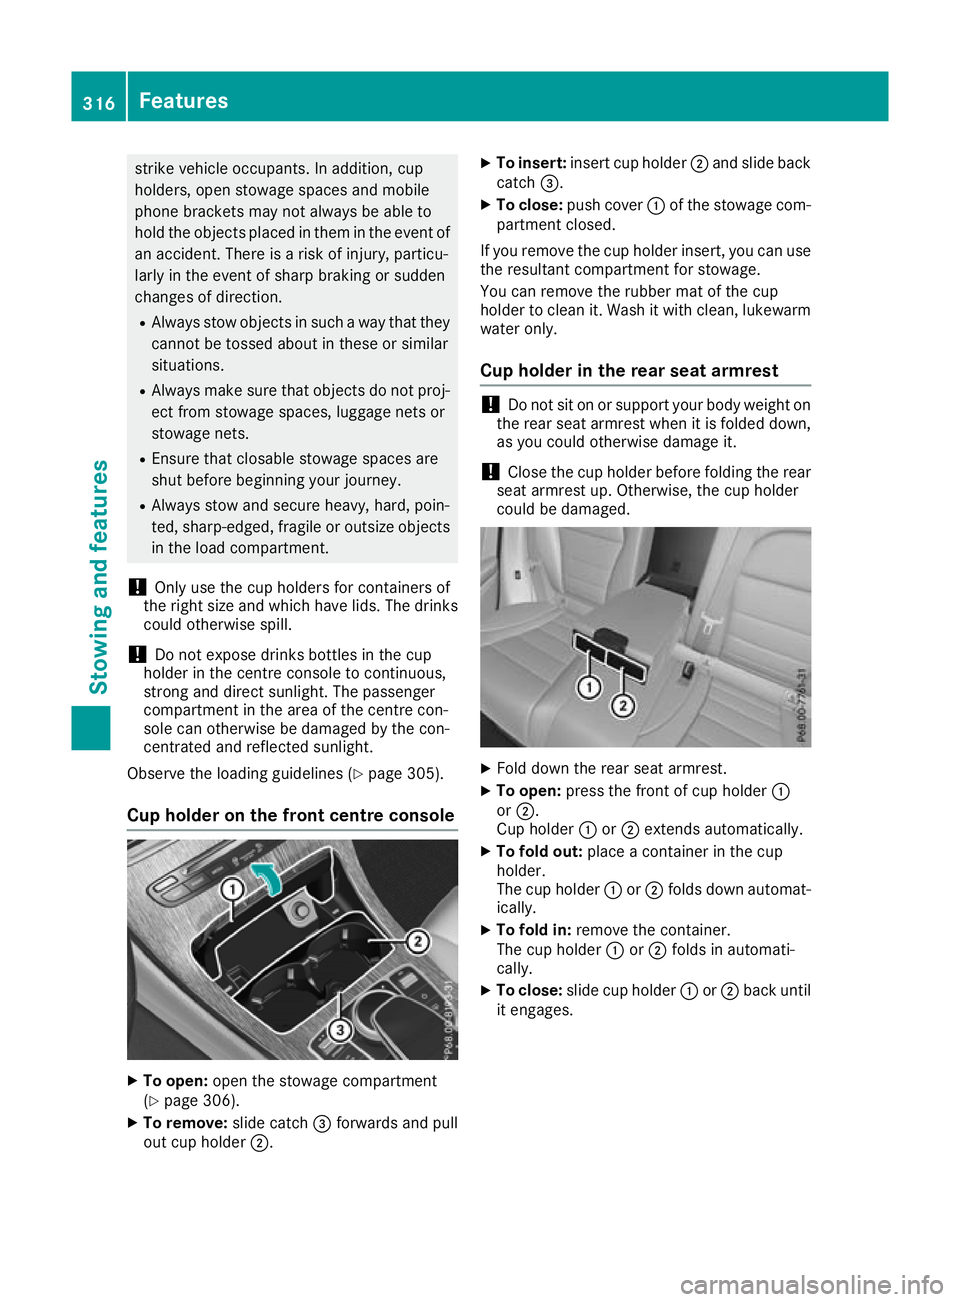
Cup holder on the front centre console X
To open: open the stowage compartment
(Y page 306).
X To remove: slide catch=forwards and pull
out cup holder ;. X
To insert: insert cup holder ;and slide back
catch =.
X To close: push cover :of the stowage com-
partment closed.
If you remove the cup holder insert, you can use
the resultant compartment for stowage.
You can remove the rubber mat of the cup
holder to clean it. Wash it with clean, lukewarm water only.
Cup holder in the rear seat armrest !
Do not sit on or support your body weight on
the rear seat armrest when it is folded down,
as you could otherwise damage it.
! Close the cup holder before folding the rear
seat armrest up. Otherwise, the cup holder
could be damaged. X
Fold down the rear seat armrest.
X To open: press the front of cup holder :
or ;.
Cup holder :or; extends automatically.
X To fold out: place a container in the cup
holder.
The cup holder :or; folds down automat-
ically.
X To fold in: remove the container.
The cup holder :or; folds in automati-
cally.
X To close: slide cup holder :or; back until
it engages. 316
FeaturesStowing and features
Page 320 of 389
Sun visors
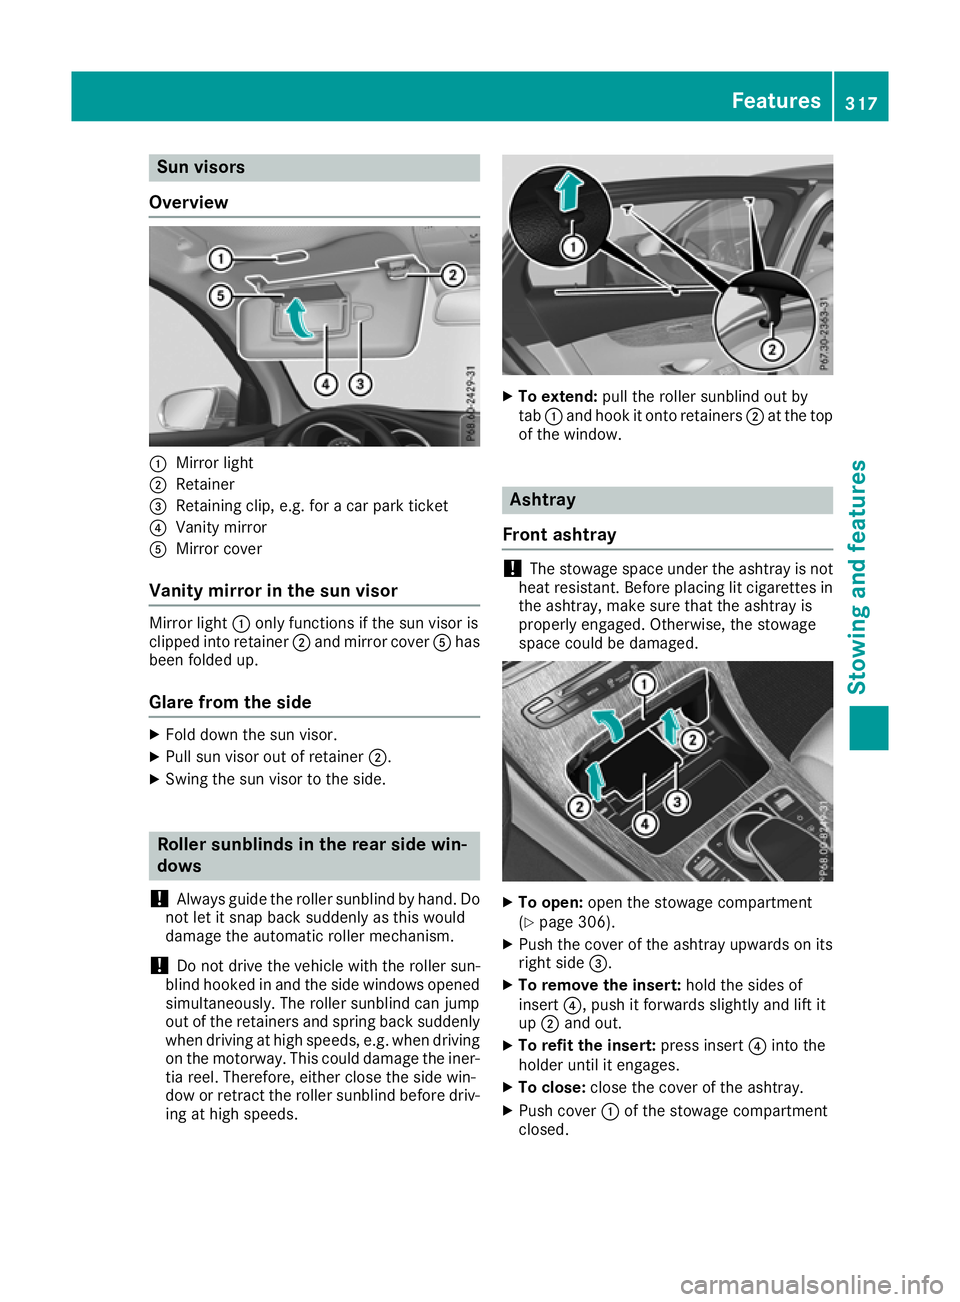
Overview :
Mirror light
; Retainer
= Retaining clip, e.g. for a car park ticket
? Vanity mirror
A Mirror cover
Vanity mirror in the sun visor Mirror light
:only functions if the sun visor is
clipped into retainer ;and mirror cover Ahas
been folded up.
Glare from the side X
Fold down the sun visor.
X Pull sun visor out of retainer ;.
X Swing the sun visor to the side. Roller sunblinds in the rear side win-
dows
! Always guide the roller sunblind by hand. Do
not let it snap back suddenly as this would
damage the automatic roller mechanism.
! Do not drive the vehicle with the roller sun-
blind hooked in and the side windows opened simultaneously. The roller sunblind can jump
out of the retainers and spring back suddenly
when driving at high speeds, e.g. when driving on the motorway. This could damage the iner-
tia reel. Therefore, either close the side win-
dow or retract the roller sunblind before driv- ing at high speeds. X
To extend: pull the roller sunblind out by
tab :and hook it onto retainers ;at the top
of the window. Ashtray
Front ashtray !
The stowage space under the ashtray is not
heat resistant. Before placing lit cigarettes in the ashtray, make sure that the ashtray is
properly engaged. Otherwise, the stowage
space could be damaged. X
To open: open the stowage compartment
(Y page 306).
X Push the cover of the ashtray upwards on its
right side =.
X To remove the insert: hold the sides of
insert ?, push it forwards slightly and lift it
up ; and out.
X To refit the insert: press insert?into the
holder until it engages.
X To close: close the cover of the ashtray.
X Push cover :of the stowage compartment
closed. Features
317Stowing and features Z