MERCEDES-BENZ GLC COUPE 2017 X253 Owner's Manual
Manufacturer: MERCEDES-BENZ, Model Year: 2017, Model line: GLC COUPE, Model: MERCEDES-BENZ GLC COUPE 2017 X253Pages: 370, PDF Size: 6.08 MB
Page 181 of 370
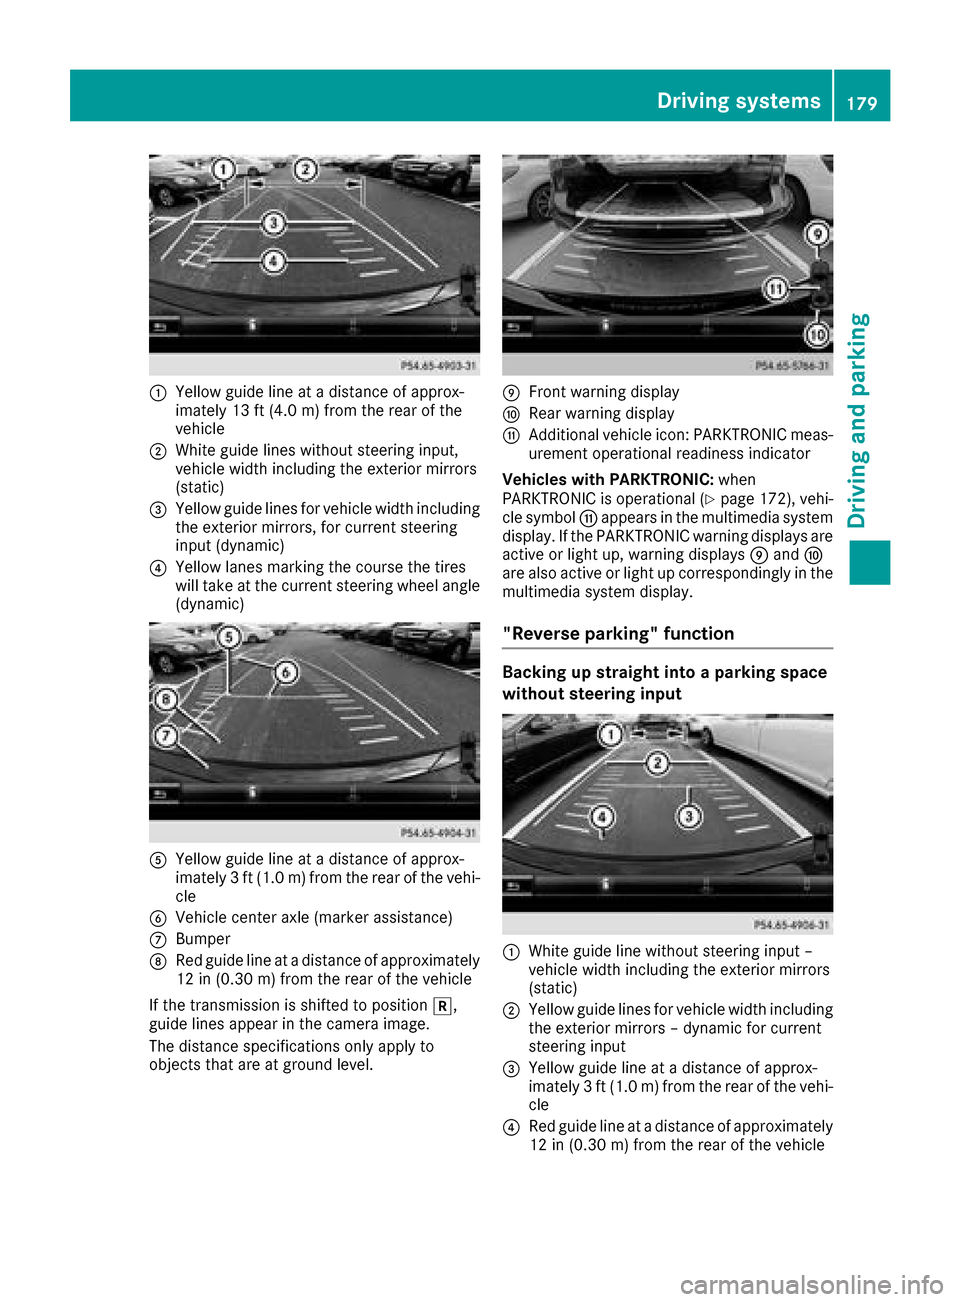
:Yellow guide line at a distance of approx-
imately 13 ft (4.0 m) from the rear of the
vehicle
;White guide lines without steering input,
vehicle width including the exterior mirrors
(static)
=Yellow guide lines for vehicle width including
the exterior mirrors, for current steering
input (dynamic)
?Yellow lanes marking the course the tires
will take at the current steering wheel angle
(dynamic)
AYellow guide line at a distance of approx-
imately 3 ft (1.0 m) from the rear of the vehi-
cle
BVehicle center axle (marker assistance)
CBumper
DRed guide line at a distance of approximately
12 in (0.30 m) from the rear of the vehicle
If the transmission is shifted to position k,
guide lines appear in the camera image.
The distance specifications only apply to
objects that are at ground level.
EFront warning display
FRear warning display
GAdditional vehicle icon: PARKTRONIC meas-
urement operational readiness indicator
Vehicles with PARKTRONIC: when
PARKTRONIC is operational (
Ypage 172), vehi-
cle symbol Gappears in the multimedia system
display. If the PARKTRONIC warning displays are
active or light up, warning displays Eand F
are also active or light up correspondingly in the
multimedia system display.
"Reverse parking" function
Backing up straight into a parking space
without steering input
:White guide line without steering input –
vehicle width including the exterior mirrors
(static)
;Yellow guide lines for vehicle width including
the exterior mirrors – dynamic for current
steering input
=Yellow guide line at a distance of approx-
imately 3 ft (1.0 m) from the rear of the vehi-
cle
?Red guide line at a distance of approximately
12 in (0.30 m)from the rear of the vehicle
Driving systems179
Driving and parking
Z
Page 182 of 370
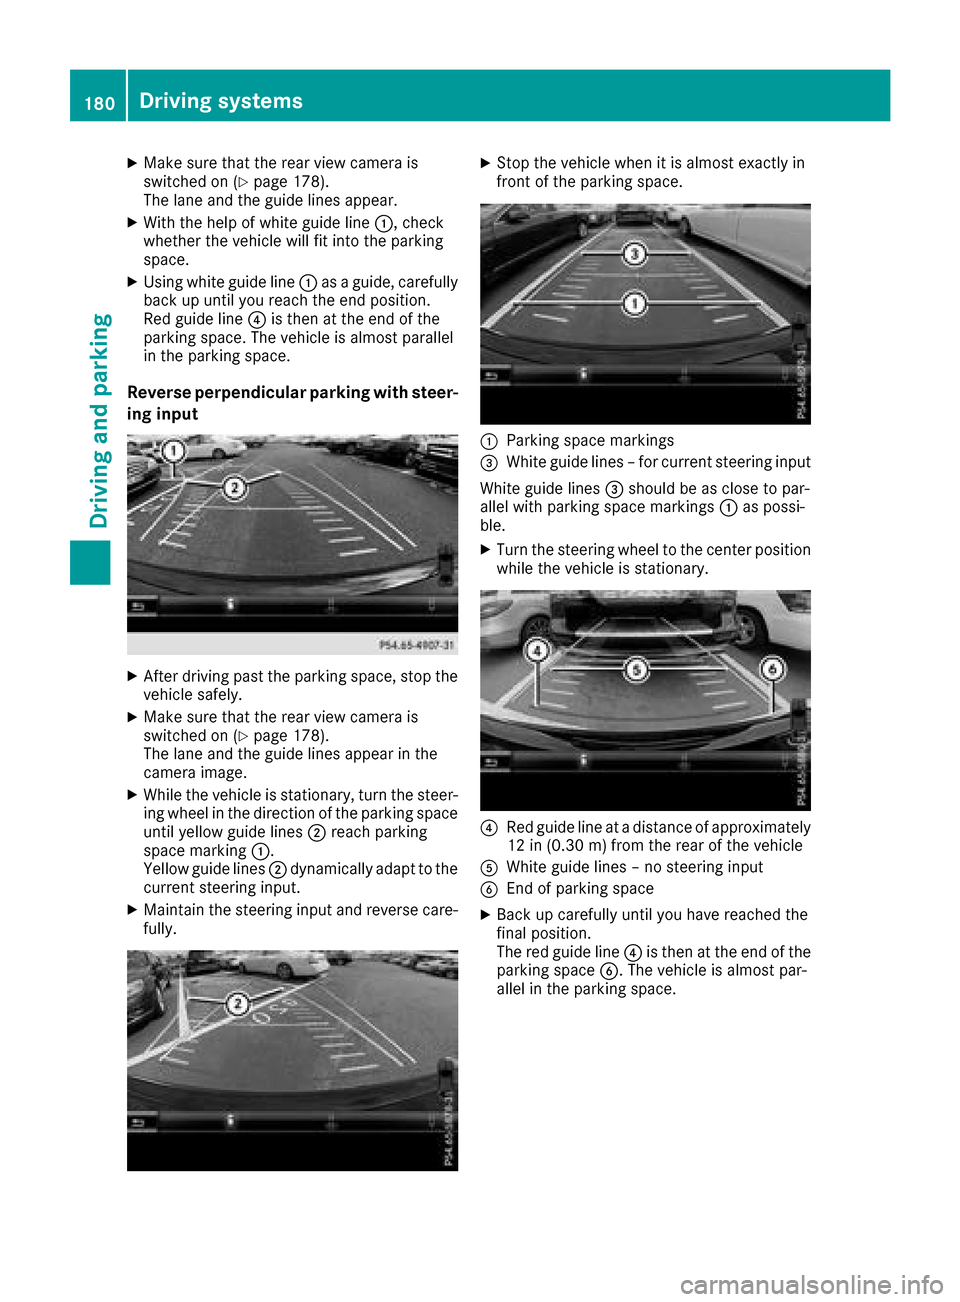
XMake sure that the rear view camera is
switched on (Ypage 178).
The lane and the guide lines appear.
XWith the help of white guide line :, check
whether the vehicle will fit into the parking
space.
XUsing white guide line :as a guide, carefully
back up until you reach the end position.
Red guide line ?is then at the end of the
parking space. The vehicle is almost parallel
in the parking space.
Reverse perpendicular parking with steer-
ing input
XAfter driving past the parking space, stop the
vehicle safely.
XMake sure that the rear view camera is
switched on (Ypage 178).
The lane and the guide lines appear in the
camera image.
XWhile the vehicle is stationary, turn the steer-
ing wheel in the direction of the parking space
until yellow guide lines ;reach parking
space marking :.
Yellow guide lines ;dynamically adapt to the
current steering input.
XMaintain the steering input and reverse care-
fully.
XStop the vehicle when it is almost exactly in
front of the parking space.
:Parking space markings
=White guide lines – for current steering input
White guide lines =should be as close to par-
allel with parking space markings :as possi-
ble.
XTurn the steering wheel to the center position while the vehicle is stationary.
?Red guide line at a distance of approximately
12 in (0.30 m) from the rear of the vehicle
AWhite guide lines – no steering input
BEnd of parking space
XBack up carefully until you have reached the
final position.
The red guide line ?is then at the end of the
parking space B. The vehicle is almost par-
allel in the parking space.
180Driving systems
Driving and parking
Page 183 of 370
"Coupling up a trailer" function
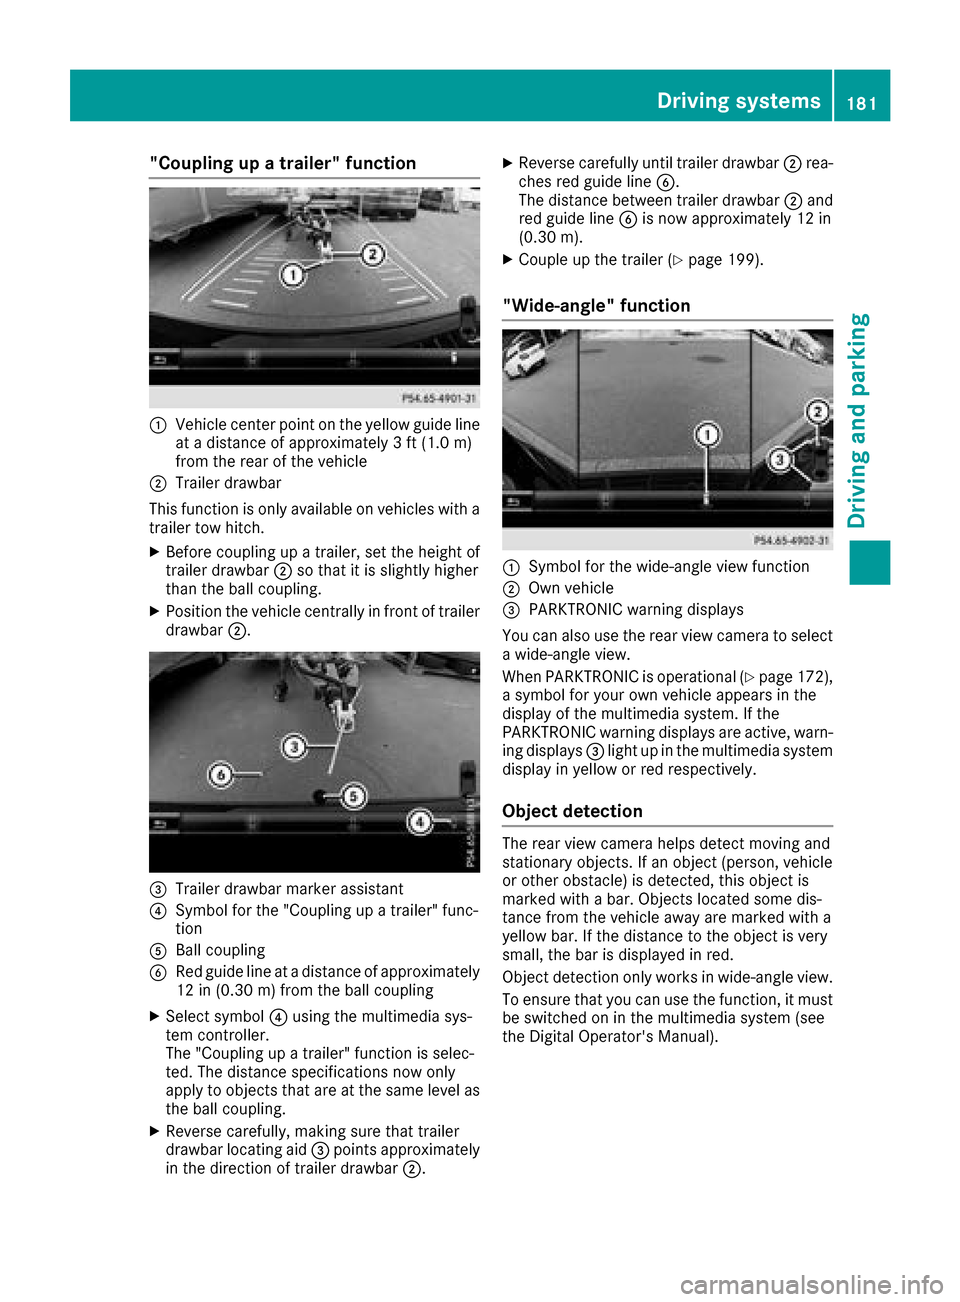
:Vehicle center point on the yellow guide line
at a distance of approximately 3 ft (1.0 m)
from the rear of the vehicle
;Trailer drawbar
This function is only available on vehicles with a
trailer tow hitch.
XBefore coupling up a trailer, set the height of
trailer drawbar ;so that it is slightly higher
than the ball coupling.
XPosition the vehicle centrally in front of trailer
drawbar ;.
=Trailer drawbar marker assistant
?Symbol for the "Coupling up a trailer" func-
tion
ABall coupling
BRed guide line at a distance of approximately
12 in (0.30 m) from the ball coupling
XSelect symbol ?using the multimedia sys-
tem controller.
The "Coupling up a trailer" function is selec-
ted. The distance specifications now only
apply to objects that are at the same level as
the ball coupling.
XReverse carefully, making sure that trailer
drawbar locating aid =points approximately
in the direction of trailer drawbar ;.
XReverse carefully until trailer drawbar ;rea-
ches red guide line B.
The distance between trailer drawbar ;and
red guide line Bis now approximately 12 in
(0.30 m).
XCouple up the trailer (Ypage 199).
"Wide-angle" function
:Symbol for the wide-angle view function
;Own vehicle
=PARKTRONIC warning displays
You can also use the rear view camera to select
a wide-angle view.
When PARKTRONIC is operational (
Ypage 172),
a symbol for your own vehicle appears in the
display of the multimedia system. If the
PARKTRONIC warning displays are active, warn-
ing displays =light up in the multimedia system
display in yellow or red respectively.
Object detection
The rear view camera helps detect moving and
stationary objects. If an object (person, vehicle
or other obstacle) is detected, this object is
marked with a bar. Objects located some dis-
tance from the vehicle away are marked with a
yellow bar. If the distance to the object is very
small, the bar is displayed in red.
Object detection only works in wide-angle view.
To ensure that you can use the function, it must
be switched on in the multimedia system (see
the Digital Operator's Manual).
Driving systems181
Driving and parking
Z
Page 184 of 370
360° camera
General notes
The 360° camera is a system consisting of four
cameras.
The system processes images from the follow-
ing cameras:
RRear view camera
RFront camera
RTwo side cameras in the exterior mirrors
The cameras cover the immediate surroundings
of the vehicle. The system supports you, for
example when parking or if vision is restricted at
an exit.
You can show images from the 360° camera in
full-screen mode or in seven different split-
screen views on the multimedia system. A split- screen view also includes a top view of the vehi-
cle. This view is calculated from the data sup-
plied by the installed cameras (virtual camera).
The seven split-screen views are:
RTop view and picture from the rear view cam-
era (130° viewing angle)
RTop view and image from the front camera
(130° viewing angle without displaying the
maximum steering wheel angle)
RTop view and enlarged rear view
RTop view and enlarged front view
RTop view and trailer view (vehicles with trailer
tow hitch)
RTop view and images from the rear-facing side
cameras (rear wheel view)
RTop view and images from the forward-facing
side cameras (front wheel view)
When the function is active and you shift the
transmission from hork toi, the guide
lines are hidden in the multimedia system.
When you change between transmission posi-
tions hand k, you see the previously selec-
ted front or rear view.
Distances measured by PARKTRONIC will also
be optically displayed:
Rin split screen view as red or yellow brackets
around the vehicle icon in the top view, or
Rat the bottom right as red or yellow brackets
around the vehicle symbol in full-screen mode
The line thickness and color of the brackets
show how far the vehicle is from an object.
Ryellow brackets with thin lines: PARKTRONIC
is active
Ryellow brackets with normal lines: an object is present in close range of the vehicle
Rred line: an object is present in the immediate
close range of the vehicle
Important safety notes
The 360°camera is only an aid and may show a
distorted view of obstacles, show them incor-
rectly or not at all. The 360°camera is not a
substitute for attentive driving.
You are always responsible for safe maneuver-
ing and parking. Make sure that there are no
persons, animals or objects in the maneuvering
area while maneuvering and parking in parking
spaces.
You are always responsible for safety, and must
always pay attention to your surroundings when
parking and maneuvering. This applies to the
areas behind, in front of and beside the vehicle. You could otherwise endanger yourself and oth-
ers.
The 360° camera will not function or will func-
tion in a limited manner:
Rif the doors are open
Rif the exterior mirrors are folded in
Rif the tailgate is open
Rin heavy rain, snow or fog
Rat night or in very dark places
Rif the cameras are exposed to very bright light
Rif the area is lit by fluorescent bulbs or LED
lighting (the display may flicker)
Rif the camera lenses fog up, e.g. when driving
into a heated garage in winter, causing a rapid
change in temperature
Rif the camera lenses are dirty or covered
Rif the vehicle components in which the cam-
eras are installed are damaged. In this case,
have the camera position and setting checked
at a qualified specialist workshop
Do not use the 360° camera in this case. You
can otherwise injure others or cause damage to
objects or the vehicle.
The guide lines in the multimedia system display
show the distances to your vehicle. The distan-
ces only apply to road level.
In trailer mode, the guide lines are shown at the
level of the trailer tow hitch.
182Driving systems
Driving and parking
Page 185 of 370
The camera in the rear area is protected by
means of a flap. This flap opens when the 360°
camera is activated. Observe the notes on
cleaning (
Ypage 310). For technical reasons,
the flap may remain open briefly after the 360°
camera has been deactivated.
The field of vision and other functions of the
camera system may be restricted due to addi-
tional attachments (e.g. license plate holder,
rear bicycle carrier).
On vehicles with height-adjustable chassis,
depending on technical conditions, leaving the
standard height can result in:
Rinaccuracies in the guide lines
Rinaccuracies in the display of generated
images (top view)
Activation conditions
The image from the 360° camera appears if:
Rthe multimedia system is switched on
Rthe 360° Camerafunction is switched on
If you are driving faster than at a moderate
speed and you turn on the 360° camera, a warn-
ing message appears.
The warning message disappears if:
Ryou are again driving at a moderate speed The
360° camera is then activated
Rthe message is confirmed with the %but-
ton
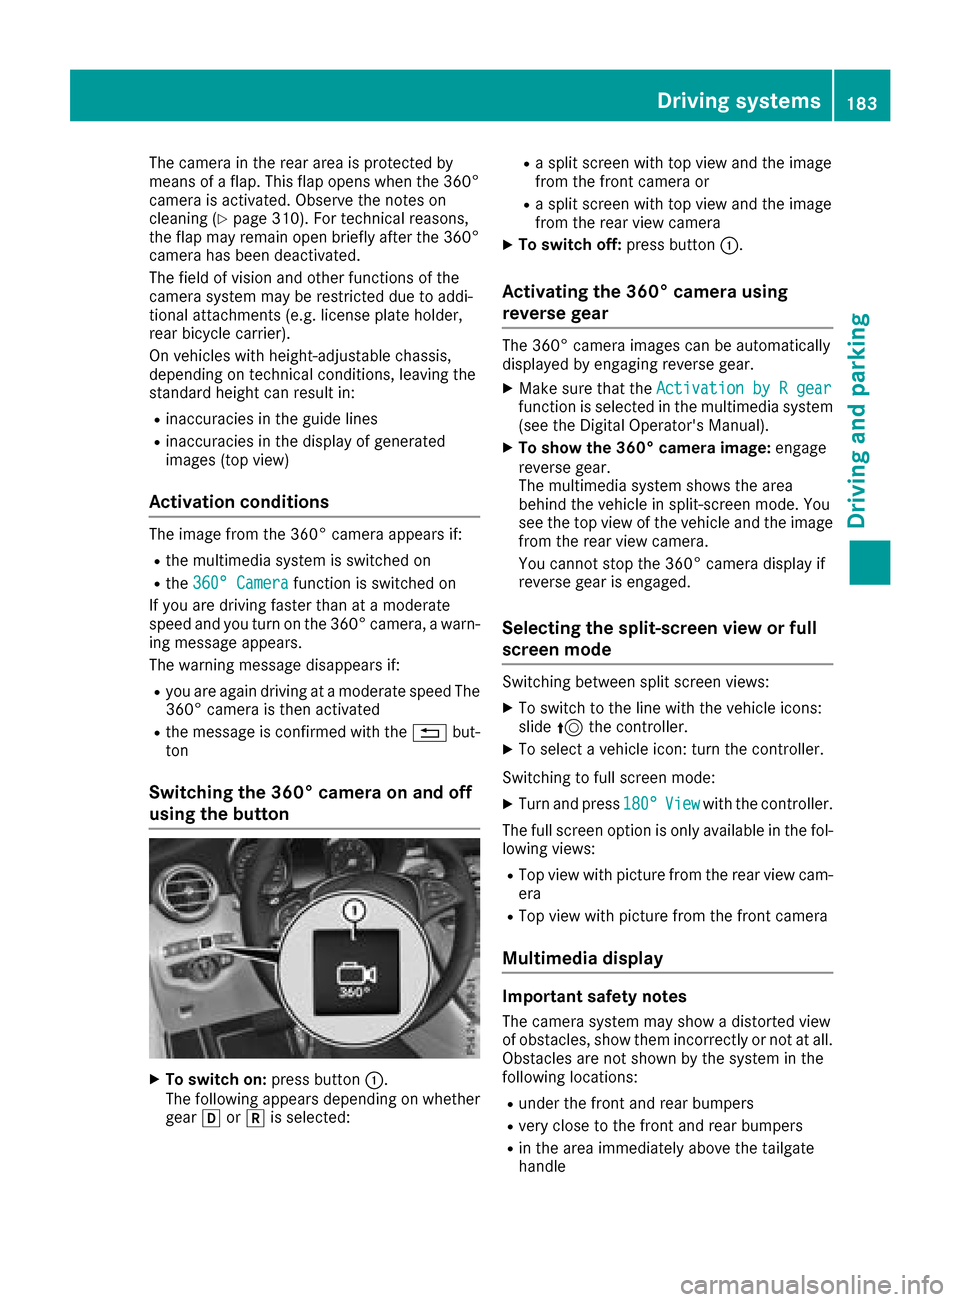
Switching the 360° camera on and off
using the button
XTo switch on: press button:.
The following appears depending on whether
gear hork is selected:
Ra split screen with top view and the image
from the front camera or
Ra split screen with top view and the image
from the rear view camera
XTo switch off: press button:.
Activating the 360° camera using
reverse gear
The 360° camera images can be automatically
displayed by engaging reverse gear.
XMake sure that the Activation by R gearfunction is selected in the multimedia system
(see the Digital Operator's Manual).
XTo show the 360° camera image: engage
reverse gear.
The multimedia system shows the area
behind the vehicle in split-screen mode. You
see the top view of the vehicle and the image
from the rear view camera.
You cannot stop the 360° camera display if
reverse gear is engaged.
Selecting the split-screen view or full
screen mode
Switching between split screen views:
XTo switch to the line with the vehicle icons:
slide 5the controller.
XTo select a vehicle icon: turn the controller.
Switching to full screen mode:
XTurn and press 180°Viewwith the controller.
The full screen option is only available in the fol-
lowing views:
RTop view with picture from the rear view cam-
era
RTop view with picture from the front camera
Multimedia display
Important safety notes
The camera system may show a distorted view
of obstacles, show them incorrectly or not at all.
Obstacles are not shown by the system in the
following locations:
Runder the front and rear bumpers
Rvery close to the front and rear bumpers
Rin the area immediately above the tailgate
handle
Driving systems183
Driving and parking
Z
Page 186 of 370
Rvery close to the exterior mirrors
Rin the transitional areas between the various
cameras in the virtual top view
!Objects not at ground level may appear to
be further away than they actually are, e.g.:
Rthe bumper of a parked vehicle
Rthe drawbar of a trailer
Rthe ball coupling of a trailer tow hitch
Rthe rear section of an HGV
Ra slanted post
Use the guidelines only for orientation.
Approach objects no further than the bottom-
most guideline.
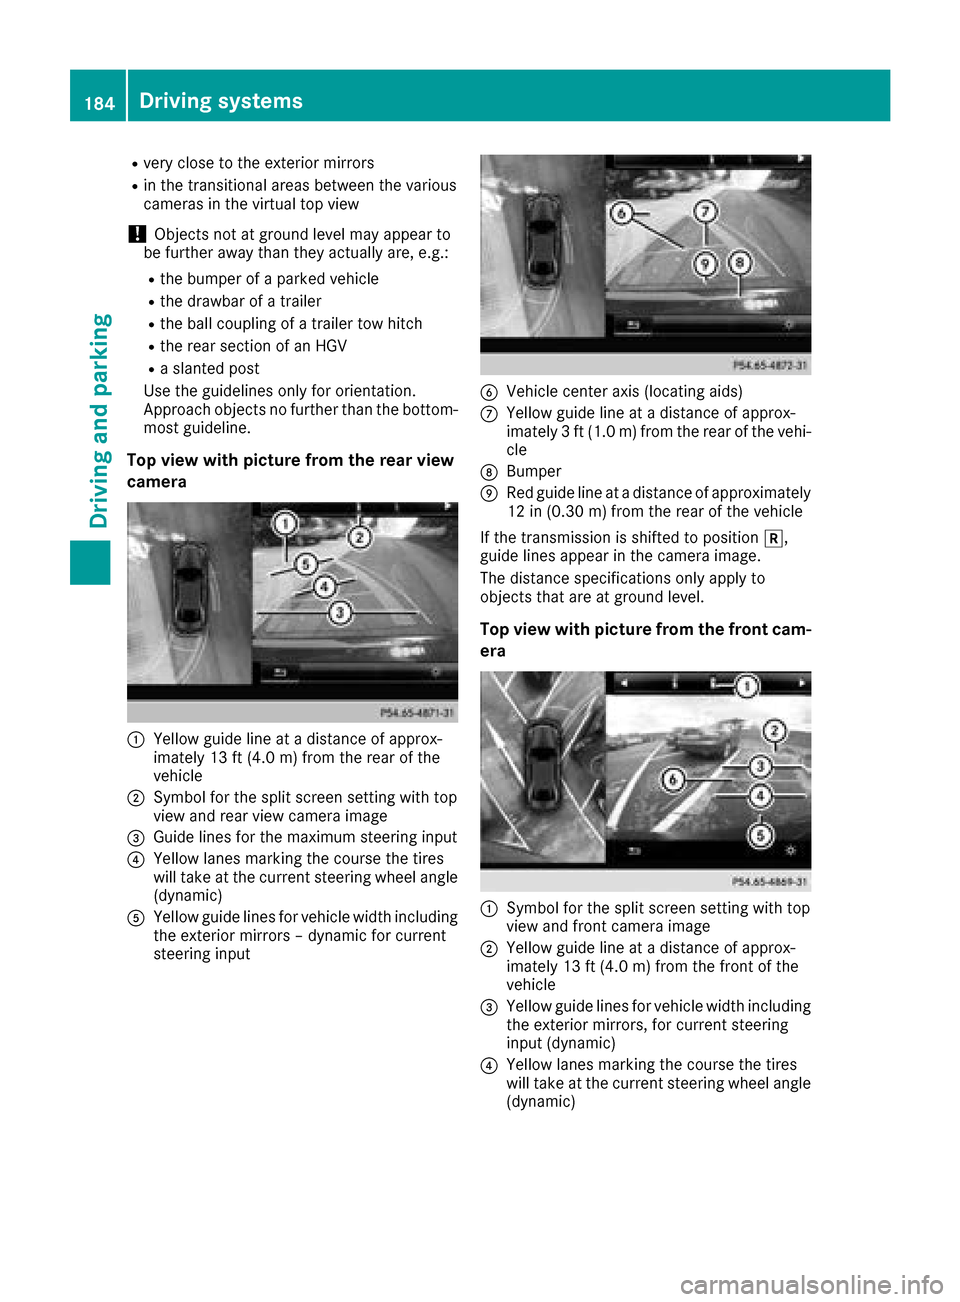
Top view with picture from the rear view
camera
:Yellow guide line at a distance of approx-
imately 13 ft (4.0 m) from the rear of the
vehicle
;Symbol for the split screen setting with top
view and rear view camera image
=Guide lines for the maximum steering input
?Yellow lanes marking the course the tires
will take at the current steering wheel angle
(dynamic)
AYellow guide lines for vehicle width including
the exterior mirrors – dynamic for current
steering input
BVehicle center axis (locating aids)
CYellow guide line at a distance of approx-
imately 3 ft (1.0 m) from the rear of the vehi-
cle
DBumper
ERed guide line at a distance of approximately
12 in (0.30 m) from the rear of the vehicle
If the transmission is shifted to position k,
guide lines appear in the camera image.
The distance specifications only apply to
objects that are at ground level.
Top view with picture from the front cam-
era
:Symbol for the split screen setting with top
view and front camera image
;Yellow guide line at a distance of approx-
imately 13 ft (4.0 m) from the front of the
vehicle
=Yellow guide lines for vehicle width including
the exterior mirrors, for current steering
input (dynamic)
?Yellow lanes marking the course the tires
will take at the current steering wheel angle
(dynamic)
184Driving systems
Driving and parking
Page 187 of 370
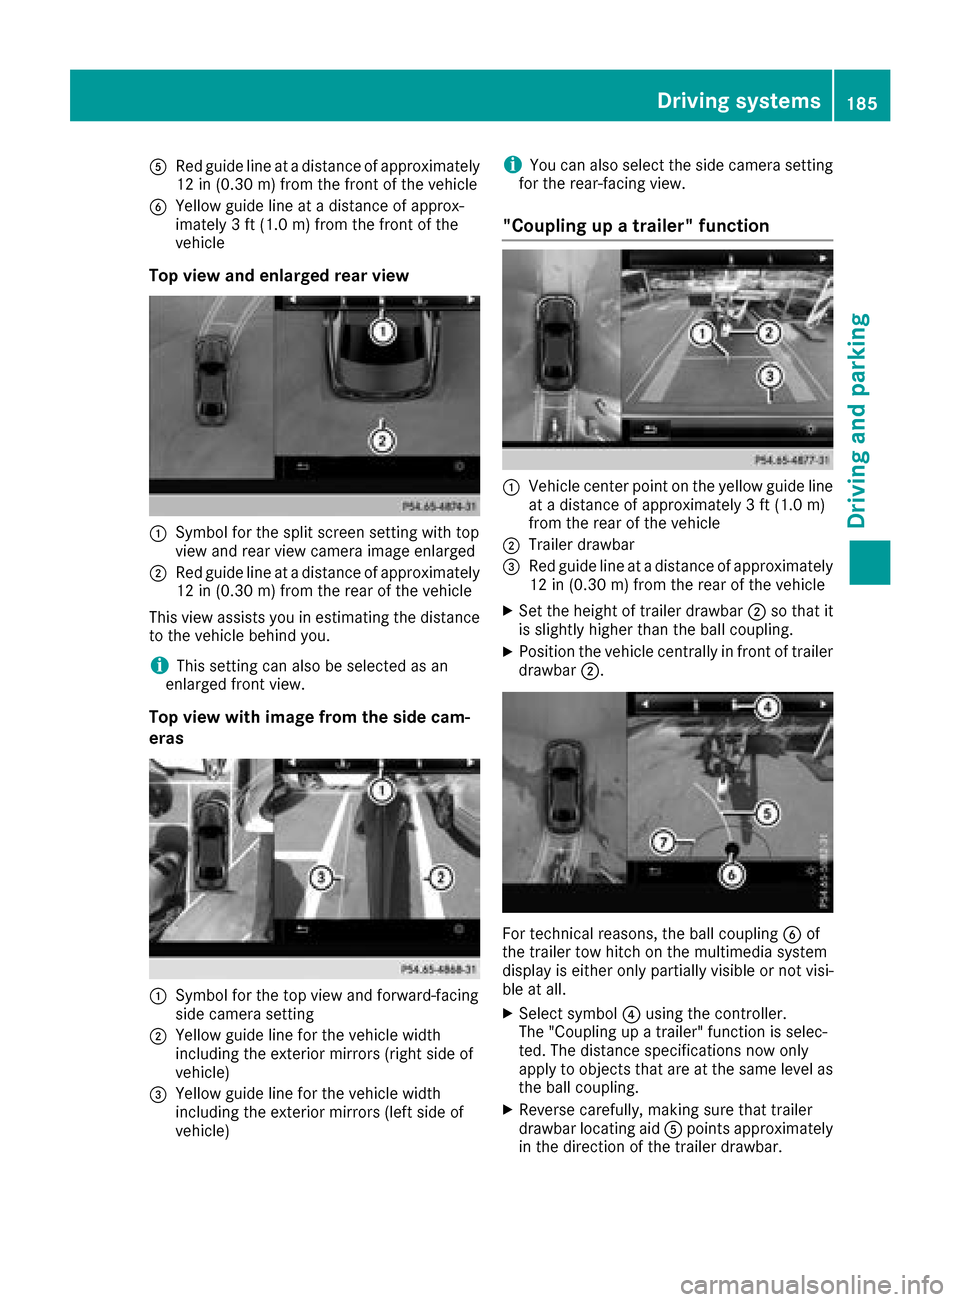
ARed guide lineat adistanc eof approximately
12 in (0.30m) from the front of the vehicle
BYellow guide line at a distance of approx-
imately 3 ft (1.0 m) fromthe front of the
vehicle
Top view and enlarged rear view
:Symbol for the split screen setting with top
view and rear view camera image enlarged
;Red guide line at a distance of approximately
12 in (0.30 m)from the rear of the vehicle
This view assists you in estimating the distance
to the vehicle behind you.
iThis setting can also be selected as an
enlarged front view.
Top view with image from the side cam-
eras
:Symbol for the top view and forward-facing
side camera setting
;Yellow guide line for the vehicle width
including the exterior mirrors (right side of
vehicle)
=Yellow guide line for the vehicle width
including the exterior mirrors (left side of
vehicle)
iYou can also select the side camera setting
for the rear-facing view.
"Coupling up a trailer" function
:Vehicle center point on the yellow guide line
at a distance of approximately 3 ft (1.0 m)
from the rear of the vehicle
;Trailer drawbar
=Red guide line at a distance of approximately
12 in (0.30 m) from the rear of the vehicle
XSet the height of trailer drawbar ;so that it
is slightly higher than the ball coupling.
XPosition the vehicle centrally in front of trailer
drawbar ;.
For technical reasons, the ball coupling Bof
the trailer tow hitch on the multimedia system
display is either only partially visible or not visi-
ble at all.
XSelect symbol ?using the controller.
The "Coupling up a trailer" function is selec-
ted. The distance specifications now only
apply to objects that are at the same level as
the ball coupling.
XReverse carefully, making sure that trailer
drawbar locating aid Apoints approximately
in the direction of the trailer drawbar.
Driving systems185
Driving and parking
Z
Page 188 of 370
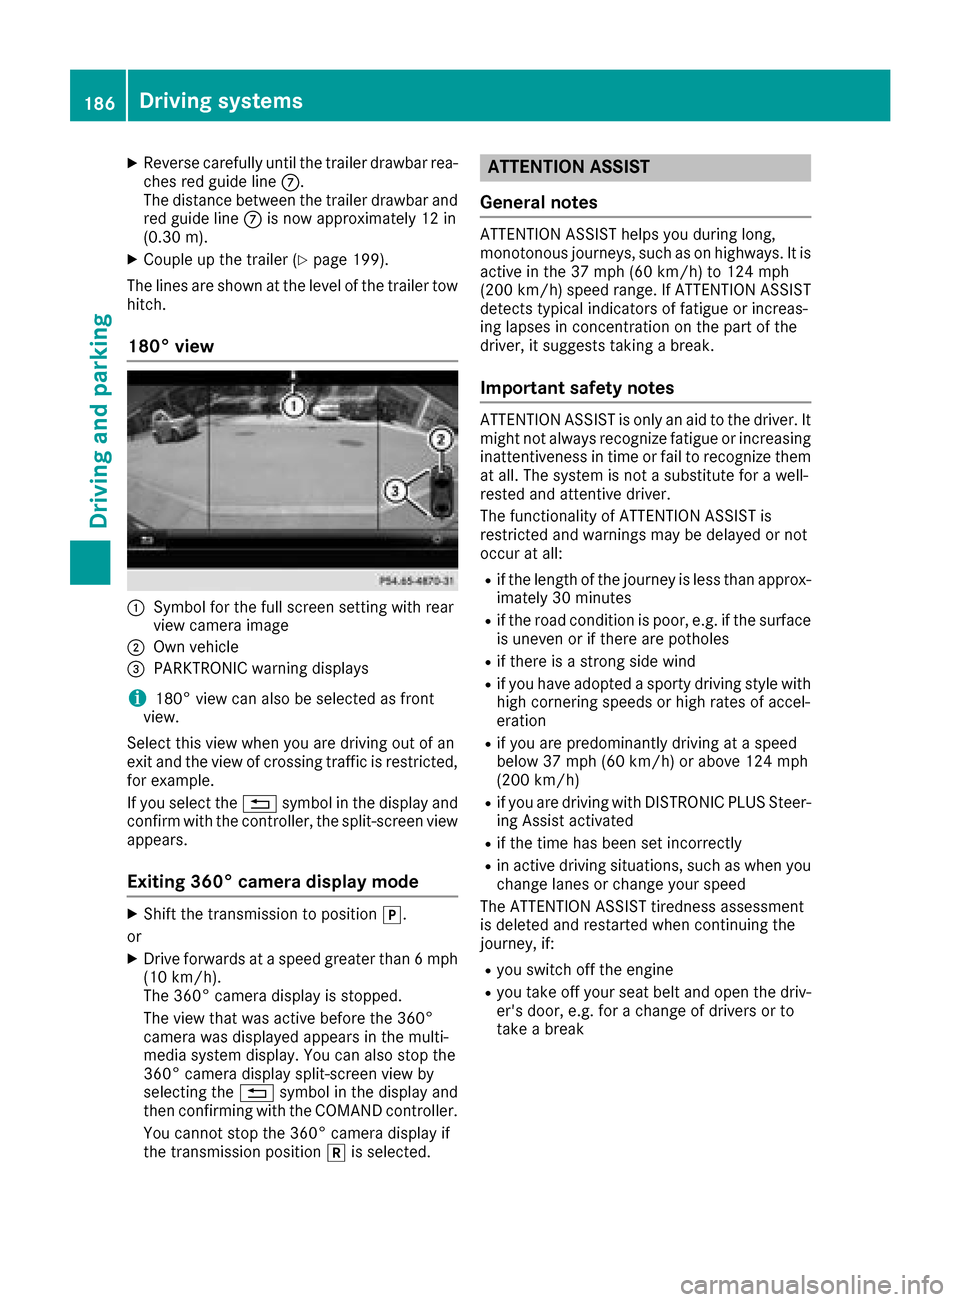
XReverse carefully until thetrailer drawbar rea-
ches red guide lin eC.
The distanc ebetween th etrailer drawbar and
red guide lin eC is no wapproximately 12 in
(0.30 m).
XCouple up th etrailer (Ypage 199).
The lines are shown at th elevel of th etrailer to w
hitch .
180° view
:Symbol for th efull scree nsetting wit hrear
vie wcamera imag e
;Own vehicle
=PARKTRONI Cwarning displays
i180° vie wcan also be selected as fron t
view.
Selec tthis vie wwhen you are driving out of an
exit and th evie wof crossing traffic is restricted,
for example.
If you select th e% symbol in th edisplay and
confirm wit hth econtroller ,th esplit-scree nvie w
appears.
Exiting 360° camera display mode
XShift th etransmission to position j.
or
XDrive forwards at aspee dgreate rthan 6mph
(10 km/h).
The 360° camera display is stopped.
The vie wthat was active before th e360°
camera was displayed appear sin th emulti-
media system display. You can also stop th e
360° camera display split-scree nvie wby
selecting th e% symbol in th edisplay and
then confirming wit hth eCOMAND controller .
You canno tstop th e360° camera display if
th etransmission position kis selected.
ATTENTION ASSIST
General notes
ATTENTION ASSIST help syou during long,
monotonous journeys, suc has on highways. It is
active in th e37 mph (60 km/h) to 12 4mph
(20 0km/h )spee drange. If ATTENTION ASSIST
detects typical indicators of fatigue or increas -
ing lapse sin concentration on th epart of th e
driver, it suggest staking abreak.
Important safety notes
ATTENTION ASSIST is only an aid to th edriver. It
might no talways recogniz efatigue or increasing
inattentiveness in time or fail to recogniz ethem
at all. The system is no t asubstitut efor awell-
reste dand attentive driver.
The functionalit yof ATTENTION ASSIST is
restricted and warning smay be delaye dor no t
occur at all:
Rif th elengt hof th ejourney is less than approx -
imately 30 minute s
Rif theroad condition is poor ,e.g. if th esurfac e
is uneven or if there are pothole s
Rif there isastron gside win d
Rif you hav eadopted asport ydriving style wit h
high cornering speeds or high rates of accel-
eration
Rif you are predominantly driving at aspee d
belo w37 mph (60 km/h) or abov e12 4mph
(20 0km/h)
Rif you are driving wit hDISTRONI CPLU SSteer -
ing Assis tactivated
Rif th etime has been set incorrectl y
Rin active driving situations, suc has when you
chang elanes or chang eyour spee d
The ATTENTION ASSIST tiredness assessmen t
is deleted and restarte dwhen continuing th e
journey, if:
Ryou switch off th eengin e
Ryou tak eoff your seat belt and open th edriv -
er' sdoor ,e.g. for achang eof drivers or to
tak e a break
186Driving systems
Driving and parking
Page 189 of 370
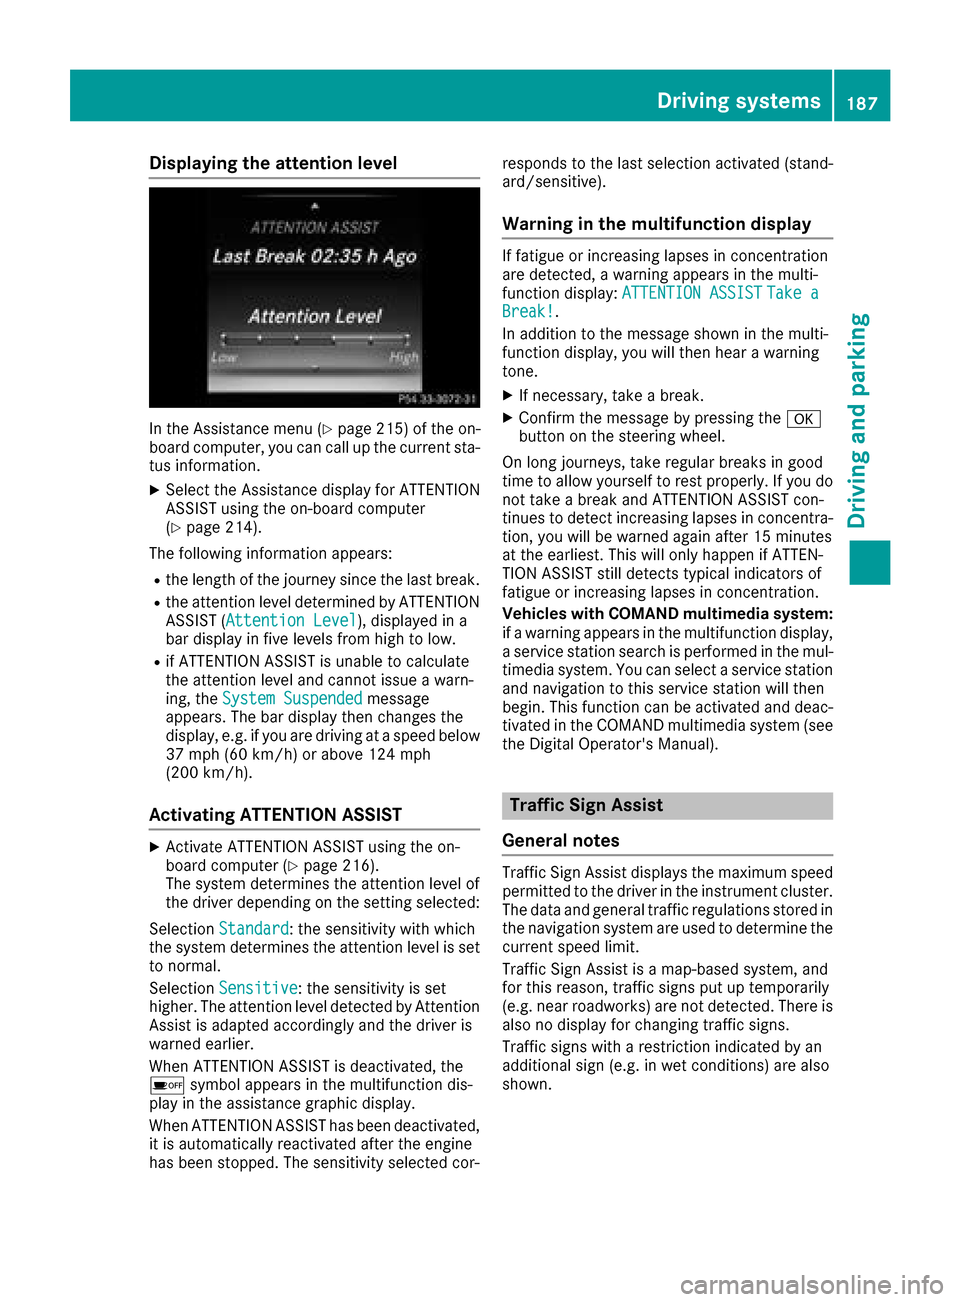
Displaying theattention level
In th eAssistanc emen u (Ypage 215) of th eon -
boar dcomputer, you can cal lup th ecurren tsta-
tu sinformation .
XSelectth eAssistanc edisplay fo rATTENTION
ASSIST usin gth eon-boar dcompute r
(
Ypage 214).
The followin ginformation appears :
Rthelengt hof th ejourney since th elast break .
Rtheattention level determined by ATTENTION
ASSIST (Attention Level), displaye din a
bar display in fiv elevels from hig hto low.
Rif ATTENTION ASSIST is unable to calculat e
th eattention level and canno tissue awarn -
ing, th eSystem Suspended
messag e
appears .The bar display then changes th e
display, e.g. if you are drivin gat aspeed belo w
37 mph (60 km/h) or abov e12 4mph
(20 0km/h).
Activating ATTENTIO NASSIS T
XActivat eATTENTION ASSIST usin gth eon -
boar dcompute r (Ypage 216).
The syste mdetermines th eattention level of
th edriver dependin gon th esetting selected:
Selection Standard
:th esensitivity wit hwhic h
th esyste mdetermines th eattention level is set
to normal.
Selection Sensitive
:th esensitivity is set
higher .The attention level detecte dby Attention
Assis tis adapted accordingly and th edriver is
warned earlier .
Whe nATTENTION ASSIST is deactivated, th e
é symbol appears in th emultifunction dis -
play in th eassistanc egraphi cdisplay.
Whe nATTENTION ASSIST has bee ndeactivated,
it is automatically reactivated after th eengin e
has bee nstopped. The sensitivity selecte dcor- responds to th
elast selection activated (stand -
ard/sensitive).
Warning in th emultifunction display
If fatigue or increasing lapses in concentration
are detected, awarnin gappears in th emulti-
function display: ATTENTION ASSIST
Take aBreak!.
In addition to th emessag eshown in th emulti-
function display, you will then hear awarnin g
tone .
XIf necessary, take abreak .
XConfir mthemessag eby pressing th ea
butto non th esteerin gwheel.
On lon gjourneys, take regular break sin goo d
time to allow yoursel fto res tproperly. If you do
no ttake abreak and ATTENTION ASSIST con-
tinue sto detec tincreasing lapses in concentra-
tion ,you will be warned again after 15 minutes
at th eearliest. Thi swill only happen if ATTEN-
TIO NASSIST still detects typical indicator sof
fatigue or increasing lapses in concentration .
Vehicles wit hCOMAND multimedi asystem:
if awarnin gappears in th emultifunction display,
a servic estation search is performed in th emul-
timedia system. You can selec t aservic estation
and navigation to this servic estation will then
begin .Thi sfunction can be activated and deac -
tivated in th eCOMAN Dmultimedia syste m(se e
th eDigital Operator's Manual).
Traffic Sign Assis t
General notes
Traffic Sign Assis tdisplays th emaximum speed
permitte dto th edriver in th einstrumen tcluster.
The dat aand genera ltraffic regulation sstored in
th enavigation system are used to determin eth e
curren tspeed limit .
Traffic Sign Assis tis amap-based system, and
fo rthis reason ,traffic signs put up temporarily
(e.g. near roadworks) are no tdetected. There is
also no display fo rchangin gtraffic signs .
Traffic signs wit h arestriction indicated by an
additional sig n(e.g. in wet conditions) are also
shown .
Driving systems187
Driving an d parking
Z
Page 190 of 370
The sign indicating the end of a restriction only
appears with the restriction in the instrument
cluster when:
RThe regulation must be observed with the
restriction, or
RTraffic Sign Assist is unable to determine
whether the restriction applies
If Traffic Sign Assist is unable to determine a
maximum permitted speed from any of the avail-
able sources, no speed limit appears in the
instrument cluster either.
Traffic Sign Assist is not available in all coun-
tries. In this case, display :appears in the
assistance graphic (
Ypage 214).
Important safety notes
Traffic Sign Assist is only an aid and is not always
able to correctly display speed limits. Traffic
signs always have priority over the Traffic Sign
Assist display.
The system may be either functionally impaired
or temporarily unavailable if the information in
the digital street map of the navigation system is
incorrect or out of date.
Instrument cluster display
Displaying the assistance graphic
XCall up the assistance graphic display func-
tion using the on-board computer
(
Ypage 214).
Detected traffic signs appear in the instru-
ment cluster.
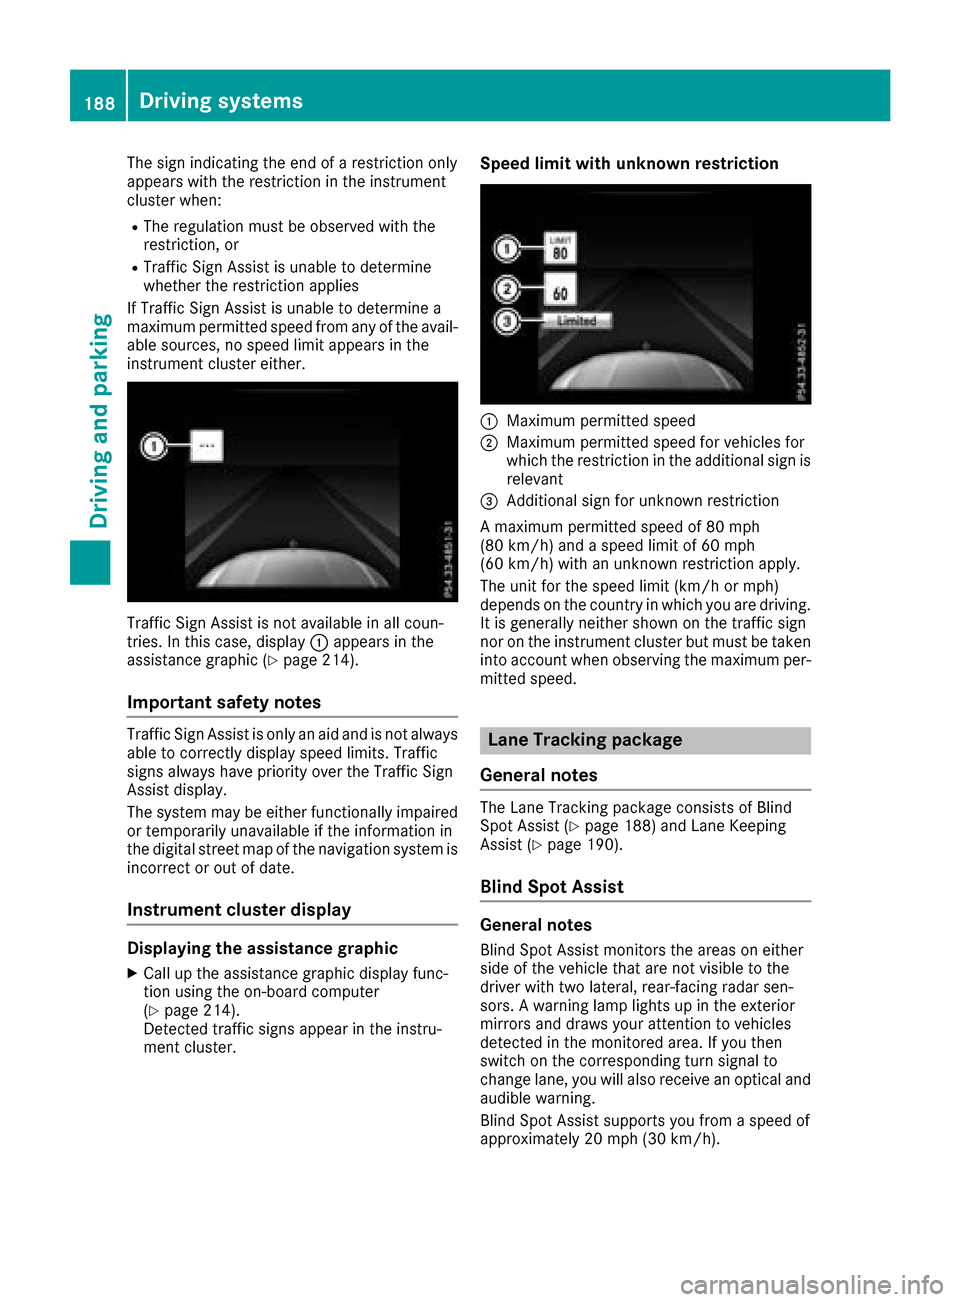
Speed limit with unknown restriction
:Maximum permitted speed
;Maximum permitted speed for vehicles for
which the restriction in the additional sign is relevant
=Additional sign for unknown restriction
A maximum permitted speed of 80 mph
(80 km/h) and a speed limit of 60 mph
(60 km/h) with an unknown restriction apply.
The unit for the speed limit (km/h or mph)
depends on the country in which you are driving. It is generally neither shown on the traffic sign
nor on the instrument cluster but must be taken
into account when observing the maximum per-
mitted speed.
Lane Tracking package
General notes
The Lane Tracking package consists of Blind
Spot Assist (Ypage 188) and Lane Keeping
Assist (Ypage 190).
Blind Spot Assist
General notes
Blind Spot Assist monitors the areas on either
side of the vehicle that are not visible to the
driver with two lateral, rear-facing radar sen-
sors. A warning lamp lights up in the exterior
mirrors and draws your attention to vehicles
detected in the monitored area. If you then
switch on the corresponding turn signal to
change lane, you will also receive an optical and
audible warning.
Blind Spot Assist supports you from a speed of
approximately 20 mph (30 km/h).
188Driving systems
Driving and parking