MERCEDES-BENZ GLC COUPE 2019 Owners Manual
Manufacturer: MERCEDES-BENZ, Model Year: 2019, Model line: GLC COUPE, Model: MERCEDES-BENZ GLC COUPE 2019Pages: 657, PDF Size: 11.28 MB
Page 121 of 657
#
If necessar y,reset the driver's or front
passenger seat.
Fo lding back there ar seat backrest
* NO
TEDama gecaused bytrapping the
seat belt when folding back the seat
backrest The seat belt could become trapped and
thus
be damaged when the seat backrest is folded
bac k. #
Make sure that the seat belt is not trap‐
ped when folding back the seat back‐
re st. #
Movethe driver's or front passenger seat for‐
wa rds, if necessar y. #
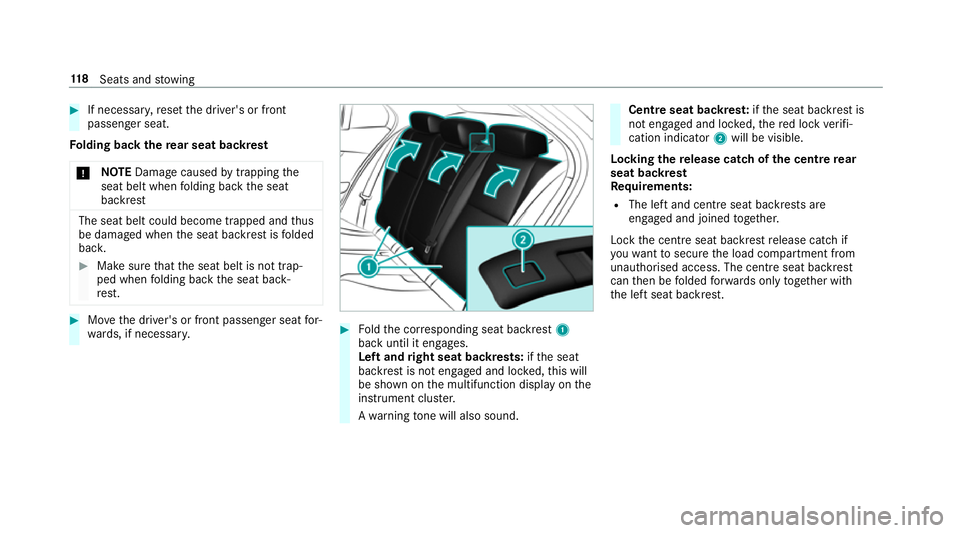
Foldthe cor responding seat backrest 1
back until it engages.
Left and right seat backrests: ifth e seat
backrest is not engaged and loc ked, this will
be shown on the multifunction display on the
instrument clus ter.
A wa rning tone will also sound. Centre seat backres
t:ifth e seat backrest is
not engaged and loc ked, there d lock verifi‐
cation indicator 2will be visible.
Lo cking there lease catch of the centre rear
seat backrest
Re quirements:
R The left and centre seat backrests are
engaged and joined toge ther.
Lock the cent reseat backrest release cat chif
yo uwa nttosecure the load compartment from
unauthorised access. The cent reseat backrest
can then be folded forw ards on lytoge ther with
th e left seat backrest. 11 8
Seats and stowing
Page 122 of 657
#
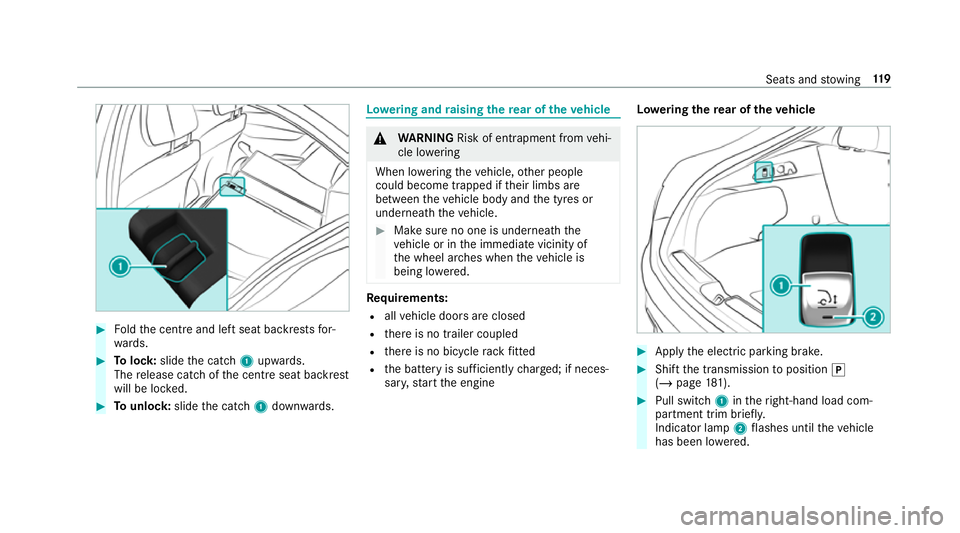
Foldthe cent reand left seat backrests for‐
wa rds. #
Tolock: slidethe catch 1upwards.
The release cat chofthe cent reseat backrest
will be loc ked. #
Tounlo ck:slide the catch 1down wards. Lo
weri ng and raising there ar of theve hicle &
WARNING Risk of entrapment from vehi‐
cle lo wering
When lo wering theve hicle, other people
could become trapped if their limbs are
between theve hicle body and the tyres or
underneath theve hicle. #
Make sure no one is underneath the
ve hicle or in the immediate vicinity of
th e wheel ar ches when theve hicle is
being lo wered. Re
quirements:
R allvehicle doors are closed
R there is no trailer coupled
R there is no bicycle rack fitted
R the battery is suf ficiently charge d; if neces‐
sar y,start the engine Lo
weri ngthere ar of theve hicle #
Apply the electric parking brake. #
Shift the transmission toposition j
(/ page 181). #
Pull switch 1intheright-hand load com‐
partment trim brief ly.
Indicator lamp 2flashes until theve hicle
has been lo wered. Seats and
stowing 11 9
Page 123 of 657
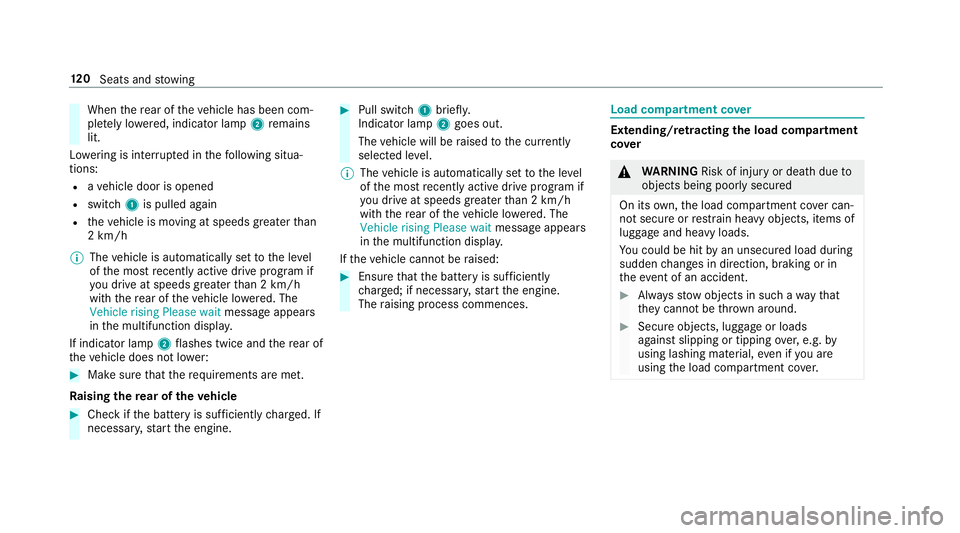
When
there ar of theve hicle has been com‐
ple tely lo wered, indicator lamp 2remains
lit.
Lo we ring is inter rupte d in thefo llowing situa‐
tions:
R ave hicle door is opened
R switch 1is pulled again
R theve hicle is moving at speeds greater than
2 km/h
% The vehicle is automatically set tothe le vel
of the most recently acti vedrive program if
yo u drive at speeds greater than 2 km/h
with there ar of theve hicle lo wered. The
Vehicle rising Please wait message appears
in the multifunction displa y.
If indicator lamp 2flashes twice and there ar of
th eve hicle does not lo wer: #
Make sure that there qu irements are met.
Ra ising there ar of theve hicle #
Che ckifth e battery is suf ficiently charge d. If
necessar y,start the engine. #
Pull switch 1briefly.
Indicator lamp 2goes out.
The vehicle will be raised tothe cur rently
selected le vel.
% The vehicle is automatically set tothe le vel
of the most recently acti vedrive program if
yo u drive at speeds greater than 2 km/h
with there ar of theve hicle lo wered. The
Vehicle rising Please wait message appears
in the multifunction displa y.
If th eve hicle cannot be raised: #
Ensure that the battery is suf ficiently
ch arge d; if necessar y,start the engine.
The raising process commences. Load compa
rtment co ver Extending/r
etra cting the load compa rtment
co ver &
WARNING Risk of inju ryor death due to
objects being poorly secured
On its own,the load compartment co ver can‐
not secure or restra in heavy objects, items of
luggage and heavy loads.
Yo u could be hit byan unsecured load during
sudden changes in direction, braking or in
th eev ent of an accident. #
Alw aysstow objects in such a wayth at
th ey cannot be thro wn around. #
Secure objects, luggage or loads
against slipping or tipping over,e.g. by
using lashing material, even if you are
using the load compartment co ver. 12 0
Seats and stowing
Page 124 of 657
*
NO
TEDama getothe load compartment
co ver when loading theve hicle The load compartment co
ver may be dam‐
aged when loading theve hicle. #
Do not place any objects abo vethe
lo we r edge of the side windo wsor on
th e load compartment co ver. The load compartment co
ver is attached behind
th e seat backrest of there ar ben chseat. #
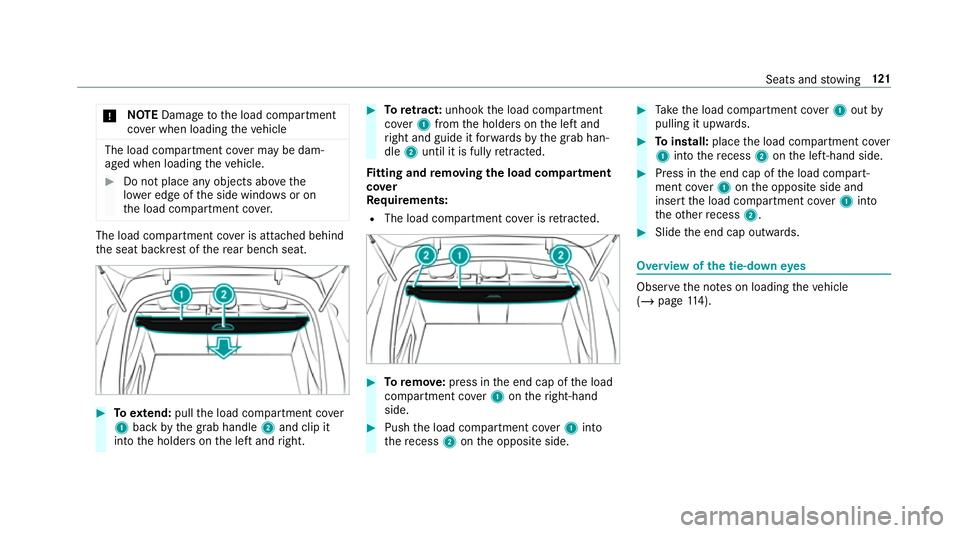
Toextend: pull the load compartment co ver
1 back bythe grab handle 2and clip it
into the holders on the left and right. #
Toretract: unhook the load compartment
co ver1 from the holders on the left and
ri ght and guide it forw ards bythe grab han‐
dle 2until it is fully retracted.
Fi tting and removing the load co mpartment
co ver
Re quirements:
R The load compartment co ver is retracted. #
Toremo ve: press in the end cap of the load
compartment co ver1 ontheright-hand
side. #
Push the load compartment co ver1 into
th ere cess 2onthe opposite side. #
Take the load compartment co ver1 out by
pulling it upwards. #
Toinstall: placethe load compartment co ver
1 into there cess 2onthe left-hand side. #
Press in the end cap of the load compart‐
ment co ver1 onthe opposite side and
insert the load compartment co ver1 into
th eot her recess 2. #
Slide the end cap outwards. Overview of
the tie-down eyes Obser
vethe no tes on loading theve hicle
(/ page 114). Seats and
stowing 121
Page 125 of 657
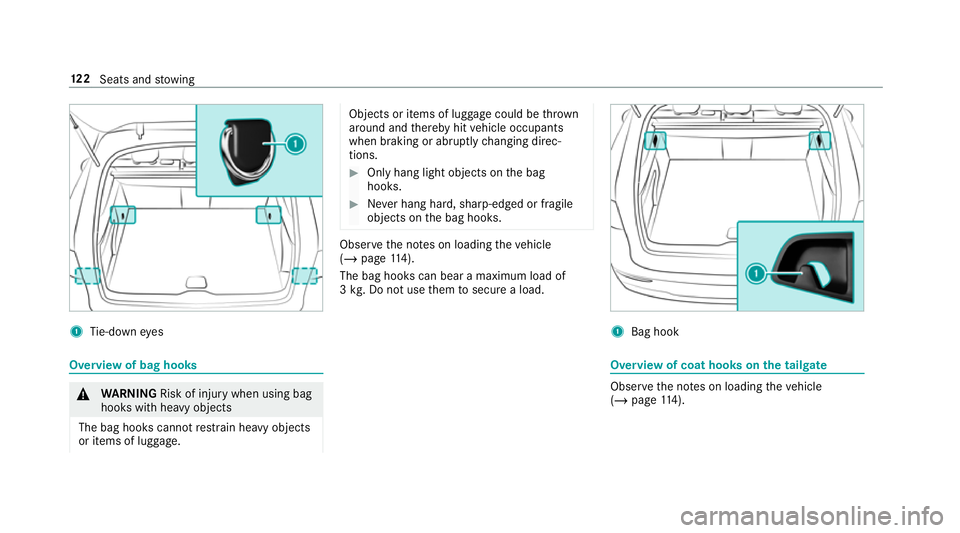
1
Tie-down eyes Overview of bag hooks
&
WARNING Risk of inju rywhen using bag
hooks with heavy objects
The bag hooks cannot restra in heavy objects
or items of luggage. Objects or items of luggage could be
thrown
around and thereby hit vehicle occupants
when braking or abruptly changing direc‐
tions. #
Onlyhang light objects on the bag
hooks. #
Never hang hard, sharp-edged or fragile
objects on the bag hooks. Obser
vethe no tes on loading theve hicle
(/ page 114).
The bag hooks can bear a maximum load of
3 kg . Do not use them tosecure a load. 1
Bag hook Overview of coat hooks on
the tailgate Obser
vethe no tes on loading theve hicle
(/ page 114). 12 2
Seats and stowing
Page 126 of 657
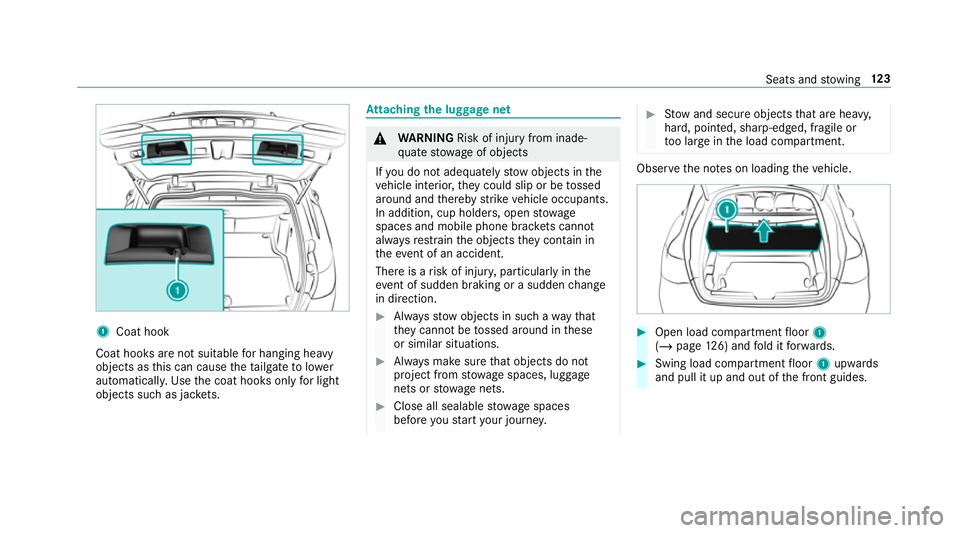
1
Coat hook
Coat hooks are not suitable for hanging heavy
objects as this can cause theta ilgate tolower
automaticall y.Use the coat hooks only for light
objects such as jac kets. At
taching the luggage net &
WARNING Risk of inju ryfrom inade‐
qu ate stow age of objects
If yo u do not adequately stowobjects in the
ve hicle interior, they could slip or be tossed
around and thereby strike vehicle occupants.
In addition, cup holders, open stowage
spaces and mobile phone brac kets cann ot
alw aysre stra in the objects they contain in
th eev ent of an accident.
There is a risk of injur y,particularly in the
ev ent of sudden braking or a sudden change
in direction. #
Alw aysstow objects in such a wayth at
th ey cannot be tossed around in these
or similar situations. #
Alw ays make sure that objects do not
project from stowage spaces, luggage
nets or stowage nets. #
Close all sealable stowage spaces
before youstart your journe y. #
Stow and secure objects that are heavy,
hard, poin ted, sharp-edged, fragile or
to o lar geinthe load compartment. Obser
vethe no tes on loading theve hicle. #
Open load compartment floor 1
(/ page 126) and fold it forw ards. #
Swing load compartment floor 1upwards
and pull it up and out of the front guides. Seats and
stowing 12 3
Page 127 of 657
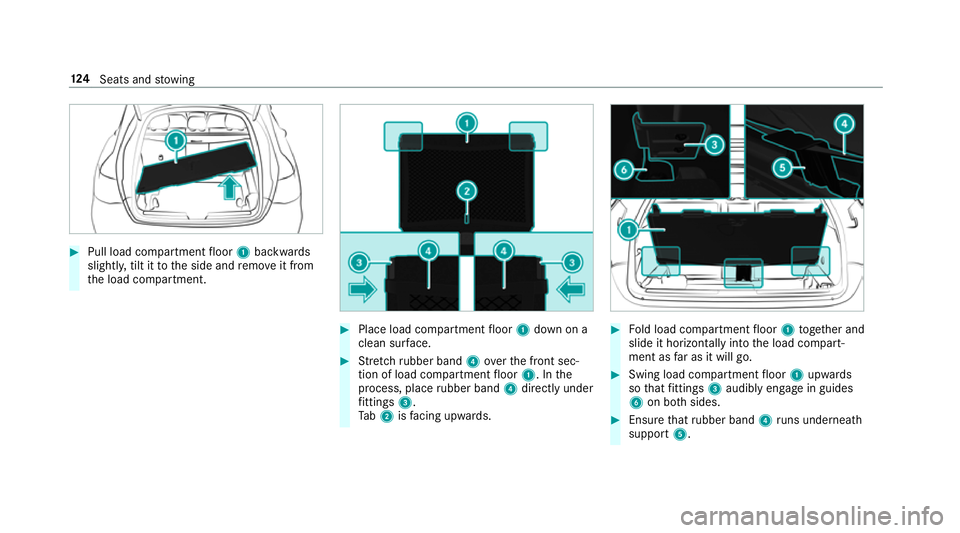
#
Pull load compartment floor 1backwards
slightl y,tilt it tothe side and remo veit from
th e load compartment. #
Place load compartment floor 1down on a
clean sur face. #
Stretch rubber band 4overth e front sec‐
tion of load compartment floor 1. In the
process, place rubber band 4directly under
fi ttings 3.
Ta b2 isfacing up wards. #
Fold load compartment floor 1toge ther and
slide it horizon tally into the load compart‐
ment as far as it will go. #
Swing load compartment floor 1upwards
so that fittings 3audibly engage in guides
6 on bo thsides. #
Ensure that rubber band 4runs undernea th
support 5. 124
Seats and stowing
Page 128 of 657
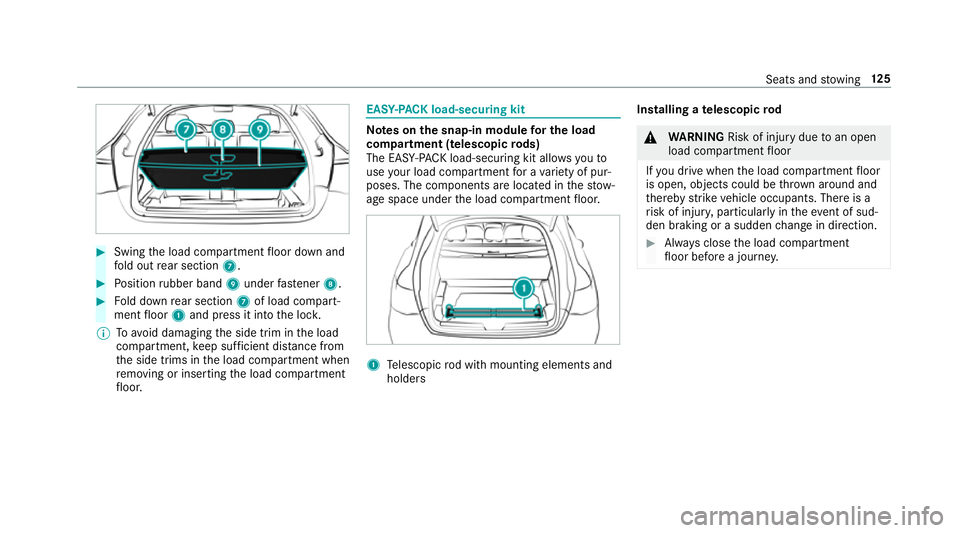
#
Swing the load compartment floor down and
fo ld out rear section 7. #
Position rubber band 9under fastener 8. #
Fold down rear section 7of load compart‐
ment floor 1and press it into the loc k.
% Toavo id damaging the side trim in the load
compartment, keep suf ficient di stance from
th e side trims in the load compartment when
re moving or inserting the load compartment
fl oor. EAS
Y-PA CK load-securing kit Note
s onthe snap-in module for the load
co mp artment (telescopic rods)
The EAS Y-PA CK load-securing kit allo wsyouto
use your load co mpartment for a variet y of pur‐
poses. The co mponents are located in thestow‐
age space under the load compartment floor. 1
Telescopic rod with mounting elements and
holders Installing a
telescopic rod &
WARNING Risk of inju rydue toan open
load compartment floor
If yo u drive when the load compartment floor
is open, objects could be thro wn around and
th ereby strike vehicle occupants. There is a
ri sk of injur y,particular lyin theeve nt of sud‐
den braking or a sudden change in direction. #
Alw ays close the load compartment
fl oor before a journe y. Seats and
stowing 12 5
Page 129 of 657
#
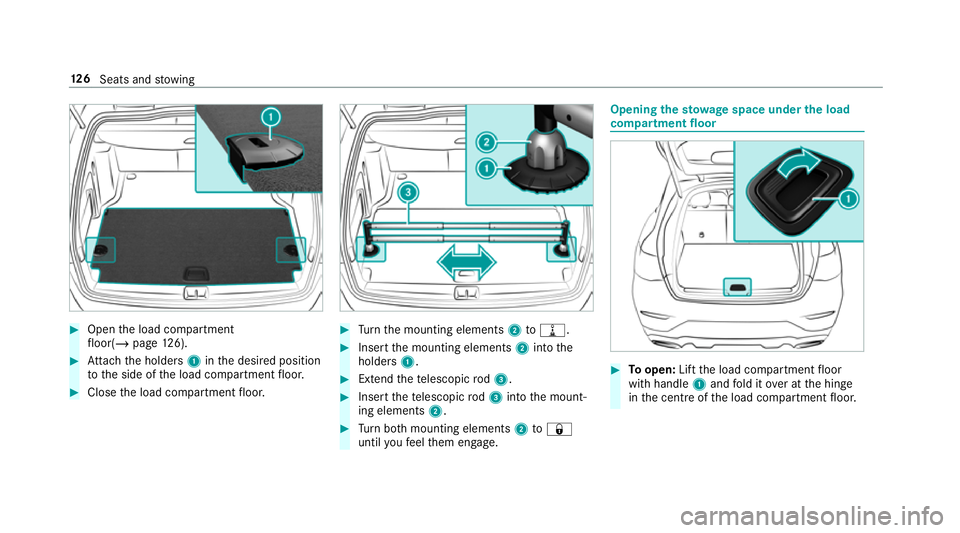
Open the load compartment
fl oor(/ page126). #
Attach the holders 1inthe desired position
to the side of the load compartment floor. #
Close the load compartment floor. #
Turn the mounting elements 2to= . #
Insert the mounting elements 2into the
holders 1. #
Extend thete lescopic rod3. #
Insert thete lescopic rod3 into the mount‐
ing elements 2. #
Turn both mounting elements 2to&
until youfe el them engage. Opening
thesto wage space under the load
compa rtment floor #
Toopen: Liftthe load compartment floor
with handle 1and fold it over at the hinge
in the cent reofthe load compartment floor. 12 6
Seats and stowing
Page 130 of 657
#
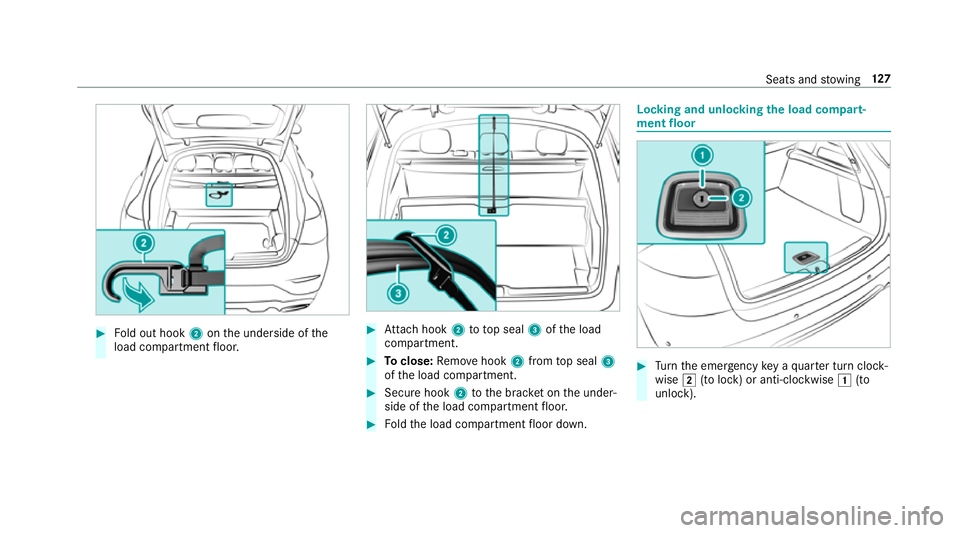
Fold out hook 2onthe underside of the
load compartment floor. #
Attach hook 2to to p seal 3ofthe load
compartment. #
Toclose: Remo vehook 2from top seal 3
of the load compartment. #
Secure hook 2tothe brac ket on the under‐
side of the load compartment floor. #
Foldthe load compartment floor down. Locking and unlocking
the load compa rt‐
ment floor #
Turn the emer gency key a quarter turn clock‐
wise 2(to lock) or anti-clockwise 1(to
unlock). Seats and
stowing 127