boot MERCEDES-BENZ GLC SUV 2015 Owners Manual
[x] Cancel search | Manufacturer: MERCEDES-BENZ, Model Year: 2015, Model line: GLC SUV, Model: MERCEDES-BENZ GLC SUV 2015Pages: 497, PDF Size: 15.27 MB
Page 9 of 497
Axle load, permissible (trailer tow-
ing)
...................................................... 492 B
Bag hook ............................................ 397
Ball coupling
Swinging in .................................... 306
Swinging out .................................. 304
BAS (Brake Assist System) .................79
BAS PLUS with Cross-Traffic Assist (Brake Assist PLUS with Cross-
Traffic Assist)
Function/note s................................ 80
Important safety notes .................... 80
Battery (high-voltage)
see High-voltage battery
Battery (key)
Checking .......................................... 98
Important safety notes .................... 97
Replacing ......................................... 98
Battery (vehicle)
Charging ........................................ 441
Display message ............................ 354
Important safety notes .................. 438
Jump starting ................................. 443
Belt tensioner
Activation ......................................... 62
Blind Spot Assist
Activating/deactivating (on-
board computer) ............................ 328
Display message ............................ 362
Notes/function .............................. 276
see Active Blind Spot Assist
BlueTEC
see AdBlue ®
Bonnet Active bonnet (pedestrian protec-tion) ............................................... 414
Closing ........................................... 416
Display message ............................ 371
Important safety notes .................. 414
Opening ......................................... 415
Boot load (maximum) ........................ 488
Brake
EBD .................................................. 87
Brake fluid
Display message ............................ 342 Notes ............................................. 486
Brake force distribution
see EBD (electronic brake force
distribution)
Brake lamps
Adaptive ........................................... 84
Display message ............................ 351
Brake pedal
Pedal resistance/pedal travel .......... 46
Brakes
ABS .................................................. 79
Adaptive Brake Assist ...................... 83
BAS .................................................. 79
BAS PLUS with Cross-Traffic
Assist ............................................... 80
Brake fluid (notes) ......................... 486
Display message ............................ 336
Driving tips .................................... 224
Hill start assist ............................... 191
HOLD function ............................... 247
Important safety notes .................. 224
Parking brake ................................ 220
RBS warning lamp .......................... 377
Recuperative Brake System ............. 46
Warning lamp ................................. 377
Breakdown
Where will I find...? ........................ 430
see Flat tyre
see Towing away
Brightness control (instrument
cluster lighting) ................................... 32
Buttons on the steering column ...... 314 C
Calling up a fault see Display messages
Car wash (care) ................................. 420
Care
360° camera ................................. 425
Automatic car wash ....................... 420
Carpets .......................................... 428
Display ........................................... 426
Exhaust pipe .................................. 426
Exterior lighting ............................. 424
Gear or selector lever .................... 427
High-pressure cleaner .................... 422
Interior ........................................... 426 6
Index
Page 26 of 497
Snow chains .................................. 457
Storing ........................................... 464
Summer tyres in winter ................. 456
Tyre size (data ).............................. 468
Tyre tread ...................................... 455
Wheel and tyre combinations ........ 470
see Flat tyre U
Unlocking Emergency unlocking ..................... 102
From inside the vehicle (central
unlocking button) ........................... 101 V
Vanity mirror (in sun visor) .............. 404
Variable SPEEDTRONIC
see SPEEDTRONIC
Vehicle
Correct use ...................................... 28
Data acquisition ............................... 29
Display message ............................ 369
Electronics ..................................... 478
Equipment ....................................... 26
Implied warranty .............................. 28
Individual settings .......................... 327
Leaving parked up ......................... 222
Locking (in an emergency) ............. 103
Locking (key) ................................... 95
Lowering ........................................ 467
Operating safety .............................. 26
Parking .......................................... 219
Pulling away ................................... 190
Raising ........................................... 465
Registration ..................................... 28
Securing from rolling away ............ 465
Towing away .................................. 445
Transporting .................................. 448
Unlocking (in an emergency) ......... 102
Unlocking (key) ................................ 95
Vehicle data ................................... 488
Vehicle data
Boot load (maximum) ..................... 488
Roof load (maximum) ..................... 488
Vehicle data (off-road driving)
Approach/departure angle ............ 489 Maximum gradient climbing abil-
ity .................................................. 489
Maximum water depth ................... 489
Vehicle dimensions ........................... 488
Vehicle emergency locking .............. 103
Vehicle identification number
see VIN
Vehicle identification plate .............. 480
Vehicle level
AIR BODY CONTROL ...................... 252
Display message ............................ 359
Vehicle tool kit .................................. 432
Video
Operating the DVD ......................... 323
VIN
Seat ............................................... 480
Type plate ...................................... 480 W
Warning and indicator lamps ABS ................................................ 379
Brakes ........................................... 377
Distance warning signal ................. 386
ESP ®
.............................................. 381
ESP ®
OFF ....................................... 383
Fuel tank ........................................ 384
General notes ................................ 375
Hybrid drive system ....................... 377
LIM (cruise control )........................ 231
LIM (DISTRONIC PLUS) .................. 237
LIM (variable SPEEDTRONIC) ......... 234
Overview .......................................... 36
Parking brake ................................ 383
PASSENGER AIR BAG ...................... 48
RBS (Recuperative Brake Sys-
tem) ............................................... 377
Reserve fuel ................................... 384
Seat belt ........................................ 376
Steering ......................................... 388
Tyre pressure monitor ................... 387
Warning triangle ................................ 431
Warnings
Stickers ........................................... 44
Washer fluid
Display message ............................ 374
Wheel and tyre combinations
Tyres .............................................. 470 Index
23
Page 225 of 497
Releasing automatically
The electric parking brake of your vehicle is
released automatically when all of the follow-
ing conditions are fulfilled:
R the engine is running
R the transmission is in position Dor R
R the seat belt is fastened
R you depress the accelerator pedal
If the transmission is in position R, the boot lid
must be closed.
If your seat belt is not fastened, the following conditions must be fulfilled to automatically
release the electric parking brake:
R the driver's door is closed
R you have shifted out of transmission posi-
tion Por you have previously driven faster
than 3 km/h
Ensure that you do not depress the acceler-
ator pedal unintentionally. Otherwise, the
parking brake will be released and the vehicle will start to move.
Emergency braking The vehicle can also be braked during an
emergency by using the electric parking
brake.
X While driving, push handle :of the electric
parking brake (Y page 220).
The vehicle is braked as long as you keep
handle :of the electric parking brake
depressed. The longer electric parking
brake handle :is depressed, the greater
the braking force.
During braking:
R a warning tone sounds
R the Release
Release parking parkingbrake
brakedisplay mes-
sage appears
R the red !indicator lamp in the instru-
ment cluster flashes
When the vehicle has been braked to a stand- still, the electric parking brake is applied. Parking up the vehicle
If you leave the vehicle parked up for longer
than four weeks, the battery may be damaged
by exhaustive discharging.
If you leave the vehicle parked up for longer
than six weeks, it may suffer from lack of use.
X Contact a qualified specialist workshop
and seek advice.
i You can obtain information about trickle
chargers from a qualified specialist work-
shop.
PLUG-IN HYBRID vehicles: observe the
important safety notes for the high-voltage
battery (Y page 440). Driving tips
General driving tips
Important safety notes G
WARNING
If you switch off the ignition while driving,
safety-relevant functions are only available
with limitations, or not at all. This could affect, for example, the power steering and the brake
boosting effect. You will require considerably
more effort to steer and brake. There is a risk of an accident.
Do not switch off the ignition while driving.
Drive sensibly – save fuel Observe the following tips to save fuel:
X The tyres should always be inflated to the
recommended tyre pressure.
X Remove unnecessary loads.
X Remove roof racks when they are not nee-
ded.
X Warm up the engine at low engine speeds.
X Avoid frequent acceleration or braking.
X Have all maintenance work carried out as
indicated by the service intervals in the 222
Driving tipsDriving and parking
Page 265 of 497
R
you are driving faster than 10 km/h
R a wheel spins and ESP ®
intervenes or fails.
The ÷ warning lamp lights up in the
instrument cluster.
A warning tone sounds. The parking symbol
disappears and the multifunction display
shows the Park Assist cancelled Park Assist cancelled mes-
sage.
When Active Parking Assist is cancelled, you
must steer and brake again yourself.
If a system malfunction occurs, the vehicle is braked to a standstill. To drive on, depress the
accelerator pedal again. Reversing camera
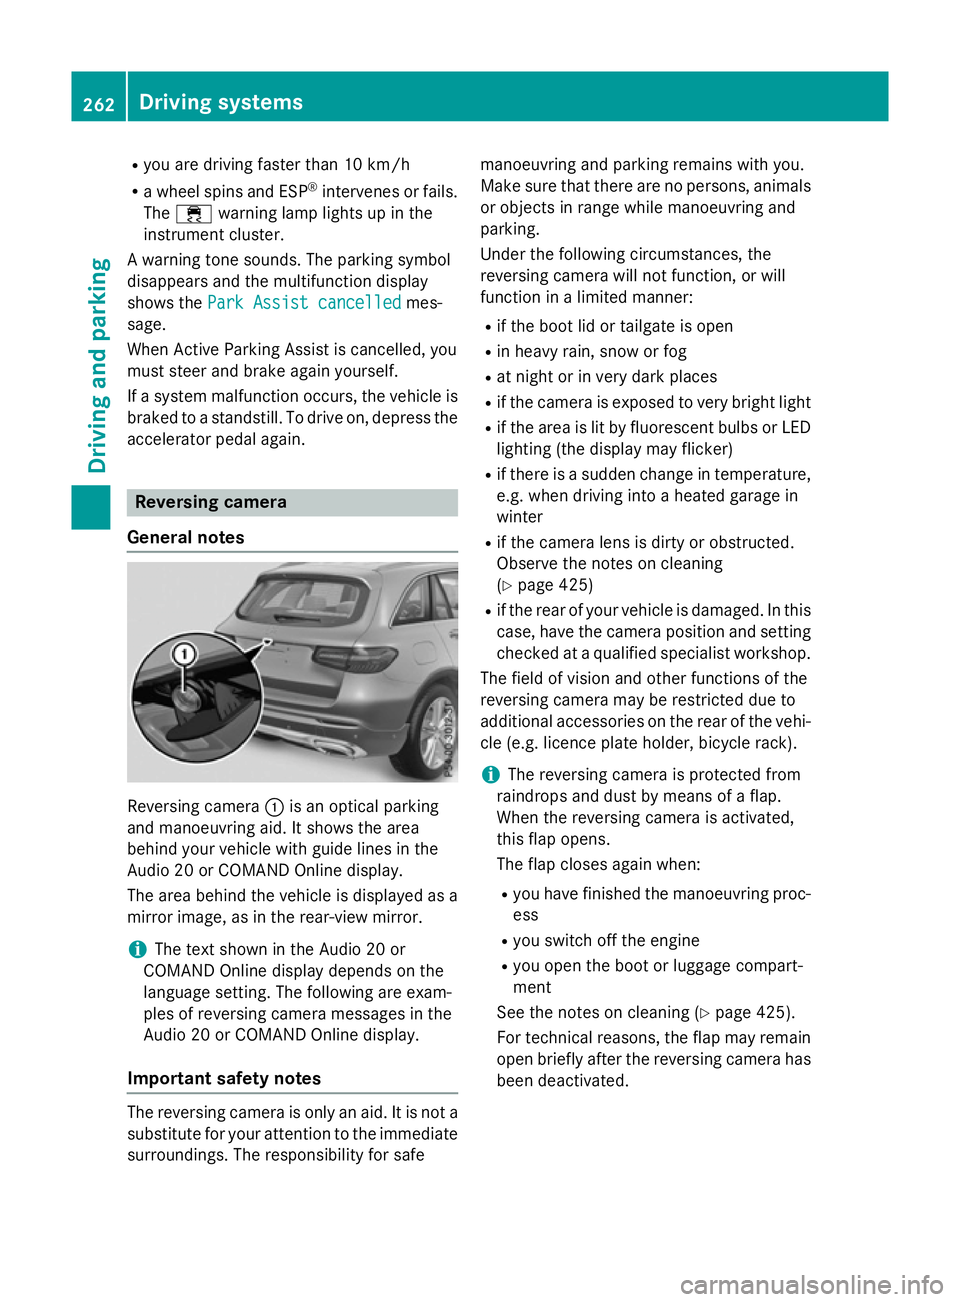
General notes Reversing camera
:is an optical parking
and manoeuvring aid. It shows the area
behind your vehicle with guide lines in the
Audio 20 or COMAND Online display.
The area behind the vehicle is displayed as a
mirror image, as in the rear-view mirror.
i The text shown in the Audio 20 or
COMAND Online display depends on the
language setting. The following are exam-
ples of reversing camera messages in the
Audio 20 or COMAND Online display.
Important safety notes The reversing camera is only an aid. It is not a
substitute for your attention to the immediate
surroundings. The responsibility for safe manoeuvring and parking remains with you.
Make sure that there are no persons, animals
or objects in range while manoeuvring and
parking.
Under the following circumstances, the
reversing camera will not function, or will
function in a limited manner:
R if the boot lid or tailgate is open
R in heavy rain, snow or fog
R at night or in very dark places
R if the camera is exposed to very bright light
R if the area is lit by fluorescent bulbs or LED
lighting (the display may flicker)
R if there is a sudden change in temperature,
e.g. when driving into a heated garage in
winter
R if the camera lens is dirty or obstructed.
Observe the notes on cleaning
(Y page 425)
R if the rear of your vehicle is damaged. In this
case, have the camera position and setting checked at a qualified specialist workshop.
The field of vision and other functions of the
reversing camera may be restricted due to
additional accessories on the rear of the vehi-
cle (e.g. licence plate holder, bicycle rack).
i The reversing camera is protected from
raindrops and dust by means of a flap.
When the reversing camera is activated,
this flap opens.
The flap closes again when:
R you have finished the manoeuvring proc-
ess
R you switch off the engine
R you open the boot or luggage compart-
ment
See the notes on cleaning (Y page 425).
For technical reasons, the flap may remain
open briefly after the reversing camera has been deactivated. 262
Driving syste
msDriving and parking
Page 266 of 497
Activating/deactivating the reversing
camera X
To activate: make sure that the key is in
position 2in the ignition lock.
X Make sure that the Activation by R
Activation by R
gear
gear function is selected in Audio 20 or
COMAND Online (see the Digital Owner's
Manual).
X Engage reverse gear.
The reversing camera flap opens. The area
behind the vehicle is shown with guide lines
in the Audio 20 or COMAND Online display.
The image from the reversing camera is
available throughout the manoeuvring
process.
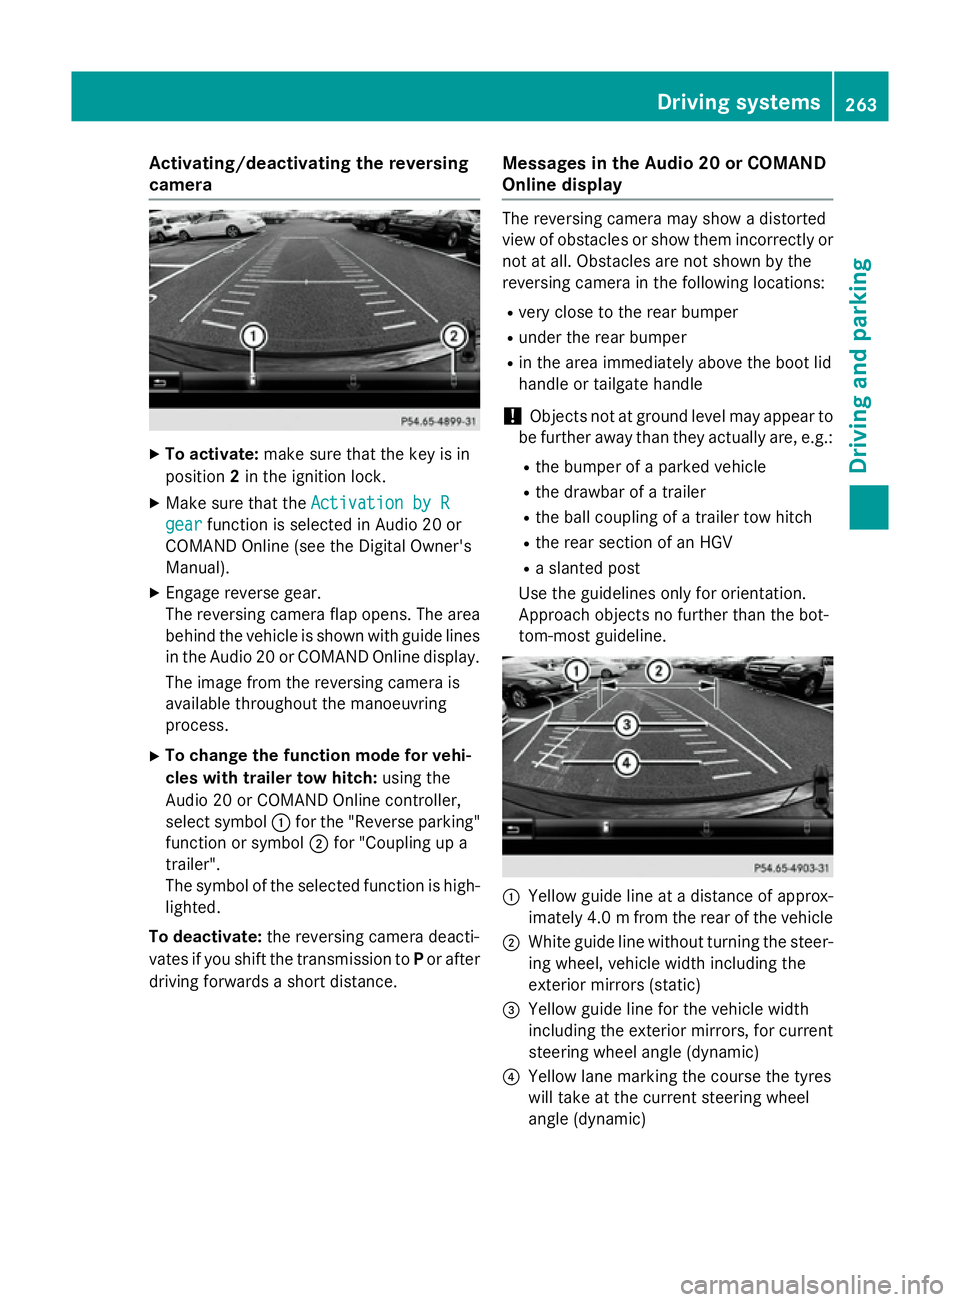
X To change the function mode for vehi-
cles with trailer tow hitch: using the
Audio 20 or COMAND Online controller,
select symbol :for the "Reverse parking"
function or symbol ;for "Coupling up a
trailer".
The symbol of the selected function is high-
lighted.
To deactivate: the reversing camera deacti-
vates if you shift the transmission to Por after
driving forwards a short distance. Messages in the Audio 20 or COMAND
Online display The reversing camera may show a distorted
view of obstacles or show them incorrectly or
not at all. Obstacles are not shown by the
reversing camera in the following locations:
R very close to the rear bumper
R under the rear bumper
R in the area immediately above the boot lid
handle or tailgate handle
! Objects not at ground level may appear to
be further away than they actually are, e.g.:
R the bumper of a parked vehicle
R the drawbar of a trailer
R the ball coupling of a trailer tow hitch
R the rear section of an HGV
R a slanted post
Use the guidelines only for orientation.
Approach objects no further than the bot-
tom-most guideline. :
Yellow guide line at a distance of approx-
imately 4.0 mfrom the rear of the vehicle
; White guide line without turning the steer-
ing wheel, vehicle width including the
exterior mirrors (static)
= Yellow guide line for the vehicle width
including the exterior mirrors, for current
steering wheel angle (dynamic)
? Yellow lane marking the course the tyres
will take at the current steering wheel
angle (dynamic) Driving systems
263Driving and parking Z
Page 271 of 497
applies to the areas behind, in front of and
beside the vehicle. You could otherwise
endanger yourself and others.
The 360° camera will not function or will
function only in a limited manner:
R if the doors are open
R if the exterior mirrors are folded in
R if the boot lid or tailgate is open
R in heavy rain, snow or fog
R at night or in very dark places
R if the cameras are exposed to very bright
light
R if the area is lit by fluorescent bulbs or LED
lighting (the display may flicker)
R if the camera lenses mist up, e.g. when
driving into a heated garage in winter, caus- ing a rapid change in temperature
R if the camera lenses are dirty or covered
R if the vehicle components in which the
cameras are fitted are damaged. In this
event, have the camera position and setting
checked at a qualified specialist workshop.
Do not use the 360° camera under such cir-
cumstances. You could otherwise injure oth-
ers or damage objects when parking the vehi- cle.
The guide lines in the COMAND display show
the distances to your vehicle. The distances
only apply to road level.
In trailer mode, the guide lines are shown at
the level of the trailer tow hitch.
The camera in the rear area is protected by
means of a flap. This flap opens when the
360° camera is activated. Observe the notes on cleaning (Y page 425). For technical rea-
sons, the flap may remain open briefly after
the 360° camera has been deactivated.
On vehicles with height-adjustable suspen-
sion, due to the technical conditions, leaving
the standard height can result in:
R inaccuracies in the guide lines
R inaccuracies in the display of generated
images (top view) Activation conditions The 360° camera image can be displayed if:
R Audio 20 or COMAND Online is switched on
(see the Digital Owner's Manual)
R the 360° camera 360° camera function is switched on
i If you are driving faster than at a moderate
speed and switch on the 360° camera, a
warning message appears.
The warning message disappears if:
R you are again driving at a moderate
speed. The 360° camera is then activa-
ted.
R the message is confirmed with the %
button.
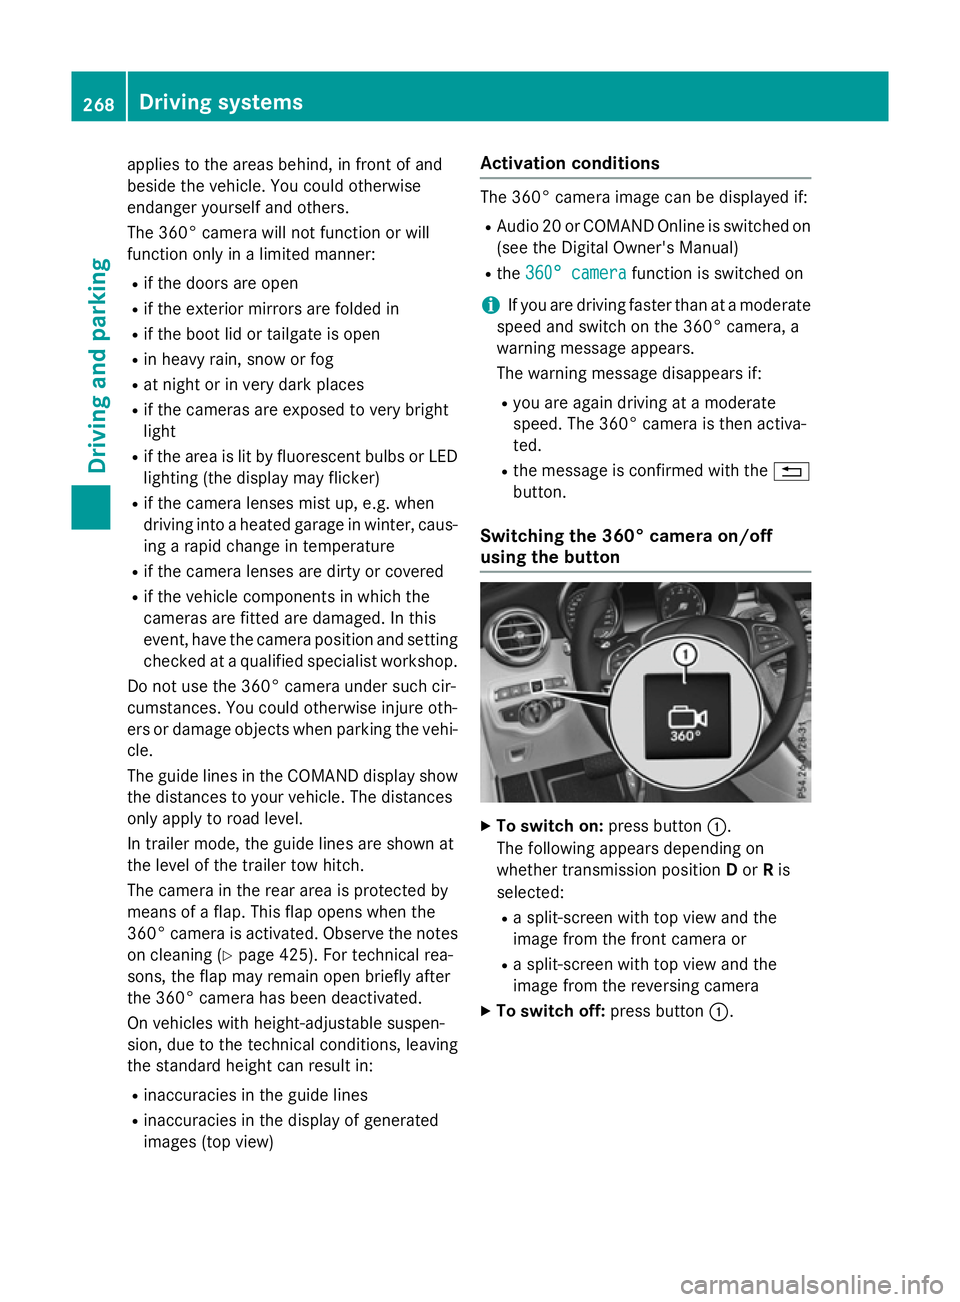
Switching the 360° camera on/off
using the button X
To switch on: press button:.
The following appears depending on
whether transmission position Dor Ris
selected:
R a split-screen with top view and the
image from the front camera or
R a split-screen with top view and the
image from the reversing camera
X To switch off: press button:.268
Driving systemsDriving and parking
Page 272 of 497
Switching on the 360° camera using
Audio 20 or COMAND Online X
To select 360° camera
360° camera in the vehicle car-
ousel: turn and press the controller.
The following appears depending on
whether transmission position Dor Ris
selected:
R a split-screen with top view and the
image from the front camera or
R a split-screen with top view and the
image from the reversing camera
Activating the 360° camera using
reverse gear You can show images from the 360° camera
automatically by engaging reverse gear.
X Make sure that the key is in position 2in the
ignition lock.
X Make sure that the Activation by R Activation by R
gear
gear function is selected in Audio 20 or
COMAND Online (see the Digital Owner's
Manual).
X To show the 360° camera image: engage
reverse gear.
The area behind the vehicle is shown in the
Audio 20 or COMAND display in split-
screen mode. You see the top view of the
vehicle and the image from the reversing
camera.
Selecting the split-screen view or full
screen mode Switching between split screen views:
X To switch to the line with the vehicle icons:
slide 5the controller.
X To select a vehicle icon: turn the controller.
Switching to full screen mode:
X 180° view
180° view Turn and press the controller. i
The full screen option is only available in
the following views:
R Top view with image from the reversing
camera
R Top view with image from the front cam-
era
Displays in the Audio 20 or COMAND
display Important safety notes
The camera system may show a distorted
view of obstacles or show them incorrectly or
not at all. Obstacles are not shown by the
system in the following locations:
R under the front and rear bumpers
R very close to the front and rear bumpers
R in the area immediately above the boot lid
handle or tailgate handle
R very close to the exterior mirrors
R in the transitional areas between the vari-
ous cameras in the virtual top view
! Objects not at ground level may appear to
be further away than they actually are, e.g.:
R the bumper of a parked vehicle
R the drawbar of a trailer
R the ball coupling of a trailer tow hitch
R the rear section of an HGV
R a slanted post
Use the guidelines only for orientation.
Approach objects no further than the bot-
tom-most guideline. Driving systems
269Driving and parking Z
Page 396 of 497
Ski/snowboard bag
Important safety notes G
WARNING
The skibag in conjunction with the lashing
straps cannot restrain any objects other than skis.
Vehicle occupants could be struck in the
event of sudden braking or an accident, for
instance, if you:
R transport other heavy or sharp-edged
objects in the skibag
R do not secure the skibag with the lashing
straps
There is a risk of accident and injury.
Store only skis in the skibag. Always secure
the skibag with the lashing straps so that it
cannot move around.
A maximum of four pairs of skis or two snow- boards can be transported in the ski/snow-
board bag.
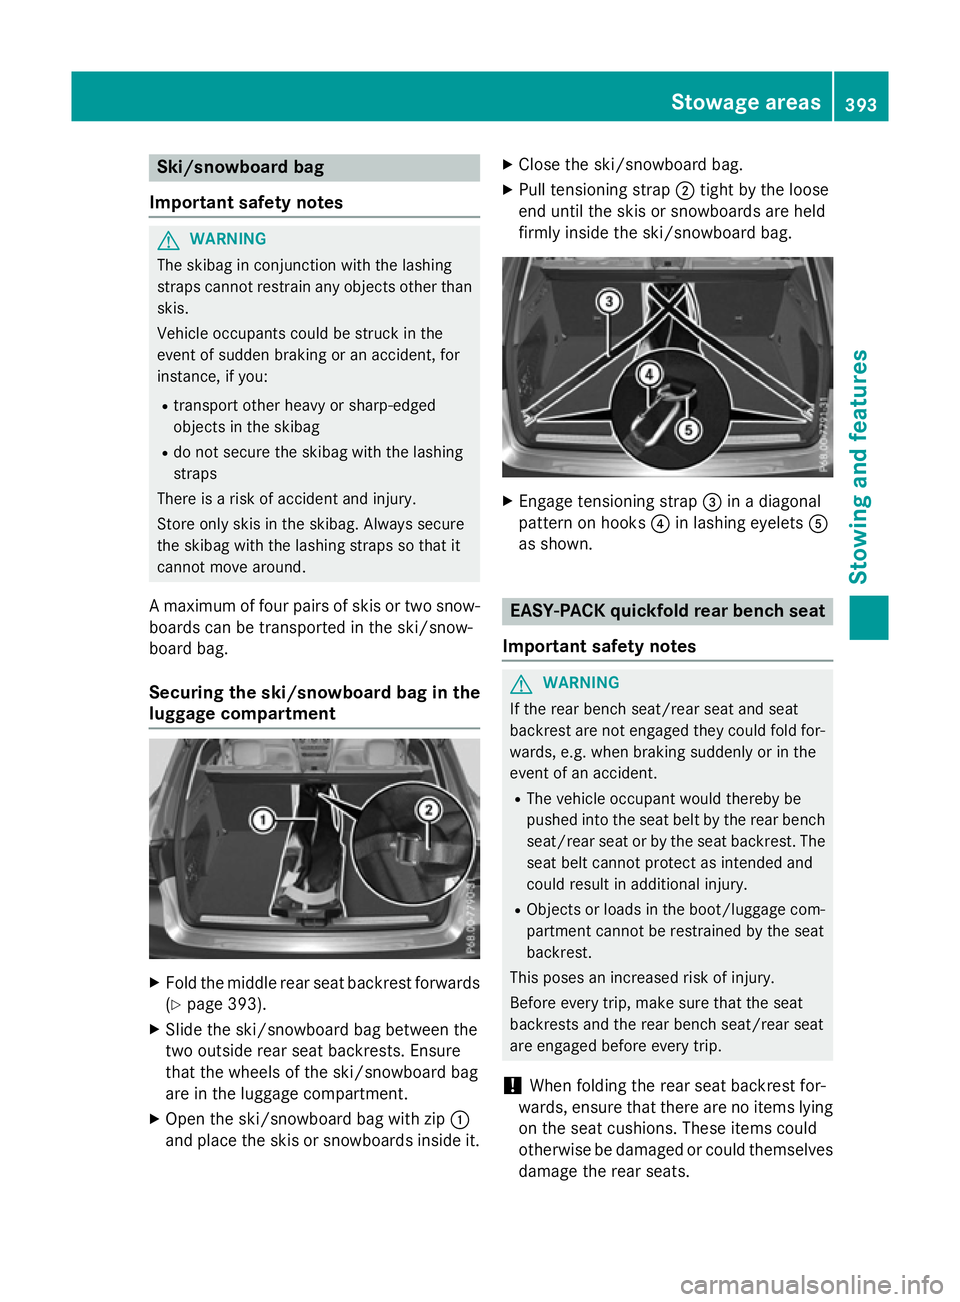
Securing the ski/snowboard bag in the
luggage compartment X
Fold the middle rear seat backrest forwards
(Y page 393).
X Slide the ski/snowboard bag between the
two outside rear seat backrests. Ensure
that the wheels of the ski/snowboard bag
are in the luggage compartment.
X Open the ski/snowboard bag with zip :
and place the skis or snowboards inside it. X
Close the ski/snowboard bag.
X Pull tensioning strap ;tight by the loose
end until the skis or snowboards are held
firmly inside the ski/snowboard bag. X
Engage tensioning strap =in a diagonal
pattern on hooks ?in lashing eyelets A
as shown. EASY-PACK quickfold rear bench seat
Important safety notes G
WARNING
If the rear bench seat/rear seat and seat
backrest are not engaged they could fold for- wards, e.g. when braking suddenly or in the
event of an accident.
R The vehicle occupant would thereby be
pushed into the seat belt by the rear bench
seat/rear seat or by the seat backrest. The
seat belt cannot protect as intended and
could result in additional injury.
R Objects or loads in the boot/luggage com-
partment cannot be restrained by the seat
backrest.
This poses an increased risk of injury.
Before every trip, make sure that the seat
backrests and the rear bench seat/rear seat
are engaged before every trip.
! When folding the rear seat backrest for-
wards, ensure that there are no items lying
on the seat cushions. These items could
otherwise be damaged or could themselves damage the rear seats. Stowage areas
393Stowing and features Z
Page 424 of 497
To avoid damage to the vehicle, deactivate
DISTRONIC PLUS and the HOLD function in
the following or similar situations:
R when towing away
R in a car wash
! Make sure:
R the side windows and sliding sunroof are
closed completely.
R the blower for the ventilation/heating is
switched off (OFF button is depressed).
R the windscreen wiper switch is at posi-
tion 0
R the 360° camera or reversing camera is
switched off.
The vehicle could otherwise be damaged.
! If the key is within the rear detection
range of KEYLESS-GO, situations such as
the following could lead to the uninten-
tional opening of the boot lid/tailgate:
R using a car wash
R using a high-pressure cleaner
Make sure that the key is at least 3 maway
from the vehicle.
! If the key is within the rear detection
range of KEYLESS-GO, the following situa-
tions, for example, could lead to the unin-
tentional opening of the tailgate:
R using a car wash
R using a high-pressure cleaner
Make sure that the key is at least 3 maway
from the vehicle.
! Make sure that the automatic transmis-
sion is in neutral position Nwhen washing
your vehicle in a tow-through car wash. The
vehicle may otherwise be damaged.
R Operating with the key:
Do not remove the key from the ignition
lock. Do not open the driver's door when
the engine is switched off or at very low
speeds. Otherwise, when in transmission position Dor Rthe automatic transmis- sion will automatically switch to park
position
Pand block the wheels.
R Operating with the Start/Stop button:
Do not open the driver's door when the
engine is switched off or at very low
speeds. Otherwise, when in transmission
position Dor Rthe automatic transmis-
sion will automatically switch to park
position Pand block the wheels.
Observe the following to make sure that the
automatic transmission stays in neutral posi-
tion N:
Operating with the key: X Make sure the ignition is switched on.
X Make sure that the vehicle is stationary.
X Depress the brake pedal and keep it
depressed.
X Select neutral N.
X Release the brake pedal.
X Release the electric parking brake, if nec-
essary.
X Switch off the ignition and leave the key in
the ignition lock.
Operating with the Start/Stop button:
X Make sure the ignition is switched on.
X Make sure that the vehicle is stationary.
X Depress the brake pedal and keep it
depressed.
X Engage park position P.
X Release the brake pedal.
X Remove the Start/Stop button from the
ignition lock (Y page 187).
X Insert the key into the ignition lock.
X Switch on the ignition.
X Depress the brake pedal and keep it
depressed.
X Select neutral N.
X Release the brake pedal.
X Release the electric parking brake, if nec-
essary.
X Switch off the ignition and leave the key in
the ignition lock. Care
421Maintenance and care Z
Page 425 of 497
You can wash the vehicle in an automatic car
wash from the very start.
Wash off excess dirt before cleaning the vehi- cle in an automatic car wash.
After using an automatic car wash, wipe off
wax from the windscreen and the wiper
blades. This will prevent smears and reduce
wiping noises caused by residue on the wind-
screen.
Washing by hand In some countries, washing by hand is only
allowed at specially equipped washing bays.
Observe the legal requirements for each indi- vidual country.
X Do not use hot water and do not wash the
vehicle in direct sunlight.
X Use a soft sponge to clean.
X Use a mild cleaning agent, such as a car
shampoo approved by Mercedes-Benz.
X Thoroughly hose down the vehicle with a
gentle jet of water.
X Do not point the water jet directly towards
the air inlet.
X Use plenty of water and rinse out the
sponge frequently.
X Rinse the vehicle with clean water and dry
thoroughly with a chamois.
X Do not let the cleaning agent dry on the
paintwork.
When using the vehicle in winter, remove all
traces of road salt deposits carefully and as
soon as possible.
High-pressure cleaning equipment G
WARNING
The water jet of circular-jet nozzles (dirt grind- ers) can cause damage not visible from the
outside to tyres or chassis components. Com-
ponents damaged in this way can unexpect-
edly fail. There is a risk of an accident.
Do not use high-pressure cleaners with circu-
lar-jet nozzles to clean the vehicle. Have dam- aged tyres or chassis components replaced
immediately.
! Always maintain a distance of at least
30 cm between the vehicle and the high-
pressure cleaner nozzle. Information about the correct distance is available from the
equipment manufacturer.
Move the high-pressure cleaner nozzle
around when cleaning your vehicle.
Do not aim directly at any of the following:
R tyres
R door gaps, roof gaps, joints etc.
R electrical components
R battery
R connectors
R lights
R seals
R trim elements
R ventilation slots
Damaged seals or electrical components
can lead to leaks or failures.
! If the key is within the rear detection
range of KEYLESS-GO, situations such as
the following could lead to the uninten-
tional opening of the boot lid/tailgate:
R using a car wash
R using a high-pressure cleaner
Make sure that the key is at least 3 maway
from the vehicle.
! If the key is within the rear detection
range of KEYLESS-GO, the following situa-
tions, for example, could lead to the unin-
tentional opening of the tailgate:
R using a car wash
R using a high-pressure cleaner
Make sure that the key is at least 3 maway
from the vehicle.
! Edition 1 special model: parts of your
vehicle are covered with a decorative foil.
Maintain a distance of at least 70 cm
between the foil-wrapped parts of the vehi- 422
CareMaintenance and care