fuel reserve MERCEDES-BENZ GLC SUV 2015 Owners Manual
[x] Cancel search | Manufacturer: MERCEDES-BENZ, Model Year: 2015, Model line: GLC SUV, Model: MERCEDES-BENZ GLC SUV 2015Pages: 497, PDF Size: 15.27 MB
Page 15 of 497
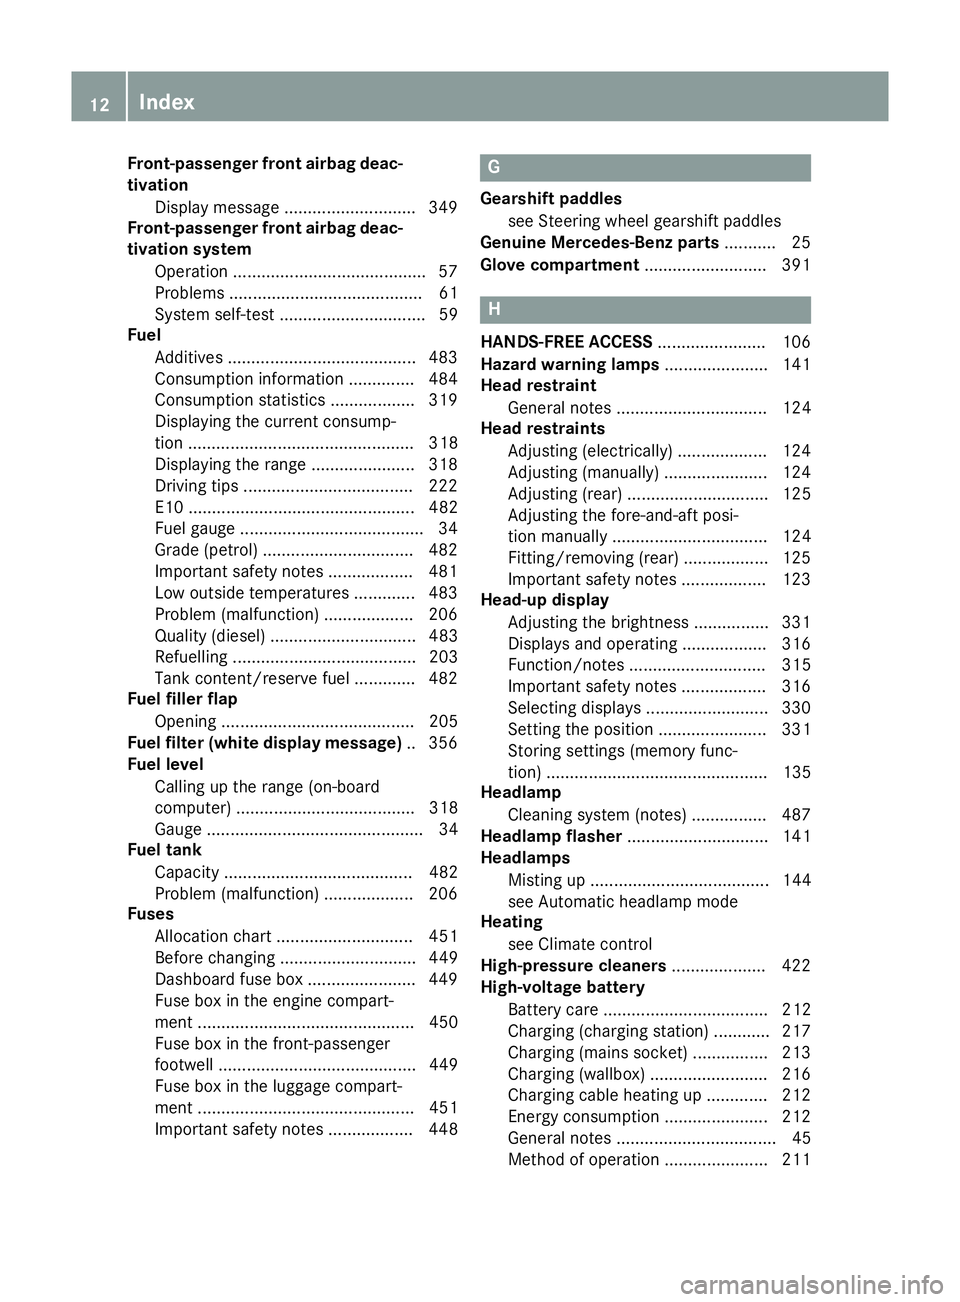
Front-passenger front airbag deac-
tivation
Display message ............................ 349
Front-passenger front airbag deac-
tivation system
Operation ........................................ .57
Problems ......................................... 61
System self-test ...............................59
Fuel
Additives ........................................ 483
Consumption information .............. 484
Consumption statistics .................. 319
Displaying the current consump-
tion ................................................ 318
Displaying the range ...................... 318
Driving tips .................................... 222
E10 ................................................ 482
Fuel gauge ...................................... .34
Grade (petrol) ................................ 482
Important safety notes .................. 481
Low outside temperatures ............ .483
Problem (malfunction) ................... 206
Quality (diesel )............................... 483
Refuelling ....................................... 203
Tank content/reserve fue l............. 482
Fuel filler flap
Opening ......................................... 205
Fuel filter (white display message) .. 356
Fuel level
Calling up the range (on-board
computer) ...................................... 318
Gaug e.............................................. 34
Fuel tank
Capacity ........................................ 482
Problem (malfunction) ................... 206
Fuses
Allocation chart ............................. 451
Before changing ............................. 449
Dashboard fuse box ....................... 449
Fuse box in the engine compart-
ment .............................................. 450
Fuse box in the front-passenger
footwell .......................................... 449
Fuse box in the luggage compart-
ment .............................................. 451
Important safety notes .................. 448 G
Gearshift paddles see Steering wheel gearshift paddles
Genuine Mercedes-Benz parts ........... 25
Glove compartment .......................... 391 H
HANDS-FREE ACCESS ....................... 106
Hazard warning lamps ...................... 141
Head restraint
General notes ................................ 124
Head restraints
Adjusting (electrically) ................... 124
Adjusting (manually) ...................... 124
Adjusting (rear) .............................. 125
Adjusting the fore-and-aft posi-
tion manually ................................. 124
Fitting/removing (rear) .................. 125
Important safety notes .................. 123
Head-up display
Adjusting the brightness ................ 331
Displays and operating .................. 316
Function/note s............................. 315
Important safety notes .................. 316
Selecting displays .......................... 330
Setting the position ....................... 331
Storing settings (memory func-
tion) ............................................... 135
Headlamp
Cleaning system (notes) ................ 487
Headlamp flasher .............................. 141
Headlamps
Misting up ...................................... 144
see Automatic headlamp mode
Heating
see Climate control
High-pressure cleaners .................... 422
High-voltage battery
Battery car e................................... 212
Charging (charging station) ............ 217
Charging (mains socket) ................ 213
Charging (wallbox) ......................... 216
Charging cable heating up ............. 212
Energy consumption ...................... 212
General notes .................................. 45
Method of operation ...................... 211 12
Index
Page 21 of 497
PRE-SAFE
®
Brake
Activating/deactivating ................. 328
Display message ............................3 44
Function/notes ................................ 87
Important safety notes .................... 88
Warning lamp ................................. 386
PRE-SAFE ®
PLUS (anticipatory
occupant protection PLUS)
Operation ......................................... 64
Protection against theft
ATA (Anti-Theft Alarm system) ......... 90
Immobiliser ...................................... 90
Interior motion sensor ..................... 91
Tow-away protectio n ........................91
Protection of the environment
General notes .................................. 25
Pulling away
Automatic transmission ................. 190
General notes ................................ 190
Hill start assist ............................... 191
Trailer ............................................ 191 Q
QR code Mercedes-Benz Guide App ................. 1
Rescue card ..................................... 29
Qualified specialist workshop ........... 28R
Radiator cover ................................... 416
Radio
Selecting a station ......................... 322
Radio-based vehicle components
Declaration of conformity ................ 27
Rain closing feature
Panorama sliding sunroo f.............. 115
RBS (Recuperative Brake System)
Warning lamp ................................. 377
Reading lamp ..................................... 145
Rear compartment
Setting the air vents ...................... 184
Setting the airflow ......................... 167
Setting the temperature ................ 165
Rear foglamp
Display message ............................ 352
Switching on/of f........................... 139 Rear lamps
see Lights
Rear seat
Adjusting the angle of the backr-
ests ................................................ 396
Display message ............................ 372
Rear window heating
Problem (fault) ............................... 170
Switching on/of f........................... 169
Rear window wiper
Replacing the wiper blad e.............. 153
Switching on/of f........................... 151
Rear-compartment seat belt sta-
tus indicator ........................................ 52
Rear-view mirror
Anti-dazzle mode (automatic) ........ 133
Dipping (manual) ........................... 131
Recuperative Brake System
Driving safety systems ..................... 46
Important safety notes .................... 46
Reflective safety vest ....................... 430
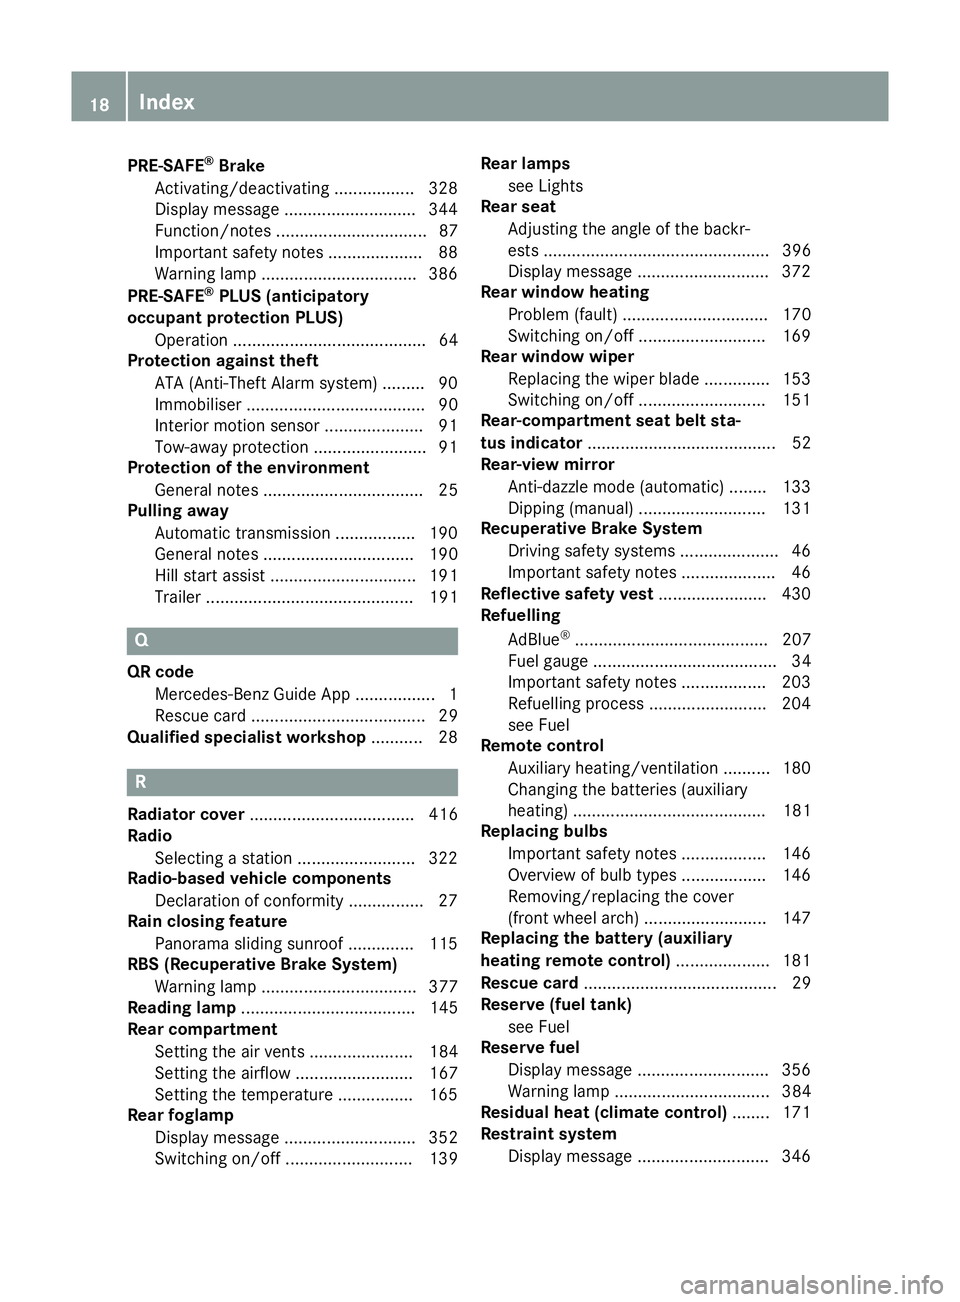
Refuelling
AdBlue ®
......................................... 207
Fuel gauge ....................................... 34
Important safety notes .................. 203
Refuelling process ......................... 204
see Fuel
Remote control
Auxiliary heating/ventilation .......... 180
Changing the batteries (auxiliary
heating) ......................................... 181
Replacing bulbs
Important safety notes .................. 146
Overview of bulb types .................. 146
Removing/replacing the cover
(front wheel arch) .......................... 147
Replacing the battery (auxiliary
heating remote control) .................... 181
Rescue card ......................................... 29
Reserve (fuel tank)
see Fuel
Reserve fuel
Display message ............................ 356
Warning lamp ................................. 384
Residual heat (climate control) ........ 171
Restraint system
Display message ............................ 346 18
Index
Page 26 of 497
Snow chains .................................. 457
Storing ........................................... 464
Summer tyres in winter ................. 456
Tyre size (data ).............................. 468
Tyre tread ...................................... 455
Wheel and tyre combinations ........ 470
see Flat tyre U
Unlocking Emergency unlocking ..................... 102
From inside the vehicle (central
unlocking button) ........................... 101 V
Vanity mirror (in sun visor) .............. 404
Variable SPEEDTRONIC
see SPEEDTRONIC
Vehicle
Correct use ...................................... 28
Data acquisition ............................... 29
Display message ............................ 369
Electronics ..................................... 478
Equipment ....................................... 26
Implied warranty .............................. 28
Individual settings .......................... 327
Leaving parked up ......................... 222
Locking (in an emergency) ............. 103
Locking (key) ................................... 95
Lowering ........................................ 467
Operating safety .............................. 26
Parking .......................................... 219
Pulling away ................................... 190
Raising ........................................... 465
Registration ..................................... 28
Securing from rolling away ............ 465
Towing away .................................. 445
Transporting .................................. 448
Unlocking (in an emergency) ......... 102
Unlocking (key) ................................ 95
Vehicle data ................................... 488
Vehicle data
Boot load (maximum) ..................... 488
Roof load (maximum) ..................... 488
Vehicle data (off-road driving)
Approach/departure angle ............ 489 Maximum gradient climbing abil-
ity .................................................. 489
Maximum water depth ................... 489
Vehicle dimensions ........................... 488
Vehicle emergency locking .............. 103
Vehicle identification number
see VIN
Vehicle identification plate .............. 480
Vehicle level
AIR BODY CONTROL ...................... 252
Display message ............................ 359
Vehicle tool kit .................................. 432
Video
Operating the DVD ......................... 323
VIN
Seat ............................................... 480
Type plate ...................................... 480 W
Warning and indicator lamps ABS ................................................ 379
Brakes ........................................... 377
Distance warning signal ................. 386
ESP ®
.............................................. 381
ESP ®
OFF ....................................... 383
Fuel tank ........................................ 384
General notes ................................ 375
Hybrid drive system ....................... 377
LIM (cruise control )........................ 231
LIM (DISTRONIC PLUS) .................. 237
LIM (variable SPEEDTRONIC) ......... 234
Overview .......................................... 36
Parking brake ................................ 383
PASSENGER AIR BAG ...................... 48
RBS (Recuperative Brake Sys-
tem) ............................................... 377
Reserve fuel ................................... 384
Seat belt ........................................ 376
Steering ......................................... 388
Tyre pressure monitor ................... 387
Warning triangle ................................ 431
Warnings
Stickers ........................................... 44
Washer fluid
Display message ............................ 374
Wheel and tyre combinations
Tyres .............................................. 470 Index
23
Page 39 of 497
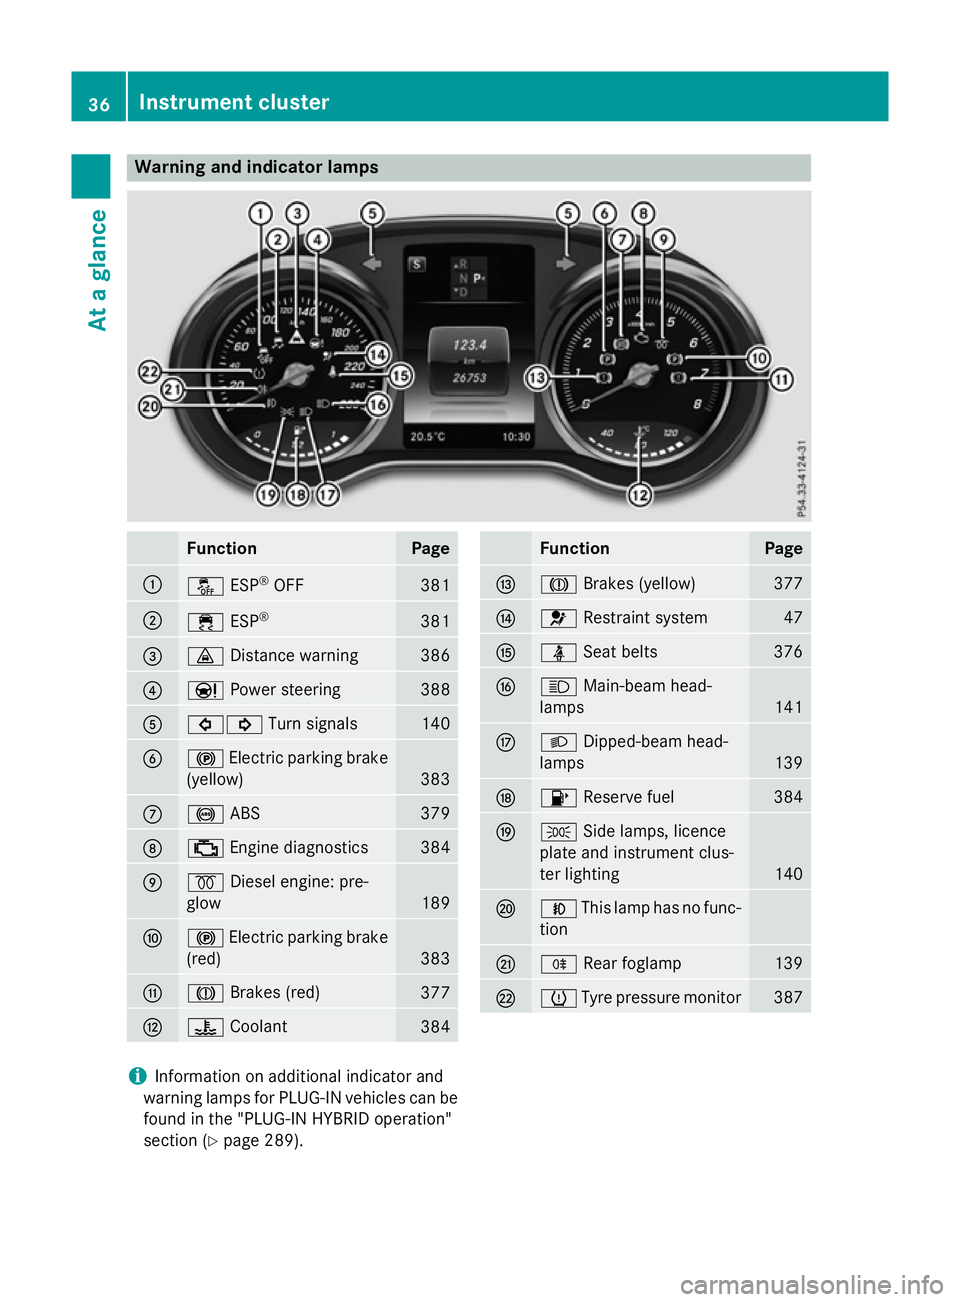
Warning and indicator lamps
Function Page
:
å
ESP®
OFF 381
;
÷
ESP® 381
=
·
Distance warning 386
?
Ð
Power steering 388
A
#!
Turn signals 140
B
!
Electric parking brake
(yellow) 383
C
!
ABS 379
D
;
Engine diagnostics 384
E
%
Diesel engine: pre-
glow 189
F
!
Electric parking brake
(red) 383
G
J
Brakes (red) 377
H
?
Coolant 384 Function Page
I
J
Brakes (yellow) 377
J
6
Restraint system 47
K
ü
Seat belts 376
L
K
Main-beam head-
lamps 141
M
L
Dipped-beam head-
lamps 139
N
8
Reserve fuel 384
O
T
Side lamps, licence
plate and instrument clus-
ter lighting 140
P
N
This lamp has no func-
tion Q
R
Rear foglamp 139
R
h
Tyre pressure monitor 387
i
Information on additional indicator and
warning lamps for PLUG-IN vehicles can be
found in the "PLUG-IN HYBRID operation"
section (Y page 289). 36
Instrument clusterAt a glance
Page 181 of 497
X
To activate or deactivate "Immediate
pre-entry climate control": press rocker
switch :up or down.
The blue or red indicator lamp above the
rocker switch lights up or goes out.
The colours of the indicator lamps in rocker
switch :have the following meanings:
R blue: cooling activated
R red: heating activated
R yellow: departure time is preselected Auxiliary heating
Important safety notes G
DANGER
If the exhaust pipe is blocked or sufficient
ventilation is not possible, toxic exhaust
fumes can enter the vehicle, especially car-
bon monoxide. This is the case, e.g. in
enclosed spaces, or if the vehicle is stuck in
snow. There is a risk of fatal injuries.
You should switch off the auxiliary heating in
enclosed spaces which do not have an extrac- tion system, e.g. a garage. If the vehicle is
stuck in snow and you must leave the auxiliary
heating running, keep the exhaust pipe and
the area around the vehicle clear of snow. To guarantee a sufficient supply of fresh air, open
a window on the side of the vehicle away from the wind. G
WARNING
When the auxiliary heating is switched on,
parts of the vehicle can become very hot.
Flammable materials such as leaves, grass or twigs may ignite if they come into contact
with:
R hot parts of the exhaust system
R the exhaust gas itself
There is a risk of fire. When the auxiliary heating is switched on,
make sure that:
R no flammable materials come into contact
with hot vehicle components
R the exhaust gas can escape from the
exhaust pipe unhindered
R the exhaust gas does not come into contact
with flammable materials.
The auxiliary heating is fitted under the front
wing on the right-hand side of the vehicle. The emissions outlet is found behind the front
wheel on the right-hand side of the vehicle.
! Operating the auxiliary heating/ventila-
tion draws on the vehicle battery. After you have heated or ventilated the vehicle a
maximum of two times, drive for a longer
distance.
Switch the auxiliary heating on regularly once a month for about ten minutes.
The auxiliary heating heats the air in the vehi-
cle interior to the set temperature. This
occurs without using the heat of the running
engine. The auxiliary heating is operated
directly using the vehicle's fuel. For this rea-
son, the tank content must be at least at
reserve fuel level to ensure that the auxiliary
heating functions.
The auxiliary heating or auxiliary ventilation
automatically adjusts to changes in temper-
ature and weather conditions. For this rea-
son, the auxiliary heating could switch from
ventilation mode to heating mode or from
heating mode to ventilation mode.
The auxiliary heating switches off when the
engine is switched off. The auxiliary ventila-
tion is not active if the engine is running.
The auxiliary heating or auxiliary ventilation
switches off automatically after 50 minutes.
This time limit can be altered. To do this, visit a qualified specialist workshop.
You cannot use the auxiliary ventilation to
cool the vehicle interior to a temperature
lower than the outside temperature. 178
Operating the climate control systemClimate control
Page 186 of 497
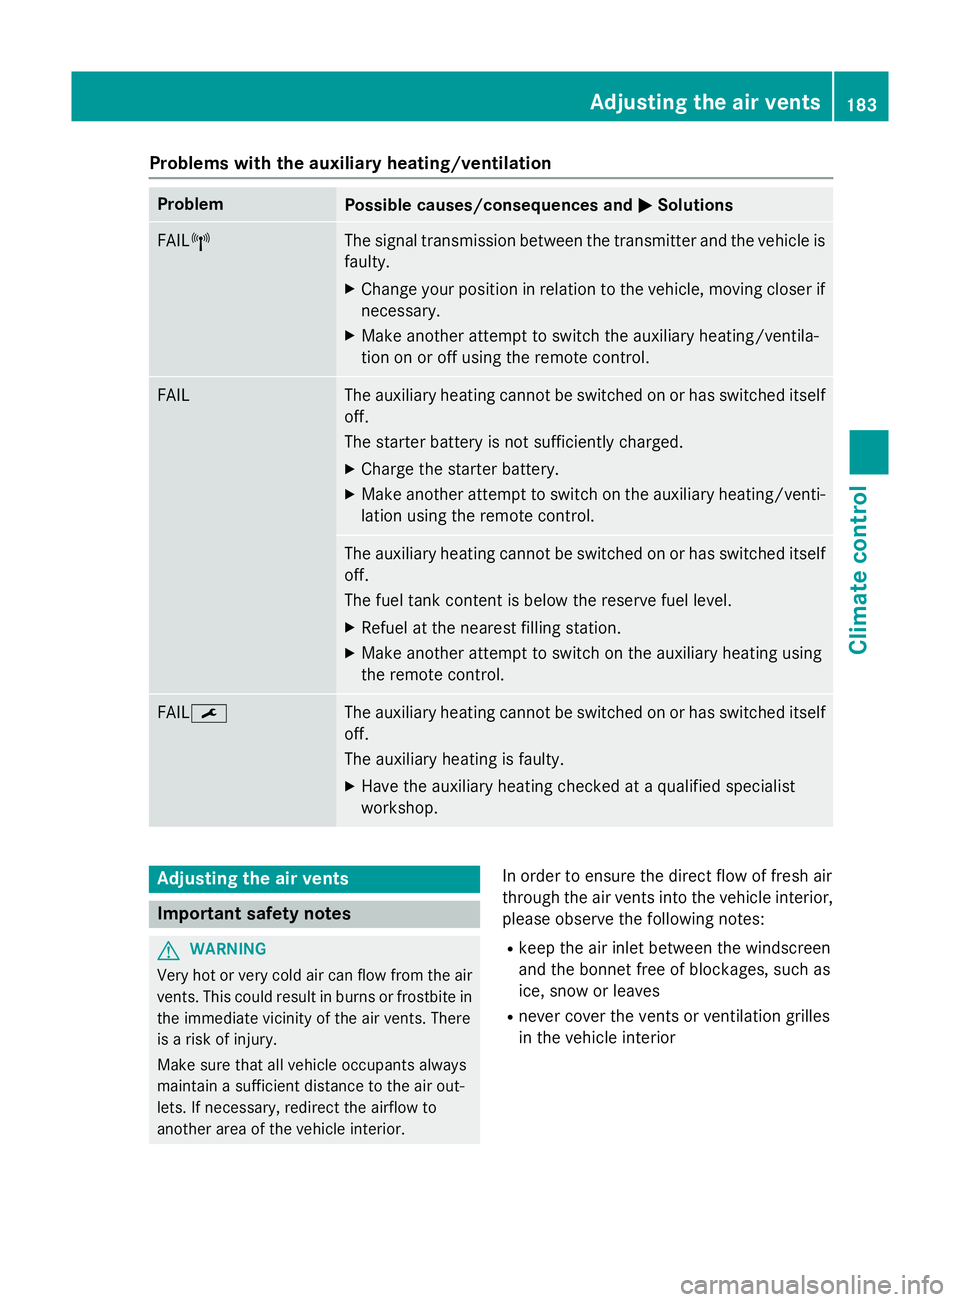
Problems with the auxiliary heating/ventilation
Problem
Possible causes/consequences and
M
MSolutions FAIL¨ The signal transmission between the transmitter and the vehicle is
faulty.
X Change your position in relation to the vehicle, moving closer if
necessary.
X Make another attempt to switch the auxiliary heating/ventila-
tion on or off using the remote control. FAIL The auxiliary heating cannot be switched on or has switched itself
off.
The starter battery is not sufficiently charged.
X Charge the starter battery.
X Make another attempt to switch on the auxiliary heating/venti-
lation using the remote control. The auxiliary heating cannot be switched on or has switched itself
off.
The fuel tank content is below the reserve fuel level.
X Refuel at the nearest filling station.
X Make another attempt to switch on the auxiliary heating using
the remote control. FAIL¯ The auxiliary heating cannot be switched on or has switched itself
off.
The auxiliary heating is faulty.
X Have the auxiliary heating checked at a qualified specialist
workshop. Adjusting the air vents
Important safety notes
G
WARNING
Very hot or very cold air can flow from the air vents. This could result in burns or frostbite in the immediate vicinity of the air vents. There
is a risk of injury.
Make sure that all vehicle occupants always
maintain a sufficient distance to the air out-
lets. If necessary, redirect the airflow to
another area of the vehicle interior. In order to ensure the direct flow of fresh air
through the air vents into the vehicle interior,
please observe the following notes:
R keep the air inlet between the windscreen
and the bonnet free of blockages, such as
ice, snow or leaves
R never cover the vents or ventilation grilles
in the vehicle interior Adjusting the air vents
183Climate control Z
Page 197 of 497
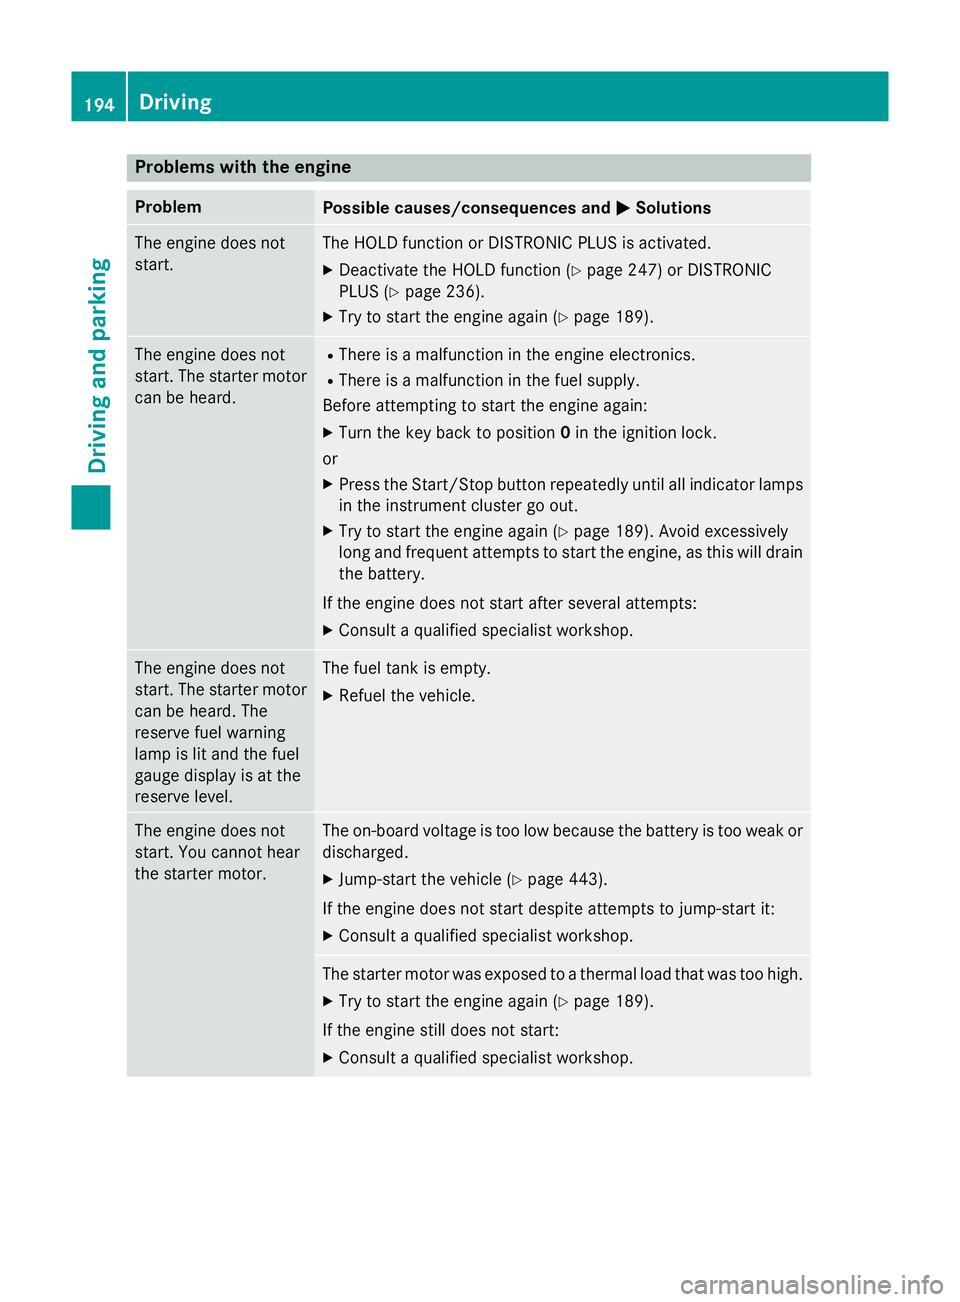
Problems with the engine
Problem
Possible causes/consequences and
M
MSolutions The engine does not
start. The HOLD function or DISTRONIC PLUS is activated.
X Deactivate the HOLD function (Y page 247) or DISTRONIC
PLUS (Y page 236).
X Try to start the engine again (Y page 189).The engine does not
start. The starter motor
can be heard. R
There is a malfunction in the engine electronics.
R There is a malfunction in the fuel supply.
Before attempting to start the engine again:
X Turn the key back to position 0in the ignition lock.
or
X Press the Start/Stop button repeatedly until all indicator lamps
in the instrument cluster go out.
X Try to start the engine again (Y page 189). Avoid excessively
long and frequent attempts to start the engine, as this will drain the battery.
If the engine does not start after several attempts: X Consult a qualified specialist workshop. The engine does not
start. The starter motor
can be heard. The
reserve fuel warning
lamp is lit and the fuel
gauge display is at the
reserve level. The fuel tank is empty.
X Refuel the vehicle. The engine does not
start. You cannot hear
the starter motor. The on-board voltage is too low because the battery is too weak or
discharged.
X Jump-start the vehicle (Y page 443).
If the engine does not start despite attempts to jump-start it:
X Consult a qualified specialist workshop. The starter motor was exposed to a thermal load that was too high.
X Try to start the engine again (Y page 189).
If the engine still does not start: X Consult a qualified specialist workshop. 194
DrivingDriving and parking
Page 226 of 497
Service Booklet or by the service interval
display.
Fuel consumption also increases when driv-
ing in cold weather, in stop-start traffic, on
short journeys and in hilly terrain. ECO display
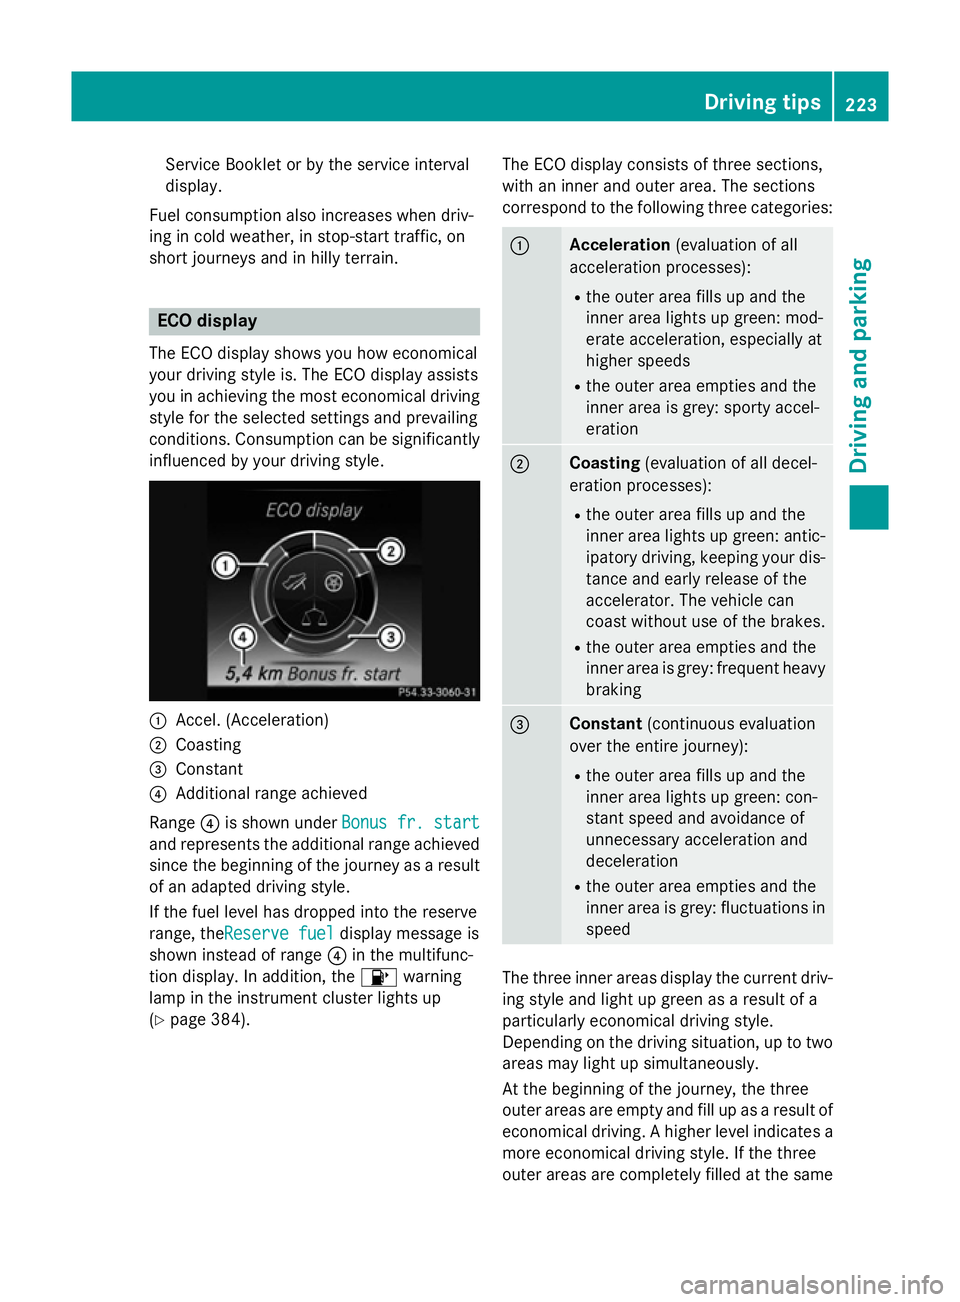
The ECO display shows you how economical
your driving style is. The ECO display assists
you in achieving the most economical driving
style for the selected settings and prevailing
conditions. Consumption can be significantly
influenced by your driving style. :
Accel. (Acceleration)
; Coasting
= Constant
? Additional range achieved
Range ?is shown under Bonus fr. start Bonus fr. start
and represents the additional range achieved since the beginning of the journey as a resultof an adapted driving style.
If the fuel level has dropped into the reserve
range, theReserve fuel Reserve fuel display message is
shown instead of range ?in the multifunc-
tion display. In addition, the 8warning
lamp in the instrument cluster lights up
(Y page 384). The ECO display consists of three sections,
with an inner and outer area. The sections
correspond to the following three categories: :
Acceleration
(evaluation of all
acceleration processes):
R the outer area fills up and the
inner area lights up green: mod-
erate acceleration, especially at
higher speeds
R the outer area empties and the
inner area is grey: sporty accel-
eration ;
Coasting
(evaluation of all decel-
eration processes):
R the outer area fills up and the
inner area lights up green: antic-
ipatory driving, keeping your dis- tance and early release of the
accelerator. The vehicle can
coast without use of the brakes.
R the outer area empties and the
inner area is grey: frequent heavy
braking =
Constant
(continuous evaluation
over the entire journey):
R the outer area fills up and the
inner area lights up green: con-
stant speed and avoidance of
unnecessary acceleration and
deceleration
R the outer area empties and the
inner area is grey: fluctuations in
speed The three inner areas display the current driv-
ing style and light up green as a result of a
particularly economical driving style.
Depending on the driving situation, up to two
areas may light up simultaneously.
At the beginning of the journey, the three
outer areas are empty and fill up as a result of economical driving. A higher level indicates a more economical driving style. If the three
outer areas are completely filled at the same Driving tips
223Driving and parking Z
Page 359 of 497
Display messages
Possible causes/consequences and
M
MSolutions 8
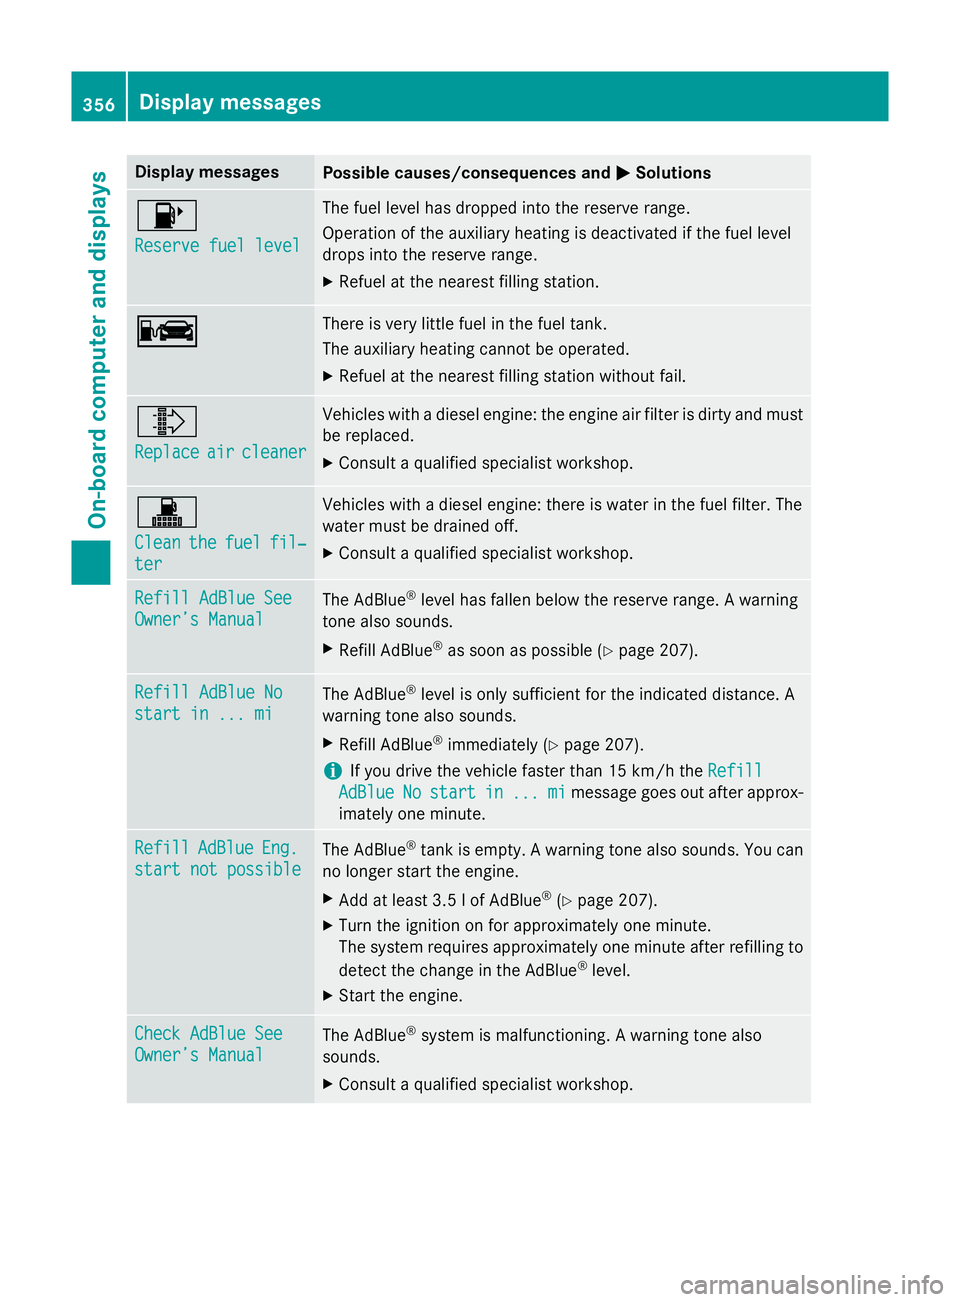
Reserve fuel level Reserve fuel level The fuel level has dropped into the reserve range.
Operation of the auxiliary heating is deactivated if the fuel level
drops into the reserve range.
X Refuel at the nearest filling station. C C There is very little fuel in the fuel tank.
The auxiliary heating cannot be operated.
X Refuel at the nearest filling station without fail. ¸
Replace Replace
air
aircleaner
cleaner Vehicles with a diesel engine: the engine air filter is dirty and must
be replaced.
X Consult a qualified specialist workshop. !
Clean Clean
the
thefuel
fuel fil‐
fil‐
ter
ter Vehicles with a diesel engine: there is water in the fuel filter. The
water must be drained off.
X Consult a qualified specialist workshop. Refill AdBlue See Refill AdBlue See
Owner’s Manual Owner’s Manual
The AdBlue
®
level has fallen below the reserve range. A warning
tone also sounds.
X Refill AdBlue ®
as soon as possible (Y page 207).Refill AdBlue No
Refill AdBlue No
start in ... mi start in ... mi
The AdBlue
®
level is only sufficient for the indicated distance. A
warning tone also sounds.
X Refill AdBlue ®
immediately (Y page 207).
i If you drive the vehicle faster than 15 km/h the
Refill
Refill
AdBlue
AdBlue No
Nostart
start in
in...
... mi
mimessage goes out after approx-
imately one minute. Refill
Refill
AdBlue
AdBlueEng.
Eng.
start not possible
start not possible The AdBlue
®
tank is empty. A warning tone also sounds. You can
no longer start the engine.
X Add at least 3.5 l of AdBlue ®
(Y page 207).
X Turn the ignition on for approximately one minute.
The system requires approximately one minute after refilling to
detect the change in the AdBlue ®
level.
X Start the engine. Check AdBlue See
Check AdBlue See
Owner’s Manual Owner’s Manual
The AdBlue
®
system is malfunctioning. A warning tone also
sounds.
X Consult a qualified specialist workshop. 356
Display
messagesOn-board computer and displays
Page 387 of 497
Engine
Warning/
indicator
lamp
N N
Signal type
Possible causes/consequences and M
MSolutions ;
N
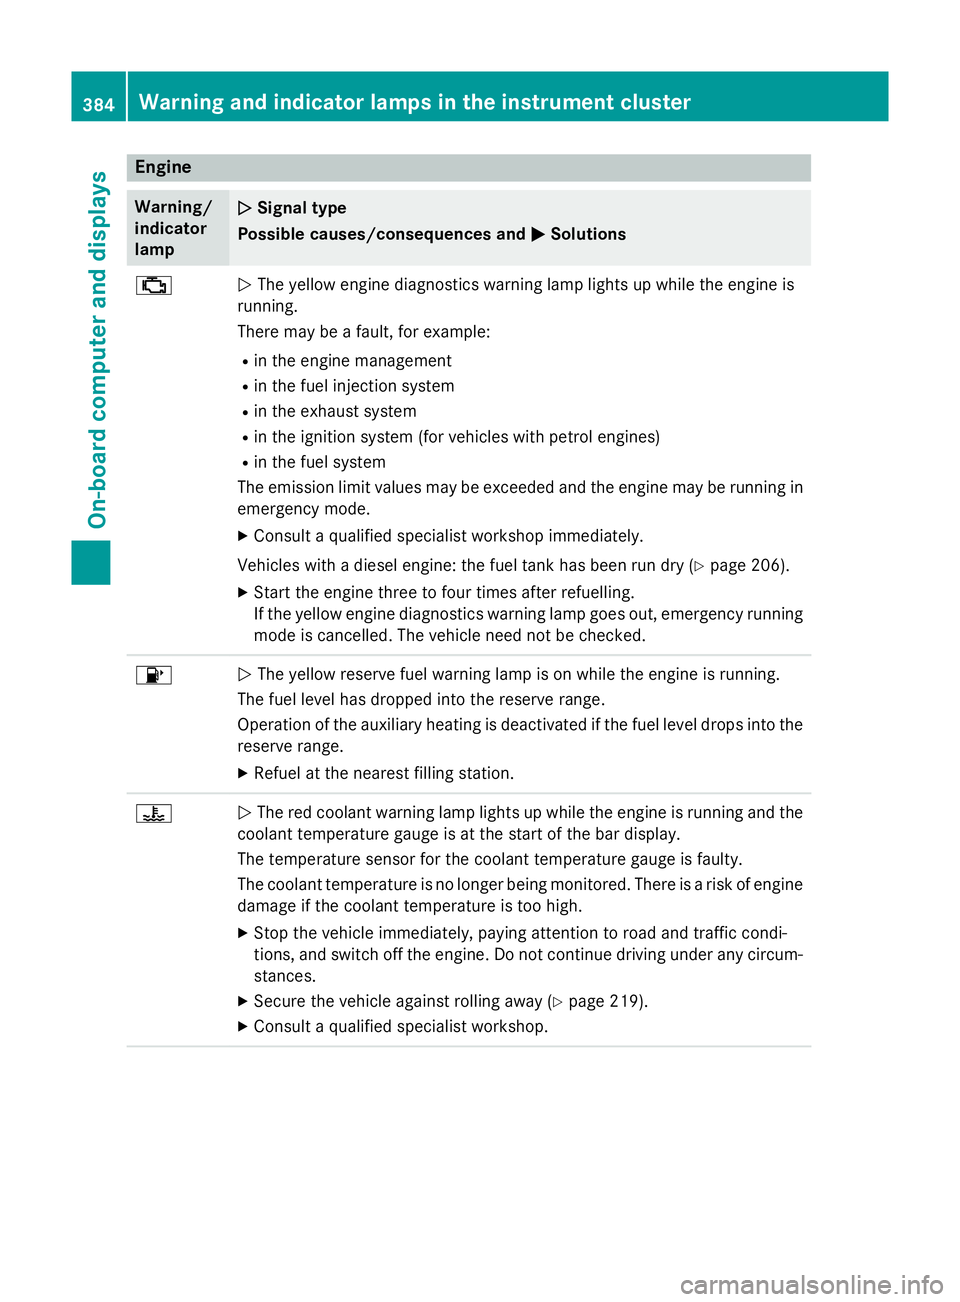
The yellow engine diagnostics warning lamp lights up while the engine is
running.
There may be a fault, for example:
R in the engine management
R in the fuel injection system
R in the exhaust system
R in the ignition system (for vehicles with petrol engines)
R in the fuel system
The emission limit values may be exceeded and the engine may be running in emergency mode.
X Consult a qualified specialist workshop immediately.
Vehicles with a diesel engine: the fuel tank has been run dry (Y page 206).
X Start the engine three to four times after refuelling.
If the yellow engine diagnostics warning lamp goes out, emergency running mode is cancelled. The vehicle need not be checked. 8
N
The yellow reserve fuel warning lamp is on while the engine is running.
The fuel level has dropped into the reserve range.
Operation of the auxiliary heating is deactivated if the fuel level drops into the reserve range.
X Refuel at the nearest filling station. ?
N
The red coolant warning lamp lights up while the engine is running and the
coolant temperature gauge is at the start of the bar display.
The temperature sensor for the coolant temperature gauge is faulty.
The coolant temperature is no longer being monitored. There is a risk of engine
damage if the coolant temperature is too high.
X Stop the vehicle immediately, paying attention to road and traffic condi-
tions, and switch off the engine. Do not continue driving under any circum- stances.
X Secure the vehicle against rolling away (Y page 219).
X Consult a qualified specialist workshop. 384
Warning and indicator lamps in the instrument clusterOn-board computer and displays