interior lights MERCEDES-BENZ GLC SUV 2015 Owners Manual
[x] Cancel search | Manufacturer: MERCEDES-BENZ, Model Year: 2015, Model line: GLC SUV, Model: MERCEDES-BENZ GLC SUV 2015Pages: 497, PDF Size: 15.27 MB
Page 17 of 497
KEYLESS-GO
Convenience closing ...................... 112
Deactivation .................................... .95
Locking ............................................ 95
Removing the Start/Stop button ... 189
Unlocking .........................................95
Kickdown
Driving tips .................................... 200
Manual gearshifting ...................... .202
Kneebag ............................................... 55 L
Lamps see Warning and indicator lamps
Lane Keeping Assist
Activating/deactivating ................. 280
Activating/deactivating (on-
board computer) ............................ 329
Display message ............................ 361
Function/informatio n.................... 279
see Active Lane Keeping Assist
Lane package ..................................... 276
Lashing eyelets ................................. 396
Level control (display message) ...... 361
Licence plate lamp (display mes-
sage) ................................................... 351
Light sensor (display message) ....... 352
Lights
Activating/deactivating the Intel-
ligent Light System ........................ 331
Active light function ....................... 142
Adaptive Highbeam Assist PLUS .... 143
Automatic headlamp mode ............ 139
Cornering light function ................. 142
Dipped-beam headlamp s............... 139
Driving abroad ............................... 138
Foglamps (extended range) ........... 143
General notes ................................ 138
Hazard warning lamps ................... 141
Headlamp flashe r........................... 141
Headlamp range ............................ 140
Intelligent Light System (func-
tion) ............................................... 141
Light switch ................................... 138
Main-beam headlamp s................... 141
Misted up headlamp s.................... 144
Motorway mode ............................. 142 Off-road lights ................................ 143
Parking lamps ................................ 140
Rear foglamp ................................. 139
Setting exterior lighting ................. 138
Side lamps ..................................... 140
Turn signals ................................... 140
see Interior lighting
LIM indicator lamp
Cruise control ................................ 231
DISTRONIC PLUS ........................... 237
Variable SPEEDTRONIC ................. 234
Limiting the speed
see SPEEDTRONIC
Loading guidelines ............................ 390
Locking
see Central locking
Locking (doors)
Automatic ...................................... 102
Emergency locking ........................ 103
From inside (central locking but-
ton) ................................................ 101
Locking centrally
see Central locking
Luggage compartment
Opening/closing (from outside,
HANDS-FREE ACCESS) .................. 106
Luggage compartment cover
Important safety notes .................. 397
Notes/function .............................. 397
Luggage compartment enlarge-
ment ................................................... 393
Luggage compartment floor
Important safety notes .................. 400
opening/closing .................... 400, 401
stowage well, under ....................... 400
Lumbar support
Adjusting the 4-way lumbar sup-
port ................................................ 125 M
M+S tyres ........................................... 456
Main-beam headlamps
Adaptive Highbeam Assist PLUS .... 143
Changing bulbs .............................. 147
Display message ............................ 351
Switching on/of f........................... 141
Matt finish (cleaning instructions) .. 42314
Index
Page 21 of 497
PRE-SAFE
®
Brake
Activating/deactivating ................. 328
Display message ............................3 44
Function/notes ................................ 87
Important safety notes .................... 88
Warning lamp ................................. 386
PRE-SAFE ®
PLUS (anticipatory
occupant protection PLUS)
Operation ......................................... 64
Protection against theft
ATA (Anti-Theft Alarm system) ......... 90
Immobiliser ...................................... 90
Interior motion sensor ..................... 91
Tow-away protectio n ........................91
Protection of the environment
General notes .................................. 25
Pulling away
Automatic transmission ................. 190
General notes ................................ 190
Hill start assist ............................... 191
Trailer ............................................ 191 Q
QR code Mercedes-Benz Guide App ................. 1
Rescue card ..................................... 29
Qualified specialist workshop ........... 28R
Radiator cover ................................... 416
Radio
Selecting a station ......................... 322
Radio-based vehicle components
Declaration of conformity ................ 27
Rain closing feature
Panorama sliding sunroo f.............. 115
RBS (Recuperative Brake System)
Warning lamp ................................. 377
Reading lamp ..................................... 145
Rear compartment
Setting the air vents ...................... 184
Setting the airflow ......................... 167
Setting the temperature ................ 165
Rear foglamp
Display message ............................ 352
Switching on/of f........................... 139 Rear lamps
see Lights
Rear seat
Adjusting the angle of the backr-
ests ................................................ 396
Display message ............................ 372
Rear window heating
Problem (fault) ............................... 170
Switching on/of f........................... 169
Rear window wiper
Replacing the wiper blad e.............. 153
Switching on/of f........................... 151
Rear-compartment seat belt sta-
tus indicator ........................................ 52
Rear-view mirror
Anti-dazzle mode (automatic) ........ 133
Dipping (manual) ........................... 131
Recuperative Brake System
Driving safety systems ..................... 46
Important safety notes .................... 46
Reflective safety vest ....................... 430
Refuelling
AdBlue ®
......................................... 207
Fuel gauge ....................................... 34
Important safety notes .................. 203
Refuelling process ......................... 204
see Fuel
Remote control
Auxiliary heating/ventilation .......... 180
Changing the batteries (auxiliary
heating) ......................................... 181
Replacing bulbs
Important safety notes .................. 146
Overview of bulb types .................. 146
Removing/replacing the cover
(front wheel arch) .......................... 147
Replacing the battery (auxiliary
heating remote control) .................... 181
Rescue card ......................................... 29
Reserve (fuel tank)
see Fuel
Reserve fuel
Display message ............................ 356
Warning lamp ................................. 384
Residual heat (climate control) ........ 171
Restraint system
Display message ............................ 346 18
Index
Page 51 of 497
PASSENGER AIR BAG indicator lamp
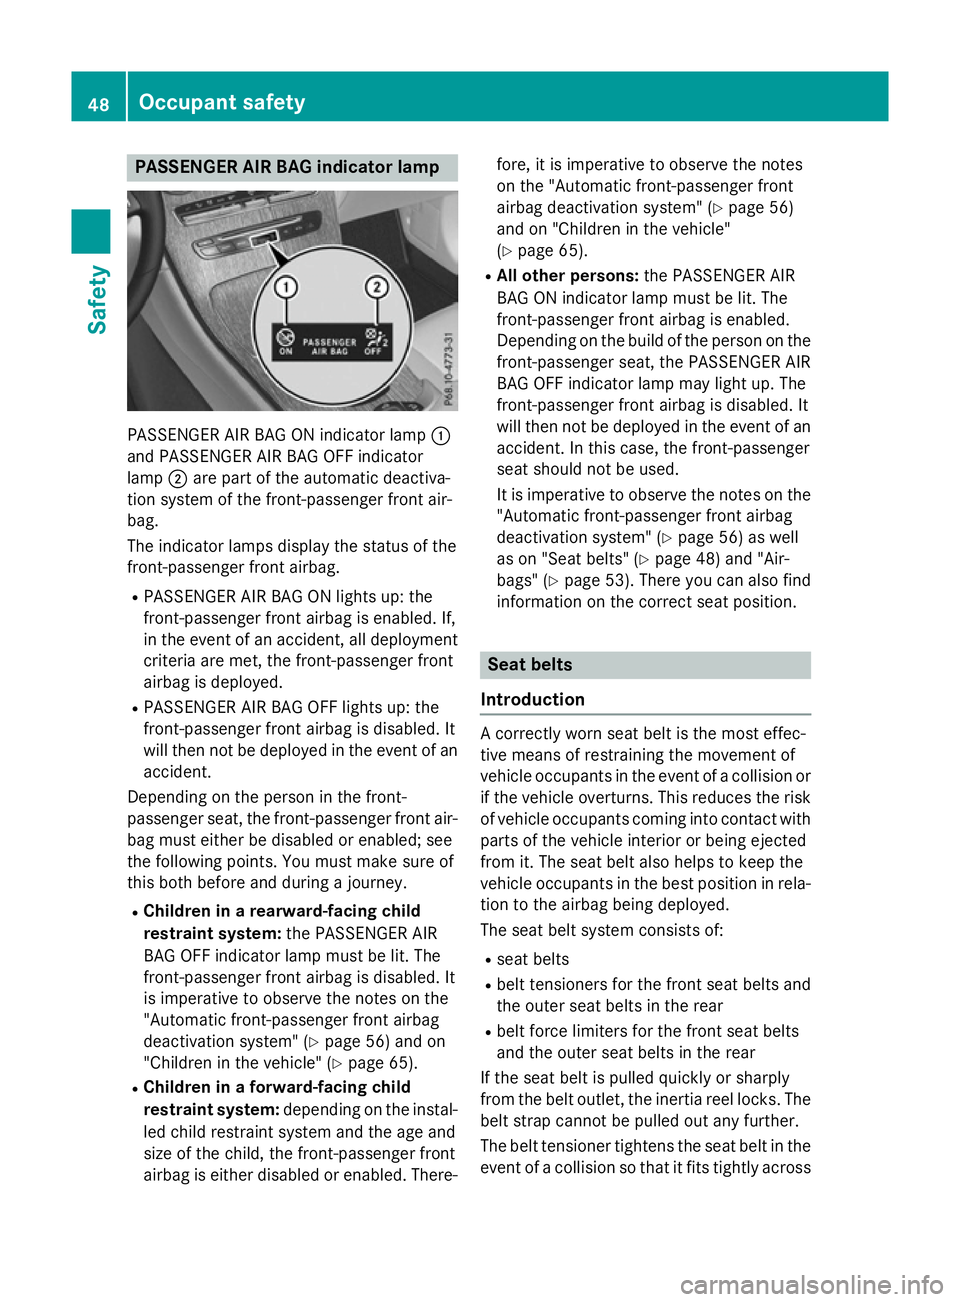
PASSENGER AIR BAG ON indicator lamp
:
and PASSENGER AIR BAG OFF indicator
lamp ;are part of the automatic deactiva-
tion system of the front-passenger front air-
bag.
The indicator lamps display the status of the
front-passenger front airbag.
R PASSENGER AIR BAG ON lights up: the
front-passenger front airbag is enabled. If,
in the event of an accident, all deployment
criteria are met, the front-passenger front
airbag is deployed.
R PASSENGER AIR BAG OFF lights up: the
front-passenger front airbag is disabled. It
will then not be deployed in the event of an
accident.
Depending on the person in the front-
passenger seat, the front-passenger front air-
bag must either be disabled or enabled; see
the following points. You must make sure of
this both before and during a journey.
R Children in a rearward-facing child
restraint system: the PASSENGER AIR
BAG OFF indicator lamp must be lit. The
front-passenger front airbag is disabled. It
is imperative to observe the notes on the
"Automatic front-passenger front airbag
deactivation system" (Y page 56) and on
"Children in the vehicle" (Y page 65).
R Children in a forward-facing child
restraint system: depending on the instal-
led child restraint system and the age and
size of the child, the front-passenger front
airbag is either disabled or enabled. There- fore, it is imperative to observe the notes
on the "Automatic front-passenger front
airbag deactivation system" (Y
page 56)
and on "Children in the vehicle"
(Y page 65).
R All other persons: the PASSENGER AIR
BAG ON indicator lamp must be lit. The
front-passenger front airbag is enabled.
Depending on the build of the person on the front-passenger seat, the PASSENGER AIR
BAG OFF indicator lamp may light up. The
front-passenger front airbag is disabled. It
will then not be deployed in the event of an
accident. In this case, the front-passenger
seat should not be used.
It is imperative to observe the notes on the "Automatic front-passenger front airbag
deactivation system" (Y page 56) as well
as on "Seat belts" (Y page 48) and "Air-
bags" (Y page 53). There you can also find
information on the correct seat position. Seat belts
Introduction A correctly worn seat belt is the most effec-
tive means of restraining the movement of
vehicle occupants in the event of a collision or
if the vehicle overturns. This reduces the risk of vehicle occupants coming into contact with
parts of the vehicle interior or being ejected
from it. The seat belt also helps to keep the
vehicle occupants in the best position in rela-
tion to the airbag being deployed.
The seat belt system consists of:
R seat belts
R belt tensioners for the front seat belts and
the outer seat belts in the rear
R belt force limiters for the front seat belts
and the outer seat belts in the rear
If the seat belt is pulled quickly or sharply
from the belt outlet, the inertia reel locks. The
belt strap cannot be pulled out any further.
The belt tensioner tightens the seat belt in the event of a collision so that it fits tightly across 48
Occupant safetySafety
Page 60 of 497
Operation of automatic front-passenger
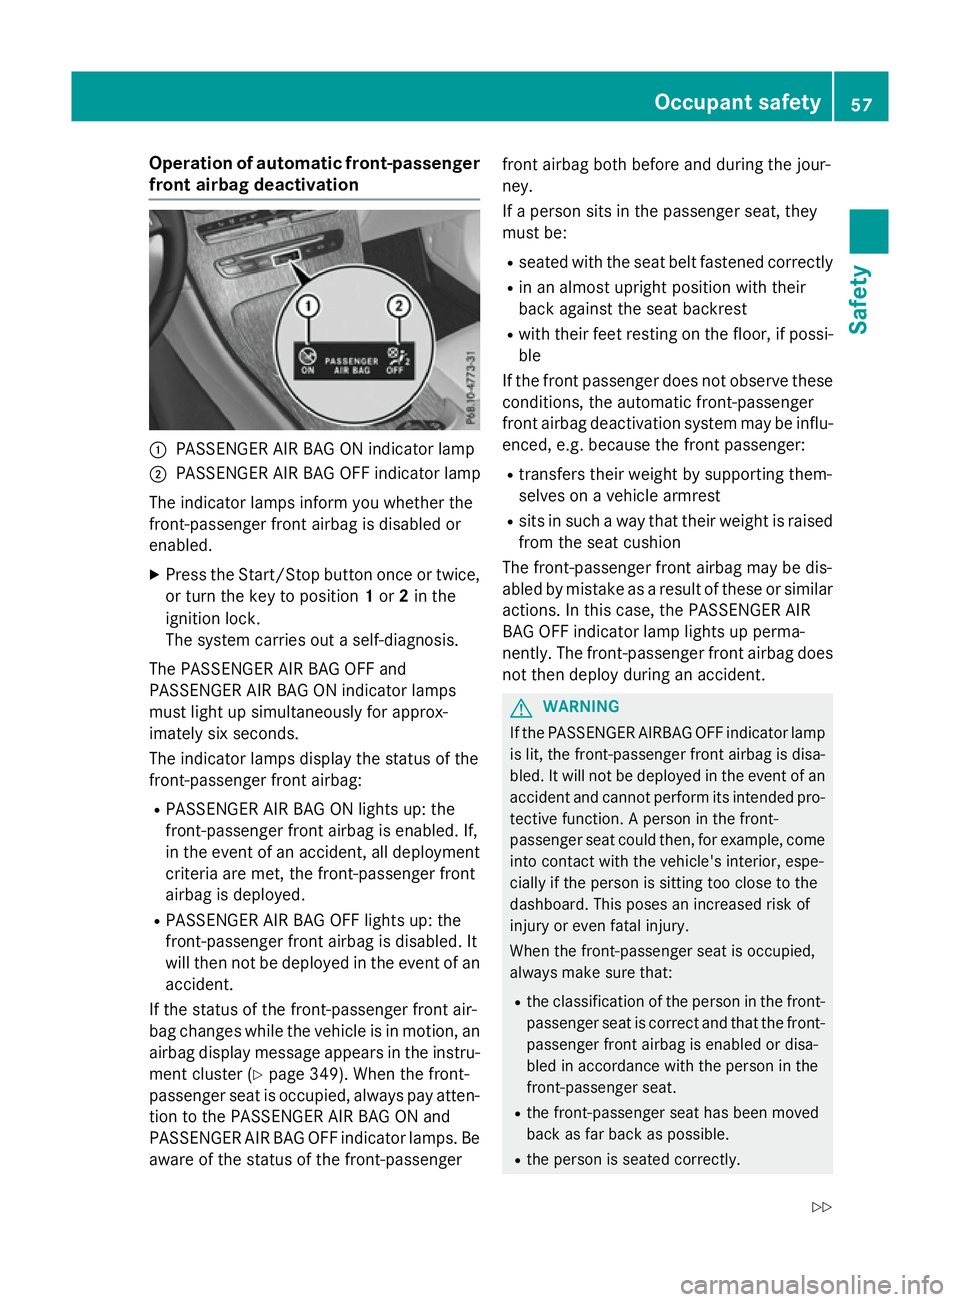
front airbag deactivation :
PASSENGER AIR BAG ON indicator lamp
; PASSENGER AIR BAG OFF indicator lamp
The indicator lamps inform you whether the
front-passenger front airbag is disabled or
enabled.
X Press the Start/Stop button once or twice,
or turn the key to position 1or 2in the
ignition lock.
The system carries out a self-diagnosis.
The PASSENGER AIR BAG OFF and
PASSENGER AIR BAG ON indicator lamps
must light up simultaneously for approx-
imately six seconds.
The indicator lamps display the status of the
front-passenger front airbag: R PASSENGER AIR BAG ON lights up: the
front-passenger front airbag is enabled. If,
in the event of an accident, all deployment
criteria are met, the front-passenger front
airbag is deployed.
R PASSENGER AIR BAG OFF lights up: the
front-passenger front airbag is disabled. It
will then not be deployed in the event of an
accident.
If the status of the front-passenger front air-
bag changes while the vehicle is in motion, an
airbag display message appears in the instru-
ment cluster (Y page 349). When the front-
passenger seat is occupied, always pay atten-
tion to the PASSENGER AIR BAG ON and
PASSENGER AIR BAG OFF indicator lamps. Be aware of the status of the front-passenger front airbag both before and during the jour-
ney.
If a person sits in the passenger seat, they
must be:
R seated with the seat belt fastened correctly
R in an almost upright position with their
back against the seat backrest
R with their feet resting on the floor, if possi-
ble
If the front passenger does not observe these
conditions, the automatic front-passenger
front airbag deactivation system may be influ-
enced, e.g. because the front passenger:
R transfers their weight by supporting them-
selves on a vehicle armrest
R sits in such a way that their weight is raised
from the seat cushion
The front-passenger front airbag may be dis-
abled by mistake as a result of these or similar actions. In this case, the PASSENGER AIR
BAG OFF indicator lamp lights up perma-
nently. The front-passenger front airbag doesnot then deploy during an accident. G
WARNING
If the PASSENGER AIRBAG OFF indicator lamp is lit, the front-passenger front airbag is disa-
bled. It will not be deployed in the event of an
accident and cannot perform its intended pro-
tective function. A person in the front-
passenger seat could then, for example, come
into contact with the vehicle's interior, espe-
cially if the person is sitting too close to the
dashboard. This poses an increased risk of
injury or even fatal injury.
When the front-passenger seat is occupied,
always make sure that:
R the classification of the person in the front-
passenger seat is correct and that the front-
passenger front airbag is enabled or disa-
bled in accordance with the person in the
front-passenger seat.
R the front-passenger seat has been moved
back as far back as possible.
R the person is seated correctly. Occupant safety
57Safety
Z
Page 62 of 497
fit the child restraint system to a suitable
rear seat.
R the front-passenger seat is occupied by a
person with a smaller build (e.g. a teenager
or small adult), either the PASSENGER AIR
BAG ON or PASSENGER AIR BAG OFF indi-
cator lamp lights up and remains lit after
the system self-test depending on the
result of the classification.
- if the PASSENGER AIR BAG ON indicator
lamp lights up, move the front-passenger
seat as far back as possible. Alterna-
tively, a person with a small build can sit on a rear seat.
- if the PASSENGER AIR BAG OFF indicator
lamp is lit, a person with a smaller build
should not use the front-passenger seat.
R the front-passenger seat is occupied by an
adult or a person with a build correspond-
ing to that of an adult, the PASSENGER AIR
BAG ON indicator lamp lights up after the
system self-test and remains lit. This indi-
cates that the front-passenger front airbag
is enabled.
If children are travelling in the vehicle, be sure
to observe the notes on "Children in the vehi- cle" (Y page 65).
If the automatic front-passenger front airbag
deactivation system is malfunctioning, the
red 6 restraint system warning lamp in
the instrument cluster and the PASSENGER
AIR BAG OFF indicator lamp light up simulta-
neously. The front-passenger front airbag is
disabled in this case and does not deploy dur- ing an accident. Have the system checked as
soon as possible by qualified technicians.
Consult a Mercedes-Benz Service Centre. The
front-passenger seat should only be repaired at a Mercedes-Benz Service Centre.
If the front-passenger seat, the seat cover orthe seat cushion is damaged, have the nec-
essary repair work carried out at a Mercedes- Benz Service Centre.
For safety reasons, Mercedes-Benz recom-
mends that you only use a child restraint sys-
tem which has been tested and approved by Mercedes-Benz in combination with the auto-
matic front-passenger front airbag deactiva-
tion system.
System self-test G
DANGER
If both the PASSENGER AIR BAG OFF and
PASSENGER AIR BAG ON indicator lamps do
not light up during the system self-test, the
system is malfunctioning. The front-
passenger front airbag might be triggered
unintentionally or might not be triggered at all in the event of an accident with high deceler-
ation. This poses an increased risk of injury or even fatal injury.
In this case the front-passenger seat may notbe used. Do not install a child restraint system
on the front-passenger seat. Have the auto-
matic front-passenger front airbag deactiva-
tion system checked and repaired immedi-
ately at a qualified specialist workshop. G
WARNING
If the PASSENGER AIRBAG OFF indicator lamp remains lit after the system self-test, the
front-passenger front airbag is disabled. It willnot be deployed in the event of an accident. In
this case, the front-passenger front airbag
cannot perform its intended protective func-
tion, e.g. when a person is seated in the front- passenger seat.
That person could, for example, come into
contact with the vehicle's interior, especially
if the person is sitting too close to the dash-
board. This poses an increased risk of injury or even fatal injury.
When the front-passenger seat is occupied,
always ensure that:
R the classification of the person in the front-
passenger seat is correct and the front-
passenger front airbag is enabled or disa- Occupant safety
59Safety
Z
Page 140 of 497
Useful information
............................138
Exterior lighting ................................ 138
Interior lighting ................................. 145
Replacing bulbs ................................. 146
Windscreen wipers ...........................150 137Lights and windscreen wipers
Page 148 of 497
Interior lighting
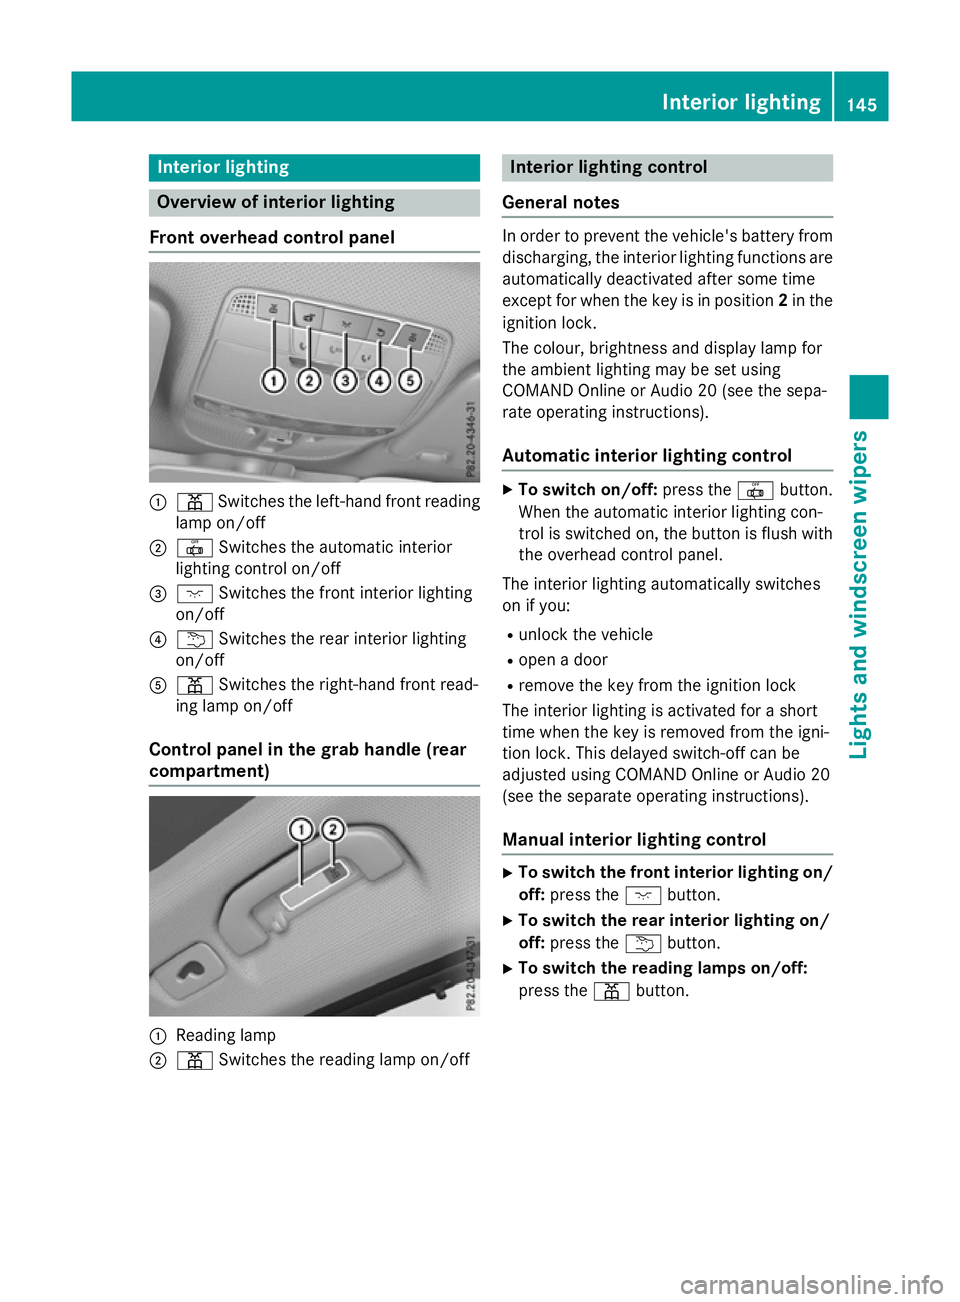
Overview of interior lighting
Front overhead control panel :
p Switches the left-hand front reading
lamp on/off
; | Switches the automatic interior
lighting control on/off
= c Switches the front interior lighting
on/off
? u Switches the rear interior lighting
on/off
A p Switches the right-hand front read-
ing lamp on/off
Control panel in the grab handle (rear
compartment) :
Reading lamp
; p Switches the reading lamp on/off Interior lighting control
General notes In order to prevent the vehicle's battery from
discharging, the interior lighting functions are
automatically deactivated after some time
except for when the key is in position 2in the
ignition lock.
The colour, brightness and display lamp for
the ambient lighting may be set using
COMAND Online or Audio 20 (see the sepa-
rate operating instructions).
Automatic interior lighting control X
To switch on/off: press the|button.
When the automatic interior lighting con-
trol is switched on, the button is flush with the overhead control panel.
The interior lighting automatically switches
on if you:
R unlock the vehicle
R open a door
R remove the key from the ignition lock
The interior lighting is activated for a short
time when the key is removed from the igni-
tion lock. This delayed switch-off can be
adjusted using COMAND Online or Audio 20
(see the separate operating instructions).
Manual interior lighting control X
To switch the front interior lighting on/
off: press the cbutton.
X To switch the rear interior lighting on/
off: press the ubutton.
X To switch the reading lamps on/off:
press the pbutton. Interior lighting
145Lights and windscreen wipers Z
Page 149 of 497
Crash-responsive emergency lighting
The interior lighting is activated automatically
if the vehicle is involved in an accident.
X To switch off the crash-responsive
emergency lighting: press the hazard
warning lamp button.
or X Lock and then unlock the vehicle using the
key. Replacing bulbs
Important safety notes
G
WARNING
Bulbs, lamps and plug connectors can
become very hot during use. When replacing a bulb, you could burn yourself on these com-
ponents. There is a risk of injury.
Allow these components to cool down before replacing the bulb.
Do not use a bulb that has been dropped or if
its glass tube has been scratched.
The bulb may explode if:
R you touch it
R it is hot
R you drop it
R you scratch it
Only operate bulbs in enclosed lamps
designed for that purpose. Only fit spare
bulbs of the same type and the specified volt- age.
Marks on the glass tube reduce the service
life of the bulbs. Do not touch the glass tube
with your bare hands. If necessary, clean the
glass tube when cold with alcohol or spirit and
rub it off with a lint-free cloth.
Protect bulbs from moisture during opera-
tion. Do not allow bulbs to come into contact
with liquids.
Only replace the bulbs listed (Y page 146).
Have the bulbs that you cannot replace your- self replaced at a qualified specialist work-
shop.
If you require assistance replacing bulbs, con-
sult a qualified specialist workshop.
If the new bulb still does not light up, consult
a qualified specialist workshop.
Headlamps and lights are an important
aspect of vehicle safety. You must therefore
make sure that these function correctly at all times. Have the headlamp setting checked
regularly.
Vehicles with LED headlamps: the front
and rear light clusters of your vehicle are
equipped with LED light bulbs. Do not replace
the bulbs yourself. Contact a qualified spe-
cialist workshop which has the necessary
specialist knowledge and tools to carry out
the work required. Overview of bulb types
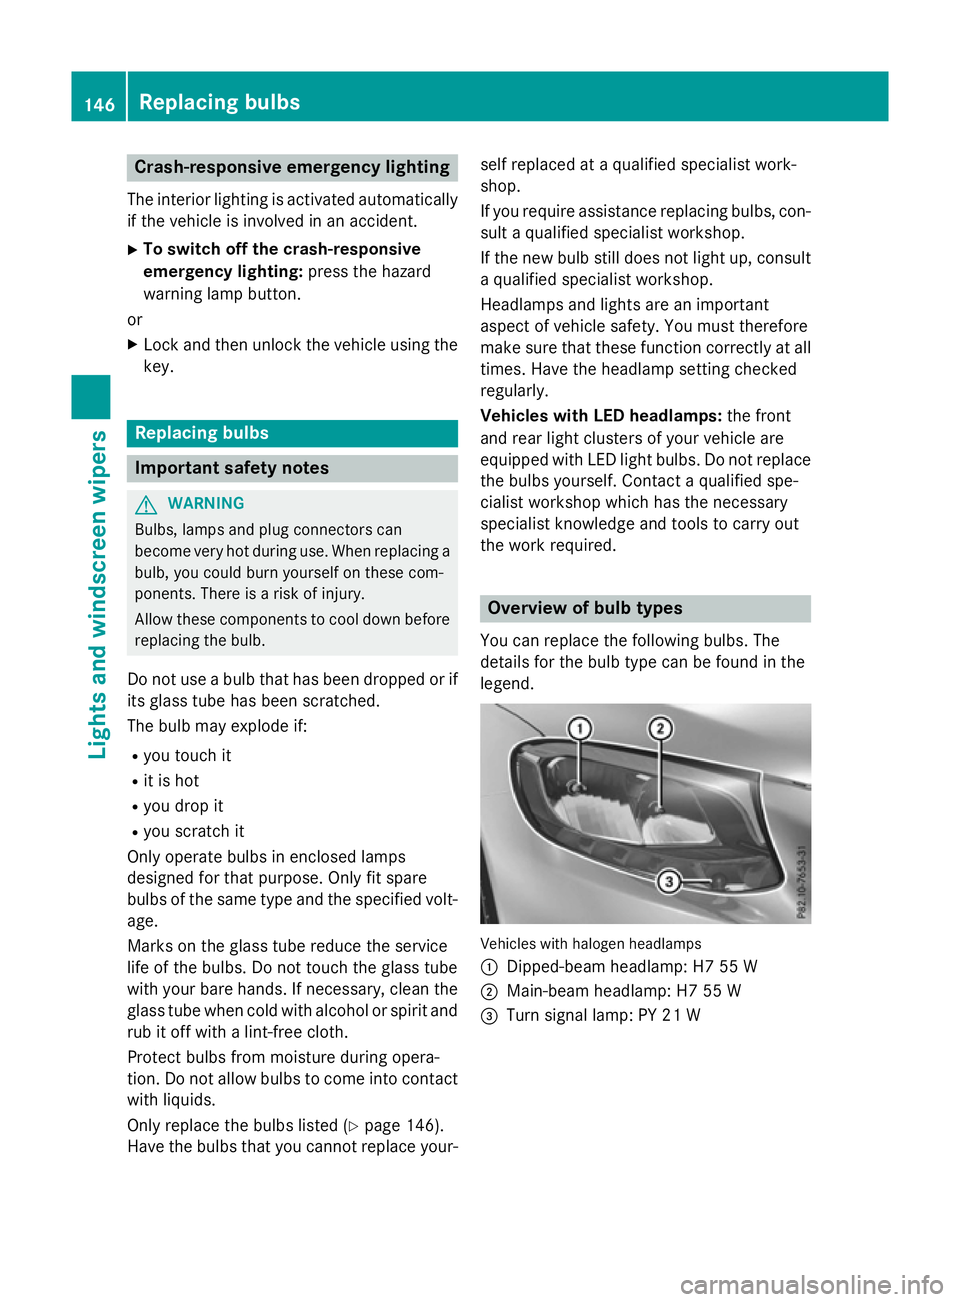
You can replace the following bulbs. The
details for the bulb type can be found in the
legend. Vehicles with halogen headlamps
:
Dipped-beam headlamp: H7 55 W
; Main-beam headlamp: H7 55 W
= Turn signal lamp: PY 21 W 146
Replacing bulbsLights and windscreen wipers
Page 173 of 497
Problems with the rear window heating
Problem
Possible causes/consequences and
M
MSolutions The rear window heat-
ing has switched off
prematurely or cannot
be activated. The battery has not been sufficiently charged.
X Switch off any consumers that are not required, e.g. reading
lamps, interior lighting or the seat heating.
When the battery is sufficiently charged, the rear window heat- ing can be activated again. Switching air-recirculation mode
on/off
General notes You can also temporarily deactivate the flow
of fresh air manually if unpleasant odours are
entering the vehicle from outside. The air
already inside the vehicle will then be recir-
culated.
If you activate air-recirculation mode, the win-
dows can mist up more quickly, in particular
at low temperatures. Only use air-recircula-
tion mode briefly to prevent the windows
misting up.
Activating/deactivating X
Turn the key to position 2in the ignition
lock (Y page 187).
X To activate: press thegrocker switch
up or down.
The indicator lamp above the grocker
switch lights up.
Air-recirculation mode is activated automati-
cally: R at high outside temperatures
R at high levels of pollution (THERMOTRONIC
automatic climate control only)
R in a tunnel (vehicles with a navigation sys-
tem only)
The indicator lamp above the grocker
switch is not lit when automatic air-recircula- tion mode is activated. Outside air is added
after approximately 30 minutes. X
To deactivate: press thegrocker
switch up or down.
The indicator lamp above the grocker
switch goes out.
Air-recirculation mode is deactivated auto-
matically:
R after approximately five minutes at outside
temperatures below approximately 5 †
R after approximately five minutes if "Cooling
with air dehumidification" is deactivated
R after approximately 30 minutes at outside
temperatures above approximately 5 † if
the "Cooling with air dehumidification"
function is activated Convenience opening or closing using
the air-recirculation button G
WARNING
When the convenience closing feature is oper- ating, parts of the body could become trapped
in the closing area of the side window and the
sliding sunroof. There is a risk of injury.
Observe the complete closing procedure
when the convenience closing feature is oper-
ating. When closing make sure that no parts of the body are in the closing area. G
WARNING
During convenience opening parts of the body could be drawn in or become trapped
between the side window and window frame.
There is a risk of injury. 170
Operating the climate control systemClimate control
Page 174 of 497
When opening, make sure that nobody is
touching the side window. If someone
becomes trapped, immediately press
the W switch in the door to stop the move-
ment of the side windows. To continue closing
the side window, pull on the Wswitch.
X Convenience closing feature (vehicles
with a panorama sliding sunroof): press
and hold the grocker switch up or
down until the side windows and the pan-
orama sliding sunroof start to close auto-
matically.
The indicator lamp above the grocker
switch lights up. Air-recirculation mode is
activated.
X Convenience closing feature (vehicles
without a sliding sunroof/panorama
sliding sunroof): press and hold the g
rocker switch up or down until the side win- dows start to close automatically.
The indicator lamp above the grocker
switch lights up. Air-recirculation mode is
activated.
If you open the side windows or the pano-
rama sliding sunroof manually after closing
with the convenience closing feature, they
will remain in this position when opened
using the convenience opening feature.
If parts of the body are in the closing area
during convenience closing, proceed as fol-
lows:
X Press the Wbutton to stop the side win-
dows.
The side windows stop.
X To then open the side windows, press the
W button again.
X Only vehicles with panorama sliding
sunroof: press the 3button to stop the
panorama sliding sunroof.
The panorama sliding sunroof stops.
X To then open the panorama sliding sunroof,
pull back on the 3button. Notes on the automatic reversing feature for:
R the side windows (Y page 110)
R the panorama sliding sunroof
(Y page 114)
X Convenience opening feature (vehicles
with a panorama sliding sunroof): press
and hold the grocker switch up or
down until the side windows and the pan-
orama sliding sunroof start to open auto-
matically.
The indicator lamp above the grocker
switch goes out. Air-recirculation mode is
deactivated.
X Convenience opening feature (vehicles
without a panorama sliding sunroof):
press and hold the grocker switch up
or down until the side windows start to
open automatically.
The indicator lamp above the grocker
switch goes out. Air-recirculation mode is
deactivated. Switching the residual heat on/off
General notes The residual heat function is only available
with THERMOTRONIC automatic climate con- trol and THERMATIC automatic climate con-
trol with auxiliary heating.
When the engine is switched off, it is possible
to make use of the residual heat of the engine to continue heating or ventilating the front
compartment of the vehicle for approximately
30 minutes. The heating or ventilation time
depends on the set interior temperature.
Switching on/off X
Turn the key to position 0in the ignition
lock or remove it (Y page 187).
X To switch on: press the!rocker
switch up or down.
The indicator lamp above the !rocker
switch lights up. Operating the climate control system
171Climate control Z