sunroof MERCEDES-BENZ GLC SUV 2015 Owners Manual
[x] Cancel search | Manufacturer: MERCEDES-BENZ, Model Year: 2015, Model line: GLC SUV, Model: MERCEDES-BENZ GLC SUV 2015Pages: 497, PDF Size: 15.27 MB
Page 19 of 497
Checklist before driving off-road .... 228
General information ......................
.227
Important safety notes .................. 226
Maximum gradient climbing abil-
ity ................................................. .489
Maximum water depth ................... 489
Travelling uphill .............................. 229
Off-road lights ................................... .143
Off-road system
DSR ............................................... 248
Off road drive program .................. 250
Off-road 4ETS .................................. 85
Off-road ABS ................................... .79
Off-road ESP ®
..................................85
Oil
see Engine oil
On-board computer
Assistance graphic menu ............... 326
Assistance menu ........................... 327
Display messages .......................... 335
Displaying a service message ........ 419
DISTRONIC PLUS ........................... 242
Factory settings ............................. 334
Head-up display ............................. 315
HYBRID menu ................................ 329
Important safety notes .................. 312
Instrument cluster menu ............... 332
Light menu .....................................3 31
Media menu ................................... 322
Menu overview .............................. 317
Message memory .......................... 335
Navigation menu ............................ 320
Operating the TV ............................ 324
Operating video DVD ..................... 323
Operation ....................................... 314
Radio menu ................................... 322
Service menu ................................. 326
Settings menu ............................... 327
Standard display ............................ 318
Telephone menu ............................ 324
Trip menu ...................................... 318
Vehicle menu ................................. 333
Opening and closing the side trim
panels ................................................. 148
Operating instructions
Vehicle equipment ........................... 26
Operating safety
Declaration of conformity ................ 27 Important safety note .....................
.26
Operating system
see On-board computer
Outside temperature display ........... 313
Overhead control panel ......................41
Override feature
Rear side windows ........................... 78
Owner's Manual
Overview .......................................... 26 P
Paint code .......................................... 480
Paintwork (cleaning instructions) ... 423
Panic alarm .......................................... 46
Panorama sliding sunroof
Important safety information ......... 113
Opening/closing ............................1 14
Problem (malfunction) ................... 118
Rain closing feature ....................... 115
Resetting ....................................... 116
Parking
Important safety notes .................. 219
Parking brake ................................ 220
Position of exterior mirror, front-
passenger sid e............................... 133
Reversing camera .......................... 262
Switching off the engine ................ 220
see PARKTRONIC
Parking aid
see 360° camera
see Active Parking Assist
see Exterior mirrors
see PARKTRONIC
see Reversing camera
Parking brake
Display message ............................ 339
Electric parking brake .................... 220
Warning lamp ................................. 383
Parking lamps
Display message ............................ 352
Switching on/of f........................... 140
PARKTRONIC
Deactivating/activating ................. 256
Driving system ............................... 254
Function/note s............................. 254
Important safety notes .................. 254
Problem (fault) ............................... 257 16
Index
Page 22 of 497
Introduction .....................................46
Warning lamp ................................. 383
Warning lamp (function) ...................47
Rev counter ........................................ 313
Reversing camera
Cleaning instructions ..................... 425
Displays in the Audio display ......... 263
Displays in the COMAND display ... 263
Function/notes ............................ .262
Switching on/off ........................... 263
Reversing feature
Panorama sliding sunroof .............. 114
Roller sunblinds ............................ .116
Side windows ................................. 110
Tailgate .......................................... 104
Reversing lamp
Changing bulbs .............................. 148
Reversing lamp (display message) .. 352
Roller sunblind
Panorama sliding sunroof .............. 115
Roller sunblinds (panorama sliding
sunroof)
Operating ....................................... 116
Roof carrier ........................................ 402
Roof lining and carpets (cleaning
instructions) ...................................... 428
Roof load (maximum) ........................ 488S
Safety Children in the vehicle ..................... 65
Hybrid drive system ......................... 44
see Operating safety
Safety net
Attaching ....................................... 398
Important safety information ......... 398
Safety notes
Hybrid vehicles ................................ 44
SD memory card
Selecting ........................................ 323
Seat
Folding the backrest (rear com-
partment) forwards/back ...... 393, 394
Seat belt
Centre rear-compartment sea t........ 51
Correct usage .................................. 50 Seat belts
Adjusting the driver's and front-
passenger seat belt ......................... 52
Adjusting the height ......................... 50
Cleaning ......................................... 428
Fastening ......................................... 50
Important safety guidelines ............. 49
Introduction ..................................... 48
Rear seat belt status indicator ......... 52
Releasing ......................................... 51
Warning lamp ................................. 376
Warning lamp (function) ................... 52
Seats
Adjusting (electrically) ................... 123
Adjusting (manually and electri-
cally) .............................................. 122
Adjusting the 4-way lumbar sup-
port ................................................ 125
Adjusting the head restraint .......... 123
Calling up a stored setting (mem-
ory function) .................................. 135
Cleaning the cover ......................... 427
Correct driver's seat position ........ 120
Important safety notes .................. 121
Seat heating .................................. 125
Seat heating problem .................... 127
Seat ventilation .............................. 127
Seat ventilation problem ................ 128
Storing settings (memory func-
tion) ............................................... 135
Switching seat heating on/of f....... 125
Switching the seat ventilation on/
off .................................................. 127
Section
PLUG-IN HYBRID operation ............ 286
Securing a load
see Stowage space
Securing luggage ............................... 396
Selector lever
Cleaning ......................................... 427
see Automatic transmission
Sensors (cleaning instructions) ....... 425
Service menu (on-board com-
puter) .................................................. 326
Service message
see ASSYST PLUS Index
19
Page 23 of 497
Service products
AdBlue ®
special additives .............. 484
Brake fluid .....................................4 86
Coolant (engine) ............................ 487
Engine oil ....................................... 485
Fuel ................................................ 480
Important safety notes .................. 480
Washer fluid ................................... 487
Setting the charge current (on-
board computer) ............................... 329
Setting the departure time (on-
board computer) ............................... 330
Settings
Factory (on-board computer) ......... 334
On-board computer ....................... 327
Side lamps
Switching on/off ........................... 140
Side windows
Convenience closing ..................... .111
Convenience opening .................... 111
Important safety notes .................. 109
Opening/closing ............................ 110
Problem (malfunction) ................... 113
Resetting ....................................... 112
Reversing feature ........................... 110
Sidebag ................................................ 55
Ski/snowboard bag .......................... 393
Sliding sunroof
see Panorama sliding sunroof
Snow chains ...................................... 457
Socket (12 V)
Centre console .............................. 406
General notes ................................ 405
Luggage compartment ................... 406
Rear compartment ......................... 406
Socket (230 V) ................................... 406
Specialist workshop ............................ 28
Spectacles compartment ................. 391
Speed, controlling
see Cruise control
Speedometer
Activating/deactivating the addi-
tional speedometer ........................ 333
Digital ............................................ 319
In the Instrument cluster ................. 34
Segments ...................................... 313
Selecting a display unit .................. 332 see Instrument cluster
SPEEDTRONIC
Deactivating variable ..................... 235
Display message ............................ 365
Function/notes ............................ .233
General notes ................................ 233
Important safety notes .................. 233
LIM indicator lamp ......................... 234
Permanent ..................................... 236
Selecting ........................................ 234
Setting the speed .......................... 235
Storing the current spee d.............. 234
Storing the current speed or call-
ing up the last stored speed .......... 235
Switching to passive ...................... 235
Variabl e......................................... 234
Start/Stop button
Starting the engine ........................ 190
Start/stop function
see ECO start/stop function
Starting (engine) ................................ 189
STEER CONTROL .................................. 90
Steering
Display message ............................ 374
Warning lamps ............................... 388
Steering Assist and Stop&Go Pilot
(DISTRONIC PLUS)
Display message ............................ 365
Steering assistant STEER CON-
TROL
see STEER CONTROL
Steering wheel
Adjusting (electrically) ................... 129
Adjusting (manually) ...................... 128
Button overview ............................... 37
Buttons (on-board computer) ......... 314
Cleaning ......................................... 427
EASY ENTRY/EXIT feature ............. 130
Important safety notes .................. 128
Steering wheel heating .................. 129
Storing settings (memory func-
tion) ............................................... 135
Steering wheel gearshift paddles .... 201
Steering wheel heating
Problem (malfunction) ................... 130
Switching on/of f........................... 129
Stowage areas ................................... 39020
Index
Page 44 of 497
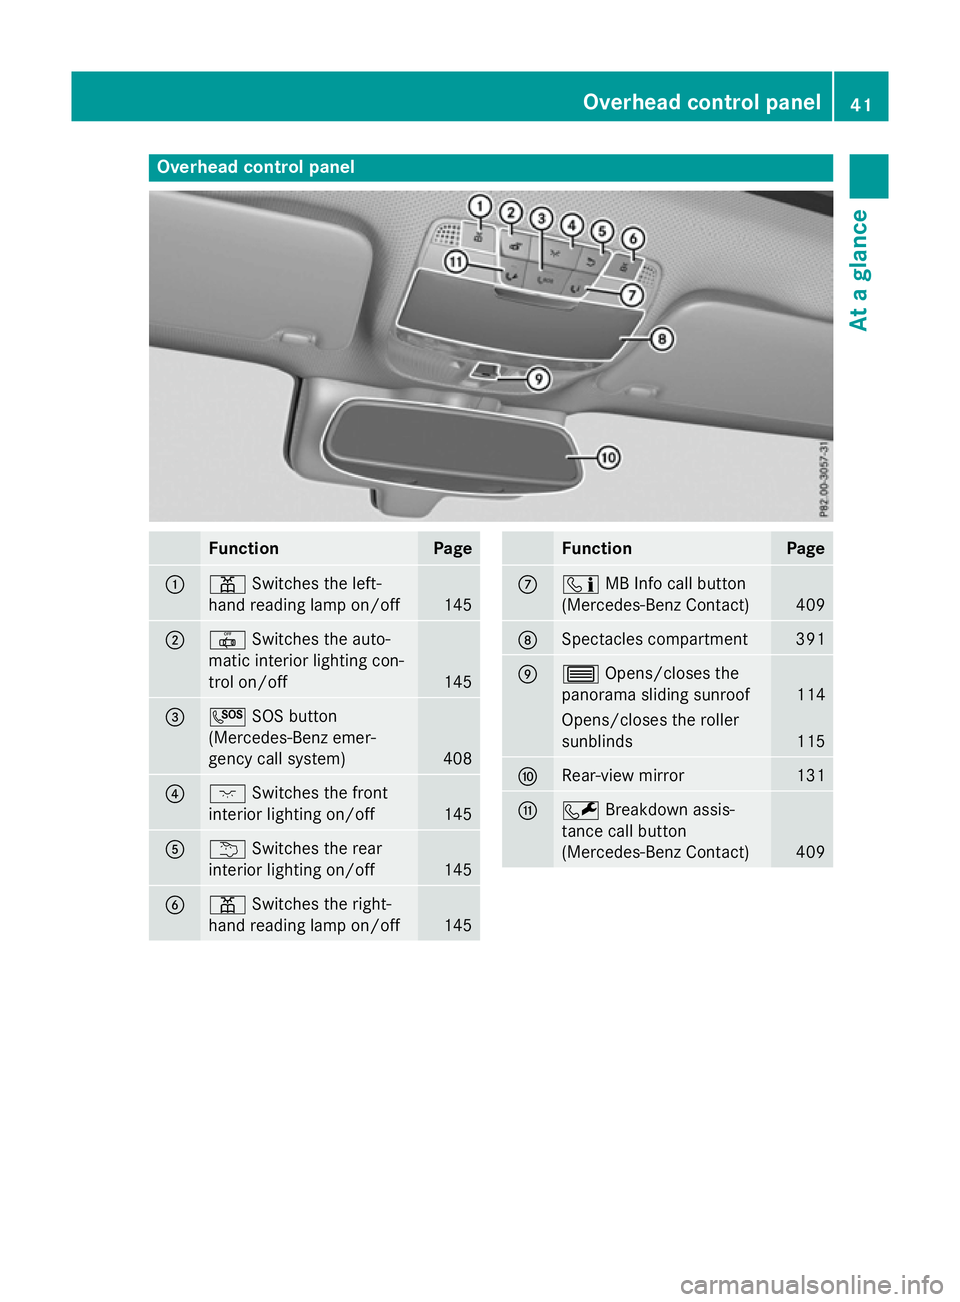
Overhead control panel
Function Page
:
p
Switches the left-
hand reading lamp on/off 145
;
|
Switches the auto-
matic interior lighting con-
trol on/off 145
=
G
SOS button
(Mercedes-Benz emer-
gency call system) 408
?
c
Switches the front
interior lighting on/off 145
A
u
Switches the rear
interior lighting on/off 145
B
p
Switches the right-
hand reading lamp on/off 145 Function Page
C
ï
MB Info call button
(Mercedes-Benz Contact) 409
D
Spectacles compartment 391
E
3
Opens/closes the
panorama sliding sunroof 114
Opens/closes the roller
sunblinds
115
F
Rear-view mirror 131
G
F
Breakdown assis-
tance call button
(Mercedes-Benz Contact) 409Overhead control panel
41At a glance
Page 67 of 497
Important safety notes
!
Make sure that there are no objects in the
footwell or behind the seats. There is a risk that the seats and/or the objects could be
damaged when PRE-SAFE ®
is activated.
Although your vehicle is equipped with a PRE-
SAFE ®
system, the possibility of injury in the
event of an accident cannot be ruled out.
Always adapt your driving style to suit the
prevailing road and weather conditions and
maintain a safe distance from the vehicle in
front. Drive carefully.
Function PRE-SAFE
®
intervenes:
R in emergency braking situations, e.g. when
BAS is activated
R in critical driving situations, e.g. when phys-
ical limits are exceeded and the vehicle
understeers or oversteers severely
R vehicles with the Driving Assistance pack-
age: when a driver assistance system inter-
venes powerfully or the radar sensor sys-
tem detects an imminent danger of colli-
sion in certain situations
PRE-SAFE ®
takes the following measures
depending on the hazardous situation detec-
ted:
R the front seat belts are pre-tensioned.
R if the vehicle skids, the side windows and
the panorama sliding sunroof are closed.
R vehicles with the memory function for the
front-passenger seat: the front-passenger
seat is adjusted if it is in an unfavourable
position.
If the hazardous situation passes without
resulting in an accident, PRE-SAFE ®
slackens
the belt pre-tensioning. All settings made by
PRE-SAFE ®
can then be reversed. If the seat belt pre-tensioning is not reduced:
X Move the seat backrest or seat back
slightly when the vehicle is stationary.
Seat belt pre-tensioning is reduced and the
locking mechanism is released.
The seat-belt adjustment is an integral part of
the PRE-SAFE ®
convenience function. Infor-
mation about the convenience function can
be found under "Belt adjustment"
(Y page 52). PRE-SAFE
®
PLUS (anticipatory occu-
pant protection PLUS)
Introduction PRE-SAFE
®
PLUS is only available in vehicles
with the Driving Assistance package.
Using the radar sensor system, PRE-SAFE ®
PLUS is able to detect that a head-on or rear- end collision is imminent. In certain hazard-
ous situations, PRE-SAFE ®
PLUS takes pre-
emptive measures to protect the vehicle
occupants.
Important safety notes The intervention of PRE-SAFE
®
PLUS cannot
prevent an imminent collision.
The driver is not warned before the interven-
tion of PRE-SAFE ®
PLUS.
PRE-SAFE ®
PLUS does not intervene:
R if the vehicle is reversing
R when the vehicle is towing a trailer and
there is a risk of a rear-end collision
When driving, or when parking or exiting a
parking space with assistance from Active
Parking Assist, PRE-SAFE ®
PLUS will not
apply the brakes.
Function PRE-SAFE
®
PLUS intervenes in certain situa-
tions if the radar sensor system detects an
imminent head-on or rear-end collision. 64
Occupant safetySafety
Page 94 of 497
X
To deactivate the alarm using KEYLESS-
GO: grasp the outside door handle. The key
must be outside the vehicle.
The alarm is deactivated.
or
X Press the Start/Stop button on the dash-
board. The key must be inside the vehicle.
The alarm is deactivated.
The alarm is not switched off, even if you
close the open door that has triggered it, for
example.
i If the alarm stays on for more than
30 second s,the Mercedes‑Benz emer-
gency call system automatically sends a
message to the Customer Assistance
Centre. This is done by means of a text
message or a data connection.
The emergency call system sends a mes-
sage or establishes a data connection pro-
vided that:
R you have subscribed to the
Mercedes‑ Benz emergency call system
R the Mercedes‑ Benz emergency call sys-
tem has been activated properly
R the necessary mobile phone network is
available Tow-away protection
Function An audible and visual alarm is triggered if your
vehicle's angle of inclination is altered while
tow-away protection is primed. This can occur if the vehicle is jacked up on one side, for
example.
Priming X
Make sure that: R
the doors are closed
R the tailgate is closed
Only then is the tow-away protection
primed.
X Lock the vehicle with the key or KEYLESS-
GO.
Tow-away protection is primed after
approximately 60 second s.
De activating X
Unlock the vehicle with the key or KEY-
LESS-GO.
or X Insert the key into the ignition lock.
Tow-away protection is deactivated auto-
matically.
Deactivating You can deactivate the tow-away protection
using COMAND Online or Audio 20. Informa-
tion about deactivating the interior motion
sensor (see the separate COMAND Online or Audio 20 operating instructions). Interior motion sensor
Function When the interior motion sensor is primed, a
visual and audible alarm is triggered if move-
ment is detected in the vehicle interior. This
can occur if someone reaches into the vehicle
interior, for example.
Priming X
Make sure that:
R the side windows are closed
R the panorama sliding sunroof is closed
R there are no objects, e.g. mascots, hang-
ing on the rear-view mirror or on the grab handles on the roof trim
This will prevent false alarms.
X Make sure that: Protection against theft
91Safety Z
Page 95 of 497
R
the doors are closed
R the panorama sliding sunroof is closed
R the tailgate is closed
Only then is the interior motion sensor
primed.
X Lock the vehicle with the key or KEYLESS-
GO.
The interior motion sensor is primed after
approximately 10 second s.
Switching off X
Unlo ck the vehicle with the key or KEY-
LESS-GO.
or X Insert the key into the ignition lock.
or X Press the Start/Stop button.
The key must be in the vehicle.
The interior motion sensor is automatically
switched off.
Deactivating You can deactivate the interior motion sensor
using COMAND Online or Audio 20. Informa-
tion about deactivating the interior motion
sensor (see the separate COMAND Online or Audio 20 operating instructions). 92
Protection against theftSafety
Page 96 of 497
Useful information
..............................94
Key ........................................................ 94
Doors .................................................. 100
Luggage compartment .....................104
Side windows .................................... 109
Panorama sliding sunroof ................113 93Opening and closing
Page 114 of 497
tion is started in the corresponding direction.
You can stop automatic operation by press-
ing/pulling again.
You can continue to operate the side windowsafter switching off the engine or removing the
key. This function remains active for five
minutes or until you open a front door.
The side windows cannot be operated from
the rear when the override feature for the side
windows is activated (Y page 78).
Information on opening and closing the roller sunblinds on the rear side windows
(Y page 404). Convenience opening feature
General notes Vehicles with KEYLESS-GO or KEYLESS-
GO start function: you can ventilate the vehi-
cle before you start driving.
If the key is in the immediate vicinity of the
vehicle, the convenience opening function is
available.
To do this, the key is used to carry out the
following functions simultaneously:
R unlock the vehicle
R open the side windows
R open the sliding sunroof or the panorama
sliding sunroof and the roller sunblind
R switch on the seat ventilation for the driv-
er's seat
The "convenience opening" feature is also
available when the vehicle is unlocked.
Convenience opening feature X
Press and hold the %button on the key
until the side windows and the sliding sun- roof or the panorama sliding sunroof are in
the desired position.
If the roller sunblinds of the panorama slid-
ing sunroof are closed, the roller sunblinds are opened first.
X Press and hold the %button again until
the panorama sliding sunroof is in the
desired position.
X To interrupt convenience opening:
release the %button. Convenience closing feature
Important safety notes G
WARNING
When the convenience closing feature is oper- ating, parts of the body could become trapped
in the closing area of the side window and the
sliding sunroof. There is a risk of injury.
Observe the complete closing procedure
when the convenience closing feature is oper-
ating. When closing make sure that no parts of the body are in the closing area.
Vehicles with KEYLESS-GO or KEYLESS-
GO start function: if the key is in the imme-
diate vicinity to the vehicle, the convenience
closing function is available.
When you lock the vehicle, you can simulta-
neously:
R close the side windows
R close the sliding sunroof or the panorama
sliding sunroof
On vehicles with a panorama sliding sunroof, you can then close the roller sunblinds.
Notes on the automatic reversing feature for:
R the side windows (Y page 110)
R the panorama sliding sunroof
(Y page 114) Side
windows
111Opening an d closing Z
Page 115 of 497
Using the key
X
Press and hold the &button until the
side windows and the sliding sunroof or the panorama sliding sunroof are fully closed.
X Make sure that all the side windows and the
sliding sunroof or panorama sliding sunroof
are closed.
X Vehicles with panorama sliding sun-
roof: press and hold the &button once
more until the roller sunblinds of the pan-
orama sliding sunroof close.
X To interrupt convenience closing:
release the &button.
Using KEYLESS-GO The driver's door and the door at which the
handle is used must both be closed. The key
must be outside the vehicle. The gap between
the key and the corresponding door handle
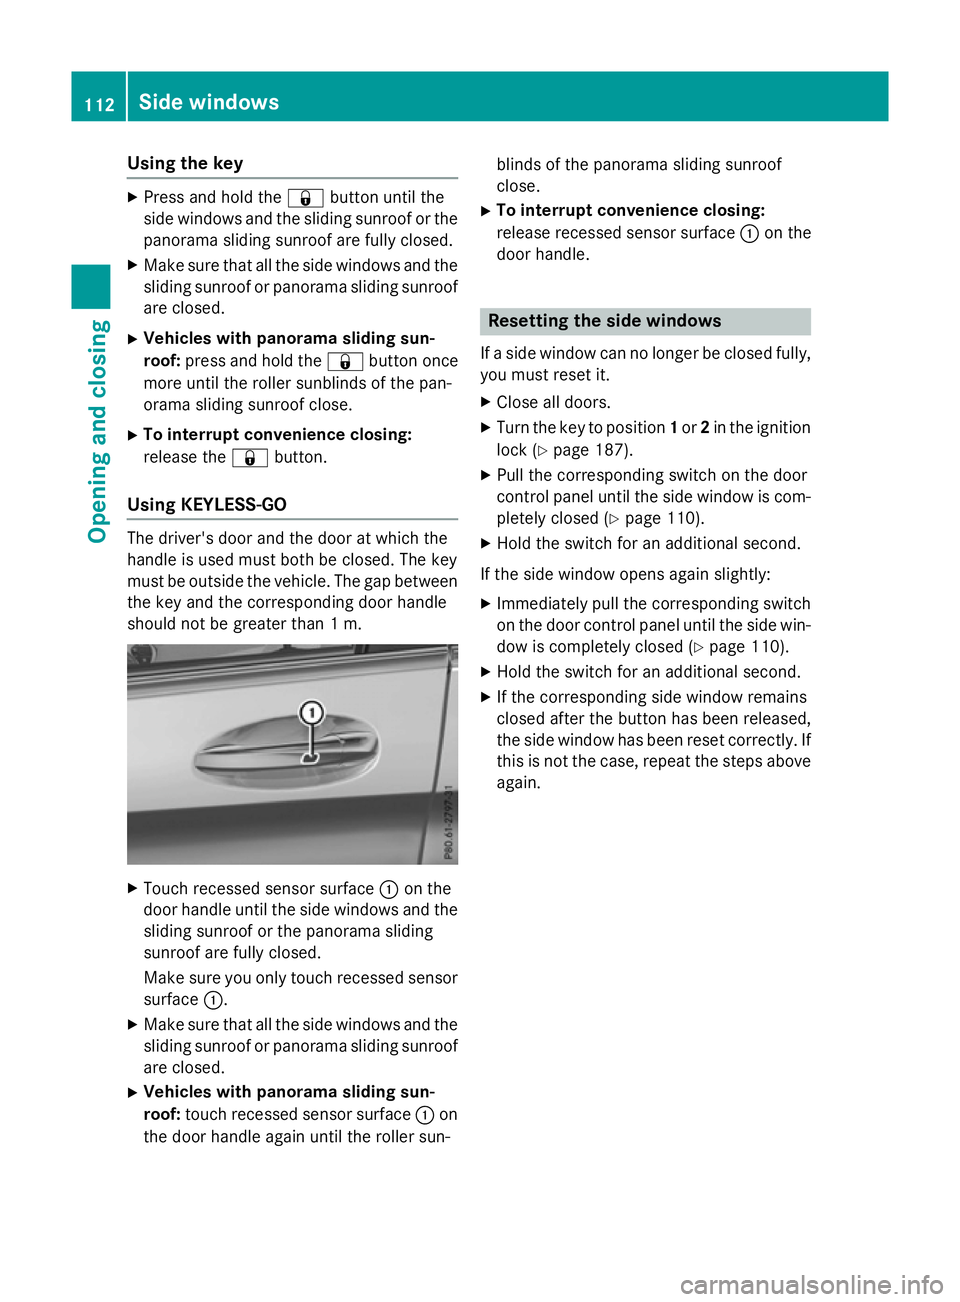
should not be greater than 1 m. X
Touch recessed sensor surface :on the
door handle until the side windows and the sliding sunroof or the panorama sliding
sunroof are fully closed.
Make sure you only touch recessed sensor surface :.
X Make sure that all the side windows and the
sliding sunroof or panorama sliding sunroof
are closed.
X Vehicles with panorama sliding sun-
roof: touch recessed sensor surface :on
the door handle again until the roller sun- blinds of the panorama sliding sunroof
close.
X To interrupt convenience closing:
release recessed sensor surface :on the
door handle. Resetting the side windows
If a side window can no longer be closed fully, you must reset it.
X Close all doors.
X Turn the key to position 1or 2in the ignition
lock (Y page 187).
X Pull the corresponding switch on the door
control panel until the side window is com- pletely closed (Y page 110).
X Hold the switch for an additional second.
If the side window opens again slightly: X Immediately pull the corresponding switch
on the door control panel until the side win-
dow is completely closed (Y page 110).
X Hold the switch for an additional second.
X If the corresponding side window remains
closed after the button has been released,
the side window has been reset correctly. If
this is not the case, repeat the steps aboveagain. 112
Side windowsOpening and closing