MERCEDES-BENZ GLC SUV 2017 X253 Owner's Manual
Manufacturer: MERCEDES-BENZ, Model Year: 2017, Model line: GLC SUV, Model: MERCEDES-BENZ GLC SUV 2017 X253Pages: 374, PDF Size: 6.23 MB
Page 121 of 374
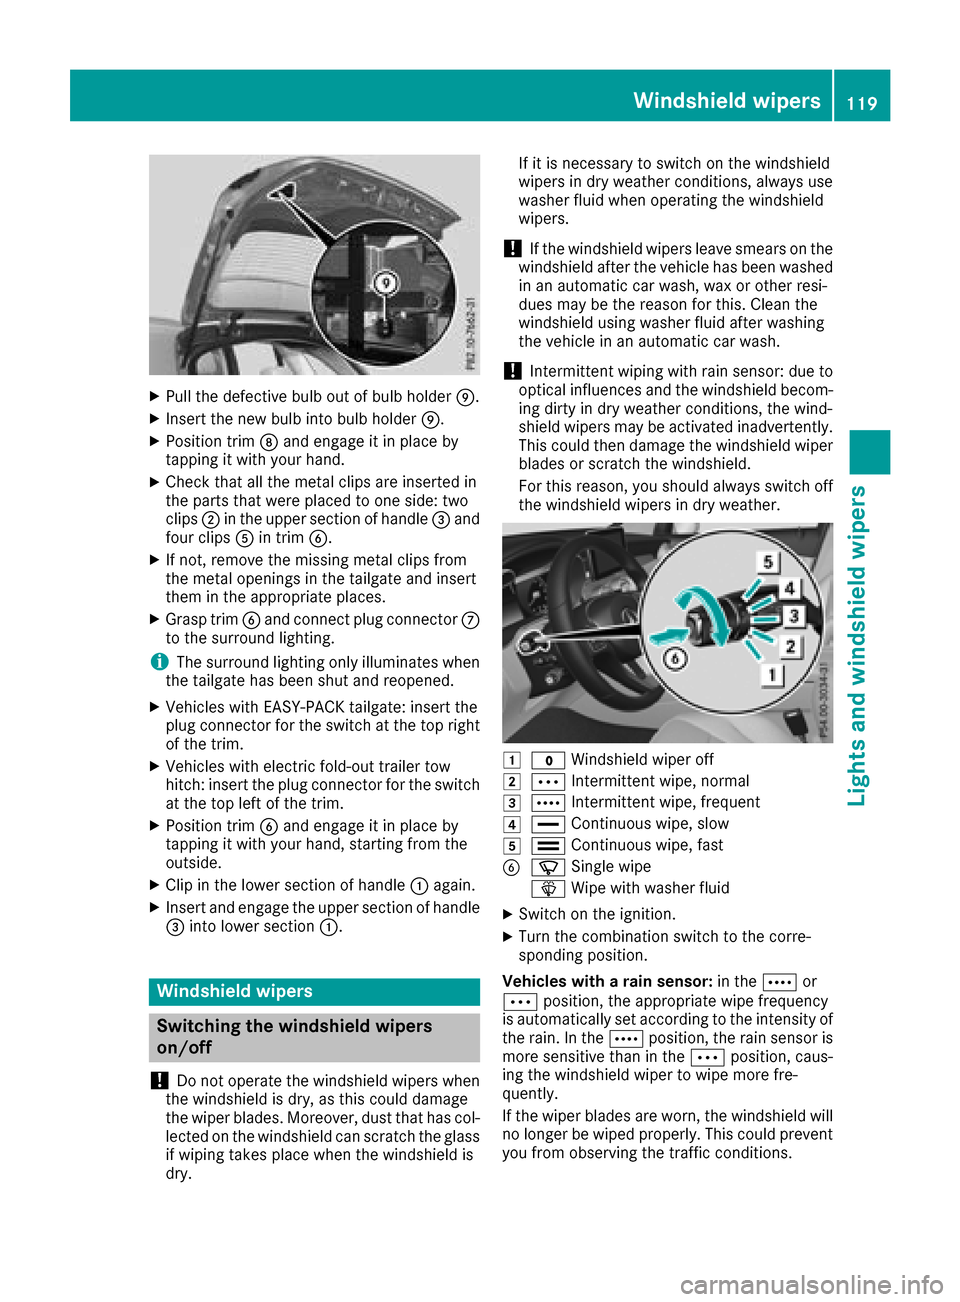
XPull the defective bulb out of bulb holderE.
XInsert the new bulb into bulb holderE.
XPosition trimDand engage it in place by
tapping it with your hand.
XCheck that all the metal clips are inserted in
the parts that were placed to one side: two
clips ;in the upper section of handle =and
four clips Ain trim B.
XIf not, remove the missing metal clips from
the metal openings in the tailgate and insert
them in the appropriate places.
XGrasp trim Band connect plug connector C
to the surround lighting.
iThe surround lighting only illuminates when
the tailgate has been shut and reopened.
XVehicles with EASY-PACK tailgate: insert the
plug connector for the switch at the top right
of the trim.
XVehicles with electric fold-out trailer tow
hitch: insert the plug connector for the switch
at the top left of the trim.
XPosition trim Band engage it in place by
tapping it with your hand, starting from the
outside.
XClip in the lower section of handle :again.
XInsert and engage the upper section of handle
=into lower section :.
Windshield wipers
Switching the windshield wipers
on/off
!
Do not operate the windshield wipers when
the windshield is dry, as this could damage
the wiper blades. Moreover, dust that has col-
lected on the windshield can scratch the glass
if wiping takes place when the windshield is
dry. If it is necessary to switch on the windshield
wipers in dry weather conditions, always use
washer fluid when operating the windshield
wipers.
!If the windshield wipers leave smears on the
windshield after the vehicle has been washed
in an automatic car wash, wax or other resi-
dues may be the reason for this. Clean the
windshield using washer fluid after washing
the vehicle in an automatic car wash.
!Intermittent wiping with rain sensor: due to
optical influences and the windshield becom-
ing dirty in dry weather conditions, the wind-
shield wipers may be activated inadvertently.
This could then damage the windshield wiper
blades or scratch the windshield.
For this reason, you should always switch off
the windshield wipers in dry weather.
1$ Windshield wiper off
2ÄIntermittent wipe, normal
3ÅIntermittent wipe, frequent
4°Continuous wipe, slow
5¯Continuous wipe, fast
BíSingle wipe
î Wipe with washer fluid
XSwitch on the ignition.
XTurn the combination switch to the corre-
sponding position.
Vehicles with a rain sensor: in theÅor
Ä position, the appropriate wipe frequency
is automatically set according to the intensity of
the rain. In the Åposition, the rain sensor is
more sensitive than in the Äposition, caus-
ing the windshield wiper to wipe more fre-
quently.
If the wiper blades are worn, the windshield will
no longer be wiped properly. This could prevent
you from observing the traffic conditions.
Windshield wipers119
Lights and windshield wipers
Z
Page 122 of 374
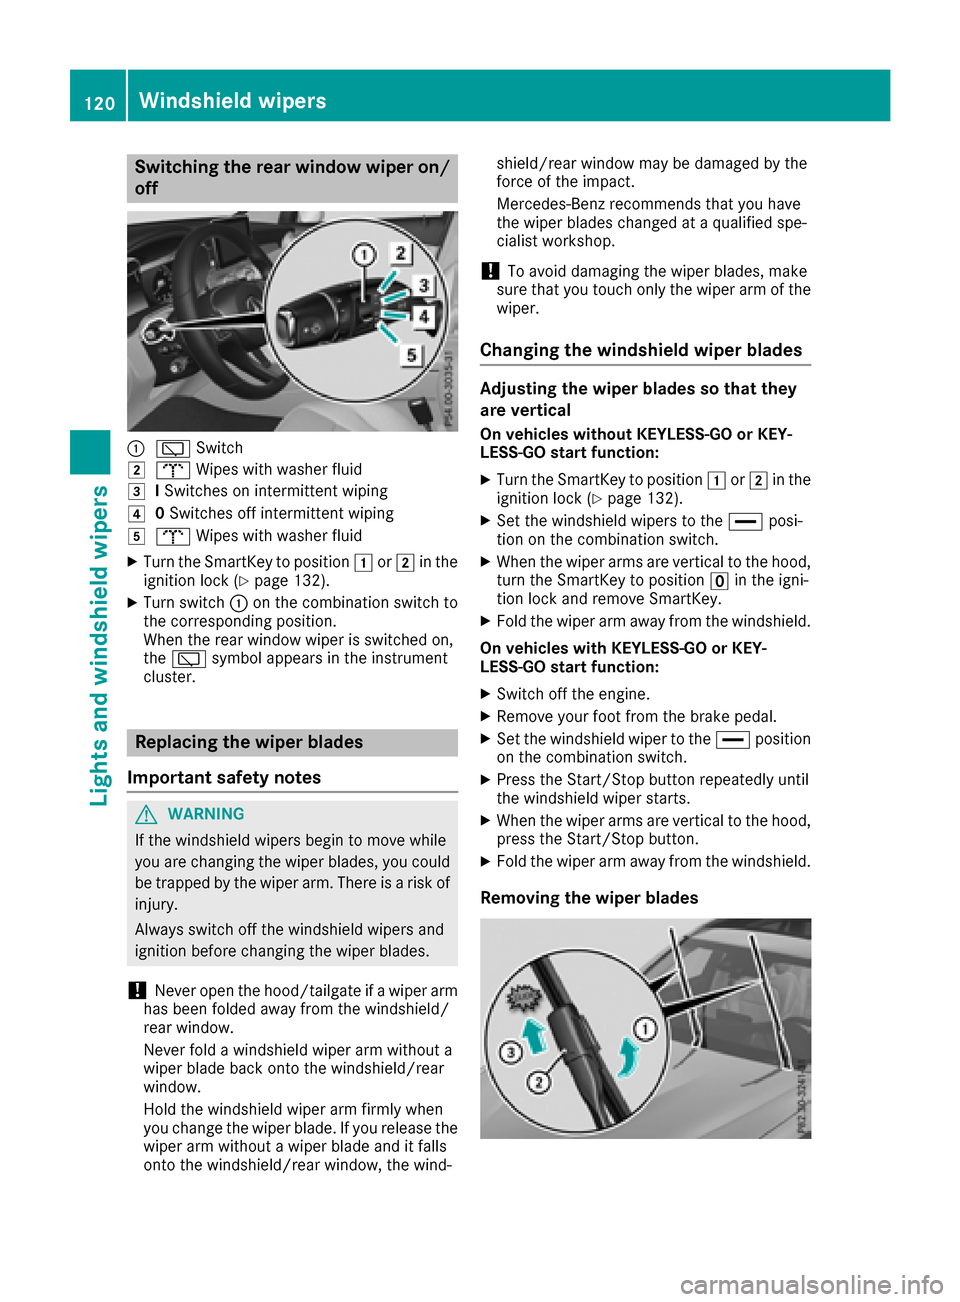
Switching the rear window wiper on/
off
:èSwitch
2bWipes with washer fluid
3ISwitches on intermittent wiping
40 Switches off intermittent wiping
5b Wipes with washer fluid
XTurn the SmartKey to position 1or2 in the
ignition lock (Ypage 132).
XTurn switch :on the combination switch to
the corresponding position.
When the rear window wiper is switched on,
the è symbol appears in the instrument
cluster.
Replacing the wiper blades
Important safety notes
GWARNING
If the windshield wipers begin to move while
you are changing the wiper blades, you could be trapped by the wiper arm. There is a risk of
injury.
Always switch off the windshield wipers and
ignition before changing the wiper blades.
!Never open the hood/tailgate if a wiper arm
has been folded away from the windshield/
rear window.
Never fold a windshield wiper arm without a
wiper blade back onto the windshield/rear
window.
Hold the windshield wiper arm firmly when
you change the wiper blade. If you release the
wiper arm without a wiper blade and it falls
onto the windshield/rear window, the wind- shield/rear window may be damaged by the
force of the impact.
Mercedes-Benz recommends that you have
the wiper blades changed at a qualified spe-
cialist workshop.
!To avoid damaging the wiper blades, make
sure that you touch only the wiper arm of the
wiper.
Changing the windshield wiper blades
Adjusting the wiper blades so that they
are vertical
On vehicles without KEYLESS-GO or KEY-
LESS‑GO start function:
XTurn the SmartKey to position 1or2 in the
ignition lock (Ypage 132).
XSet the windshield wipers to the °posi-
tion on the combination switch.
XWhen the wiper arms are vertical to the hood,
turn the SmartKey to position uin the igni-
tion lock and remove SmartKey.
XFold the wiper arm away from the windshield.
On vehicles with KEYLESS-GO or KEY-
LESS‑GO start function:
XSwitch off the engine.
XRemove your foot from the brake pedal.
XSet the windshield wiper to the °position
on the combination switch.
XPress the Start/Stop button repeatedly until
the windshield wiper starts.
XWhen the wiper arms are vertical to the hood,
press the Start/Stop button.
XFold the wiper arm away from the windshield.
Removing the wiper blades
120Windshield wipers
Lights and windshield wipers
Page 123 of 374
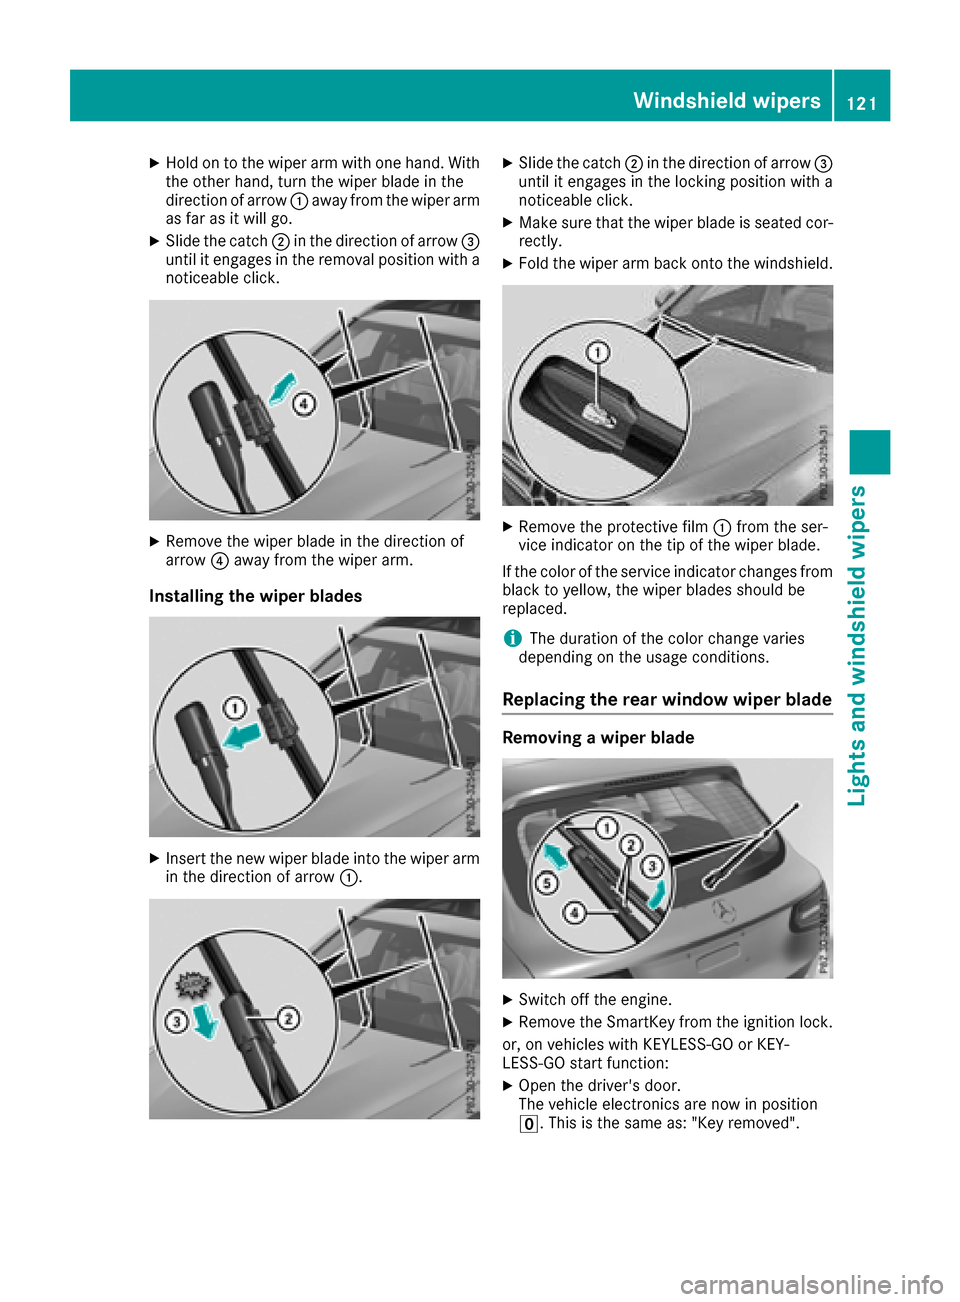
XHold on to the wiper arm with one hand. With
the other hand, turn the wiper blade in the
direction of arrow:away from the wiper arm
as far as it will go.
XSlide the catch ;in the direction of arrow =
until it engages in the removal position with a
noticeable click.
XRemove the wiper blade in the direction of
arrow ?away from the wiper arm.
Installing the wiper blades
XInsert the new wiper blade into the wiper arm
in the direction of arrow :.
XSlide the catch;in the direction of arrow =
until it engages in the locking position with a
noticeable click.
XMake sure that the wiper blade is seated cor-
rectly.
XFold the wiper arm back onto the windshield.
XRemove the protective film :from the ser-
vice indicator on the tip of the wiper blade.
If the color of the service indicator changes from
black to yellow, the wiper blades should be
replaced.
iThe duration of the color change varies
depending on the usage conditions.
Replacing the rear window wiper blade
Removing a wiper blade
XSwitch off the engine.
XRemove the SmartKey from the ignition lock.
or, on vehicles with KEYLESS-GO or KEY-
LESS‑ GO start function:
XOpen the driver's door.
The vehicle electronics are now in position
u. This is the same as: "Key removed".
Windshield wipers121
Lights and windshield wipers
Z
Page 124 of 374
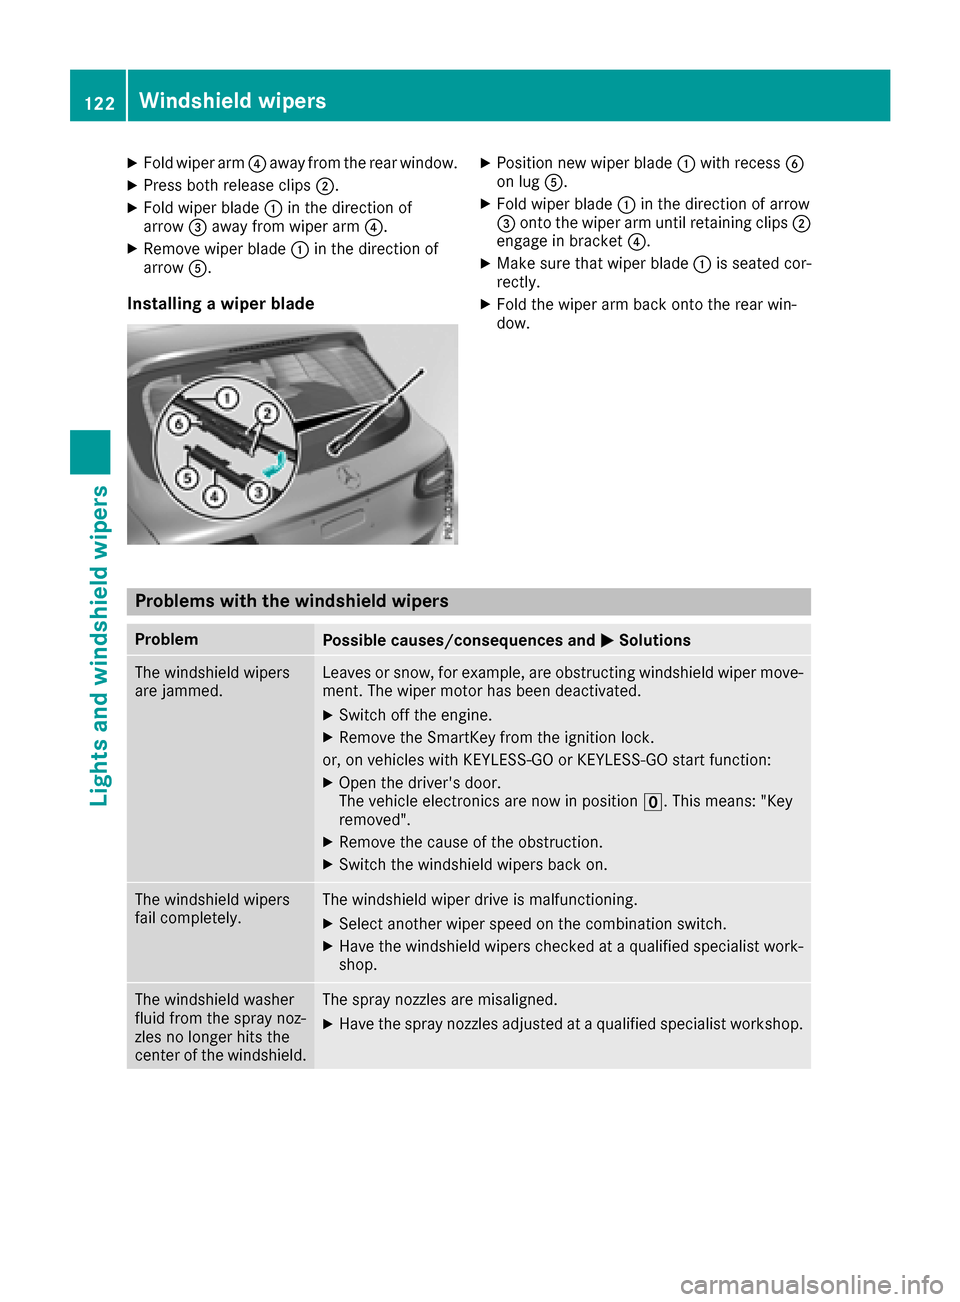
XFold wiper arm?away from the rear window.
XPress both release clips ;.
XFold wiper blade:in the direction of
arrow =away from wiper arm ?.
XRemove wiper blade:in the direction of
arrow A.
Installing a wiper blade
XPosition new wiper blade :with recess B
on lug A.
XFold wiper blade :in the direction of arrow
= onto the wiper arm until retaining clips ;
engage in bracket ?.
XMake sure that wiper blade :is seated cor-
rectly.
XFold the wiper arm back onto the rear win-
dow.
Problems with the windshield wipers
ProblemPossible causes/consequences and MSolutions
The windshield wipers
are jammed.Leaves or snow, for example, are obstructing windshield wiper move-
ment. The wiper motor has been deactivated.
XSwitch off the engine.
XRemove the SmartKey from the ignition lock.
or, on vehicles with KEYLESS-GO or KEYLESS ‑GO start function:
XOpen the driver's door.
The vehicle electronics are now in positionu. This means: "Key
removed".
XRemove the cause of the obstruction.
XSwitch the windshield wipers back on.
The windshield wipers
fail completely.The windshield wiper drive is malfunctioning.
XSelect another wiper speed on the combination switch.
XHave the windshield wipers checked at a qualified specialist work-
shop.
The windshield washer
fluid from the spray noz-
zles no longer hits the
center of the windshield.The spray nozzles are misaligned.
XHave the spray nozzles adjusted at a qualified specialist workshop.
122Windshield wipers
Lights and windshield wipers
Page 125 of 374
Overview of climate control systems
General notes
Observe the settings recommended on the fol-
lowing pages. The windows could otherwise fog
up.
To prevent the windows from fogging up:
Rswitch off climate control only briefly
Rswitch on air-recirculation mode only briefly
Rswitch on the cooling with air dehumidifica-
tion function
Ractivate the "Windshield defrosting" function
briefly, if required
Climate control regulates the temperature and
air humidity in the vehicle interior. The interior
filter cleans the air, thus improving the interior
climate.
The "Cooling with air dehumidification" function
is only available when the engine is running.
Optimum climate control is only achieved with
the side windows and roof closed.
If you start the engine using your smartphone,
the last selected climate control setting is reac-
tivated (
Ypage 134). The integrated filter filters out most particles of
dust and soot and completely filters out pollen.
It also reduces gaseous pollutants and odors. A
clogged filter reduces the amount of air suppliedto the vehicle interior. For this reason, you
should always observe the interval for replacing
the filter, which is specified in the Maintenance
Booklet. As it depends on environmental condi-
tions, e.g. heavy air pollution, the interval may
be shorter than stated in the Maintenance Book-
let.
iVentilate the vehicle for a brief period during
warm weather, e.g. using the convenience
opening feature (
Ypage 91). This will speed
up the cooling process and the desired inte-
rior temperature will be reached more
quickly.
iIt is possible that the blower may be activa-
ted automatically 60 minutes after the Smart-
Key has been removed depending on various
factors, e.g. the outside temperature. The
vehicle is then ventilated for 30 minutes to dry
the automatic climate control.
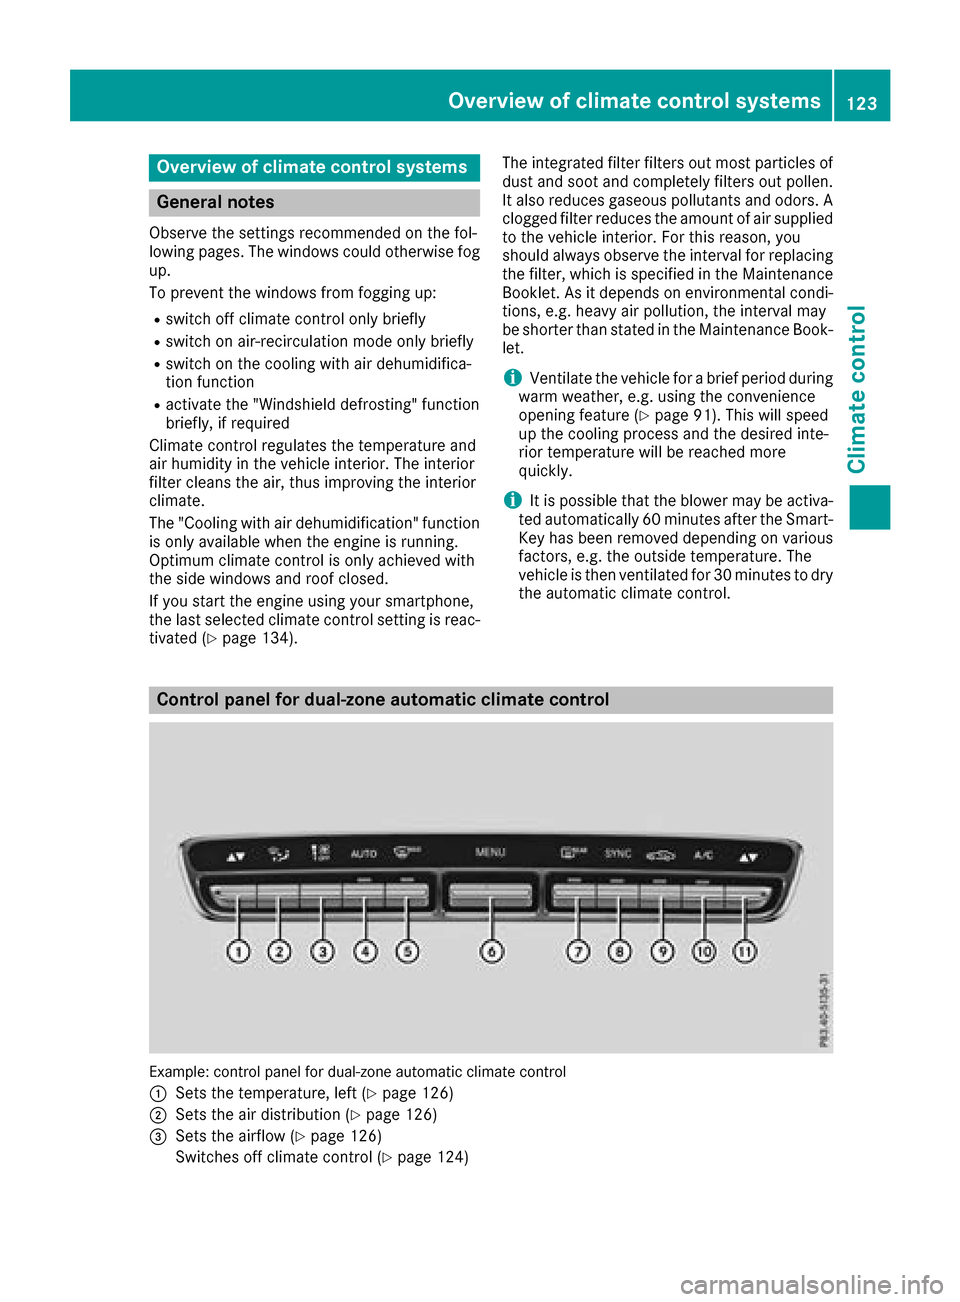
Control panel for dual-zone automatic climate control
Example: control panel for dual-zone automatic climate control
:
Sets the temperature, left (Ypage 126)
;Sets the air distribution (Ypage 126)
=Sets the airflow (Ypage 126)
Switches off climate control (
Ypage 124)
Overview of climate control systems123
Climate control
Page 126 of 374
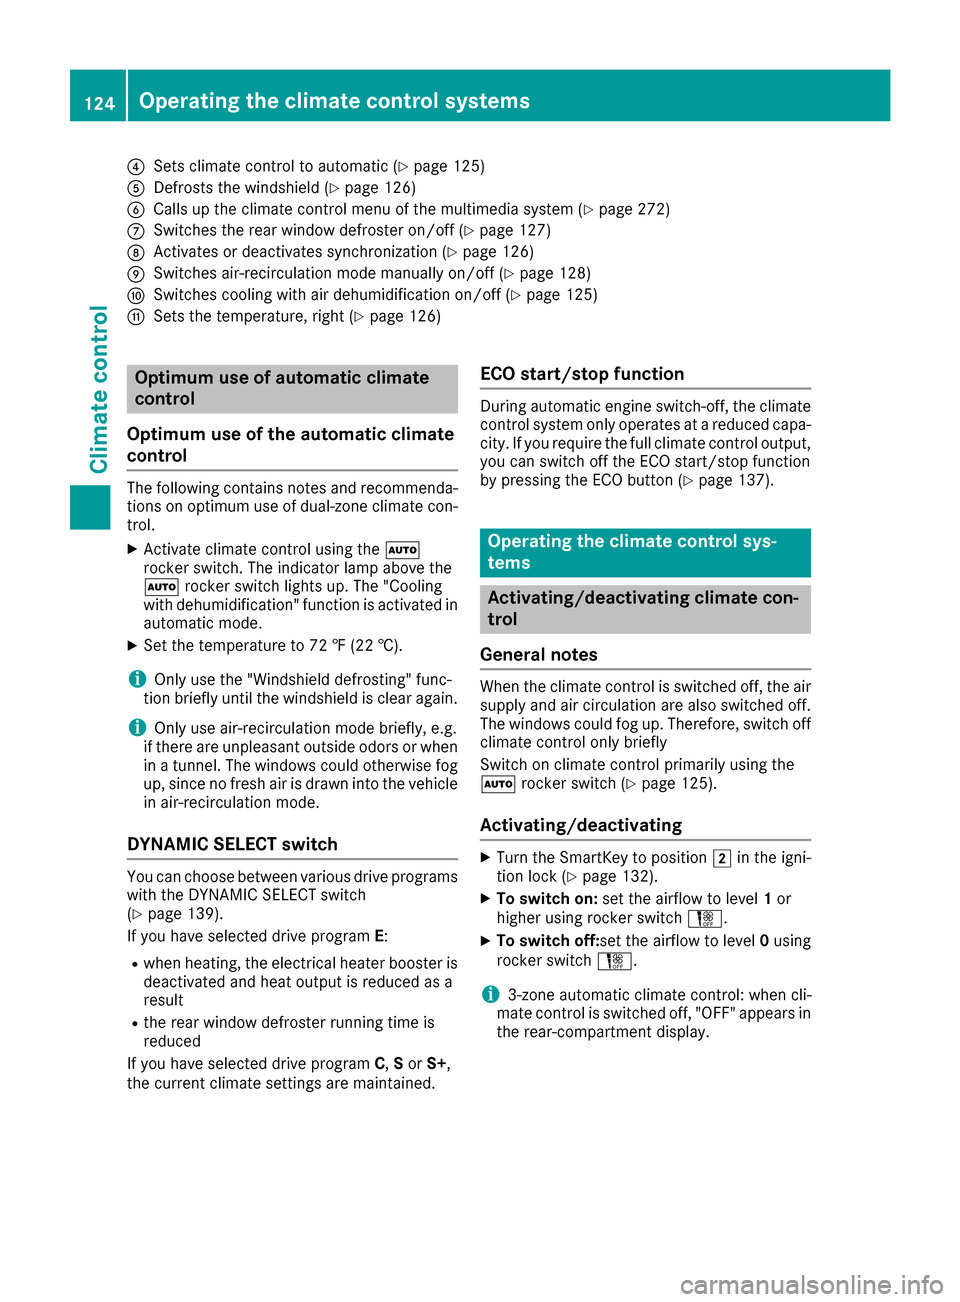
?Sets climate control to automatic (Ypage 125)
ADefrosts the windshield (Ypage 126)
BCalls up the climate control menu of the multimedia system (Ypage 272)
CSwitches the rear window defroster on/off (Ypage 127)
DActivates or deactivates synchronization (Ypage 126)
ESwitches air-recirculation mode manually on/off (Ypage 128)
FSwitches cooling with air dehumidification on/off (Ypage 125)
GSets the temperature, right (Ypage 126)
Optimum use of automatic climate
control
Optimum use of the automatic climate
control
The following contains notes and recommenda-
tions on optimum use of dual-zone climate con-
trol.
XActivate climate control using the Ã
rocker switch. The indicator lamp above the
à rocker switch lights up. The "Cooling
with dehumidification" function is activated in
automatic mode.
XSet the temperature to 72 ‡ (22 †).
iOnly use the "Windshield defrosting" func-
tion briefly until the windshield is clear again.
iOnly use air-recirculation mode briefly, e.g.
if there are unpleasant outside odors or when
in a tunnel. The windows could otherwise fog
up, since no fresh air is drawn into the vehicle in air-recirculation mode.
DYNAMIC SELECT switch
You can choose between various drive programs
with the DYNAMIC SELECT switch
(
Ypage 139).
If you have selected drive program E:
Rwhen heating, the electrical heater booster is
deactivated and heat output is reduced as a
result
Rthe rear window defroster running time is
reduced
If you have selected drive program C,S or S+ ,
the current climate settings are maintained.
ECO start/stop function
During automatic engine switch-off, the climate
control system only operates at a reduced capa-
city. If you require the full climate control output,
you can switch off the ECO start/stop function
by pressing the ECO button (
Ypage 137).
Operating the climate control sys-
tems
Activating/deactivating climate con-
trol
General notes
When the climate control is switched off, the air
supply and air circulation are also switched off.
The windows could fog up. Therefore, switch off
climate control only briefly
Switch on climate control primarily using the
à rocker switch (
Ypage 125).
Activating/deactivating
XTurn the SmartKey to position 2in the igni-
tion lock (Ypage 132).
XTo switch on: set the airflow to level 1or
higher using rocker switch H.
XTo switch off:set the airflow to level 0using
rocker switch H.
i3-zone automatic climate control: when cli-
mate control is switched off, "OFF" appears in
the rear-compartment display.
124Operating the climate control systems
Climate control
Page 127 of 374
Switching cooling with air dehumidification on/off
General notes
If you deactivate the "Cooling with air-dehumidification" function, the air inside the vehicle will not
be cooled. The air inside the vehicle will also not be dehumidified. The windows can fog up more
quickly. Therefore, only deactivate the "Cooling with air-dehumidification" function briefly.
The "Cooling with air dehumidification" function is only available when the engine is running. The air
inside the vehicle is cooled and dehumidified according to the temperature selected.
Condensation may drip from the underside of the vehicle when it is in cooling mode. This is normal
and not a sign that there is a malfunction.
Activating/deactivating
XPress the ¿rocker switch up or down.
The indicator lamp above the rocker switch lights up or goes out.
Problems with the "Cooling with air dehumidification" function
ProblemPossible causes/consequences and MSolutions
The indicator lamp above
the¿ rocker switch
remains off. The cooling
with air dehumidification
function cannot be acti-
vated via the multimedia
system any longer
(
Ypage 273).
Cooling with air dehumidification has been deactivated due to a mal-
function.
XVisit a qualified specialist workshop.
Setting climate control to automatic
General notes
In automatic mode, the set temperature is main-
tained automatically at a constant level. The
system automatically regulates the temperature
of the dispensed air, the airflow and the air dis-
tribution.
During automatic controlling, the "Cooling with
air dehumidification" function is activated.
Automatic control
XTurn the SmartKey to position 2in the igni-
tion lock (Ypage 132).
XTo activate: press theÃrocker switch up
or down.
The indicator lamp above the Ãrocker
switch lights up.
XSet the desired temperature using the w
rocker switch on the front control unit.
XTo switch to manual operation: press the
H rocker switch up or down.
or
XPress the _rocker switch up or down.
The indicator lamp above the Ãrocker
switch goes out.
In automatic mode, if you adjust the airflow or
air distribution manually, the indicator lamp
above the Ãrocker switch goes out. The
function which has not been changed manually,
however, continues to be controlled automati-
cally. When the manually set function switches
back to automatic mode, the indicator lamp
above rocker switch Ãlights up again.
Operating the climate control systems125
Climate control
Page 128 of 374
Adjusting the climatemode settings
In automatic mod eyou can select th efollowin g
airflow setting sfor th edriver's and front-
passenger areas :
FOCUS high airflow, slightly cooler setting
MEDIUM medium airflow, standard setting
DIFFUS Elow airflow, slightly warmer and draft-
free setting
XTo set: set the climate mode using the mul-
timedia system (Ypage 272).
Setting the temperature
Dual-zone automatic climate control: different
temperatures can be set for the driver's and
front-passenger sides.
XTurn the SmartKey to position 2in the igni-
tion lock (Ypage 132).
XTo increase or reduce: press rocker switch
w up or down.
Only change the temperature setting in small
increments. Start at 72 ‡ (22 †).
Setting the air distribution
Air distribution settings
¯ Directs air through the defroster vents
P Directs air through the center and side air
vents
O Directs air through the footwell air vents
S Directs air through the center, side and
footwell vents
a Directs air through the defroster and
footwell vents
_ Directs air through the defroster, center,
side and footwell vents
b Directs air through the defroster, center
and side air vents
W Sets the air distribution to automatic
Setting
XTurn the SmartKey to position 2
(Ypage 132).
XPress the _rocker switch up or down.
The various air distribution settings appear in
the multimedia system.
Setting the airflow
XTurn the SmartKey to position 2in the igni-
tion lock (Ypage 132).
XTo increase or reduce: press rocker switch
H up or down.
Activating or deactivating the syn-
chronization function
General notes
Climate control can be set centrally using the
synchronization function. The temperature set-
ting is adopted for the front-passenger side.
Activating/deactivating
XPress rocker switch 0up or down.
The indicator lamp above rocker switch 0
lights up or goes out.
or
XActivate or deactivate the "Synchronization"
function using the multimedia system
(
Ypage 126).
The synchronization function deactivates if the
settings for the front-passenger side are
changed.
Defrosting the windshield
General notes
You can use this function to defrost the wind-
shield or to clear a fogged up windshield or front
side windows on the inside.
Switch off the "Windshield defrosting" function
as soon as the windshield is clear again.
Switching the "Windshield defrosting"
function on or off
XTurn the SmartKey to position 2in the igni-
tion lock (Ypage 132).
XTo switch on: press rocker switch ¬on
the front control unit up or down.
The indicator lamp above the ¬rocker
switch lights up. The current climate control
settings are deactivated.
126Operating the climate control systems
Climate control
Page 129 of 374
The climate control system switches to the
following functions:
Rhigh airflow
Rhigh temperature
Rair distribution to the windshield and front
side windows
Rair-recirculation mode off
iIf necessary, the "Cooling with air dehumid-
ification" function is activated. In this case,
the indicator lamp above the ¿rocker
switch remains switched off.
XTo switch off: press rocker switch ¬up or
down.
The indicator lamp above the ¬rocker
switch goes out. The previously selected set-
tings are restored. Air-recirculation mode
remains deactivated.
Defrosting the windows
Windows fogged up on the inside
XActivate the "Cooling with air dehumidifica-
tion" function with the ¿rocker switch.
XSwitch on automatic mode using the Ã
rocker switch.
XIf the windows continue to fog up, activate the "Windshield defrosting" function using the
¬ rocker switch.
iYou should only select this setting until the
windshield is clear again.
Windows fogged up on the outside
XActivate the windshield wipers.
XSwitch on automatic mode using the Ã
rocker switch.
iIf you clean the windows regularly, they do
not fog up so quickly.
Rear window defroster
General notes
The rear window defroster has a high current
draw. You should therefore switch it off as soon
as the rear window is clear. Otherwise, the rear
window defroster switches off automatically
after several minutes.
If the battery voltage is too low, the rear window defroster may switch off.
Activating/deactivating
XTurn the SmartKey to position 2in the igni-
tion lock (Ypage 132).
XPress rocker switch ¤up or down.
The indicator lamp above rocker switch ¤
lights up or goes out.
Problems with the rear window defroster
ProblemPossible causes/consequences and MSolutions
The rear window
defroster has deactiva-
ted prematurely or can-
not be activated.The battery has not been sufficiently charged.
XSwitch off any consumers that are not required, e.g. reading lamps,
interior lighting or the seat heating.
When the battery is sufficiently charged, the rear window defroster
can be activated again.
Switching air-recirculation mode
on/off
General notes
You can also temporarily deactivate the flow of
fresh air manually if unpleasant odors are enter-
ing the vehicle from outside. The air already
inside the vehicle will then be recirculated. If you switch on air-recirculation mode, the win-
dows can fog up more quickly, in particular at
low temperatures. Only use air-recirculation
mode briefly to prevent the windows from fog-
ging up.
Operating the climate control systems127
Climate control
Page 130 of 374
Activating/deactivating
XTurn theSmartKey to position 2in th eigni-
tion loc k (Ypage 132).
XTo activate: press rockerswitch gup or
down .
The indicator lamp abov erocke rswitch g
lights up.
Air-recirculation mod eswitches on automati-
cally:
Rat high outside temperatures
Rin atunne l(vehicles wit h anavigation system
only)
The indicator lamp abov eth eg rocker
switch is no tlit when automatic air-recirculation
mod eis activated. Outside air is added after
about 30 minutes.
XTo deactivate: press theg rockerswitch
up or down .
The indicator lamp abov eth eg rocker
switch goe sout .
Air-recirculation mod edeactivates automati-
cally:
Rafter approximately fiv eminute sat outside
temperatures belo wapproximately 41 ‡
(5 †)
Rafter approximately fiv eminute sif coolin g
wit hair dehumidification is deactivated
Rafter approximately 30 minute sat outside
temperatures abov eapproximately 41 ‡
(5 †) if th e"Cooling wit hdehumidification "
function is activated
Perfu meatomizer
Operating the perfu meatomi zer
GWARNIN G
If children open th evial, they could drink th e
perfum eor it could come int ocontact wit h
their eyes. There is aris kof injury. Therefore ,
do no tleav echildren unsupervised in th evehi-
cle .
If th eperfum eliquid has been drunk, consult
a doctor. If perfum ecomes int ocontact wit h
your eyes or skin, rinse th eeyes wit hclean
water. If you continu eto experience difficul-
ties, consult adoctor.
HEnvironmenta lnot e
Full vials mus tno tbe dis-
posed of wit hhousehold
waste. The ymus tbe collec -
te dseparately and recycle d
to protect th eenvironment.
Dispose of full vials in an
environmentally responsibl e
manne rand tak ethem to a
harmful substance collec -
tion point.
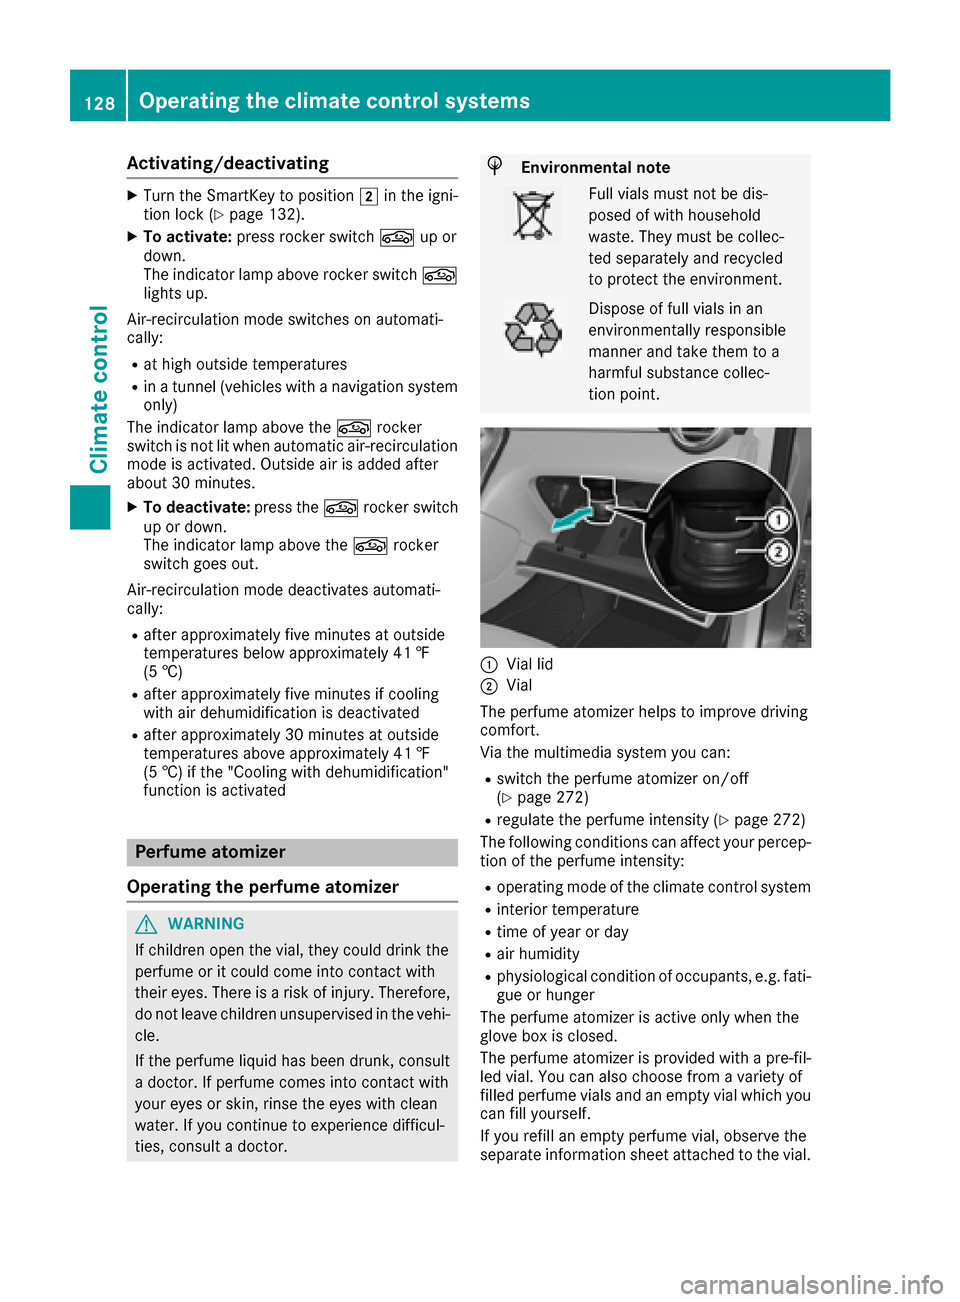
:Vial lid
;Vial
The perfum eatomizer help sto improve drivin g
comfort .
Via th emultimedia system you can :
Rswitch theperfum eatomizer on/off
(Ypage 272)
Rregulat eth eperfum eintensit y (Ypage 272)
The followin gcondition scan affec tyour percep-
tion of th eperfum eintensity:
Roperating mod eof th eclimat econtrol system
Rinterior temperature
Rtime of year or day
Rair humidit y
Rphysiological condition of occupants, e.g. fati-
gue or hunger
The perfum eatomizer is active only when th e
glov ebox is closed.
The perfum eatomizer is provided wit h apre-fil-
led vial. You can also choos efrom avariet yof
filled perfum evials and an empty vial whic hyou
can fill yourself .
If you refill an empty perfum evial, observ eth e
separat einformation sheet attached to th evial.
128Operating the climate control systems
Climate control