light MERCEDES-BENZ GLC SUV 2018 User Guide
[x] Cancel search | Manufacturer: MERCEDES-BENZ, Model Year: 2018, Model line: GLC SUV, Model: MERCEDES-BENZ GLC SUV 2018Pages: 390, PDF Size: 6.54 MB
Page 18 of 390
Operation ......................................... 52
System self-test ...............................54
Occupant safety
Air bags ...........................................4 9
Automatic measures after an acci-
dent ................................................. 59
Belt warning .....................................4 9
Childr eninthe vehicle .................... .60
Important safety notes .................... 44
Introduction to the restraint sys-
tem .................................................. 44
Occupant Classification System
(OCS) ............................................... 52
PASSENGER AIR BAG indicator
lamps ............................................... 45
Pets in the vehicle ........................... 65
PRE-SAFE
®(anticipatory occu-
pant protection) ............................... 58
PRE-SAFE
®PLUS (anticipatory
occupant protection PLUS) .............. 59
Restraint system warning lamp ........ 45
Seat belt .......................................... 45
OCS
Conditions ....................................... 52
Faults ............................................... 55
Operation .........................................5 2
System self-test ............................... 54
Odometer ........................................... 224
Off-road driving
Approach/departure angle ............ 384
Checklist after driving off-road ...... 167
Checklist before driving off-road .... 167
General information ....................... 166
Important safety notes .................. 165
Maximum gradient climbing abil-
ity .................................................. 384
Maximum water depth ................... 383
Traveling uphill ............................... 168
Off-road program
Activating/deactivating. ................ 183
General notes ................................ 181
Overview of programs .................... 182
Off-road system
DSR ............................................... 180
Off road drive pro gram .................. 181
Off-roa
d 4ETS .................................. 70
Off-road ESP
®.................................. 72 Oil
see Engine oil
On-board computer
AMG menu ..................................... 235
Assistance graphic menu ............... 231
Assistance menu ........................... 232
Display messages .......................... 239
Displaying a service message ........ 323
Displays and operation .................. 220
Distance Pilot DISTRONIC ............. 175
Factory settings ............................. 235
G-Meter ......................................... 236
Head-up display ............................. 223
Head-up display menu ................... 233
Important safety notes .................. 220
Instrument cluster menu ............... 234
Lights menu ................................... 234
Media menu ................................... 228
Menu overview .............................. 224
Message memory .......................... 239
Navigation menu ............................ 226
RACETIMER ................................... 237
Radio menu ................................... 228
Service menu ................................. 231
Settings menu ............................... 231
Standard display ............................ 224
Telephone menu ............................ 230
Trip menu ...................................... 224
Video DVD operation ..................... 229
Opening and closing the side trim
panels ................................................. 119
Operating safety
Declaration of conformity ................ 31
Important safety notes .................... 31
Operating system
see On-board computer
Operation
Digital Operator's Manual ................ 27
Operator's Manual
Overview .......................................... 29
Vehicle equipment ........................... 29
Outside temperature display ........... 221
Overhead control panel ...................... 42
Override feature
Rear side windows ........................... 65
16Index
Page 25 of 390
Maximum loaded vehicle weight
(definition) .....................................368
Maximum permissible tire pres-
sure (definition) .............................3 68
Maximum tire load ......................... 366
Maximum tire load (definition) ....... 368
MOExtended tires .......................... 351
Optional equipment weight (defi-
nition) ............................................ 369
PSI (pounds per square inch) (def-
inition) ...........................................3 68
Replacing ....................................... 369
Service life ..................................... 350
Sidewall (definition) ....................... 368
Snow chains .................................. 351
Speed rating (definition) ................ 368
Storing ...........................................3 70
Structure and characteristics
(definition) ..................................... 367
Summer tires in winter .................. 351
Temperature .................................. 363
TIN (Tire Identification Number)
(definition) ..................................... 369
Tire bead (definition) ......................3 68
Tire pressure (definition) ................ 368
Tire pressures (recommended) ...... 367
Tire size (data) ............................... 373
Tire size designation, load-bearing
capacity, speed rating .................... 364
Tire tread ....................................... 350
Tire tread (definition) ..................... 368
Total load limit (definition) ............. 369
Traction ......................................... 363
Traction (definition) ....................... 369
Tread wear ..................................... 363
Uniform Tire Quality Grading
Standards ...................................... 362
Uniform Tire Quality Grading
Standards (definition) .................... 367
Wear indicator (definition) ............. 369
Wheel and tire combination ........... 373
Wheel rim (definition) .................... 367
see Flat tire
Top Tether ............................................ 62
Touchpad
Changing the station/music
track .............................................. 283
C
haracter suggestions ................... 282 Deleting characters ....................... 282
Entering a space ............................ 282
Entering characters ....................... 282
Gesture control .............................. 282
Handwriting recognition ................ 282
Operating the touchpad ................. 282
Overview ........................................ 282
Quick access for Audio .................. 283
Switching ....................................... 282
Switching input line ....................... 282
Tow-starting
Emergency engine starting ............ 347
Important safety notes .................. 343
Towing a trailer
Axle load, permissible .................... 384
Cleaning the trailer tow hitch ......... 329
Coupling up a trailer ...................... 216
Decoupling a trailer ....................... 218
Driving tips .................................... 215
ESP
®(Electronic Stability Pro-
gram) ............................................... 72
Important safety notes .................. 214
Installing the ball coupling ............. 216
Lights display message .................. 251
Power supply ................................. 218
Pulling away with a trailer .............. 140
Removing the ball coupling ............ 218
Trailer loads ................................... 384
Towing away
Important safety guidelines ........... 343
Installing the towing eye ................ 344
Notes for 4MATIC vehicles ............ 346
Removing the towing eye ............... 345
Transporting the vehicle ................ 346
With both axles on the ground ....... 345
Towing eye ......................................... 333
Traction system
see ETS/4ETS (Electronic Trac-
tion System)
Traffic reports
see also Digital Operator's Man-
ual .................................................. 280
Traffic Sign Assist
Activating/deactivating the warn-
ing function .................................... 232
Display message ............................ 259
Function/notes ............................. 205
Important safety notes .................. 205
Index23
Page 35 of 390
essary, contact us at one of the following
addresses.
In the USA
Customer Assistance Center
Mercedes-Benz USA, LLC
3 Mercedes Drive
Montvale, NJ 07645-0350
In Canada
Customer Relations Department
Mercedes-Benz Canada, Inc.
98 Vanderhoof Avenue
Toronto, Ontario M4G 4C9
Reporting safety defects
USA only:
The following text is reproduced as required of
all manufacturers under Title 49, Code of U.S.
Federal Regulations, Part 575 pursuant to the
National Traffic and Motor Vehicle Safety Act of
1966.
If you believe that your vehicle has a defect
which could cause a crash or could cause injury
or death, you should immediately inform the
National Highway Traffic Safety Administration
(NHTSA) in addition to notifying Mercedes-Benz
USA, LLC.
If NHTSA receives similar complaints, it may
open an investigation, and if it finds that a safety
defect exists in a group of vehicles, it may order
a recall and remedy campaign. However, NHTSA
cannot become involved in individual problems
between you, your dealer, or Mercedes-Benz
USA, LLC.
To contact NHTSA, you may call the Vehicle
Safety Hotline toll-free at 1-888-327-4236
(TTY: 1-800-424-9153); go tohttp://
www.safercar.gov; or write to: Administrator,
NHTSA, 400 Seventh Street, SW., Washington,
DC 20590.
You can also obtain other information about
motor vehicle safety from
http://www.safercar.gov
Limited Warranty
!
Observe the notes in this Operator's Manual
regarding the correct operation of your vehi-
cle and possible damage to the vehicle. Dam-
age to the vehicle which is caused by violation of these notes is not covered by the
Mercedes-Benz implied warranty or the new
or used-vehicle warranty.
QR code for rescue card
The QR codes are secured in the fuel filler flap
and on the opposite side on the B-pillar. In the
event of an accident, rescue services can use
the QR code to quickly find the appropriate res-
cue card for your vehicle. The current rescue
card contains the most important information
about your vehicle in a compact form, e.g. the
routing of the electric cables.
You can find more information under
www.mercedes-benz.de/qr-code.
Data stored in the vehicle
Data storage
A wide range of electronic components in your
vehicle contain data memories.
These data memories temporarily or perma-
nently store technical information about:
Rthe vehicle's operating state
Rincidents
Rmalfunctions
In general, this technical information docu-
ments the state of a component, a module, a
system or the surroundings.
This includes, for example:
Roperating conditions of system components.
For example, fluid levels
Rthe vehicle's status messages and those of its
individual components, e.g. number of wheel
revolutions/speed, deceleration in move-
ment, lateral acceleration, accelerator pedal
position
Rmalfunctions and defects in important system
components, e.g. lights, brakes
Rvehicle reactions and operating conditions in
special driving situations, e.g. air bag deploy-
ment, intervention of stability control sys-
tems
Rambient conditions, e.g. outside temperature
Data stored in the vehicle33
Introduction
Z
Page 38 of 390
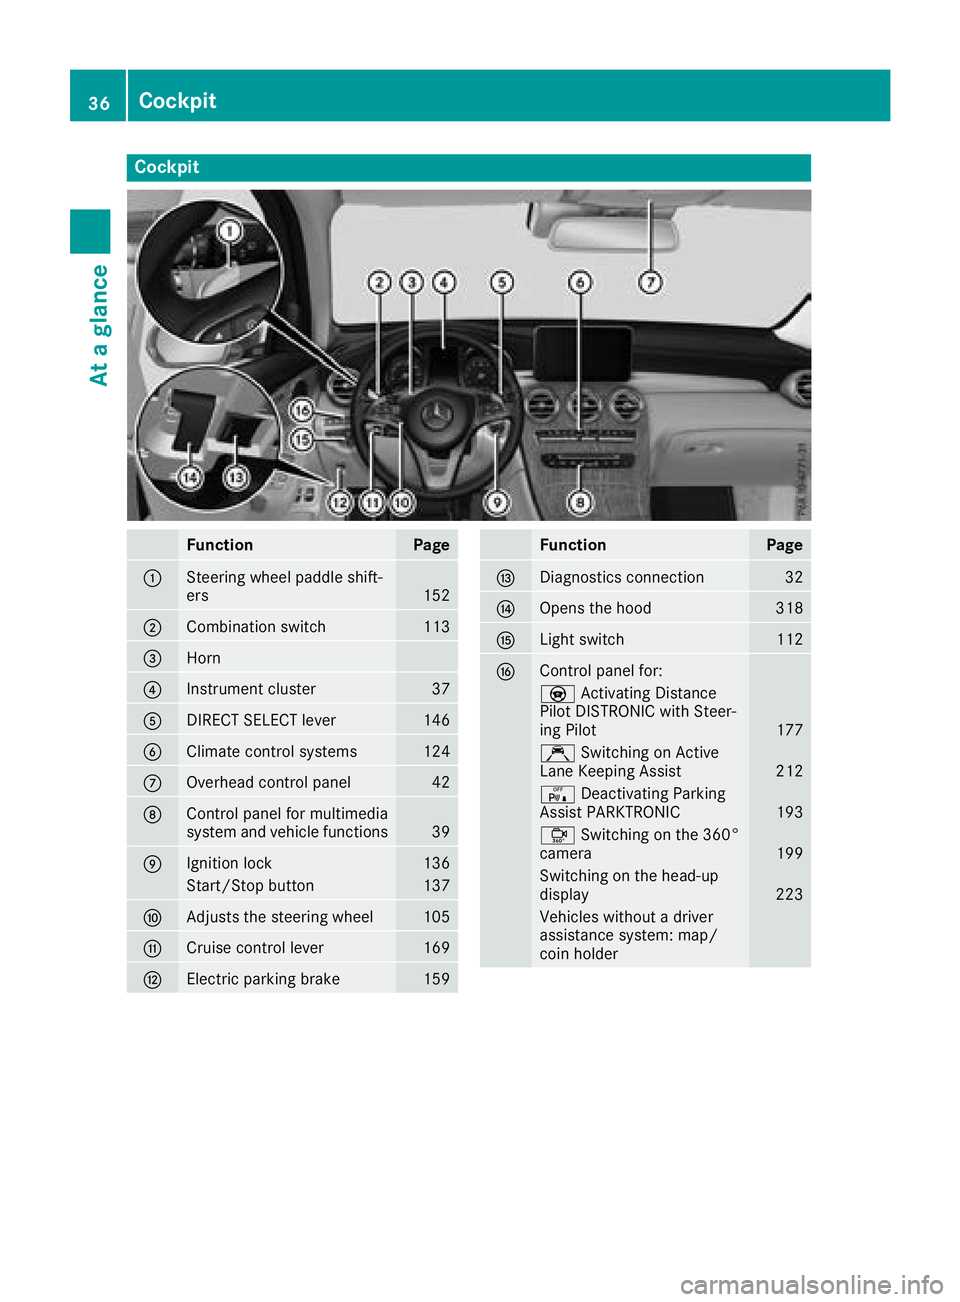
Cockpit
FunctionPage
:Steering wheel paddle shift-
ers152
;Combination switch113
=Horn
?Instrument cluster37
ADIRECT SELECT lever146
BClimate control systems124
COverhead control panel42
DControl panel for multimedia
system and vehicle functions39
EIgnition lock136
Start/Stop button137
FAdjusts the steering wheel105
GCruise control lever169
HElectric parking brake159
FunctionPage
IDiagnostics connection32
JOpens the hood318
KLight switch112
LControl panel for:
YActivating Distance
Pilot DISTRONIC with Steer-
ing Pilot
177
Ç Switching on Active
Lane Keeping Assist212
c Deactivating Parking
Assist PARKTRONIC193
Ô Switching on the 360°
camera199
Switching on the head-up
display223
Vehicles without a driver
assistance system: map/
coin holder
36Cockpit
At a glance
Page 42 of 390
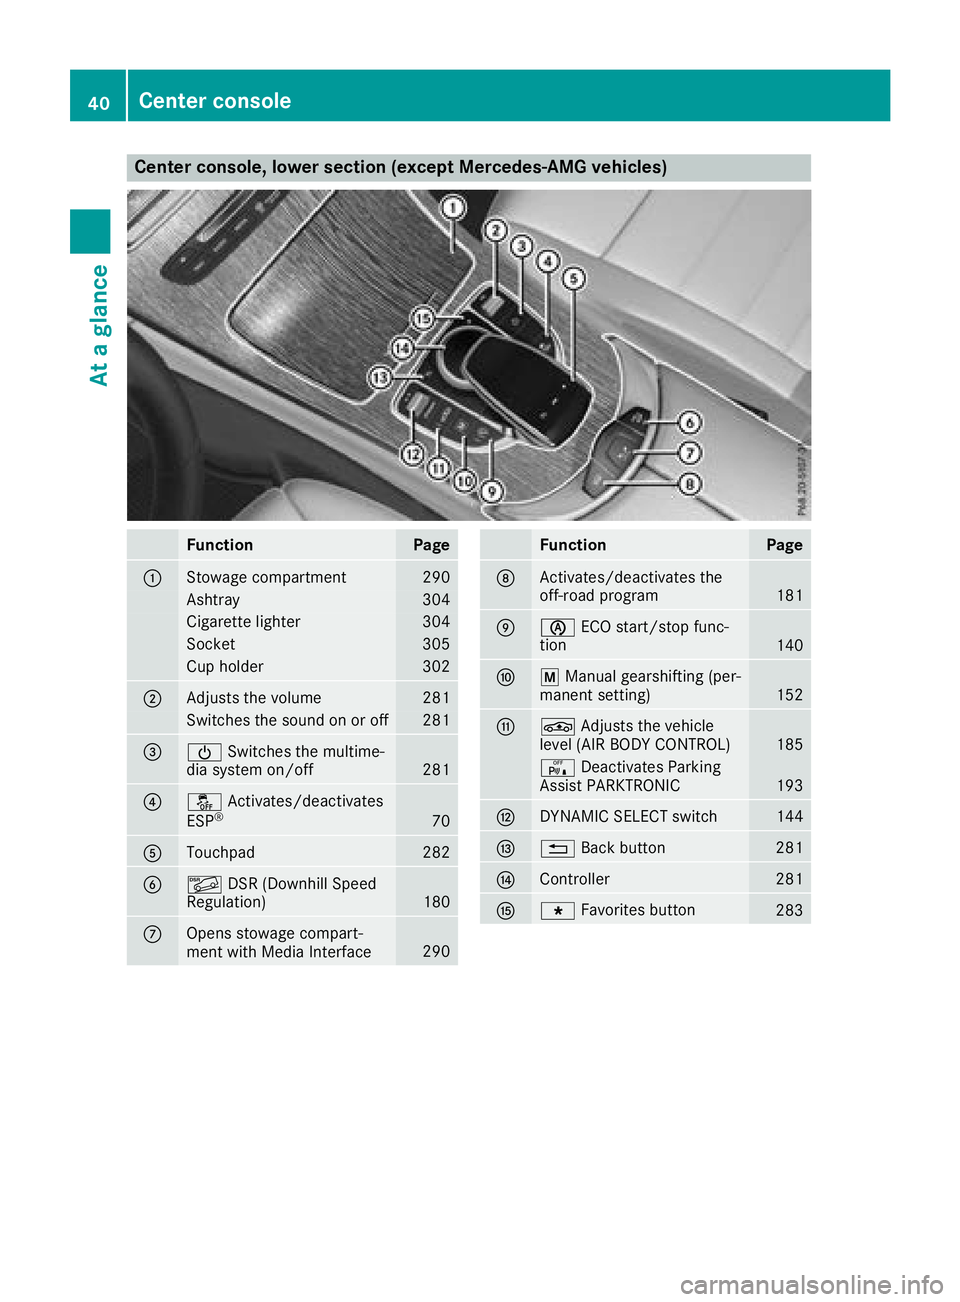
Center console, lower section (except Mercedes-AMG vehicles)
FunctionPage
:Stowage compartment290
Ashtray304
Cigarette lighter304
Socket305
Cup holder302
;Adjusts the volume281
Switches the sound on or off281
=ÜSwitches the multime-
dia system on/off281
?å Activates/deactivates
ESP®70
ATouchpad282
BÃ DSR (Downhill Speed
Regulation)180
COpens stowage compart-
ment with Media Interface290
FunctionPage
DActivates/deactivates the
off-road program181
Eè ECO start/stop func-
tion140
Fp Manual gearshifting (per-
manent setting)152
GÉ Adjusts the vehicle
level (AIR BODY CONTROL)185
c Deactivates Parking
Assist PARKTRONIC193
HDYNAMIC SELECT switch144
I% Back button281
JController281
KgFavorites button283
40Center console
At a glance
Page 43 of 390
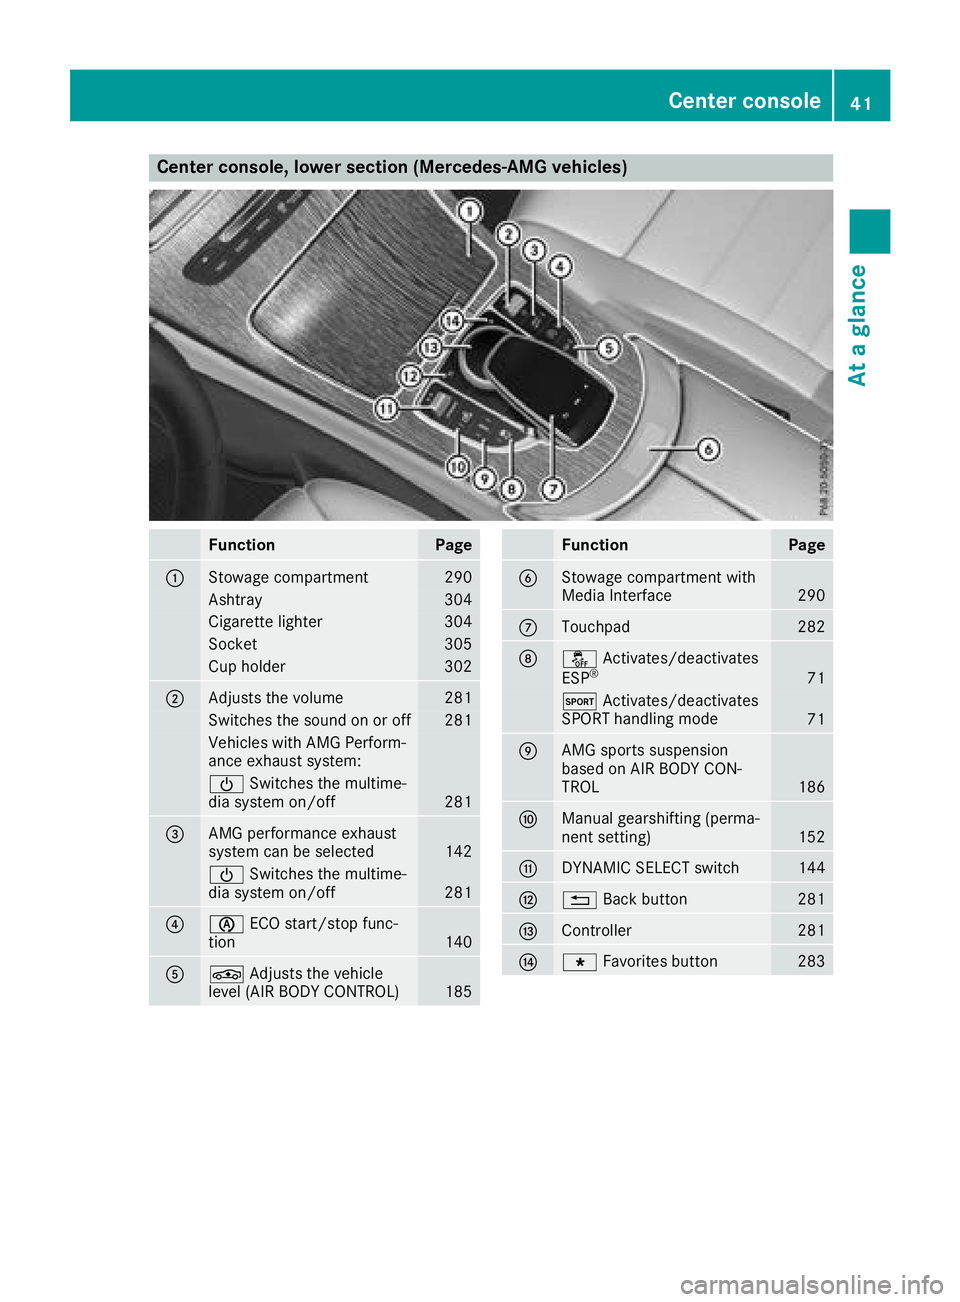
Center console, lower section (Mercedes-AMG vehicles)
FunctionPage
:Stowage compartment290
Ashtray304
Cigarette lighter304
Socket305
Cup holder302
;Adjusts the volume281
Switches the sound on or off281
Vehicles with AMG Perform-
ance exhaust system:
ÜSwitches the multime-
dia system on/off281
=AMG performance exhaust
system can be selected142
Ü Switches the multime-
dia system on/off281
?è ECO start/stop func-
tion140
AÉ Adjusts the vehicle
level (AIR BODY CONTROL)185
FunctionPage
BStowage compartment with
Media Interface290
CTouchpad282
Då Activates/deactivates
ESP®71
M Activates/deactivates
SPORT handling mode71
EAMG sports suspension
based on AIR BODY CON-
TROL
186
FManual gearshifting (perma-
nent setting)152
GDYNAMIC SELECT switch144
H% Back button281
IController281
JgFavorites button283
Center console41
At a glance
Page 44 of 390
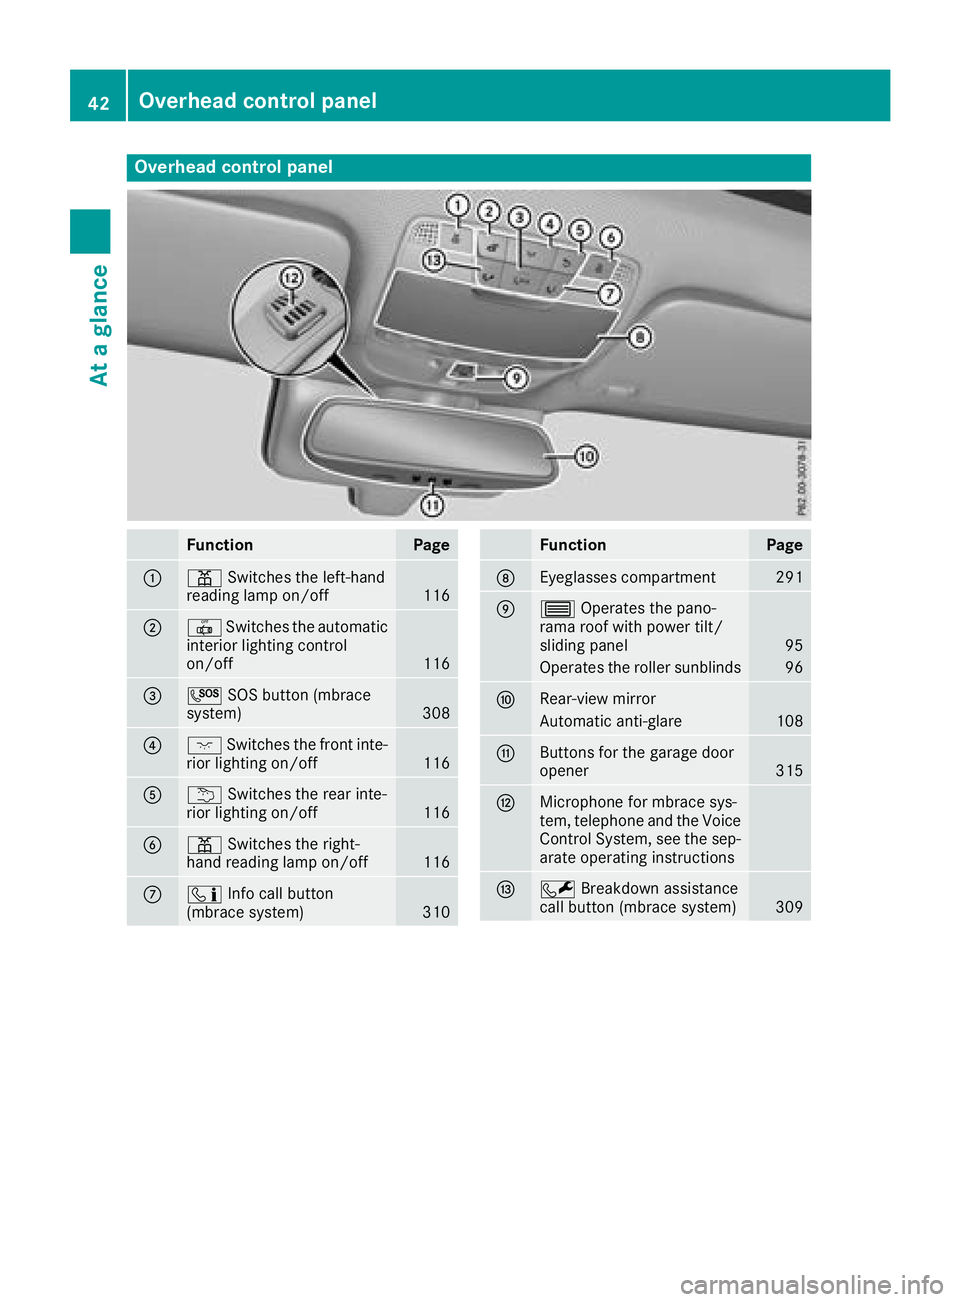
Overhead control panel
FunctionPage
:pSwitches the left-hand
reading lamp on/off116
;| Switches the automatic
interior lighting control
on/off
116
=G SOS button (mbrace
system)308
?c Switches the front inte-
rior lighting on/off116
Au Switches the rear inte-
rior lighting on/off116
Bp Switches the right-
hand reading lamp on/off116
Cï Info call button
(mbrace system)310
FunctionPage
DEyeglasses compartment291
E3 Operates the pano-
rama roof with power tilt/
sliding panel
95
Operates the roller sunblinds96
FRear-view mirror
Automatic anti-glare108
GButtons for the garage door
opener315
HMicrophone for mbrace sys-
tem, telephone and the Voice
Control System, see the sep-
arate operating instructions
IF Breakdown assistance
call button (mbrace system)309
42Overhead control panel
At a glance
Page 47 of 390
Restraint system warning lamp
The functions of the restraint system are
checked after the ignition is switched on and at
regular intervals while the engine is running.
Therefore, malfunctions can be detected in
good time.
The6 restraint system warning lamp on the
instrument cluster lights up when the ignition is
switched on. It goes out no later than a few sec-
onds after the vehicle is started. The compo-
nents of the restraint system are in operational
readiness.
A malfunction has occurred if the 6restraint
system warning lamp:
Rdoes not light up after the ignition is switched
on
Rdoes not go out after a few seconds with the
engine running
Rlights up again while the engine is running
GWARNING
If the restraint system is malfunctioning,
restraint system components may be trig-
gered unintentionally or may not deploy as
intended during an accident. This can affect
for example the Emergency Tensioning
Device or the air bag. This poses an increased
risk of injury or even fatal injury.
Have the restraint system checked and
repaired in a qualified specialist workshop as
soon as possible.
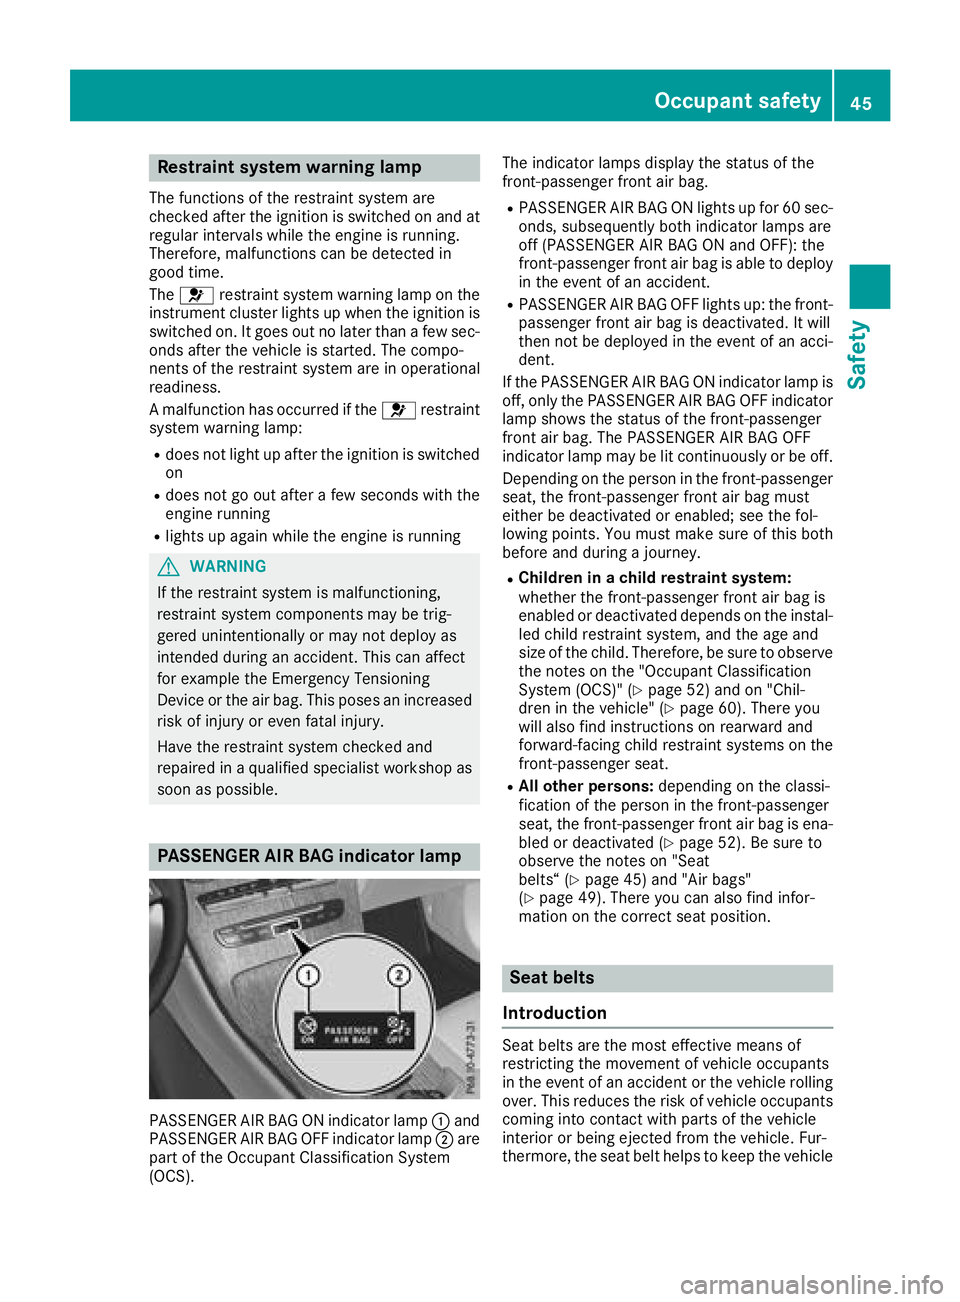
PASSENGER AIR BAG indicator lamp
PASSENGER AIR BAG ON indicator lamp :and
PASSENGER AIR BAG OFF indicator lamp ;are
part of the Occupant Classification System
(OCS). The indicator lamps display the status of the
front-passenger front air bag.
RPASSENGER AIR BAG ON lights up for 60 sec-
onds, subsequently both indicator lamps are
off (PASSENGER AIR BAG ON and OFF): the
front-passenger front air bag is able to deploy
in the event of an accident.
RPASSENGER AIR BAG OFF lights up: the front-
passenger front air bag is deactivated. It will
then not be deployed in the event of an acci-
dent.
If the PASSENGER AIR BAG ON indicator lamp is
off, only the PASSENGER AIR BAG OFF indicator lamp shows the status of the front-passenger
front air bag. The PASSENGER AIR BAG OFF
indicator lamp may be lit continuously or be off.
Depending on the person in the front-passenger
seat, the front-passenger front air bag must
either be deactivated or enabled; see the fol-
lowing points. You must make sure of this both
before and during a journey.
RChildren in a child restraint system:
whether the front-passenger front air bag is
enabled or deactivated depends on the instal-led child restraint system, and the age and
size of the child. Therefore, be sure to observe
the notes on the "Occupant Classification
System (OCS)" (
Ypage 52) and on "Chil-
dren in the vehicle" (Ypage 60). There you
will also find instructions on rearward and
forward-facing child restraint systems on the
front-passenger seat.
RAll other persons: depending on the classi-
fication of the person in the front-passenger
seat, the front-passenger front air bag is ena-
bled or deactivated (
Ypage 52). Be sure to
observe the notes on "Seat
belts“ (
Ypage 45) and "Air bags"
(Ypage 49). There you can also find infor-
mation on the correct seat position.
Seat belts
Introduction
Seat belts are the most effective means of
restricting the movement of vehicle occupants
in the event of an accident or the vehicle rolling over. This reduces the risk of vehicle occupants
coming into contact with parts of the vehicle
interior or being ejected from the vehicle. Fur-
thermore, the seat belt helps to keep the vehicle
Occupant safety45
Safety
Z
Page 50 of 390
of an accident, they could be crushed
between the vehicle occupant and seat belt.
Robjects are never secured with a seat belt if
the seat belt is also being used by one of the
vehicle's occupants
Also ensure that there are never objects
between a person and the seat, e.g. cushions.
Seat belts are only intended to secure and
restrain vehicle occupants. Always observe the
"Loading guidelines" for securing objects, lug-
gage or loads (
Ypage 290).
Fastening and adjusting the seat belts
Observe the safety notes on the seat belt
(Ypage 46) and the notes on correct use of seat
belts (Ypage 47).
If the center rear seat belt is being used, also
observe the information about the seat belt for
the center rear seat (
Ypage 48).
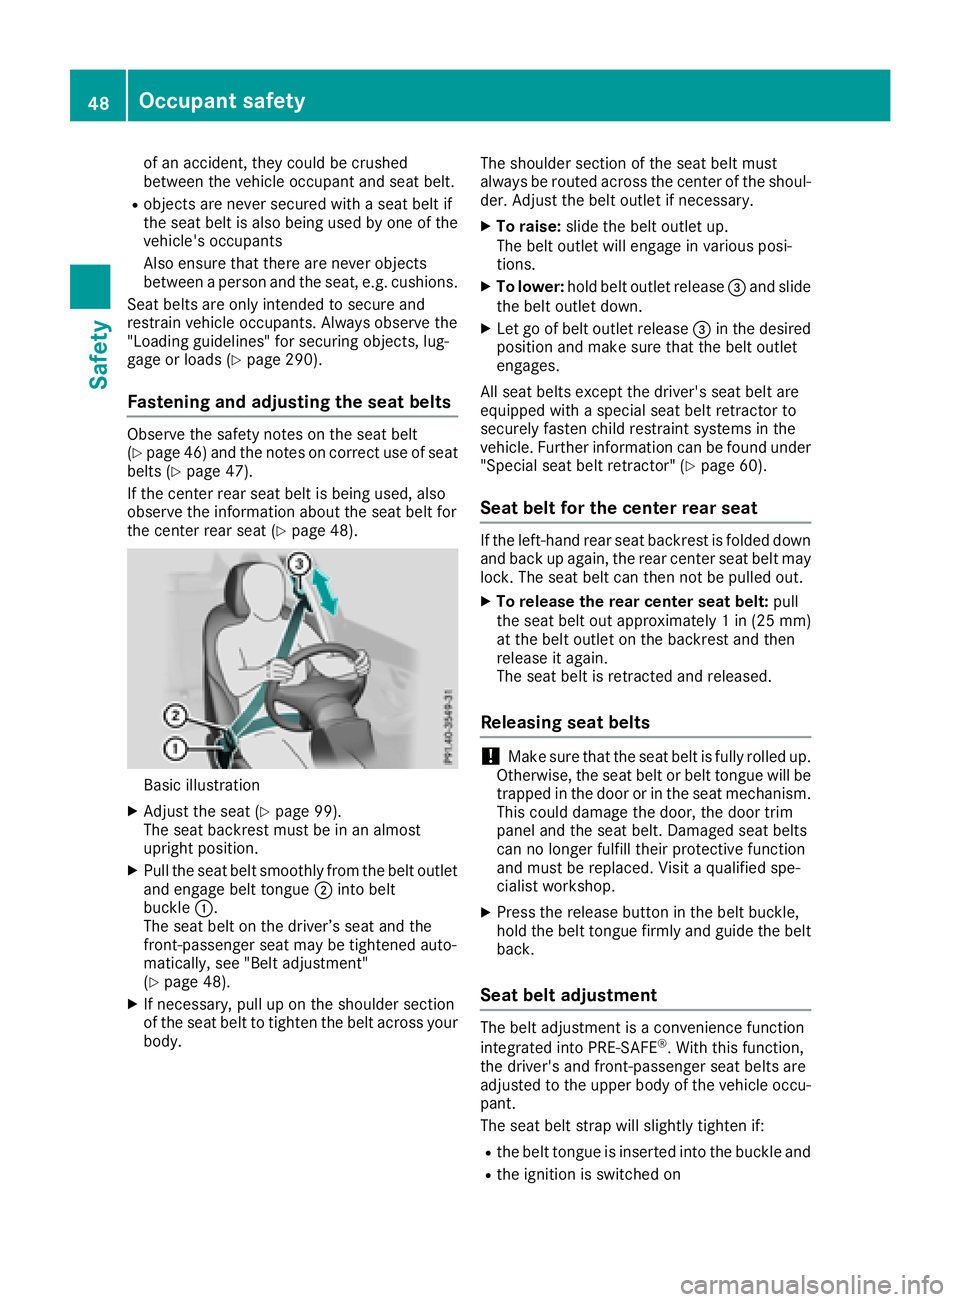
Basic illustration
XAdjust the seat (Ypage 99).
The seat backrest must be in an almost
upright position.
XPull the seat belt smoothly from the belt outlet
and engage belt tongue ;into belt
buckle :.
The seat belt on the driver’s seat and the
front-passenger seat may be tightened auto-
matically, see "Belt adjustment"
(
Ypage 48).
XIf necessary, pull up on the shoulder section
of the seat belt to tighten the belt across your
body. The shoulder section of the seat belt must
always be routed across the center of the shoul-
der. Adjust the belt outlet if necessary.
XTo raise:
slide the belt outlet up.
The belt outlet will engage in various posi-
tions.
XTo lower: hold belt outlet release =and slide
the belt outlet down.
XLet go of belt outlet release =in the desired
position and make sure that the belt outlet
engages.
All seat belts except the driver's seat belt are
equipped with a special seat belt retractor to
securely fasten child restraint systems in the
vehicle. Further information can be found under
"Special seat belt retractor" (
Ypage 60).
Seat belt for the center rear seat
If the left-hand rear seat backrest is folded down
and back up again, the rear center seat belt may
lock. The seat belt can then not be pulled out.
XTo release the rear center seat belt: pull
the seat belt out approximately 1 in (25 mm)
at the belt outlet on the backrest and then
release it again.
The seat belt is retracted and released.
Releasing seat belts
!Make sure that the seat belt is fully rolled up.
Otherwise, the seat belt or belt tongue will be
trapped in the door or in the seat mechanism.
This could damage the door, the door trim
panel and the seat belt. Damaged seat belts
can no longer fulfill their protective function
and must be replaced. Visit a qualified spe-
cialist workshop.
XPress the release button in the belt buckle,
hold the belt tongue firmly and guide the belt
back.
Seat belt adjustment
The belt adjustment is a convenience function
integrated into PRE-SAFE®. With this function,
the driver's and front-passenger seat belts are
adjusted to the upper body of the vehicle occu-
pant.
The seat belt strap will slightly tighten if:
Rthe belt tongue is inserted into the buckle and
Rthe ignition is switched on
48Occupant safety
Safety
Page 51 of 390
The seat belt adjustment will apply a certain
tightening force if any slack is detected between
the vehicle occupant and the seat belt. Do not
grab hold of the seat belt.
You can switch the seat belt adjustment on and
off using the multimedia system. Information on
switching the seat belt adjustment on and off
can be found in the Digital Operating Instruc-
tions.
Belt warning for the driver and front
passenger
The7 seat belt warning lamp in the instru-
ment cluster is a reminder that all vehicle occu- pants must wear their seat belts. It may light up
continuously or flash. In addition, there may be
a warning tone.
Regardless of whether the driver's seat belt has
already been fastened, the 7seat belt warn-
ing lamp lights up for six seconds each time the engine is started. If the front doors are closed
and the driver's or front-passenger seat belt has
not been fastened, the 7seat belt warning
lamp lights up again after the six seconds. As
soon as the driver's and front-passenger seat
belts are fastened or a front door is opened
again, the 7seat belt warning lamp goes out.
If the driver's seat belt is not fastened after the
engine is started, an additional warning tone will sound. The warning tone switches off after six
seconds or once the driver's seat belt is fas-
tened.
If the vehicle's speed exceeds 15 mph
(25 km/h) once and the driver's and front-
passenger seat belts are not fastened, a warning
tone sounds. A warning tone also sounds with
increasing intensity for 60 seconds or until the
driver or front passenger have fastened their
seat belts.
If the driver or front passenger unfasten their
seat belts during the journey, the seat belt warn-
ing is activated again.
Air bags
Introduction
The installation point of an air bag can be rec-
ognized by the AIRBAG marking.
An air bag complements the correctly fastened
seat belt. It is no substitute for the seat belt. The air bag provides additional protection in appli-
cable accident situations.
Not all air bags are deployed in an accident. The
different air bag systems function independ-
ently from one another (
Ypage 56).
However, no system available today can com-
pletely eliminate injuries and fatalities.
It is also not possible to rule out a risk of injury
caused by an air bag due to the high speed at
which the air bag must be deployed.
Important safety notes
GWARNING
If you do not sit in the correct seat position,
the air bag cannot protect as intended and
could even cause additional injury when
deployed. This poses an increased risk of
injury or even fatal injury.
To avoid hazardous situations, always make
sure that all of the vehicle's occupants:
Rhave fastened their seat belts correctly,
including pregnant women
Rare sitting correctly and maintain the great-
est possible distance to the air bags
Rfollow the following instructions
Always make sure that there are no objects
between the air bag and the vehicle's occu-
pants.
RAdjust the seats properly before beginning
your journey. Always make sure that the seat
is in an almost upright position. The center of
the head restraint must support the head at
about eye level.
RMove the driver's and front-passenger seats
as far back as possible. The driver's seat posi-
tion must allow the vehicle to be driven safely.
ROnly hold the steering wheel on the outside.
This allows the air bag to be fully deployed.
RAlways lean against the backrest while driv-
ing. Do not lean forward or lean against the
door or side window. You may otherwise be in
the deployment area of the air bags.
RAlways keep your feet in the footwell in front
of the seat. Do not put your feet on the dash-
Occupant safety49
Safety
Z