door lock MERCEDES-BENZ GLC SUV 2018 Workshop Manual
[x] Cancel search | Manufacturer: MERCEDES-BENZ, Model Year: 2018, Model line: GLC SUV, Model: MERCEDES-BENZ GLC SUV 2018Pages: 390, PDF Size: 6.54 MB
Page 336 of 390
Flat tire
Preparing the vehicle
Your vehiclemay be equipped with:
RMOExtended tires (tires wit hrun-flat proper -
ties) (Ypage 334)
Vehicl epreparation is no tnecessar yon vehi-
cle swit hMOExtended tires
RaTIREFI Tkit (Ypage 333)
Vehicles equipped wit hMOExtended tires are
no tequipped wit h aTIREFI Tkit at th efactory. It
is therefor erecommended that you additionally
equip your vehicl ewit h a TIREFI Tkit if you moun t
tires that do no tfeature run-flat properties, e.g.
winte rtires . ATIREFI Tkit may be obtained from
a qualified specialist workshop.
Vehicles wit han mbrace system (US Aonly) that
are no tequipped wit h aTIREFI Tkit :in th eevent
of aflat tire, contact th eCustome rAssistanc e
Cente rof th embrace emergenc ycall system
(
Ypage 308).
Information on changing and mounting wheels
(
Ypage 370).
XStop th evehicl eon solid, non-slippery and
leve lground ,as far away as possible from
traffic.
XSwitc hon th ehazard warning lamps.
XSecur eth evehicl eagainst rollin gaway
(Ypage 158).
XIf possible ,brin gth efron twheels int oth e
straight-ahead position .
XSwitchoff th eengine.
XRemove th eSmartKey from th eignition lock.
or, in vehicles withKEY
LESS-GO start-function
or KEYLESS‑ GO
XOpen thedriver' sdoor .
The vehicl eelectronics are no win position
u. whic his th esam eas th eSmartKey having
been removed.
XRemove th eStart/Sto pbutto nfrom th eigni-
tion loc k (Ypage 137).
XMakesure that th eengin ecanno tbe started
via your smartphon e (Ypage 139).
XMakesure that th epassenger sare no tendan -
gered as they do so. Mak esure that no on eis
near th edanger area while awhee lis bein g
changed. Anyon ewho is no tdirectly assisting
in th ewhee lchang eshould, for example ,
stand behind th ebarrier.
XGet out of th evehicle. Pay attention to traffic
condition swhen doin gso.
XClose th edriver' sdoor .
Vehicles with MOExtended tires (tires
with run-flat characteristics)
General notes
Wit hMOExtended tires (tires wit hrun flat char-
acteristics), you can continue to driv eyour vehi-
cle eve nif there is atotal loss of pressur ein on e
or mor etires .The affected tire must no tsho w
any clearly visible damage.
You can recognize aMOExtended tire by th e
MOExtended markin gwhic happear son th e
sidewall of th etire. You will fin dthis markin g
next to th etire siz edesignation ,th eload-bear -
ing capacit yand th espee dindex (
Ypage 364).
MOExtended tires may only be used in conjunc -
tion wit han active tire pressur eloss warning
system or wit han active tire pressur emonitor.
If apressure loss warning messag eappears
in th emultifunction display:
Robserv eth einstruction sin th edisplay mes -
sage s (Ypage 262)
Rcheck th etire for damag e
Rif driving on,observ eth efollowin gnote s
The driving distanc epossible in run-flat mod eis
approximately 50 mile s(80 km) when th evehi-
cle is partially laden .When th evehicl eis fully
laden it is approximately 19 mile s(30 km).
In addition to th evehicl eload, th edriving dis-
tance possible depend supon :
Rvehicl espee d
Rroad condition
Routside temperature
The driving distanc epossible in run-flat mod e
may be reduce dby extreme driv ing condi
tion
s
or maneuvers, or it can be increased throug h a
moderat estyle of driving .
The driving distanc epossible in run-flat mod eis
counted from th emomen tth etire pressur eloss
warning appear sin th emultifunction display.
You must no texcee d amaximum permissible
spee dof 50 mph (80 km/h).
334Flat tire
Breakdown assistance
Page 346 of 390

In such cases, use a tow bar. Before towing,
make sure that the steering moves freely.
GWARNING
You can no longer steer the vehicle if the
steering wheel lock has been engaged. There
is a risk of an accident.
Always switch off the ignition when towing the
vehicle with a tow cable or a tow bar.
GWARNING
When towing or tow-starting another vehicle
and its weight is greater than the permissible
gross weight of your vehicle, the:
Rthe towing eye could detach itself
Rthe vehicle/trailer combination could roll-
over.
There is a risk of an accident.
When towing or tow-starting another vehicle,
its weight should not be greater than the per- missible gross weight of your vehicle.
Details on the permissible gross vehicle weight
of your vehicle can be found on the vehicle iden-
tification plate (
Ypage 376).
!When Active Brake Assist, Distance Pilot
DISTRONIC or the HOLD function is activated,
the vehicle brakes automatically in certain
situations.
To avoid damage to the vehicle, deactivate
these systems in the following or similar sit-
uations:
Rwhen towing the vehicle
Rin the car wash
!Make sure that the electric parking brake is
released. If the electric parking brake is faulty,
visit a qualified specialist workshop.
!Only secure the tow rope or tow bar at the
towing eyes, or the trailer tow hitch, if availa-
ble. You could otherwise damage the vehicle.
!Do not use the trailer tow hitch for recovery
or towing. Do not use the towing eye for
recovery. this could damage the vehicle. If in
doubt, have the vehicle recovered using a
crane.
!When towing, pull away slowly and
smoothly. If the tractive power is too high, the
vehicles could be damaged.
!Shift the automatic transmission to position
i and do not open the driver's or front pas-
senger's door during towing. The automatic
transmission may otherwise shift to position
j, which could damage the transmission.
!Do not tow with sling-type equipment. This
could damage the vehicle.
!The vehicle can be towed a maximum of
30 miles (50km). The towing speed of 30 mph (50 km/h) must not be exceeded.
If the vehicle has to be towed more than
30 miles (50km), the entire vehicle must be
raised and transported.
It is better to have the vehicle transported than
to have it towed awa y.
If the vehicle ha
s suffered transmission damage,
have it transported on a transporter or trailer.
The automatic transmission must be in position
i when the vehicle is being towed. If the auto-
matic transmission cannot be shifted to position
i, have the vehicle transported on a trans-
porter or trailer.
The battery must be connected and charged.
Otherwise, you:
Rcannot turn the SmartKey to position 2in
the ignition lock
Rcannot release the electric parking brake
Rcannot shift the automatic transmission to
position i
Disarm the automatic locking feature before the
vehicle is towed (
Ypage 85). You could other-
wise be locked out when pushing or towing the
vehicle.
Installing/removing the towing eye
Installing the towing eye
GWARNING
The exhaust tail pipe may be very hot. There is
a risk of burns when removing the rear cover.
Do not touch the exhaust pipe. Take particular
care when removing the rear cover.
344Towing and tow-starting
Breakdown assistance
Page 347 of 390
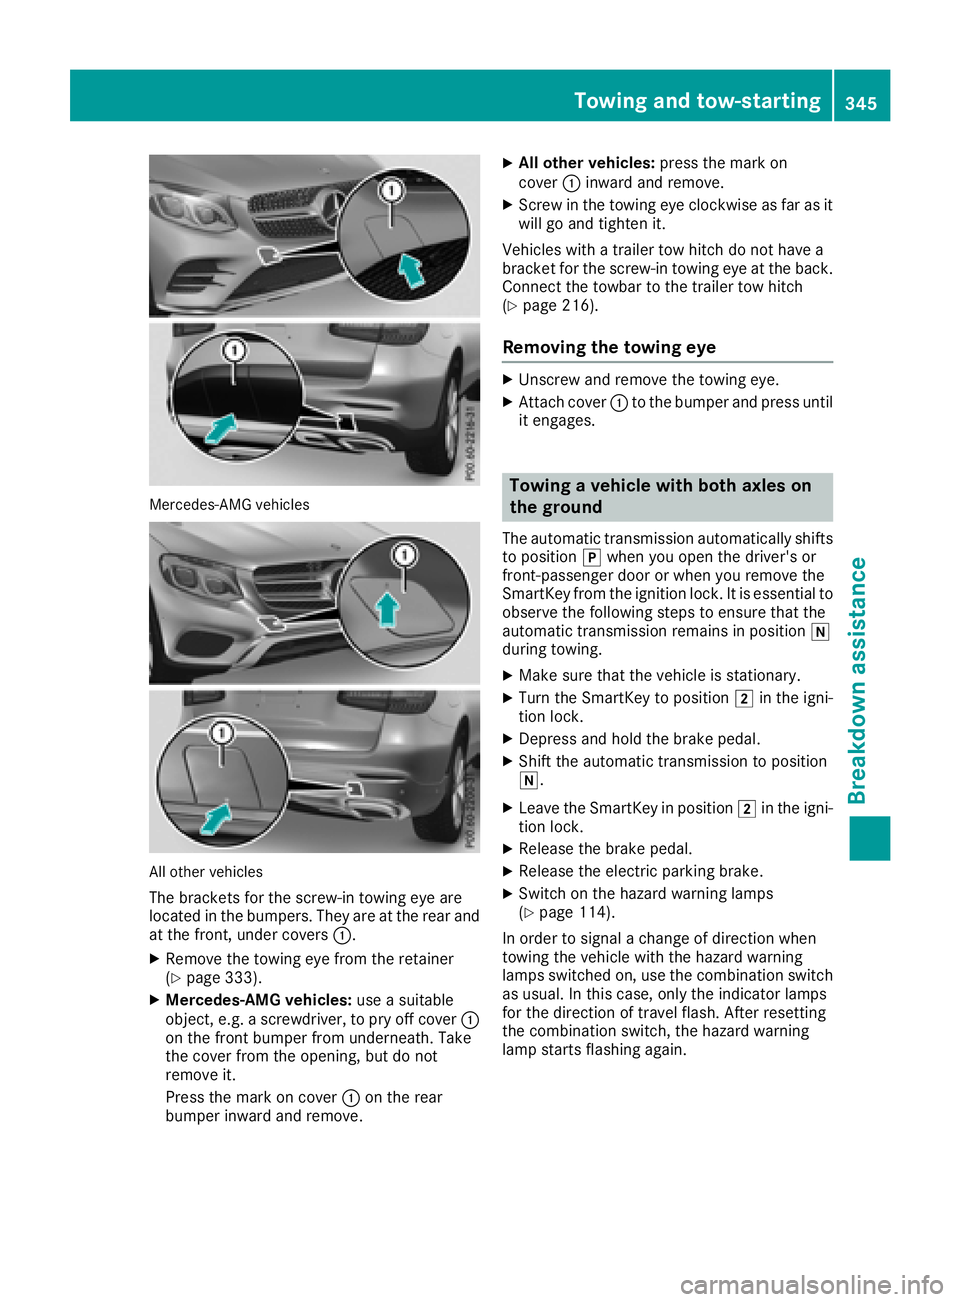
Mercedes-AMG vehicles
All other vehicles
The brackets for the screw-in towing eye are
located in the bumpers. They are at the rear and
at the front, under covers :.
XRemove the towing eye from the retainer
(Ypage 333).
XMercedes-AMG vehicles: use a suitable
object, e.g. a screwdriver, to pry off cover :
on the front bumper from underneath. Take
the cover from the opening, but do not
remove it.
Press the mark on cover :on the rear
bumper inward and remove.
XAll other vehicles: press the mark on
cover :inward and remove.
XScrew in the towing eye clockwise as far as it
will go and tighten it.
Vehicles with a trailer tow hitch do not have a
bracket for the screw-in towing eye at the back.
Connect the towbar to the trailer tow hitch
(
Ypage 216).
Removing the towing eye
XUnscrew and remove the towing eye.
XAttach cover :to the bumper and press until
it engages.
Towing a vehicle with both axles on
the ground
The automatic transmission automatically shifts
to position jwhen you open the driver's or
front-passenger door or when you remove the
SmartKey from the ignition lock. It is essential to observe the following steps to ensure that the
automatic transmission remains in position i
during towing.
XMake sure that the vehicle is stationary.
XTurn the SmartKey to position 2in the igni-
tion lock.
XDepress and hold the brake pedal.
XShift the automatic transmission to position
i.
XLeave the SmartKey in position 2in the igni-
tion lock.
XRelease the brake pedal.
XRelease the electric parking brake.
XSwitch on the hazard warning lamps
(Ypage 114).
In order to signal a change of direction when
towing the vehicle with the hazard warning
lamps switched on, use the combination switch
as usual. In this case, only the indicator lamps
for the direction of travel flash. After resetting
the combination switch, the hazard warning
lamp starts flashing again.
Towing and tow-starting345
Breakdown assistance
Z
Page 349 of 390
Tow-starting (emergency engine
starting)
!
Vehicles with automatic transmission must
not be tow-started. You could otherwise dam-
age the automatic transmission.
iYou can find information on "Jump-starting"
under (Ypage 341).
Fuses
Important safety notes
GWARNING
If you manipulate or bridge a faulty fuse or if
you replace it with a fuse with a higher amper- age, the electric cables could be overloaded.
This could result in a fire. There is a risk of an
accident and injury.
Always replace faulty fuses with the specified
new fuses having the correct amperage.
Blown fuses must be replaced with fuses of the
same rating, which you can recognize by the
color and value. The fuse ratings are listed in the
fuse allocation chart.
The fuse allocation chart is on the fuse box in the
cargo compartment (
Ypage 348).
If a newly inserted fuse also blows, have the
cause traced and rectified at a qualified special-
ist workshop, e.g. an authorized Mercedes-Benz Center.
!Only use fuses that have been approved for
Mercedes-Benz vehicles and which have the
correct fuse rating for the system concerned.
Otherwise, components or systems could be
damaged.
!Make sure that no moisture can enter the
fuse box when the cover is open.
!When closing the cover, make sure that it is
lying correctly on the fuse box. Moisture seep-
ing in or dirt could otherwise impair the oper-
ation of the fu ses.
T
he fuses in your vehicle serve to close down
faulty circuits. If a fuse blows, all the compo-
nents on the circuit and their functions stop
operating.
Before changing a fuse
Observe the important safety notes
(Ypage 347)
XSwitch off the engine.
XSwitch off all electrical consumers.
XMake sure that the ignition is switched off
(Ypage 137).
or
XWhen using the SmartKey, turn the SmartKey
to position uin the ignition lock and remove
it (
Ypage 136).
XSecure the vehicle against rolling away
(Ypage 158).
All indicator lamps in the instrument cluster
must be off.
The fuses are located in various fuse boxes:
RFuse box on the driver's side of the dashboard
RFuse box in the front-passenger footwell
RFuse box in the engine compartment on the
driver's side
RFuse box under the cargo compartment floor
on the right-hand side of the vehicle, when
viewed in the direction of travel
Dashboard fuse box
The fuse box is under a cover on the side of the dashboard. You can obtain further information
from an authorized Mercedes-Benz Center.
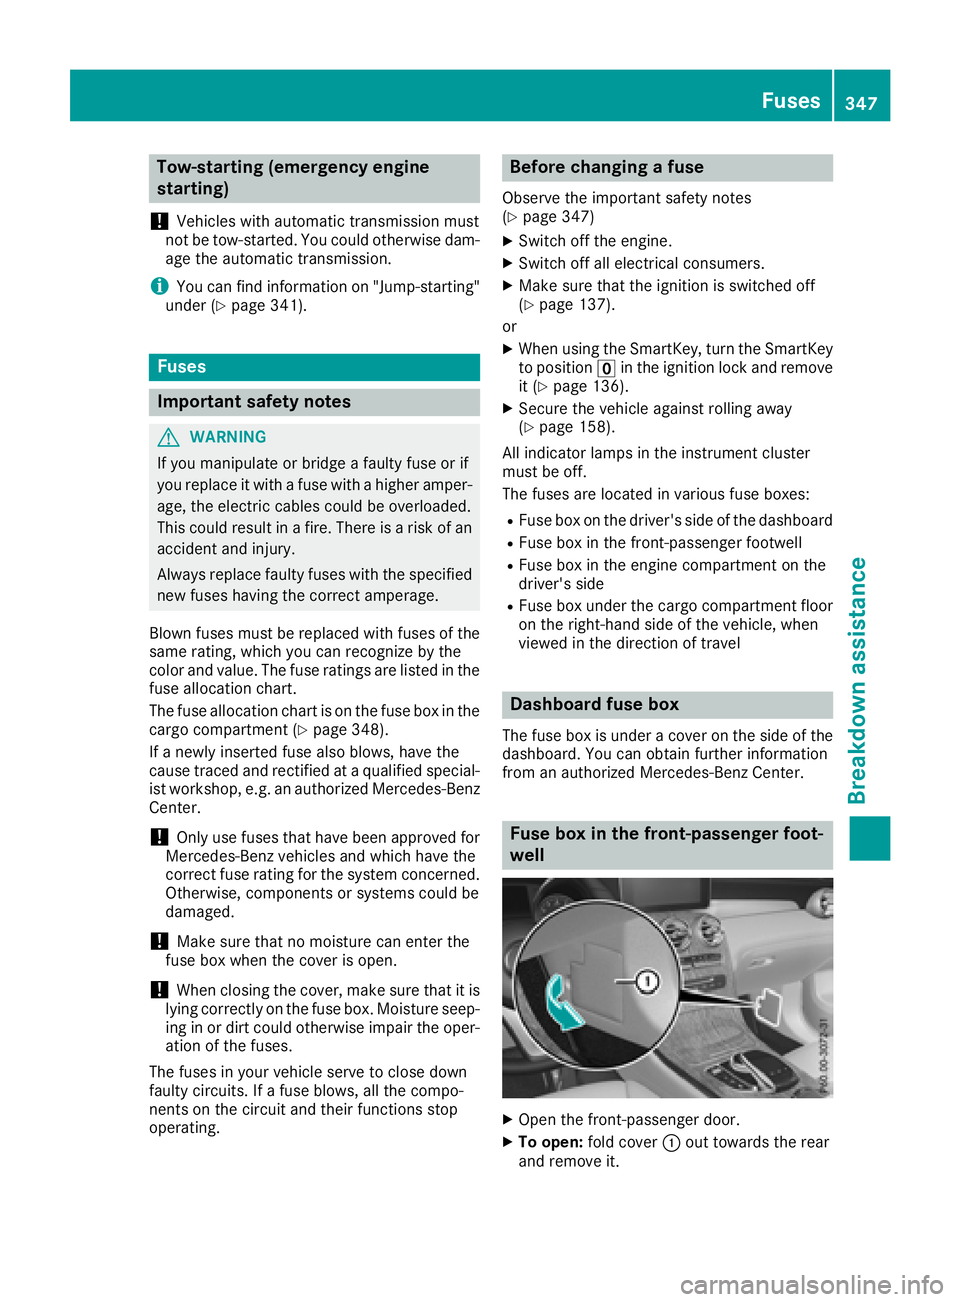
Fuse box in the front-passenger foot-
well
XOpen the front-passenger door.
XTo open: fold cover :out towards the rear
and remove it.
Fuses347
Breakdown assistance
Z
Page 372 of 390
the tires are installed corresponding to the
direction of rotation.
An arrow on the sidewall of the tire indicates its
correct direction of rotation.
Storing wheels
Store wheels that are not being used in a cool,
dry and preferably dark place. Protect the tires
from oil, grease, gasoline and diesel.
Mounting a wheel
Preparing the vehicle
XStop the vehicle on solid, non-slippery and
level ground.
XApply the electric parking brake manually.
XBring the front wheels into the straight-ahead position.
XShift the transmission to position j.
XMake sure that the vehicle level is set to "Nor-
mal" on vehicles with AIR BODY CONTROL
(
Ypage 186).
XSwitch off the engine.
XVehicles without KEYLESS-GO:remove the
SmartKey from the ignition lock.
XVehicles with KEYLESS-GO start-function
or KEYLESS-GO: open the driver's door.
The vehicle electronics are now in key posi-
tion u. This is the same as the key having
been removed.
XVehicles with KEYLESS-GO start-function
or KEYLESS-GO: remove the Start/Stop but-
ton from the ignition lock (
Ypage 137).
XMake sure that the engine cannot be started
via your smartphone (Ypage 139).
XIf included in the vehicle equipment, remove
the tire-change tool kit from the vehicle.
XSafeguard the vehicle against rolling away.
Securing the vehicle to prevent it from
rolling away
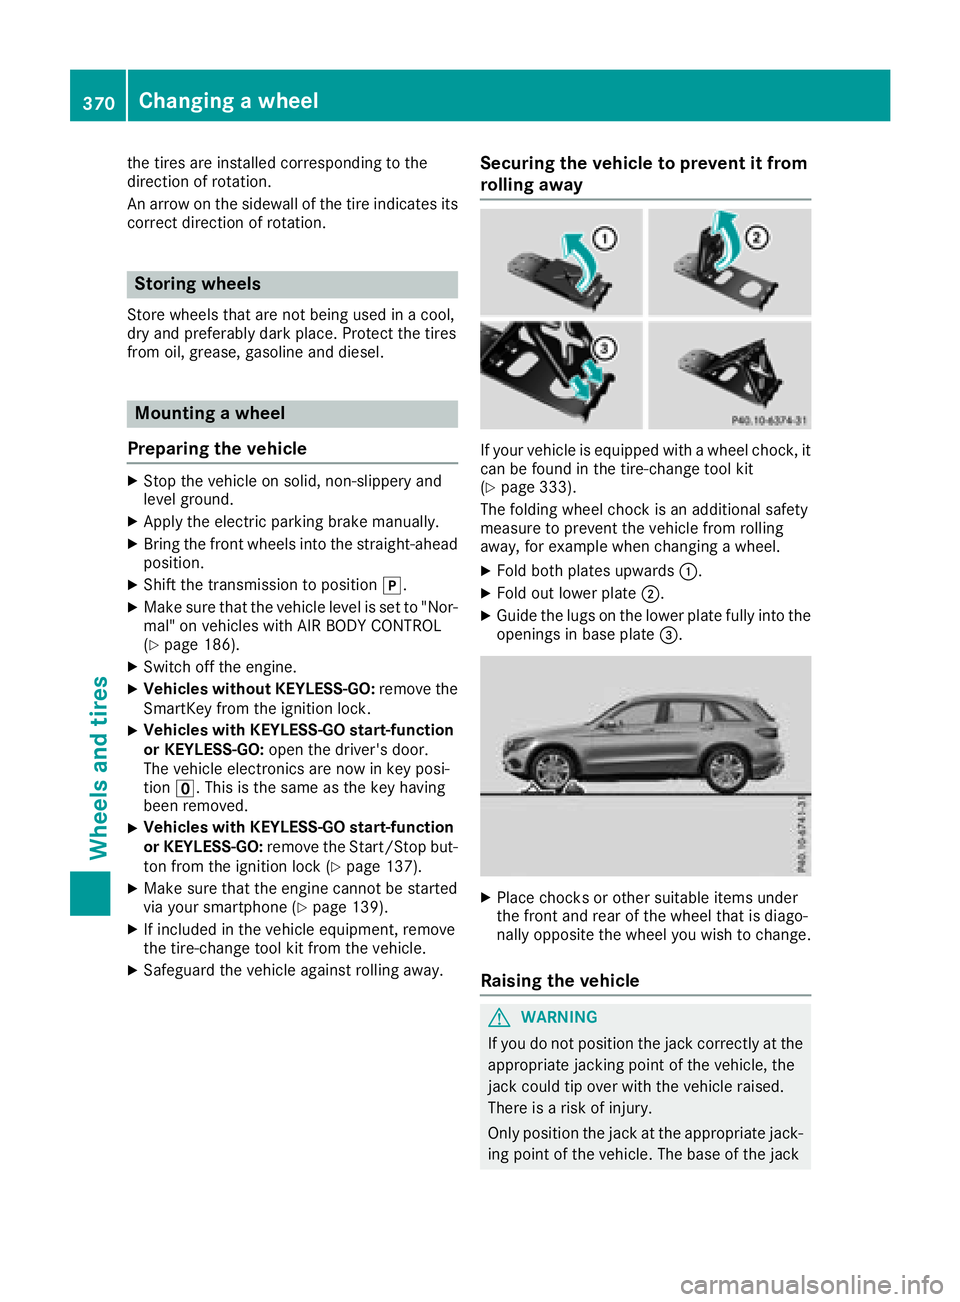
If your vehicle is equipped with a wheel chock, it
can be found in the tire-change tool kit
(
Ypage 333).
The folding wheel chock is an additional safety
measure to prevent the vehicle from rolling
away, for example when changing a wheel.
XFold both plates upwards :.
XFold out lower plate;.
XGuide the lugs on the lower plate fully into the
openings in base plate =.
XPlace chocks or other suitable items under
the front and rear of the wheel that is diago-
nally opposite the wheel you wish to change.
Raising the vehicle
GWARNING
If you do not position the jack correctly at the
appropriate jacking point of the vehicle, the
jack could tip over with the vehicle raised.
There is a risk of injury.
Only position the jack at the appropriate jack-
ing point of the vehicle. The base of the jack
370Changing a wheel
Wheels an d tires
Page 373 of 390
must be positioned vertically, directly under
the jacking point of the vehicle.
!Only position the jack at the appropriate
jacking point of the vehicle. Otherwise, you
could damage the vehicle.
Observe the following when raising the vehi-
cle:
RTo raise the vehicle, only use the vehicle-spe-
cific jack that has been tested and approved
by Mercedes-Benz. If used incorrectly, the
jack could tip over with the vehicle raised.
RThe jack is designed only to raise and hold the
vehicle for a short time while a wheel is being
changed. It must not be used for performing
maintenance work under the vehicle.
RAvoid changing the wheel on uphill and down-
hill slopes.
RBefore raising the vehicle, secure it from roll-
ing away by applying the parking brake and
inserting wheel chocks. Do not disengage the
parking brake while the vehicle is raised.
RThe jack must be placed on a firm, flat and
non-slip surface. On a loose surface, a large,
flat, load-bearing underlay must be used. On a
slippery surface, a non-slip underlay must be
used, e.g. rubber mats.
RDo not use wooden blocks or similar objects
as a jack underlay. Otherwise, the jack will not
be able to achieve its load-bearing capacity
due to the restricted height.
RMake sure that the distance between the
underside of the tires and the ground does not
exceed 1.2 in (3 cm).
RDo not place your hands or feet under the
raised vehicle.
RDo not lie under the vehicle.
RDo not start the engine when the vehicle is
raised.
RNever open or close a door or the tailgate
when the vehicle is raised.
RMake sure that no persons are present in the
vehicle when the vehicle is raised.
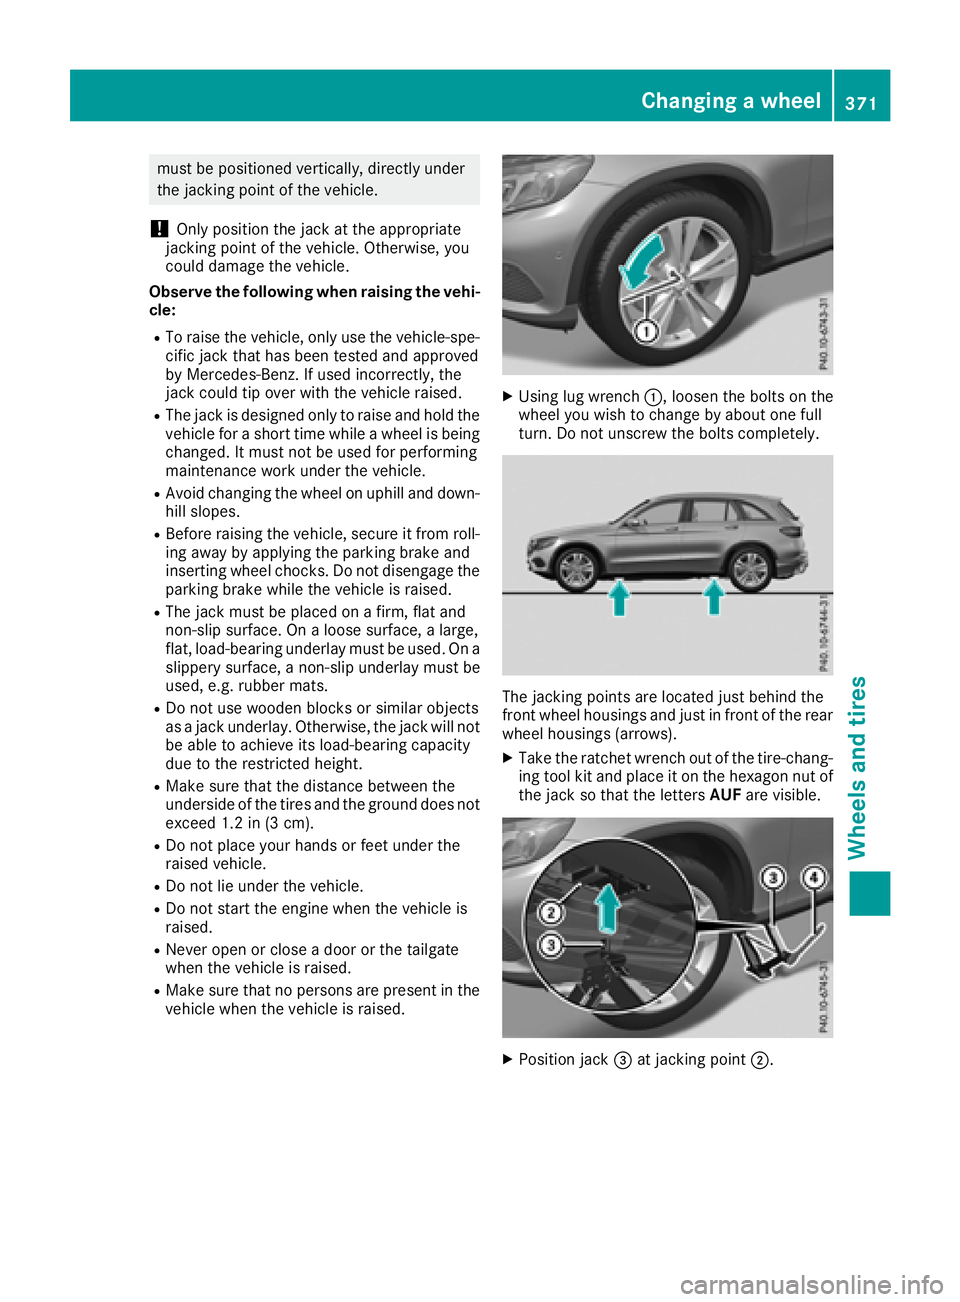
XUsing lug wrench :, loosen the bolts on the
wheel you wish to change by about one full
turn. Do not unscrew the bolts completely.
The jacking points are located just behind the
front wheel housings and just in front of the rear
wheel housings (arrows).
XTake the ratchet wrench out of the tire-chang-
ing tool kit and place it on the hexagon nut of the jack so that the letters AUFare visible.
XPosition jack =at jacking point ;.
Changing a wheel371
Wheels and tires
Z