tire pressure MERCEDES-BENZ GLC SUV 2018 Owner's Manual
[x] Cancel search | Manufacturer: MERCEDES-BENZ, Model Year: 2018, Model line: GLC SUV, Model: MERCEDES-BENZ GLC SUV 2018Pages: 390, PDF Size: 6.54 MB
Page 5 of 390
Maintenance and care......................318
Engine compartment ........................... 318
ASSYST PLUS ...................................... 322
Care ..................................................... 324
Breakdown assistance .....................332
Where will I find...? .............................. 332
Flat tire ................................................ 334
Battery (vehicle) .................................. 338
Jump-starting ....................................... 341
Towing and tow-starting ...................... 343
Fuses ...................................................3 47
Wheels and tires............................... 349
Important safety notes ........................ 349
Operation ............................................ 349
Winter operation .................................. 351
Tire pressure ....................................... 352
Loading the vehicle .............................. 359
All about wheels and tires ................... 362
Changing a wheel ................................ 369
Wheel/tire combination ......................3 73
Technical data................................... 375
Information regarding technical data ... 375
Vehicle electronics .............................. 375
Identification plates .............................3 76
Service products and filling capaci-
ties ...................................................... 377
Vehicle data ......................................... 382
Vehicle data for off-road driving .......... 383
Trailer tow hitch ................................... 384
Contents3
Page 24 of 390
TelephoneAccepting a call (multifunction
steering wheel) .............................. 230
Authorizing a mobile phone (con-
necting) ......................................... 288
Connecting a mobile phone
(device manager) ........................... 287
Display message ............................ 267
Introduction ................................... 230
Menu (on-board computer) ............ 230
Number from the phone book ........ 230
Redialing ........................................ 231
Rejecting/ending a call ................. 230
see also Digital Operator's Man-
ual .................................................. 280
see Mobile phone
Temperature
Coolant (display in the instrument
cluster) .......................................... 221
Engine oil (on-board computer,
Mercedes-AMG vehicles) ............... 235
Outside temperature ...................... 221
Setting (climate control) ................ 128
Transmission oil (on-board com-
puter, Mercedes-AMG vehicles) ..... 235
Timing (RACETIMER) ......................... 237
Tire pressure
Calling up (on-board computer) ..... 356
Checking manually ........................ 355
Display message ............................ 262
Maximum ....................................... 355
Not reached (TIREFIT) .................... 337
Notes ............................................. 353
Reached (TIREFIT) .......................... 337
Recommended ............................... 352
Using the TIREFIT kit ...................... 336
Tire pressure loss warning system
General notes ................................ 355
Important safety notes .................. 355
Restarting ...................................... 356
Tire pressure monitor
Checking the tire pressure elec-
tronically ........................................ 358
Function/notes ............................. 356
General notes ................................ 356
Important safety notes .................. 357
Radio type approval for the tire
pressure monitor ........................... 359 Restarting ...................................... 358
Warning lamp ................................. 278
Warning message .......................... 358
Tire pres sure s
ensors
Display message ............................ 263
Tire-change tool kit ........................... 333
TIREFIT kit
Important safety notes .................. 335
Storage location ............................ 333
Tire pressure not reached .............. 337
Tire pressure reached .................... 337
Using ............................................. 336
Tires
Aspect ratio (definition) ................. 368
Average weight of the vehicle
occupants (definition) .................... 367
Bar (definition) ............................... 367
Changing a wheel .......................... 369
Characteristics .............................. 367
Checking ........................................ 349
Curb weight (definition) ................. 368
Definition of terms ......................... 367
Direction of rotation ...................... 369
Display message ............................ 262
Distribution of the vehicle occu-
pants (definition) ............................ 369
DOT (Department of Transporta-
tion) (definition) ............................. 367
DOT, Tire Identification Number
(TIN) ............................................... 366
GAWR (Gross Axle Weight Rating)
(definition) ..................................... 367
GVW (Gross Vehicle Weight) (def-
inition) ........................................... 368
GVWR (Gross Vehicle Weight Rat-
ing) (definition) .............................. 368
Important safety notes .................. 349
Increased vehicle weight due to
optional equipment (definition) ...... 367
Information on driving .................... 349
Kilopascal (kPa) (definition) ........... 368
Labeling (overview) ........................ 364
Load bearing index (definition) ...... 369
Load index ..................................... 366
Load index (definition) ................... 368
Maximum load on a tire (defini-
tion) ............................................... 368
22Index
Page 25 of 390
Maximum loaded vehicle weight
(definition) .....................................368
Maximum permissible tire pres-
sure (definition) .............................3 68
Maximum tire load ......................... 366
Maximum tire load (definition) ....... 368
MOExtended tires .......................... 351
Optional equipment weight (defi-
nition) ............................................ 369
PSI (pounds per square inch) (def-
inition) ...........................................3 68
Replacing ....................................... 369
Service life ..................................... 350
Sidewall (definition) ....................... 368
Snow chains .................................. 351
Speed rating (definition) ................ 368
Storing ...........................................3 70
Structure and characteristics
(definition) ..................................... 367
Summer tires in winter .................. 351
Temperature .................................. 363
TIN (Tire Identification Number)
(definition) ..................................... 369
Tire bead (definition) ......................3 68
Tire pressure (definition) ................ 368
Tire pressures (recommended) ...... 367
Tire size (data) ............................... 373
Tire size designation, load-bearing
capacity, speed rating .................... 364
Tire tread ....................................... 350
Tire tread (definition) ..................... 368
Total load limit (definition) ............. 369
Traction ......................................... 363
Traction (definition) ....................... 369
Tread wear ..................................... 363
Uniform Tire Quality Grading
Standards ...................................... 362
Uniform Tire Quality Grading
Standards (definition) .................... 367
Wear indicator (definition) ............. 369
Wheel and tire combination ........... 373
Wheel rim (definition) .................... 367
see Flat tire
Top Tether ............................................ 62
Touchpad
Changing the station/music
track .............................................. 283
C
haracter suggestions ................... 282 Deleting characters ....................... 282
Entering a space ............................ 282
Entering characters ....................... 282
Gesture control .............................. 282
Handwriting recognition ................ 282
Operating the touchpad ................. 282
Overview ........................................ 282
Quick access for Audio .................. 283
Switching ....................................... 282
Switching input line ....................... 282
Tow-starting
Emergency engine starting ............ 347
Important safety notes .................. 343
Towing a trailer
Axle load, permissible .................... 384
Cleaning the trailer tow hitch ......... 329
Coupling up a trailer ...................... 216
Decoupling a trailer ....................... 218
Driving tips .................................... 215
ESP
®(Electronic Stability Pro-
gram) ............................................... 72
Important safety notes .................. 214
Installing the ball coupling ............. 216
Lights display message .................. 251
Power supply ................................. 218
Pulling away with a trailer .............. 140
Removing the ball coupling ............ 218
Trailer loads ................................... 384
Towing away
Important safety guidelines ........... 343
Installing the towing eye ................ 344
Notes for 4MATIC vehicles ............ 346
Removing the towing eye ............... 345
Transporting the vehicle ................ 346
With both axles on the ground ....... 345
Towing eye ......................................... 333
Traction system
see ETS/4ETS (Electronic Trac-
tion System)
Traffic reports
see also Digital Operator's Man-
ual .................................................. 280
Traffic Sign Assist
Activating/deactivating the warn-
ing function .................................... 232
Display message ............................ 259
Function/notes ............................. 205
Important safety notes .................. 205
Index23
Page 27 of 390
Vehicle levelAIR BODY CONTROL ...................... 185
Display message ............................ 256
Video
Operating the DVD ......................... 229
see also Digital Operator's Man-
ual .................................................. 280
VIN
Seat ............................................... 377
Type plate ...................................... 376
W
Warning and indicator lampsABS ................................................ 271
Active Brake Assist ........................ 277
Airbag ............................................ 274
Brakes ........................................... 270
Coolant .......................................... 275
Distance warning ........................... 277
Engine diagnostics ......................... 274
ESP
®.............................................. 271
ESP®OFF ....................................... 273
Fuel tank ........................................ 274
General notes ................................ 268
Overview .......................................... 37
Parking brake ................................ 274
PASSENGER AIR BAG ...................... 45
Reserve fuel ................................... 274
Restraint system ............................ 274
Seat belt ........................................ 269
SPORT handling mode ................... 273
Steering ......................................... 279
Tire pressure monitor .................... 278
Warranty .............................................. 29
Washer fluid
Display message ............................ 267
Weather display (COMAND)
see also Digital Operator's Man-
ual .................................................. 280
Wheel and tire combinations
Tires ............................................... 373
Wheel bolt tightening torque ........... 373
Wheel chock ...................................... 370
Wheels
Changing a wheel .......................... 369
Checking ........................................ 349
Cleaning ......................................... 326 Important safety notes .................. 349
Information on driving .................... 349
Interchanging/changing ................ 369
Mounting a new wheel ................... 372
Mounting a wheel .......................... 370
Removing a wheel .......................... 372
Snow chains .................................. 351
Storing ........................................... 370
Tightening torque ........................... 373
Wheel size/tire size ....................... 373
Window curtain air bag
Display message ............................ 248
Operation ......................................... 51
Windows
see Side windows
Windshield
Defrosting ...................................... 130
Windshield washer fluid
see Windshield washer system
Windshield washer system
Adding washer fluid ....................... 322
Important safety notes .................. 381
Windshield wipers
Problem (malfunction) ................... 123
Rear window wiper ........................ 121
Replacing the wiper blades ............ 121
Switchi
ng on/off ........................... 120
Winter driving
Important safety notes .................. 351
Slippery road surfaces ................... 165
Snow chains .................................. 351
Winter operation
Radiator cover ............................... 319
Summer tires ................................. 351
Winter tires
M+S tires ....................................... 351
Wiper arm
Moving to a vertical position .......... 121
Wiper blades
Cleaning ......................................... 327
Important safety notes .................. 121
Replacing ....................................... 121
Replacing (rear window) ................ 122
Replacing (windshield) ................... 121
Without changing gears
Display message ............................ 265
Wooden trim (cleaning instruc-
tions) .................................................. 330
Index25
Page 30 of 390
Protecting the environment
General notes
HEnvironmental note
Daimler's declared policy is one of compre-
hensive environmental protection.
The objectives are for the natural resources
that form the basis of our existence on this
planet to be used sparingly and in a manner
that takes the requirements of both nature
and humanity into account.
You too can help to protect the environment
by operating your vehicle in an environmen-
tally responsible manner.
Fuel consumption and the rate of engine,
transmission, brake and tire wear are affected by these factors:
Roperating conditions of your vehicle
Ryour personal driving style
You can influence both factors. You should
bear the following in mind:
Operating conditions:
Ravoid short trips as these increase fuel con-
sumption.
Ralways make sure that the tire pressures
are correct.
Rdo not carry any unnecessary weight.
Rremove roof racks once you no longer need
them.
Ra regularly serviced vehicle will contribute
to environmental protection. You should
therefore adhere to the service intervals.
Ralways have service work carried out at a
qualified specialist workshop.
Personal driving style:
Rdo not depress the accelerator pedal when
starting the engine.
Rdo not warm up the engine when the vehicle
is stationary.
Rdrive carefully and maintain a safe distance
from the vehicle in front.
Ravoid frequent, sudden acceleration and
braking.
Rchange gear in good time and use each gear
only up to Ôof its maximum engine speed.
Rswitch off the engine in stationary traffic.
Rkeep an eye on the vehicle's fuel consump-
tion.
Environmental concerns and recom-
mendations
Wherever the Operator's Manual requires you to
dispose of materials, first try to regenerate or re-
use them. Observe the relevant environmental
rules and regulations when disposing of materi-
als. In this way you will help to protect the envi-
ronment.
Genuine Mercedes-Benz parts
HEnvironmental note
Daimler AG also supplies reconditioned major
assemblies and parts which are of the same
quality as new parts. They are covered by the
same Limited Warranty entitlements as new
parts.
!Air bags and Emergency Tensioning Devi-
ces, as well as control units and sensors for
these restraint systems, may be installed in
the following areas of your vehicle:
Rdoors
Rdoor pillars
Rdoor sills
Rseats
Rcockpit
Rinstrument cluster
Rcenter console
Do not install accessories such as audio sys-
tems in these areas. Do not carry out repairs or welding. You could impair the operating
efficiency of the restraint systems.
Have aftermarket accessories installed at a
qualified specialist workshop.
You could jeopardize the operating safety of
your vehicle if you use parts, tires and wheels as
well as accessories relevant to safety which
have not been approved by Mercedes-Benz. This
could lead to malfunctions in safety-relevant
28Genuine Mercedes-Benz parts
Introduction
Page 68 of 390
Drivingsafet ysystems
Overview of drivin gsafet ysystems
In this section ,you will fin dinformation about
th efollowin gdrivin gsafet ysystems :
RABS (Anti-loc kBrakin gSystem)
(Ypage 66)
RBA S (B rakeAssist System) (Ypage 67)
RActive Brak eAssis t (Ypage 67 )
RESP®(Electronic StabilityProgram)
(Ypage 69)
REB D (Electroni cBrak eforc eDistribution )
(Ypage 73 )
RADAPTIV EBRAKE (Ypage 73 )
RActive Brak eAssis twit hcross-traffic function
(Ypage 73)
RSTEE RCONTROL (Ypage 76)
Important safet ynotes
If you fail to adapt your drivin gstyle or if you are
inattentive ,th edrivin gsafet ysystems can nei-
ther reduce th eris kof an acciden tno roverride
th elaws of physics. Driving safet ysystems are
merely aids designed to assist driving. You are
responsible fo rmaintainin gth edistanc eto th e
vehicle in front, fo rvehicle speed, fo rbraking in
goo dtime, and fo rstayin gin lane. Always adapt
your drivin gstyle to suit th eprevailin groad and
weather condition sand maintain asaf edistanc e
from th evehicle in front. Drive carefully.
The drivin gsafet ysystems described only wor k
as effectively as possible when there is ade-
quat econtact between th etires and th eroad
surface. Pay particular attention to th einforma-
tion regardin gtires ,recommended minimum
tire tread depths etc. in th e"Wheels and tires "
section (
Ypage 349).
In wintr ydrivin gconditions, always use winte r
tires (M+ Stires )and if necessary, snow chains.
Only in this way will the driving safety systems
described in this section work as effectively as
possible.
ABS (Anti-lock Braking System)
General information
ABS regulates brake pressure in such a way that
the wheels do not lock when you brake. This
allows you to continue steering the vehicle when
braking.
The ! ABS warning lamp in the instrument
cluster lights up when the ignition is switched
on. It goes out when the engine is running.
ABS works from a speed of about 5 mph
(8 km/h), regardless of road-surface conditions.
ABS works on slippery surfaces, even when you
only brake gently.
Important safety notes
iObserve the "Important safety notes" sec-
tion (Ypage 66).
GWARNING
If ABS is faulty, the wheels could lock when
braking. The steerability and braking charac-
teristics may be severely impaired. Addition-
ally, further driving safety systems are deac-
tivated. There is an increased danger of skid-
ding and accidents.
Drive on carefully. Have ABS checked imme-
diately at a qualified specialist workshop.
When ABS is malfunctioning, other systems,
including driving safety systems, will also
become inoperative. Observe the information
on the ABS warning lamp (
Ypage 271) and dis-
play messages which may be shown in the
instrument cluster (
Ypage 240).
Braking
XIf ABS intervenes: continue to depress the
brake pedal vigorously until the braking sit-
uation is over.
XTo make a full brake application: depress
the brake pedal with full force.
If ABS intervenes when braking, you will feel a
pulsing in the brake pedal.
The pulsating brake pedal can be an indication
of hazardous road conditions, and functions as a reminder to take extra care while driving.
66Driving safety systems
Safety
Page 158 of 390
clean water. Seek medical assistance with-
out delay.
RIf fuel is swallowed, seek medical assis-
tance without delay. Do not induce vomit-
ing.
RImmediately change out of clothing which
has come into contact with fuel.
GWARNING
Electrostatic buildup can create sparks and
ignite fuel vapors. There is a risk of fire and
explosion.
Always touch the vehicle body before opening
the fuel filler flap or touching the fuel pump
nozzle. Any existing electrostatic buildup is
thereby discharged.
Do not get into the vehicle again during the refu-
eling process. otherwise electrostatic charge
could build up again.
!Do not use diesel to refuel vehicles with a
gasoline engine. Do not switch on the ignition
if you accidentally refuel with the wrong fuel.
Otherwise, the fuel will enter the fuel system. Even small amounts of the wrong fuel could
result in damage to the fuel system and the
engine. Notify a qualified specialist workshop
and have the fuel tank and fuel lines drained
completely.
!Overfilling the fuel tank could damage the
fuel system.
!Take care not to spill any fuel on painted
surfaces. You could otherwise damage the
paintwork.
!Use a filter when adding fuel from a fuel can.
The fuel lines and/or the fuel injection system
could otherwise be blocked by particles from
the fuel can.
If you overfill the fuel tank, fuel could spray out
when the fuel pump nozzle is removed.
For further information on fuel and fuel quality
(
Ypage 377).
Refueling
General information
Pay attention to the important safety notes
(Ypage 155).
All vehicles except PLUG-IN HYBRID vehi-
cles: if you unlock or lock the vehicle from the
outside, the fuel filler flap also unlocks or locks.
PLUG-IN HYBRID vehicles: the pressure in the
fuel tank must be released before refueling (see
Digital Operator's Manual).
The position of the 8fuel filler cap is dis-
played on the instrument cluster. The arrow next
to the filling pump indicates the side of the vehi-
cle.
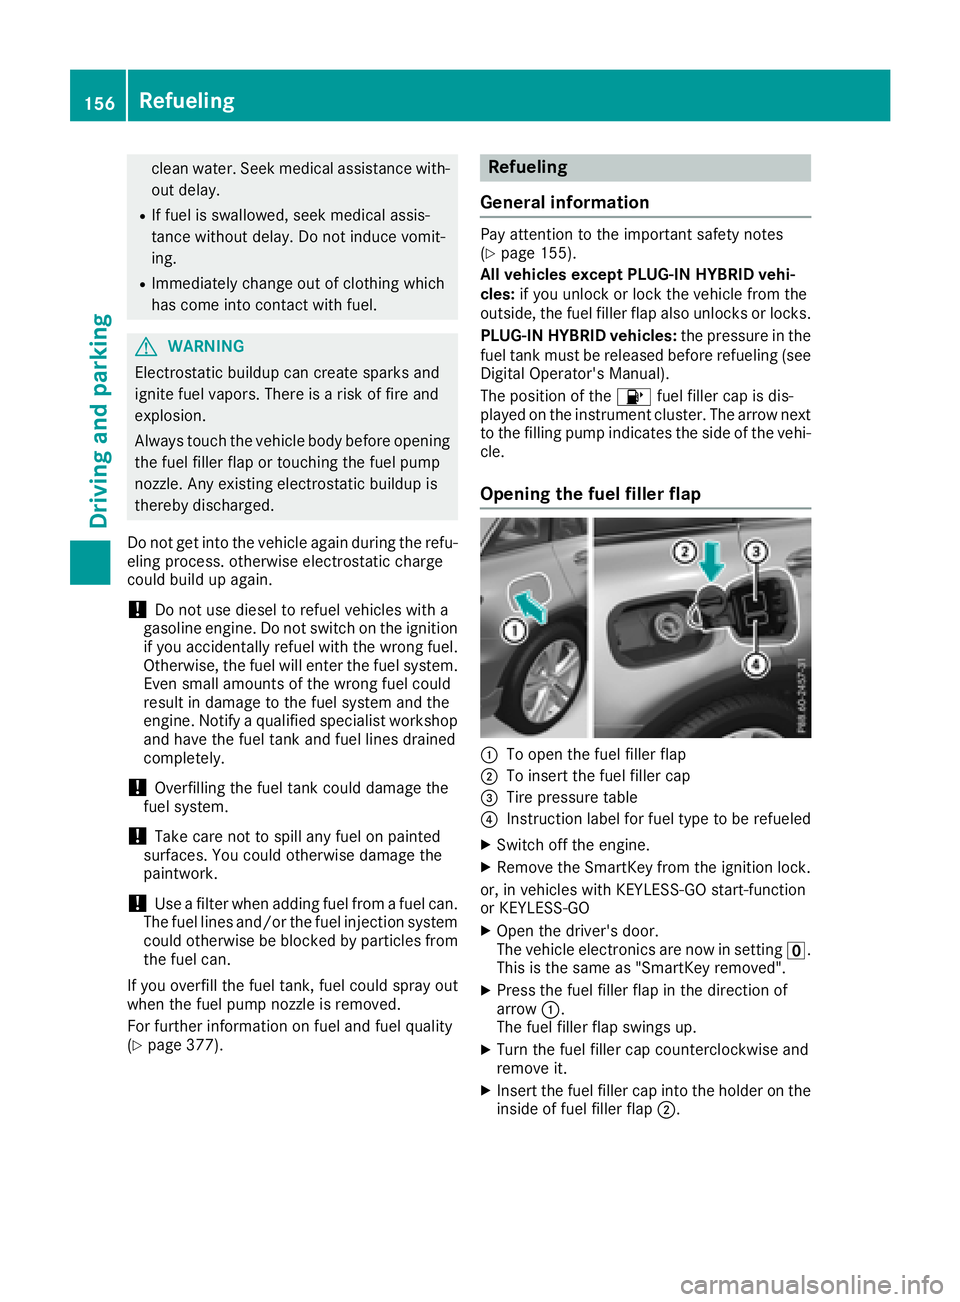
Opening the fuel filler flap
:To open the fuel filler flap
;To insert the fuel filler cap
=Tire pressure table
?Instruction label for fuel type to be refueled
XSwitch off the engine.
XRemove the SmartKey from the ignition lock.
or, in vehicles with KEYLESS-GO start-function
or KEYLESS ‑GO
XOpen the driver's door.
The vehicle electronics are now in setting u.
This is the same as "SmartKey removed".
XPress the fuel filler flap in the direction of
arrow :.
The fuel filler flap swings up.
XTurn the fuel filler cap counterclockwise and
remove it.
XInsert the fuel filler cap into the holder on the
inside of fuel filler flap ;.
156Refueling
Driving and parking
Page 163 of 390
GWARNING
If you operate mobile communication equip-
ment when driving, you may be distracted
from the traffic situation. You could also lose
control of the vehicle. There is a risk of an
accident.
Only operate this equipment when the vehicle
is stationary.
Observe the legal requirements for the country
in which you are driving. Some jurisdictions pro-
hibit the driver from using a mobile phone while driving a vehicle.
If you make a call while driving, always use
hands-free mode. Only operate the telephone
when the traffic situation permits. If you are
unsure, pull over to a safe location and stop
before operating the telephone.
Bear in mind that at a speed of only 30 mph
(approximately 50 km/h), the vehicle covers a
distance of 44 ft (approximately 14 m)per sec-
ond.
Drive sensibly – save fuel
Observe the following tips to save fuel:
XThe tires should always be inflated to the rec-
ommended tire pressure.
XRemove unnecessary loads.
XRemove roof racks when they are not needed.
XWarm up the engine at low engine speeds.
XAvoid frequent acceleration or braking.
XHave all maintenance work carried out as
indicated by the service intervals in the Main-
tenance Booklet or by the service interval dis-
play.
Fuel consumption also increases when driving in cold weather, in stop-start traffic and in hilly ter-
rain.
Drinking and driving
GWARNING
Drinking and driving and/or taking drugs and driving are very dangerous combinations.
Even a small amount of alcohol or drugs can
affect your reflexes, perceptions and judg-
ment.
The possibility of a serious or even fatal acci-dent is greatly increased when you drink or
take drugs and drive.
Do not drink or take drugs and drive or allow
anyone to drive who has been drinking or tak-
ing drugs.
Emission control
GWARNING
Combustion engines emit poisonous exhaust
gases such as carbon monoxide. Inhaling
these exhaust gases leads to poisoning. There
is a risk of fatal injury. Therefore never leave
the engine running in enclosed spaces with-
out sufficient ventilation.
Certain engine systems are designed to keep
the level of poisonous components in exhaust
fumes within legal limits.
These systems only work at peak efficiency if
they are serviced exactly in accordance with the
manufacturer's specifications. Always have
work on the engine carried out at a qualified
specialist workshop. Mercedes-Benz recom-
mends that you use an authorized Mercedes-
Benz Center for this purpose. In particular, work
relevant to safety or on safety-related systems
must be carried out at a qualified specialist
workshop.
The engine settings must not be changed under any circumstances. Furthermore, all specific
service work must be carried out at regular
intervals and in accordance with the Mercedes-
Benz service requirements. Details can be found in the Maintenance Booklet.
ECO display
The ECO display shows you how economical
your driving style is. The ECO display assists you
in achieving the most economical driving style
for the selected settings and prevailing condi-
tions. Your driving style can significantly influ-
ence the vehicle's consumption.
Driving tips161
Driving and parking
Z
Page 165 of 390
In addition to driving style, the actual consump-
tion is affected by other factors, such as:
Rload
RTire pressure
RCold start
RChoice of route
RActive electrical consumers
These factors are not included in the ECO dis-
play.
An economical driving style specially requires
driving at moderate engine speeds.
Achieving a higher value in the categories
"Acceleration" and "Constant":
Robserve the gearshift recommendations
Rdrive using drive program E
On long journeys at a constant speed, e.g. on the
highway, only the outer area for "constant" will
change.
The ECO display summarizes the driving style
from the start of the journey to its completion.
Therefore, there are more marked changes in
the outer areas at the start of a journey. On lon- ger journeys, there are fewer changes. For more
marked changes, perform a manual rest
(
Ypage 226).
For further information on the ECO display, see
(
Ypage 225).
Brakes
Important safety notes
GWARNING
If you shift down on a slippery road surface in an attempt to increase the engine's braking
effect, the drive wheels could lose their grip.
There is an increased danger of skidding and
accidents.
Do not shift down for additional engine brak-
ing on a slippery road surface.
Downhill gradients
!On long and steep gradients, you must
reduce the load on the brakes by shifting to a
lower gear in good time. This allows you to
take advantage of the engine's braking effect.
This helps you to avoid overheating the
brakes and wearing them out excessively. When you take advantage of engine braking, a
drive wheel may not turn for some time, e.g.
on a slippery road surface. This could cause
damage to the drive train. This type of damage
is not covered by the Mercedes-Benz war-
ranty.
Heavy and light loads
GWARNING
If you rest your foot on the brake pedal while
driving, the braking system can overheat. This increases the stopping distance and can even
cause the braking system to fail. There is a
risk of an accident.
Never use the brake pedal as a footrest. Never
depress the brake pedal and the accelerator
pedal at the same time.
!Depressing the brake pedal constantly
results in excessive and premature wear to
the brake pads.
If the brakes have been subjected to a heavy
load, do not stop the vehicle immediately. Drive
on for a short while. This allows the airflow to
cool the brakes more quickly.
Wet roads
If you have driven for a long time in heavy rain
without braking, there may be a delayed reac-
tion from the brakes when braking for the first
time. This may also occur after the vehicle has
been washed or driven through deep water.
You have to depress the brake pedal more
firmly. Maintain a greater distance from the
vehicle in front.
After driving on a wet road or having the vehicle
washed, brake firmly while paying attention to
the traffic conditions. This will warm up the
brake discs, thereby drying them more quickly
and protecting them against corrosion.
Limited braking performance on salt-
treated roads
If you drive on salted roads, a layer of salt resi-
due may form on the brake discs and brake
pads. This can result in a significantly longer
braking distance.
Driving tips163
Driving and parking
Z
Page 169 of 390
RTake care when turning on an uphill or down-hill slope or when driving across a slope. The
vehicle could otherwise tip over.
RAlways keep the side windows and the pano-
rama roof with power tilt/sliding panel closed
during the journey.
RDo not deviate from marked routes.
Do not use the HOLD function when driving off-
road, on steep uphill or downhill gradients or on
slippery or loose surfaces. The HOLD function
cannot hold the vehicle on such surfaces.
Checklist before driving off-road
XEngine oil level: check the engine oil level
and add oil if necessary.
When driving on steep gradients, the engine
oil level must be sufficiently high to ensure a
correct oil supply in the vehicle.
XWheels and tires: check the tire tread depth
and tire pressure.
XCheck for damage and remove any foreign
objects, e.g. small stones, from the wheels/
tires.
XReplace any missing valve caps.
XReplace dented or damaged wheels.
XRims: dented or bent rims can result in a loss
of tire pressure and damage the tire bead.
Before driving off-road, check the wheels and replace them if necessary.
Checklist after driving off-road
!If you detect damage to the vehicle after
driving off-road, have the vehicle checked
immediately at a qualified specialist work-
shop.
XDeactivate off-road program (Ypage 181).
XDeactivate DSR (Ypage 180).
XClean the headlamps and rear lights and
check for damage.
XClean the front and rear license plates.
XClean the wheels/tires with a water jet and
remove any foreign objects.
XClean the wheels, wheel housings and the
vehicle underside with a water jet; check for
any foreign objects and damage.
XCheck whether twigs or other parts of plants
have become trapped. These increase the risk
of fire and can damage fuel pipes, brake hoses or the rubber bellows of the axle joints
and propeller shafts.
XAfter the trip, examine without fail the entire
undercarriage, wheels, tires, brakes, body-
work structure, steering, chassis and exhaust
system for damage.
XAfter driving in sand, mud, gravel, water or
similar dirty conditions, have the following
checked and cleaned:
Rbrake discs
Rwheels
Rbrake pads
Raxle joints
XIf you detect strong vibrations after off-road
travel, check for foreign objects in the wheels
and drive train and remove them if necessary.
Foreign objects can disturb the balance and
cause vibrations.
Driving over poor road surfaces places greater
demands on your vehicle than driving on normal
roads. After driving off-road, check the vehicle.
This allows you to detect damage promptly and
reduce the risk of an accident to yourself and
other road users.
Driving on sand
Observe the following rules when driving on
sand:
RSelect the off-road program (Ypage 181).
RAvoid high engine speeds.
RUse the left-hand steering wheel paddle
shifter to shift to a lower gear appropriate to
the terrain.
RDrive quickly to overcome the rolling resist-
ance. Otherwise the vehicle's wheels could
become stuck in loose ground.
RDrive in the tracks of other vehicles if possi-
ble. Make sure that:
-the tire ruts are not too deep.
-the sand is sufficiently firm.
-the ground clearance of the vehicle is suf-
ficient.
Tire ruts and gravel roads
!Check that the ruts are not too deep and
that your vehicle has sufficient clearance.
Otherwise, your vehicle could be damaged or
bottom out and get stuck.
Driving tips167
Driving and parking
Z