MERCEDES-BENZ GLC SUV 2019 Owners Manual
Manufacturer: MERCEDES-BENZ, Model Year: 2019, Model line: GLC SUV, Model: MERCEDES-BENZ GLC SUV 2019Pages: 673, PDF Size: 11.51 MB
Page 131 of 673
#
Stow and secure objects that are heavy,
hard, poin ted, sharp-edged, fragile or
to o lar geinthe load compartment. Obser
vethe no tes on loading theve hicle. #
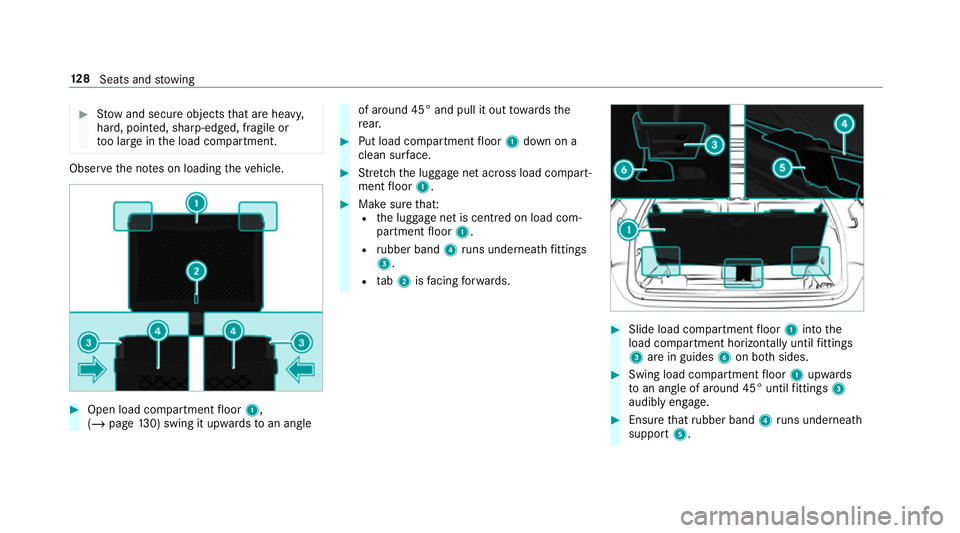
Open load compartment floor 1,
(/ page 130) swing it upwards toan angle of around 45° and pull it out
towa rdsthe
re ar. #
Put load compartment floor 1down on a
clean sur face. #
Stretch the luggage net across load compart‐
ment floor 1. #
Make sure that:
R the luggage net is cent red on load com‐
partment floor 1.
R rubber band 4runs undernea thfittings
3.
R tab2 isfacing forw ards. #
Slide load compartment floor 1into the
load compartment horizon tally until fittings
3 are in guides 6on bo thsides. #
Swing load compartment floor 1upwards
to an angle of around 45° until fittings 3
audibly engage. #
Ensu rethat rubber band 4runs undernea th
support 5. 12 8
Seats and stowing
Page 132 of 673
#
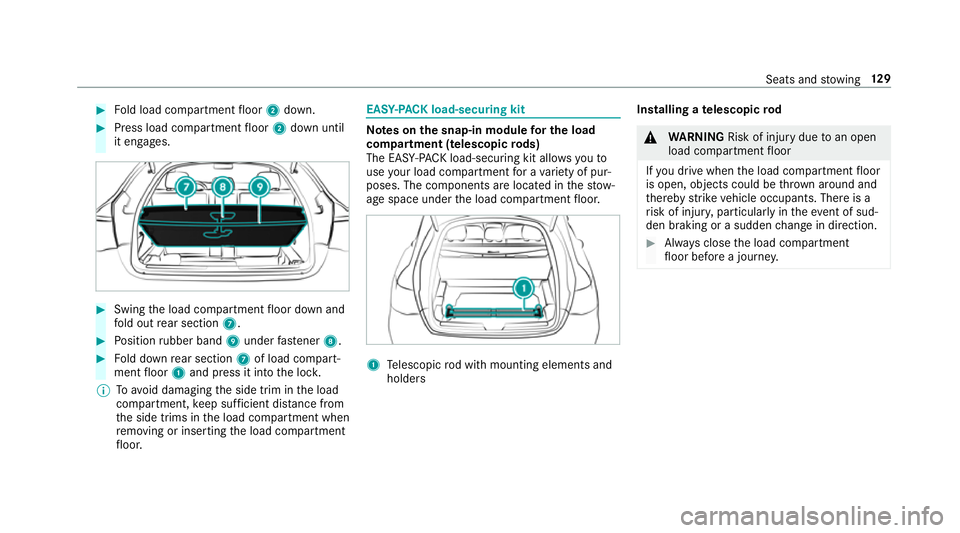
Fold load compartment floor 2down. #
Press load compartment floor 2down until
it engages. #
Swing the load compartment floor down and
fo ld out rear section 7. #
Position rubber band 9under fastener 8. #
Fold down rear section 7of load compart‐
ment floor 1and press it into the loc k.
% Toavo id damaging the side trim in the load
compartment, keep suf ficient di stance from
th e side trims in the load compartment when
re moving or inserting the load compartment
fl oor. EAS
Y-PA CK load-securing kit Note
s onthe snap-in module for the load
co mp artment (telescopic rods)
The EAS Y-PA CK load-securing kit allo wsyouto
use your load co mpartment for a variet y of pur‐
poses. The co mponents are located in thestow‐
age space under the load compartment floor. 1
Telescopic rod with mounting elements and
holders Installing a
telescopic rod &
WARNING Risk of inju rydue toan open
load compartment floor
If yo u drive when the load compartment floor
is open, objects could be thro wn around and
th ereby strike vehicle occupants. There is a
ri sk of injur y,particular lyin theeve nt of sud‐
den braking or a sudden change in direction. #
Alw ays close the load compartment
fl oor before a journe y. Seats and
stowing 12 9
Page 133 of 673
#
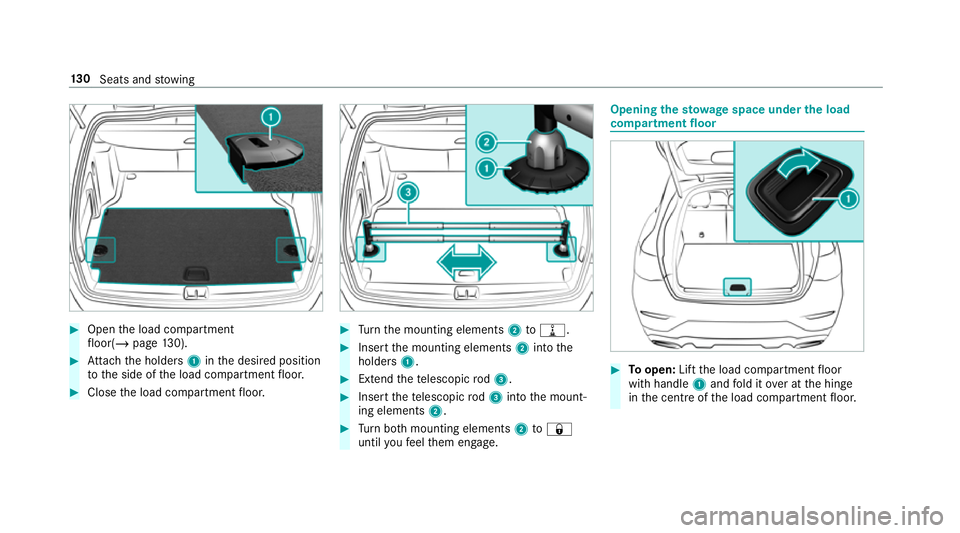
Open the load compartment
fl oor(/ page130). #
Attach the holders 1inthe desired position
to the side of the load compartment floor. #
Close the load compartment floor. #
Turn the mounting elements 2to= . #
Insert the mounting elements 2into the
holders 1. #
Extend thete lescopic rod3. #
Insert thete lescopic rod3 into the mount‐
ing elements 2. #
Turn both mounting elements 2to&
until youfe el them engage. Opening
thesto wage space under the load
compa rtment floor #
Toopen: Liftthe load compartment floor
with handle 1and fold it over at the hinge
in the cent reofthe load compartment floor. 13 0
Seats and stowing
Page 134 of 673
#
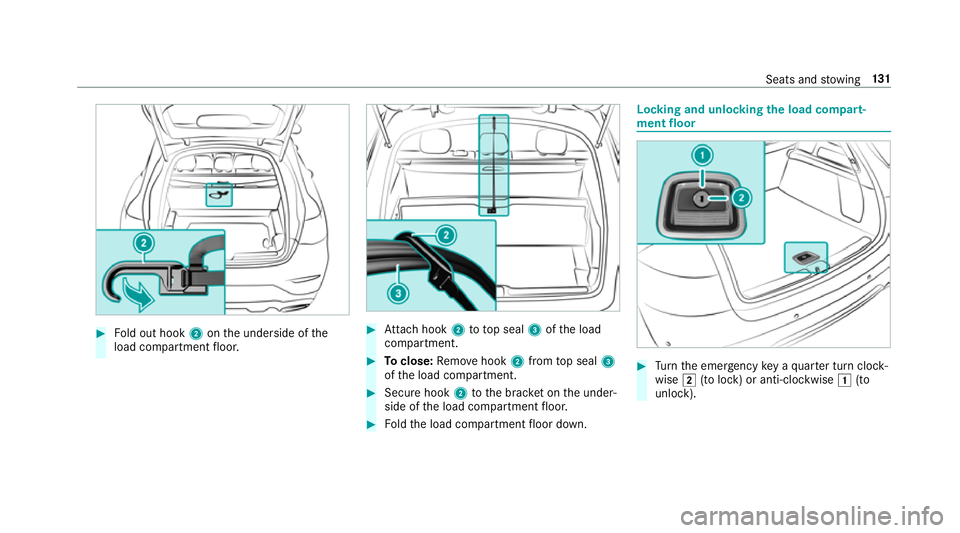
Fold out hook 2onthe underside of the
load compartment floor. #
Attach hook 2to to p seal 3ofthe load
compartment. #
Toclose: Remo vehook 2from top seal 3
of the load compartment. #
Secure hook 2tothe brac ket on the under‐
side of the load compartment floor. #
Foldthe load compartment floor down. Locking and unlocking
the load compa rt‐
ment floor #
Turn the emer gency key a quarter turn clock‐
wise 2(to lock) or anti-clockwise 1(to
unlock). Seats and
stowing 131
Page 135 of 673
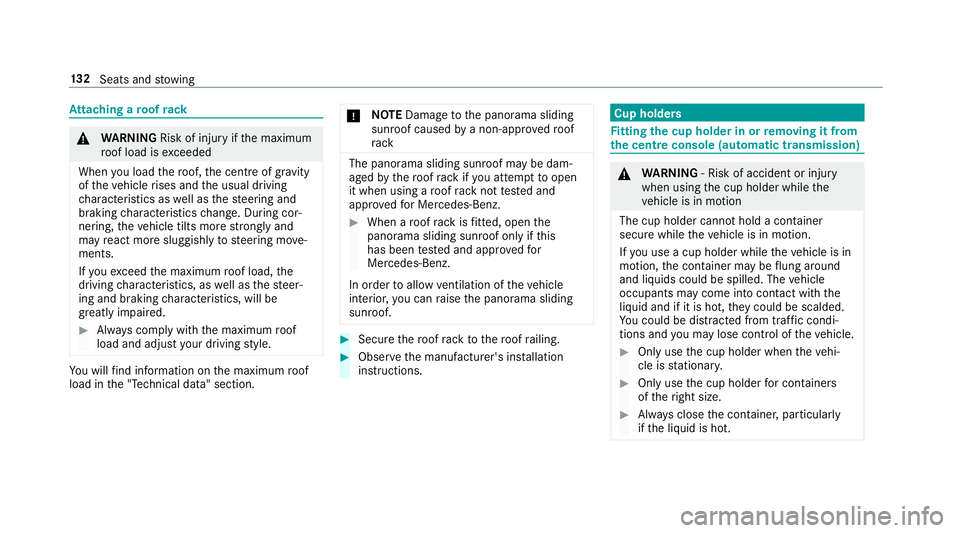
At
taching a roof rack &
WARNING Risk of inju ryifth e maximum
ro of load is exceeded
When you load thero of, the cent reof gr avity
of theve hicle rises and the usual driving
ch aracteristics as well as thesteering and
braking characteristics change. During cor‐
nering, theve hicle tilts more strongly and
may react more sluggishly tosteering mo ve‐
ments.
If yo uexc eed the maximum roof load, the
driving characteristics, as well as thesteer‐
ing and braking characteristics, will be
great lyimpaired. #
Alw ays comply with the maximum roof
load and adjust your driving style. Yo
u will find information on the maximum roof
load in the "Technical data" section. *
NO
TEDama getothe panorama sliding
sunroof caused bya non-appr ovedro of
ra ck The panorama sliding sunroof may be dam‐
aged
bythero of rack ifyo u attem pttoopen
it when using a roof rack not tested and
appr ovedfo r Mercedes-Benz. #
When a roof rack isfitted, open the
panorama sliding sunroof only if this
has been tested and appr oved for
Mercedes-Benz.
In order toallow ventilation of theve hicle
interior, you can raise the panorama sliding
sunroof. #
Secure thero of rack tothero of railing. #
Obser vethe manufacturer's ins tallation
instructions. Cup holders
Fi
tting the cup holder in or removing it from
the centre console (au tomatic transmission) &
WARNING ‑ Risk of accident or inju ry
when using the cup holder while the
ve hicle is in motion
The cup holder cannot hold a container
secure while theve hicle is in motion.
If yo u use a cup holder while theve hicle is in
motion, the conta iner may be flung around
and liquids could be spilled. The vehicle
occupants may come into contact with the
liquid and if it is hot, they could be scalded.
Yo u could be distracted from traf fic condi‐
tions and you may lose cont rol of theve hicle. #
Only use the cup holder when theve hi‐
cle is stationar y. #
Only use the cup holder for containers
of theright size. #
Alw ays close the conta iner, particularly
if th e liquid is hot. 13 2
Seats and stowing
Page 136 of 673
#
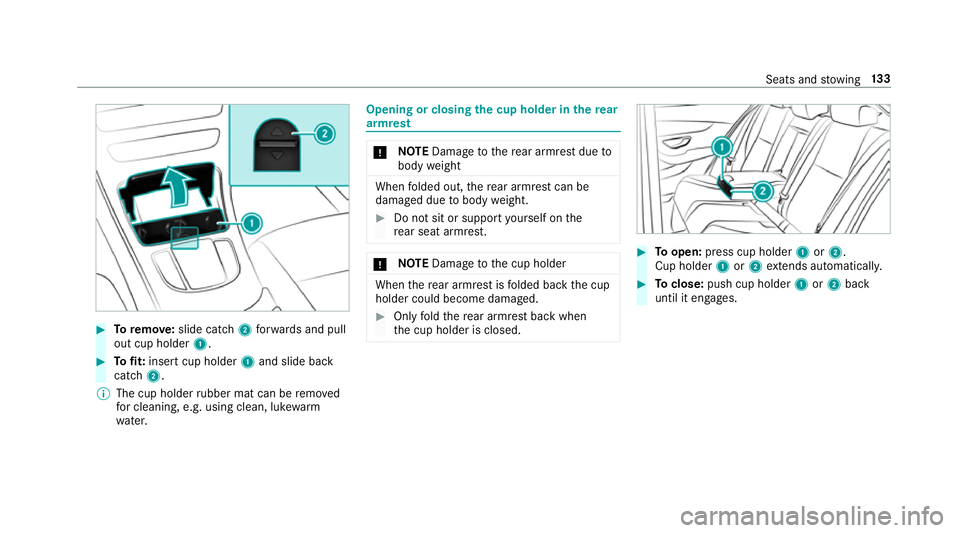
Toremo ve:slide catch 2forw ards and pull
out cup holder 1. #
Tofit: inse rtcup holder 1and slide ba ck
catch 2.
% The cup holder rubber mat can be remo ved
fo r cleaning, e.g. using clean, luk ewarm
wate r. Opening or closing
the cup holder in there ar
armrest *
NO
TEDama getothere ar armrest due to
body weight When
folded out, there ar armrest can be
damaged due tobody weight. #
Do not sit or support yourself on the
re ar seat armrest. *
NO
TEDama getothe cup holder When
there ar armrest is folded back the cup
holder could become damaged. #
Only fold there ar armrest back when
th e cup holder is closed. #
Toopen: press cup holder 1or2.
Cup holder 1or2 extends au tomatical ly. #
Toclose: push cup holder 1or2 back
until it engages. Seats and
stowing 13 3
Page 137 of 673
Asht
ray and cigar ette lighter Using
the ashtr ayinthe front centre console *
NO
TEDama getothestow age compart‐
ment under the ashtr aydue tointense
heat The
stow age compartment under the ashtray
is not heat resis tant and could be damaged if
yo ure st a lit cigar ette on it. #
Make sure that the ashtr ayis fully
engaged. #
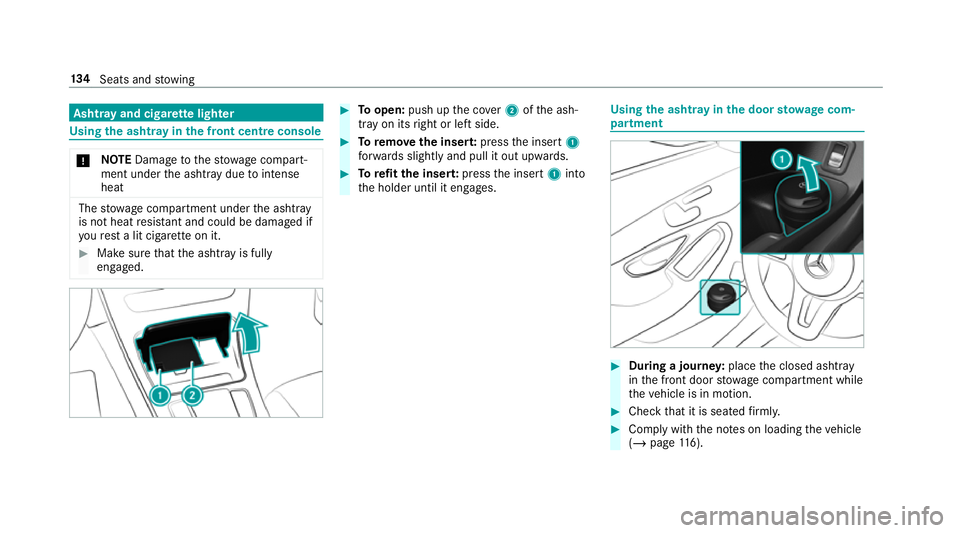
Toopen: push up the co ver2 ofthe ash‐
tray on its right or left side. #
Toremo vethe inser t:press the insert 1
fo rw ards slightly and pull it out upwards. #
Torefit the inse rt:press the insert 1into
th e holder until it engages. Using
the ashtr ayinthe door stow age com‐
partment #
During a journe y:place the closed ashtray
in the front door stowage compartment while
th eve hicle is in motion. #
Check that it is seated firm ly. #
Comply with the no tes on loading theve hicle
(/ page 116). 134
Seats and stowing
Page 138 of 673
#
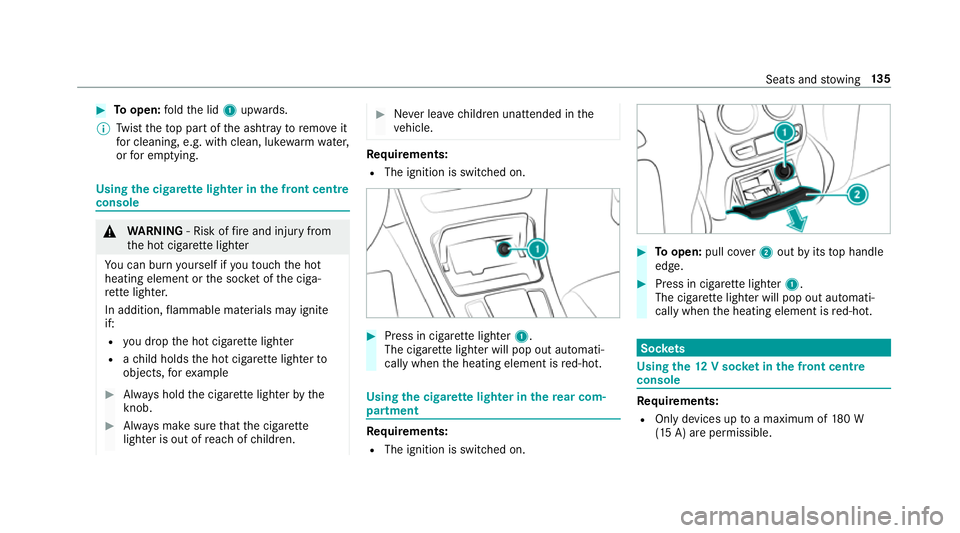
Toopen: fold the lid 1upwards.
% Twist theto p part of the ashtray toremo veit
fo r cleaning, e.g. with clean, luk ewarmwate r,
or for em ptying. Using
the cigar ette lighter in the front centre
console &
WARNING ‑ Risk of fire and injury from
th e hot cigar ette lighter
Yo u can burn yourself if youto uch the hot
heating element or the soc ket of the ciga‐
re tte lighter.
In addition, flammable materials may ignite
if:
R you drop the hot cigar ette lighter
R ach ild holds the hot cigar ette lighter to
objects, forex ample #
Alw ays hold the cigar ette lighter bythe
knob. #
Alw ays make sure that the cigar ette
lighter is out of reach of children. #
Never lea vechildren unat tended in the
ve hicle. Re
quirements:
R The ignition is switched on. #
Press in cigar ette lighter 1.
The cigar ette lighter will pop out automati‐
cally when the heating element is red-hot. Using
the cigar ette lighter in there ar com‐
partment Re
quirements:
R The ignition is switched on. #
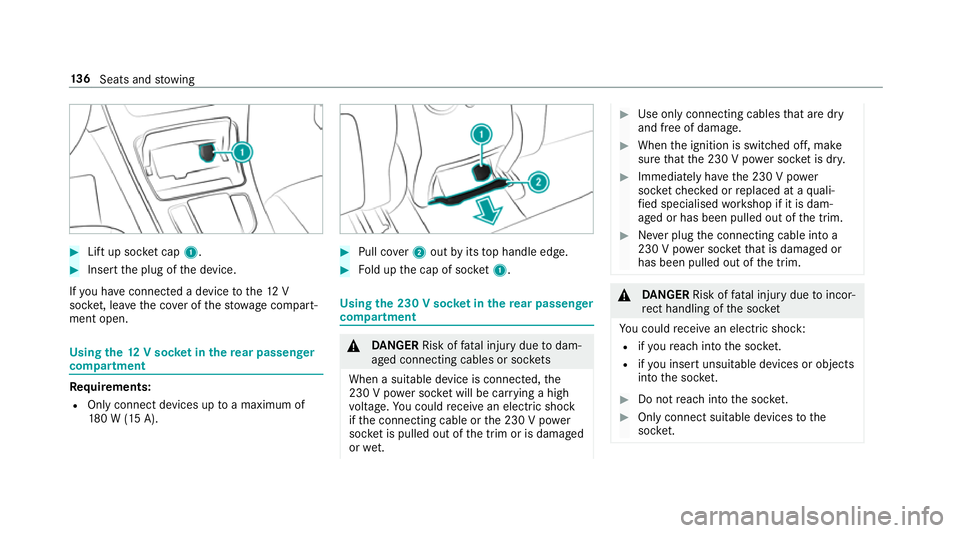
Toopen: pull co ver2 out byits top handle
edge. #
Press in cigar ette lighter 1.
The cigar ette lighter will pop out automati‐
cally when the heating element is red-hot. Soc
kets Using the
12V so cket inthe front centre
console Re
quirements:
R Only devices up toa maximum of 180 W
(15 A) are permissible. Seats and
stowing 13 5
Page 139 of 673
#
Lift up soc ket cap 1. #
Inse rtthe plug of the device.
If yo u ha veconnected a device tothe12 V
soc ket, le ave the co ver of thestow age compart‐
ment open. Using
the12 V so cket inthere ar passenger
comp artment Re
quirements:
R Only connect devices up toa maximum of
18 0 W (15 A). #
Pull co ver2 out byits top handle edge. #
Fold up the cap of soc ket1. Using the 230 V so
cket inthere ar passenger
comp artment &
DANG ER Risk of fata l injury due todam‐
aged connecting cables or soc kets
When a suitable device is connected, the
230 V power soc ket will be car rying a high
vo ltage. You could recei vean electric shock
if th e connecting cable or the 230 V po wer
soc ket is pulled out of the trim or is damaged
or we t. #
Use only connecting cables that are dry
and free of damage. #
When the ignition is switched off, make
sure that the 230 V po wer soc ket is dr y. #
Immedia tely ha ve the 230 V po wer
soc ketch ecked or replaced at a quali‐
fi ed specialised workshop if it is dam‐
aged or has been pulled out of the trim. #
Never plug the connecting cable into a
230 V po wer soc ketth at is damaged or
has been pulled out of the trim. &
DANG ER Risk of fata l injury due toincor‐
re ct handling of the soc ket
Yo u could recei vean electric shock:
R ifyo ure ach into the soc ket.
R ifyo u insert unsuitable devices or objects
into the soc ket. #
Do not reach into the soc ket. #
Only connect suitable devices tothe
soc ket. 13 6
Seats and stowing
Page 140 of 673
Re
quirements:
R Devices are equipped with a suitable plug
which con form sto thest andards specific to
th e count ryyou are in.
R A device up toa maximum of 150 W (0.65 A)
is used.
R Do not use multiple soc ket outlets. #
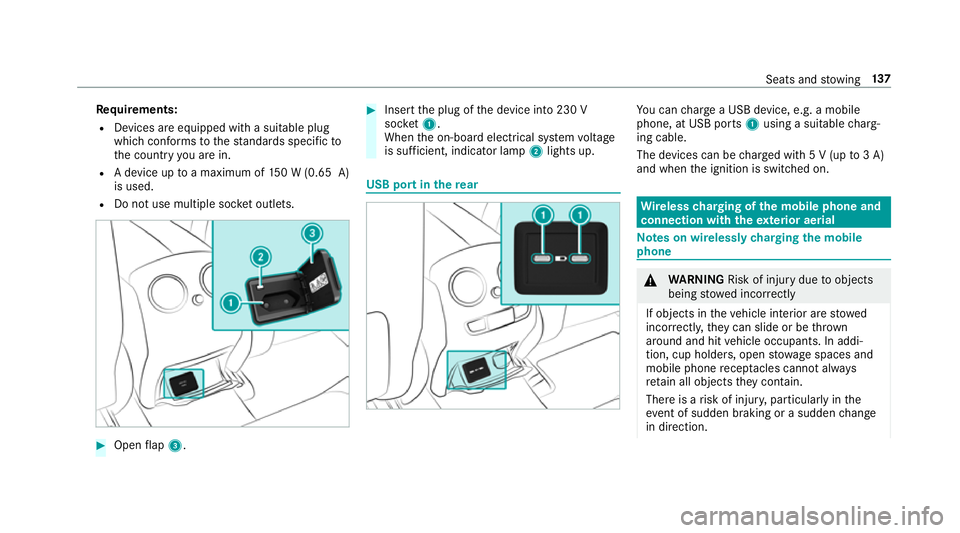
Open flap 3. #
Insert the plug of the device into 230 V
soc ket1.
When the on-board electrical sy stem voltage
is suf ficient, indicator la mp2lights up. USB port in
there ar Yo
u can charge a USB device, e.g. a mobile
phone, at USB ports 1using a suitable charg‐
ing cable.
The devices can be charge d with 5 V (up to3 A)
and when the ignition is switched on. Wire
lesscharging of the mobile phone and
connection with theex terior aerial Note
s on wirelessly charging the mobile
phone &
WARNING Risk of inju rydue toobjects
being stowed inco rrectly
If objects in theve hicle interior are stowed
incor rectly, they can slide or be thrown
around and hit vehicle occupants. In addi‐
tion, cup holders, open stowage spaces and
mobile phone recep tacles cannot al ways
re tain all objects they contain.
The reis a risk of injur y,particularly in the
ev ent of sudden braking or a sudden change
in direction. Seats and
stowing 137