jump cable MERCEDES-BENZ GLE 2016 Owners Manual
[x] Cancel search | Manufacturer: MERCEDES-BENZ, Model Year: 2016, Model line: GLE, Model: MERCEDES-BENZ GLE 2016Pages: 450, PDF Size: 12.92 MB
Page 190 of 450
Observe the following notes: R
Stop the vehicle before starting to drive along
an off-road route. If necessary, select the off-
road program ( Y
page 237) or shift to the
LOW RANGE off-road gear ( Y
page 239).R
Select a vehicle level that is suitable for the
terrain. To avoid damaging the vehicle, make
sure there is always sufficient ground clear-
ance. R
Check that items of luggage and loads are
stowed safely and are well secured
( Y
page 333).R
Always keep the engine running and in gear
when driving on a downhill gradient. Activate
DSR ( Y
page 236).R
Always keep the engine running and in gear
when driving on a slope. R
Adapt your speed to the terrain. The rougher,
steeper or more ruts on the terrain, the slower
your speed should be. R
Do not jump with the vehicle as this will inter-
rupt the vehicle's propulsion. R
Drive with extreme care on unfamiliar off-road
routes where visibility is poor. For safety rea-
sons, get out of the vehicle first and survey
the off-road route. R
Look out for obstacles, such as rocks, holes,
tree stumps and furrows. R
Always keep the doors, the tailgate, the side
windows and the sliding sunroof closed while
the vehicle is in motion. R
Do not shift the automatic transmission to
transmission position N .R
Observe the notes on off-road fording
( Y
page 185).
i Do not use the HOLD function when driving
off-road, on steep uphill or downhill gradients
or on slippery or loose surfaces. The HOLD
function cannot hold the vehicle on such sur-
faces.
Checklist before driving off-road
! If the engine oil warning lamp lights up while
the vehicle is in motion, stop the vehicle in a
safe place as soon as possible. Check the
engine oil level. The engine oil warning lamp
warning must not be ignored. Continuing the
journey while the symbol is displayed could
lead to engine damage. X
Engine oil level: check the engine oil level
and add oil if necessary.
When driving on steep gradients, the engine
oil level must be sufficiently high to ensure a
correct oil supply in the vehicle. X
DEF tank (BlueTEC vehicles): check the
level and add if necessary ( Y
page 167).X
Tire-changing tool kit: check that the jack is
working and make sure you have the lug
wrench, a robust tow cable and a folding
spade in the vehicle. X
Wheels and tires: check the tire tread depth
and tire pressure. X
Check for damage and remove any foreign
objects, e.g. small stones, from the wheels/
tires. X
Replace any missing valve caps. X
Replace dented or damaged wheels. X
Rims: dented or bent rims can result in a loss
of tire pressure and damage the tire bead.
Before driving off-road, check the wheels and
replace them if necessary.
Checklist after driving off-road
! If you detect damage to the vehicle after
driving off-road, have the vehicle checked
immediately at a qualified specialist work-
shop.
Driving over rough terrain places greater
demands on your vehicle than driving on normal
roads. After driving off-road, check the vehicle.
This allows you to detect damage promptly and
reduce the risk of an accident to yourself and
other road users. X
If the Offroad or Offroad Plus drive program
is selected: select the Individual , Sport ,
Comfort or Slippery drive program
( Y
page 152). X
Deactivate the LOW RANGE off-road gear
( Y
page 239). X
Deactivate DSR ( Y
page 236).X
Lower the vehicle level again to a level suita-
ble to the road conditions, e.g. to the normal
level. X
Clean the headlamps and rear lights and
check for damage. X
Clean the front and rear license plates. X
Clean the wheels and tires with a water jet
and remove any foreign objects.188
Driving tips
Driving and parking
Page 377 of 450
The highly flammable gas mixture forms when
charging the battery as well as when jump-start-
ing.
Always make sure that neither you nor the bat-
tery is electrostatically charged. A build-up of
electrostatic charge can be caused, for exam-
ple: R
by wearing clothing made from synthetic
fibers R
due to friction between clothing and seats R
if you push or pull the battery across the car-
pet or other synthetic materials R
if you wipe the battery with a cloth
G WARNING
During the charging process, a battery produ-
ces hydrogen gas. If a short circuit occurs or
sparks are created, the hydrogen gas can
ignite. There is a risk of an explosion. R
Make sure that the positive terminal of a
connected battery does not come into con-
tact with vehicle parts. R
Never place metal objects or tools on a bat-
tery. R
It is important that you observe the descri-
bed order of the battery terminals when
connecting and disconnecting a battery. R
When jump-starting, make sure that the
battery poles with identical polarity are
connected. R
It is particularly important to observe the
described order when connecting and dis-
connecting the jumper cables. R
Never connect or disconnect the battery
terminals while the engine is running.
G WARNING
Battery acid is caustic. There is a risk of injury.
Avoid contact with skin, eyes or clothing. Do
not inhale any battery gases. Do not lean over
the battery. Keep children away from batter-
ies. Wash away battery acid immediately with
plenty of clean water and seek medical atten-
tion. H Environmental note
Batteries contain dangerous
substances. It is against the
law to dispose of them with
the household rubbish. They
must be collected separately
and recycled to protect the
environment.
Dispose of batteries in an
environmentally friendly
manner. Take discharged
batteries to a qualified spe-
cialist workshop or a special
collection point for used bat-
teries.
! Have the battery checked regularly at a
qualified specialist workshop.
Observe the service intervals in the Mainte-
nance Booklet or contact a qualified specialist
workshop for more information.
! Always have work on batteries carried out at
a qualified specialist workshop. Should it, in
exceptional circumstances, be absolutely
necessary to disconnect the 12-volt battery
yourself, observe the following: R
secure the vehicle to prevent it from rolling
away. R
switch off the ignition. R
always disconnect the negative terminal
clamp first, followed by the positive termi-
nal clamp.
After the battery has been disconnected, the
transmission is locked in position P .
After the work has been done, install the bat-
tery and replace the cover of the positive ter-
minal clamp firmly.
Comply with safety precautions and take pro-
tective measures when handling batteries.
Risk of explosion.
Fire, open flames and smoking are
prohibited when handling the bat-
tery. Avoid creating sparks.Battery (vehicle) 375
Breakdown assitance Z
Page 381 of 450
Jump-starting For the jump-starting procedure, use only the jump-starting connection point in the engine com-
partment, consisting of a positive terminal and a ground point.
G WARNING
Battery acid is caustic. There is a risk of injury.
Avoid contact with skin, eyes or clothing. Do not inhale any battery gases. Do not lean over the
battery. Keep children away from batteries. Wash away battery acid immediately with plenty of
clean water and seek medical attention.
G WARNING
During charging and jump-starting, explosive gases can escape from the battery. There is a risk
of an explosion.
Particularly avoid fire, open flames, creating sparks and smoking. Ensure there is sufficient ven-
tilation while charging and jump-starting. Do not lean over a battery.
G WARNING
During the charging process, a battery produces hydrogen gas. If a short circuit occurs or sparks
are created, the hydrogen gas can ignite. There is a risk of an explosion. R
Make sure that the positive terminal of a connected battery does not come into contact with
vehicle parts. R
Never place metal objects or tools on a battery. R
It is important that you observe the described order of the battery terminals when connecting
and disconnecting a battery. R
When jump-starting, make sure that the battery poles with identical polarity are connected. R
It is particularly important to observe the described order when connecting and disconnecting
the jumper cables. R
Never connect or disconnect the battery terminals while the engine is running.
G WARNING
A discharged battery can freeze at temperatures below freezing point. When jump-starting the
vehicle or charging the battery, gases can escape from the battery. There is a risk of an explosion.
Allow the frozen battery to thaw out before charging it or jump-starting.
! Vehicles with a gasoline engine: avoid repeated and lengthy starting attempts. Otherwise, the
catalytic converter could be damaged by non-combusted fuel.
If the indicator/warning lamps do not light up at low temperatures, it is very likely that the dis-
charged battery has frozen. In this case you may neither jump-start the vehicle nor charge the
battery. The service life of a thawed-out battery may be shorter. The starting characteristics can be
impaired, particularly at low temperatures. Have the thawed-out battery checked at a qualified
specialist workshop. Jump-starting 379
Breakdown assitance Z
Page 382 of 450
Do not start the vehicle using a rapid charging device. If your vehicle's battery is discharged, the
engine can be jump-started from another vehicle or from a second battery using jumper cables.
Observe the following points: R
The battery is not accessible in all vehicles. If the other vehicle's battery is not accessible, jump-
start the vehicle using a second battery or a jump-starting device. R
Vehicles with a gasoline engine: only jump-start the vehicle when the engine and exhaust
system are cold. R
Do not start the engine if the battery is frozen. Let the battery thaw first. R
Only jump-start from batteries with a 12 V voltage rating. R
Only use jumper cables which have a sufficient cross-section and insulated terminal clamps. R
If the battery is fully discharged, leave the battery that is being used to jump-start connected for
a few minutes before attempting to start. This charges the battery slightly. R
Make sure that the two vehicles do not touch.
Make sure that: R
The jumper cables are not damaged. R
Bare parts of the terminal clamp do not come into contact with other metal parts while the jumper
cables are connected to the battery. R
The jumper cables cannot come into contact with parts which can move when the engine is
running, such as the V-belt pulley or the fan. X
Secure the vehicle by applying the electric parking brake. X
Shift the transmission to position P .X
Make sure that the ignition is switched off. All indicator lamps in the instrument cluster must be
off. When using the SmartKey, turn the SmartKey to position 0 in the ignition lock and remove it
( Y
page 145).X
Switch off all electrical consumers, e.g. rear window defroster, lighting, etc. X
Open the hood.
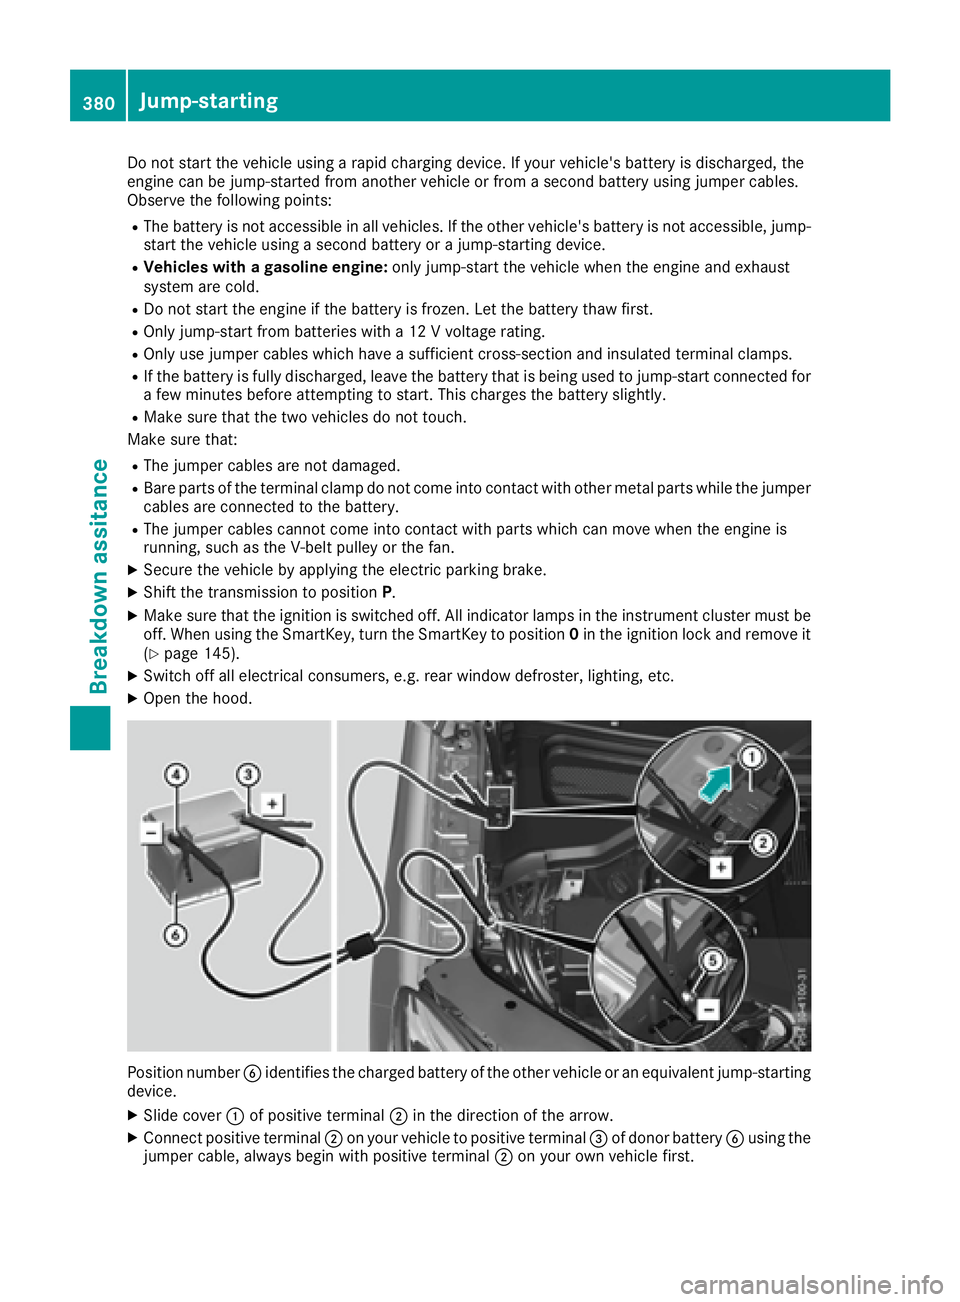
Position number �
Page 386 of 450
You can find information on "Jump-starting"
under ( Y
page 379).
Fuses
Important safety notes
G WARNING
If you manipulate or bridge a faulty fuse or if
you replace it with a fuse with a higher amper-
age, the electric cables could be overloaded.
This could result in a fire. There is a risk of an
accident and injury.
Always replace faulty fuses with the specified
new fuses having the correct amperage.
! For the fuse boxes in the engine compart-
ment and under the rear bench seat, only use
fuses with the suffix "S". Otherwise, compo-
nents or systems could be damaged.
The fuses in your vehicle serve to close down
faulty circuits. If a fuse blows, all the compo-
nents on the circuit and their functions stop
operating.
Blown fuses must be replaced with fuses of the
same rating, which you can recognize by the
color and value. The fuse ratings are listed in the
fuse allocation chart.
The fuse allocation chart is located in the fuse
box under the rear bench seat ( Y
page 385).
If a newly inserted fuse also blows, have the
cause traced and rectified at a qualified special-
ist workshop, e.g. an authorized Mercedes-Benz
Center.
Before changing a fuse Observe the important safety notes
( Y
page 384) X
Secure the vehicle against rolling away
( Y
page 178).X
Switch off the engine. X
Switch off all electrical consumers. X
Remove the SmartKey from the ignition lock.
or, in vehicles with KEYLESS-GO start-function
or KEYLESS ‑ GO X
Open the driver's door.
The on-board electronics now have status 0 .
This is the same as the SmartKey having been
removed.
The driver’s door can be closed again.
All indicator lamps in the instrument cluster
must be off.
The fuses are located in various fuse boxes: R
Fuse box on the front-passenger side of the
dashboard R
Fuse box in the engine compartment on the
right-hand side of the vehicle, when viewed in
the direction of travel R
Fuse box under the rear bench seat
Dashboard fuse box Pay attention to the important safety notes
( Y
page 384).
! Do not use a pointed object such as a screw-
driver to open the cover in the dashboard. You
could damage the dashboard or the cover.
! Make sure that no moisture can enter the
fuse box when the cover is open.
! When closing the cover, make sure that it is
lying correctly on the fuse box. Moisture seep-
ing in or dirt could otherwise impair the oper-
ation of the fuses.
X
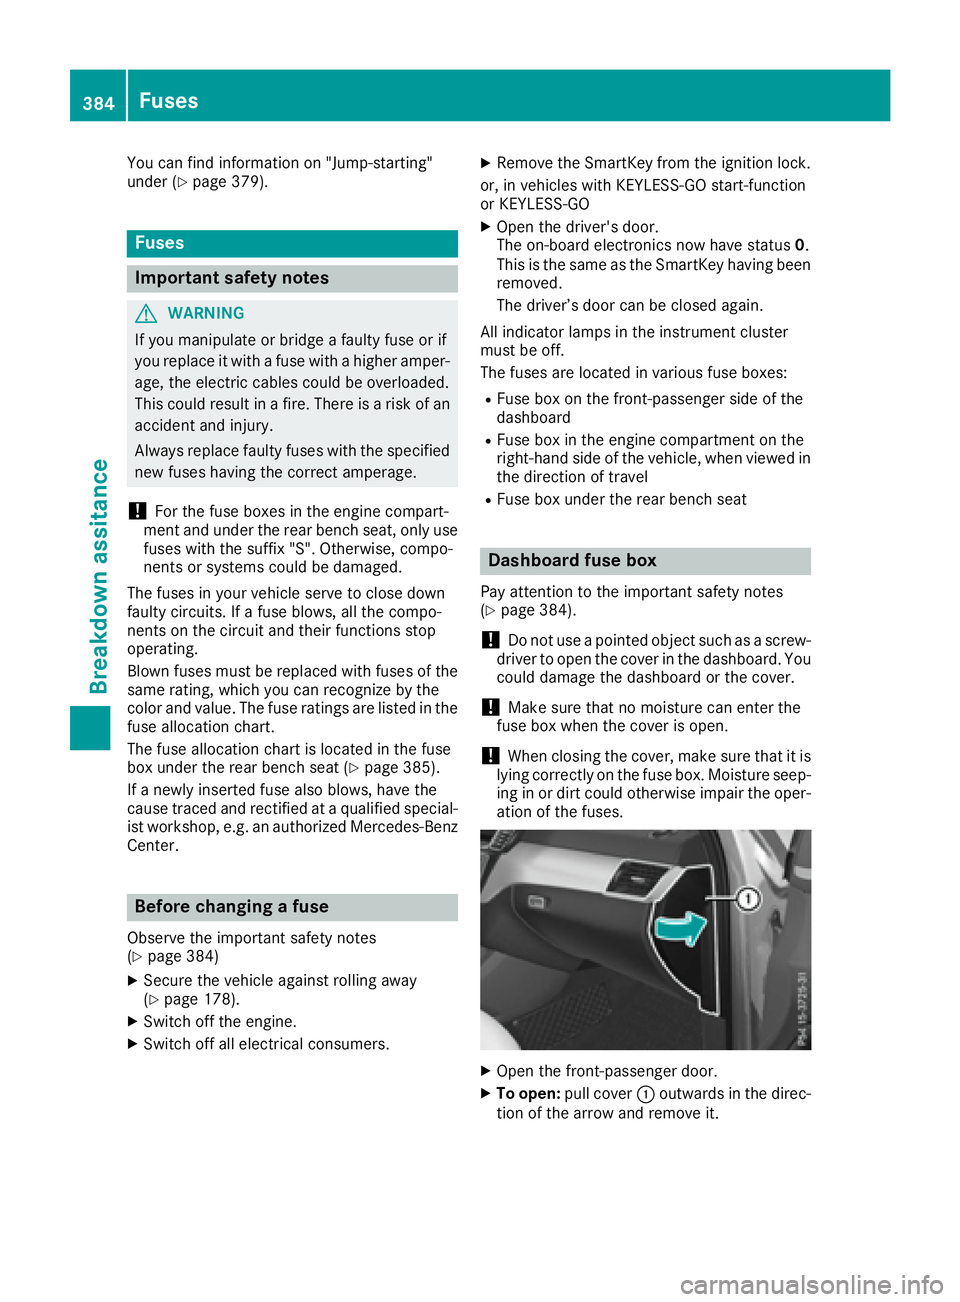
Open the front-passenger door. X
To open: pull cover �C outwards in the direc-
tion of the arrow and remove it.384
Fuses
Breakdown assitance