tire size MERCEDES-BENZ GLE 2016 Owners Manual
[x] Cancel search | Manufacturer: MERCEDES-BENZ, Model Year: 2016, Model line: GLE, Model: MERCEDES-BENZ GLE 2016Pages: 450, PDF Size: 12.92 MB
Page 23 of 450
Average weight of the vehicle
occupants (definition) .................... 406
Bar (definition) ............................... 406
Changing a wheel .......................... 408
Characteristics .............................. 406
Checking ........................................ 388
Curb weight (definition) ................. 407
Definition of terms ......................... 406
Direction of rotation ...................... 409
Display message ............................ 309
Distribution of the vehicle occu-
pants (definition) ............................ 408
DOT (Department of Transporta-
tion) (definition) ............................. 406
DOT, Tire Identification Number
(TIN) ............................................... 405
GAWR (Gross Axle Weight Rating)
(definition) ..................................... 406
General notes ................................ 413
GTW (Gross Trailer Weight) (defi-
nition) ............................................ 407
GVW (Gross Vehicle Weight) (def-
inition) ........................................... 407
GVWR (Gross Vehicle Weight Rat-
ing) (definition) .............................. 407
Important safety notes .................. 387
Increased vehicle weight due to
optional equipment (definition) ...... 406
Information on driving .................... 387
Kilopascal (kPa) (definition) ........... 407
Labeling (overview) ........................ 403
Load bearing index (definition) ...... 408
Load index ..................................... 405
Load index (definition) ................... 407
M+S tires ....................................... 389
Maximum load on a tire (defini-
tion) ............................................... 407
Maximum loaded vehicle weight
(definition) ..................................... 407
Maximum permissible tire pres-
sure (definition) ............................. 407
Maximum tire load ......................... 405
Maximum tire load (definition) ....... 407
MOExtended tires .......................... 389
Optional equipment weight (defi-
nition) ............................................ 408
PSI (pounds per sq uare inch) (def-
i
nition) ........................................... 407 Replacing ....................................... 408
Service life ..................................... 388
Sidewall (definition) ....................... 408
Speed rating (definition) ................ 407
Storing ........................................... 409
Structure and characteristics
(definition) ..................................... 406
Temperature .................................. 402
TIN (Tire Identification Number)
(definition) ..................................... 408
Tire bead (definition) ...................... 407
Tire pressure (definition) ................ 407
Tire pressures (recommended) ...... 406
Tire size (data) ............................... 413
Tire size designation, load-bearing
capacity, speed rating .................... 403
Tire tread ....................................... 388
Tire tread (definition) ..................... 407
Total load limit (definition) ............. 408
Traction ......................................... 402
Traction (definition) ....................... 408
Tread wear ..................................... 402
TWR (permissible trailer drawbar
noseweight) (definition) ................. 408
Uniform Tire Quality Grading
Standards ...................................... 401
Uniform Tire Quality Grading
Standards (definition) .................... 406
Wear indicator (definition) ............. 408
Wheel and tire combination ........... 414
Wheel rim (definition) .................... 406
see Flat tire
Top Tether ............................................ 62
Tow-starting
Emergency engine starting ............ 383
Important safety notes .................. 381
Towing a trailer
Axle load, permissible .................... 445
Cleaning the trailer tow hitch ......... 366
Coupling up a trailer ...................... 259
Decoupling a trailer ....................... 261
Driving tips .................................... 257
ESP ®
(Electronic Stability Pro-
gram) ............................................... 73
Important safety notes .................. 256
Installing the ball coupling ............. 258
Lights display message .................. 292
Mo u nting dimensions .................... 444 Index 21
Page 25 of 450
Vehicle data ................................... 441
Vehicle battery
see Battery (vehicle)
Vehicle data ....................................... 441
Vehicle data (off-road driving)
Approach/departure angle ............ 443
Fording depth ................................ 442
Maximum gradient climbing abil-
ity .................................................. 444
Vehicle dimensions ........................... 441
Vehicle emergency locking ................ 86
Vehicle identification number
see VIN
Vehicle identification plate .............. 432
Vehicle level
AIRMATIC ...................................... 207
Vehicle level (display message) ....... 302
Vehicle tool kit .................................. 369
Video
Operating the DVD ........................ .2 70
VIN ...................................................... 432
Seat ............................................... 433
Type plate ...................................... 432
W
Warning
Stickers .......................................... .4 2
Warning and indicator lamps
ABS ................................................ 319
Brakes .......................................... .3 17
Check Engine ................................. 325
Coolant .......................................... 325
Distance warning ........................... 327
DISTRONIC PLUS ........................... 327
ESP ®
.............................................. 321
ESP ®
OFF ....................................... 322
Fuel tank ........................................ 325
Hybrid drive system ....................... 318
Overview .......................................... 35
Parking brake ................................ 324
PASSENGER AIR BAG ..................... .4 5
RBS (Recuperative Brake Sys -
tem) .............................................. .3 18
Reserve fuel ................................... 325
Restraint system ............................ 324
Seat belt ........................................ 316
Tire pressure monitor .................... 328 Warranty .............................................. 26
Washer fluid
Display message ............................ 314
Wheel and tire combinations
Tires ............................................... 414
Wheel bolt tightening torque ........... 412
Wheel chock ...................................... 409
Wheels
Changing a wheel .......................... 408
Checking ........................................ 388
Cleaning ......................................... 364
Emergency spare wheel ................. 426
General notes ................................ 413
Important safety notes .................. 387
Information on driving .................... 387
Interchanging/changing ................ 408
Mounting a new wheel ................... 411
Mounting a wheel .......................... 409
Overview ........................................ 387
Removing a wheel .......................... 411
Storing .......................................... .4 09
Tightening torque ........................... 412
Wheel size/tire si ze ....................... 413
Wi
ndow curtain air bag
Display message ............................ 289
Operation ......................................... 51
Windows
see Side windows
Windshield
Defrosting ...................................... 136
Windshield washer fluid
see Windshield washer system
Windshield washer system
Adding washer fluid ....................... 359
Important safety notes .................. 439
Windshield wipers
Problem (malfunction) ................... 125
Rear window wiper ........................ 122
Replacing the wiper blades ............ 122
Switching on/off ........................... 121
Winter driving
Slippery road surfaces ................... 186
Snow chains .................................. 390
Winter operation
General notes ................................ 389
Overview ........................................ 389
Radiator cover ............................... 357 Index 23
Page 49 of 450
poses an increased risk of injury or even fatal
injury.
Adjust the seat properly before beginning
your journey. Always ensure that the backrest
is in an almost vertical position and that the
shoulder section of your seat belt is routed
across the center of your shoulder.
G WARNING
Persons under 5 ft (1.50 m) in height cannot
fasten the seat belt correctly without an addi-
tional suitable restraint system. If the seat
belt is incorrectly fastened, it cannot protect
as intended. Furthermore, an incorrectly fas-
tened seat belt can cause additional injury, for
example, in an accident, during braking or an
abrupt change of direction. This poses an
increased risk of injury or even fatal injury.
For this reason, always secure persons under
5 ft (1.50 m) in height in suitable restraint
systems.
If a child younger than twelve years old and
under 5 ft (1.50 m) in height is traveling in the
vehicle: R
always secure the child in a child restraint
system suitable for this Mercedes-Benz vehi-
cle. The child restraint system must be appro-
priate to the age, weight and size of the child R
always observe the instructions and safety
notes on "Children in the vehicle"
( Y
page 60) in addition to the child restraint
system manufacturer's installation and oper-
ating instructions R
be sure to observe the instructions and safety
notes on the "Occupant classification system
(OCS)" ( Y
page 52)
G WARNING
The seat belts may not perform their intended
protective function if: R
they are damaged, modified, extremely
dirty, bleach or dyed R
the seat belt buckle is damaged or
extremely dirty R
the Emergency Tensioning Devices, belt
anchorages or inertia reels have been modi-
fied Seat belts may sustain non-visible damage in
an accident, e.g. due to glass splinters. Modi-
fied or damaged seat belts may tear or fail,
e.g. in an accident. Modified Emergency Ten-
sioning Devices could accidentally trigger or
fail to deploy when necessary. This poses an
increased risk of injury or even fatal injury.
Never modify the seat belts, Emergency Ten-
sioning Devices, belt anchorages or inertia
reels. Make sure that the seat belts are
undamaged, not worn out and clean. Follow-
ing an accident, have the seat belts checked
immediately at a qualified specialist work-
shop.
Only use seat belts that have been approved for
your vehicle by Mercedes-Benz.
Proper use of the seat belts Pay attention to the safety notes about the seat
belt ( Y
page 46).
All vehicle occupants must fasten the seat belt
correctly before setting off. Make sure that all
occupants are wearing their seat belts correctly
for the entire journey.
When fastening the seat belt, make sure that: R
The seat belt tongue is inserted into the belt
buckle that belongs to the seat. R
The seat belt is tightened across your body.
Avoid wearing bulky clothing, e.g. a winter
coat. R
The seat belt is not twisted.
Only then can the forces produced in the
event of an accident be evenly distributed
across the belt. R
The shoulder section of the belt must always
be routed across the center of the shoulder.
The shoulder section of the belt should not
come into contact with your neck and must
not be routed under the arm. Where possible,
adjust the seat belt to the appropriate height. R
The lap belt must be taut and as low as pos-
sible over your lap.
The lap belt must always pass across your hip
joints and never across your stomach or
abdomen. Pregnant women must take partic-
ular care. If necessary, the lap belt can be
pushed down across the hip joints and pulled
tight using the shoulder section.Occupant safety 47
Safety Z
Page 372 of 450
X
Open the tailgate. X
Lift the cargo compartment floor upwards
( Y
page 337).X
Remove the "Minispare" emergency spare
wheel ( Y
page 427).
Flat tire
Preparing the vehicle Your vehicle may be equipped with: R
MOExtended tires (tires with run-flat proper-
ties)
Vehicle preparation is not necessary on vehi-
cles with MOExtended tires R
a TIREFIT kit ( Y
page 369)R
an emergency spare wheel (only for certain
countries)
Information on changing and mounting wheels
( Y
page 408). X
Stop the vehicle on solid, non-slippery and
level ground, as far away as possible from
traffic. X
Switch on the hazard warning lamps. X
Secure the vehicle against rolling away
( Y
page 178).X
If possible, bring the front wheels into the
straight-ahead position. X
Vehicles with the AIRMATIC package:
make sure that the normal vehicle level is
selected ( Y
page 207).X
Vehicles with the Off-Road Engineering
package: make sure that the normal vehicle
level is selected ( Y
page 201).X
Switch off the engine. X
Vehicles without KEYLESS-GO: remove the
SmartKey from the ignition lock. X
Vehicles with KEYLESS-GO: open the driv-
er's door.
The on-board electronics now have status 0 .
This is the same as the SmartKey having been
removed. X
Vehicles with KEYLESS-GO: remove the
Start/Stop button from the ignition lock
( Y
page 146).X
Make sure that the engine cannot be started
via your smartphone ( Y
page 148).X
Make sure that the passengers are not endan-
gered as they do so. Make sure that no one is
near the danger area while a wheel is being changed. Anyone who is not directly assisting
in the wheel change should, for example,
stand behind the barrier. X
Get out of the vehicle. Pay attention to traffic
conditions when doing so. X
Close the driver's door. X
Unload heavy luggage.
i Only operate the tire inflation compressor
using a 12 V socket, even if the ignition is
turned off ( Y
page 343).
An emergency cut-out ensures that the on-
board voltage does not drop too low. If the on-
board voltage is too low, the power to the
sockets is automatically cut. This ensures
that there is sufficient power to start the
engine.
MOExtended tires (tires with run-flat
properties)
General notes With MOExtended tires (tires with run flat char-
acteristics), you can continue to drive your vehi-
cle even if there is a total loss of pressure in one
or more tires. The affected tire must not show
any clearly visible damage.
You can recognize MOExtended tires by the
MOExtended marking which appears on the
sidewall of the tire. You will find this marking
next to the tire size designation, the load-bear-
ing capacity and the speed index ( Y
page 403).
MOExtended tires may only be used in conjunc-
tion with an active tire pressure loss warning
system or with an active tire pressure monitor.
If a pressure loss warning message appears
in the multifunction display: R
observe the instructions in the display mes-
sages ( Y
page 309). R
check the tire for damage. R
if driving on, observe the following notes.
The driving distance possible in run-flat mode is
approximately 50 miles (80 km) when the vehi-
cle is partially laden and approximately 18 miles
(30 km) when the vehicle is fully laden.
In addition to the vehicle load, the driving dis-
tance possible depends upon: R
vehicle speed R
road condition R
outside temperature370
Flat tire
Breakdown assitance
Page 373 of 450
The driving distance possible in run-flat mode
may be reduced by extreme driving conditions
or maneuvers, or it can be increased through a
moderate style of driving.
The driving distance possible in run-flat mode is
counted from the moment the tire pressure loss
warning appears in the multifunction display.
You must not exceed a maximum speed of
50 mph (80 km/ h) .
i When replacing one or all tires, please
observe the following specifications for your
vehicle's tires: R
size R
type and R
the "MOExtended" mark
If a tire has gone flat and cannot be replaced
with a MOExtended tire, a standard tire may
be used as a temporary measure. Make sure
that you use the proper size and type (sum-
mer or winter tire).
i Vehicles equipped with MOExtended tires
are not equipped with a TIREFIT kit at the fac-
tory. It is therefore recommended that you
additionally equip your vehicle with a TIREFIT
kit if you mount tires that do not feature run-
flat properties, e.g. winter tires. A TIREFIT kit
may be obtained from a qualified specialist
workshop.
Important safety notes
G WARNING
When driving in emergency mode, the driving
characteristics deteriorate, e.g. when corner-
ing, accelerating quickly and when braking.
There is a risk of an accident.
Do not exceed the stated maximum speed.
Avoid abrupt steering and driving maneuvers,
and driving over obstacles (curbs, potholes,
off-road). This applies in particular to a laden
vehicle.
Stop driving in emergency mode if: R
you hear banging noises. R
the vehicle starts to shake. R
you see smoke and smell rubber. R
ESP ®
is intervening constantly.R
there are tears in the sidewalls of the tire. After driving in emergency mode, have the
wheel rims checked at a qualified specialist
workshop with regard to their further use. The
defective tire must be replaced in every case.
TIREFIT kit
Important safety notes TIREFIT is a tire sealant.
You can use TIREFIT to seal punctures of up to
0.16 in (4 mm), particularly those in the tire
tread. You can use TIREFIT at outside tempera-
tures down to �
Page 389 of 450
Useful information
i This Operator's Manual describes all models
and all standard and optional equipment of
your vehicle available at the time of publica-
tion of the Operator's Manual. Country-spe-
cific differences are possible. Please note
that your vehicle may not be equipped with all
features described. This also applies to
safety-related systems and functions.
i Read the information on qualified specialist
workshops ( Y
page 29).
Important safety notes
G WARNING
If wheels and tires of the wrong size are used,
the wheel brakes or suspension components
may be damaged. There is a risk of an acci-
dent.
Always replace wheels and tires with those
that fulfill the specifications of the original
part.
When replacing wheels, make sure to use the
correct: R
designation R
model
When replacing tires, make sure to use the
correct: R
designation R
manufacturer R
model
G WARNING
A flat tire severely impairs the driving, steer-
ing and braking characteristics of the vehicle.
There is a risk of accident.
Tires without run-flat characteristics: R
do not drive with a flat tire. R
immediately replace the flat tire with your
emergency spare wheel or spare wheel, or
consult a qualified specialist workshop. Tires with run-flat characteristics: R
pay attention to the information and warn-
ing notices on MOExtended tires (tires with
run-flat characteristics).
Accessories that are not approved for your vehi-
cle by Mercedes-Benz or are not being used cor-
rectly can impair the operating safety.
Before purchasing and using non-approved
accessories, visit a qualified specialist work-
shop and inquire about: R
suitability R
legal stipulations R
factory recommendations
Information on the sizes and types of wheels and
tires for your vehicle can be found under
"Wheel/tire combinations" ( Y
page 413).
Tire pressure information can be found: R
on the Tire and Loading Information placard
on the B-pillar on the driver's side R
in the tire pressure table in the fuel filler flap R
in the "Tire pressure" section
Operation
Information on driving Check the tire pressure when the vehicle is
heavily laden and adjust prior to a trip.
While driving, pay attention to vibrations, noises
and unusual handling characteristics, e.g. pull-
ing to one side. This may indicate that the
wheels or tires are damaged. If you suspect that
a tire is defective, reduce your speed immedi-
ately. Stop the vehicle as soon as possible to
check the wheels and tires for damage. Hidden
tire damage could also be causing the unusual
handling characteristics. If you find no signs of
damage, have the tires and wheels checked at a
qualified specialist workshop.
When parking your vehicle, make sure that the
tires do not get deformed by the curb or other
obstacles. If it is necessary to drive over curbs,
speed humps or similar elevations, try to do so
slowly and at an obtuse angle. Otherwise, the
tires, particularly the sidewalls, may be dam-
aged. Operation 387
Wheels and tires Z
Page 391 of 450
with run-flat characteristics)" section
( Y
page 370). R
Only mount tires of the correct size onto the
wheels. R
Break in new tires at moderate speeds for the
first 60 miles (10 0 km). They only re ach their
full performance after this distance. R
Do not drive with tires which have too little
tread depth, as this significantly reduces the
traction on wet roads (hydroplaning). R
Replace the tires after six years at the latest,
regardless of wear.
Observe the notes on the emergency spare
wheel ( Y
page 426).
MOExtended tires (tires with run-flat
properties) With MOExtended tires (tires with run flat char-
acteristics), you can continue to drive your vehi-
cle even if there is a total loss of pressure in one
or more tires.
MOExtended tires may only be used in conjunc-
tion with an active tire pressure loss warning
system or with an active tire pressure monitor
and on wheels specifically tested by Mercedes-
Benz.
Notes on driving with MOExtended tires with a
flat tire ( Y
page 370).
i Vehicles equipped with MOExtended tires
are not equipped with a TIREFIT kit at the fac-
tory. It is therefore recommended that you
additionally equip your vehicle with a TIREFIT
kit if you mount tires that do not feature run-
flat properties, e.g. winter tires. A TIREFIT kit
can be obtained from a qualified specialist
workshop.
Winter operation
General notes Have your vehicle winter-proofed at a qualified
specialist workshop at the onset of winter.
Observe the notes in the "Changing a wheel"
section ( Y
page 408). Driving with summer tires At temperatures below 45 ‡ (+7 †) , the el as-
ticity of summer tires and therefore also the
traction and braking capability are reduced con-
siderably. Change the tires on your vehicle to
M+S tires. Using summer tires at very cold tem-
peratures could cause cracks to form, thereby
damaging the tires permanently. Mercedes-
Benz cannot accept responsibility for this type
of damage.
G WARNING
Damaged tires can cause tire inflation pres-
sure loss. As a result, you could lose control of
your vehicle. There is a risk of accident.
Check the tires regularly for signs of damage
and replace any damaged tires immediately.
M+S tires
G WARNING
M+S tires with a tire tread depth of less than
�
Page 392 of 450
Once the winter tires are mounted: X
Check the tire pressures ( Y
page 393).X
Restart the tire pressure monitor
( Y
page 394).X
Vehicles for Canada: restart the tire pres-
sure loss warning system ( Y
page 394).
Information about driving with an emergency
spare wheel ( Y
page 426).
Snow chains
G WARNING
If snow chains are installed to the front
wheels, they may drag against the vehicle
body or chassis components. This could
cause damage to the vehicle or the tires.
There is a risk of an accident.
To avoid hazardous situations: R
never install snow chains to the front
wheels R
always install snow chains in pairs to the
rear wheels.
! You must drive at raised vehicle level (height
1) if snow chains have been installed. The
vehicle may otherwise be damaged.
! Vehicles with ADS (Adaptive Damping
System): do not use the sport mode when
driving with snow chains mounted. The vehi-
cle may otherwise be damaged.
! On some tire sizes there is not enough space
for snow chains. To avoid damage to the vehi-
cle or tires, observe the "Wheel and tire com-
binations" section under "Tires and wheels".
For safety reasons, Mercedes-Benz recom-
mends that you only use snow chains that have
been specially approved for your vehicle by
Mercedes-Benz, or are of a corresponding
standard of quality. For more information,
please contact a qualified specialist workshop.
If you intend to mount snow chains, please bear
the following points in mind: R
Only use snow chains when driving on roads
completely covered by snow. Remove the snow chains as soon as possible when you
come to a road that is not snow-covered. R
do not exceed the maximum permissible
speed of 30 mph (50 km/h). R
Local regulations may restrict the use of snow
chains. Observe the appropriate regulations if
you wish to mount snow chains. R
Snow chains may not be mounted on all
wheel/tire combinations. Permissible wheel-
tire combinations ( Y
page 413).
You may wish to deactivate ESP ®
when pulling
away with snow chains installed ( Y
page 72).
You can thereby allow the wheels to spin in a
controlled manner, achieving an increased driv-
ing force (cutting action).
Information about driving with an emergency
spare wheel ( Y
page 426).
Tire pressure
Tire pressure specifications
Important safety notes
G WARNING
Underinflated or overinflated tires pose the
following risks: R
the tires may burst, especially as the load
and vehicle speed increase. R
the tires may wear excessively and/or
unevenly, which may greatly impair tire
traction. R
the driving characteristics, as well as steer-
ing and braking, may be greatly impaired.
There is a risk of an accident.
Follow recommended tire inflation pressures
and check the pressure of all the tires includ-
ing the spare wheel: R
monthly, at least R
if the load changes R
before beginning a long journey R
under different operating conditions, e.g.
off-road driving
If necessary, correct the tire pressure.
The data on the Tire and Loading Information
placard and tire pressure table shown here are390
Tire pressure
Wheels and tires
Page 393 of 450
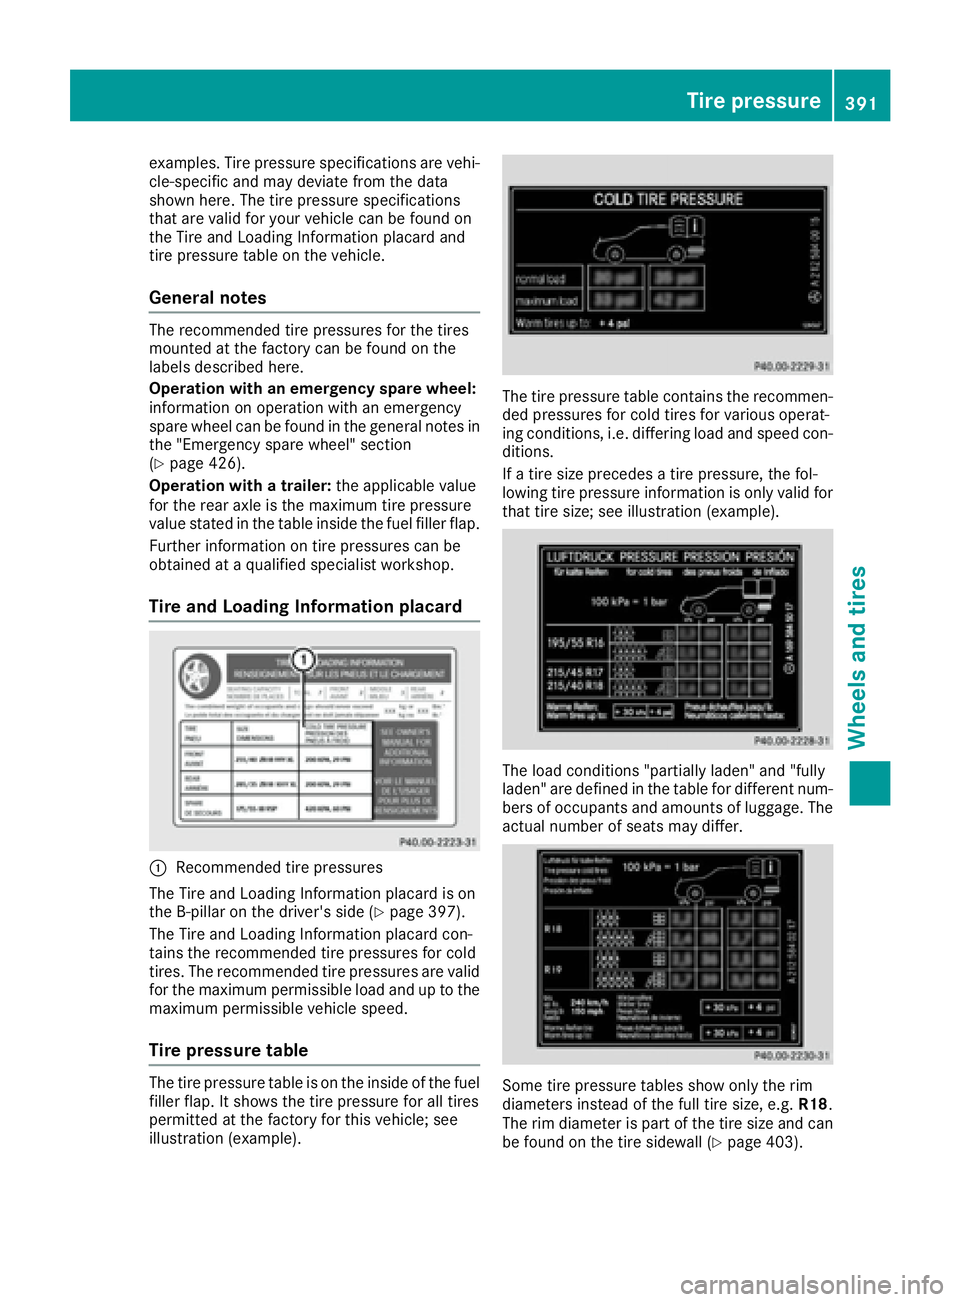
examples. Tire pressure specifications are vehi-
cle-specific and may deviate from the data
shown here. The tire pressure specifications
that are valid for your vehicle can be found on
the Tire and Loading Information placard and
tire pressure table on the vehicle.
General notes The recommended tire pressures for the tires
mounted at the factory can be found on the
labels described here.
Operation with an emergency spare wheel:
information on operation with an emergency
spare wheel can be found in the general notes in
the "Emergency spare wheel" section
( Y
page 426).
Operation with a trailer: the applicable value
for the rear axle is the maximum tire pressure
value stated in the table inside the fuel filler flap.
Further information on tire pressures can be
obtained at a qualified specialist workshop.
Tire and Loading Information placard
�C
Recommended tire pressures
The Tire and Loading Information placard is on
the B-pillar on the driver's side ( Y
page 397).
The Tire and Loading Information placard con-
tains the recommended tire pressures for cold
tires. The recommended tire pressures are valid
for the maximum permissible load and up to the
maximum permissible vehicle speed.
Tire pressure table
The tire pressure table is on the inside of the fuel
filler flap. It shows the tire pressure for all tires
permitted at the factory for this vehicle; see
illustration (example). The tire pressure table contains the recommen-
ded pressures for cold tires for various operat-
ing conditions, i.e. differing load and speed con-
ditions.
If a tire size precedes a tire pressure, the fol-
lowing tire pressure information is only valid for
that tire size; see illustration (example).
The load conditions "partially laden" and "fully
laden" are defined in the table for different num-
bers of occupants and amounts of luggage. The
actual number of seats may differ.
Some tire pressure tables show only the rim
diameters instead of the full tire size, e.g. R18 .
The rim diameter is part of the tire size and can
be found on the tire sidewall ( Y
page 403).Tire pressure 391
Wheels and tires Z
Page 397 of 450
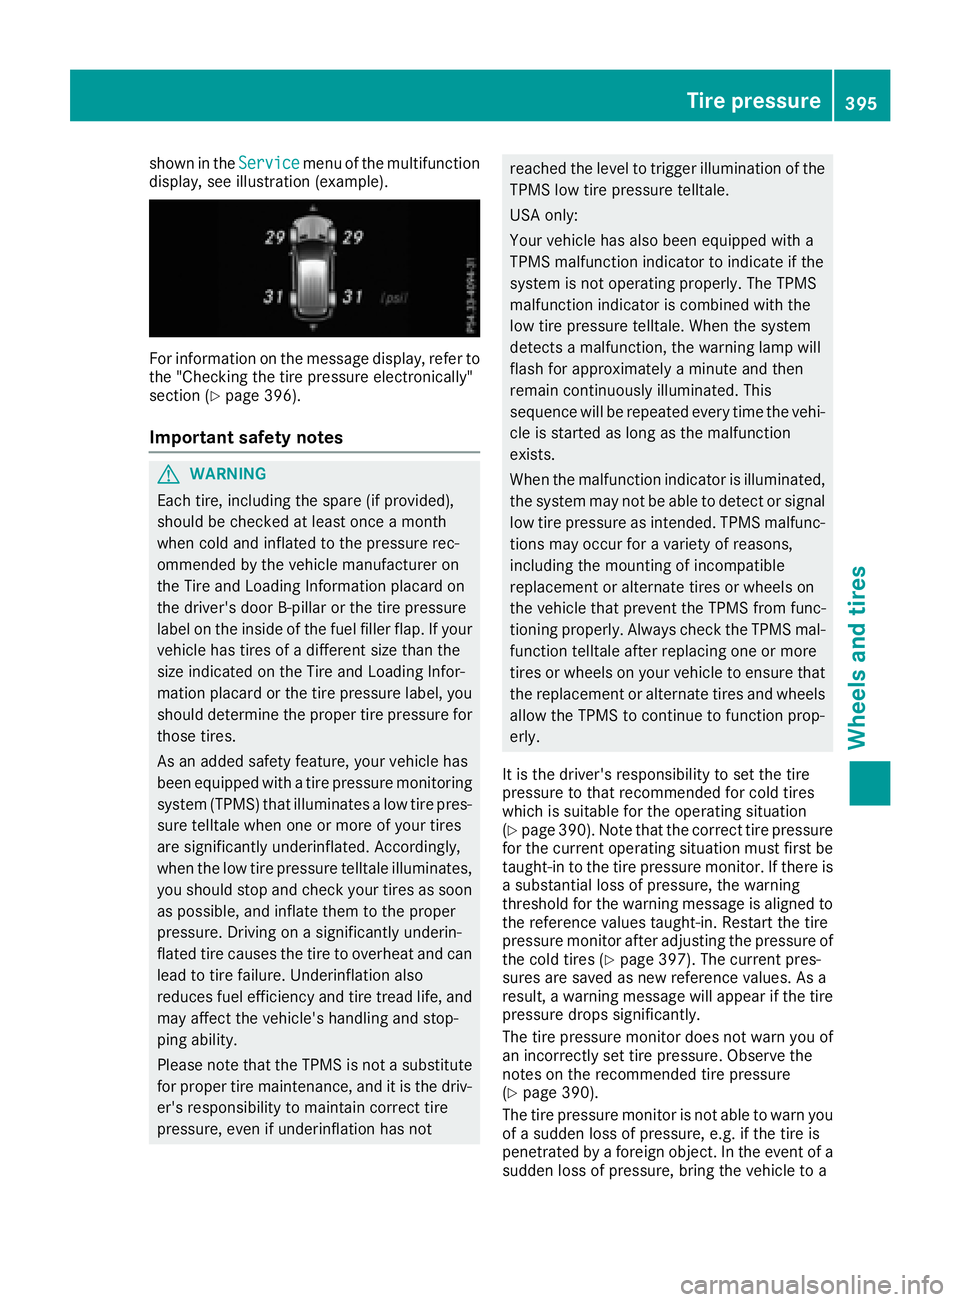
shown in the Service menu of the multifunction
display, see illustration (example).
For information on the message display, refer to
the "Checking the tire pressure electronically"
section ( Y
page 396).
Important safety notes
G WARNING
Each tire, including the spare (if provided),
should be checked at least once a month
when cold and inflated to the pressure rec-
ommended by the vehicle manufacturer on
the Tire and Loading Information placard on
the driver's door B-pillar or the tire pressure
label on the inside of the fuel filler flap. If your
vehicle has tires of a different size than the
size indicated on the Tire and Loading Infor-
mation placard or the tire pressure label, you
should determine the proper tire pressure for
those tires.
As an added safety feature, your vehicle has
been equipped with a tire pressure monitoring
system (TPMS) that illuminates a low tire pres-
sure telltale when one or more of your tires
are significantly underinflated. Accordingly,
when the low tire pressure telltale illuminates,
you should stop and check your tires as soon
as possible, and inflate them to the proper
pressure. Driving on a significantly underin-
flated tire causes the tire to overheat and can
lead to tire failure. Underinflation also
reduces fuel efficiency and tire tread life, and
may affect the vehicle's handling and stop-
ping ability.
Please note that the TPMS is not a substitute
for proper tire maintenance, and it is the driv-
er's responsibility to maintain correct tire
pressure, even if underinflation has not reached the level to trigger illumination of the
TPMS low tire pressure telltale.
USA only:
Your vehicle has also been equipped with a
TPMS malfunction indicator to indicate if the
system is not operating properly. The TPMS
malfunction indicator is combined with the
low tire pressure telltale. When the system
detects a malfunction, the warning lamp will
flash for approximately a minute and then
remain continuously illuminated. This
sequence will be repeated every time the vehi-
cle is started as long as the malfunction
exists.
When the malfunction indicator is illuminated,
the system may not be able to detect or signal
low tire pressure as intended. TPMS malfunc-
tions may occur for a variety of reasons,
including the mounting of incompatible
replacement or alternate tires or wheels on
the vehicle that prevent the TPMS from func-
tioning properly. Always check the TPMS mal-
function telltale after replacing one or more
tires or wheels on your vehicle to ensure that
the replacement or alternate tires and wheels
allow the TPMS to continue to function prop-
erly.
It is the driver's responsibility to set the tire
pressure to that recommended for cold tires
which is suitable for the operating situation
( Y
page 390). Note that the correct tire pressure
for the current operating situation must first be
taught-in to the tire pressure monitor. If there is
a substantial loss of pressure, the warning
threshold for the warning message is aligned to
the reference values taught-in. Restart the tire
pressure monitor after adjusting the pressure of
the cold tires ( Y
page 397). The current pres-
sures are saved as new reference values. As a
result, a warning message will appear if the tire
pressure drops significantly.
The tire pressure monitor does not warn you of
an incorrectly set tire pressure. Observe the
notes on the recommended tire pressure
( Y
page 390).
The tire pressure monitor is not able to warn you
of a sudden loss of pressure, e.g. if the tire is
penetrated by a foreign object. In the event of a
sudden loss of pressure, bring the vehicle to a Tire pressure 395
Wheels and tires Z