mirror MERCEDES-BENZ GLE 2018 Owner's Guide
[x] Cancel search | Manufacturer: MERCEDES-BENZ, Model Year: 2018, Model line: GLE, Model: MERCEDES-BENZ GLE 2018Pages: 398, PDF Size: 9.25 MB
Page 318 of 398
Information on Roadside Assistance
( Y
page 29).
Downloading routes Downloading routes allows you to transfer and
save predefined routes in the navigation sys-
tem.
A route can be prepared and sent either by a
customer service representative or under "Own-
ers Online" at http://www.mbusa.com .
Each route can include up to four way points.
Once a route has been received by the naviga-
tion system, you will see the Do you want to
start route guidance? Destination
Received destination has been saved
in "Previous destinations". message on
the multimedia system display.
The route is saved. X
To start route guidance: select Yes .
An overview of the route is shown in the dis-
play.
If you select No , the saved route can be called
up later in the navigation menu. X
Select Start .
Route guidance starts.
Downloaded and saved routes can be called up
again.
Speed alert You can define the upper speed limit, which
must not be exceeded by the vehicle.
If the vehicle exceeds the set speed, a message
is sent to the Customer Assistance Center. The
Customer Assistance Center then forwards this
information to you.
You can select the way in which you receive this
information beforehand. Possible options
include text message, e-mail or an automated
call.
The data you receive contains the following
information: R
the location where the speed limit was excee-
ded R
the time at which the speed limit was excee-
ded R
the selected speed limit which was exceeded Geo fencing Geo fencing allows you to select areas which the
vehicle should not enter or leave. You will be
informed if the vehicle crosses the boundaries
of the selected areas. You can select the way in
which you receive this information beforehand.
Possible options include text message, e-mail or
an automated call.
The area can be determined as either a circle or
a polygon with a maximum of ten corners. You
can specify up to ten areas simultaneously. Dif-
ferent settings are possible for each area.
These settings can be called up under "Owners
Online" at http://www.mbusa.com.
Alternatively, you can also trigger an Info call
and notify the customer service representative
that you wish to activate geo-fencing.
Currently inactive areas can be activated by text
message.
Triggering the vehicle alarm With this function, you can trigger the vehicle's
panic alarm via text message. An alarm sounds
and the exterior lighting flashes. Depending on
the setting, the panic alarm lasts five or ten sec-
onds. Afterwards, the alarm switches off.
Garage door opener
General notes The HomeLink ®
garage door opener integrated
in the rear-view mirror allows you to operate up
to three different door and gate systems.
Use the integrated garage door opener only on
garage doors that: R
have safety stop and reverse features and R
meet current U.S. federal safety standards
Once programed, the integrated garage door
opener in the rear-view mirror will assume the
function of the garage door system's remote
control. Please also read the operating instruc-
tions for the garage door system.
When programming a garage door opener, park
the vehicle outside the garage. Do not run the
engine while programming.
Certain garage door drives are incompatible
with the integrated garage door opener. If you
have difficulty programing the integrated garage316
Features
Stowage and features
Page 320 of 398
Several attempts might be necessary. You
should test every position for at least
25 seconds before trying another position.
Synchronizing the rolling code Pay attention to the "Important safety notes"
( Y
page 317).
If the garage door system uses a rolling code,
you will also have to synchronize the garage
door system with the integrated garage door
opener in the rear-view mirror. To do this you will
need to use the programming button on the door
drive control panel. The programming button
may be located in different places depending on
the manufacturer. It is usually located on the
door drive unit on the garage ceiling.
Familiarize yourself with the garage door drive
operating instructions, e.g. under "Program-
ming additional remote controls", before carry-
ing out the following steps.
Your vehicle must be within reach of the garage
door or gate opener drive. Make sure that nei-
ther your vehicle nor any persons/objects are
present within the sweep of the door or gate. X
Turn the SmartKey to position �H in the igni-
tion lock ( Y
page 135).X
Get out of the vehicle. X
Press the programming button on the door
drive unit.
You now have 30 seconds to initiate the next
step. X
Get into the vehicle. X
Press previously programed button �D , �
Page 328 of 398
A qualified specialist workshop will reset the
ASSYST service interval display after the service
work has been carried out. You can also obtain
further information on maintenance work, for
example.
Special service requirements The specified maintenance interval takes only
the normal operation of the vehicle into
account. Under increased load on the vehicle,
maintenance work must be carried out more
frequently, for example: R
Regular city driving with frequent intermedi-
ate stops R
If the vehicle is primarily used to travel short
distances R
Use in mountainous terrain or on poor road
surfaces R
If the engine is often left idling for long periods
Under these or similar conditions, have, for
example, the air filter, engine oil and oil filter
replaced or changed more frequently. Under
arduous operating conditions, the tires must be
checked more often. Further information can be
obtained at a qualified specialist workshop.
Driving abroad An extensive Mercedes-Benz Service network is
also available in other countries. You can obtain
further information from any authorized
Mercedes-Benz Center.
Care
General notes
H Environmental note
Dispose of empty packaging and cleaning
cloths in an environmentally responsible man-
ner.
! When cleaning your car, do not use: R
dry, coarse or hard cloths R
abrasive cleaning agents R
solvents R
cleaning agents containing solvents
Do not scrub.
Do not touch the surfaces and films with hard
objects, e.g. rings or ice scrapers. Otherwise, you may scratch or damage the surfaces and
films.
! Do not park your vehicle for a long period of
time directly after cleaning, particularly after
cleaning the wheel rim with wheel cleaner.
Wheel cleaner can lead to the increased cor-
rosion of the brake discs and pads. Therefore,
drive for a few minutes after cleaning. By
heating up the brakes, the brake discs and
pads dry. The vehicle can then be parked for a
long period of time.
Regular care of your vehicle is a condition for
retaining the quality in the long term.
Use care products and cleaning agents recom-
mended and approved by Mercedes-Benz.
Washing the vehicle and cleaning the
paintwork
Automatic car wash
G WARNING
Braking efficiency is reduced after washing
the vehicle. There is a risk of an accident.
After the vehicle has been washed, brake
carefully while paying attention to the traffic
conditions until full braking power is restored.
! Before driving into an automatic car wash,
make sure that it is suitable for the dimen-
sions of the vehicle. In particular, make sure
that: R
there is enough ground clearance between
the vehicle underbody and the guide rails of
the automatic car wash. R
the clearance width of the automatic car
wash is sufficient, particularly the width of
the guide rails. R
you enter the automatic car wash straight
and in the center of the guide rails in order
to avoid damaging the tires or wheel rims.
Fold in the exterior mirrors before the vehicle
is washed. The exterior mirrors could other-
wise be damaged.
! When Distance Pilot DISTRONIC or the
HOLD function is activated, the vehicle
brakes automatically in certain situations.326
Care
Maintenance and care
Page 332 of 398
Cleaning the mirror turn signals
! Only use cleaning agents or cleaning cloths
that are suitable for plastic lenses. Unsuitable
cleaning agents or cleaning cloths could
scratch or damage the plastic lenses of the
mirror turn signals. X
Clean the plastic lenses of the mirror turn sig-
nals in the exterior mirror housing using a wet
sponge and mild cleaning agent, e.g.
Mercedes-Benz car shampoo or cleaning
cloths.
Cleaning the side running board
! Do not clean the aluminum inserts of the
side running board with alkaline or acidic
cleaners, such as wheel cleaner. Do not use
acidic wheel cleaners to remove brake dust.
The aluminum inserts could otherwise be
damaged.
Cleaning the sensors
! If you clean the sensors with a power
washer, make sure that you keep a distance
of at least 11.8 in (30 cm) between the vehicle
and the power washer nozzle. Information
about the correct distance is available from
the equipment manufacturer.
X
Clean sensors �C of the driving systems with
water, car shampoo and a soft cloth. Cleaning the rear view camera and 360°
camera
! Do not clean the camera lens and the area
around the rear view camera or 360° camera
with a power washer.
X
Make sure that the vehicle is stationary and
the SmartKey is in position �H in the ignition
lock. X
Open the camera cover for cleaning via the
multimedia system (see Digital Operator's
Manual). X
To clean the camera: use clean water and a
soft cloth to clean the camera lens �C .
360° camera: if you drive at speeds above
20 mph (30 km/h) or with the SmartKey in posi-
tion �
Page 393 of 398
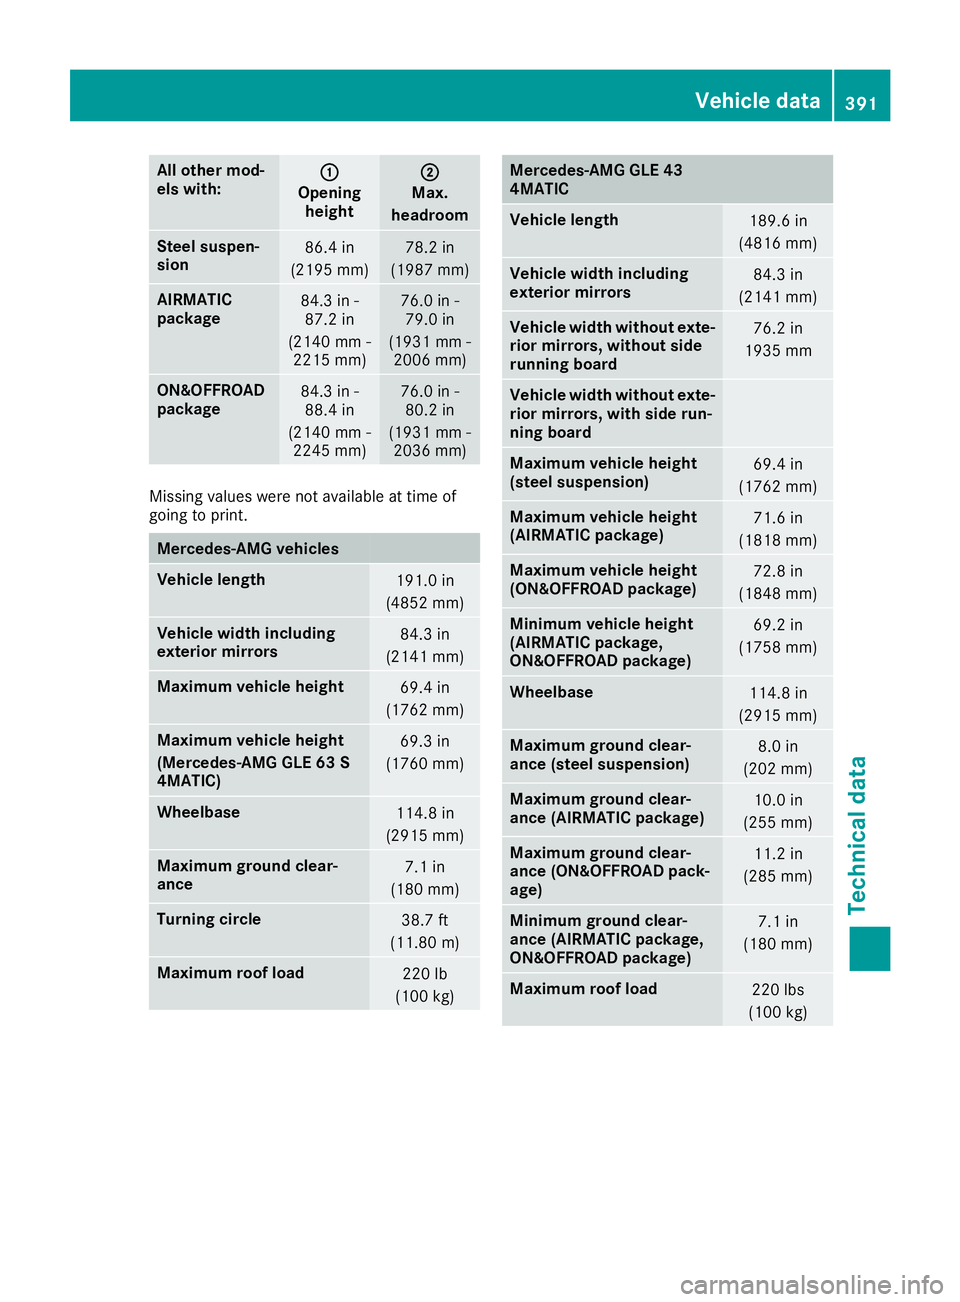
All other mod -
els with: �C
Opening
height �D
Max.
headr oom
Steel suspen-
sion 86.4 in
(2195 mm ) 78.2 in
(1987 mm )
AIRMATIC
package 84.3 in -
87.2 in
(2140 mm -
2215 mm ) 76.0 in -
79.0 in
(1931 mm -
2006 mm )
ON&O FFROAD
package 84.3 in -
88.4 in
(2140 mm -
2245 mm ) 76.0 in -
80.2 in
(1931 mm -
2036 mm )
Missin g values were not available at time of
going to print.
Mercedes ‑ AMG vehicles
Vehicle length
191.0 in
(4852 mm)
Vehicle width including
exterior mirrors 84.3 in
(2141 mm)
Maximum vehicle height
69.4 in
(1762 mm)
Maximum vehicle height
(Mercedes-AMG GLE 63 S
4MATIC) 69.3 in
(1760 mm)
Wheelbase
114.8 in
(2915 mm)
Maximum ground clear-
ance 7.1 in
(180 mm)
Turning circle
38.7 ft
(11.80 m)
Maximum roof load
220 lb
(100 kg) Mercedes-AMG GLE 43
4MATIC
Vehicle length
189.6 in
(4816 mm)
Vehicle width including
exterior mirrors 84.3 in
(2141 mm)
Vehicle width without exte-
rior mirrors, without side
running board 76.2 in
1935 mm
Vehicle width without exte-
rior mirrors, with side run-
ning board
Maximum vehicle height
(steel suspension) 69.4 in
(1762 mm)
Maximum vehicle height
(AIRMATIC package) 71.6 in
(1818 mm)
Maximum vehicle height
(ON&OFFROAD package) 72.8 in
(1848 mm)
Minimum vehicle height
(AIRMATIC package,
ON&OFFROAD package) 69.2 in
(1758 mm)
Wheelbase
114.8 in
(2915 mm)
Maximum ground clear-
ance (steel suspension) 8.0 in
(202 mm)
Maximum ground clear-
ance (AIRMATIC package) 10.0 in
(255 mm)
Maximum ground clear-
ance (ON&OFFROAD pack-
age) 11.2 in
(285 mm)
Minimum ground clear-
ance (AIRMATIC package,
ON&OFFROAD package) 7.1 in
(180 mm)
Maximum roof load
220 lbs
(100 kg)Vehicle data 391
Technical data Z