reset MERCEDES-BENZ GLE 2019 User Guide
[x] Cancel search | Manufacturer: MERCEDES-BENZ, Model Year: 2019, Model line: GLE, Model: MERCEDES-BENZ GLE 2019Pages: 398, PDF Size: 12.25 MB
Page 110 of 398
X
Engage reverse gear.
The exterior mirror on the front-passenger
side moves to the default setting parking posi-
tion.
X Use button 0087to adjust the exterior mirror to
a position that allows you to see the rear
wheel and the curb.
The parking position is stored.
i If you shift the transmission to another posi-
tion, the exterior mirror on the front-
passenger side returns to the driving position.
Using the memory button You can store the parking position of the exte-
rior mirror on the front-passenger side using
memory button
M0085. The reverse gear must not
be engaged during the process.
X Turn the SmartKey to position 0048in the igni-
tion lock (Y page 135).
X Press button 0044.
X Use button 0087to adjust the exterior mirror to
a position that allows you to see the rear
wheel and the curb.
X Press memory button M0085 and one of the
arrows on button 0087within three seconds.
The parking position is stored if the exterior
mirror does not move.
X If the mirror moves out of position, repeat the
steps.
Calling up a stored parking position set- ting X
Turn the SmartKey to position 0048in the igni-
tion lock (Y page 135).
X Adjust the exterior mirror on the front-
passenger side using button 0044.
X Engage reverse gear.
The exterior mirror on the front-passenger
side moves to the stored parking position.
The exterior mirror on the front-passenger side
moves back to its original position:
R as soon as you exceed a speed of 9 mph
(15 km/h)
R when you use button 0043to select the exterior
mirror on the driver's side Memory function
Storing settings
G
WARNING
If you use the memory function on the driver's side while driving, you could lose control of
the vehicle as a result of the adjustments
being made. There is a risk of an accident.
Only use the memory function on the driver's
side when the vehicle is stationary. G
WARNING
When the memory function adjusts the seat or steering wheel, you and other vehicle occu-
pants – particularly children – could become
trapped. There is a risk of injury.
While the memory function is making adjust-
ments, make sure that no one has any body
parts in the sweep of the seat or steering
wheel. If somebody becomes trapped, imme-
diately release the memory function position
button. The adjustment process is stopped. G
WARNING
Children could become trapped if they acti-
vate the memory function, particularly when
unattended. There is a risk of injury.
When leaving the vehicle, always take the
SmartKey with you and lock the vehicle. Never leave children unsupervised in the vehicle.
The memory function can be used at any time,
e.g. even when the SmartKey isn't in the ignition
lock.
With the memory function, you can store up to
three different settings, e.g. for three different
people.
The following settings are stored as a single
memory preset:
R position of the seat, backrest and head
restraint
R driver's side: steering wheel position
R driver's side: position of the exterior mirrors
on the driver's and front-passenger sides 108
Memory functionSeats, steering
wheel and mirrors
Page 111 of 398
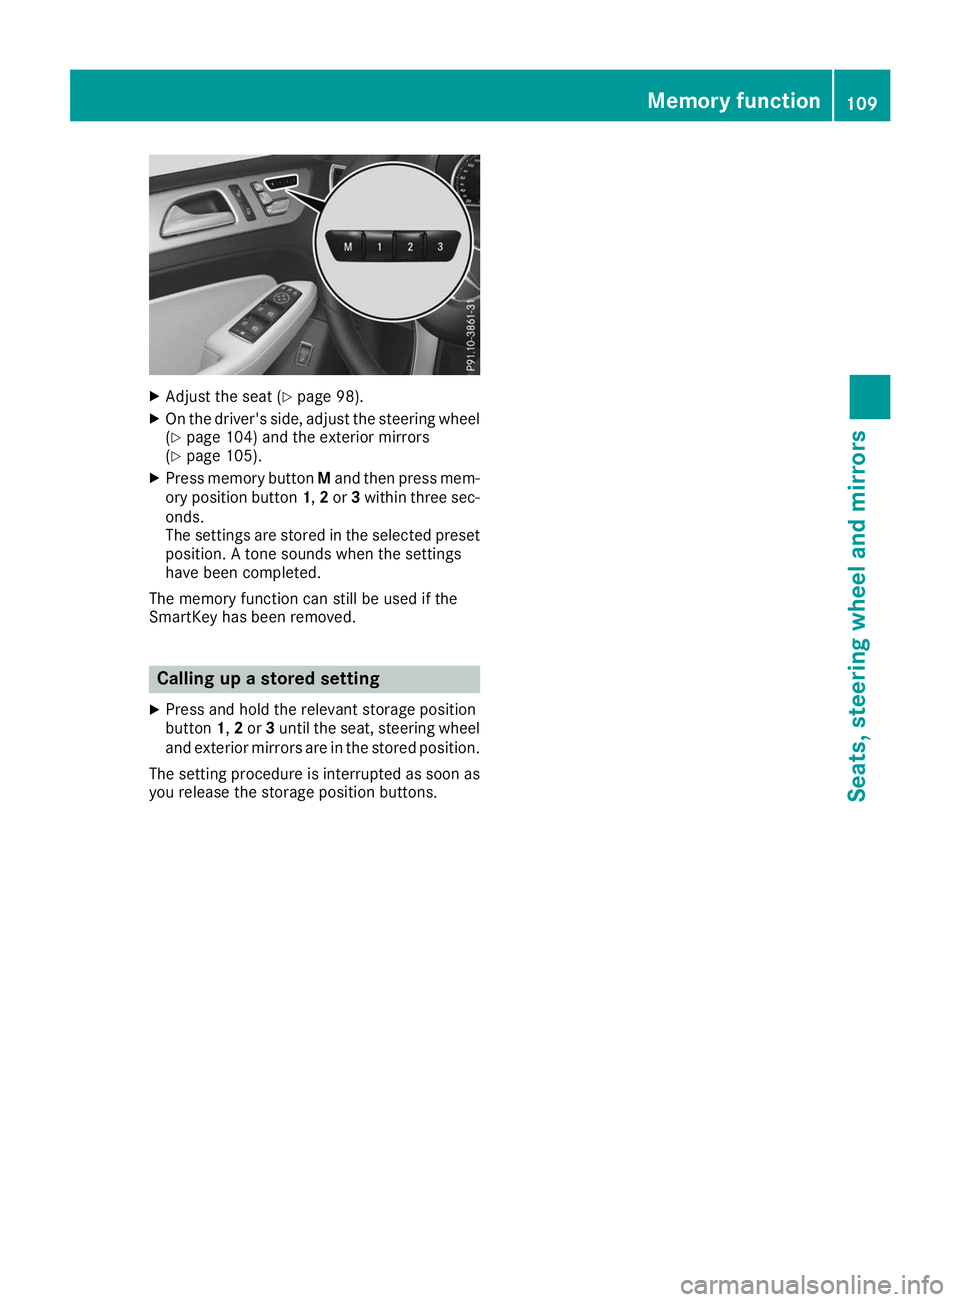
X
Adjust the seat (Y page 98).
X On the driver's side, adjust the steering wheel
(Y page 104) and the exterior mirrors
(Y page 105).
X Press memory button Mand then press mem-
ory position button 1,2or 3within three sec-
onds.
The settings are stored in the selected preset position. A tone sounds when the settings
have been completed.
The memory function can still be used if the
SmartKey has been removed. Calling up a stored setting
X Press and hold the relevant storage position
button 1,2or 3until the seat, steering wheel
and exterior mirrors are in the stored position.
The setting procedure is interrupted as soon as you release the storage position buttons. Memory function
109Seats, steeringwheel and mirrors Z
Page 233 of 398
Left control panel
0059
0065 R
Calls up the menu and menu bar 0063
0064 Press briefly:
R Scrolls in lists
R Selects a submenu or function
R In the Audio Audio menu: selects the
previous or next station, when the
preset list or station list is active,
or the previous or next audio track
or video scene
R In the Tel
Tel(Telephone) menu:
switches to the phone book and
selects a name or telephone num-
ber 0063
0064 Press and hold:
R
In the Audio Audio menu: selects a pre-
set list or a station list in the
desired frequency range or an
audio track or video scene using
rapid scrolling
R In the Tel
Tel (Telephone) menu:
starts rapid scrolling if the phone
book is open 0076 R
Confirms the selection or display
message
R In the Tel
Tel (Telephone) menu:
switches to the phone book and
starts dialing the selected number 0038 Press briefly:
R Back
R Switches off voice-operated con-
trol for navigation or the Voice
Control System
R Hides display messages or calls up
the last Trip
Trip menu function used
R Exits the telephone book/redial
memory 0038 Press and hold:
R
Calls up the standard display in the
Trip Trip menu Right control panel
0076 R
Rejects or ends a call
R Exits the telephone book/redial
memory 0061 R
Makes or accepts a call
R Switches to the redial memory 0081
0082 R
Adjusts the volume 0063 R
Mute 0059 R
Switches on voice-operated con-
trol for navigation or the Voice
Control System Multifunction display
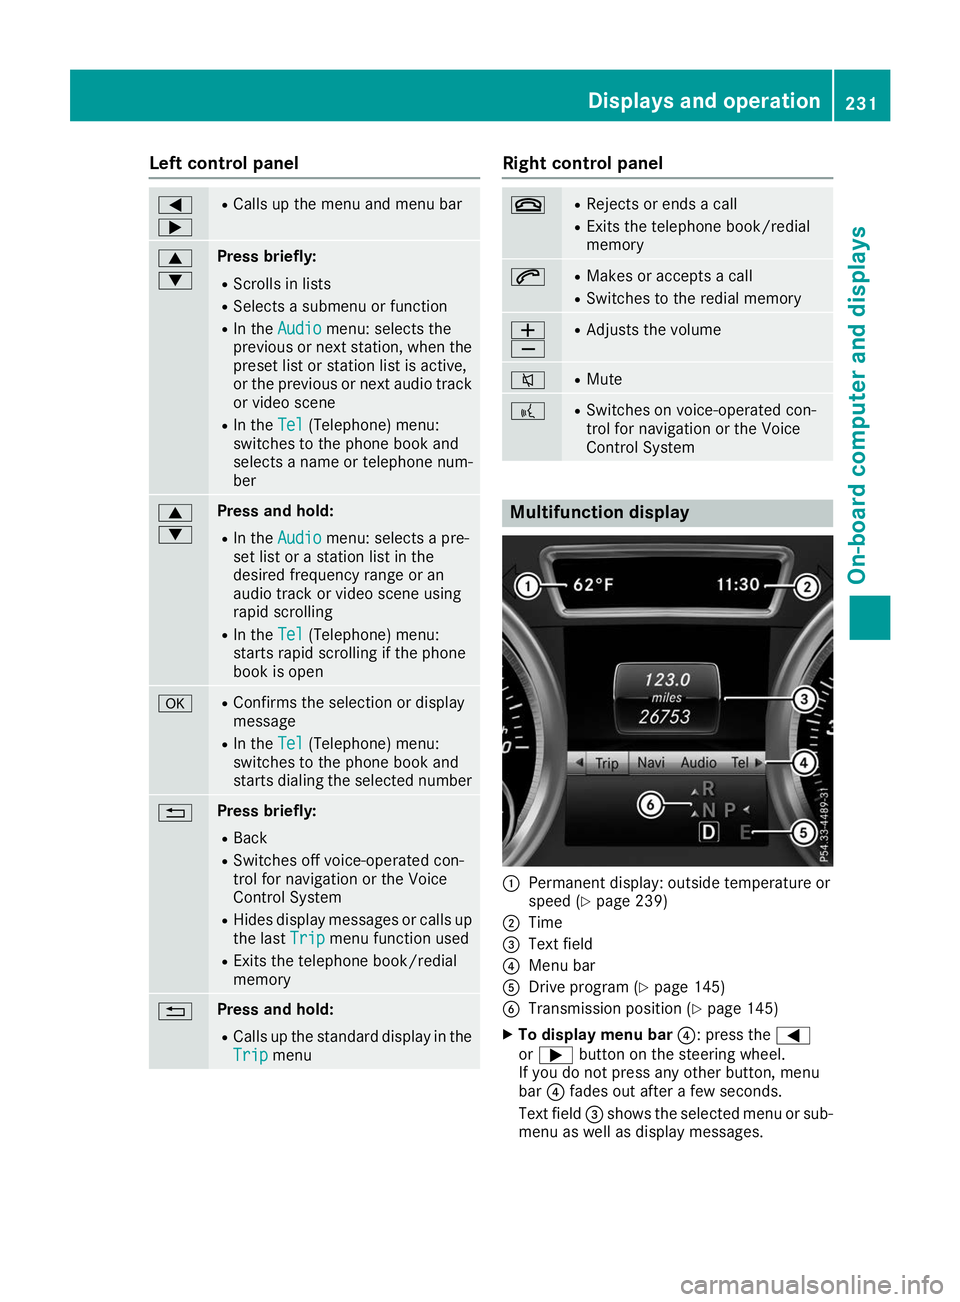
0043
Permanent display: outside temperature or
speed (Y page 239)
0044 Time
0087 Text field
0085 Menu bar
0083 Drive program (Y page 145)
0084 Transmission position (Y page 145)
X To display menu bar 0085: press the0059
or 0065 button on the steering wheel.
If you do not press any other button, menu
bar 0085fades out after a few seconds.
Text field 0087shows the selected menu or sub-
menu as well as display messages. Displays and operation
231On-board computer and displays Z
Page 234 of 398
i
Set the time using the multimedia system;
see the Digital Operator's Manual.
Possible displays in the multifunction dis-
play:
R 0097Gearshift recommendation, when shifting
manually (Y page 147)
R 005D Active Parking Assist (Y page 191)
R CRUISE
CRUISE Cruise control (Y page 169)
R 00CE Adaptive Highbeam Assist
(Y page 114)
R 00D6 ECO start/stop function (Y page 139)
R 00D9 HOLD function (Y page 182)
R 004F Active Distance Assist DISTRONIC
Active Steering Assist (Y page 237)
R DSR
DSR Downhill Speed Regulation
(Y page 214) Menus and submenus
Menu overview
Press the 0059or0065 button on the steering
wheel to call up the menu bar and select a menu.
Operating the on-board computer (Y page 230).
Depending on the equipment installed in the
vehicle, you can call up the following menus:
R Trip
Trip menu (Y page 232)
R Navi
Navi menu (navigation instructions)
(Y page 233)
R Audio
Audio menu (Y page 235)
R Tel
Tel menu (telephone) (Y page 236)
R DriveAssist
DriveAssist menu (assistance)
(Y page 237)
R Serv.
Serv. menu (Y page 238)
R Sett.
Sett. menu (settings) (Y page 239)
R ON&OFFROAD
ON&OFFROAD menu (Ypage 241)
R AMG
AMG menu (Mercedes-AMG vehicles)
(Y page 241) Trip menu
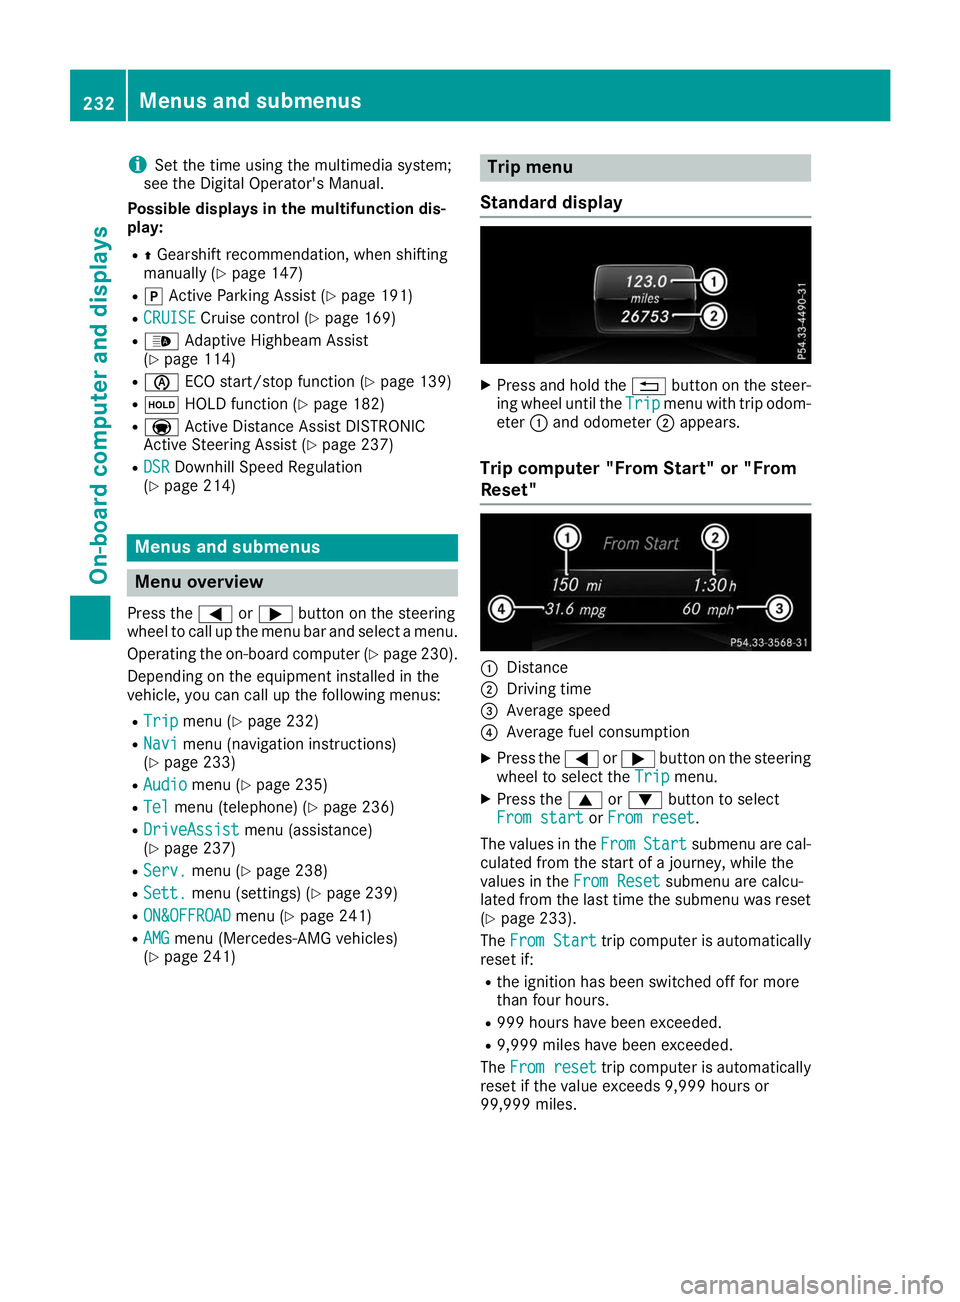
Standard display X
Press and hold the 0038button on the steer-
ing wheel until the Trip
Tripmenu with trip odom-
eter 0043and odometer 0044appears.
Trip computer "From Start" or "From
Reset" 0043
Distance
0044 Driving time
0087 Average speed
0085 Average fuel consumption
X Press the 0059or0065 button on the steering
wheel to select the Trip Tripmenu.
X Press the 0063or0064 button to select
From start
From start orFrom reset
From reset.
The values in the From
FromStart
Start submenu are cal-
culated from the start of a journey, while the
values in the From Reset
From Resetsubmenu are calcu-
lated from the last time the submenu was reset
(Y page 233).
The From Start
From Start trip computer is automatically
reset if:
R the ignition has been switched off for more
than four hours.
R 999 hours have been exceeded.
R 9,999 miles have been exceeded.
The From reset From reset trip computer is automatically
reset if the value exceeds 9,999 hours or
99,999 miles. 232
Menus and submenusOn-board computer and displays
Page 235 of 398
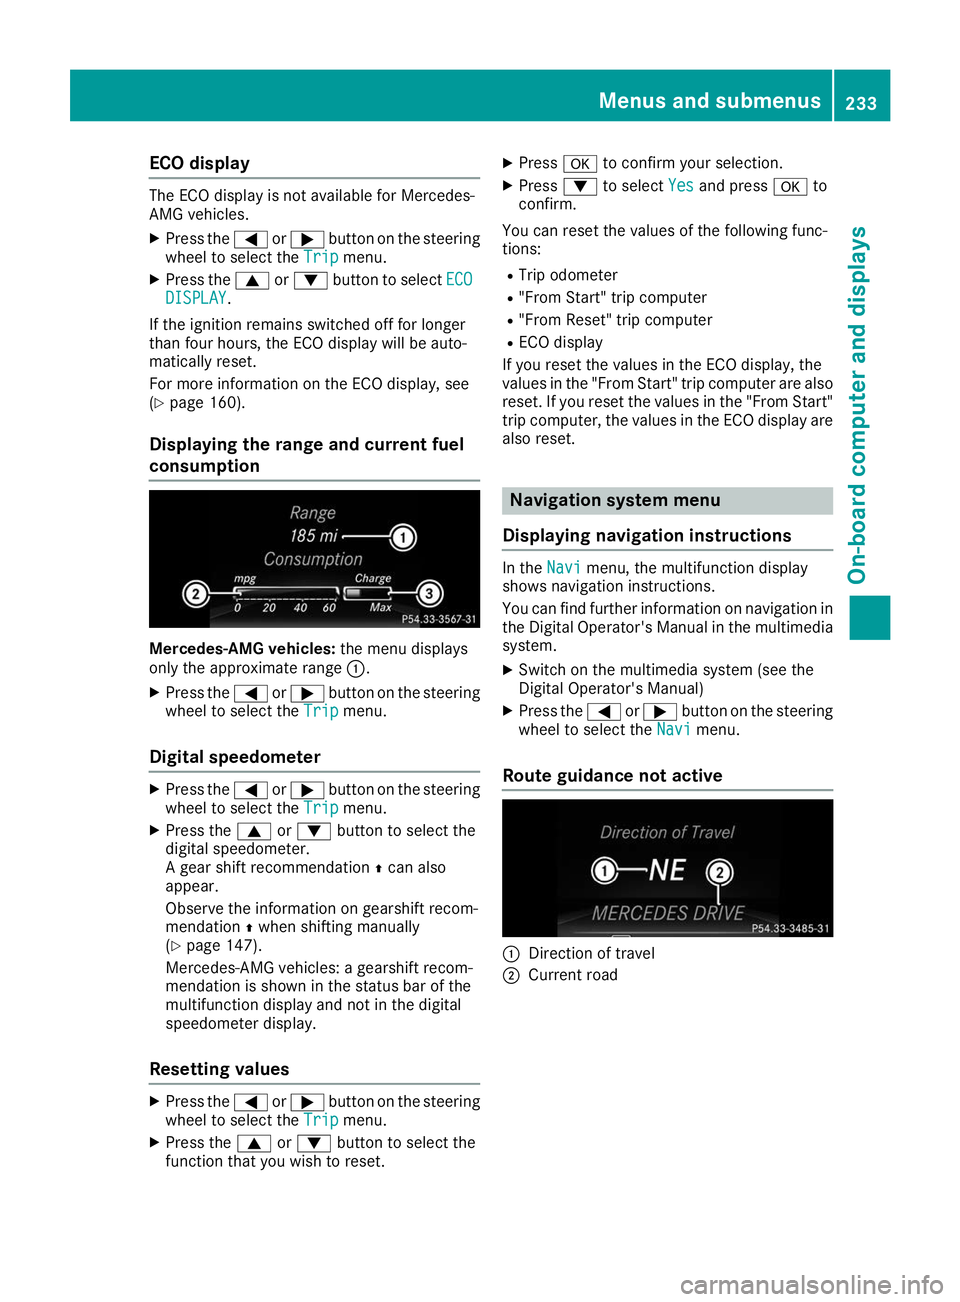
ECO display
The ECO display is not available for Mercedes-
AMG vehicles.
X Press the 0059or0065 button on the steering
wheel to select the Trip Tripmenu.
X Press the 0063or0064 button to select ECO
ECO
DISPLAY
DISPLAY.
If the ignition remains switched off for longer
than four hours, the ECO display will be auto-
matically reset.
For more information on the ECO display, see
(Y page 160).
Displaying the range and current fuel
consumption Mercedes-AMG vehicles:
the menu displays
only the approximate range 0043.
X Press the 0059or0065 button on the steering
wheel to select the Trip Tripmenu.
Digital speedometer X
Press the 0059or0065 button on the steering
wheel to select the Trip Tripmenu.
X Press the 0063or0064 button to select the
digital speedometer.
A gear shift recommendation 0097can also
appear.
Observe the information on gearshift recom-
mendation 0097when shifting manually
(Y page 147).
Mercedes-AMG vehicles: a gearshift recom-
mendation is shown in the status bar of the
multifunction display and not in the digital
speedometer display.
Resetting values X
Press the 0059or0065 button on the steering
wheel to select the Trip Tripmenu.
X Press the 0063or0064 button to select the
function that you wish to reset. X
Press 0076to confirm your selection.
X Press 0064to select Yes
Yes and press 0076to
confirm.
You can reset the values of the following func-
tions: R Trip odometer
R "From Start" trip computer
R "From Reset" trip computer
R ECO display
If you reset the values in the ECO display, the
values in the "From Start" trip computer are also reset. If you reset the values in the "From Start"trip computer, the values in the ECO display are
also reset. Navigation system menu
Displaying navigation instructions In the
Navi Navimenu, the multifunction display
shows navigation instructions.
You can find further information on navigation in
the Digital Operator's Manual in the multimedia system.
X Switch on the multimedia system (see the
Digital Operator's Manual)
X Press the 0059or0065 button on the steering
wheel to select the Navi
Navi menu.
Route guidance not active 0043
Direction of travel
0044 Current road Menus and submenus
233On-board computer and displays Z
Page 237 of 398
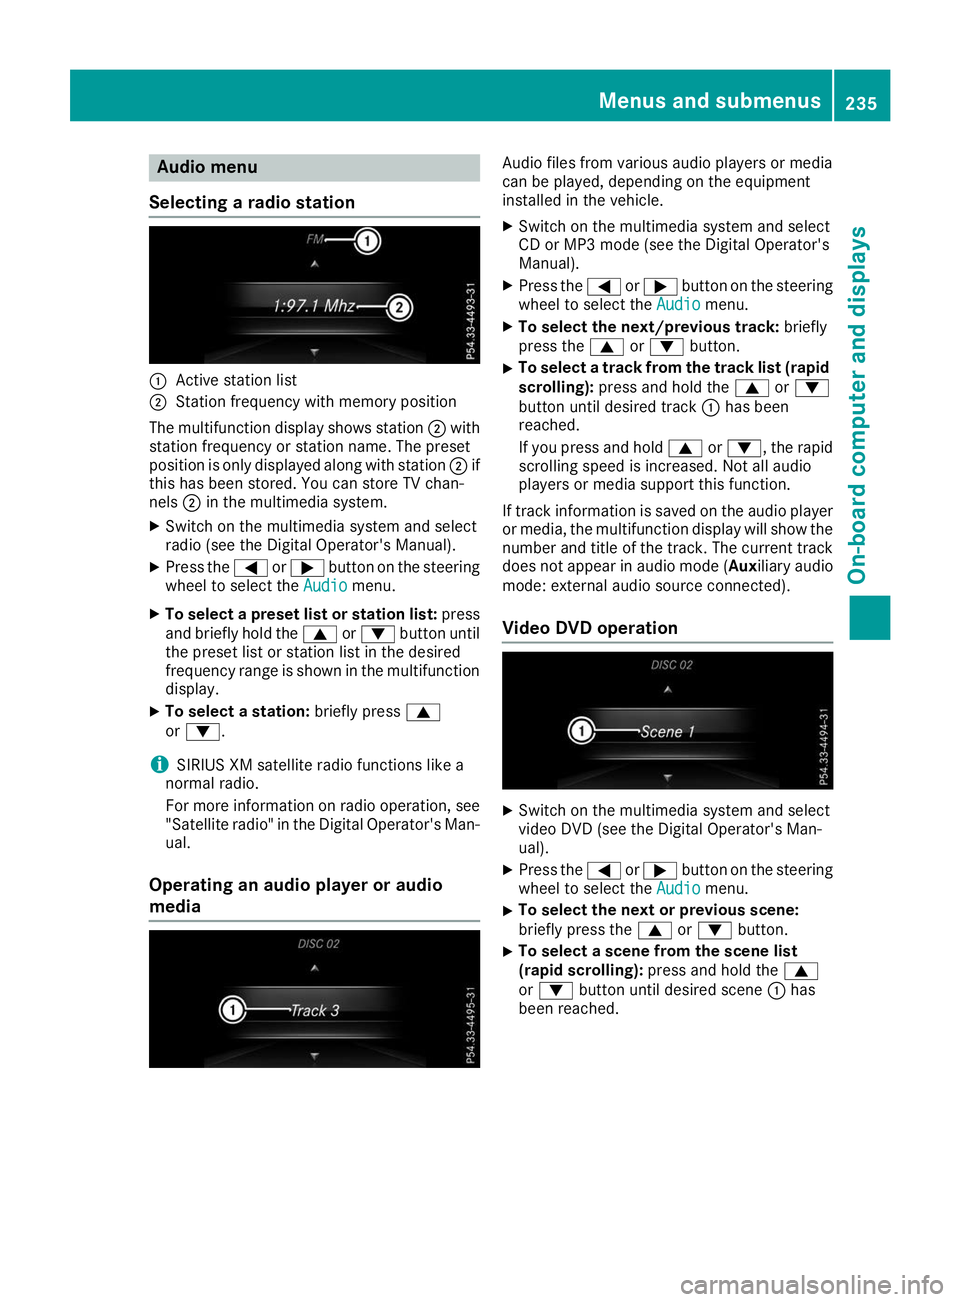
Audio menu
Selecting a radio station 0043
Active station list
0044 Station frequency with memory position
The multifunction display shows station 0044with
station frequency or station name. The preset
position is only displayed along with station 0044if
this has been stored. You can store TV chan-
nels 0044in the multimedia system.
X Switch on the multimedia system and select
radio (see the Digital Operator's Manual).
X Press the 0059or0065 button on the steering
wheel to select the Audio Audiomenu.
X To select a preset list or station list: press
and briefly hold the 0063or0064 button until
the preset list or station list in the desired
frequency range is shown in the multifunction
display.
X To select a station: briefly press0063
or 0064.
i SIRIUS XM satellite radio functions like a
normal radio.
For more information on radio operation, see "Satellite radio" in the Digital Operator's Man-
ual.
Operating an audio player or audio
media Audio files from various audio players or media
can be played, depending on the equipment
installed in the vehicle.
X Switch on the multimedia system and select
CD or MP3 mode (see the Digital Operator's
Manual).
X Press the 0059or0065 button on the steering
wheel to select the Audio Audiomenu.
X To select the next/previous track: briefly
press the 0063or0064 button.
X To select a track from the track list (rapid
scrolling): press and hold the 0063or0064
button until desired track 0043has been
reached.
If you press and hold 0063or0064, the rapid
scrolling speed is increased. Not all audio
players or media support this function.
If track information is saved on the audio player
or media, the multifunction display will show the number and title of the track. The current track
does not appear in audio mode ( Auxiliary audio
mode: external audio source connected).
Video DVD operation X
Switch on the multimedia system and select
video DVD (see the Digital Operator's Man-
ual).
X Press the 0059or0065 button on the steering
wheel to select the Audio Audiomenu.
X To select the next or previous scene:
briefly press the
0063or0064 button.
X To select a scene from the scene list
(rapid scrolling): press and hold the 0063
or 0064 button until desired scene 0043has
been reached. Menus and sub
menus
235On-board computer and displays Z
Page 243 of 398
X
Press the 0064or0063 button to select the
Belt Adjustment
Belt Adjustment function.
If the Belt
Belt Adjustment
Adjustment function is activated,
the vehicle seat belt is shown in orange in the
multifunction display.
X Press the 0076button to save the setting.
For further information on belt adjustment, see
(Y page 48).
Switching the fold-in mirrors when lock-
ing feature on/off
This function is only available when the vehicle is
equipped with the electrical fold-in function.
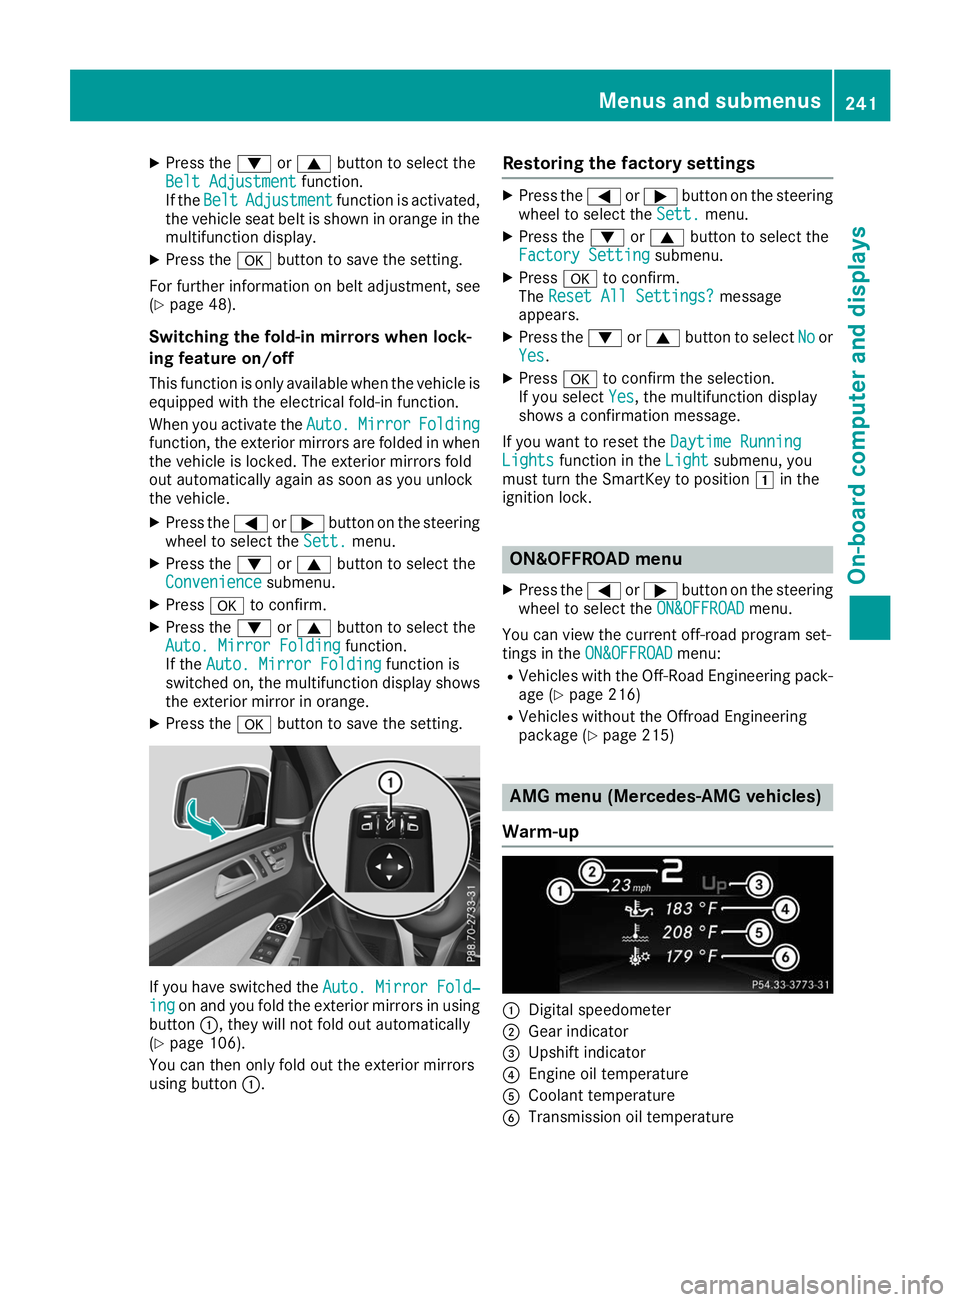
When you activate the Auto.
Auto. Mirror
Mirror Folding
Folding
function, the exterior mirrors are folded in when the vehicle is locked. The exterior mirrors fold
out automatically again as soon as you unlock
the vehicle.
X Press the 0059or0065 button on the steering
wheel to select the Sett.
Sett. menu.
X Press the 0064or0063 button to select the
Convenience Convenience submenu.
X Press 0076to confirm.
X Press the 0064or0063 button to select the
Auto. Mirror Folding
Auto. Mirror Folding function.
If the Auto. Mirror Folding
Auto. Mirror Folding function is
switched on, the multifunction display shows the exterior mirror in orange.
X Press the 0076button to save the setting. If you have switched the
Auto. Mirror Fold‐
Auto. Mirror Fold‐
ing
ing on and you fold the exterior mirrors in using
button 0043, they will not fold out automatically
(Y page 106).
You can then only fold out the exterior mirrors
using button 0043. Restoring the factory settings X
Press the 0059or0065 button on the steering
wheel to select the Sett.
Sett.menu.
X Press the 0064or0063 button to select the
Factory Setting
Factory Setting submenu.
X Press 0076to confirm.
The Reset All Settings?
Reset All Settings? message
appears.
X Press the 0064or0063 button to select No
Noor
Yes
Yes.
X Press 0076to confirm the selection.
If you select Yes
Yes, the multifunction display
shows a confirmation message.
If you want to reset the Daytime Running
Daytime Running
Lights
Lights function in the Light
Lightsubmenu, you
must turn the SmartKey to position 0047in the
ignition lock. ON&OFFROAD menu
X Press the 0059or0065 button on the steering
wheel to select the ON&OFFROAD
ON&OFFROADmenu.
You can view the current off-road program set-
tings in the ON&OFFROAD ON&OFFROAD menu:
R Vehicles with the Off-Road Engineering pack-
age (Y page 216)
R Vehicles without the Offroad Engineering
package (Y page 215) AMG menu (Mercedes-AMG vehicles)
Warm-up 0043
Digital speedometer
0044 Gear indicator
0087 Upshift indicator
0085 Engine oil temperature
0083 Coolant temperature
0084 Transmission oil temperature Menus and submenus
241On-board computer and displays Z
Page 245 of 398
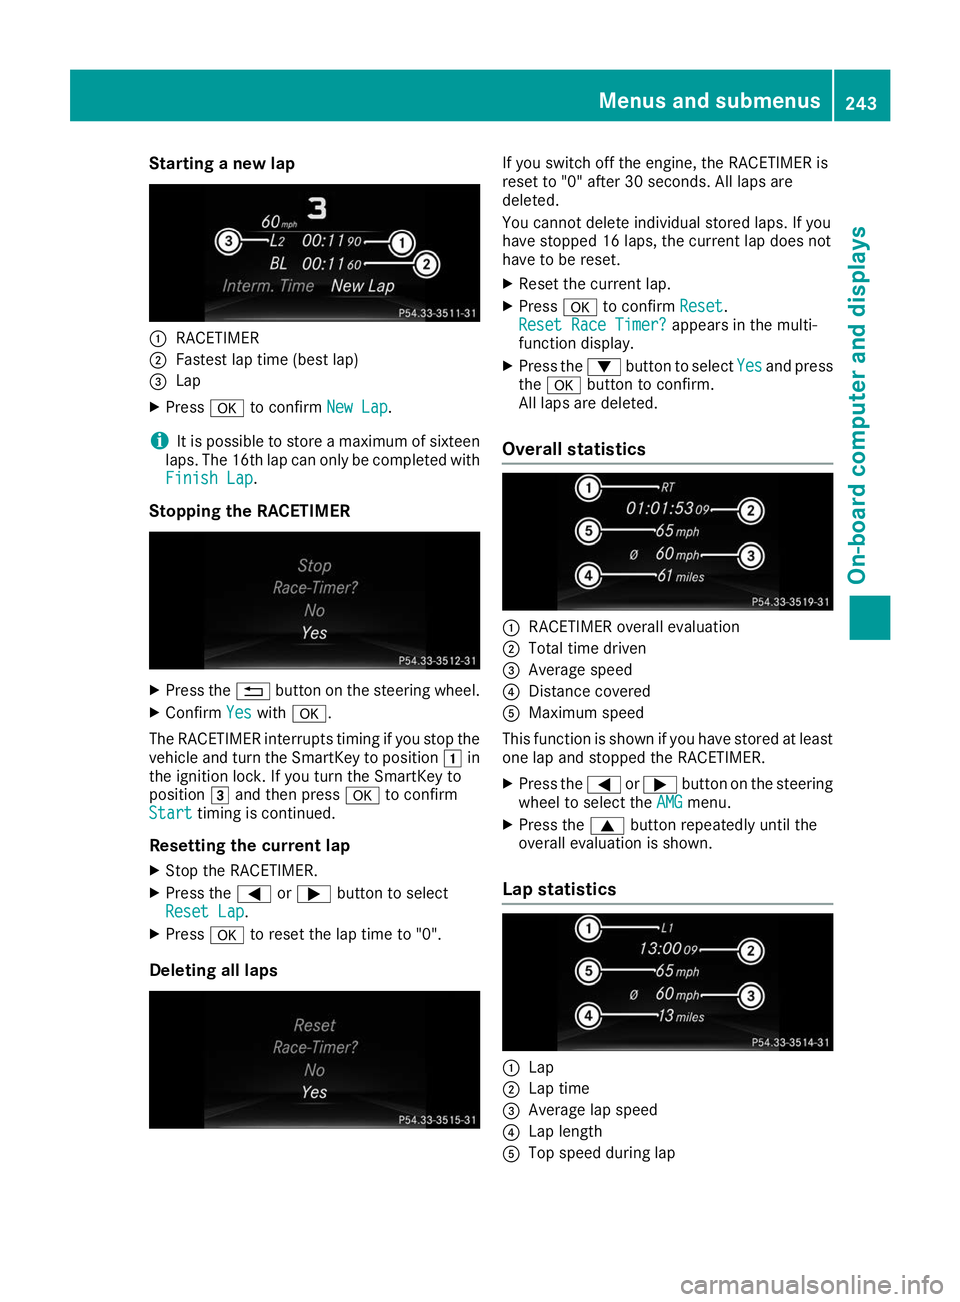
Starting a new lap
0043
RACETIMER
0044 Fastest lap time (best lap)
0087 Lap
X Press 0076to confirm New Lap
New Lap.
i It is possible to store a maximum of sixteen
laps. The 16th lap can only be completed with
Finish Lap
Finish Lap.
Stopping the RACETIMER X
Press the 0038button on the steering wheel.
X Confirm Yes
Yes with 0076.
The RACETIMER interrupts timing if you stop the
vehicle and turn the SmartKey to position 0047in
the ignition lock. If you turn the SmartKey to
position 0049and then press 0076to confirm
Start
Start timing is continued.
Resetting the current lap X Stop the RACETIMER.
X Press the 0059or0065 button to select
Reset Lap
Reset Lap.
X Press 0076to reset the lap time to "0".
Deleting all laps If you switch off the engine, the RACETIMER is
reset to "0" after 30 seconds. All laps are
deleted.
You cannot delete individual stored laps. If you
have stopped 16 laps, the current lap does not
have to be reset.
X Reset the current lap.
X Press 0076to confirm Reset
Reset.
Reset Race Timer? Reset Race Timer? appears in the multi-
function display.
X Press the 0064button to select Yes
Yesand press
the 0076 button to confirm.
All laps are deleted.
Overall statistics 0043
RACETIMER overall evaluation
0044 Total time driven
0087 Average speed
0085 Distance covered
0083 Maximum speed
This function is shown if you have stored at least one lap and stopped the RACETIMER.
X Press the 0059or0065 button on the steering
wheel to select the AMG AMGmenu.
X Press the 0063button repeatedly until the
overall evaluation is shown.
Lap statistics 0043
Lap
0044 Lap time
0087 Average lap speed
0085 Lap length
0083 Top speed during lap Menus and submenus
243On-board computer and displays Z
Page 327 of 398
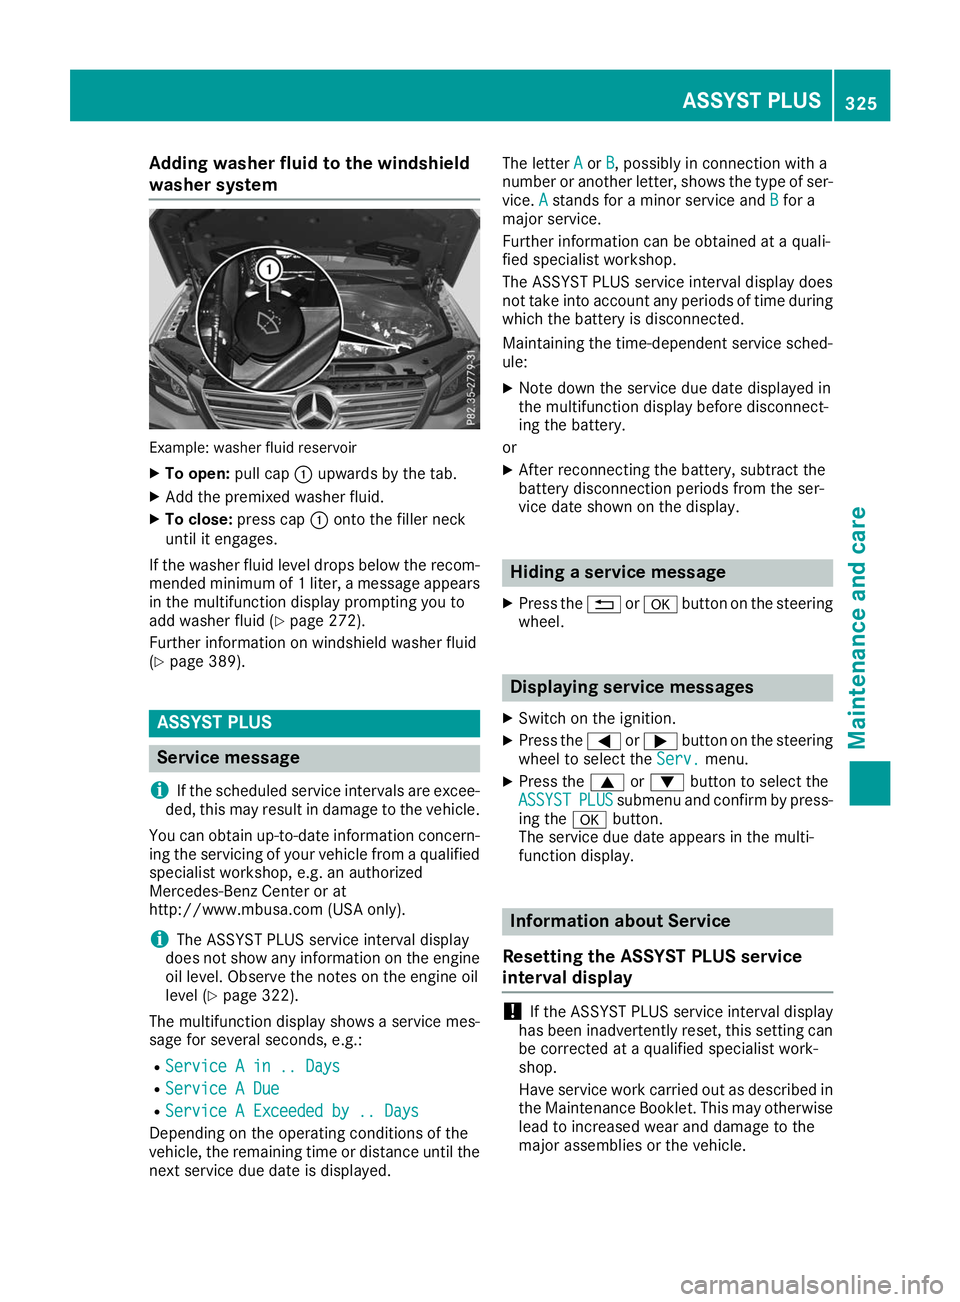
Adding washer fluid to the windshield
washer system
Example: washer fluid reservoir
X
To open: pull cap0043upwards by the tab.
X Add the premixed washer fluid.
X To close: press cap 0043onto the filler neck
until it engages.
If the washer fluid level drops below the recom- mended minimum of 1 liter, a message appears in the multifunction display prompting you to
add washer fluid (Y page 272).
Further information on windshield washer fluid
(Y page 389). ASSYST PLUS
Service message
i If the scheduled service intervals are excee-
ded, this may result in damage to the vehicle.
You can obtain up-to-date information concern-
ing the servicing of your vehicle from a qualified
specialist workshop, e.g. an authorized
Mercedes-Benz Center or at
http://www.mbusa.com (USA only).
i The ASSYST PLUS service interval display
does not show any information on the engine oil level. Observe the notes on the engine oil
level (Y page 322).
The multifunction display shows a service mes-
sage for several seconds, e.g.:
R Service A in .. Days
Service A in .. Days
R Service A Due Service A Due
R Service A Exceeded by .. Days
Service A Exceeded by .. Days
Depending on the operating conditions of the
vehicle, the remaining time or distance until the
next service due date is displayed. The letter
A Aor B
B, possibly in connection with a
number or another letter, shows the type of ser-
vice. A
Astands for a minor service and B
Bfor a
major service.
Further information can be obtained at a quali-
fied specialist workshop.
The ASSYST PLUS service interval display does
not take into account any periods of time during
which the battery is disconnected.
Maintaining the time-dependent service sched-
ule:
X Note down the service due date displayed in
the multifunction display before disconnect-
ing the battery.
or X After reconnecting the battery, subtract the
battery disconnection periods from the ser-
vice date shown on the display. Hiding a service message
X Press the 0038or0076 button on the steering
wheel. Displaying service messages
X Switch on the ignition.
X Press the 0059or0065 button on the steering
wheel to select the Serv. Serv.menu.
X Press the 0063or0064 button to select the
ASSYST
ASSYST PLUS
PLUSsubmenu and confirm by press-
ing the 0076button.
The service due date appears in the multi-
function display. Information about Service
Resetting the ASSYST PLUS service
interval display !
If the ASSYST PLUS service interval display
has been inadvertently reset, this setting can
be corrected at a qualified specialist work-
shop.
Have service work carried out as described in the Maintenance Booklet. This may otherwise
lead to increased wear and damage to the
major assemblies or the vehicle. ASSYST PLUS
325Maintenance and care Z
Page 328 of 398
A qualified specialist workshop will reset the
ASSYST PLUS service interval display after the
service work has been carried out. You can also obtain further information on maintenance
work, for example.
Special service requirements The specified maintenance interval takes only
the normal operation of the vehicle into
account. Under increased load on the vehicle,
maintenance work must be carried out more
frequently, for example:
R Regular city driving with frequent intermedi-
ate stops
R If the vehicle is primarily used to travel short
distances
R Use in mountainous terrain or on poor road
surfaces
R If the engine is often left idling for long periods
Under these or similar conditions, have, for
example, the air filter, engine oil and oil filter
replaced or changed more frequently. Under
arduous operating conditions, the tires must be
checked more often. Further information can be
obtained at a qualified specialist workshop.
Driving abroad An extensive Mercedes-Benz Service network is
also available in other countries. You can obtain further information from any authorized
Mercedes-Benz Center. Care
General notes
H
Environmental note
Dispose of empty packaging and cleaning
cloths in an environmentally responsible man-
ner.
! When cleaning your car, do not use:
R dry, coarse or hard cloths
R abrasive cleaning agents
R solvents
R cleaning agents containing solvents
Do not scrub.
Do not touch the surfaces and films with hard objects, e.g. rings or ice scrapers. Otherwise, you may scratch or damage the surfaces and
films.
! Do not park your vehicle for a long period of
time directly after cleaning, particularly after
cleaning the wheel rim with wheel cleaner.
Wheel cleaner can lead to the increased cor-
rosion of the brake discs and pads. Therefore,
drive for a few minutes after cleaning. By
heating up the brakes, the brake discs and
pads dry. The vehicle can then be parked for a
long period of time.
Regular care of your vehicle is a condition for
retaining the quality in the long term.
Use care products and cleaning agents recom-
mended and approved by Mercedes-Benz. Washing the vehicle and cleaning the
paintwork
Automatic car wash G
WARNING
Braking efficiency is reduced after washing
the vehicle. There is a risk of an accident.
After the vehicle has been washed, brake
carefully while paying attention to the traffic
conditions until full braking power is restored.
! Before driving into an automatic car wash,
make sure that it is suitable for the dimen-
sions of the vehicle. In particular, make sure
that:
R there is enough ground clearance between
the vehicle underbody and the guide rails of the automatic car wash.
R the clearance width of the automatic car
wash is sufficient, particularly the width of
the guide rails.
R you enter the automatic car wash straight
and in the center of the guide rails in order
to avoid damaging the tires or wheel rims.
Fold in the exterior mirrors before the vehicle
is washed. The exterior mirrors could other-
wise be damaged.
! When Active Distance Assist DISTRONIC or
the HOLD function is activated, the vehicle
brakes automatically in certain situations. 326
CareMaintenance and care