transmission MERCEDES-BENZ GLE 2019 Manual Online
[x] Cancel search | Manufacturer: MERCEDES-BENZ, Model Year: 2019, Model line: GLE, Model: MERCEDES-BENZ GLE 2019Pages: 398, PDF Size: 12.25 MB
Page 350 of 398
the combination switch, the hazard warning
lamp starts flashing again. Transporting the vehicle
4MATIC vehicles/vehicles with auto-
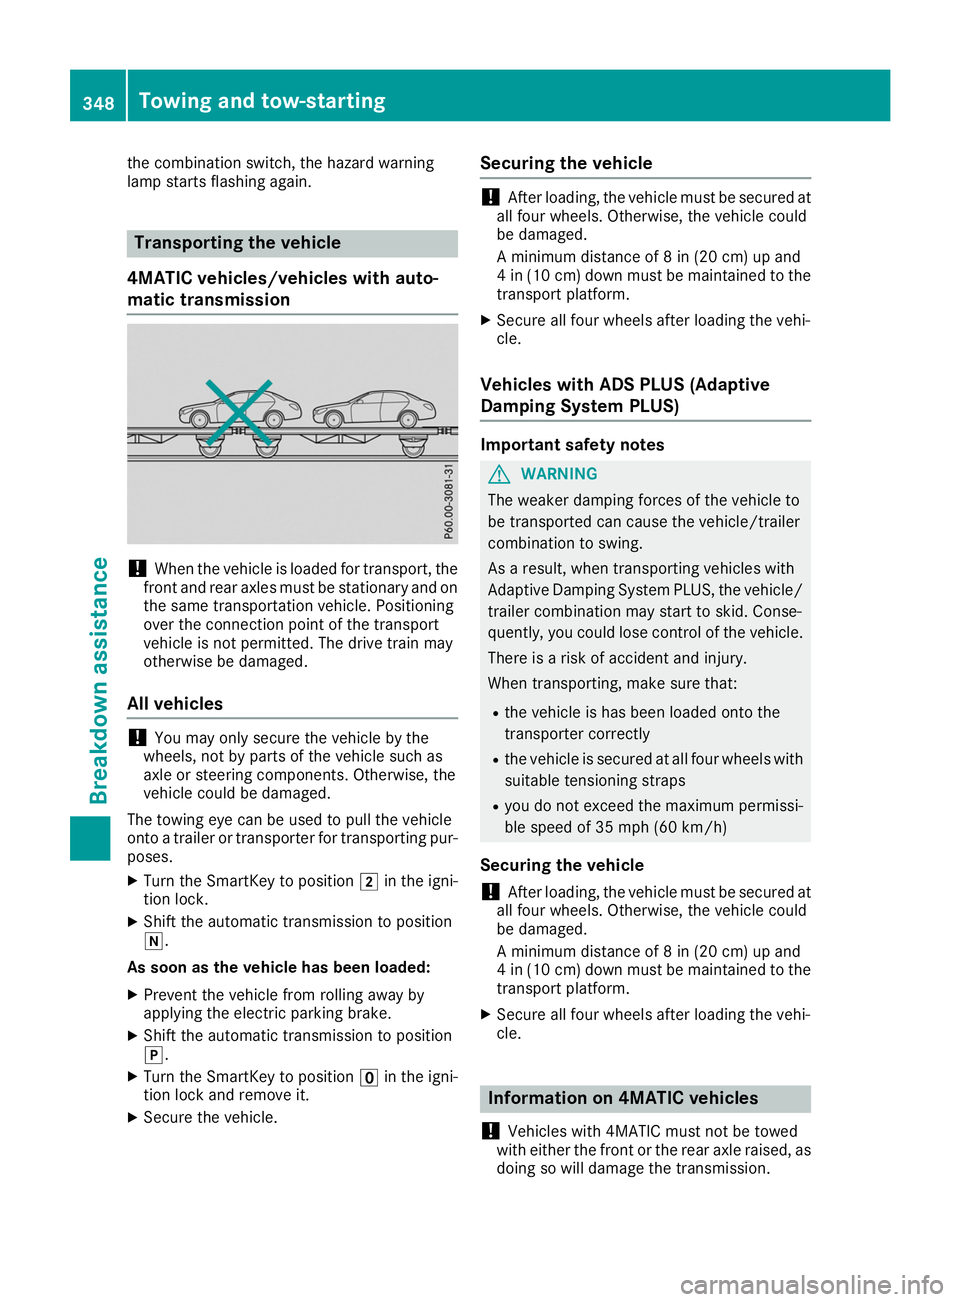
matic transmission !
When the vehicle is loaded for transport, the
front and rear axles must be stationary and on
the same transportation vehicle. Positioning
over the connection point of the transport
vehicle is not permitted. The drive train may
otherwise be damaged.
All vehicles !
You may only secure the vehicle by the
wheels, not by parts of the vehicle such as
axle or steering components. Otherwise, the
vehicle could be damaged.
The towing eye can be used to pull the vehicle
onto a trailer or transporter for transporting pur-
poses.
X Turn the SmartKey to position 0048in the igni-
tion lock.
X Shift the automatic transmission to position
005C.
As soon as the vehicle has been loaded:
X Prevent the vehicle from rolling away by
applying the electric parking brake.
X Shift the automatic transmission to position
005D.
X Turn the SmartKey to position 0092in the igni-
tion lock and remove it.
X Secure the vehicle. Securing the vehicle !
After loading, the vehicle must be secured at
all four wheels. Otherwise, the vehicle could
be damaged.
A minimum distance of 8 in (20 cm) up and
4 in (10 cm) down must be maintained to the transport platform.
X Secure all four wheels after loading the vehi-
cle.
Vehicles with ADS PLUS (Adaptive
Damping System PLUS) Important safety notes
G
WARNING
The weaker damping forces of the vehicle to
be transported can cause the vehicle/trailer
combination to swing.
As a result, when transporting vehicles with
Adaptive Damping System PLUS, the vehicle/ trailer combination may start to skid. Conse-
quently, you could lose control of the vehicle.
There is a risk of accident and injury.
When transporting, make sure that:
R the vehicle is has been loaded onto the
transporter correctly
R the vehicle is secured at all four wheels with
suitable tensioning straps
R you do not exceed the maximum permissi-
ble speed of 35 mph (60 km/h)
Securing the vehicle ! After loading, the vehicle must be secured at
all four wheels. Otherwise, the vehicle could
be damaged.
A minimum distance of 8 in (20 cm) up and
4 in (10 cm) down must be maintained to the
transport platform.
X Secure all four wheels after loading the vehi-
cle. Information on 4MATIC vehicles
! Vehicles with 4MATIC must not be towed
with either the front or the rear axle raised, as
doing so will damage the transmission. 348
Towing and tow-startingBreakdown assistance
Page 351 of 398
Vehicles with 4MATIC may either be towed away
with both axles on the ground or be loaded up
and transported.
If the vehicle's transmission, front, or rear axle is damaged, have the vehicle transported on a
truck or trailer.
In the event of damage to the electrical sys-
tem: if the battery is defective, the automatic
transmission will be locked in position 005D. To
shift the automatic transmission to position 005C,
you must provide power to the vehicle's on-
board electrical system in the same way as
when jump-starting (Y page 343).
Have the vehicle transported on a transporter or
trailer. Tow-starting (emergency engine
starting)
! Vehicles with automatic transmission must
not be tow-started. You could otherwise dam-
age the automatic transmission.
You can find information on "Jump-starting"
under (Y page 343). Fuses
Important safety notes
G
WARNING
If you manipulate or bridge a faulty fuse or if
you replace it with a fuse with a higher amper- age, the electric cables could be overloaded.
This could result in a fire. There is a risk of an
accident and injury.
Always replace faulty fuses with the specified
new fuses having the correct amperage.
! For the fuse boxes in the engine compart-
ment and under the rear bench seat, only use fuses with the suffix "S". Otherwise, compo-
nents or systems could be damaged.
! Make sure that no moisture can enter the
fuse box when the cover is open.
! When closing the cover, make sure that it is
lying correctly on the fuse box. Moisture seep-
ing in or dirt could otherwise impair the oper- ation of the fuses. The fuses in your vehicle serve to close down
faulty circuits. If a fuse blows, all the compo-
nents on the circuit and their functions stop
operating.
Blown fuses must be replaced with fuses of the
same rating, which you can recognize by the
color and value. The fuse ratings are listed in the fuse allocation chart.
The fuse allocation chart is located in the fuse
box under the rear bench seat (Y page 350).
If a newly inserted fuse also blows, have the
cause traced and rectified at a qualified special- ist workshop, e.g. an authorized Mercedes-Benz
Center. Before changing a fuse
Observe the important safety notes
(Y page 349)
X Switch off the engine.
X Switch off all electrical consumers.
X Remove the SmartKey from the ignition lock.
Or, on vehicles with KEYLESS-GO start function
or KEYLESS‑GO:
X Open the driver's door.
The vehicle electronics are now in key posi-
tion 0092. This is the same as the SmartKey
having been removed.
The driver’s door can be closed again.
X Secure the vehicle against rolling away
(Y page 156).
All indicator lamps in the instrument cluster
must be off.
The fuses are located in various fuse boxes:
R Fuse box on the front-passenger side of the
dashboard
R Fuse box in the engine compartment on the
right-hand side of the vehicle, when viewed in
the direction of travel
R Fuse box under the rear bench seat Dashboard fuse box
! Do not use a pointed object such as a screw-
driver to open the cover in the dashboard. You could damage the dashboard or the cover.
Mercedes-Benz recommends that you have this
work performed at a qualified specialist work- Fuses
349Breakdown assistance Z
Page 374 of 398
be required earlier. Do not change the direction
of wheel rotation.
Clean the contact surfaces of the wheel and the
brake disc thoroughly every time a wheel is rota- ted. Check the tire pressure and, if necessary,
restart the tire pressure loss warning system or
the tire pressure monitor (Y page 358).Direction of rotation
Tires with a specified direction of rotation have
additional benefits, e.g. if there is a risk of hydro-
planing. These advantages can only be gained if the tires are installed corresponding to the
direction of rotation.
An arrow on the sidewall of the tire indicates itscorrect direction of rotation. Storing wheels
Store wheels that are not being used in a cool,
dry and preferably dark place. Protect the tires
from oil, grease, gasoline and diesel. Mounting a wheel
Preparing the vehicle X
Vehicle with emergency spare wheel:
when mounting the emergency spare wheel in
the event of a flat tire, follow the additional
notes on vehicle preparation under "Flat tire"
(Y page 335).
X Stop the vehicle on solid, non-slippery and
level ground.
X Apply the electric parking brake manually.
X Bring the front wheels into the straight-ahead
position.
X Vehicles with automatic transmission:
shift the transmission to position
005D.
X Vehicles with the AIRMATIC package:
make sure that the normal vehicle level is
selected (Y page 185).
X Vehicles with the Off-Road Engineering
package:
make sure that the normal vehicle
level is selected (Y page 179).
X Switch off the engine.
X Vehicles without KEYLESS-GO: remove the
SmartKey from the ignition lock. X
Vehicles with KEYLESS-GO: open the driv-
er's door.
The vehicle electronics are now in position
0092. This means no SmartKey is in the ignition
lock.
X Vehicles with KEYLESS-GO: remove the
Start/Stop button from the ignition lock
(Y page 135).
X Make sure that the engine cannot be started
via your smartphone (Y page 137).
X If included in the vehicle equipment, remove
the tire-change tool kit from the vehicle.
X Safeguard the vehicle against rolling away.
i Apart from certain country-specific varia-
tions, vehicles are not equipped with a tire-
change tool kit. For more information on
which tools are required to perform a wheel
change on your vehicle, consult a qualified
specialist workshop.
Necessary tire-changing tools can include, for
example:
R Jack
R Wheel chock
R Lug wrench
Securing the vehicle to prevent it from
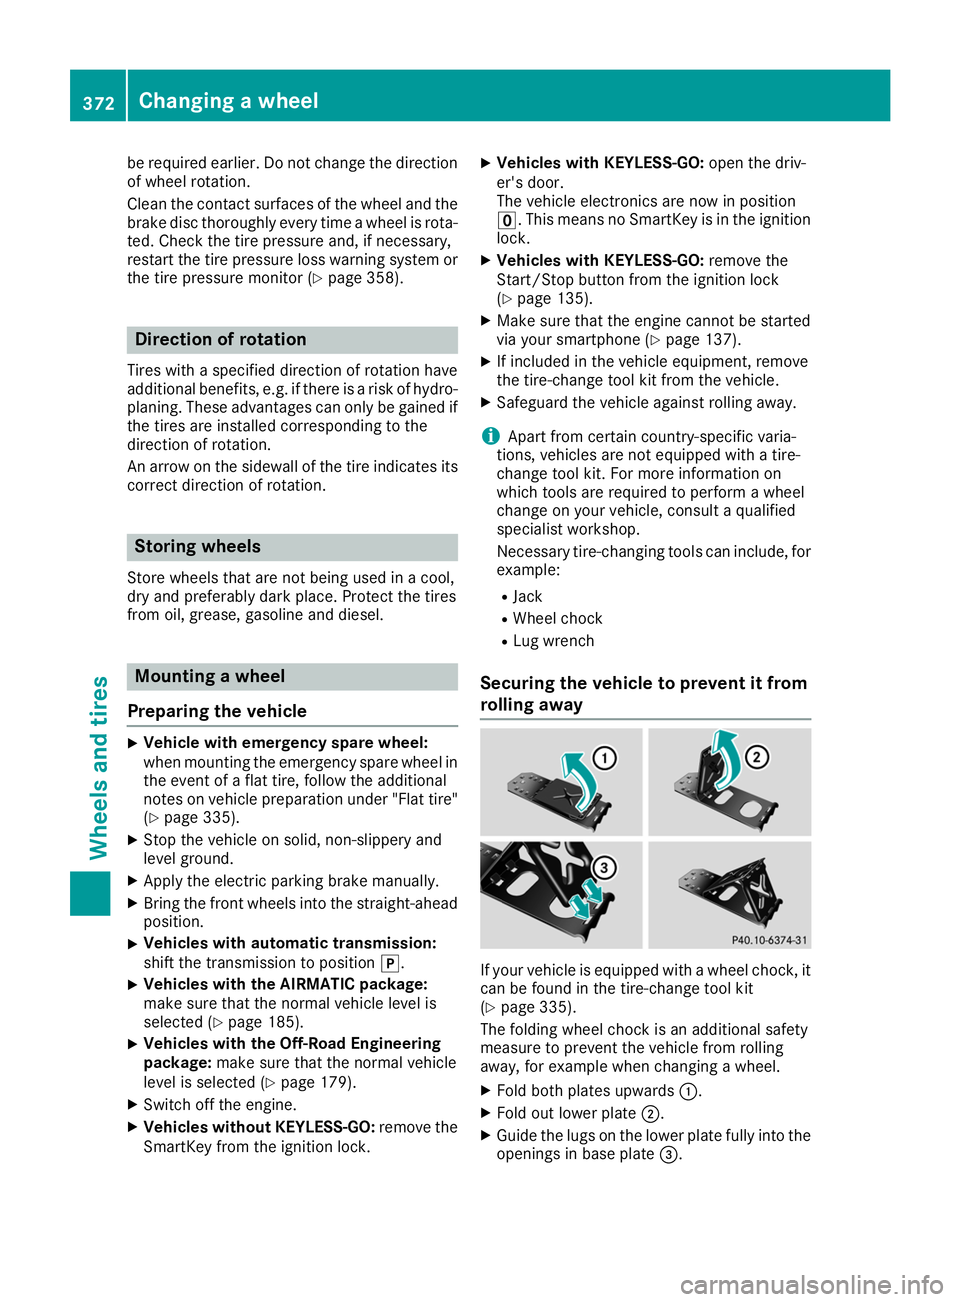
rolling away If your vehicle is equipped with a wheel chock, it
can be found in the tire-change tool kit
(Y page 335).
The folding wheel chock is an additional safety
measure to prevent the vehicle from rolling
away, for example when changing a wheel.
X Fold both plates upwards 0043.
X Fold out lower plate 0044.
X Guide the lugs on the lower plate fully into the
openings in base plate 0087.372
Changing a wheelWheels and tires
Page 383 of 398
Information regarding technical data
Plug-in hybrid: be sure to read the separate
Operator's Manual. Otherwise, you may not rec- ognize dangers.
i The data stated here specifically refers to a
vehicle with standard equipment. Consult an
authorized Mercedes-Benz Center for the
data for all vehicle variants and trim levels. Vehicle electronics
Installing two-way radios and mobile
phones (RF transmitters)
G
WARNING
The electromagnetic radiation from two-way
radios can interfere with the vehicle electron-
ics if two-way radios are manipulated or ret-
rofitted incorrectly. This could jeopardize the
operating safety of the vehicle. There is a risk of an accident.
You should have all work on electrical and
electronic components carried out at a quali-
fied specialist workshop. G
WARNING
If you incorrectly operate two-way radios in
the vehicle, the electromagnetic radiation
may interfere with the vehicle electronics, for example if:
R the two-way radio is not connected to an
exterior antenna
R the exterior antenna is not correctly moun-
ted or is not low-reflection
This could jeopardize the operating safety of
the vehicle. There is a risk of an accident.
Have the low-reflection exterior antenna
installed at a qualified specialist workshop.
Always connect two-way radios to the low-
reflection exterior antenna when operating in the vehicle.
! The operating permit may be invalidated if
the instructions for installation and use of
two-way radios are not observed. In particular, the following conditions must be
complied with:
R only approved wavebands may be used
R observe the maximum permissible output
in these wavebands
R only approved antenna positions may be
used
Excessive levels of electromagnetic radiation
may cause damage to your health and the health of others. Using an exterior antenna takes into
account current scientific discussions relating
to the possible health hazards that may result
from electromagnetic fields.
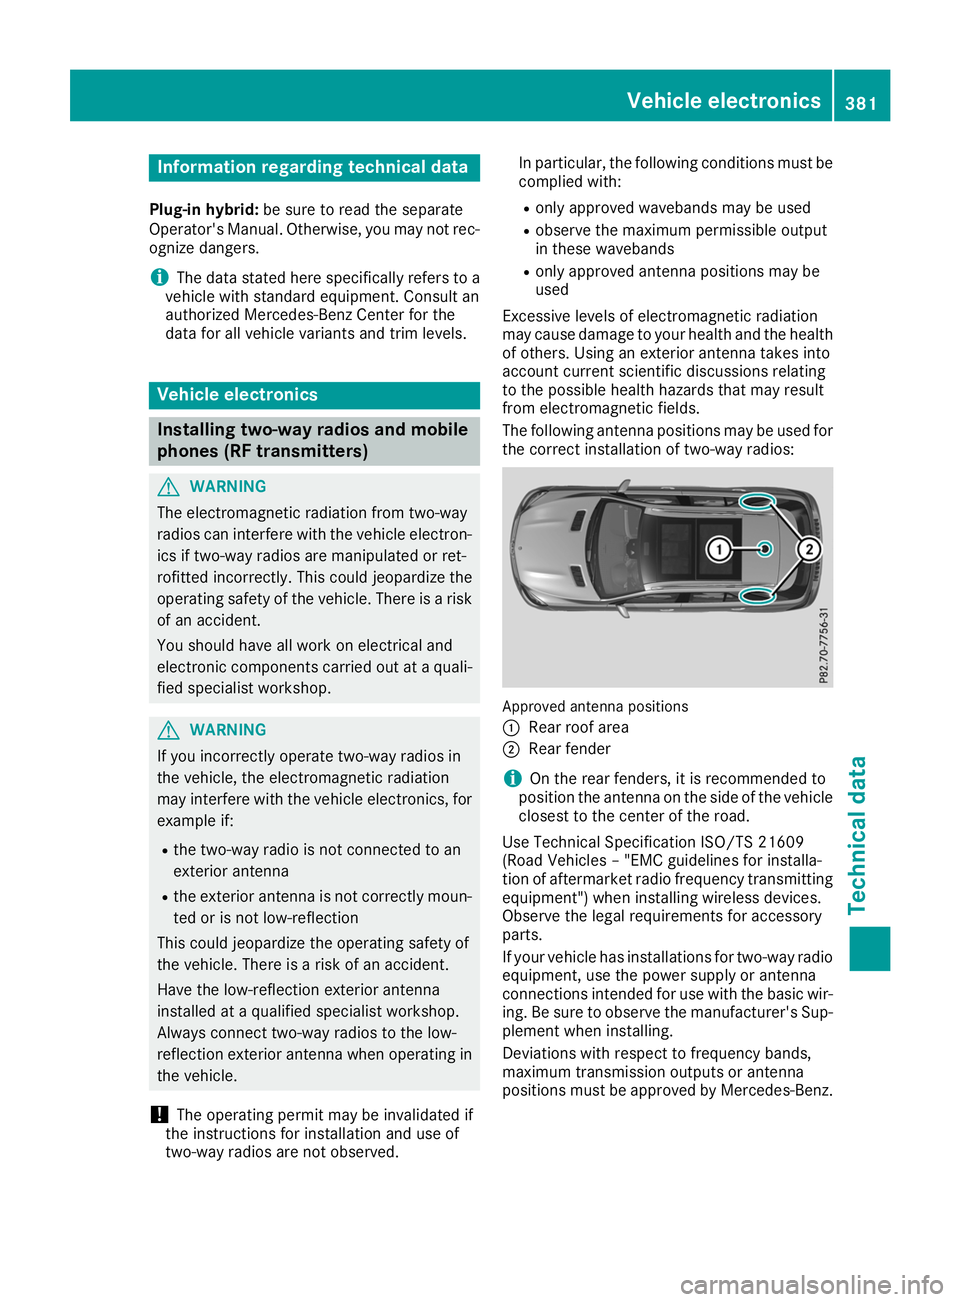
The following antenna positions may be used for
the correct installation of two-way radios: Approved antenna positions
0043
Rear roof area
0044 Rear fender
i On the rear fenders, it is recommended to
position the antenna on the side of the vehicle
closest to the center of the road.
Use Technical Specification ISO/TS 21609
(Road Vehicles – "EMC guidelines for installa-
tion of aftermarket radio frequency transmitting
equipment") when installing wireless devices.
Observe the legal requirements for accessory
parts.
If your vehicle has installations for two-way radio
equipment, use the power supply or antenna
connections intended for use with the basic wir-
ing. Be sure to observe the manufacturer's Sup- plement when installing.
Deviations with respect to frequency bands,
maximum transmission outputs or antenna
positions must be approved by Mercedes-Benz. Vehicle electronics
381Technical data Z
Page 384 of 398
The maximum transmission output (PEAK) at the
base of the antenna must not exceed the fol-
lowing values: Frequency band Maximum
transmission output Short wave
3 - 54 MHz 100 W
4 m waveband
74 - 88 MHz 30 W
2 m waveband
144 - 174 MHz 50 W
Trunked radio system/
Tetra
380 - 460 MHz 10 W
70 cm waveband
400 - 460 MHz 35 W
Mobile communications
(2G/3G/4G) 10 W
The following can be used in the vehicle without
restrictions:
R Two-way radios with a maximum transmission
output of up to 100 mW
R Two-way radios with transmitter frequencies
in the 380 - 410 MHz waveband and a maxi-
mum transmission output of up to 2 W
(trunked radio/Tetra)
R Mobile phones (2G/3G/4G)
There are no restrictions when positioning the
antenna on the outside of the vehicle for the
following wavebands:
R Trunked radio system/Tetra
R 70 cm waveband
R 2G/3G/4G Identification plates
Vehicle identification plate with vehi-
cle identification number (VIN)
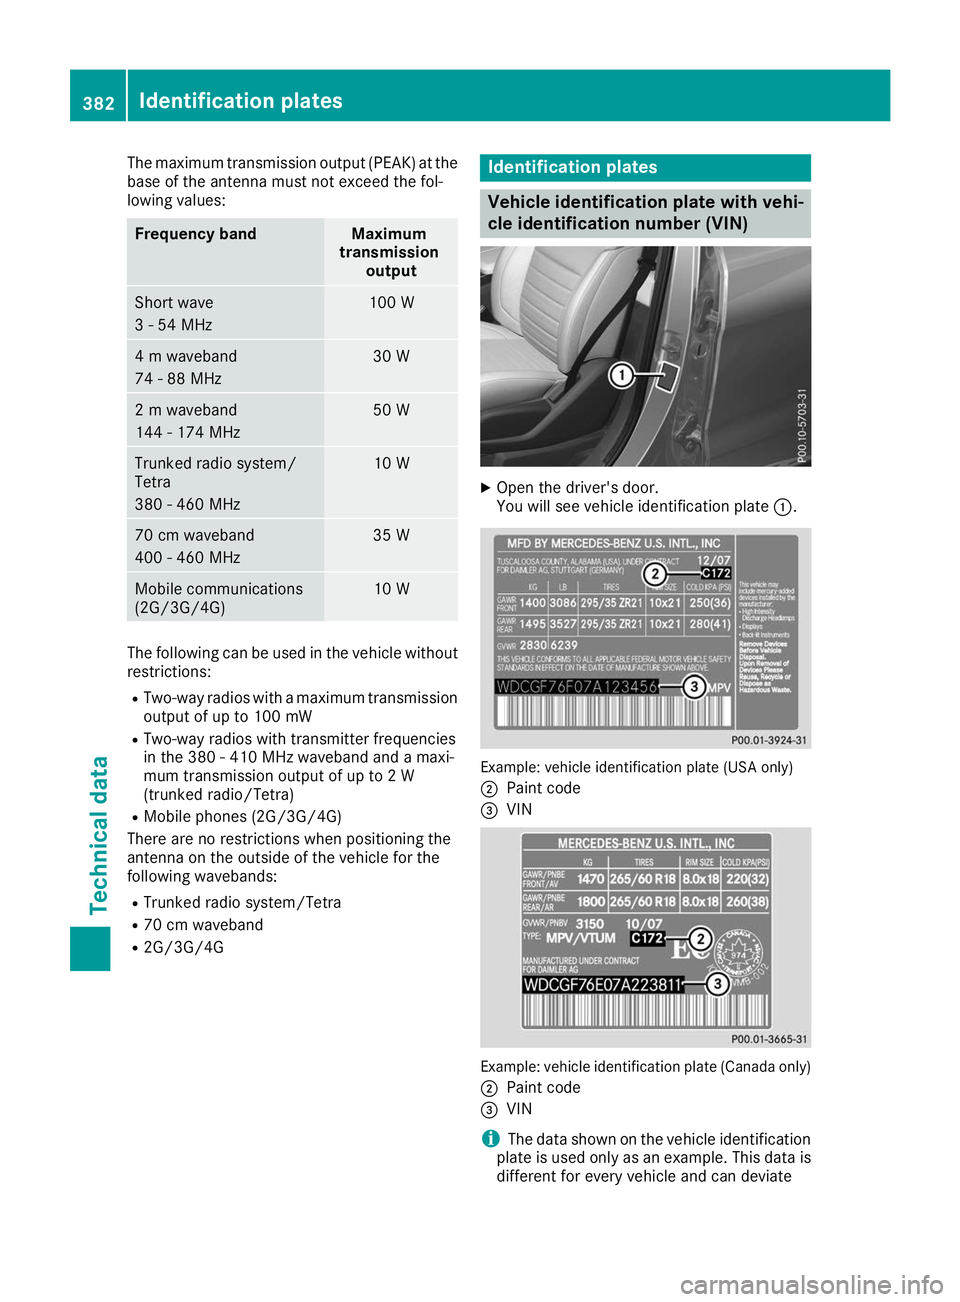
X
Open the driver's door.
You will see vehicle identification plate 0043. Example: vehicle identification plate (USA only)
0044 Paint code
0087 VIN Example: vehicle identification plate (Canada only)
0044 Paint code
0087 VIN
i The data shown on the vehicle identification
plate is used only as an example. This data is
different for every vehicle and can deviate 382
Identification platesTechnical data
Page 385 of 398
from the data shown here. You can find the
data applicable to your vehicle on the vehicle
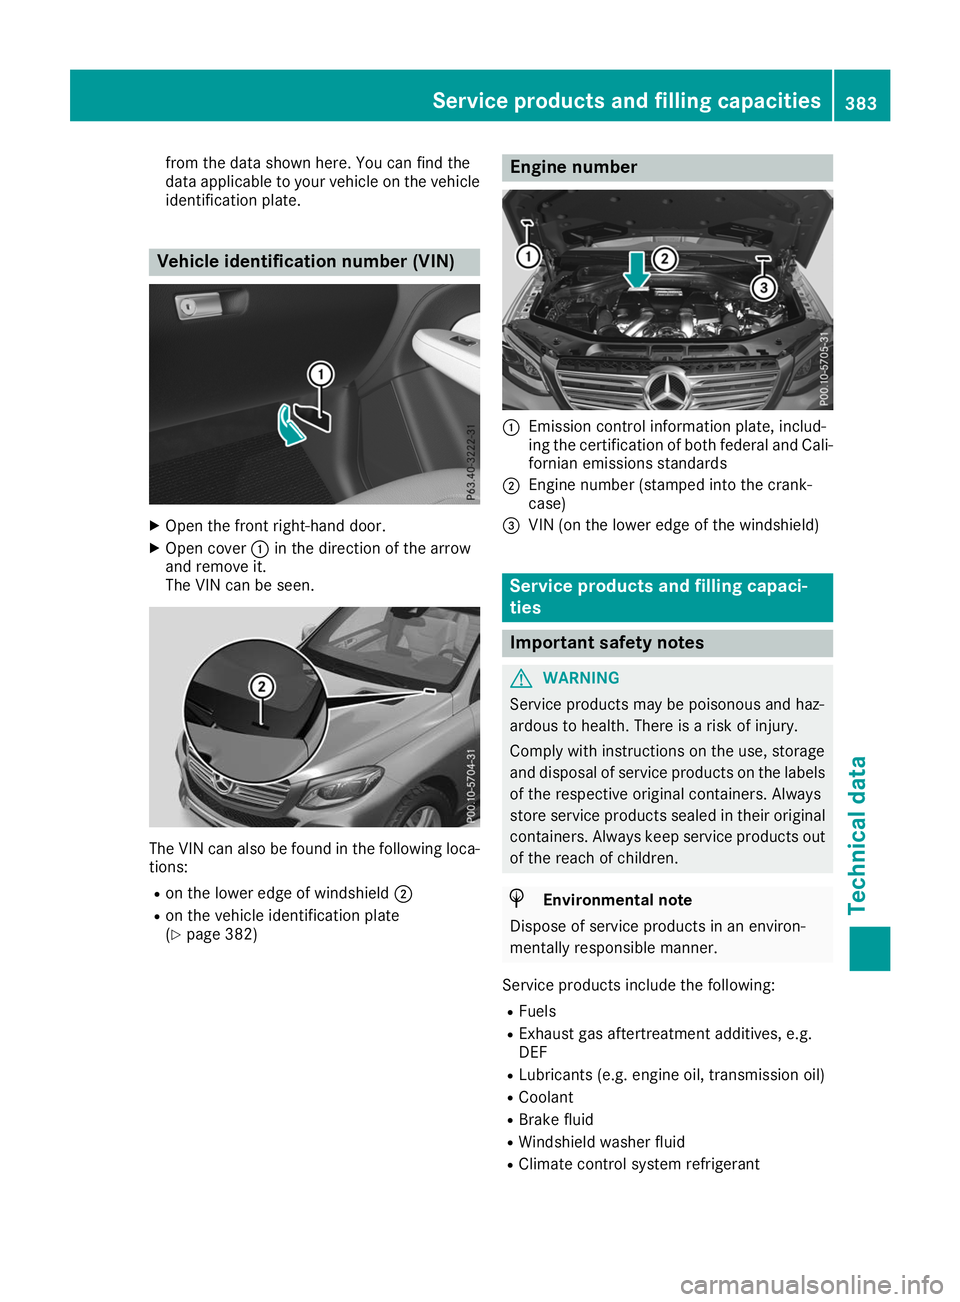
identification plate. Vehicle identification number (VIN)
X
Open the front right-hand door.
X Open cover 0043in the direction of the arrow
and remove it.
The VIN can be seen. The VIN can also be found in the following loca-
tions:
R on the lower edge of windshield 0044
R on the vehicle identification plate
(Y page 382) Engine number
0043
Emission control information plate, includ-
ing the certification of both federal and Cali-
fornian emissions standards
0044 Engine number (stamped into the crank-
case)
0087 VIN (on the lower edge of the windshield) Service products and filling capaci-
ties
Important safety notes
G
WARNING
Service products may be poisonous and haz-
ardous to health. There is a risk of injury.
Comply with instructions on the use, storage
and disposal of service products on the labels of the respective original containers. Always
store service products sealed in their original containers. Always keep service products out
of the reach of children. H
Environmental note
Dispose of service products in an environ-
mentally responsible manner.
Service products include the following: R Fuels
R Exhaust gas aftertreatment additives, e.g.
DEF
R Lubricants (e.g. engine oil, transmission oil)
R Coolant
R Brake fluid
R Windshield washer fluid
R Climate control system refrigerant Service products and filling capacities
383Technical data Z