height MERCEDES-BENZ GLE 2019 Owners Manual
[x] Cancel search | Manufacturer: MERCEDES-BENZ, Model Year: 2019, Model line: GLE, Model: MERCEDES-BENZ GLE 2019Pages: 398, PDF Size: 12.25 MB
Page 21 of 398
Route guidance active
...................... 234S
Safety Children in the vehicle ..................... 59
see Occupant safety
see Operating safety
Safety system
see Driving safety systems
SD card
Inserting ........................................ 293
Inserting/removing ........................ 293
Removing ....................................... 293
SD memory card
see also Digital Operator's Man-
ual .................................................. 287
Selecting ........................................ 235
Search & Send
see also Digital Operator's Man-
ual .................................................. 287
Seat
Correct driver's seat position ........... 97
Seat belts
Adjusting the driver's and front-
passenger seat bel t......................... 48
Adjusting the height ......................... 48
Cleaning ......................................... 333
Correct usage .................................. 47
Fastening ......................................... 48
Important safety guidelines ............. 46
Introduction ..................................... 45
Releasing ......................................... 48
Switching belt adjustment on/off
(on-board computer) ...................... 240
Warning lamp ................................. 274
Warning lamp (function) ................... 48
Seats
Adjusting (electrically) ..................... 98
Adjusting the 4-way lumbar sup-
port ................................................ 101
Adjusting the head restraint ............ 99
Calling up a stored setting (mem-
ory function) .................................. 109
Cleaning the cover ......................... 333
Folding the rear bench seat for-
wards/back ................................... 298
Important safety notes .................... 97 Overview .......................................... 97
Seat heating problem .................... 103
Seat ventilation problem ................ 103
Storing settings (memory func-
tion) ............................................... 108
Switching seat heating on/of
f....... 101
Switching seat ventilation on/of f.. 102
Section
Sliding sunroof ................................. 92
Securing hooks .................................. 300
Selector lever
Cleaning ......................................... 332
Sensors (cleaning instructions) ....... 330
Service menu (on-board com-
puter) .................................................. 238
Service message
see ASSYST PLUS
Service products
Brake fluid ..................................... 388
Coolant (engine) ............................ 388
DEF special additives ..................... 386
Engine oil ....................................... 387
Fuel ................................................ 384
Important safety notes .................. 383
Refrigerant (air-conditioning sys-
tem) ............................................... 389
Washer fluid ................................... 389
Setting the air distribution ............... 129
Setting the airflow ............................ 129
Setting the date/time format
see also Digital Operator's Man-
ual .................................................. 287
Setting the language
see also Digital Operator's Man-
ual .................................................. 287
Setting the time
see also Digital Operator's Man-
ual .................................................. 287
Settings
Factory (on-board computer) ......... 241
On-board compute r....................... 239
SETUP (on-board computer,
Mercedes-AMG vehicles) .................. 242
Side impact air bag ............................. 51
Side marker lamp (display mes-
sage) ................................................... 256 Index
19
Page 49 of 398
If a child younger than twelve years old and
under 5 ft (1.50 m)in height is traveling in the
vehicle:
R always secure the child in a child restraint
system suitable for this Mercedes-Benz vehi-
cle. The child restraint system must be appro- priate to the age, weight and size of the child.
R always observe the instructions and safety
notes on "Children in the vehicle"
(Y page 59) in addition to the child restraint
system manufacturer's installation and oper-
ating instructions
R always observe the instructions and safety
notes on the "Occupant classification system
(OCS)". (Y page 51) G
WARNING
The seat belts may not perform their intended protective function if:
R they are damaged, modified, extremely
dirty, bleached or dyed
R the seat belt buckle is damaged or
extremely dirty
R the Emergency Tensioning Devices, belt
anchorages or inertia reels have been modi-
fied.
Seat belts may be damaged in an accident,
although the damage may not be visible, e.g.
due to splinters of glass. Modified or damaged
seat belts may tear or fail, e.g. in an accident. Modified Emergency Tensioning Devices
could accidentally trigger or fail to deploy
when necessary. This poses an increased risk
of injury or even fatal injury.
Never modify the seat belts, Emergency Ten-
sioning Devices, belt anchorages and inertia
reels. Make sure that the seat belts are
undamaged, not worn out and clean. Follow-
ing an accident, have the seat belts checked
immediately at a qualified specialist work-
shop.
Only use seat belts that have been approved for
your vehicle by Mercedes-Benz. Proper use of the seat belts Observe the safety notes on the seat belt
(Y
page 46).
All vehicle occupants must be wearing the seat
belt correctly before beginning the journey. Also
make sure that all vehicle occupants are always wearing the seat belt correctly while the vehicle is in motion.
When fastening the seat belt, always make sure
that:
R the seat belt buckle tongue is inserted only
into the belt buckle belonging to that seat
R the seat belt is pulled tight across your body
Avoid wearing bulky clothing, e.g. a winter
coat.
R the seat belt is not twisted
Only then can the forces which occur be dis-
tributed over the area of the belt.
R the shoulder section of the belt is routed
across the center of your shoulder
The shoulder section of the seat belt should
not touch your neck or be routed under your
arm or behind your back. Where possible,
adjust the seat belt to the appropriate height.
R the lap belt is taut and passes across your lap
as low down as possible
The lap belt must always be routed across
your hip joints and not across your abdomen.
This applies particularly to pregnant women.
If necessary, push the lap belt down to your
hip joint and pull it tight using the shoulder
section of the belt.
R the seat belt is not routed across sharp, poin-
ted or fragile objects
If you have such items located on or in your
clothing, e.g. pens, keys or eyeglasses, store
these in a suitable place.
R only one person is using a seat belt
Infants and children must never travel sitting
on the lap of a vehicle occupant. In the event
of an accident, they could be crushed
between the vehicle occupant and seat belt.
R objects are never secured with a seat belt if
the seat belt is also being used by one of the
vehicle's occupants
Also ensure that there are never objects
between a person and the seat, e.g. cushions.
Seat belts are only intended to secure and
restrain vehicle occupants. Always observe the
"Loading guidelines" for securing objects, lug-
gage or loads (Y page 295). Occupant safety
47Safety Z
Page 51 of 398
seconds or once the driver's seat belt is fas-
tened.
If the vehicle's speed exceeds 15 mph
(25 km/h) once and the driver's and front-
passenger seat belts are not fastened, a warning
tone sounds. A warning tone also sounds with
increasing intensity for 60 seconds or until the
driver or front passenger have fastened their
seat belts.
If the driver or front passenger unfasten their
seat belts during the journey, the seat belt warn- ing is activated again. Air bags
Introduction The installation point of an air bag can be rec-
ognized by the AIRBAG marking.
An air bag complements the correctly fastened
seat belt. It is no substitute for the seat belt. The
air bag provides additional protection in appli-
cable accident situations.
Not all air bags are deployed in an accident. The
different air bag systems function independ-
ently from one another (Y page 56).
However, no system available today can com-
pletely eliminate injuries and fatalities.
It is also not possible to rule out a risk of injury
caused by an air bag due to the high speed at
which the air bag must be deployed.
Important safety notes G
WARNING
If you do not sit in the correct seat position,
the air bag cannot protect as intended and
could even cause additional injury when
deployed. This poses an increased risk of
injury or even fatal injury.
To avoid hazardous situations, always make
sure that all of the vehicle's occupants:
R have fastened their seat belts correctly,
including pregnant women
R are sitting correctly and maintain the great-
est possible distance to the air bags
R follow the following instructions Always make sure that there are no objects
between the air bag and the vehicle's occu-
pants.
R Adjust the seats properly before beginning
your journey. Always make sure that the seat
is in an almost upright position. The center of
the head restraint must support the head at
about eye level.
R Move the driver's and front-passenger seats
as far back as possible. The driver's seat posi-
tion must allow the vehicle to be driven safely.
R Only hold the steering wheel on the outside.
This allows the air bag to be fully deployed.
R Always lean against the backrest while driv-
ing. Do not lean forward or lean against the
door or side window. You may otherwise be in
the deployment area of the air bags.
R Always keep your feet in the footwell in front
of the seat. Do not put your feet on the dash-
board, for example. Your feet may otherwise
be in the deployment area of the air bag.
R For this reason, always secure persons less
than 5 ft (1.50 m) tall in suitable restraint sys-
tems. Up to this height, the seat belt cannot
be worn correctly.
If a child is traveling in your vehicle, also
observe the following notes:
R Always secure children under twelve years of
age and less than 5 ft (1.50 m)tall in suitable
child restraint systems.
R Child restraint systems should be installed on
the rear seats.
R Only secure a child in a rearward-facing child
restraint system on the front-passenger seat
when the front-passenger front air bag is
deactivated. If the PASSENGER AIR BAG OFF indicator lamp is permanently lit, the front-
passenger front air bag is deactivated
(Y page 45).
R Always observe the instructions and safety
notes on the "Occupant Classification System
(OCS)" (Y page 51) and on "Children in the
vehicle" (Y page 59) in addition to the child
restraint system manufacturer's installation
and operating instructions. Occupant safety
49Safety Z
Page 62 of 398
a child restraint system on a rear seat. Children
are generally better protected there.
If a child younger than twelve years old and
under 5 ft (1.50 m) in height is traveling in the
vehicle:
R always secure the child in a child restraint
system suitable for Mercedes-Benz vehicles.
The child restraint system must be appropri-
ate to the age, weight and size of the child.
R be sure to observe the instructions and safety
notes in this section in addition to the child
restraint system manufacturer's installation
instructions.
R always observe the instructions and safety
notes on the "Occupant classification system (OCS)". (Y page 51) G
WARNING
If you leave children unsupervised in the vehi- cle, they could set it in motion by, for example:
R release the parking brake.
R shift the automatic transmission out of the
parking position P.
R start the engine.
In addition, they may operate vehicle equip-
ment and become trapped. There is a risk of
an accident and injury.
When leaving the vehicle, always take the
SmartKey with you and lock the vehicle. Never
leave children unsupervised in the vehicle. G
WARNING
If persons, particularly children are subjected to prolonged exposure to extreme heat or
cold, there is a risk of injury, possibly even
fatal. Never leave children unattended in the
vehicle. G
WARNING
If the child restraint system is subjected to
direct sunlight, parts may get very hot. Chil-
dren may burn themselves on these parts,
particularly on the metal parts of the child
restraint system. There is a risk of injury.
If you leave the vehicle, taking the child with
you, always ensure that the child restraint
system is not exposed to direct sunlight. Pro- tect it with a blanket, for example. If the child
restraint system has been exposed to direct
sunlight, let it cool down before securing the
child in it. Never leave children unattended in the vehicle.
Always ensure that all vehicle occupants have
their seat belts fastened correctly and are sitting properly. Particular attention must be paid to
children.
Observe the safety notes on the seat belt
(Y page 46) and the notes on correct use of seat
belts (Y page 47).
A booster seat may be necessary to achieve
proper seat belt positioning for children over
40 lbs (18 kg) until they reach a height where a
three-point seat belt can be properly fastened
without a booster seat. Special seatbelt retractor
G
WARNING
If the seat belt is released while driving, the
child restraint system will no longer be
secured properly. The special seat belt retrac- tor is disabled and the inertia real draws in a
portion of the seat belt. The seat belt cannot
be immediately refastened. There is an
increased risk of injury, possibly even fatal.
Stop the vehicle immediately, paying atten-
tion to road and traffic conditions. Reactivate
the special seat belt retractor and secure the
child restraint system properly.
All seat belts in the vehicle, except the driver's
seat belt, are equipped with a special seat belt
retractor. When activated, the special seat belt
retractor ensures that the seat belt cannot
slacken once the child seat is secured.
Installing a child restraint system:
X Make sure you observe the child restraint
system manufacturer's installation instruc-
tions.
X Pull the seat belt smoothly from the belt out-
let.
X Engage seat belt tongue in belt buckle. 60
Children in the vehicleSafety
Page 100 of 398
G
WARNING
You could lose control of your vehicle if you do the following while driving:
R adjust the driver's seat, head restraint,
steering wheel or mirrors
R fasten the seat belt
There is a risk of an accident.
Adjust the driver's seat, head restraint, steer-
ing wheel and mirror and fasten your seat belt before starting the engine. G
WARNING
If you adjust the seat height carelessly, you or other vehicle occupants could be trapped andthereby injured. Children in particular could
accidentally press the electrical seat adjust-
ment buttons and become trapped. There is a
risk of injury.
While moving the seats, make sure that your
hands or other body parts do not get under the
lever assembly of the seat adjustment sys-
tem. G
WARNING
If the head restraints are not installed or not
adjusted correctly, they cannot provide pro-
tection as intended. There is an increased risk
of injury in the head and neck area, e.g. in the event of an accident or when braking.
Always drive with the head restraints instal-
led. Before driving off, make sure for every
vehicle occupant that the center of the head
restraint supports the back of the head at
about eye level. G
WARNING
The seat belt does not offer the intended level of protection if you have not moved the back-
rest to an almost vertical position. When brak-
ing or in the event of an accident, you could
slide underneath the seat belt and sustain
abdomen or neck injuries, for example. This
poses an increased risk of injury or even fatal injury. Adjust the seat properly before beginning
your journey. Always ensure that the backrest
is in an almost vertical position and that the
shoulder section of your seat belt is routed
across the center of your shoulder.
! To prevent damage to the seats and the seat
heating, observe the following notes:
R Do not spill liquids onto the seats. Dry the
seats as soon as possible if liquid does get
spilled on the seats.
R If the seat covers are damp or wet, do not
switch on the seat heating. Also, do not use
the seat heating to dry the seats.
R Clean the seat covers as recommended;
see keyword "Care".
R Do not transport heavy loads on the seats.
Do not place pointed objects on the seat
cushions such as knives, nails or tools.
Where possible, use the seats only for car-
rying passengers.
R When operating the seat heating, do not
cover the seats with insulating materials,
e.g. blankets, coats, bags, protective cov-
ers, child seats or booster seats.
! Make sure that there are no objects in the
footwell under or behind the seats when mov-
ing the seats back. There is a risk that the
seats and/or the objects could be damaged.
i Further related subjects:
R Cargo compartment enlargement (folding
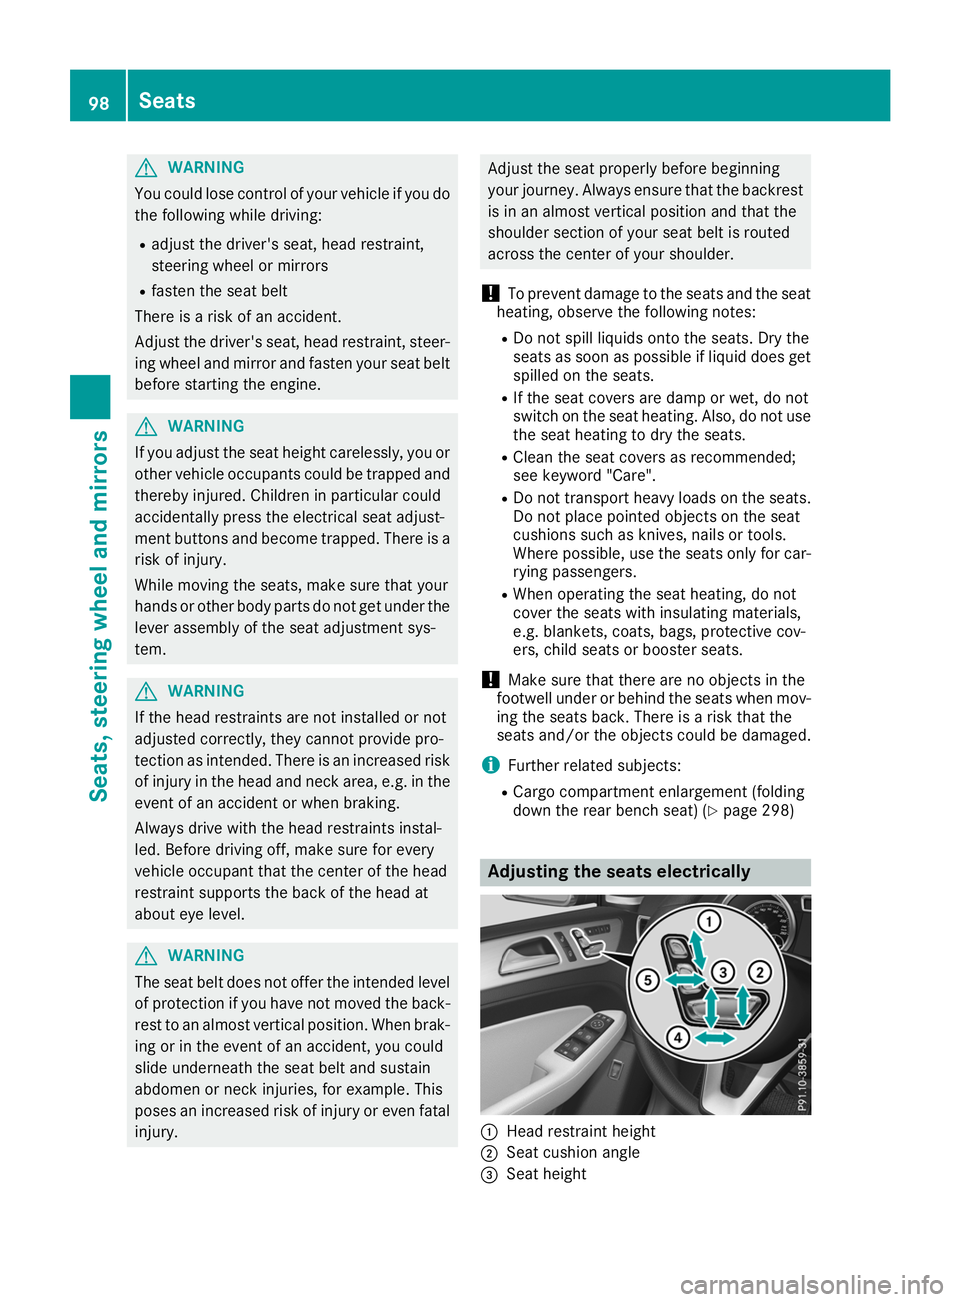
down the rear bench seat) (Y page 298) Adjusting the seats electrically
0043
Head restraint height
0044 Seat cushion angle
0087 Seat height 98
SeatsSeats, steering wheel and mirrors
Page 101 of 398
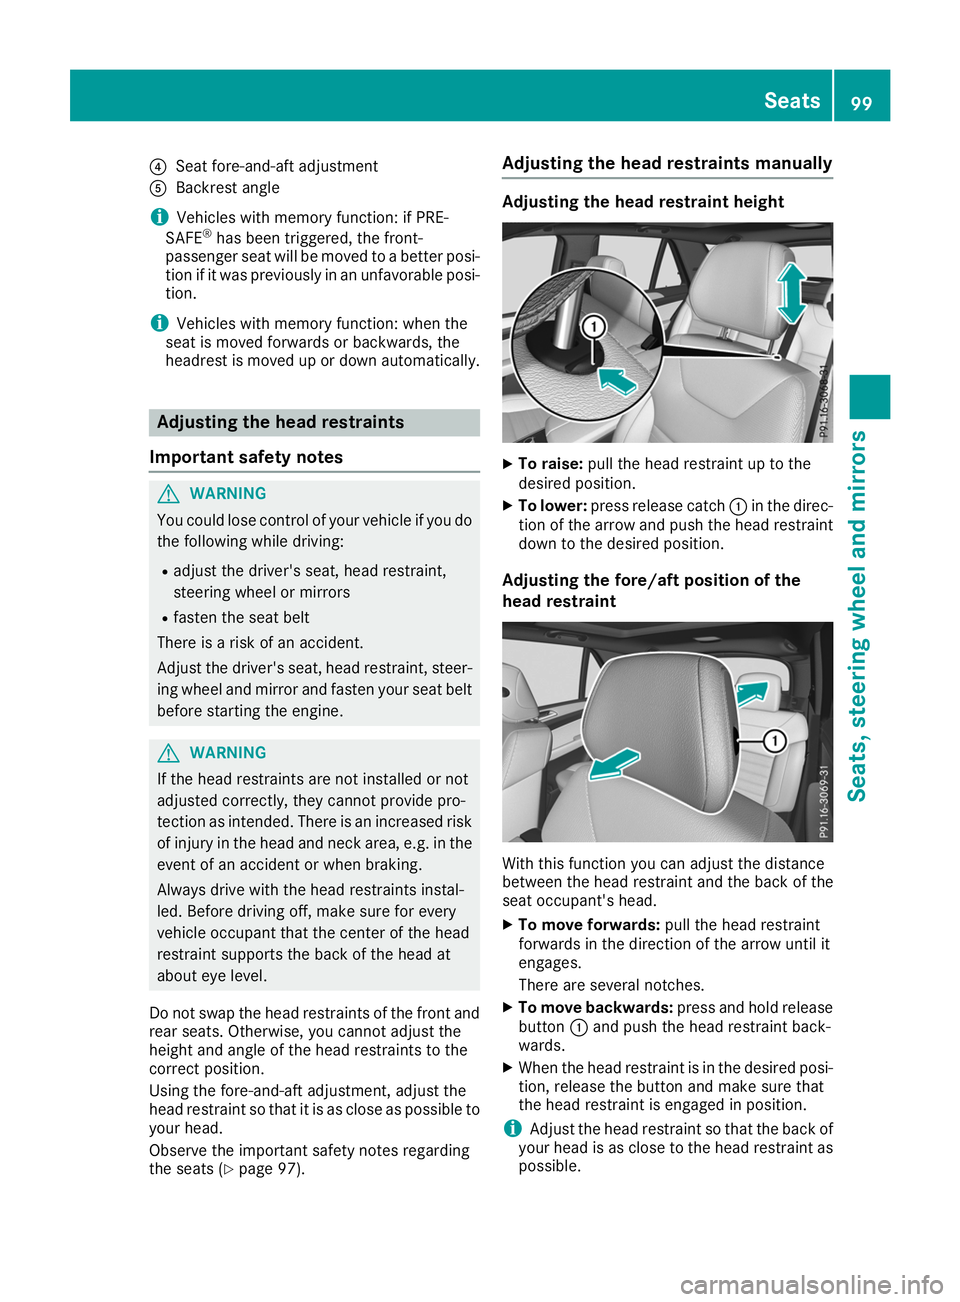
0085
Seat fore-and-aft adjustment
0083 Backrest angle
i Vehicles with memory function: if PRE-
SAFE ®
has been triggered, the front-
passenger seat will be moved to a better posi- tion if it was previously in an unfavorable posi-
tion.
i Vehicles with memory function: when the
seat is moved forwards or backwards, the
headrest is moved up or down automatically. Adjusting the head restraints
Important safety notes G
WARNING
You could lose control of your vehicle if you do the following while driving:
R adjust the driver's seat, head restraint,
steering wheel or mirrors
R fasten the seat belt
There is a risk of an accident.
Adjust the driver's seat, head restraint, steer-
ing wheel and mirror and fasten your seat belt before starting the engine. G
WARNING
If the head restraints are not installed or not
adjusted correctly, they cannot provide pro-
tection as intended. There is an increased risk
of injury in the head and neck area, e.g. in the event of an accident or when braking.
Always drive with the head restraints instal-
led. Before driving off, make sure for every
vehicle occupant that the center of the head
restraint supports the back of the head at
about eye level.
Do not swap the head restraints of the front and
rear seats. Otherwise, you cannot adjust the
height and angle of the head restraints to the
correct position.
Using the fore-and-aft adjustment, adjust the
head restraint so that it is as close as possible to your head.
Observe the important safety notes regarding
the seats (Y page 97). Adjusting the head restraints manually Adjusting the head restraint height
X
To raise: pull the head restraint up to the
desired position.
X To lower: press release catch 0043in the direc-
tion of the arrow and push the head restraint down to the desired position.
Adjusting the fore/aft position of the
head restraint With this function you can adjust the distance
between the head restraint and the back of the
seat occupant's head.
X To move forwards: pull the head restraint
forwards in the direction of the arrow until it
engages.
There are several notches.
X To move backwards: press and hold release
button 0043and push the head restraint back-
wards.
X When the head restraint is in the desired posi-
tion, release the button and make sure that
the head restraint is engaged in position.
i Adjust the head restraint so that the back of
your head is as close to the head restraint as possible. Seats
99Seats, steering wheel and mirrors Z
Page 102 of 398
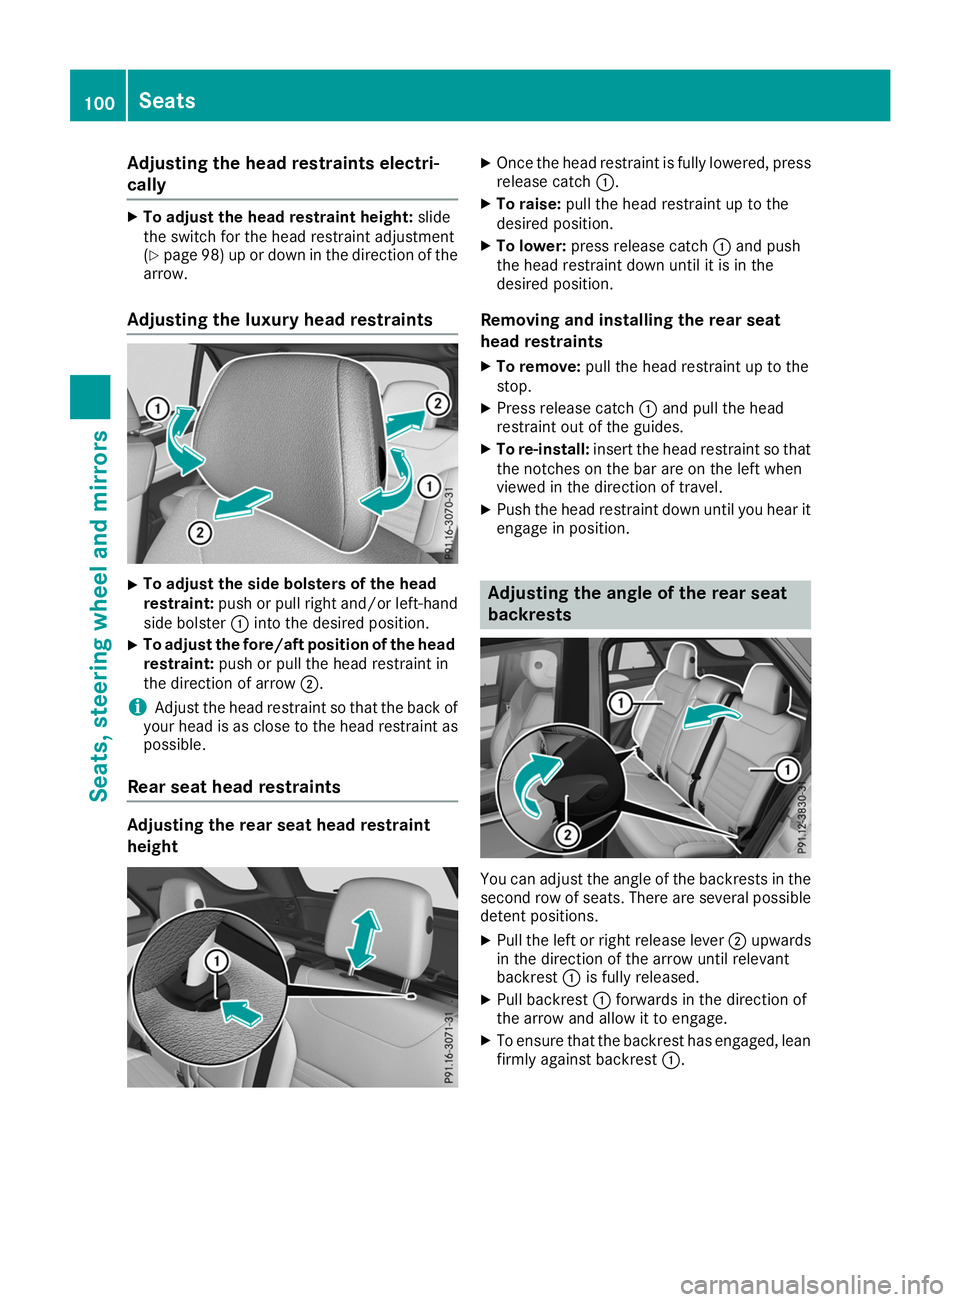
Adjusting the head restraints electri-
cally X
To adjust the head restraint height: slide
the switch for the head restraint adjustment
(Y page 98) up or down in the direction of the
arrow.
Adjusting the luxury head restraints X
To adjust the side bolsters of the head
restraint:
push or pull right and/or left-hand
side bolster 0043into the desired position.
X To adjust the fore/aft position of the head
restraint: push or pull the head restraint in
the direction of arrow 0044.
i Adjust the head restraint so that the back of
your head is as close to the head restraint as possible.
Rear seat head restraints Adjusting the rear seat head restraint
height X
Once the head restraint is fully lowered, press
release catch 0043.
X To raise: pull the head restraint up to the
desired position.
X To lower: press release catch 0043and push
the head restraint down until it is in the
desired position.
Removing and installing the rear seat
head restraints X To remove: pull the head restraint up to the
stop.
X Press release catch 0043and pull the head
restraint out of the guides.
X To re-install: insert the head restraint so that
the notches on the bar are on the left when
viewed in the direction of travel.
X Push the head restraint down until you hear it
engage in position. Adjusting the angle of the rear seat
backrests
You can adjust the angle of the backrests in the
second row of seats. There are several possible
detent positions.
X Pull the left or right release lever 0044upwards
in the direction of the arrow until relevant
backrest 0043is fully released.
X Pull backrest 0043forwards in the direction of
the arrow and allow it to engage.
X To ensure that the backrest has engaged, lean
firmly against backrest 0043.100
SeatsSeats
, steering wheel and mirrors
Page 105 of 398
Problems with the seat heating or seat ventilation
Problem
Possible causes/consequences and
0050
0050Solutions The seat heating or seat
ventilation has switched
off prematurely or can-
not be switched on. The on-board voltage is too low because too many electrical consum-
ers are switched on.
X Switch off electrical consumers that you do not need, such as the
rear window defroster or interior lighting.
Once the battery is sufficiently charged, the seat heating or seat
ventilation will switch back on automatically. Steering wheel
Important safety notes
G
WARNING
You could lose control of your vehicle if you do the following while driving:
R adjust the driver's seat, head restraint,
steering wheel or mirrors
R fasten the seat belt
There is a risk of an accident.
Adjust the driver's seat, head restraint, steer-
ing wheel and mirror and fasten your seat belt before starting the engine. G
WARNING
Children could injure themselves if they
adjust the steering wheel. There is a risk of
injury.
When leaving the vehicle, always take the
SmartKey with you and lock the vehicle. Never leave children unsupervised in the vehicle.
The electrically adjustable steering wheel can
still be adjusted when there is no SmartKey in
the ignition lock. Adjusting the steering wheel man-
ually
G
WARNING
If the steering wheel is unlocked while the
vehicle is in motion, it could change position
unexpectedly. This could cause you to lose control of the vehicle. There is a risk of an
accident.
Before starting off, make sure the steering
wheel is locked. Never unlock the steering
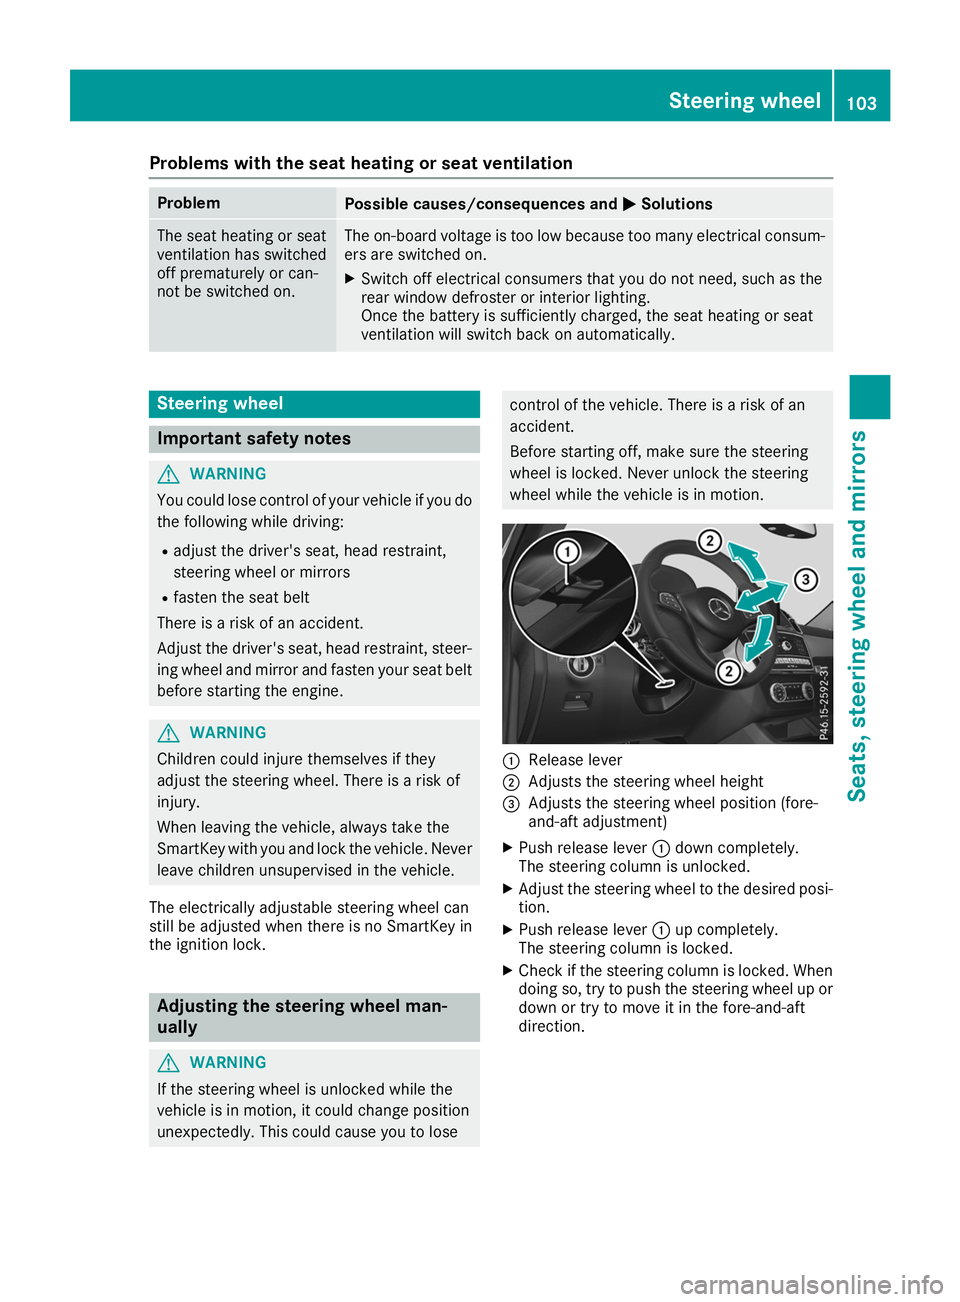
wheel while the vehicle is in motion. 0043
Release lever
0044 Adjusts the steering wheel height
0087 Adjusts the steering wheel position (fore-
and-aft adjustment)
X Push release lever 0043down completely.
The steering column is unlocked.
X Adjust the steering wheel to the desired posi-
tion.
X Push release lever 0043up completely.
The steering column is locked.
X Check if the steering column is locked. When
doing so, try to push the steering wheel up or down or try to move it in the fore-and-aft
direction. Steering wheel
103Seats, steering wheel and mirrors Z
Page 106 of 398
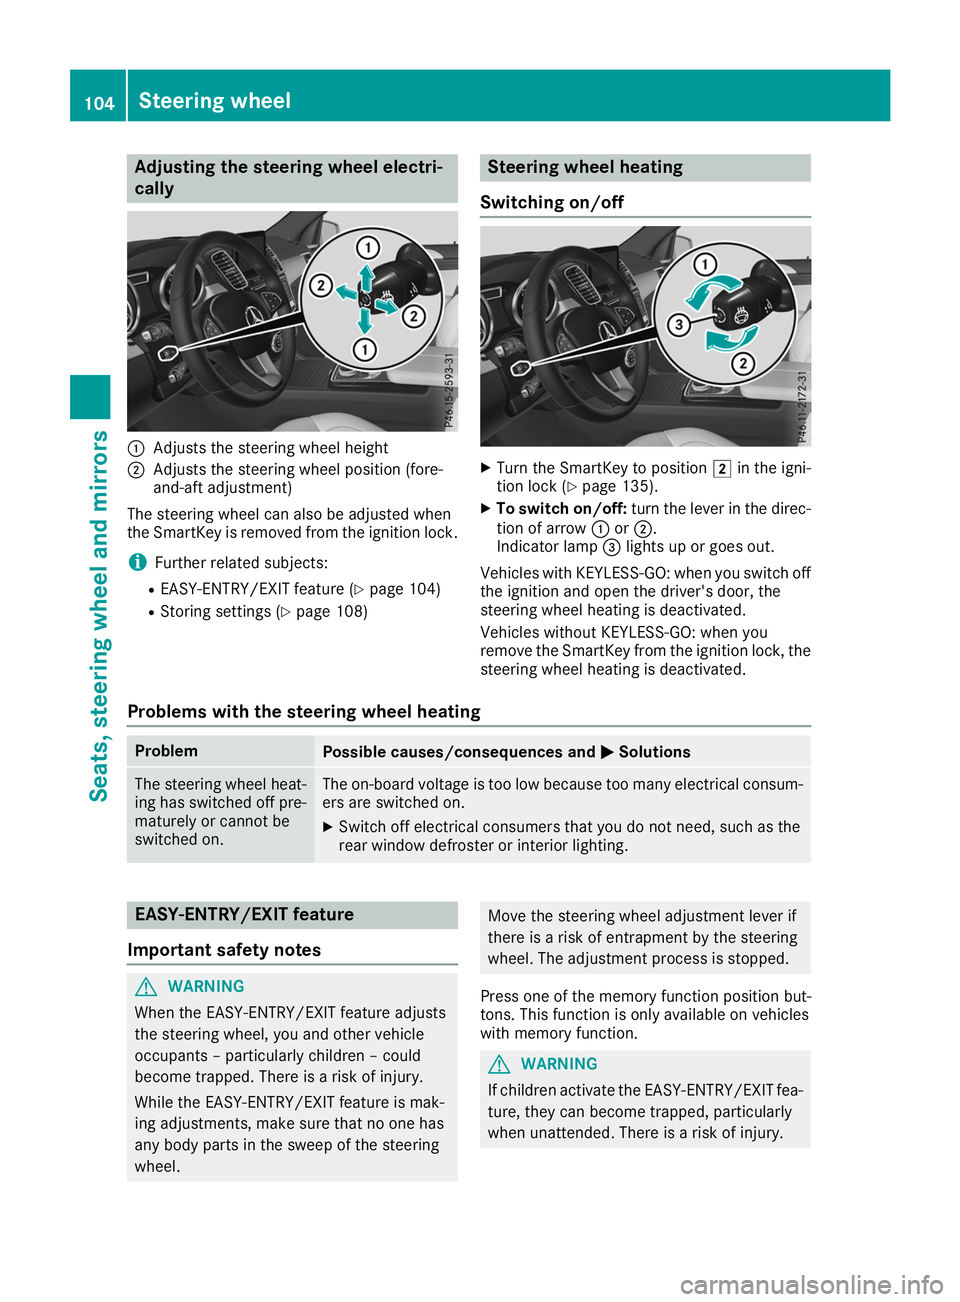
Adjusting the steering wheel electri-
cally 0043
Adjusts the steering wheel height
0044 Adjusts the steering wheel position (fore-
and-aft adjustment)
The steering wheel can also be adjusted when
the SmartKey is removed from the ignition lock.
i Further related subjects:
R EASY-ENTRY/EXIT feature (Y page 104)
R Storing settings (Y page 108) Steering wheel heating
Switching on/off X
Turn the SmartKey to position 0048in the igni-
tion lock (Y page 135).
X To switch on/off: turn the lever in the direc-
tion of arrow 0043or0044.
Indicator lamp 0087lights up or goes out.
Vehicles with KEYLESS-GO: when you switch off the ignition and open the driver's door, the
steering wheel heating is deactivated.
Vehicles without KEYLESS-GO: when you
remove the SmartKey from the ignition lock, the
steering wheel heating is deactivated.
Problems with the steering wheel heating Problem
Possible causes/consequences and
0050 0050Solutions The steering wheel heat-
ing has switched off pre-
maturely or cannot be
switched on. The on-board voltage is too low because too many electrical consum-
ers are switched on.
X Switch off electrical consumers that you do not need, such as the
rear window defroster or interior lighting. EASY-ENTRY/EXIT feature
Important safety notes G
WARNING
When the EASY-ENTRY/EXIT feature adjusts
the steering wheel, you and other vehicle
occupants – particularly children – could
become trapped. There is a risk of injury.
While the EASY-ENTRY/EXIT feature is mak-
ing adjustments, make sure that no one has
any body parts in the sweep of the steering
wheel. Move the steering wheel adjustment lever if
there is a risk of entrapment by the steering
wheel. The adjustment process is stopped.
Press one of the memory function position but-
tons. This function is only available on vehicles
with memory function. G
WARNING
If children activate the EASY-ENTRY/EXIT fea- ture, they can become trapped, particularly
when unattended. There is a risk of injury. 104
Steering wheelSeats
, steering wheel and mirrors
Page 181 of 398
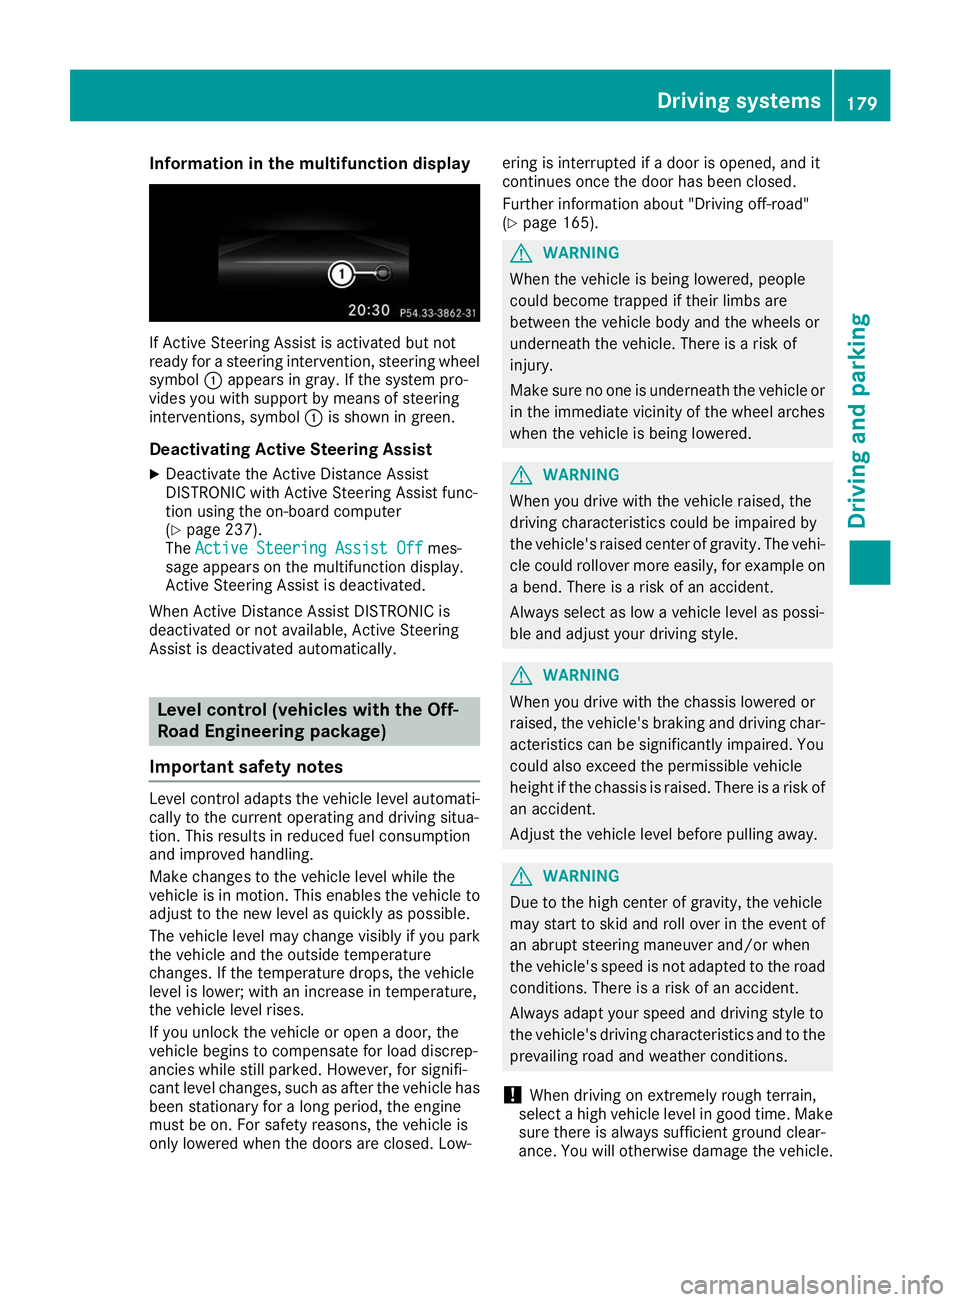
Information in the multifunction display
If Active Steering Assist is activated but not
ready for a steering intervention, steering wheel
symbol 0043appears in gray. If the system pro-
vides you with support by means of steering
interventions, symbol 0043is shown in green.
Deactivating Active Steering Assist
X Deactivate the Active Distance Assist
DISTRONIC with Active Steering Assist func-
tion using the on-board computer
(Y page 237).
The Active Steering Assist Off
Active Steering Assist Off mes-
sage appears on the multifunction display.
Active Steering Assist is deactivated.
When Active Distance Assist DISTRONIC is
deactivated or not available, Active Steering
Assist is deactivated automatically. Level control (vehicles with the Off-
Road Engineering package)
Important safety notes Level control adapts the vehicle level automati-
cally to the current operating and driving situa-
tion. This results in reduced fuel consumption
and improved handling.
Make changes to the vehicle level while the
vehicle is in motion. This enables the vehicle to adjust to the new level as quickly as possible.
The vehicle level may change visibly if you park
the vehicle and the outside temperature
changes. If the temperature drops, the vehicle
level is lower; with an increase in temperature,
the vehicle level rises.
If you unlock the vehicle or open a door, the
vehicle begins to compensate for load discrep-
ancies while still parked. However, for signifi-
cant level changes, such as after the vehicle has
been stationary for a long period, the engine
must be on. For safety reasons, the vehicle is
only lowered when the doors are closed. Low- ering is interrupted if a door is opened, and it
continues once the door has been closed.
Further information about "Driving off-road"
(Y
page 165). G
WARNING
When the vehicle is being lowered, people
could become trapped if their limbs are
between the vehicle body and the wheels or
underneath the vehicle. There is a risk of
injury.
Make sure no one is underneath the vehicle or in the immediate vicinity of the wheel arches
when the vehicle is being lowered. G
WARNING
When you drive with the vehicle raised, the
driving characteristics could be impaired by
the vehicle's raised center of gravity. The vehi- cle could rollover more easily, for example on
a bend. There is a risk of an accident.
Always select as low a vehicle level as possi-
ble and adjust your driving style. G
WARNING
When you drive with the chassis lowered or
raised, the vehicle's braking and driving char-
acteristics can be significantly impaired. You
could also exceed the permissible vehicle
height if the chassis is raised. There is a risk of an accident.
Adjust the vehicle level before pulling away. G
WARNING
Due to the high center of gravity, the vehicle
may start to skid and roll over in the event of
an abrupt steering maneuver and/or when
the vehicle's speed is not adapted to the road conditions. There is a risk of an accident.
Always adapt your speed and driving style to
the vehicle's driving characteristics and to the prevailing road and weather conditions.
! When driving on extremely rough terrain,
select a high vehicle level in good time. Make
sure there is always sufficient ground clear-
ance. You will otherwise damage the vehicle. Driving systems
179Driving and parking Z