AUX MERCEDES-BENZ GLE-Class 2016 C292 Comand Manual
[x] Cancel search | Manufacturer: MERCEDES-BENZ, Model Year: 2016, Model line: GLE-Class, Model: MERCEDES-BENZ GLE-Class 2016 C292Pages: 206, PDF Size: 6.66 MB
Page 5 of 206
1, 2, 3 ...
360° cameraDisplaying images ............................ 47
Opening the camera cover for
cleaning (COMAND) .........................4 8
Settings ........................................... 48
A
Access data of the mobile phone
network provider
Deleting ......................................... 129
Editing ........................................... 129
Making entries ............................... 128
Selecting ........................................ 127
Activating media mode
General notes ................................ 149
Adding bookmarks ............................ 136
Address book
Adding a new contact .................... 107
Adding information to a contact .... 108
Automatically importing contacts
from the phone .............................. 111
Browsing ........................................ 107
Calling up ....................................... 107
Changing the category of an entry .. 109
Changing the display and sorting
criteria for contacts ....................... 110
Deleting contacts ........................... 111
Deleting imported contacts ........... 112
Displaying contact details .............. 108
Editing a contact ............................ 109
Importing contacts ........................ 111
Introduction ................................... 106
Making a call ................................. 109
Receiving vCards ........................... 112
Saving a contact ............................ 111
Searching for a contact ................. 107
Sending e-mails ............................. 109
Sending text messages .................. 109
Starting route guidance ................. 108
Storing a phone number as a
speed dial number ......................... 110
Voice tags ...................................... 110
Address entry menu ............................ 56
Adjusting the volume
COMAND ......................................... 26 Traffic announcements .................... 26
Alternative Route ................................ 76
Ambient lighting
Setting (COMAND) ........................... 44
Armrest
Adjusting (COMAND) ....................... 46
Audio CD/DVD and MP3 mode
Switching to (Rear Seat Entertain-
ment System) ................................ 194
Audio CD/MP3 mode
Switching to ................................... 149
Audio CDs
Saving ............................................ 156
Automatic time
Switching on/off .............................. 34
AUX jacks
CD/DVD drive ............................... 188
Avoiding an area .................................. 87
B
Back button......................................... 20
Bang & Olufsen sound system
Balance/Fader ............................... 176
Calling up the sound menu ............ 175
Equalizer ........................................ 175
Features ........................................ 175
Sound profile ................................. 176
VIP selection .................................. 176
Bluetooth
®
Activating audio mode ................... 163
Activating/deactivating ................... 40
Basic display (audio mode) ............ 162
Connecting another mobile
phone .............................................. 97
Connecting audio devices .............. 159
De-authorizing (de-registering) a
device ............................................ 162
Device list ...................................... 160
Displaying connection details .......... 98
Entering the passcode ..................... 96
External authorization (audio
device) ........................................... 161
Increasing the volume using
COMAND ....................................... 164
Interface .......................................... 93
Reconnecting an audio device ....... 161
Searching for a mobile phone .......... 95
Index3
Page 10 of 206
Selecting the access data of the
mobile phone network provider ..... 127
Setting up an Internet connection .. 127
Web browser .................................. 135
P
Pause functionVideo DVD ..................................... 170
Personal POIs and routes
Alert when approaching (personal
POI) .................................................. 68
Editing .............................................. 69
Importing via Mercedes-Benz
Apps ................................................ 69
Recording the route ......................... 70
Saving .............................................. 68
Selecting .......................................... 69
Settings for personal POIs ............... 67
Phone book
Adding a new contact .................... 104
Adding information to a contact .... 105
Automatically importing contacts
from the mobile phone .................. 105
Calling up ....................................... 103
Deleting a contact ......................... 106
Displaying the details of an entry ... 104
Entering characters ......................... 28
Saving a contact ............................ 106
Searching for a contact ................. 103
Symbol overview ............................ 103
Phone call
Dialing .............................................. 99
Picture viewer
Changing view ............................... 171
Displaying pictures ........................ 171
Exiting the picture viewer .............. 171
POI (navigation)
Category .......................................... 63
Defining the position for the POI
search .............................................. 62
Entering ........................................... 61
Selecting .......................................... 63
Previous destinations (navigation) .... 82
Q
Quick access for audio and tele-
phone
Changing the audio source .............. 26
Changing the station/music
track ................................................ 25
Sending DTMF tones ........................ 26
R
RadioActivating/deactivating the sta-
tion presets display ....................... 141
Deleting a station .......................... 142
Displaying information ................... 143
Displaying station information ....... 143
Displaying the artist and track ....... 143
Overview ........................................ 140
Setting the waveband .................... 141
Sound settings (balance, bass,
treble) ............................................ 143
Storing stations ............................. 142
Switching on .................................. 140
Tagging music tracks (download-
ing/purchasing tracks from the
iTunes Store
®) ............................... 143
Radio station
Storing ........................................... 142
Read-aloud function
Automatic ........................................ 80
Read-aloud function for e-mails ....... 118
Reading out
Traffic reports on the route .............. 80
Real-time traffic reports ..................... 78
Rear Seat Entertainment System
Active COMAND source ................. 200
Adjusting sound settings ............... 192
Adjusting the brightness ................ 192
Adjusting the color ........................ 192
Adjusting the contrast ................... 192
AUX mode ...................................... 202
CD/DVD audio and MP3 mode ...... 193
Changing the batteries .................. 190
Changing the picture format .......... 192
Control menu ................................. 197
Cordless headphones .................... 189
DVD video mode ............................ 196
8Index
Page 188 of 206
Your multimediasyste mequipment
These operatin ginstruction sdescribe all th e
standar dan doptional equipment of your multi-
media system, as available at th etime of going
to press. Country-specifi cdifference sare pos -
sible. Bear in min dthat your vehicle may no t
feature all function sdescribed here. Thi salso
applies to safety-relevan tsystems an dfunc-
tions.
Read th einformation on qualifie dspecialis t
workshop sin th evehicle Operator's Manual.
Overview
Important safet ynotes
GWARNING
The CD/DVD drive is aclass 1lase rproduct.
If you ope nth ehousin gof th eCD/DVD drive,
there is aris kof exposure to invisible lase r
radiation .Thi slase rradiation could damage
your retina. There is aris kof injury.
Never ope nth ehousing. Always hav emain -
tenanc ean drepair wor kcarrie dout at aquali -
fie dspecialis tworkshop .
GWARNING
If objects suc has headphones/headset sor
external audio/video sources are no tsecure d
in th epassenger compartment, they can be
flun garound an dhit vehicle occupants .There
is aris kof injury, fo rexample in th eevent of
sudden braking or asudden change in direc -
tion .
Always stow these items or similar objects
carefully so that they canno tbe flun garound ,
fo rexample in alockable vehicle stowag e
compartment.
Equipment
Observ ethat arange of Rear Seat Entertain -
men tSystems are available fo rMercedes-Ben z
vehicles .In this Operator's Manual, th eRear
Seat Entertainmen tSyste mCode 86 4is used
fo rillustration purposes. If you hav e adifferen t
Rear Seat Entertainmen tSyste min your vehicle, please refer to th
emanufacturer's operatin g
instructions.
Component s
The Rear Seat Entertainmen tSyste mincludes :
Rtwoscreens fo rth erea rbehin dth efront-seat
head restraints
Rtw oremot econtrols
Rasingle drive (rear-compartmen tdrive)
RAU Xjack son bot hrea rscreens (AUX display)
an don th erear-compartmen tdrive (AUX
drive)
Rheadphone sfo reac hrea rscree n
Rtwoset sof cordless headphone s
186Overview
Rear Seat Entertainment System
Page 189 of 206
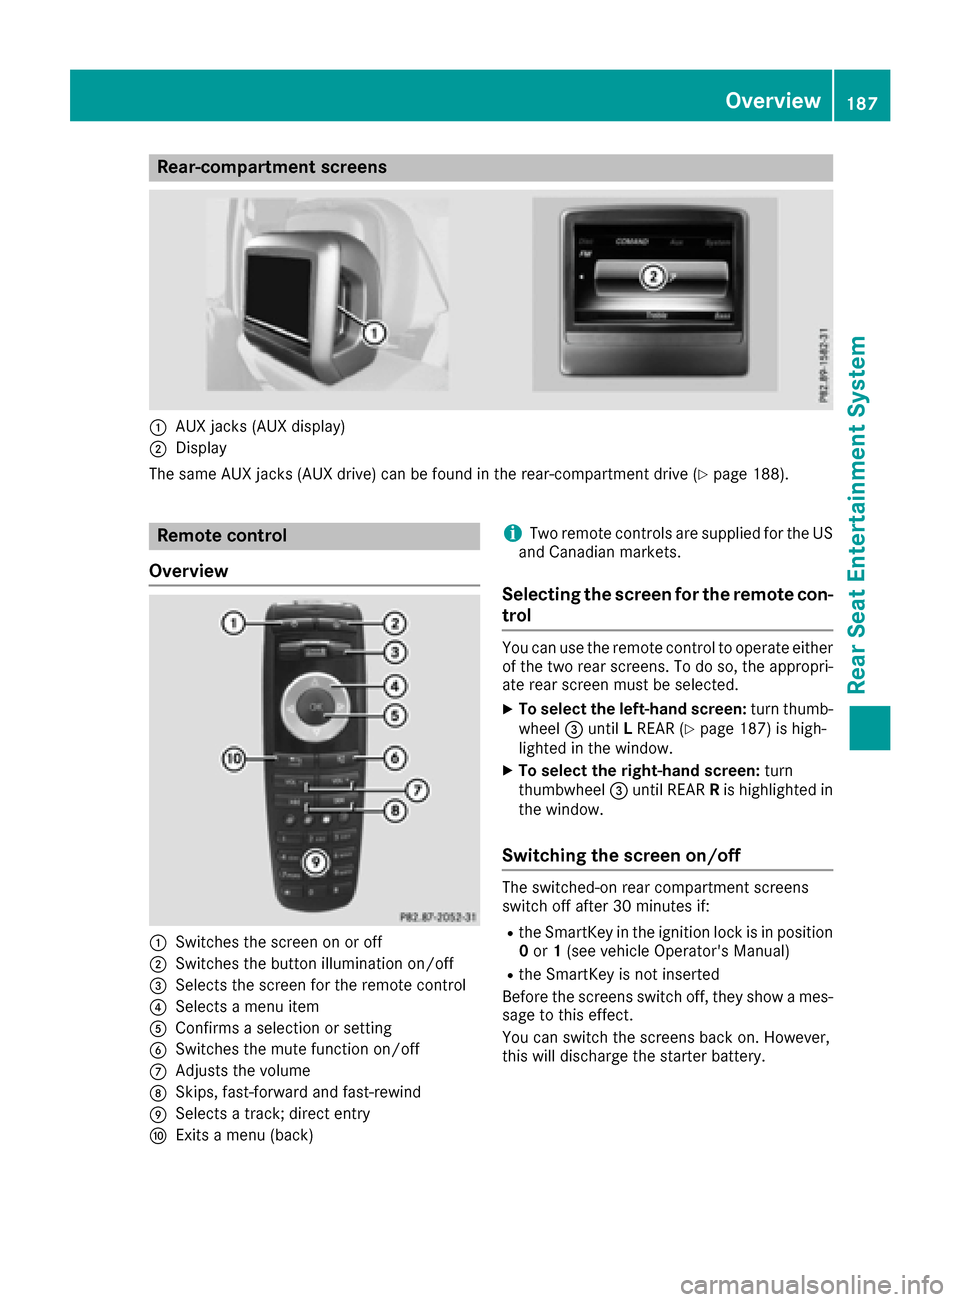
Rear-compartment screens
:AUX jacks (AUX display)
;Display
The same AUX jacks (AUX drive) can be found in the rear-compartment drive (
Ypage 188).
Remote control
Overview
:Switches the screen on or off
;Switches the button illumination on/off
=Selects the screen for the remote control
?Selects a menu item
AConfirms a selection or setting
BSwitches the mute function on/off
CAdjusts the volume
DSkips, fast-forward and fast-rewind
ESelects a track; direct entry
FExits a menu (back)
iTwo remote controls are supplied for the US
and Canadian markets.
Selecting the screen for the remote con-
trol
You can use the remote control to operate either
of the two rear screens. To do so, the appropri-
ate rear screen must be selected.
XTo select the left-hand screen: turn thumb-
wheel =until LREAR (Ypage 187) is high-
lighted in the window.
XTo select the right-hand screen: turn
thumbwheel =until REAR Ris highlighted in
the window.
Switching the screen on/off
The switched-on rear compartment screens
switch off after 30 minutes if:
Rthe SmartKey in the ignition lock is in position 0 or 1(see vehicle Operator's Manual)
Rthe SmartKey is not inserted
Before the screens switch off, they show a mes-
sage to this effect.
You can switch the screens back on. However,
this will discharge the starter battery.
Overview187
Rear Seat Entertainment System
Z
Page 190 of 206
XPoint the remote control at the rear-compart-ment screen which has been selected for
remote operation.
XPress button :on the remote control
(Ypage 187).
The rear screen switches on or off.
Switching the button lighting on/off
XPress button ;on the remote control
(Ypage 187).
Depending on the previous status, the button
lighting is switched on or off.
iIf you do not use the remote control for
about 15 seconds, the button lighting
switches off automatically.
Switching the sound on or off
XPress button Bon the remote control
(Ypage 187).
The sound is switched on/off.
Selecting a menu/menu item and con-
firming your selection
XSelect a menu item using the =;
9: buttons on the remote control and
press the 9button to confirm.
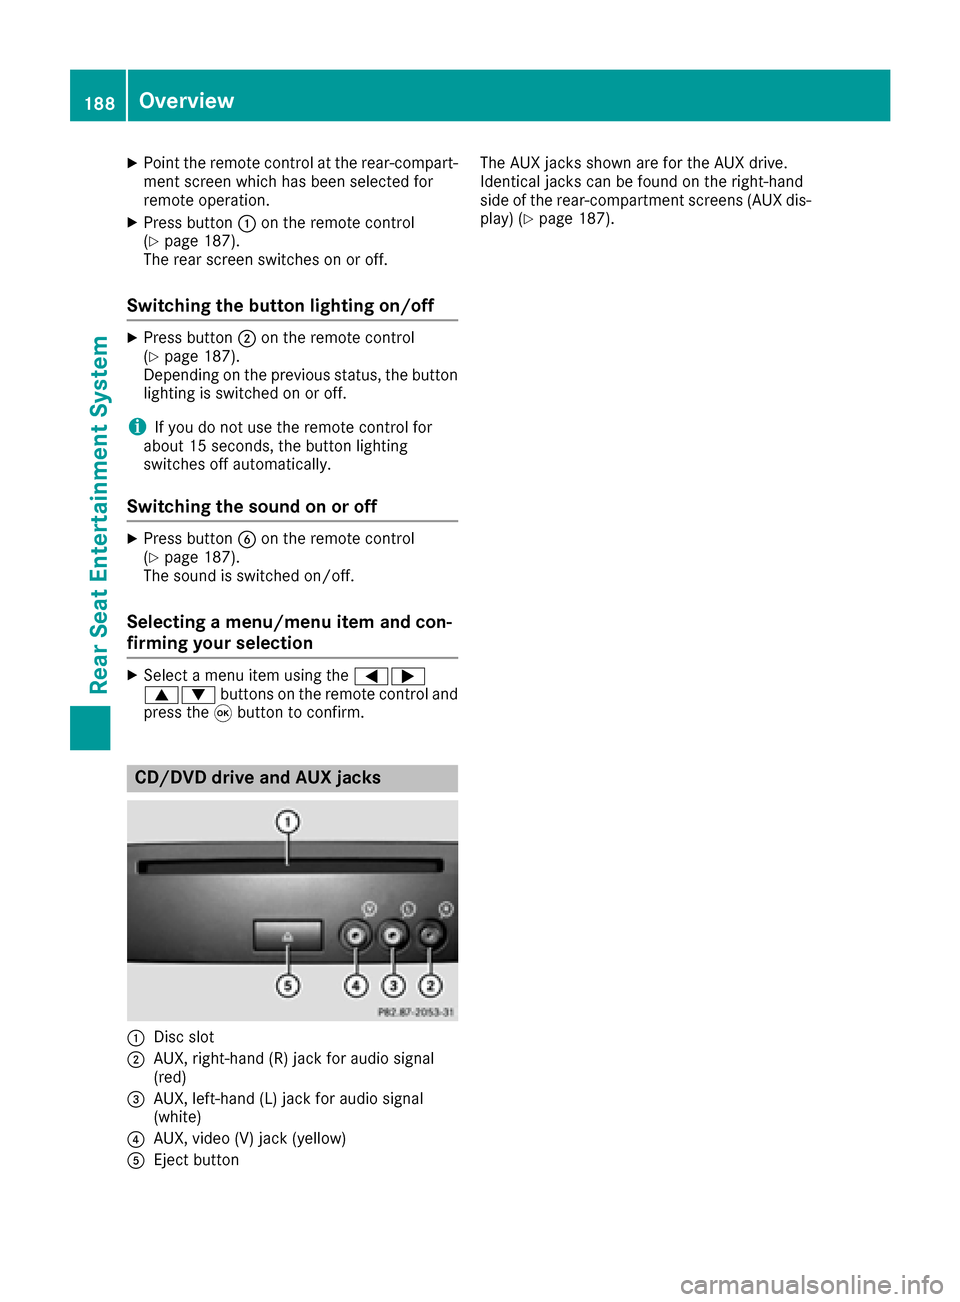
CD/DVD drive and AUX jacks
:Disc slot
;AUX, right-hand (R) jack for audio signal
(red)
=AUX, left-hand (L) jack for audio signal
(white)
?AUX, video (V) jack (yellow)
AEject button The AUX jacks shown are for the AUX drive.
Identical jacks can be found on the right-hand
side of the rear-compartment screens (AUX dis-
play) (
Ypage 187).
188Overview
Rear Seat Entertainment System
Page 194 of 206
Selecting sound settings
You can select sound settings in the following
operating modes:
RAudio CD/MP3
RVideo DVD
RRadio (active media source in COMAND)
RAUX
XSwitch on an operating mode (e.g. audio CD
mode) (Ypage 193).
XSelectTrebleorBassusing
the :=; buttons on the remote
control and press the 9button to confirm.
An adjustment scale appears.
XSelect a setting using the 9:buttons
and press the 9button to confirm.
Multiple users
Simultaneous use of the rear-compart-
ment disc drive
The two rear-compartment screens can be oper- ated almost entirely independently from one
another. However, a conflict may occur in some
menus if the two screens are used simultane-
ously.
The following functions affect both screens:
Rchanging playback options
Rselecting a track (from a track list or folder)
Rusing the play, pause and stop functions
Rfast forward and rewind or scrolling
Rcalling up the DVD menu and navigating
within it
Rsetting the language, subtitles and camera
angle
Rcalling up interactive DVD content
The following functions affect only one screen:
Rchanging audio and video functions as well as picture settings
Rswitching between full screen and the menu
Switching between operating modes
When you exit an operating mode (e.g. audio CD
mode), the current setting is saved. If you call up
this operating mode again later, there are two
possibilities:
Rthe operating mode has been changed on the
other screen.
Rthe operating mode has not been changed.
In the first case, the operating mode appears as it is on the other screen.
In the second case, the setting appears on the
screen as it was when you last exited the oper-
ating mode.
Picture settings
Overview
You can select the picture settings in video DVD and AUX mode (Ypage 202).
Adjusting the brightness, contrast and
color
XSwitch to video DVD mode (Ypage 196).
XTo show the menu: press the9button on
the remote control.
XSelect DVD-Videousing the :=;
buttons and press the 9button to confirm.
XSelect Brightness,Contrastor Colorusing the 9: buttons and press the 9
button to confirm.
A scale appears.
XSelect a setting using the 9:buttons
and press the 9button to confirm.
Changing the picture format
XTo show the menu: press the9button on
the remote control.
XSelect DVD-Videousing the :=;
buttons and press the 9button to confirm.
The dot in front of one of the menu items
Automatic
, 16:9 Optimized,4:3or Wide‐screenshows the currently set picture for-
mat.
XSelect a format using the 9:buttons
and press the 9button to confirm.
192Basic functions
Rear Seat Entertainment System
Page 204 of 206
DVD video mode functions
XTo hide amenu :confirm Menuwithth e9
button.
The video imag eis playe din full scree nmode.
Additional setting options:
XAdjust th ebrightness, contras tand color
(Ypage 192).
XChange th epicture format (Ypage 192).
XAdjust thesoun dsetting s (Ypage 192).
AUX mode
Introduction
You can connec texternal video source swit h a
soun dand video signal to th eRear Seat Enter-
tainmen tSystem:
Ron eexternal video source to eac hof th erea r
screens (AUX display)
Ron eexternal video source to th erear-com-
partmen tdis cdrive (AUX drive)
Operatin gth eexternal video source ;see th e
manufacturer's operatin ginstructions.
Fo rfurther details about external video sources,
please consult an authorized Mercedes-Ben z
Center.
Connecting AUX equipment
AUX drive jacks
The AU Xdrive jack sare located on th erear-
compartmen tdrive to th eright of th eþ
(
Ypage 188) button.
AUX display jacks
The AU Xdisplay jack sare on th esid eof th etw o
rea rscreens (Ypage 187).
Connecting audi oan dvideo cables
XInser tth eaudio plug sfo rth elef tand right
signal sinto th ecorrespondin gL and Rjacks.
XInser tth evideo plug into th eV jack .
Activating AUX mode
AUX drive
Requirements :th eexternal video source is con-
nected to th erear-compartmen tdrive and play-
bac kis selected.
XSelec tAuxin th emen uusin gth e
9=; buttons on theremot econ-
trol and press th e9 butto nto confirm .
The AU Xmen uappears .
XSelectSourcefrom th eAU Xmen uand press
th e9 butto nto confirm .
XSelectDis cDrive Auxand press th e9
butto nto confirm .
Playback starts. If an external video source
doe sno tprovid e avideo picture, an audio
men uappears .
Displaying AUX
Requirements :th eexternal video source is con-
nected to th erear-compartmen tscree nand
playback is selected.
XSelec t ascree nusin gth ethumbwhee lon th e
remot econtro l (Ypage 187) until "LREAR"
(left-han dscreen) or "RREAR" (right-hand
screen) is highlighted in th ewindow.
XSelec tAuxin th emen uusin gth e
9=; buttons on theremot econ-
trol and press th e9 butto nto confirm .
XSelectSourcefrom th eAU Xmen uand press
th e9 butto nto confirm .
XSelectDispla yAuxand press th e9 butto n
to confirm .
Playback starts. If an external video source
doe sno tprovid e avideo picture, an audio
men uappears .
Adjusting treble an dbass
XSelec tTrebleor Bas sin th eAU Xmen uand
press th e9 butto non th eremot econtro lto
confirm .
A scale appears .
XSelect asetting usin gth e9 or: but-
to nand press th e9 butto nto confirm .
202AUX mode
Rear Seat Entertainment System
Page 205 of 206
Adjusting the brightness, contrastor
color
XSelec tDispla yAuxor Dis cDrive Auxin
th eAU Xmen uand press th e9 butto nto
confirm .
XSelectBrightnes s,Contrastor Colorand
press th e9 butto nto confirm .
A scale appears.
XSelec t asetting usin gth e9 or: but-
to nand press th e9 butto nto confirm .
Changing the picture for mat
XSelec tDispla yAuxor Dis cDrive Auxin
th eAU Xmen uand press th e9 butto nto
confirm .
XSelectAutomatic,16: 9Optimized,4:3or
Widescree nusingth e9: buttons and
confirm wit h9 button.
The dot in fron tof th emen uitem indicates th e
currentl yselected pictur eformat .
AUX mode203
Rear Seat Entertainment System
Z