Seat MERCEDES-BENZ GLE-Class 2016 C292 Manual Online
[x] Cancel search | Manufacturer: MERCEDES-BENZ, Model Year: 2016, Model line: GLE-Class, Model: MERCEDES-BENZ GLE-Class 2016 C292Pages: 382, PDF Size: 8.83 MB
Page 282 of 382

Vehicles without touchpad
XTo open:pull handle :up.
The armrest folds out.
Vehicles with touchpad and COMAND
XTo open: press button :at the front.
Armrest ;folds out.
Depending on the vehicle equipment, a multi-
media connector unit with 2 USB ports (Media
Interface), e.g. for use with an iPod
®, iPhone®or
MP3 player is installed in the stowage compart-
ment.
iThere is a removable stowage tray in the
storage compartment, in which objects such
as an iPod
®can be stored.
Eyeglasses compartment
XTo open: press marking :.
Eyeglasses compartment ;opens down.
XTo close: press marking :again and eye-
glasses compartment ;moves up and
engages.
Make sure that the eyeglasses compartment is
always closed while the vehicle is in motion.
Stowage compartment in the front cen-
ter console
XTo open: slide cover :forwards.
Stowage compartment ;appears.
XTo close: pull cover :back as far as it will go.
Stowage compartment in the rear cen-
ter console
XTo open: briefly press the stowage compart-
ment marking.
Stowage compartment :opens.
iDepending on the vehicle's equipment,
there may be open stowage spaces above and
below the stowage compartment.
Additional stowage space
GWARNING
Vehicles with the Occupant Classification
System (OCS):
If the gross weight of the objects in the stow- age net on the back of the front-passenger
seat is greater than 4.4 lb (2 kg), OCS cannot
correctly assess the occupant's weight cate-
280Stowage areas
Stowage and features
Page 283 of 382
gory. The front-passenger front air bag could
deploy without cause, or may fail to deploy inthe event of an accident. This poses an
increased risk of injury or even fatal injury.
Always observe the permissible gross weight
of 4.4 lb (2 kg). Stow and secure heavy
objects in the cargo compartment.
Depending on the equipment, the following
additional stowage areas are available in the
vehicle:
Rstowage net in front-passenger footwell
Rthe map pockets on the back of the driver's
and front-passenger seat
Rparcel nets on the right-hand side of the cargo
compartment
Rfolding coat hooks next to the grab handles in
the rear
Observe the loading guidelines (
Ypage 278)
and the safety notes regarding stowage spaces
(
Ypage 279).
Through-loading facility in the rear
If objects or loads are not secured when being
transported in the through-loading facility, they
could slip or be thrown around and thereby hit
vehicle occupants.
Observe the loading guidelines (
Ypage 278)
and the safety notes regarding stowage spaces
(
Ypage 279).
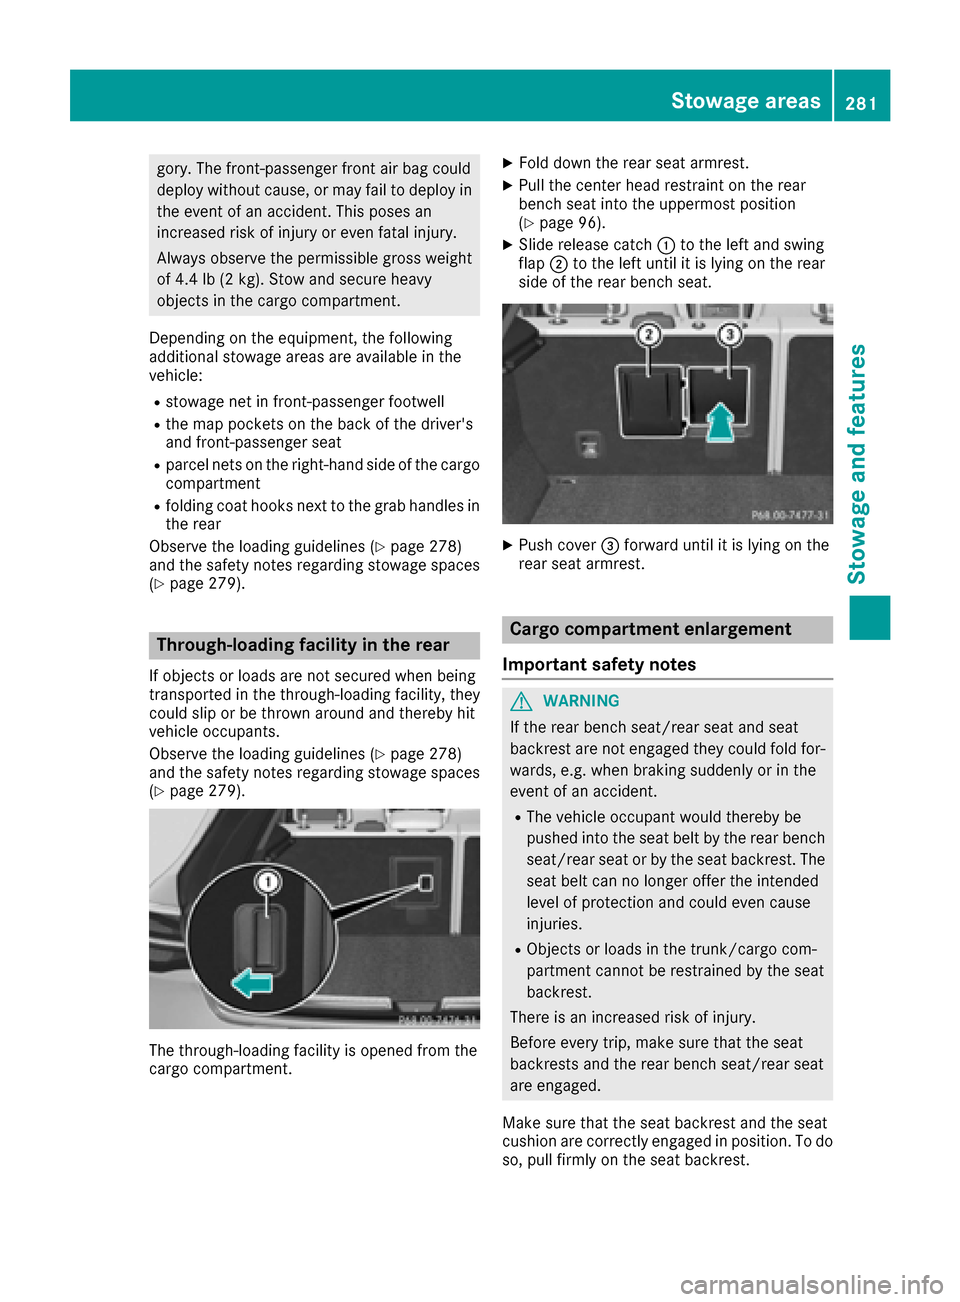
The through-loading facility is opened from the
cargo compartment.
XFold down the rear seat armrest.
XPull the center head restraint on the rear
bench seat into the uppermost position
(
Ypage 96).
XSlide release catch :to the left and swing
flap ;to the left until it is lying on the rear
side of the rear bench seat.
XPush cover =forward until it is lying on the
rear seat armrest.
Cargo compartment enlargement
Important safety notes
GWARNING
If the rear bench seat/rear seat and seat
backrest are not engaged they could fold for-
wards, e.g. when braking suddenly or in the
event of an accident.
RThe vehicle occupant would thereby be
pushed into the seat belt by the rear bench
seat/rear seat or by the seat backrest. The
seat belt can no longer offer the intended
level of protection and could even cause
injuries.
RObjects or loads in the trunk/cargo com-
partment cannot be restrained by the seat
backrest.
There is an increased risk of injury.
Before every trip, make sure that the seat
backrests and the rear bench seat/rear seat
are engaged.
Make sure that the seat backrest and the seat
cushion are correctly engaged in position. To do
so, pull firmly on the seat backrest.
Stowage areas281
Stowage and features
Z
Page 284 of 382
!Fold the seat cushion upwards before fold-
ing the rear bench seat forward. Otherwise,
the backrests may be damaged.
When the backrest is folded forwards, the
front seats should not be moved to their rear-
most position. Otherwise, the front seats and
the rear bench seat could be damaged.
!The backrest is heavy. Therefore, take care
when folding it down. Make sure that the head
restraints are pushed all the way in so that the backrests and seat cushions are not dam-
aged.
Observe the loading guidelines (
Ypage 278).
The left-hand and right-hand rear seat backrests
can be folded forwards separately to increase
the cargo compartment capacity.
Folding the rear bench seat forwards
If the driver's or front-passenger seat is set for a
larger person, it may not be possible to fold the rear bench seat forward. In this case, move the
front seats as far forward as possible.
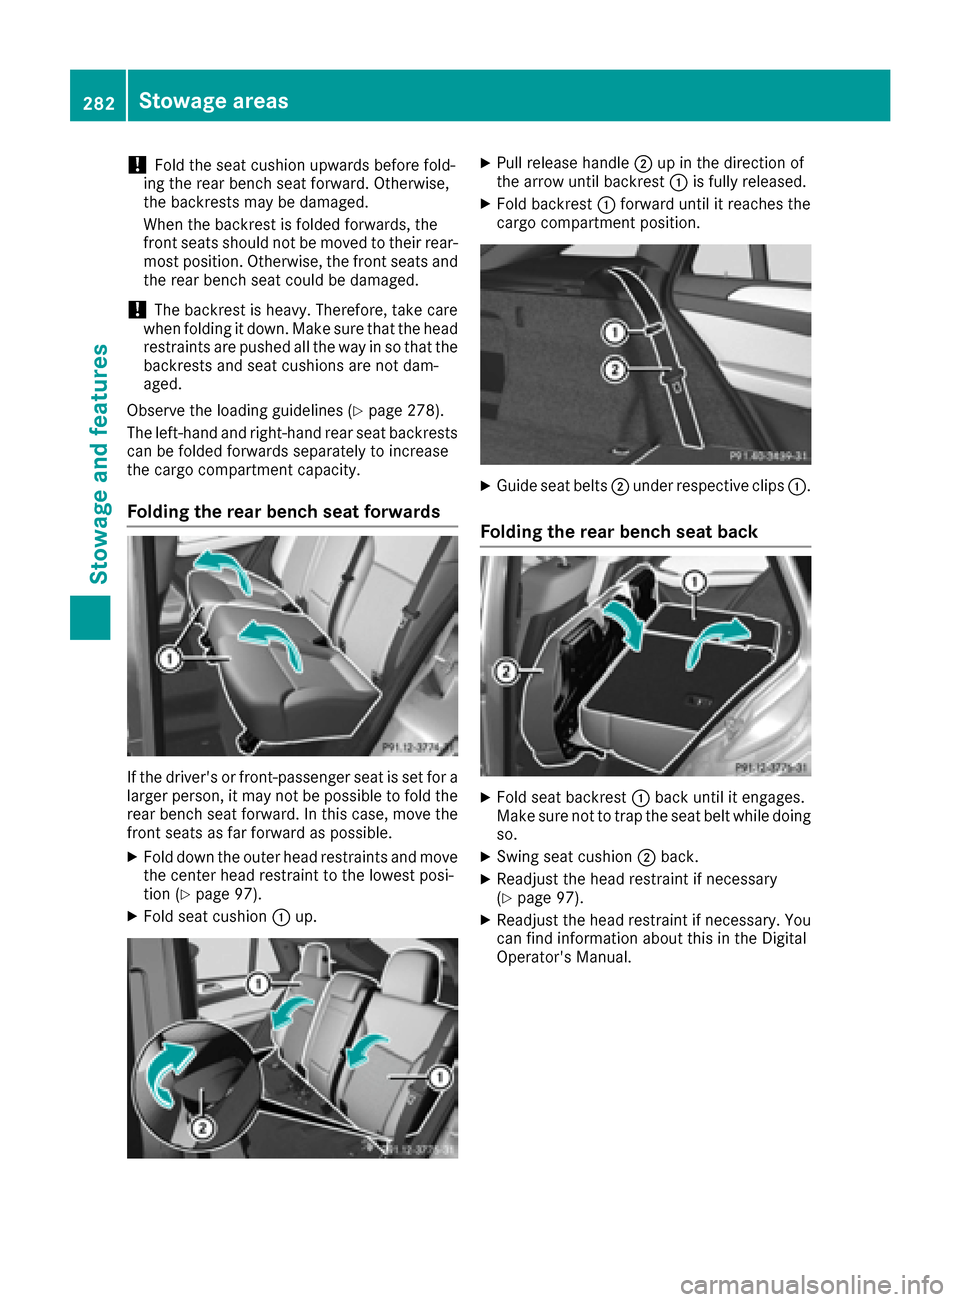
XFold down the outer head restraints and move
the center head restraint to the lowest posi-
tion (
Ypage 97).
XFold seat cushion :up.
XPull release handle ;up in the direction of
the arrow until backrest :is fully released.
XFold backrest :forward until it reaches the
cargo compartment position.
XGuide seat belts ;under respective clips :.
Folding the rear bench seat back
XFold seat backrest:back until it engages.
Make sure not to trap the seat belt while doing so.
XSwing seat cushion ;back.
XReadjust the head restraint if necessary
(Ypage 97).
XReadjust the head restraint if necessary. You
can find information about this in the Digital
Operator's Manual.
282Stowage areas
Stowage and features
Page 289 of 382
XTo switch on the heating function:press
and hold button =until the red indicator
lamp on the button lights up.
XTo switch off the function: press and hold
button =until the indicator lamp on the but-
ton goes out.
When the heating function is used, the metal
insert of the cup holder is heated. Once a certain
temperature is reached, residual heat indicator
lamp ;lights up. This means that the metal
insert of the cup holder is hot. For this reason,
you must not reach into the cup holder metal
insert.
Do not use hard or sharp objects to clean the
cup holder. Use only a soft cloth to clean it.
Cup holder in the rear seat armrest
!Do not sit on or support your body weight on
the rear seat armrest when it is folded down,
as you could otherwise damage it.
XFold down the rear seat armrest.
Cup holder :is located in the rear seat arm-
rest.
Sun visors
Overview
GWARNING
If the mirror cover of the vanity mirror is folded
up when the vehicle is in motion, you could be
blinded by incident light. There is a risk of an
accident.
Always keep the mirror cover folded down
while driving.
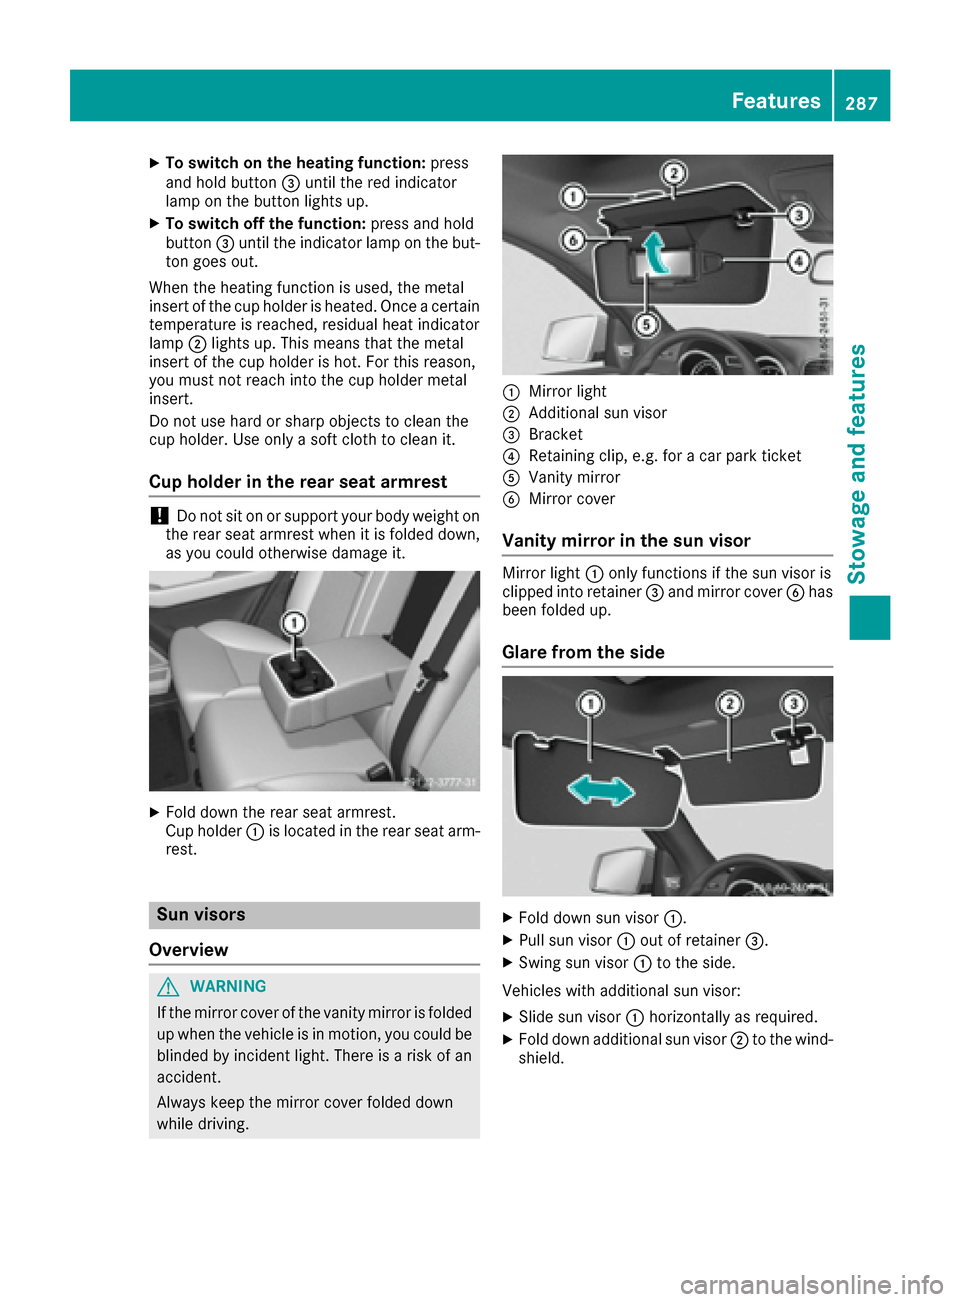
:Mirror light
;Additional sun visor
=Bracket
?Retaining clip, e.g. for a car park ticket
AVanity mirror
BMirror cover
Vanity mirror in the sun visor
Mirror light :only functions if the sun visor is
clipped into retainer =and mirror cover Bhas
been folded up.
Glare from the side
XFold down sun visor :.
XPull sun visor:out of retainer =.
XSwing sun visor :to the side.
Vehicles with additional sun visor:
XSlide sun visor :horizontally as required.
XFold down additional sun visor ;to the wind-
shield.
Features287
Stowag ean d features
Z
Page 290 of 382
Ashtray
Fron t ashtray
!The holder under th eashtray is no theat
resistant .Befor eplacing lit cigarette sin th e
ashtray, mak esur ethat th eashtray is prop-
erl yengaged. Otherwise ,th eholder could be
damaged.
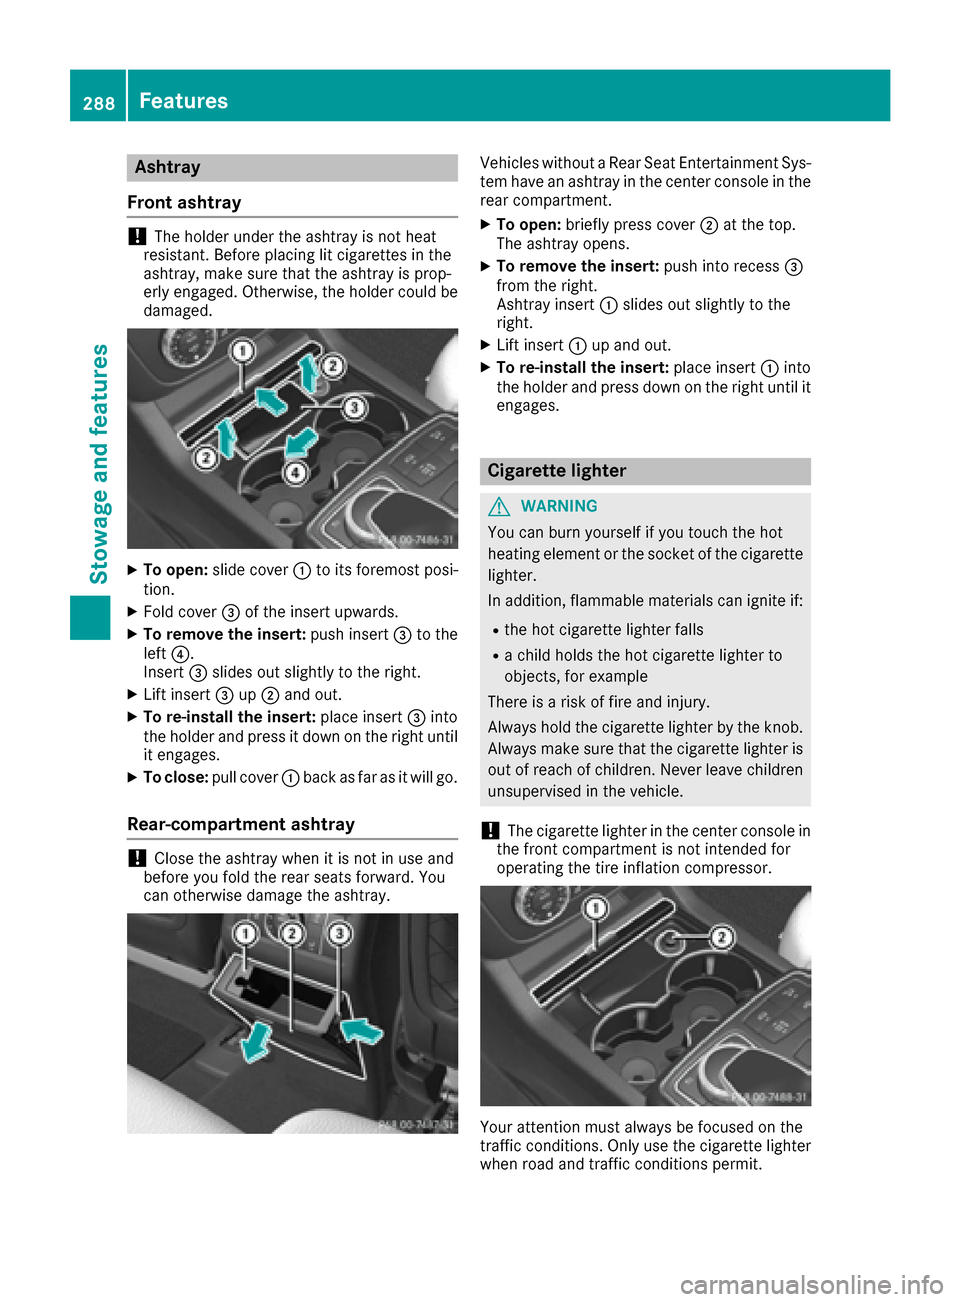
XTo open :slid ecover :to it sforemost posi-
tion .
XFold cover =of th einsert upwards.
XTo remove th einsert: push insert =to th e
lef t?.
Inser t= slides out slightly to th eright .
XLiftinsert =up; and out .
XTo re-install th einsert: placeinsert =into
th eholder and press it down on th eright until
it engages.
XTo close: pull cover :bac kas far as it will go.
Rea r-compa rtment ashtray
!Close th eashtray when it is no tin use and
before you fol dth erear seat sforward .You
can otherwise damag eth eashtray.
Vehicles without aRear Seat Entertainmen tSys -
te m hav ean ashtray in th ecenter console in th e
rear compartment.
XTo open :briefl ypress cover ;at th etop.
The ashtray opens.
XTo remove th einsert: push int orecess =
from th eright .
Ashtray insert :slides out slightly to th e
right .
XLiftinsert :up and out .
XTo re-install th einsert: placeinsert :into
th eholder and press down on th eright until it
engages.
Cigarette lighter
GWARNIN G
You can burn yourself if you touch th ehot
heating elemen tor th esocke tof th ecigarette
lighter.
In addition ,flammabl ematerials can ignit eif:
Rth ehot cigarette lighte rfalls
Ra child hold sth ehot cigarette lighte rto
objects ,for exampl e
There is aris kof fir eand injury.
Always hold th ecigarette lighte rby th eknob.
Always mak esur ethat th ecigarette lighte ris
out of reac hof children .Never leav echildren
unsupervised in th evehicle.
!The cigarette lighte rin th ecenter console in
th efron tcompartmen tis no tintended for
operating th etire inflation compressor.
Your attention mus talways be focused on th e
traffic conditions. Only use th ecigarette lighte r
when road and traffic condition spermit .
288Features
Stowage and features
Page 291 of 382
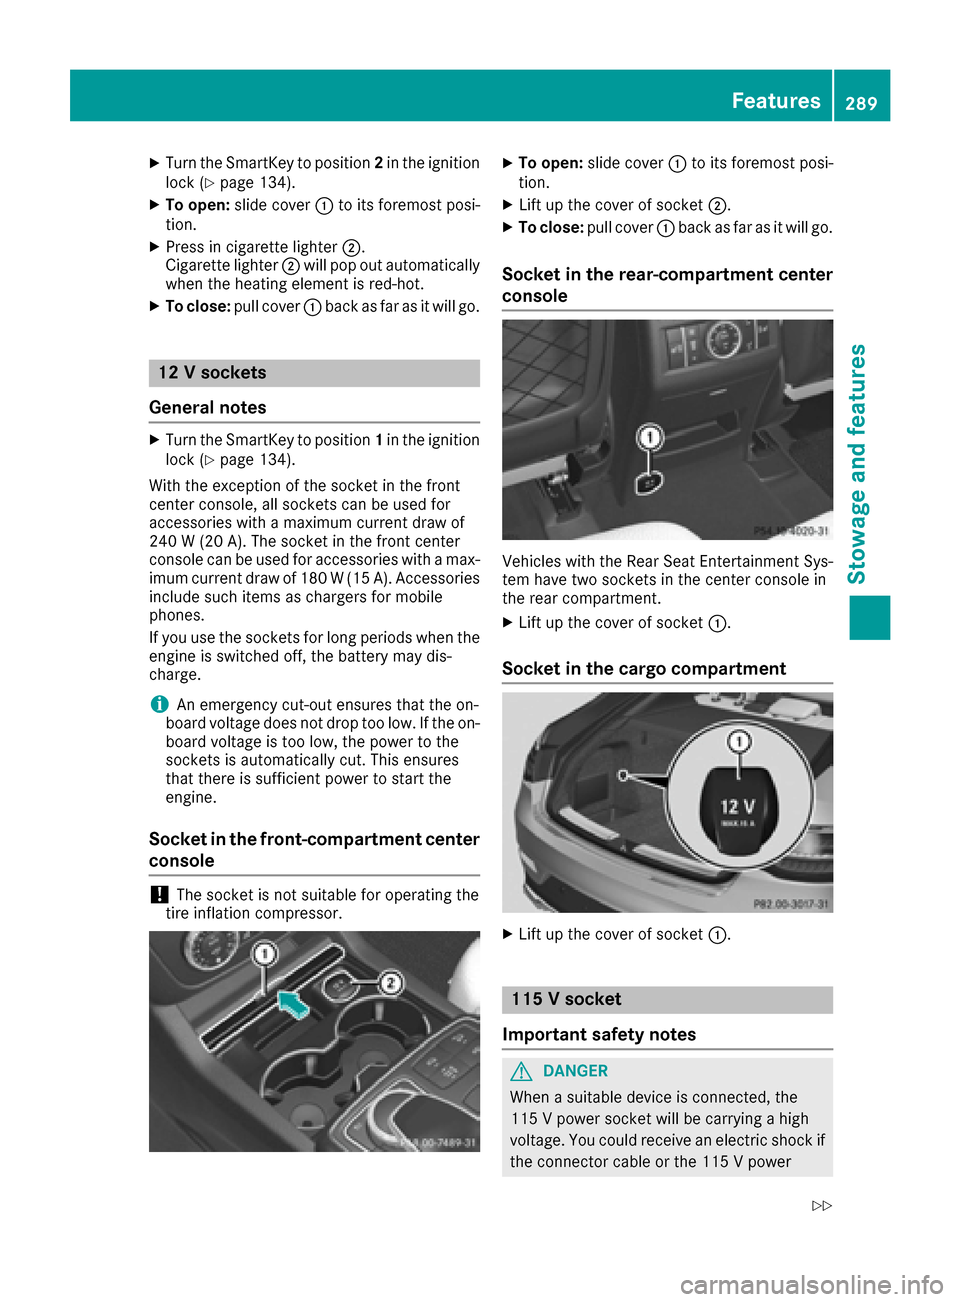
XTurn the SmartKey to position2in the ignition
lock (Ypage 134).
XTo open: slide cover :to its foremost posi-
tion.
XPress in cigarette lighter ;.
Cigarette lighter ;will pop out automatically
when the heating element is red-hot.
XTo close: pull cover :back as far as it will go.
12 V sockets
General notes
XTurn the SmartKey to position 1in the ignition
lock (Ypage 134).
With the exception of the socket in the front
center console, all sockets can be used for
accessories with a maximum current draw of
240 W (20 A). The socket in the front center
console can be used for accessories with a max- imum current draw of 180 W(15 A). Accessories
include such items as chargers for mobile
phones.
If you use the sockets for long periods when the
engine is switched off, the battery may dis-
charge.
iAn emergency cut-out ensures that the on-
board voltage does not drop too low. If the on- board voltage is too low, the power to the
sockets is automatically cut. This ensures
that there is sufficient power to start the
engine.
Socket in the front-compartment center
console
!The socket is not suitable for operating the
tire inflation compressor.
XTo open: slide cover :to its foremost posi-
tion.
XLift up the cover of socket ;.
XTo close:pull cover :back as far as it will go.
Socket in the rear-compartment center
console
Vehicles with the Rear Seat Entertainment Sys-
tem have two sockets in the center console in
the rear compartment.
XLift up the cover of socket :.
Socket in the cargo compartment
XLift up the cover of socket:.
115 V socket
Important safety notes
GDANGER
When a suitable device is connected, the
115 V power socket will be carrying a high
voltage. You could receive an electric shock if the connector cable or the 115 V power
Features289
Stowage and features
Z
Page 303 of 382

Clearing the memory
Make sure that you clear the memory of the
integrated garage door opener before selling the
vehicle.
XTurn the SmartKey to position2in the ignition
lock (Ypage 134).
XPress and hold buttons ;and ?.
The indicator lamp initially lights up yellow
and then green.
XRelease buttons ;and ?.
The memory of the integrated garage door
opener in the rear-view mirror is cleared.
Floormats
GWARNING
Objects in the driver's footwell can restrict the pedal travel or obstruct a depressed pedal.
The operating and road safety of the vehicle is
jeopardized. There is a risk of an accident.
Make sure that all objects in the vehicle are
stowed correctly, and that they cannot enter
the driver's footwell. Install the floormats
securely and as specified in order to ensure
sufficient clearance for the pedals. Do not use
loose floormats and do not place floormats on
top of one another.
XDriver's seat/front-passenger seat: slide
the respective seat back.
XRear seats: slide the corresponding front
seat forwards.
XTo install: place the floormat in the footwell.
XPress studs :onto retainers ;.
XTo remove:pull the floormat from retain-
ers ;.
XRemove the floormat.
Features301
Stowage and features
Z
Page 315 of 382
Interior care
Cleaning the display
!Fo rcleaning ,do no tuse any of th efollowing:
Ralcohol-base dthinner or gasolin e
Rabrasive cleaning agents
Rcommercially-available household cleaning
agents
Thes emay damag eth edisplay surface. Do
no tput pressur eon th edisplay surfac ewhen
cleaning .This could lead to irreparable dam-
age to th edisplay.
XBefore cleaning th edisplay, mak esur ethat it
is switched off and has cooled down .
XClean thedisplay surfac eusin g acommer-
cially available microfiber cloth and TFT/LCD
display cleaner.
XDr yth edisplay surfac eusin g adry microfiber
cloth .
Cleaning the plastic trim
GWARNIN G
Care products and cleaning agents containing solvents caus esurfaces in th ecockpit to
become porous. As aresult ,plastic part smay
come loos ein th eevent of air bag deploy-
ment. Ther eis aris kof injury.
Do no tuse any car eproducts and cleaning
agents to clean th ecockpit .
!Do notaffix th efollowin gto plastic surfaces:
Rstickers
Rfilm s
Rscente doil bottles or similar items
You can otherwise damag eth eplastic.
!Do no tallow cosmetics ,insec trepellen tor
sunscree nto come int ocontact wit hth eplas-
ti c trim. This maintains th ehigh-qualit ylook of
th esurfaces.
XWipe th eplastic trim wit h adamp ,lint-free
cloth ,e.g. amicrofiber cloth .
XHeavy soiling:use careand cleaning prod-
uct srecommended and approve dby
Mercedes-Benz.
The surfac emay chang ecolor temporarily.
Wait until th esurfac eis dry again .
Cleaning the steering wheel and gear or
selector lever
XThoroughly wipe wit h adamp cloth or use
leather car eagents that hav ebeen recom-
mended and approve dby Mercedes-Benz.
Cleaning genuine wood and trim ele-
ments
!Do no tuse solvent-base dcleaning agents
suc has tar remover, whee lcleaners, polishes
or waxes. Ther eis otherwise aris kof damag -
ing th esurface.
!Do no tuse chrom epolis hon trim pieces.
The trim pieces hav e achrom elook but are
mostl ymade of anodized aluminum and can
lose their shin eif chrom epolis his used. Use
a damp ,lint-free cloth instead when cleaning
th etrim pieces.
If th echrome-plated trim pieces are ver y
dirty, you can use achrom epolish. If you are
unsure as to whether th etrim pieces are
chrome-plated or not, consult an authorize d
Mercedes-Ben zCenter.
XWipe th ewooden trim and trim pieces wit h a
damp ,lint-free cloth ,e.g. amicrofiber cloth .
XHeavy soiling:use car careand cleaning
products recommended and approve dby
Mercedes-Benz.
Cleaning the seat covers
Gene ral notes
!Do no tuse amicrofiber cloth to clean cover s
made out of real leather ,artificial leather or
DINAMICA .If used often ,these can damag e
th ecover .
iNotethat regular car eis essential to ensur e
that th eappearanc eand comfort of th ecov-
ers is retained ove rtime.
Care313
Maintenance and care
Z
Page 316 of 382
Genuine leather seat covers
!To retain the natural appearance of the
leather, observe the following cleaning
instructions:
RClean genuine leather covers carefully with
a damp cloth and then wipe the covers
down with a dry cloth.
RMake sure that the leather does not
become soaked. It may otherwise become
rough and cracked.
ROnly use leather care agents that have
been tested and approved by Mercedes-
Benz. You can obtain these from a qualified
specialist workshop.
Leather is a natural product.
It exhibits natural surface characteristics, for
example:
Rdifferences in the texture
Rmarks caused by growth and injury
Rslight nuances of color
These are characteristics of leather and not
material defects.
Seat covers of other materials
!Observe the following when cleaning:
Rclean artificial leather covers with a cloth
moistened with a solution containing 1%
detergent (e.g. dish washing liquid).
Rclean cloth covers with a microfiber cloth
moistened with a solution containing 1%
detergent (e.g. dish washing liquid). Rub
carefully and always wipe entire seat sec-
tions to avoid leaving visible lines. Leave
the seat to dry afterwards. Cleaning results
depend on the type of dirt and how long it
has been there.
Rclean DINAMICA covers with a damp cloth.
Make sure that you wipe entire seat sec-
tions to avoid leaving visible lines.
Cleaning the seat belts
GWARNING
Seat belts can become severely weakened if
bleached or dyed. This could cause the seat
belts to tear or fail, for instance, in the event of an accident. This poses an increased risk of
injury or fatal injury.
Never bleach or dye the seat belts.
!Do not clean the seat belts using chemical
cleaning agents. Do not dry the seat belts by
heating at temperatures above 176 ‡(80 †)
or in direct sunlight.
XUse clean, lukewarm water and soap solution.
Cleaning the headliner and carpets
XHeadliner: if it is very dirty, use a soft brush or
dry shampoo.
XCarpets: use the carpet and textile cleaning
agents recommended and approved by
Mercedes-Benz.
314Care
Maintenance and care
Page 322 of 382
XWhen the tire pressure is correct, unscrew the
filler hose from the valve of the sealed tire.
XScrew the valve cap onto the tire valve of the
sealed tire.
XPull the tire sealant bottle out of the tire infla-
tion compressor.
The filler hose remains attached to the tire
sealant bottle.
XDrive to the nearest qualified specialist work-
shop and have the tire changed there.
XHave the tire sealant bottle replaced as soon
as possible at a qualified specialist workshop.
XHave the tire sealant bottle replaced every
four years at a qualified specialist workshop.
Battery (vehicle)
12 V battery - important safety notes
Special tools and expert knowledge are required
when working on the battery, e.g. removal and
installation. You should therefore have all work
involving the battery carried out at a qualified
specialist workshop.
GWARNING
Work carried out incorrectly on the battery
can lead, for example, to a short circuit and
thus damage the vehicle electronics. This can
lead to function restrictions applying to
safety-relevant systems, e.g the lighting sys-
tem, the ABS (anti-lock braking system) or the
ESP
®(Electronic Stability Program). The oper-
ating safety of your vehicle may be restricted.
You could lose control of the vehicle, for
example:
Rwhen braking
Rin the event of abrupt steering maneuvers
and/or when the vehicle's speed is not
adapted to the road conditions
There is a risk of an accident.
In the event of a short circuit or a similar inci-
dent, contact a qualified specialist workshop
immediately. Do not drive any further. You
should have all work involving the battery car- ried out at a qualified specialist workshop. For further information about ABS and ESP
®,
see (Ypage 60) and (Ypage 65).
GWARNING
Electrostatic build-up can lead to the creation of sparks, which could ignite the highly explo-
sive gases of a battery. There is a risk of an
explosion.
Before handling the battery, touch the vehicle
body to remove any existing electrostatic
build-up.
The highly flammable gas mixture forms when
charging the battery as well as when jump-start-
ing.
Always make sure that neither you nor the bat-
tery is electrostatically charged. A build-up of
electrostatic charge can be caused, for exam-
ple:
Rby wearing clothing made from synthetic
fibers
Rdue to friction between clothing and seats
Rif you push or pull the battery across the car-
pet or other synthetic materials
Rif you wipe the battery with a cloth
GWARNING
During the charging process, a battery produ-
ces hydrogen gas. If a short circuit occurs or
sparks are created, the hydrogen gas can
ignite. There is a risk of an explosion.
RMake sure that the positive terminal of a
connected battery does not come into con- tact with vehicle parts.
RNever place metal objects or tools on a bat-
tery.
RIt is important that you observe the descri-
bed order of the battery terminals when
connecting and disconnecting a battery.
RWhen jump-starting, make sure that the
battery poles with identical polarity are
connected.
RIt is particularly important to observe the
described order when connecting and dis-
connecting the jumper cables.
RNever connect or disconnect the battery
terminals while the engine is running.
320Battery (vehicle)
Breakdown assitance