interior lights MERCEDES-BENZ GLE-Class 2016 C292 Owner's Manual
[x] Cancel search | Manufacturer: MERCEDES-BENZ, Model Year: 2016, Model line: GLE-Class, Model: MERCEDES-BENZ GLE-Class 2016 C292Pages: 382, PDF Size: 8.83 MB
Page 7 of 382
Blind Spot AssistActivating/deactivating ................. 228
Display message ............................ 255
Notes/function .............................. 203
Trailer towing ................................. 205
see Active Blind Spot Assist
BlueTEC
Adding DEF .................................... 153
BlueTEC (DEF) .................................... 370
Brake fluid
Display message ............................ 240
Notes ............................................. 371
Brake force distribution
see EBD (electronic brake force
distribution)
Brake lamps
Display message ............................ 247
Brakes
ABS .................................................. 60
Adaptive Brake Assist ...................... 64
BAS .................................................. 61
BAS PLUS with Cross-Traffic
Assist ............................................... 61
Brake fluid (notes) ......................... 371
Display message ............................ 235
Important safety notes .................. 162
Maintenance .................................. 163
Parking brake ................................ 158
Riding tips ...................................... 162
Warning lamp ................................. 267
Breakdown
Where will I find...? ........................ 315
see Flat tire
see Towing away
Brightness control (instrument
cluster lighting) ................................... 31
C
California
Important notice for retail cus-
tomers and lessees .......................... 23
Calling up a malfunction
see Display messages
Care
360° camera ................................. 312
Car wash ........................................ 307
Carpets .......................................... 314 Display ........................................... 313
Exhaust pipe .................................. 312
Exterior lights ................................ 311
Gear or selector lever .................... 313
Interior ........................................... 313
Matte finish ................................... 309
Notes ............................................. 307
Paint .............................................. 309
Plastic trim .................................... 313
Power washer ................................ 309
Rear view camera .......................... 311
Roof lining ...................................... 314
Seat belt ........................................ 314
Seat cover ..................................... 313
Sensors ......................................... 311
Side running board ........................ 311
Steering wheel ............................... 313
Trim pieces .................................... 313
Washing by hand ........................... 308
Wheels ........................................... 310
Windows ........................................ 310
Wiper blades .................................. 310
Wooden trim .................................. 313
Cargo compartment enlargement
Important safety notes .................. 281
Cargo compartment floor
Important safety notes .................. 284
Opening/closing ............................ 284
Stowage well (under) ..................... 284
Cargo tie down rings ......................... 283
CD player (on-board computer) ........ 225
Center console
Lower section .................................. 35
Upper section .................................. 34
Central locking
Automatic locking (on-board com-puter) ............................................. 230
Locking/unlocking (SmartKey) ........ 72
Child
Restraint system .............................. 55
Child seat
Forward-facing restraint system ...... 58
LATCH-type (ISOFIX) child seat
anchors ............................................ 56
On the front-passenger seat ............ 57
Rearward-facing restraint system .... 58
Top Tether ....................................... 56
Index5
Page 13 of 382
Instrument clusterOverview .......................................... 31
Warning and indicator lamps .......... .32
Instrument cluster lighting .............. 219
Interior lighting
Automatic control .......................... 113
Emergency lighting ........................ 113
Manual control .............................. .113
Overview ........................................ 112
Reading lamp ................................. 112
J
Jack
Storage location ............................ 315
Using ............................................. 353
Jump starting (engine) ......................323
K
Key positions
SmartKey ....................................... 134
Start/Stop button .......................... 134
KEYLESS-GO
Convenience closing feature ............ 87
Deactivation ..................................... 73
Display message ............................ 264
Locking ............................................ 73
Start function ................................... 74
Starting the engine ........................ 136
Unlocking ......................................... 73
Kickdown
Driving tips ....................................1 46
Manual gearshifting ....................... 149
Knee bag .............................................. 44
L
Lamps
see Warning and indicator lamps
Lane Keeping Assist
Activating/deactivating ................. 228
Display message ............................ 255
Function/information .................... 205
see Active Lane Keeping Assist
Lap time (RACETIMER) ...................... 232
LATCH-type (ISOFIX) child seat
anchors ................................................ 56
Level control (display message) ...... 253License plate lamp (display mes-
sage)
................................................... 247
Light function, active
Display message ............................ 248
Light sensor (display message) ....... 248
Lights
Adaptive Highbeam Assist ............. 111
Automatic headlamp mode ............ 108
Cornering light function ................. 111
Hazard warning lamps ................... 110
High beam flasher .......................... 110
High-beam headlamps ................... 110
Light switch ................................... 108
Low-beam headlamps .................... 109
Parking lamps ................................ 109
Rear fog lamp ................................ 109
Standing lamps .............................. 109
Switching the daytime running
lamps on/off (on-board com-
puter) ............................................. 229
Turn signals ................................... 110
see Interior lighting
Loading guidelines ............................ 278
Locking
see Central locking
Locking (doors)
Automatic ........................................ 79
Emergency locking ........................... 80
From inside (central locking but-
ton) .................................................. 79
Locking centrally
see Central locking
Locking verification signal (on-
board computer) ............................... 230
Low-beam headlamps
Display message ............................ 246
Switching on/off ........................... 109
Lumbar support
Adjusting (on the seat) ..................... 98
Luxury head restraints ....................... 97
M
M+S tires............................................ 332
Malfunction message
see Display messages
Matte finish (cleaning instruc-
tions) .................................................. 309
Index11
Page 49 of 382
protective function. A person in the front-
passenger seat could then, for example, come
into contact with the vehicle's interior, espe-
cially if the person is sitting too close to the
dashboard. This poses an increased risk of
injury or even fatal injury.
When the front-passenger seat is occupied,
always ensure that:
Rthe classification of the person in the front-passenger seat is correct and the front-
passenger front air bag is enabled or disa-
bled in accordance with the person in the
front-passenger seat
Rthe front-passenger seat has been moved
back as far back as possible.
Rthe person is seated correctly.
Make sure, both before and during the jour-
ney, that the status of the front-passenger
front air bag is correct.
GWARNING
If you secure a child in a rearward-facing child
restraint system on the front-passenger seat
and the PASSENGER AIR BAG ON indicator
lamp is lit up, the front-passenger front air bag may deploy in an accident. The child could be
struck by the air bag. This poses an increased
risk of injury or even fatal injury.
Make sure that the front-passenger front air
bag has been disabled. The PASSENGER AIR
BAG OFF indicator lamp must be lit.
If the PASSENGER AIR BAG OFF indicator lamp
remains off and/or the PASSENGER AIR BAG
ON indicator lamp is lit, do not fit a rearward-
facing child restraint system to the front-
passenger seat. For more information, see
"Problems with the Occupant Classification Sys-
tem (OCS)" (
Ypage 50).
GWARNING
If you secure a child in a forward-facing child
restraint system on the front-passenger seat
and you position the front-passenger seat too close to the dashboard, in the event of an
accident, the child could:
Rcome into contact with the vehicle's inte-
rior if the PASSENGER AIR BAG OFF indi-
cator lamp is lit, for example
Rbe struck by the air bag if the PASSENGER
AIR BAG ON is lit up
This poses an increased risk of injury or even fatal injury.
Move the front-passenger seat as far back as
possible. Always make sure that the shoulder belt strap is correctly routed from the vehicle
belt outlet to the shoulder belt guide on the
child restraint system. The shoulder belt strap
must be routed forwards and downwards
from the vehicle belt outlet. If necessary,
adjust the vehicle belt outlet and the front-
passenger seat accordingly. Always observe
the child restraint system manufacturer's
installation instructions.
If OCS detects that:
Rthe front-passenger seat is not occupied, the
PASSENGER AIR BAG OFF indicator lamp
lights up continuously after the system's self-
diagnosis test. This indicates that the front-
passenger front air bag is deactivated.
Rthe front-passenger seat is occupied by a
child aged up to twelve months in a standard
child restraint system, the PASSENGER AIR
BAG OFF indicator lamp lights up continu-
ously after the system's self-diagnosis test.
This indicates that the front-passenger front
air bag is deactivated.
In the case of a twelve-month-old child in a
standard child restraint system, the
PASSENGER AIR BAG ON indicator lamp may
light up continuously after the system's self-
diagnosis test. This indicates that the front-
passenger front air bag is activated. Catego-
rization is dependent on the type of child
restraint system and the stature of the child,
for example. In this case, always install t
he
child restraint system on a suitable rear seat.
Occupant safety47
Safety
Z
Page 50 of 382
Rthe front-passenger seat is occupied by a per-
son of smaller stature (e.g. a teenager or a
small adult), either the PASSENGER AIR BAG
ON or PASSENGER AIR BAG OFF indicator
lamp lights up continuously after the system's
self-diagnosis test depending on the catego-
rization.
-If the PASSENGER AIR BAG ON indicator
lamp is lit, position the front-passenger
seat as far back as possible. Alternatively, a
person of smaller stature can sit on a rear
seat.
-If the PASSENGER AIR BAG OFF indicator
lamp lights up, a person of smaller stature
should not sit on the front-passenger seat.
Rthe front-passenger seat is occupied by an
adult or a person of an appropriate size, the
PASSENGER AIR BAG ON indicator lamp
lights up continuously after the system's self-diagnosis test. This indicates that the front-
passenger front air bag is activated.
If children are traveling in the vehicle, be sure to
observe the notes on "Children in the vehicle"
(
Ypage 54).
If the OCS is malfunctioning, both the red 6
restraint system warning lamp in the instrument
cluster and the PASSENGER AIR BAG OFF indi-
cator lamp light up simultaneously. In this case,
the front-passenger air bag is deacti vated a
nd
does not deploy during an accident. Have the
system checked by qualified technicians as
soon as possible. Consult an authorized
Mercedes-Benz Center. Only have the front-
passenger seat repaired at an authorized
Mercedes-Benz Center.
If the front-passenger seat, the seat cover or the
seat cushion are damaged, have the necessary
repair work carried out at an authorized
Mercedes-Benz Center.
For safety reasons, Mercedes-Benz recom-
mends that you only use seat accessories that
have been approved by Mercedes-Benz.
If the driver's air bag deploys, this does not
mean that the front-passenger front air bag will
also deploy. The Occupant Classification Sys-
tem (OCS) categorizes the occupant on the
front-passenger seat. Depending on the result,
the front-passenger air bag is activated or deac-
tivated.
System self-test
GDANGER
If both the PASSENGER AIR BAG OFF and
PASSENGER AIR BAG ON indicator lamps do
not light up during the system self-test, the
system is malfunctioning. The front-
passenger front air bag might be triggered
unintentionally or might not be triggered at all
in the event of an accident with high deceler-
ation. This poses an increased risk of injury or
even fatal injury.
In this case the front-passenger seat may not
be used. Do not install a child restraint system
on the front-passenger seat. Have the Occu-
pant Classification System (OCS) checked
and repaired immediately at a qualified spe-
cialist workshop.
GDANGER
If the PASSENGER AIR BAG OFF indicator
lamp remains lit after the system self-test, the
front-passenger front air bag is disabled. It will
not be deployed in the event of an accident. In
this case, the front-passenger front air bag
cannot perform its intended protective func-
tion, e.g. when a person is seated in the front-
passenger seat.
That person could, for example, come into
contact with the vehicle's interior, especially
if the person is sitting too close to the dash-
board. This poses an increased risk of injury or
even fatal injury.
When the front-passenger seat is occupied,
always ensure that:
Rthe classification of the person in the front-
passenger seat is correct and the front-
passenger front air bag is enabled or disa-
bled in accordance with the person in the
front-passenger seat
Rthe person is seated properly with a cor-
rectly fastened seatbelt
Rthe front-passenger seat has been moved
back as far back as possible
If the PASSENGER AIR BAG OFF indicator
lamp remains lit when it should not, the front-
48Occupant safety
Safety
Page 114 of 382
activated regardless. There is a risk of an acci-dent.
Always carefully observe the traffic conditions
and switch off the high-beam headlamps in
good time.
Adaptive Highbeam Assist cannot take into
account road, weather or traffic conditions.
Adaptive Highbeam Assist is only an aid. You are responsible for adjusting the vehicle's lighting
to the prevailing light, visibility and traffic con-
ditions.
In particular, the detection of obstacles can be
restricted if there is:
Rpoor visibility, e.g. due to fog, heavy rain or
snow
Rdirt on the sensors or the sensors are
obscured
Switching Adaptive Highbeam Assist
on/off
XTo switch on: turn the light switch to Ã.
XPress the combination switch beyond the
pressure point in the direction of arrow :.
The _ indicator lamp in the multifunction
display lights up when it is dark and the light
sensor activates the low-beam headlamps.
If you are driving at speeds above approx-
imately 16 mph (25 km/h):
The headlamp range is set automatically
depending on the distance between the vehi-
cle and other road users.
If you are driving at speeds above approx-
imately 19 mph (30 km/h) and no other road
users have been detected:
The high-beam headlamps are switched on
automatically. The Kindicator lamp in the
instrument cluster also lights up.
If you are driving at speeds below approx-
imately 16 mph (25 km/h) or other road users
have been detected or the roads are ade-
quately lit:
The high-beam headlamps are switched off
automatically. The Kindicator lamp in the
instrument cluster goes out. The _indi- cator lamp in the multifunction display
remains lit.
XTo switch off:
move the combination switch
back to its normal position or move the light
switch to another position.
The _ indicator lamp in the multifunction
display goes out.
Headlamps fogged up on the inside
Certain climatic and physical conditions may
cause moisture to form in the headlamp. This
moisture does not affect the functionality of the
headlamp.
Interior lighting
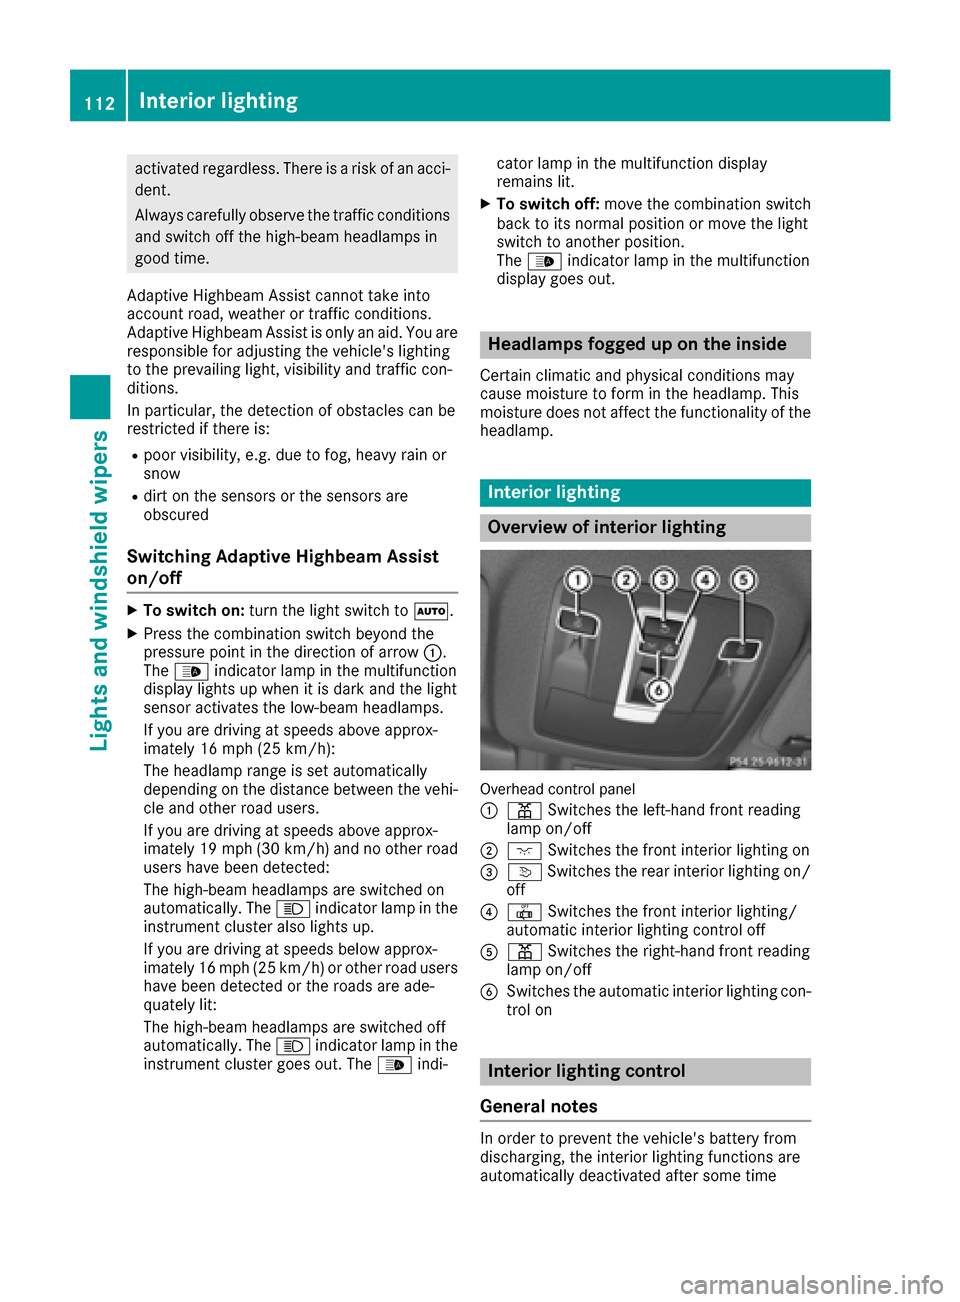
Overview of interior lighting
Overhead control panel
:
p Switches the left-hand front reading
lamp on/off
;c Switches the front interior lighting on
=vSwitches the rear interior lighting on/
off
?| Switches the front interior lighting/
automatic interior lighting control off
Ap Switches the right-hand front reading
lamp on/off
BSwitches the automatic interior lighting con-
trol on
Interior lighting control
General notes
In order to prevent the vehicle's battery from
discharging, the interior lighting functions are
automatically deactivated after some time
112Interior lighting
Lights and windshield wipers
Page 115 of 382
except when the SmartKey is in position2in the
ignition lock.
The color and brightness for the ambient lighting may be set via the multimedia system (see the
separate operating instructions).
Automatic interior lighting control
XTo switch on: set the switch to center posi-
tion B.
XTo switch off: set the switch to the |
position.
The interior lighting automatically switches on if
you:
Runlock the vehicle
Ropen a door
Rremove the SmartKey from the ignition lock
The interior light is activated for a short while
when the SmartKey is removed from the ignition
lock. This delayed switch-off can be adjusted via
the multimedia system (see the separate oper-
ating instructions).
Manual interior lighting control
XTo switch the front interior lighting on: set
the switch to the cposition.
XTo switch the front interior lighting off: set
the switch to the |position or (if the door
is closed) to the center position.
XTo switch the rear compartment interior
lighting on/off: press theubutton.
XTo switch the reading lamps on/off: press
the p button.
Crash-responsive emergency lighting
The interior lighting is activated automatically if
the vehicle is involved in an accident.
XTo switch off the crash-responsive emer-
gency lighting: press the hazard warning
lamp button.
or
XLock and then unlock the vehicle using the
SmartKey.
Replacing bulbs (vehicles with LED
headlamps)
The front and rear light clusters of your vehicle
are equipped with LED light bulbs. Do not
replace the bulbs yourself. Contact a qualified
specialist workshop which has the necessary
specialist knowledge and tools to carry out the
work required.
Lamps are an important aspect of vehicle safety.
You must therefore make sure that these func-
tion correctly at all times. Have the headlamp
setting checked regularly.
Windshield wipers
Switching the windshield wipers
on/off
!
Do not operate the windshield wipers when
the windshield is dry, as this could damage
the wiper blades. Moreover, dust that has col-
lected on the windshield can scratch the glass
if wiping takes place when the windshield is
dry.
If it is necessary to switch on the windshield
wipers in dry weather conditions, always use
washer fluid when operating the windshield
wipers.
!If the windshield wipers leave smears on the
windshield after the vehicle has been washed
in an automatic car wash, wax or other resi-
dues may be the reason for this. Clean the
windshield using washer fluid after washing
the vehicle in an automatic car wash.
!Intermittent wiping with rain sensor: due to
optical influences and the windshield becom-
ing dirty in dry weather conditions, the wind-
shield wipers may be activated inadvertently.
This could then damage the windshield wiper
blades or scratch the windshield.
For this reason, you should always switch off
the windshield wipers in dry weather.
Windshield wipers113
Lights and windshield wipers
Z
Page 126 of 382
Optimum use of 3-zone automatic cli-
mate control
The following contains instructions and recom-
mendations to enable you to get the most out of
your 3-zone automatic climate control.
RActivate climate control using theÃand
¿ buttons. The indicator lamps above the
à and¿ buttons light up.
RIn automatic mode, you can also use the ñ
button to set a climate mode (FOCUS/
MEDIUM/DIFFUSE). The MEDIUM level is
recommended.
RSet the temperature to 72 ‡ (22 †).
ROnly use the "Windshield defrosting" function
briefly until the windshield is clear again.
ROnly use air-recirculation mode briefly, e.g. if
there are unpleasant outside odors or when in
a tunnel. The windows could otherwise fog up, since no fresh air is drawn into the vehicle in
air-recirculation mode.
RUse the ZONE function to adopt the temper-
ature settings on the driver's side for the
front-passenger side and the rear compart-
ment as well. The indicator lamp above the
á button goes out.
RUse the residual heat function if you want to
heat or ventilate the vehicle interior when the
ignition is switched off. The residual heat
function can only be activated or deactivated with the ignition switched off.
RIf you change the settings of the climate con-
trol system, the climate status display
appears for approximately three seconds at
the bottom of the screen in the multimedia
system display. You will see the current set-
tings of the various climate control functions.
During automatic engine switch-off, the climate
control system only operates at a reduced capa-
city. If you require the full climate control output,
you can switch off the ECO start/stop function
by pressing the ECO button (
Ypage 139).
Operating the climate control sys-
tems
Activating/deactivating climate con-
trol
General notes
When the climate control is switched off, the air
supply and air circulation are also switched off.
The windows could fog up. Therefore, switch off
climate control only briefly
iSwitch on climate control primarily using
the à button (Ypage 126).
In the rear compartment, you can also switch
climate control on and off using the Ãand
^ buttons.
Activating or deactivating
XTurn the SmartKey to position 2in the ignition
lock (Ypage 134).
XTo activate: press theÃbutton.
The indicator lamp in the Ãbutton lights
up. Airflow and air distribution are set to auto-
matic mode.
or
XPress the ^button.
The indicator lamp in the ^button goes
out. The previously selected settings are
restored.
XTo deactivate: press the^button.
The indicator lamp in the ^button lights
up.
Switching cooling with air dehumidi-
fication on/off
General notes
If you deactivate the "Cooling with air-dehumid-
ification" function, the air inside the vehicle will
not be cooled. The air inside the vehicle will also
not be dehumidified. The windows can fog up
more quickly. Therefore, only deactivate the
"Cooling with air-dehumidification" function
briefly.
The "Cooling with air dehumidification" function is only available when the engine is running. The
air inside the vehicle is cooled and dehumidified
according to the temperature selected.
124Operating the climate control systems
Climate control
Page 132 of 382
Problems with the rear window defroster
ProblemPossible causes/consequences andMSolutions
The rear window
defroster has deactiva-
ted prematurely or can-
not be activated.The battery has not been sufficiently charged.
XSwitch off any consumers that are not required, e.g. reading lamps,
interior lighting or the seat heating.
When the battery is sufficiently charged, the rear window defroster
can be activated again.
Switching air-recirculation mode
on/off
General notes
You can deactivate the flow of fresh air if
unpleasant odors are entering the vehicle from
outside. The air already inside the vehicle will
then be recirculated.
If you switch on air-recirculation mode, the win-
dows can fog up more quickly, in particular at
low temperatures. Only use air-recirculation
mode briefly to prevent the windows from fog-
ging up.
Switching on/off
XTurn the SmartKey to position 2in the ignition
lock (Ypage 134).
XTo activate: press thedbutton.
The indicator lamp in the dbutton lights
up.
iIn the event of high pollution levels (3-zone
automatic climate control only) or at high out-
side temperatures, air-recirculation mode is
automatically activated. When air-recircula-
tion mode is activated automatically, the indi-
cator lamp in the dbutton is not lit.
Outside air is added after about 30 minutes.
XTo deactivate: press thedbutton.
The indicator lamp in the dbutton goes
out.
iAir-recirculation mode deactivates auto-
matically:
Rafter approximately five minutes at outside
temperatures below approximately 41 ‡
(5 †)
Rafter approximately five minutes if cooling
with air dehumidification is deactivated
Rafter approximately 30 minutes at outside
temperatures above approximately 41 ‡ (5 †) if the "Cooling with air dehumidifi-
cation" function is activated
Switching the residual heat on or off
General notes
The residual heat function is only available on
vehicles for Canada.
It is possible to make use of the residual heat of
the engine to continue heating the stationary
vehicle for up to 30 minutesafter the engine has
been switched off. The heating time depends on
the set interior temperature.
Switching on/off
XTo activate: press theÌorÁ button.
The indicator lamp in the ÌorÁ button
lights up.
iThe blower will run at a low speed regardless
of the airflow setting.
iIf you activate the residual heat function at
high temperatures, only the ventilation will be
activated. The blower runs at medium speed.
XTo deactivate: press theÌorÁ but-
ton.
The indicator lamp in the ÌorÁ button
goes out.
Residual heat is deactivated automatically:
Rafter approximately 30 minutes
Rwhen the ignition is switched on
Rif the battery voltage drops
Ionization
Ionization is used to purify the air in the vehicle
interior and attain an improved interior climate.
130Operating the climate control systems
Climate control
Page 141 of 382
Mercedes-AMG vehicles:the ECO start/stop
function is only available in drive programs
Comfort andSlippery.
Automatic engine switch-off
If the vehicle is braked to a standstill in Dor N,
the ECO start/stop function switches off the
engine automatically.
The ECO start/stop function is operational
when:
Rthe indicator lamp in the ECO button is lit
green.
Rthe outside temperature is within the range
that is suitable for the system.
Rthe engine is at normal operating tempera-
ture.
Rthe set temperature for the vehicle interior
has been reached.
Rthe battery is sufficiently charged.
Rthe system detects that the windshield is not
fogged up when the air-conditioning system is switched on.
Rthe hood is closed.
Rthe driver's door is closed and the driver's
seat belt is fastened.
All of the vehicle's systems remain active when
the engine is stopped automatically.
The HOLD function can also be activated if the
engine has been switched off automatically. It is
then not necessary to continue applying the
brakes during the automatic stop phase. When
you depress the accelerator pedal, the engine
starts automatically and the braking effect of
the HOLD function is deactivated.
All vehicles (except Mercedes-AMG vehi-
cles): automatic engine switch-off can take
place a maximum of four times in a row (initial
stop, then three subsequent stops).
Mercedes-AMG vehicles: the number of con-
secutive automatic engine switch-offs is unlimi- ted.
Automatic engine start
The engine starts automatically if:
Ryou switch off the ECO start/stop function by
pressing the ECO button
Rin transmission position Dor Nthe brake
pedal is released and the HOLD function is not
active
Ryou depress the accelerator pedal
Ryou engage reverse gear R
Ryou move the transmission out of position P
Ryou switch to theSport PlusorSport drive
program (Mercedes-AMG vehicles)
Ryou activate manual gearshifting (Mercedes-
AMG vehicles)
Ryou unfasten your seat belt or open the driv-
er's door
Rthe vehicle starts to roll
Rthe brake system requires this
Rthe temperature in the vehicle interior devi-
ates from the set range
Rthe system detects moisture on the wind-
shield when the air-conditioning system is
switched on
Rthe battery's condition of charge is too low
Shifting the transmission to position Pdoes not
start the engine.
Deactivating or activating the ECO
start/stop function
All vehicles (except Mercedes-AMG vehi-
cles)
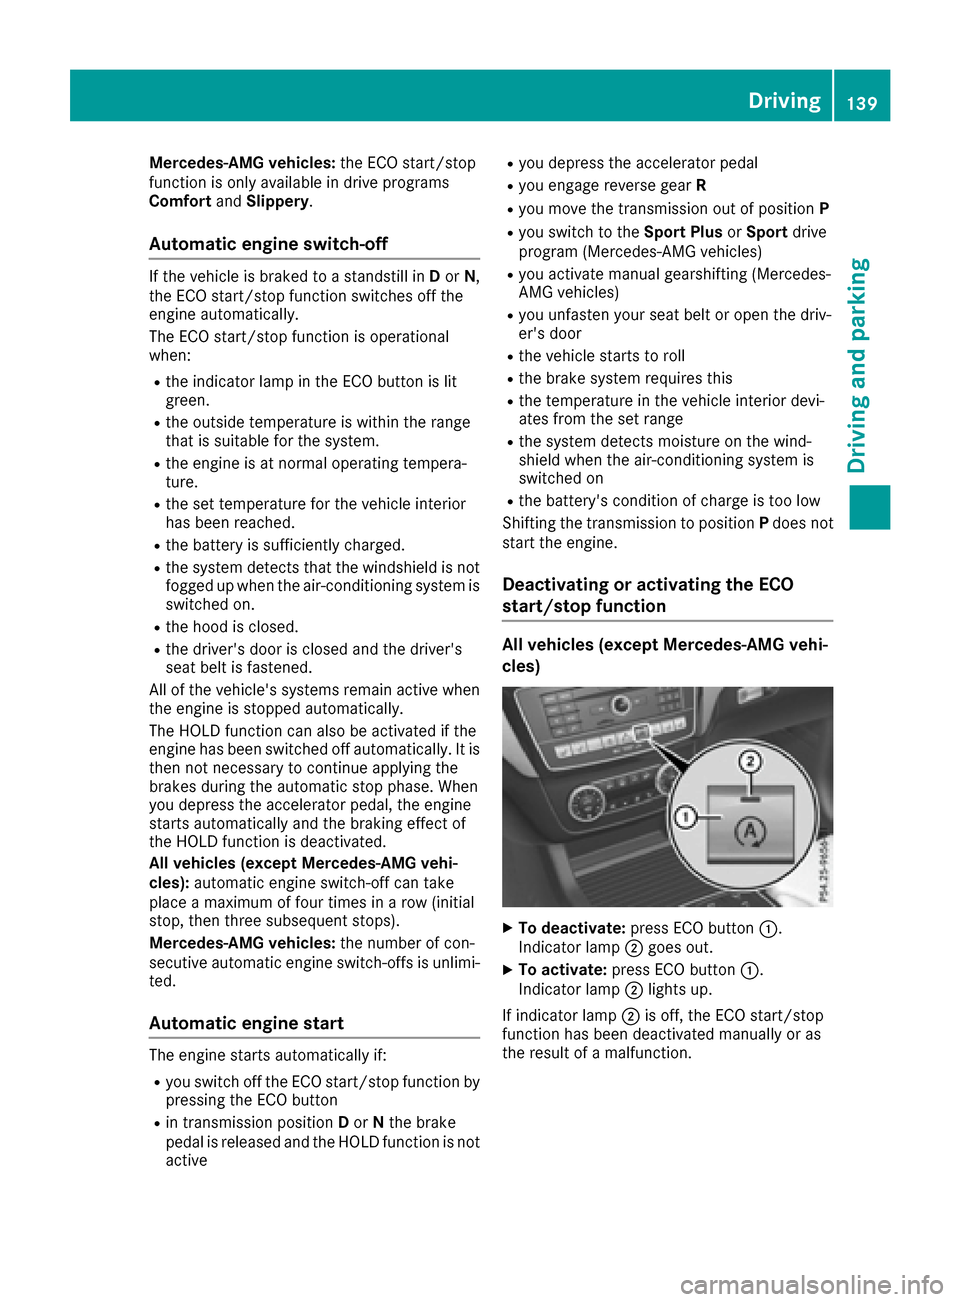
XTo deactivate: press ECO button :.
Indicator lamp ;goes out.
XTo activate: press ECO button :.
Indicator lamp ;lights up.
If indicator lamp ;is off, the ECO start/stop
function has been deactivated manually or as
the result of a malfunction.
Driving139
Driving and parking
Z
Page 165 of 382
Limited braking performance on salt-
treated roads
If you drive on salted roads, a layer of salt resi-
due may form on the brake discs and brake
pads. This can result in a significantly longer
braking distance.
RBrake occasionally to remove any possible
salt residue. Make sure that you do not
endanger other road users when doing so.
RCarefully depress the brake pedal and the
beginning and end of a journey.
RMaintain a greater distance to the vehicle
ahead.
Servicing the brakes
!The brake fluid level may be too low, if:
Rif the red brake warning lamp lights up in
the instrument cluster and
Ryou hear a warning tone while the engine is
running
Observe additional warning messages in the
multifunction display.
The brake fluid level may be too low due to
brake pad wear or leaking brake lines.
Have the brake system checked immediately. Consult a qualified specialist workshop to
arrange this.
!A function or performance test should only
be carried out on a 2-axle dynamometer. If
you wish to operate the vehicle on such a
dynamometer, please consult a qualified spe-
cialist workshop in advance. You could oth-
erwise damage the drive train or the brake
system.
!Because ESP®is an automatic system, the
engine and ignition must be switched off
(SmartKey in position 0or 1or Start/Stop
button in position 0or 1) when the electric
parking brake is being tested on a brake dyna-
mometer (maximum 10 seconds).
Braking triggered automatically by ESP
®may
seriously damage the brake system.
All checks and maintenance work on the brake
system must be carried out at a qualified spe-
cialist workshop.
Have brake pads installed and brake fluid
replaced at a qualified specialist workshop.
If the brake system has only been subject to
moderate loads, you should test the functional- ity of your brakes at regular intervals. To do so,
depress the brake
pedal f
irmly when driving at a
high speed. This improves the grip of the brake
pads.
You can find a description of Brake Assist (BAS) on (
Ypage 61) or of BAS PLUS on (Ypage 61).
Mercedes-Benz recommends that you only have
brake pads/linings installed on your vehicle
which have been approved for Mercedes-Benz
vehicles or which correspond to an equivalent
quality standard. Brake pads/linings which have
not been approved for Mercedes-Benz vehicles
or which are not of an equivalent quality could
affect your vehicle's operating safety.
Mercedes-Benz recommends that you only use
brake fluid that has been specially approved for
your vehicle by Mercedes-Benz, or which corre-
sponds to an equivalent quality standard. Brake
fluid which has not been approved for
Mercedes-Benz vehicles or which is not of an
equivalent quality could affect your vehicle's
operating safety.
Driving on wet roads
Hydroplaning
If water has accumulated to a certain depth on
the road surface, there is a danger of hydro-
planing occurring, even if:
Ryou drive at low speeds.
Rthe tires have adequate tread depth.
For this reason, in the event of heavy rain or in
conditions in which hydroplaning may occur,
you must drive in the following manner:
Rlower your speed.
Ravoid ruts.
Ravoid sudden steering movements.
Rbrake carefully.
Driving on flooded roads
!Do not drive through flooded areas. Check
the depth of any water before driving through
it. Drive slowly through standing water. Oth-
erwise, water may enter the vehicle interior or
the engine compartment. This can damage
the electronic components in the engine or
the automatic transmission. Water can also
be drawn in by the engine's air suction nozzles
and this can cause engine damage.
Driving tips163
Driving and parking
Z