remote start MERCEDES-BENZ GLE-Class 2016 C292 Owner's Manual
[x] Cancel search | Manufacturer: MERCEDES-BENZ, Model Year: 2016, Model line: GLE-Class, Model: MERCEDES-BENZ GLE-Class 2016 C292Pages: 382, PDF Size: 8.83 MB
Page 74 of 382

Useful information
i
This Operator's Manual describes all models
and all standard and optional equipment of
your vehicle available at the time of publica-
tion of the Operator's Manual. Country-spe-
cific differences are possible. Please note
that your vehicle may not be equipped with all
features described. This also applies to
safety-related systems and functions.
iRead the information on qualified specialist
workshops (Ypage 26).
SmartKey
Important safety notes
GWARNING
If children are left unsupervised in the vehicle,
they could:
Ropen the doors, thus endangering other
people or road users.
Rget out and disrupt traffic.
Roperate the vehicle's equipment.
Additionally, children could set the vehicle in
motion if, for example, they:
Rrelease the parking brake.
Rshifting the automatic transmission out of
park position P
RStart the engine.
There is a risk of an accident and injury.
When leaving the vehicle, always take the
SmartKey with you and lock the vehicle. Never
leave children or animals unattended in the
vehicle. Always keep the SmartKey out of
reach of children.
GWARNING
If you attach heavy or large objects to the
SmartKey, the SmartKey could be uninten-
tionally turned in the ignition lock. This could
cause the engine to be switched off. There is a risk of an accident.
Do not attach any heavy or large objects to theSmartKey. Remove any bulky key rings before
inserting the SmartKey into the ignition lock.
!Keep the SmartKey away from strong mag-
netic fields. Otherwise, the remote control
function could be affected.
Strong magnetic fields can occur in the vicin-
ity of powerful electrical installations.
Do not keep the SmartKey:
Rwith electronic devices, e.g. a mobile phone
or another SmartKey.
Rwith metallic objects, e.g. coins or metal foil.
Rinside metallic objects, e.g. a metal case.
This can affect the functionality of the Smart-
Key.
Do not keep the KEYLESS-GO or KEYLESS-GO
Start function key in the temperature-controlled
cup holder. Otherwise, the KEYLESS-GO or KEY-
LESS-GO Start function key will not be detected. Vehicles with KEYLESS-GO start function: do
not keep the SmartKey in the cargo compart-
ment. Otherwise, the SmartKey may not be
detected, e.g. when starting the engine using
the Start/Stop button.
SmartKey functions
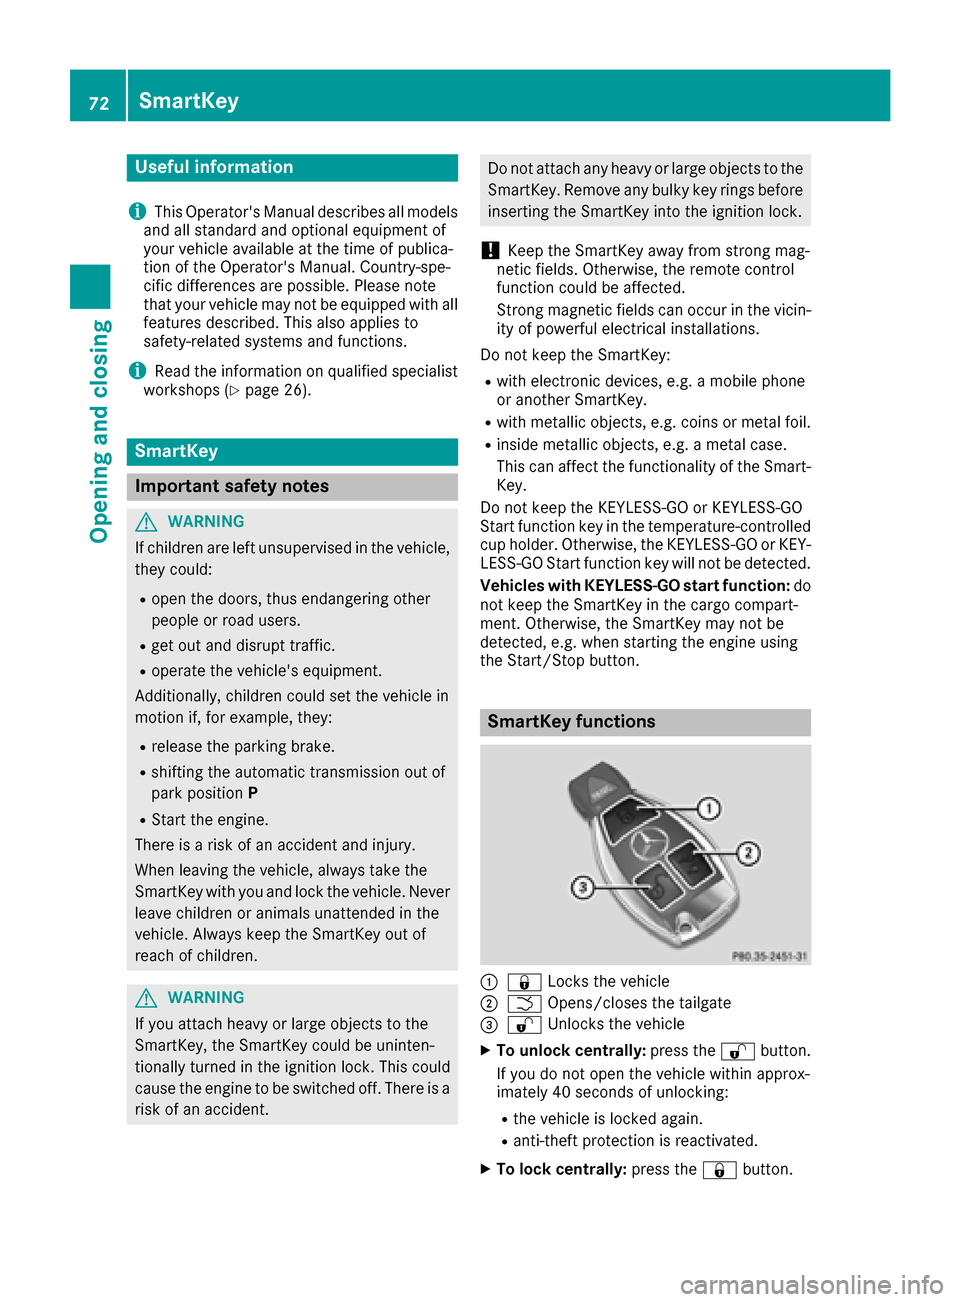
:& Locks the vehicle
;FOpens/closes the tailgate
=%Unlocks the vehicle
XTo unlock centrally: press the%button.
If you do not open the vehicle within approx-
imately 40 seconds of unlocking:
Rthe vehicle is locked again.
Ranti-theft protection is reactivated.
XTo lock centrally: press the&button.
72SmartKey
Opening and closing
Page 84 of 382

Tailgate reversing feature
The tailgate is equipped with automatic obstacledetection with reversing feature. If a solid object
blocks or restricts the tailgate when automati-
cally opening or closing, this procedure is stop-
ped. If the tailgate is stopped during the closing procedure, it will open again automatically. The
automatic obstacle recognition with reversing
feature is only an aid. It is not a substitute for
your attentiveness when opening and closing
the tailgate.
GWARNING
The reversing feature does not react:
Rto soft, light and thin objects, e.g. small fin-
gers
Rover the last 1/3 in (8 mm) of the closing
movement
This means that the reversing feature cannot
prevent someone being trapped in these sit-
uations. There is a risk of injury.
Make sure that no body parts are in close
proximity during the closing procedure.
If somebody becomes trapped:
Rpress the Fbutton on the SmartKey, or
Rpull or press the remote operating switch
on the driver's door or
Rpress the closing or locking button on the
tailgate or
Rpull the handle on the tailgate
Opening and closing manually from
outside
Opening
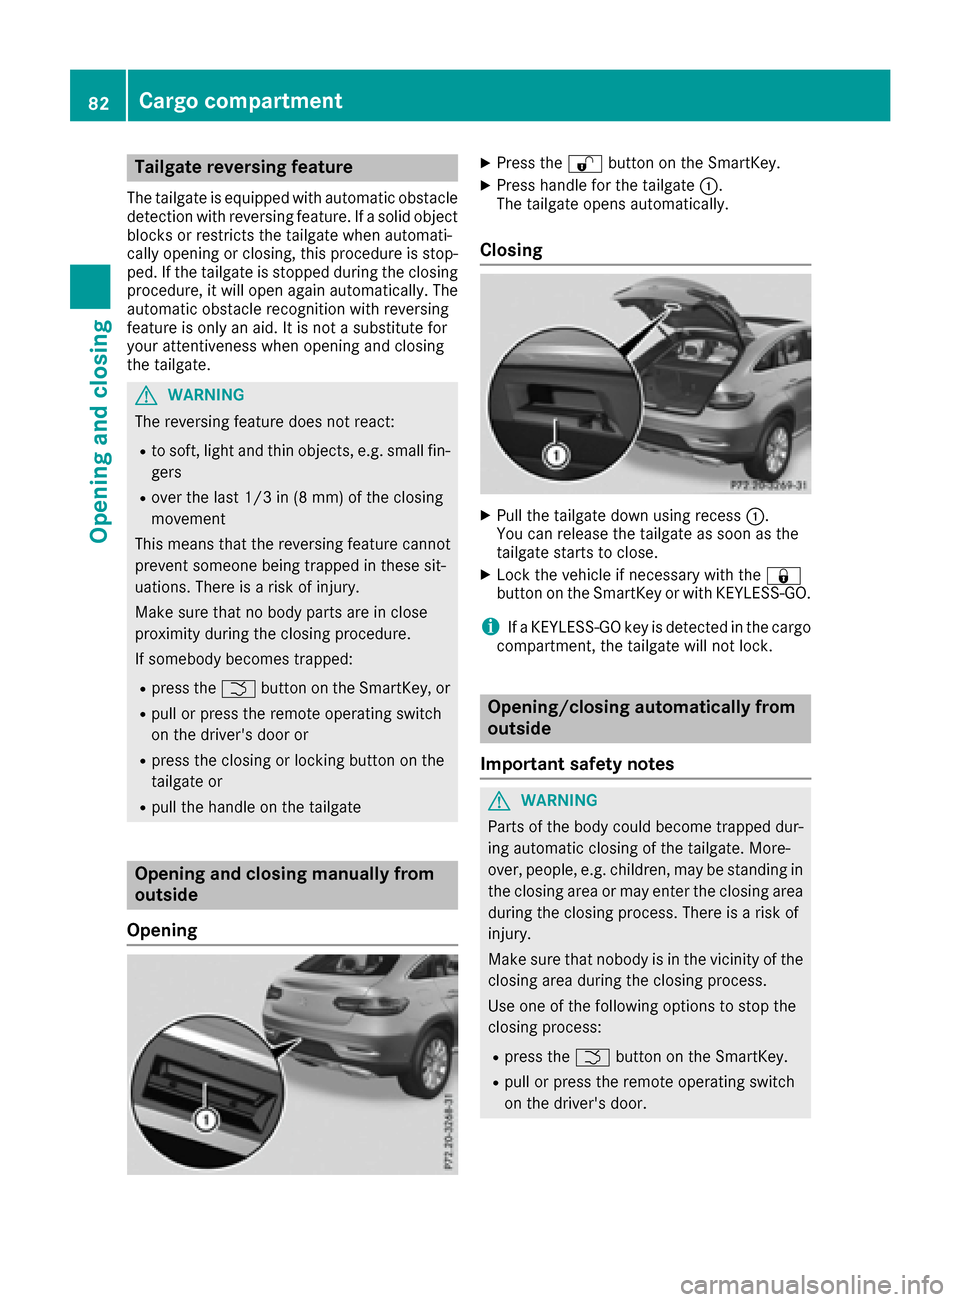
XPress the %button on the SmartKey.
XPress handle for the tailgate :.
The tailgate opens automatically.
Closing
XPull the tailgate down using recess :.
You can release the tailgate as soon as the
tailgate starts to close.
XLock the vehicle if necessary with the &
button on the SmartKey or with KEYLESS-GO.
iIf a KEYLESS-GO key is detected in the cargo
compartment, the tailgate will not lock.
Opening/closing automatically from
outside
Important safety notes
GWARNING
Parts of the body could become trapped dur-
ing automatic closing of the tailgate. More-
over, people, e.g. children, may be standing in the closing area or may enter the closing area
during the closing process. There is a risk of
injury.
Make sure that nobody is in the vicinity of the
closing area during the closing process.
Use one of the following options to stop the
closing process:
Rpress the Fbutton on the SmartKey.
Rpull or press the remote operating switch
on the driver's door.
82Cargo compartment
Opening and closing
Page 137 of 382

To start the vehicle without actively using the
SmartKey:
Rthe Start/Stop button must be inserted in the
ignition lock.
Rthe SmartKey must be in the vehicle.
Rthe vehicle must not be locked with the
SmartKey or KEYLESS-GO (Ypage 73).
Do not keep the SmartKey:
Rwith electronic devices, e.g. a mobile phone
or another SmartKey.
Rwith metallic objects, e.g. coins or metal foil.
Rinside metallic objects, e.g. a metal case.
This can affect the functionality of the Smart- Key.
Do not keep the SmartKey in the temperature-
controlled cup holder (
Ypage 286). Otherwise
the SmartKey will not be detected.
If you lock the vehicle with the SmartKey's
remote control or with KEYLESS-GO, after a
short time:
Ryou will not be able to switch on the ignition
with the Start/Stop button.
Ryou will not be able to start the engine with the
Start/Stop button until the vehicle is
unlocked again.
If you lock the vehicle centrally using the button
on the front door (
Ypage 79), you can continue
to start the engine with the Start/Stop button.
The engine can be switched off while the vehicle
is in motion by pressing and holding the Start/
Stop button for three seconds. This function
operates independently of the ECO start/stop
automatic engine switch-off function.
Key positions with the Start/Stop button
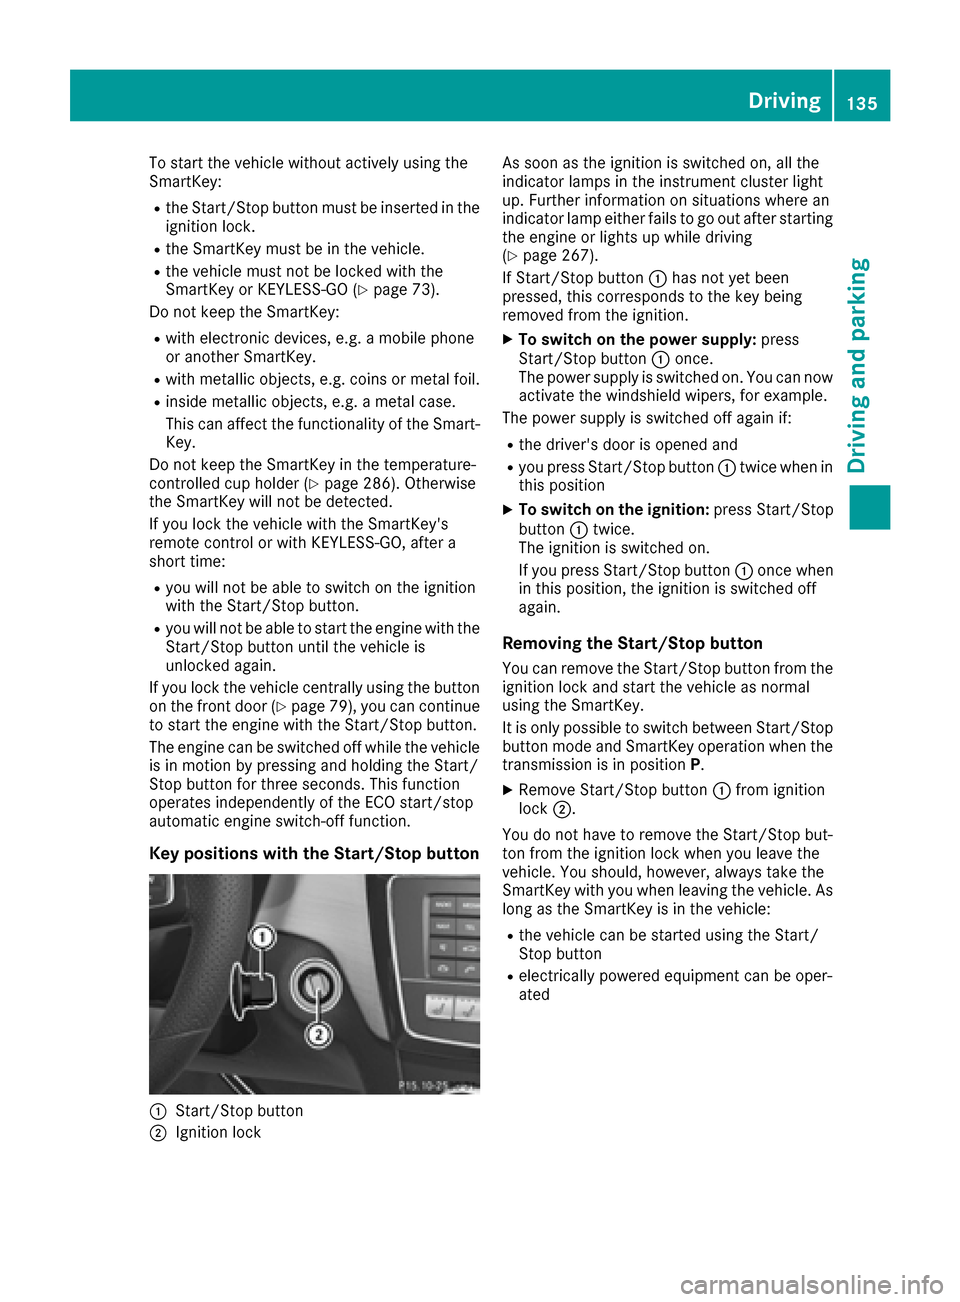
:Start/Stop button
;Ignition lock As soon as the ignition is switched on, all the
indicator lamps in the instrument cluster light
up. Further information on situations where an
indicator lamp either fails to go out after starting
the engine or lights up while driving
(
Ypage 267).
If Start/Stop button :has not yet been
pressed, this corresponds to the key being
removed from the ignition.
XTo switch on the power supply: press
Start/Stop button :once.
The power supply is switched on. You can now activate the windshield wipers, for example.
The power supply is switched off again if:
Rthe driver's door is opened and
Ryou press Start/Stop button :twice when in
this position
XTo switch on the ignition: press Start/Stop
button :twice.
The ignition is switched on.
If you press Start/Stop button :once when
in this position, the ignition is switched off
again.
Removing the Start/Stop button
You can remove the Start/Stop button from the
ignition lock and start the vehicle as normal
using the SmartKey.
It is only possible to switch between Start/Stop button mode and SmartKey operation when the
transmission is in position P.
XRemove Start/Stop button :from ignition
lock ;.
You do not have to remove the Start/Stop but-
ton from the ignition lock when you leave the
vehicle. You should, however, always take the
SmartKey with you when leaving the vehicle. As
long as the SmartKey is in the vehicle:
Rthe vehicle can be started using the Start/
Stop button
Relectrically powered equipment can be oper-
ated
Driving135
Driving and parking
Z
Page 301 of 382

Programming
Programming buttons
Pay attention to the "Important safety notes"
(Ypage 298).
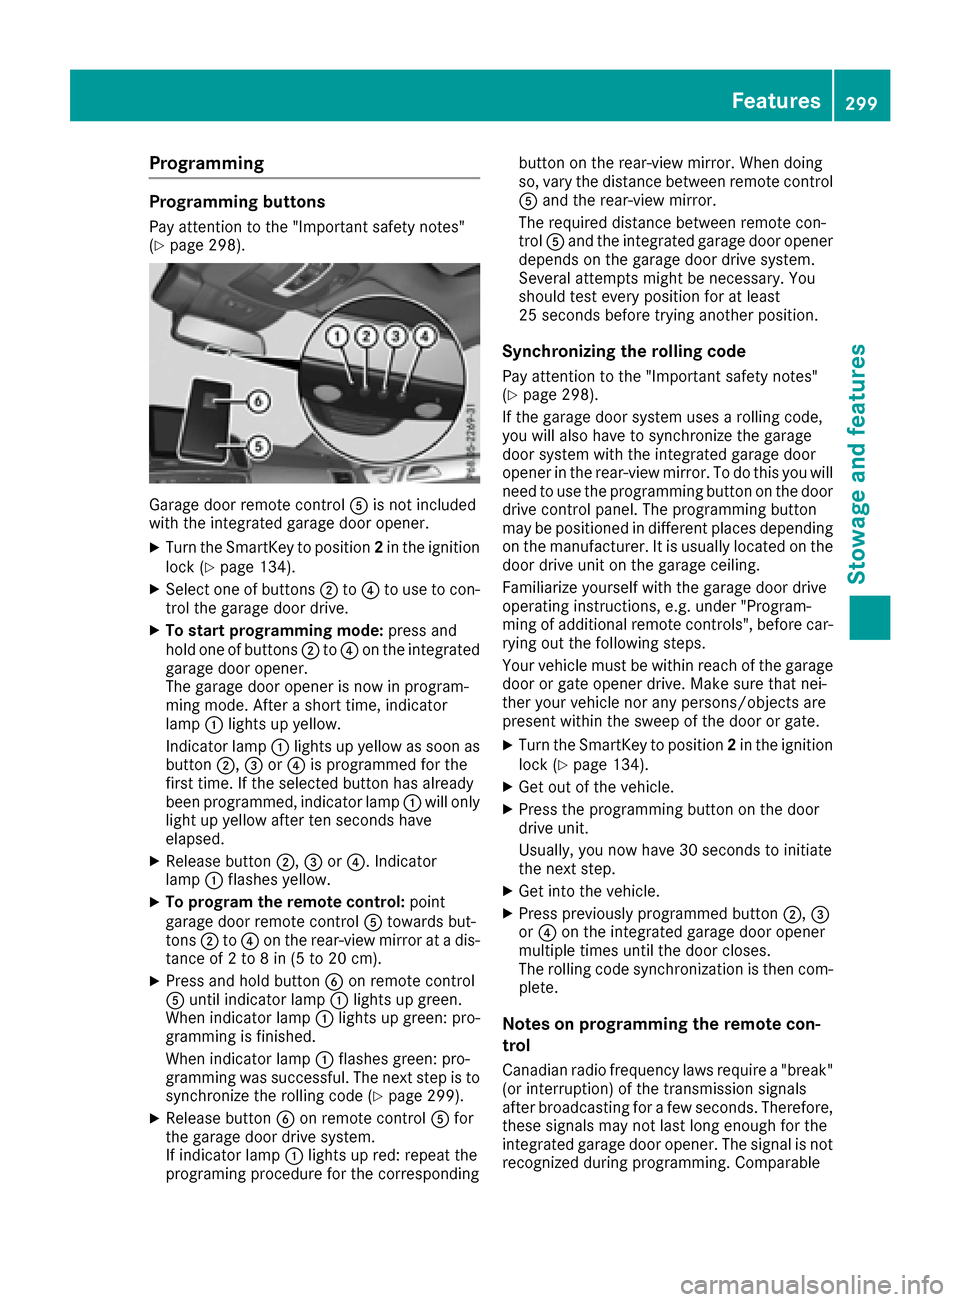
Garage door remote controlAis not included
with the integrated garage door opener.
XTurn the SmartKey to position 2in the ignition
lock (Ypage 134).
XSelect one of buttons ;to? to use to con-
trol the garage door drive.
XTo start programming mode: press and
hold one of buttons ;to? on the integrated
garage door opener.
The garage door opener is now in program-
ming mode. After a short time, indicator
lamp :lights up yellow.
Indicator lamp :lights up yellow as soon as
button ;,=or? is programmed for the
first time. If the selected button has already
been programmed, indicator lamp :will only
light up yellow after ten seconds have
elapsed.
XRelease button ;,=or?. Indicator
lamp :flashes yellow.
XTo program the remote control: point
garage door remote control Atowards but-
tons ;to? on the rear-view mirror at a dis-
tance of 2 to 8 in (5 to 20 cm).
XPress and hold button Bon remote control
A until indicator lamp :lights up green.
When indicator lamp :lights up green: pro-
gramming is finished.
When indicator lamp :flashes green: pro-
gramming was successful. The next step is to synchronize the rolling code (
Ypage 299).
XRelease button Bon remote control Afor
the garage door drive system.
If indicator lamp :lights up red: repeat the
programing procedure for the corresponding button on the rear-view mirror. When doing
so, vary the distance between remote control
A
and the rear-view mirror.
The required distance between remote con-
trol Aand the integrated garage door opener
depends on the garage door drive system.
Several attempts might be necessary. You
should test every position for at least
25 seconds before trying another position.
Synchronizing the rolling code
Pay attention to the "Important safety notes"
(Ypage 298).
If the garage door system uses a rolling code,
you will also have to synchronize the garage
door system with the integrated garage door
opener in the rear-view mirror. To do this you will
need to use the programming button on the door
drive control panel. The programming button
may be positioned in different places depending
on the manufact
urer. It is usually located on the
door drive unit on the garage ceiling.
Familiarize yourself with the garage door drive
operating instructions, e.g. under "Program-
ming of additional remote controls", before car-
rying out the following steps.
Your vehicle must be within reach of the garage
door or gate opener drive. Make sure that nei-
ther your vehicle nor any persons/objects are
present within the sweep of the door or gate.
XTurn the SmartKey to position 2in the ignition
lock (Ypage 134).
XGet out of the vehicle.
XPress the programming button on the door
drive unit.
Usually, you now have 30 seconds to initiate
the next step.
XGet into the vehicle.
XPress previously programmed button ;,=
or ? on the integrated garage door opener
multiple times until the door closes.
The rolling code synchronization is then com- plete.
Notes on programming the remote con-
trol
Canadian radio frequency laws require a "break"
(or interruption) of the transmission signals
after broadcasting for a few seconds. Therefore,
these signals may not last long enough for the
integrated garage door opener. The signal is not
recognized during programming. Comparable
Features299
Stowage and features
Z