sport mode MERCEDES-BENZ GLE-Class 2016 W218 User Guide
[x] Cancel search | Manufacturer: MERCEDES-BENZ, Model Year: 2016, Model line: GLE-Class, Model: MERCEDES-BENZ GLE-Class 2016 W218Pages: 450, PDF Size: 10.52 MB
Page 255 of 450

Highway driving
When driving on a highway, switching off the
combustion engine has a particularly positive
effect on fuel consumption and emissions.
If the driver removes his/her foot from the
accelerator pedal in theComfortdrive program
and a speed of 80 mph (130 km/h) is not excee-
ded, the combustion engine is automatically
switched off.
Further information on the automatic engine
switch-off (
Ypage 253).
ECO start/stop function
General notes
The ECO start/stop function switches the com-
bustion engine off automatically when the vehi-
cle stops moving and at speeds below 80 mph
(130 km/h) (
Ypage 253).
All vehicle systems remain active, e.g. the auto-
matic climate control.
The ECO start/stop function is neither available
in the Sport drive program nor during manual
shifting.
Automatic engine switch-off
The engine is switched off automatically, includ-
ing when:
Rthe driver removes his/her foot from the
accelerator in the Comfortdrive program and
a speed of 80 mph (130 km/h) is not excee-
ded (
Ypage 253)
Rthe engine has reached its operating temper-
ature
Rthe driver’s seat belt is fastened and the
driver’s door is closed
Rthe driver only slightly depresses the accel-
erator pedal in order to, for example, maintain
the current speed for a limited distance
Rthe hood is closed and engaged properly
Rthe high-voltage battery is charged suffi-
ciently
Rno malfunctions are present in the hybrid
drive system
The internal combustion engine will not be
switched off automatically, if:
Rthe self-diagnosis function of the engine man-
agement is active
Rthere is a malfunction in the hybrid drive sys-
tem
Rthe climate control of the vehicle requires it
Rthe high-voltage battery is being charged
(Ypage 248)
Automatic engine start
The automatically switched-off internal combus-
tion engine starts automatically in certain situa-
tions, if:
Rthe power demand from the driver via the
accelerator pedal is greater than the electric
motor alone can provide
Rthe driver switches to the Sportdrive pro-
gram or to manual gearshifting
Rthe condition of charge of the high-voltage
battery has reached the lower limit
Rthe driver has selected the CHARGE operating
mode
Overrun mode
In overrun mode, the combustion engine is
switched off and is disconnected from the drive
train. The electric motor:
Rgenerates low thrust, which corresponds to
the overrun mode of an active combustion
engine
Rfunctions as a generator and produces the
necessary energy for the auxiliary consumers and charges the high-voltage battery
Overrun mode is available in the Comfortdrive
program at speeds below 80 mph (130 km/h).
Route-based operating strategy
For the route-based operating strategy, the sys-
tem factors in information about the expected
route when route guidance is active.
The information on the route is provided by the
multimedia system and includes the following:
Rroad categories
Rspeed limitations
The use of electric energy is automatically opti-
mally distributed from the beginning to the end
of the journey, using information about the
route. The distribution is pre-emptive and takes
into consideration:
Rthe sections of the journey ahead
Rthe energy consumption on the whole route
PLUG-IN HYBRID operation253
Driving and parking
Z
Page 279 of 450
You can view the current settings of the off-road
programs in theON&OFFROADmenu.
RVehicles with the Off-Road Engineering pack-
age (Ypage 237)
RVehicles without the Offroad Engineering
package (Ypage 237)
AMG menu (Mercedes-AMG vehicles)
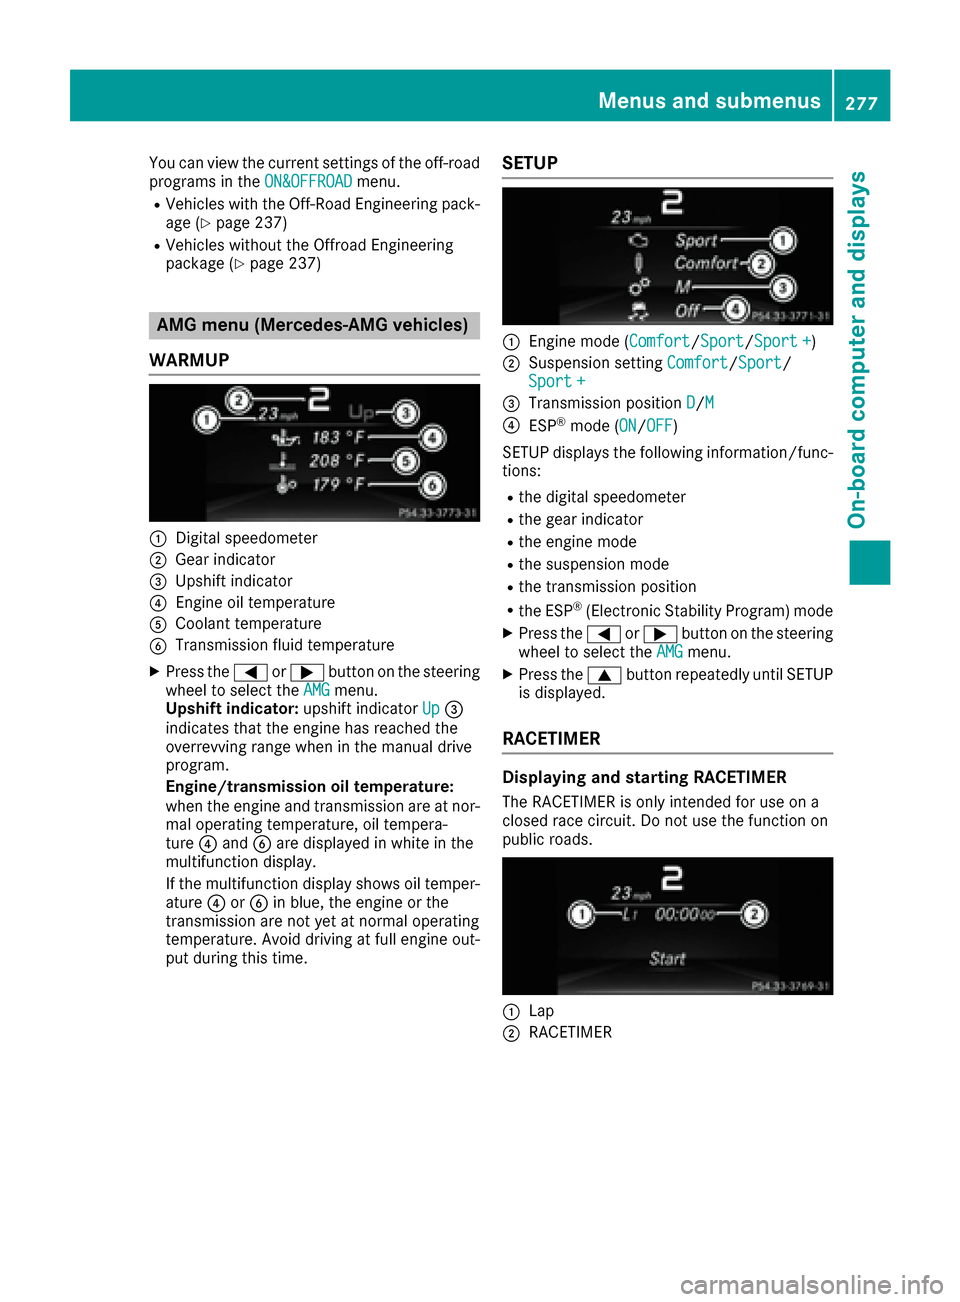
WARMUP
:Digital speedometer
;Gear indicator
=Upshift indicator
?Engine oil temperature
ACoolant temperature
BTransmission fluid temperature
XPress the =or; button on the steering
wheel to select the AMGmenu.
Upshift indicator: upshift indicatorUp=
indicates that the engine has reached the
overrevving range when in the manual drive
program.
Engine/transmission oil temperature:
when the engine and transmission are at nor- mal operating temperature, oil tempera-
ture ?and Bare displayed in white in the
multifunction display.
If the multifunction display shows oil temper-
ature ?orB in blue, the engine or the
transmission are not yet at normal operating
temperature. Avoid driving at full engine out-
put during this time.
SETUP
:Engine mode (Comfort/ Sport/Sport +)
;Suspension setting Comfort/Sport/
Sport+
=Transmission position D/M
?ESP®mode (ON/OFF)
SETUP displays the following information/func- tions:
Rthe digital speedometer
Rthe gear indicator
Rthe engine mode
Rthe suspension mode
Rthe transmission position
Rthe ESP®(Electronic Stability Program) mode
XPress the =or; button on the steering
wheel to select the AMGmenu.
XPress the9button repeatedly until SETUP
is displayed.
RACETIMER
Displaying and starting RACETIMER
The RACETIMER is only intended for use on a
closed race circuit. Do not use the function on
public roads.
:Lap
;RACETIMER
Menus and submenus277
On-board computer and displays
Z
Page 301 of 450

Hybrid drive system
Display messagesPossible causes/consequences andMSolutions
d
VehicleOperationalSwitchtheIgnitionOff Before Exiting
PLUG-IN HYBRID vehicles:
You are exiting the vehicle when it is in a ready-to-drive state. The
READY indicator in the multifunction display is on. A warning tone also
sounds.
If you leave the vehicle:
XSecure the vehicle against rolling away (Ypage 178).
XSwitch off the ignition and remove the SmartKey.
If you do not leave the vehicle:
XSwitch off the electrical consumers, e.g. automatic climate control,
seat heating.
Please note the following: the electrical consumers are supplied by the 12 V battery. If the vehicle is left in a ready-to-drive state for an exten-
ded period, it will switch off once the 12 V battery is almost empty. It
will then only be possible to start the vehicle using a second battery
(jump-starting).
Change the currentdrive programbeforechangingtheoperatingmodeorExit manualdrive program Mbeforechangingtheoperating mode
PLUG-IN HYBRID vehicles:
You have attempted to change the operating mode when in automatic
drive program Sport, Individual (with activated Sport characteristics)
or manual drive program M.
XSelect the Comfort, Slippery or Individual (with activated Comfort or
Eco characteristics) drive program (Ypage 152).
XSelect the preferred operating mode HYBRID,E-MODE,E-SAVE or
CHARGE (Ypage 246).
E-MODE CurrentlyUnavailable
PLUG-IN HYBRID vehicles:
The condition of charge of the high-voltage battery has dropped to the
lower limit and the E-MODEoperating mode has been switched off.
Driving with the internal combustion engine is activated and the oper-
ating mode switches to the basic HYBRIDsetting.
XContinue driving using the internal combustion engine.
You can switch to the E-SAVEorCHARGE operating mode as
required (
Ypage 246).
If you select CHARGE, the high-voltage battery is charged.
Once the charge level display for the high-voltage battery has
increased slightly, you can switch to the E-MODEoperating mode
again.
Display messages299
On-board computer and displays
Z
Page 302 of 450

Display messagesPossible causes/consequences andMSolutions
OnlyE-MODE Availa ‐ble Power Limite dRefuel Immediately
PLUG-INHYBRID vehicles:
The fuel tan khas been run dry and th ecombustion engin ehas been
switched off .
A warning tone also sounds.
The vehicl ewill be powered by electrical energ yonly. Performance is
restricted and th evehicl emay accelerate mor eslowly than normal.
XRefue lat th eneares tgas station without fail .
In th e"Total range and electric range" menu, you can display th e
approximat erange of th evehicl e (
Ypage 250).
Withou tstartingengine again, con ‐sultworkshop
You canno tstart th eengin eagain due to amalfunction .
A warning tone also sounds.
If th eengin eis running:
XVisit aqualified specialist workshop .
If you switch off th eengine:
XSecur eth evehicl eagainst rollin gaway (Ypage 178).
XNotify aqualified specialist workshop or breakdown service.
á
Towing Not Permit ‐ted See Operator'sManual
The hybrid drive system is faulty.
XHaveth evehicl etransporte don atransporte ror trailer to th enear-
est qualified specialist workshop .
Û
Malfunction VisitWorkshop
The hybrid drive system is faulty.
XVisitaqualified specialist workshop .
Û
Malfunction
The hybrid drive system is faulty.
XHaveth evehicl etowed away by aprofessional recovery compan yto
th eneares tqualified specialist workshop .
d
Malfunction
The drive system is malfunctioning .
The ECO start/sto pfunction may be malfunctioning .
The drive powe ris restricted.
XVisit aqualified specialist workshop .
ï
ChargerCable Con ‐nected
PLUG-INHYBRID vehicles:
The charging cable connecto ris connecte dto th evehicl esocket.
You canno tdrive off as lon gas th echarging cable connecto ris still
connected.
Befor eyou drive off :
XRemove thecharging cable connecto rfrom th evehicl esocke t
(Ypage 174).
300Display messages
On-board computer and displays
Page 331 of 450

Useful information
i
This Operator's Manual describes all models
and all standard and optional equipment of
your vehicle available at the time of publica-
tion of the Operator's Manual. Country-spe-
cific differences are possible. Please note
that your vehicle may not be equipped with all
features described. This also applies to
safety-related systems and functions.
iRead the information on qualified specialist
workshops (Ypage 29).
Stowage areas
Loading guidelines
GWARNING
If objects, luggage or loads are not secured or
not secured sufficiently, they could slip, tip
over or be flung around and thereby hit vehicle
occupants. There is a risk of injury, particu-
larly in the event of sudden braking or a sud-
den change in direction.
Always store objects so that they cannot be
flung around. Secure objects, luggage or
loads against slipping or tipping before the
journey.
GWARNING
Combustion engines emit poisonous exhaust
gases such as carbon monoxide. If the tailgate
is open when the engine is running, particu-
larly if the vehicle is moving, exhaust fumes
could enter the passenger compartment.
There is a risk of poisoning.
Turn off the engine before opening the tail-
gate. Never drive with the tailgate open.
GWARNING
The exhaust tail pipe and tail pipe trim can
become very hot. If you come into contact
with these parts of the vehicle, you could burn
yourself. There is a risk of injury.
Always be particularly careful around the
exhaust tail pipe and the tail pipe trim. Allow
these components to cool down before touch-
ing them.
The gross vehicle weight (GVW) is the vehicle
weight including fuel, vehicle tool kit, spare
wheel, installed accessories, vehicle occupants
and luggage/cargo.
Do not exceed the load limit or permitted gross
vehicle weight rating (GVWR) for your vehicle.
The gross load limit and the GVWR are specified
on the vehicle identification plate on the B-pillar
of the driver's door (
Ypage 397).
The load must also be distributed so that the
weight on each axle never exceeds the gross
axle weight rating (GAWR) for the front and rear
axles. The specifications for GVWR and GAWR
are on the vehicle identification plate on the B-
pillar of the driver's door (
Ypage 397).
Observe the notes on loading the vehicle
(
Ypage 397).
The handling characteristics of a laden vehicle
are dependent on the distribution of the load
within the vehicle. For this reason, you should
observe the following notes when transporting a
load:
RNever exceed the maximum permissible
gross vehicle mass or the gross axle weight
rating for the vehicle (including occupants).
RThe cargo compartment is the preferred place to carry objects.
RPosition heavy loads as far forwards as pos-
sible and as low down in the cargo compart-
ment as possible.
RThe load must not protrude above the upper
edge of the seat backrests.
RAlways place the load against the rear or frontseat backrests. Make sure that the seat
backrests are securely locked into place.
RAlways place the load behind unoccupied
seats if possible.
RUse the cargo tie-down rings and the parcel
nets to transport loads and luggage.
RUse cargo tie-down rings and fastening mate-
rials appropriate for the weight and size of theload.
RHook in the cargo net when loading.
RSecure the load with sufficiently strong and
wear-resistant tie-downs. Pad sharp edges for
protection.
Stowage areas329
Stowage and features
Z
Page 384 of 450

Otherwise, the automatic transmission may
shift to positionPwhen the driver's or front-
passenger door are opened, which could lead
to damage to the transmission.
!Do not tow with sling-type equipment. This
could damage the vehicle.
!Vehicles with differential locks: make sure
the differential locks are in automatic mode.
When towing, the differential locks must not
be switched on. The transmission may other- wise be damaged.
!The vehicle can be towed a maximum of
30 miles (50km). The towing speed of 30 mph
(50 km/h) must not be exceeded.
If the vehicle has to be towed more than
30 miles (50km), the entire vehicle must be
raised and transported.
It is better to have the vehicle transported than
to have it towed away.
If the vehicle has suffered transmission damage,
have it transported on a transporter or trailer.
The automatic transmission must be in position
N when the vehicle is being towed.
The battery must be connected and charged.
Otherwise, you:
Rcannot turn the SmartKey to position 2in the
ignition lock
Rcannot release the electric parking brake
Rcannot shift the automatic transmission to
position N
Disarm the automatic locking feature before the vehicle is towed (
Ypage 275). You could other-
wise be locked out when pushing or towing the
vehicle.
PLUG-IN HYBRID vehicles:
PLUG-IN HYBRID vehicles may not be towed
away but must instead be transported, if:
Rthe multifunction display is not working or
Rthe á Towing Not Permitted SeeOperator'sManualmessage appears in the
multifunction display.
If the vehicle is in a dangerous area, it can be
towed out of that area with both axles on the
ground. In this case, the towing distance must
not be greater than 165 ft (50 m)and must not
exceed a towing speed of 6 mph (10 km/h). For
longer distances, have the vehicle loaded and
transported.
Installing/removing the towing eye
Installing the towing eye
The brackets for the screw-in towing eye are
located in the bumpers. They are at the front and
rear behind covers :;.
XRemove the towing eye from the vehicle tool
kit (Ypage 369).
XTo open the cover at the front: press the
mark on cover :inwards in the direction of
the arrow.
XTo open the cover at the rear: insert a flat,
blunt object into the cutout and lever
cover ;out of the bumper.
XTake cover :or; off the opening.
XScrew in the towing eye clockwise as far as it
will go and tighten it.
Removing the towing eye
XUnscrew and remove the towing eye.
XPosition cover :or; in the bumper and
press the cover on until it engages.
XPlace the towing eye in the vehicle tool kit.
Towing a vehicle with both axles on
the ground
The automatic transmission automatically shifts
to position Pwhen you open the driver's or front-
passenger door or when you remove the Smart-
Key from the ignition lock.
382Towing and tow-starting
Breakdown assitance
Page 392 of 450

Once the winter tires are mounted:
XCheck the tire pressures (Ypage 393).
XRestart the tire pressure monitor
(Ypage 394).
XVehicles for Canada:restart the tire pres-
sure loss warning system (Ypage 394).
Information about driving with an emergency
spare wheel (
Ypage 426).
Snow chains
GWARNING
If snow chains are installed to the front
wheels, they may drag against the vehicle
body or chassis components. This could
cause damage to the vehicle or the tires.
There is a risk of an accident.
To avoid hazardous situations:
Rnever install snow chains to the front
wheels
Ralways install snow chains in pairs to the
rear wheels.
!You must drive at raised vehicle level (height
1) if snow chains have been installed. The
vehicle may otherwise be damaged.
!Vehicles with ADS (Adaptive Damping
System): do not use the sport mode when
driving with snow chains mounted. The vehi-
cle may otherwise be damaged.
!On some tire sizes there is not enough space
for snow chains. To avoid damage to the vehi-
cle or tires, observe the "Wheel and tire com-
binations" section under "Tires and wheels".
For safety reasons, Mercedes-Benz recom-
mends that you only use snow chains that have
been specially approved for your vehicle by
Mercedes-Benz, or are of a corresponding
standard of quality. For more information,
please contact a qualified specialist workshop.
If you intend to mount snow chains, please bear
the following points in mind:
ROnly use snow chains when driving on roads
completely covered by snow. Remove the snow chains as soon as possible when you
come to a road that is not snow-covered.
Rdo not exceed the maximum permissible
speed of 30 mph (50 km/h).
RLocal regulations may restrict the use of snow
chains. Observe the appropriate regulations if
you wish to mount snow chains.
RSnow chains may not be mounted on all
wheel/tire combinations. Permissible wheel-
tire combinations (
Ypage 413).
You may wish to deactivate ESP®when pulling
away with snow chains installed (Ypage 72).
You can thereby allow the wheels to spin in a
controlled manner, achieving an increased driv-
ing force (cutting action).
Information about driving with an emergency
spare wheel (
Ypage 426).
Tire pressure
Tire pressure specifications
Important safety notes
GWARNING
Underinflated or overinflated tires pose the
following risks:
Rthe tires may burst, especially as the load
and vehicle speed increase.
Rthe tires may wear excessively and/or
unevenly, which may greatly impair tire
traction.
Rthe driving characteristics, as well as steer-
ing and braking, may be greatly impaired.
There is a risk of an accident.
Follow recommended tire inflation pressures
and check the pressure of all the tires includ-
ing the spare wheel:
Rmonthly, at least
Rif the load changes
Rbefore beginning a long journey
Runder different operating conditions, e.g.
off-road driving
If necessary, correct the tire pressure.
The data on the Tire and Loading Information
placard and tire pressure table shown here are
390Tire pressure
Wheels and tires
Page 405 of 450
Tire labeling
Overview
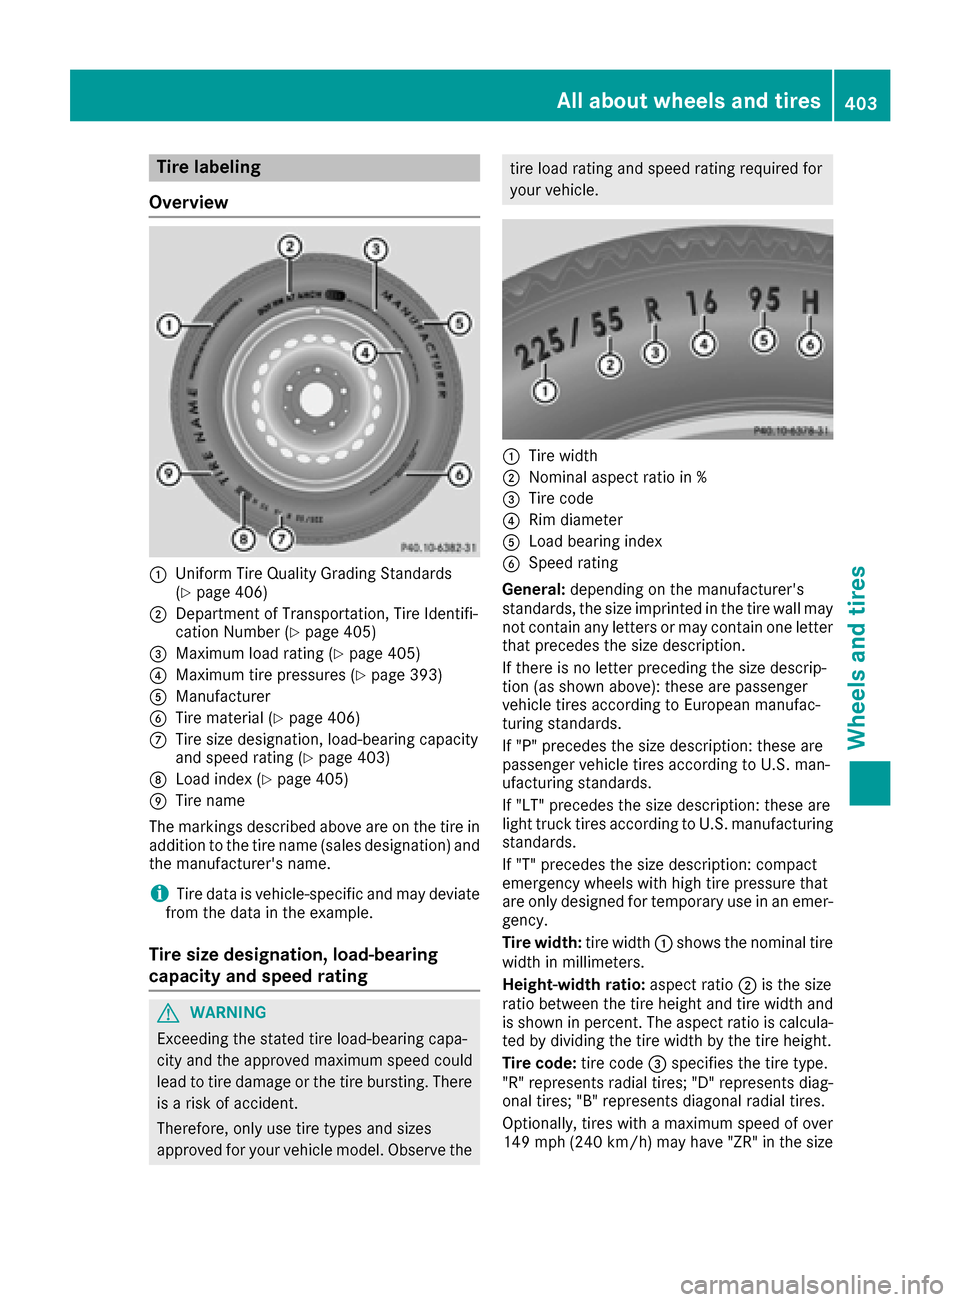
:Uniform Tire Quality Grading Standards
(Ypage 406)
;Department of Transportation, Tire Identifi-
cation Number (Ypage 405)
=Maximum load rating (Ypage 405)
?Maximum tire pressures (Ypage 393)
AManufacturer
BTire material (Ypage 406)
CTire size designation, load-bearing capacity
and speed rating (Ypage 403)
DLoad index (Ypage 405)
ETire name
The markings described above are on the tire in
addition to the tire name (sales designation) and
the manufacturer's name.
iTire data is vehicle-specific and may deviate
from the data in the example.
Tire size designation, load-bearing
capacity and speed rating
GWARNING
Exceeding the stated tire load-bearing capa-
city and the approved maximum speed could
lead to tire damage or the tire bursting. There is a risk of accident.
Therefore, only use tire types and sizes
approved for your vehicle model. Observe the
tire load rating and speed rating required for
your vehicle.
:Tire width
;Nominal aspect ratio in %
=Tire code
?Rim diameter
ALoad bearing index
BSpeed rating
General: depending on the manufacturer's
standards, the size imprinted in the tire wall may
not contain any letters or may contain one letter
that precedes the size description.
If there is no letter preceding the size descrip-
tion (as shown above): these are passenger
vehicle tires according to European manufac-
turing standards.
If "P" precedes the size description: these are
passenger vehicle tires according to U.S. man-
ufacturing standards.
If "LT" precedes the size description: these are
light truck tires according to U.S. manufacturing
standards.
If "T" precedes the size description: compact
emergency wheels with high tire pressure that
are only designed for temporary use in an emer-
gency.
Tire width: tire width:shows the nominal tire
width in millimeters.
Height-width ratio: aspect ratio;is the size
ratio between the tire height and tire width and
is shown in percent. The aspect ratio is calcula-
ted by dividing the tire width by the tire height.
Tire code: tire code=specifies the tire type.
"R" represents radial tires; "D" represents diag-
onal tires
; "B" represents diagonal radial tires.
Optionally, tires with a maximum speed of over
149 mph (240 km/h) may have "ZR" in the size
All about wheels an d tires403
Wheels and tires
Z
Page 432 of 450

Technical data
All models (except GLE 450 Sport AMG 4MATIC, GLE 550 4MATIC and Mercedes-
AMG GLE 63)
"Minispare" emergency spare wheel
TiresWheels
T 155/90 R1811 3 M
Tire pressure : 420 kPa (4.2 bar/61 psi)4.0 B x 18 H2
Wheel offset: 1.57 in (40 mm)
T 155/80 R19 114 M6
Tire pressure: 420 kPa (4.2 bar/61 psi)
4.5 B x 19 H2
Wheel offset: 1.57 in (40 mm)
iHybrid vehicles are not equipped with an emergency spare wheel at the factory. In the event of
a flat tire, a TIREFIT kit is available.
GLE 450 Sport AMG 4MATIC and GLE 550 4MATIC
"Minispare" emergency spare wheel
TiresWheels
T 155/80 R19 114 M
Tire pressure: 420 kPa (4.2 bar/61 psi)4.5 B x 19 H2
Wheel offset: 1.57 in (40 mm)
Mercedes-AMG GLE 63
Collapsible spare wheel
TiresWheels
195/65 R20 108 P
Tire pressure: 350 kPa (3.5 bar/51 psi)6.0 B x 20 H2
Wheel offset: 1.42 in (36 mm)
6Only for vehicles with the AIRMATIC package (code 489).
430Emergency spare wheel
Wheels and tires
Page 436 of 450

229.5). They have not necessarily been
approved by Mercedes-Benz.
Other identifications, for example:
R0 W-30
R5 W-30
R5 W-40
Fuel
Important safety notes
GWARNING
Fuel is highly flammable. If you handle fuel
incorrectly, there is a risk of fire and explo-
sion.
You must avoid fire, open flames, creating
sparks and smoking. Switch off the engine
and, if applicable, the auxiliary heating before refueling.
GWARNING
Fuel is poisonous and hazardous to health.
There is a risk of injury.
You must make sure that fuel does not come into contact with your skin, eyes or clothing
and that it is not swallowed. Do not inhale fuel
vapors. Keep fuel away from children.
If you or others come into contact with fuel,
observe the following:
RWash away fuel from skin immediately
using soap and water.
RIf fuel comes into contact with your eyes,
immediately rinse them thoroughly with
clean water. Seek medical assistance with-
out delay.
RIf fuel is swallowed, seek medical assis-
tance without delay. Do not induce vomit-
ing.
RImmediately change out of clothing which
has come into contact with fuel.
Tank capacity
Missing values were not available at time of
going to print.
ModelTotal capa- city
GLE 450 Sport AMG
4MATIC
GLE 550 4MATIC21.1 US gal (80.0 l)
Allot her models24.6 US gal
(93.0 l)
ModelOf which
reserve
GLE 450 Sport AMG
4MATIC
GLE 550 4MATICApprox.
2.6 US gal (10.0 l)
Mercedes‑AMG vehiclesApprox.
3.7 US gal (14.0 l)
Allot her modelsApprox.
3.2 US gal (12.0 l)
Gasoline
Fuel grade
!Do not use diesel to refuel vehicles with a
gasoline engine. Do not switch on the ignition
if you accidentally refuel with the wrong fuel.
Otherwise, the fuel will enter the fuel system.
Even small amounts of the wrong fuel could
result in damage to the fuel system and the
engine. Notify a qualified specialist workshop
and have the fuel tank and fuel lines drained
completely.
!Only refuel using unleaded premium grade
gasoline with at least 91 AKI/95 RON.
!Only use the fuel recommended. Operating
the vehicle with other fuels can lead to engine failure.
434Service products and filling capacities
Technical data