fuel pressure MERCEDES-BENZ GLE-CLASS SUV 2016 Owners Manual
[x] Cancel search | Manufacturer: MERCEDES-BENZ, Model Year: 2016, Model line: GLE-CLASS SUV, Model: MERCEDES-BENZ GLE-CLASS SUV 2016Pages: 450, PDF Size: 10.52 MB
Page 22 of 450
Summer tires.....................................3 89
Sun visor ............................................ 340
Suspension setting
AMG adaptive sport suspension
system ...........................................2 09
Suspension settings
SETUP (on-board computer) .......... 277
SUV
(Sport Utility Vehicle) ....................... 28
Switching air-recirculation mode
on/off ................................................. 138
T
Tachometer ........................................ 263
Tail lamps
Display message ............................ 293
Tailgate
Display message ............................ 312
Emergency unlocking ....................... 90
Important safety notes .................... 87
Limiting the opening angle ...............9 0
Opening dimensions ......................4 41
Opening/closing (automatically
from inside) ...................................... 89
Opening/closing (automatically
from outside) ................................... 88
Opening/closing (from outside) ....... 88
Power closing .................................. 86
Tank
see Fuel tank
Tank content
Fuel gauge ....................................... 34
Technical data
Capacities ...................................... 433
Emergency spare wheel ................. 430
Information ....................................4 31
Tires/wheels ................................. 413
Trailer loads ................................... 445
Vehicle data ................................... 441
Telephone
Accepting a call (multifunction
steering wheel) .............................. 270
Display message ............................ 314
Menu (on-board computer) ............ 270
Number from the phone book ........2 70
Redialing ........................................ 271
Rejecting/ending a call ................. 270 Temperature
Coolant (display in the instrument
cluster) .......................................... 264
Coolant (on-board computer,
Mercedes-AMG vehicles) ...............2 77
Coolant (on-board computer) ......... 273
Engine oil (on-board computer,
Mercedes-AMG vehicles) ...............2 77
Outside temperature ......................2 64
Setting (climate control) ................ 134
Transmission oil (on-board com-
puter, Mercedes-AMG vehicles) ..... 277
Through-loading feature ................... 332
Time
see separate operating instructions
Timing (RACETIMER) ......................... 277
Tire pressure
Calling up (on-board computer) ..... 394
Checking manually ........................ 393
Displ ay message ............................ 309
Ma
ximum ....................................... 393
Not reached (TIREFIT) .................... 373
Notes ............................................. 392
Reached (TIREFIT) .......................... 373
Recommended ............................... 390
Tire pressure loss warning system
General notes ................................ 393
Important safety notes .................. 394
Restarting ...................................... 394
Tire pressure monitor
Checking the tire pressure elec-
tronically ........................................ 396
Function/notes .............................3 94
General notes ................................ 394
Important safety notes .................. 395
Radio type approval for the tire
pressure monitor ........................... 397
Restarting ...................................... 397
Warning lamp ................................. 328
Warning message .......................... 396
TIREFIT kit .......................................... 371
Important safety notes .................. 371
Storage location ............................ 369
Tire pressure not reached .............. 373
Tire pressure reached .................... 373
Tires
Aspect ratio (definition) ................. 407
20Index
Page 25 of 450
Vehicle data ................................... 441
Vehicle battery
see Battery (vehicle)
Vehicle data ....................................... 441
Vehicle data (off-road driving)
Approach/departure angle ............ 443
Fording depth ................................ 442
Maximum gradient climbing abil-
ity .................................................. 444
Vehicle dimensions ........................... 441
Vehicle emergency locking ................ 86
Vehicle identification number
see VIN
Vehicle identification plate .............. 432
Vehicle level
AIRMATIC ...................................... 207
Vehicle level (display message) ....... 302
Vehicle tool kit .................................. 369
Video
Operating the DVD .........................2 70
VIN ...................................................... 432
Seat ............................................... 433
Type plate ...................................... 432
W
Warning Stickers ...........................................4 2
Warning and indicator lamps
ABS ................................................ 319
Brakes ...........................................3 17
Check Engine ................................. 325
Coolant .......................................... 325
Distance warning ........................... 327
DISTRONIC PLUS ........................... 327
ESP
®.............................................. 321
ESP®OFF ....................................... 322
Fuel tank ........................................ 325
Hybrid drive system ....................... 318
Overview .......................................... 35
Parking brake ................................ 324
PASSENGER AIR BAG ......................4 5
RBS (Recuperative Brake Sys -
tem) .............................................. .318
Reserve fuel ................................... 325
Restraint system ............................ 324
Seat belt ........................................ 316
Tire pressure monitor .................... 328 Warranty
.............................................. 26
Washer fluid
Display message ............................ 314
Wheel and tire combinations
Tires ............................................... 414
Wheel bolt tightening torque ........... 412
Wheel chock ...................................... 409
Wheels
Changing a wheel .......................... 408
Checking ........................................ 388
Cleaning ......................................... 364
Emergency spare wheel ................. 426
General notes ................................ 413
Important safety notes .................. 387
Information on driving .................... 387
Interchanging/changing ................ 408
Mounting a new wheel ................... 411
Mounting a wheel .......................... 409
Overview ........................................ 387
Removing a wheel .......................... 411
Storing ...........................................4 09
Tightening torque ........................... 412
Wheel size/tire si
ze ....................... 413
Window curtain air bag
Display message ............................ 289
Operation ......................................... 51
Windows
see Side windows
Windshield
Defrosting ...................................... 136
Windshield washer fluid
see Windshield washer system
Windshield washer system
Adding washer fluid ....................... 359
Important safety notes .................. 439
Windshield wipers
Problem (malfunction) ................... 125
Rear window wiper ........................ 122
Replacing the wiper blades ............ 122
Switching on/off ........................... 121
Winter driving
Slippery road surfaces ................... 186
Snow chains .................................. 390
Winter operation
General notes ................................ 389
Overview ........................................ 389
Radiator cover ............................... 357
Index23
Page 27 of 450
Protection of the environment
General notes
HEnvironmental note
Daimler's declared policy is one of compre-
hensive environmental protection.
The objectives are for the natural resources
that form the basis of our existence on this
planet to be used sparingly and in a manner
that takes the requirements of both nature
and humanity into account.
You too can help to protect the environment
by operating your vehicle in an environmen-
tally responsible manner.
Fuel consumption and the rate of engine,
transmission, brake and tire wear are affected by these factors:
Roperating conditions of your vehicle
Ryour personal driving style
You can influence both factors. You should
bear the following in mind:
Operating conditions:
Ravoid short trips as these increase fuel con-
sumption.
Ralways make sure that the tire pressures
are correct.
Rdo not carry any unnecessary weight.
Rremove roof racks once you no longer need
them.
Ra regularly serviced vehicle will contribute
to environmental protection. You should
therefore adhere to the service intervals.
Ralways have service work carried out at a
qualified specialist workshop.
Personal driving style:
Rdo not depress the accelerator pedal when
starting the engine.
Rdo not warm up the engine when the vehicle
is stationary.
Rdrive carefully and maintain a safe distance
from the vehicle in front.
Ravoid frequent, sudden acceleration and
braking.
Rchange gear in good time and use each gear
only up to Ôof its maximum engine speed.
Rswitch off the engine in stationary traffic.
Rkeep an eye on the vehicle's fuel consump-
tion.
Environmental concerns and recom-
mendations
Wherever the operating instructions require you
to dispose of materials, first try to regenerate or
re-use them. Observe the relevant environmen-
tal rules and regulations when disposing of
materials. In this way you will help to protect the
environment.
Genuine Mercedes-Benz parts
HEnvironmental note
Daimler AG also supplies reconditioned major
assemblies and parts which are of the same
quality as new parts. They are covered by the
same Limited Warranty entitlements as new
parts.
!Air bags and Emergency Tensioning Devi-
ces, as well as control units and sensors for
these restraint systems, may be installed in
the following areas of your vehicle:
Rdoors
Rdoor pillars
Rdoor sills
Rseats
Rcockpit
Rinstrument cluster
Rcenter console
Do not install accessories such as audio sys-
tems in these areas. Do not carry out repairs or welding. You could impair the operating
efficiency of the restraint systems.
Have aftermarket accessories installed at a
qualified specialist workshop.
You could jeopardize the operating safety of
your vehicle if you use parts, tires and wheels as
well as accessories relevant to safety which
have not been approved by Mercedes-Benz. This
could lead to malfunctions in safety-relevant
Introduction25
Z
Page 37 of 450
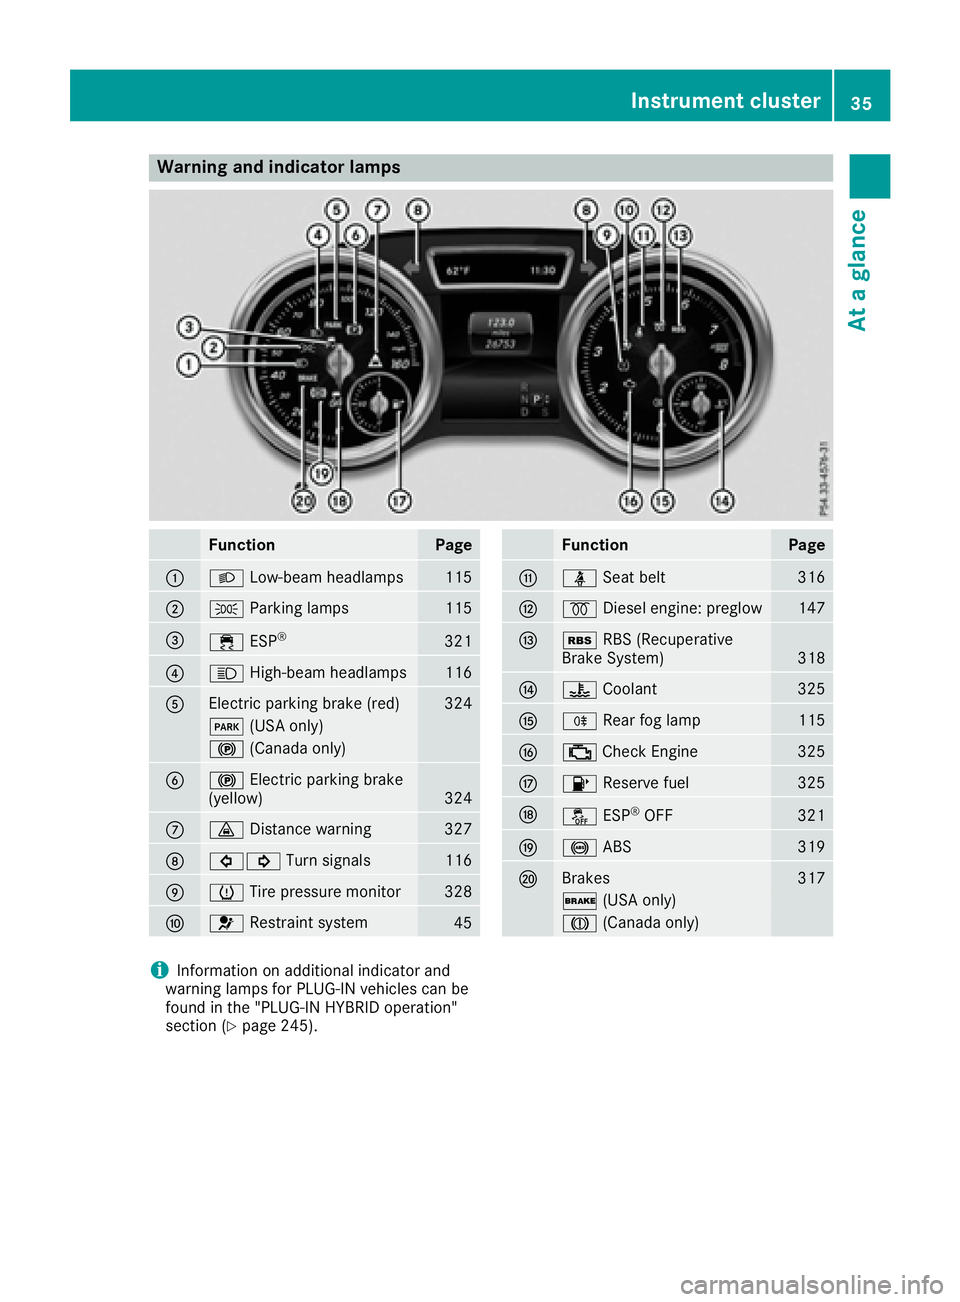
Warning and indicator lamps
FunctionPage
:LLow-beam headlamps115
;TParking lamps115
=÷ESP®321
?KHigh-beam headlamps116
AElectric parking brake (red)324
F(USA only)
!(Canada only)
B!Electric parking brake
(yellow)324
C· Distance warning327
D#! Turn signals116
EhTire pressure monitor328
F6Restraint system45
FunctionPage
GüSeat belt316
H%Diesel engine: preglow147
IéRBS (Recuperative
Brake System)318
J? Coolant325
KRRear fog lamp115
L;Check Engine325
M8 Reserve fuel325
NåESP®OFF321
O!ABS319
PBrakes317
$(USA only)
J(Canada only)
iInformation on additional indicator and
warning lamps for PLUG-IN vehicles can be
found in the "PLUG-IN HYBRID operation"
section (
Ypage 245).
Instrument cluster35
At a glance
Page 61 of 450
PRE-SAFE®takes the following measures
depending on the hazardous situation detected:
Rthe front seat belts are pre-tensioned.
Rif the vehicle skids, the side windows and the
sliding sunroof are closed.
Rvehicles with the memory function: the front-
passenger seat is adjusted if it is in an unfav-
orable position.
Rvehicles with a multicontour seat: the air pres-
sure in the side bolsters of the seat backrest
is increased.
If the hazardous situation passes without result-
ing in an accident, PRE-SAFE
®slackens the belt
pre-tensioning. On vehicles with multicontour
seats, the air pressure in the side bolsters is
reduced again. All settings made by PRE-SAFE
®
can then be reversed.
If the seat belt pre-tensioning is not reduced:
XMove the seat backrest or seat back slightly
when the vehicle is stationary.
The seat belt pre-tensioning is reduced and
the locking mechanism is released.
The seat-belt adjustment is an integral part of
the PRE-SAFE
®convenience function. Informa-
tion about the convenience function can be
found under "Belt adjustment" (
Ypage 48).
PRE-SAFE®PLUS (anticipatory occu-
pant protection system PLUS)
Introduction
PRE-SAFE®PLUS is only available in vehicles
with the Driving Assistance package.
Using the radar sensor system, PRE-SAFE
®
PLUS is able to detect that a head-on or rear-end
collision is imminent. In certain hazardous sit-
uations, PRE-SAFE
®PLUS takes pre-emptive
measures to protect the vehicle occupants.
Important safety notes
The intervention of PRE-SAFE®PLUS cannot
prevent an imminent collision.
The driver is not warned about the intervention
of PRE-SAFE
®PLUS.
PRE-SAFE®PLUS does not intervene if the vehi-
cle is backing up.
When driving, or when parking or exiting a park-
ing space with assistance from Active Parking Assist, PRE-SAFE
®PLUS will not apply the
brakes.
Function
PRE-SAFE®PLUS intervenes in certain situa-
tions if the radar sensor system detects an
imminent head-on or rear-end collision.
PRE-SAFE
®PLUS takes the following measures
depending on the hazardous situation detected:
Rif the radar sensor system detects that a
head-on collision is imminent, the seat belts
are pre-tensioned.
Rif the radar sensor system detects that a rear-
end collision is imminent:
-the brake pressure is increased if the driver
applies the brakes when the vehicle is sta-
tionary.
-the seat belts are pre-tensioned.
The PRE-SAFE®PLUS braking application is can-
celed:
Rif the accelerator pedal is depressed when a
gear is engaged
Rif the risk of a collision passes or is no longer
detected
Rif DISTRONIC PLUS indicates an intention to
pull away
If the hazardous situation passes without result-
ing in an accident, the original settings are
restored.
Automatic measures after an acci-
dent
Immediately after an accident, the following
measures are implemented, depending on the
type and severity of the impact:
Rthe hazard warning lamps are activated
Rthe emergency lighting is activated
Rthe vehicle doors are unlocked
Rthe front side windows are lowered
Rvehicles with a memory function: the electri-
cally adjustable steering wheel is raised
Rthe engine is switched off and the fuel supply
is cut off
Occupant safety59
Safety
Z
Page 163 of 450
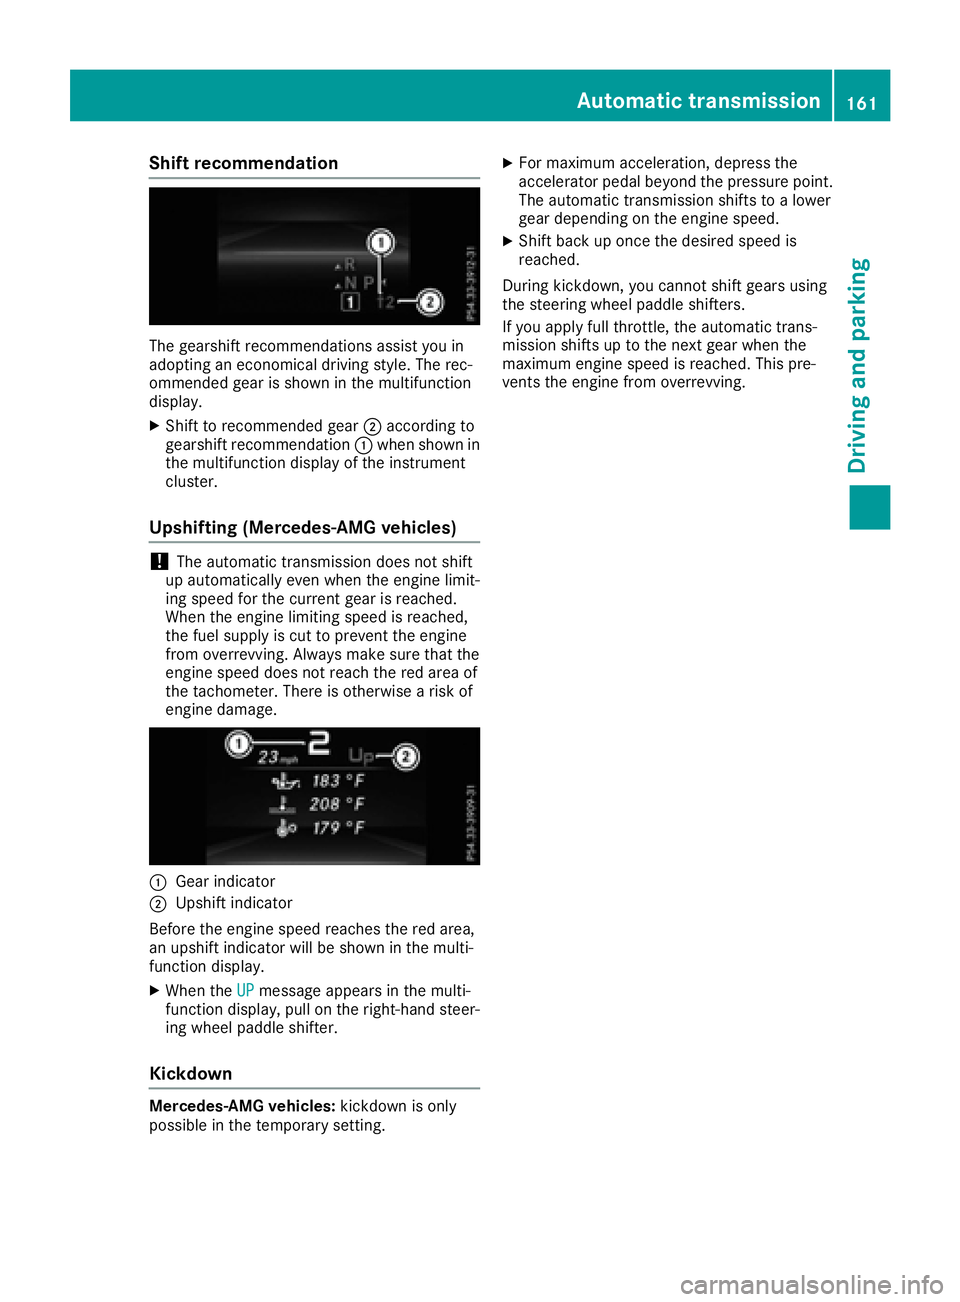
Shift recommendation
The gearshift recommendations assist you in
adopting an economical driving style. The rec-
ommended gear is shown in the multifunction
display.
XShift to recommended gear;according to
gearshift recommendation :when shown in
the multifunction display of the instrument
cluster.
Upshifting (Mercedes-AMG vehicles)
!The automatic transmission does not shift
up automatically even when the engine limit-
ing speed for the current gear is reached.
When the engine limiting speed is reached,
the fuel supply is cut to prevent the engine
from overrevving. Always make sure that the
engine speed does not reach the red area of
the tachometer. There is otherwise a risk of
engine damage.
:Gear indicator
;Upshift indicator
Before the engine speed reaches the red area,
an upshift indicator will be shown in the multi-
function display.
XWhen the UPmessage appears in the multi-
function display, pull on the right-hand steer-
ing wheel paddle shifter.
Kickdown
Mercedes-AMG vehicles: kickdown is only
possible in the temporary setting.
XFor maximum acceleration, depress the
accelerator pedal beyond the pressure point.
The automatic transmission shifts to a lower
gear depending on the engine speed.
XShift back up once the desired speed is
reached.
During kickdown, you cannot shift gears using
the steering wheel paddle shifters.
If you apply full throttle, the automatic trans-
mission shifts up to the next gear when the
maximum engine speed is reached. This pre-
vents the engine from overrevving.
Automatic transmission161
Driving and parking
Z
Page 165 of 450
You must avoid fire, open flames, creating
sparks and smoking. Switch off the engine
and, if applicable, the auxiliary heating beforerefueling.
GWARNING
Fuel is poisonous and hazardous to health.
There is a risk of injury.
You must make sure that fuel does not come into contact with your skin, eyes or clothing
and that it is not swallowed. Do not inhale fuel
vapors. Keep fuel away from children.
If you or others come into contact with fuel,
observe the following:
RWash away fuel from skin immediately
using soap and water.
RIf fuel comes into contact with your eyes,
immediately rinse them thoroughly with
clean water. Seek medical assistance with-
out delay.
RIf fuel is swallowed, seek medical assis-
tance without delay. Do not induce vomit-
ing.
RImmediately change out of clothing which
has come into contact with fuel.
GWARNING
Electrostatic buildup can create sparks and
ignite fuel vapors. There is a risk of fire and
explosion.
Always touch the vehicle body before opening
the fuel filler flap or touching the fuel pump
nozzle. Any existing electrostatic buildup is
thereby discharged.
GWARNING
Vehicles with a diesel engine:
If you mix diesel fuel with gasoline, the flash
point is lower than that of pure diesel fuel.
When the engine is running, exhaust system
components could overheat without being
noticed. There is a risk of fire.
Never refuel with gasoline. Never mix gasoline with diesel fuel.
!Do not use gasoline to refuel vehicles with a
diesel engine. Do not switch on the ignition if
you accidentally refuel with the wrong fuel.
Otherwise, the fuel will enter the fuel system. Even small amounts of the wrong fuel could
result in damage to the fuel system and the
engine. The repair costs are high. Notify a
qualified specialist workshop and have the
fuel tank and fuel lines drained completely.
!Do not use diesel to refuel vehicles with a
gasoline engine. Do not switch on the ignition
if you accidentally refuel with the wrong fuel.
Otherwise, the fuel will enter the fuel system. Even small amounts of the wrong fuel could
result in damage to the fuel system and the
engine. Notify a qualified specialist workshop
and have the fuel tank and fuel lines drained
completely.
!Overfilling the fuel tank could damage the
fuel system.
!Take care not to spill any fuel on painted
surfaces. You could otherwise damage the
paintwork.
!Use a filter when refueling from a fuel can.
Otherwise, the fuel lines and/or injection sys- tem could be blocked by particles from the
fuel can.
Do not get into the vehicle again during the refu-
eling process. Otherwise, electrostatic charge
could build up again.
If you overfill the fuel tank, fuel could spray out
when the fuel pump nozzle is removed.
iFlexible Fuel vehicles can be recognized by
the Ethanol up to E85 sticker on the inside of
the fuel filler flap.
For furt her in
formation on fuel and fuel quality
(Ypage 434).
Refueling
General information
Pay attention to the important safety notes
(Ypage 162).
PLUG-IN HYBRID vehicles: pressure in the fuel
tank must be released before refueling.
Except PLUG-IN HYBRID vehicles: if you
unlock/lock the vehicle from the outside, the
fuel filler flap also unlocks/locks.
Refueling163
Driving and parking
Z
Page 166 of 450
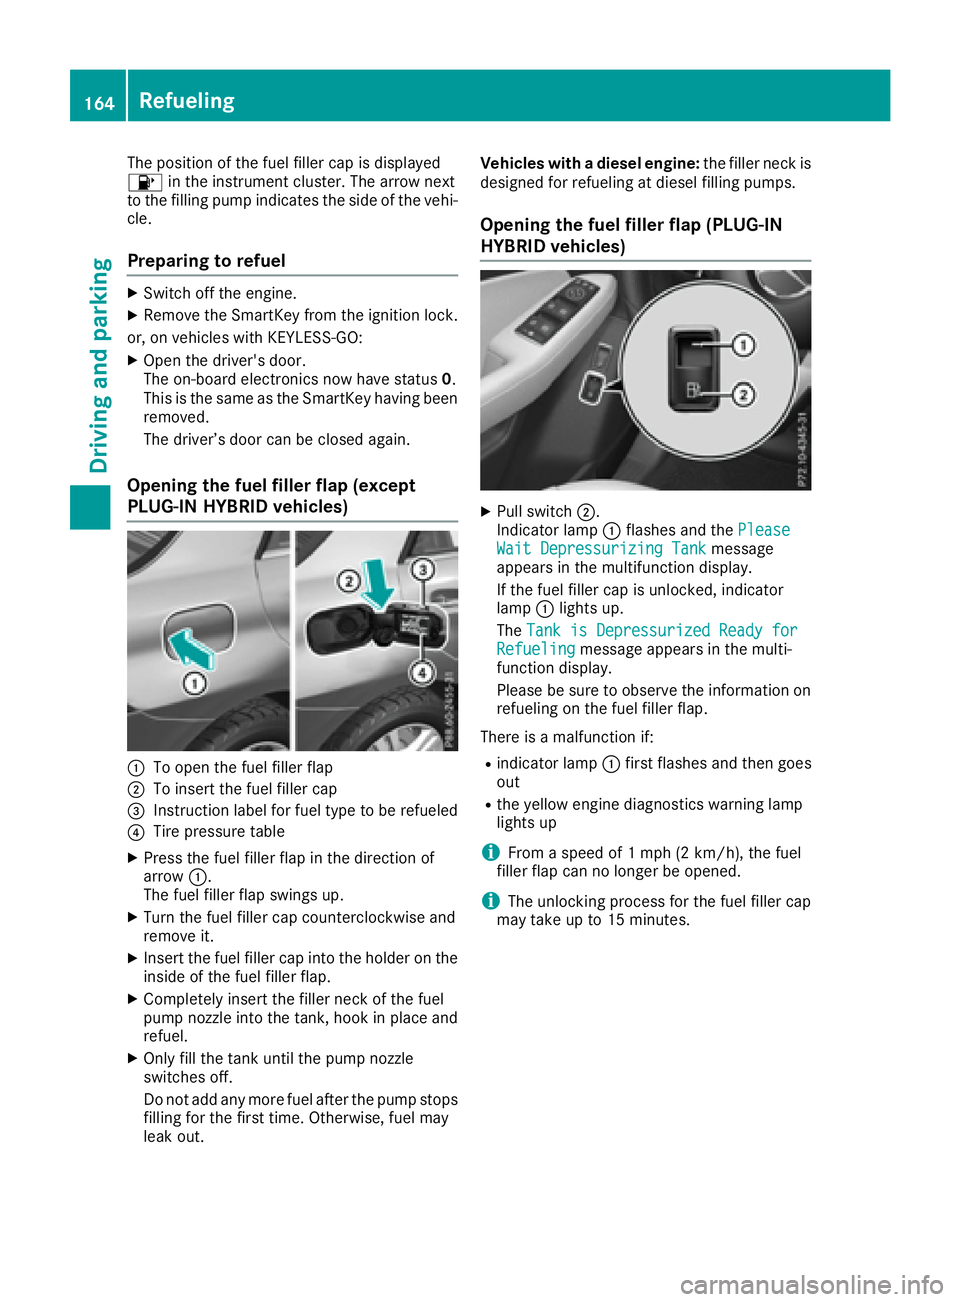
The position of the fuel filler cap is displayed
8in the instrument cluster. The arrow next
to the filling pump indicates the side of the vehi-
cle.
Preparing to refuel
XSwitch off the engine.
XRemove the SmartKey from the ignition lock.
or, on vehicles with KEYLESS‑GO:
XOpen the driver's door.
The on-board electronics now have status 0.
This is the same as the SmartKey having been
removed.
The driver’s door can be closed again.
Opening the fuel filler flap (except
PLUG-IN HYBRID vehicles)
:To open the fuel filler flap
;To insert the fuel filler cap
=Instruction label for fuel type to be refueled
?Tire pressure table
XPress the fuel filler flap in the direction of
arrow :.
The fuel filler flap swings up.
XTurn the fuel filler cap counterclockwise and
remove it.
XInsert the fuel filler cap into the holder on the
inside of the fuel filler flap.
XCompletely insert the filler neck of the fuel
pump nozzle into the tank, hook in place and
refuel.
XOnly fill the tank until the pump nozzle
switches off.
Do not add any more fuel after the pump stops
filling for the first time. Otherwise, fuel may
leak out. Vehicles with a diesel engine:
the filler neck is
designed for refueling at diesel filling pumps.
Opening the fuel filler flap (PLUG-IN
HYBRID vehicles)
XPull switch ;.
Indicator lamp :flashes and the Please
Wait Depressurizing Tankmessage
appears in the multifunction display.
If the fuel filler cap is unlocked, indicator
lamp :lights up.
The Tank is Depressurized Ready for
Refuelingmessage appears in the multi-
function display.
Please be sure to observe the information on
refueling on the fuel filler flap.
There is a malfunction if:
Rindicator lamp :first flashes and then goes
out
Rthe yellow engine diagnostics warning lamp
lights up
iFrom a speed of 1 mph (2 km/h), the fuel
filler flap can no longer be opened.
iThe unlocking process for the fuel filler cap
may take up to 15 minutes.
164Refueling
Driving and parking
Page 167 of 450
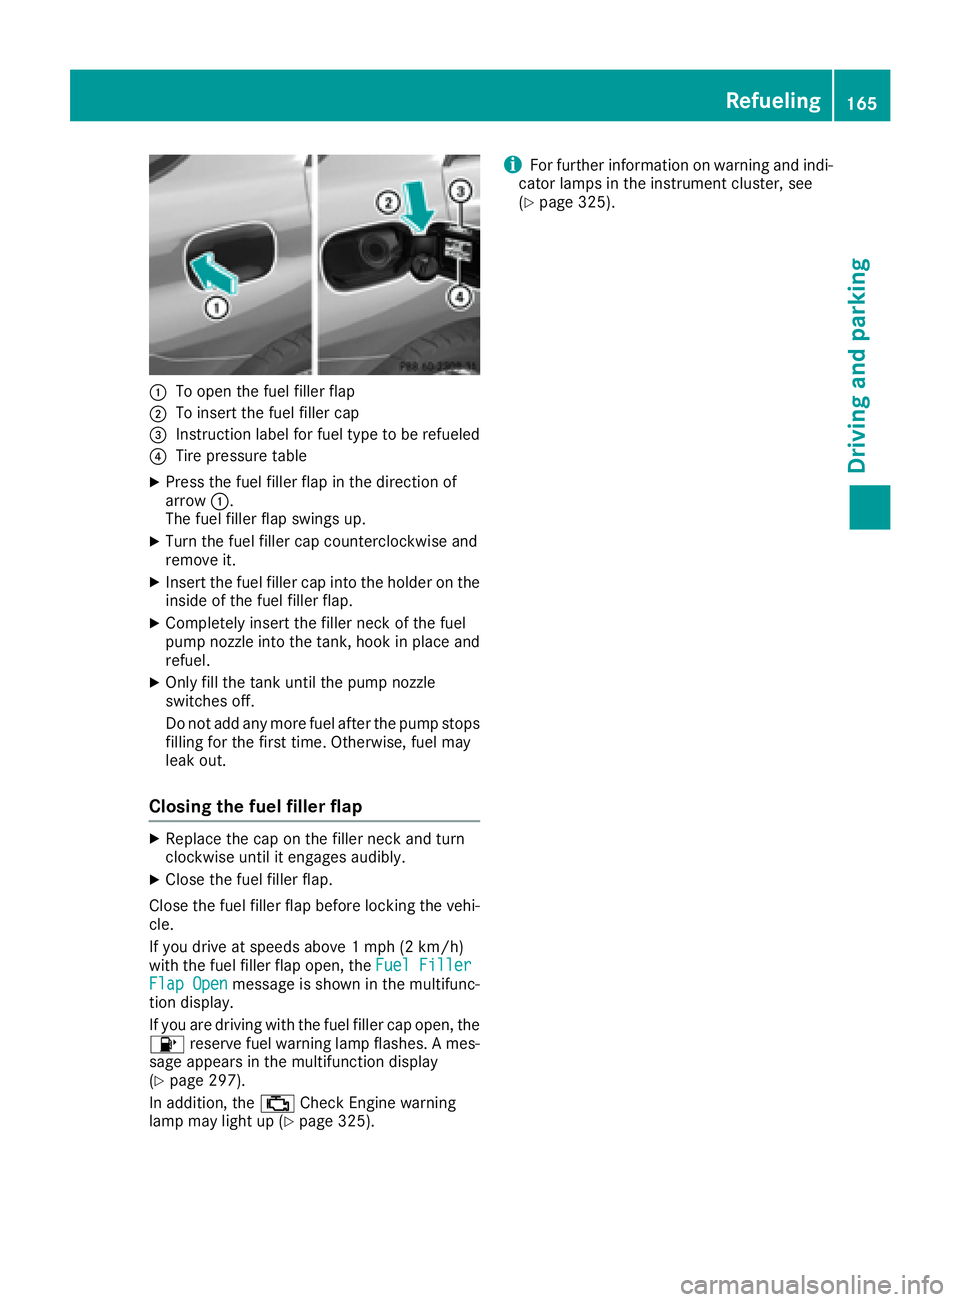
:To open the fuel filler flap
;To insert the fuel filler cap
=Instruction label for fuel type to be refueled
?Tire pressure table
XPress the fuel filler flap in the direction of
arrow:.
The fuel filler flap swings up.
XTurn the fuel filler cap counterclockwise and
remove it.
XInsert the fuel filler cap into the holder on the
inside of the fuel filler flap.
XCompletely insert the filler neck of the fuel
pump nozzle into the tank, hook in place and
refuel.
XOnly fill the tank until the pump nozzle
switches off.
Do not add any more fuel after the pump stops filling for the first time. Otherwise, fuel may
leak out.
Closing the fuel filler flap
XReplace the cap on the filler neck and turn
clockwise until it engages audibly.
XClose the fuel filler flap.
Close the fuel filler flap before locking the vehi-
cle.
If you drive at speeds above 1 mph (2 km/h)
with the fuel filler flap open, the Fuel Filler
Flap Openmessage is shown in the multifunc-
tion display.
If you are driving with the fuel filler cap open, the
8 reserve fuel warning lamp flashes. A mes-
sage appears in the multifunction display
(
Ypage 297).
In addition, the ;Check Engine warning
lamp may light up (
Ypage 325).
iFor further information on warning and indi-
cator lamps in the instrument cluster, see
(
Ypage 325).
Refueling165
Driving and parking
Z
Page 184 of 450
Drive sensibly–save fuel
Observ eth efollowin gtips to sav efuel:
XThe tires should always be inflate dto th erec -
ommended tire pressure.
XRemov eunnecessary loads.
XRemov eroof carriers when they are no tnee-
ded.
XWar mup th eengin eat low engin espeeds .
XAvoid frequent acceleration or braking .
XHaveall maintenance wor kcarrie dout as
indicated by th eservic eintervals in th eMain -
tenance Booklet or by th eservic einterval dis -
play.
Fue lconsumption also increase swhen drivin gin
cold weather ,in stop-start traffic and in hill yter-
rain .
Drinking an ddrivin g
GWARNING
Drinking and drivin gand/o rtaking drugs and
drivin gare ver ydangerous combinations.
Even asmall amount of alcoho lor drugs can
affec tyour reflexes, perception sand judg-
ment.
The possibilit yof aserious or eve nfatal acci-
den tis greatly increase dwhen you drink or
take drugs and drive.
Do no tdrink or take drugs and drive or allow
anyon eto drive who has bee ndrinkin gor tak-
in g drugs.
Emission contro l
GWARNING
Combustion engines emi tpoisonous exhaus t
gases suc has carbon monoxide. Inhaling
these exhaus tgases lead sto poisoning. There
is aris kof fatal injury. Therefor enever leav e
th eengin erunning in enclose dspaces with-
out sufficien tventilation .
Certain engin esystems are designed to keep
th elevel of poisonous component sin exhaus t
fumes within lega llimits.
These systems only wor kat peak efficiency if
they are serviced exactly in accordance wit hth e
manufacturer's specifications. Always hav ewor
kon th eengin ecarrie dout at aqualified
specialis tworkshop .Mercedes-Ben zrecom -
mends that you use an authorized Mercedes -
Benz Cente rfo rthis purpose. In particular, wor k
relevant to safet yor on safety-related systems
mus tbe carrie dout at aqualified specialis t
workshop .
The engin esetting smus tno tbe changed under
any circumstances. Furthermore, all specific
servic ewor kmus tbe carrie dout at regular
intervals and in accordance wit hth eMercedes -
Benz servic erequirements .Details can be found
in th eMaintenance Booklet .
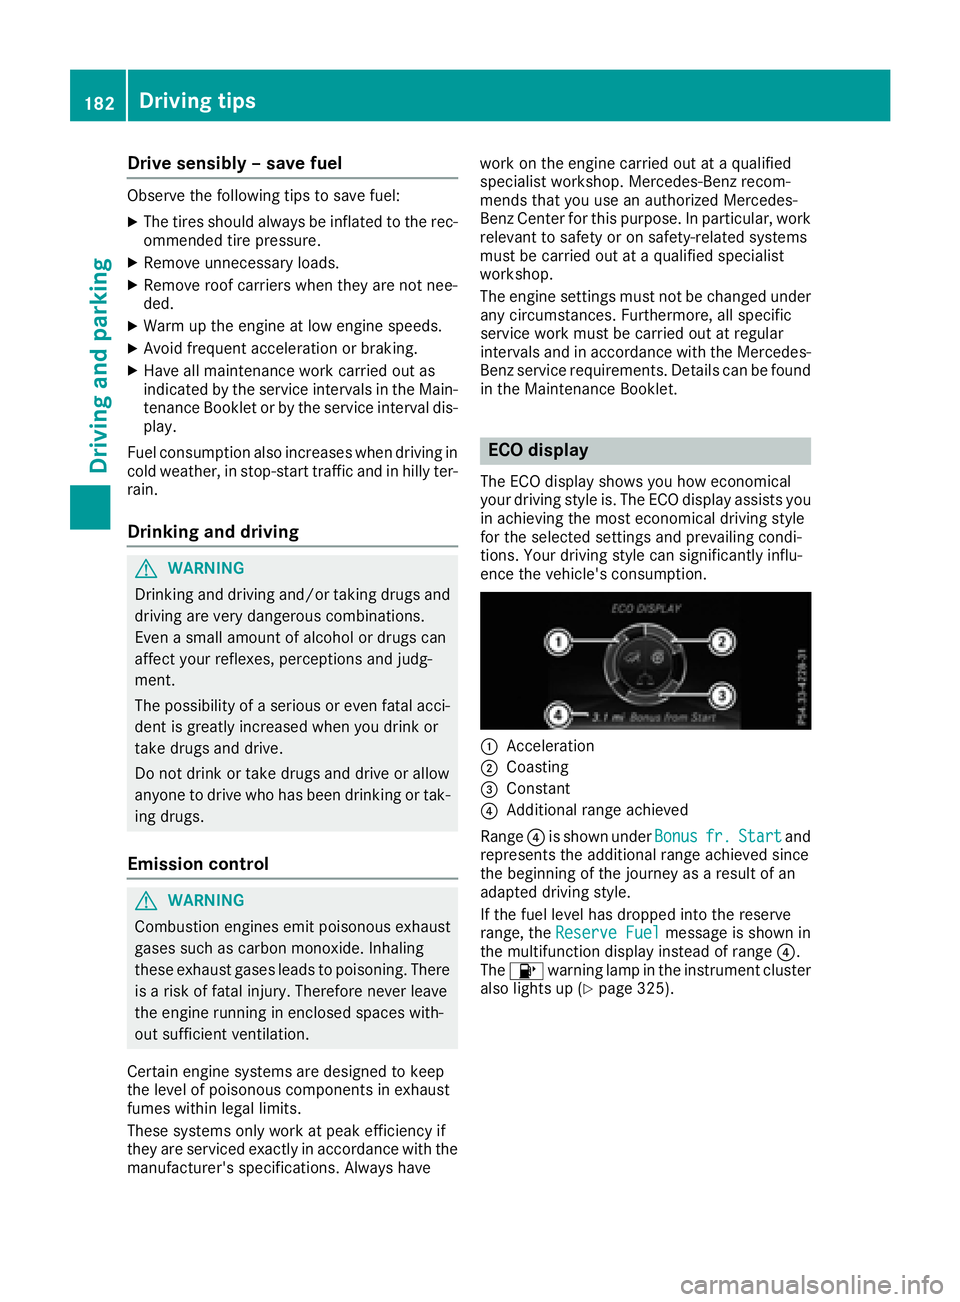
ECO display
The ECOdisplay shows you how economical
your drivin gstyle is. The EC Odisplay assist syou
in achievin gth emost economical drivin gstyle
fo rth eselecte dsetting sand prevailin gcondi-
tions. Your drivin gstyle can significantly influ-
ence th evehicle' sconsumption .
:Acceleration
;Coasting
=Constant
?Additional range achieved
Range ?is shown under Bonus
fr.Startand
represents th eadditional range achieved since
th ebeginning of th ejourney as aresult of an
adapted drivin gstyle.
If th efue llevel has dropped into th ereserv e
range, th eReserv eFue l
messag eis shown in
th emultifunction display instead of range ?.
The 8 warnin glamp in th einstrumen tcluster
also lights up (
Ypage 325).
182Driving tips
Driving and parking