fuel MERCEDES-BENZ GLE COUPE 2015 User Guide
[x] Cancel search | Manufacturer: MERCEDES-BENZ, Model Year: 2015, Model line: GLE COUPE, Model: MERCEDES-BENZ GLE COUPE 2015Pages: 393, PDF Size: 12.71 MB
Page 55 of 393
Using the radar sensor system, PRE-SAFE
®
PLUS is able to detect that a head-on or rear-end
collision is imminent. In certain hazardous sit-
uations, PRE-SAFE ®
PLUS takes pre-emptive
measures to protect the vehicle occupants.
Important safety notes The intervention of PRE-SAFE
®
PLUS cannot
prevent an imminent collision.
The driver is not warned before the intervention
of PRE-SAFE ®
PLUS.
PRE-SAFE ®
PLUS does not intervene:
R if the vehicle is reversing
R when the vehicle is towing a trailer and there
is a risk of a rear-end collision
When driving, or when parking or exiting a park- ing space with assistance from Active Parking
Assist, PRE-SAFE ®
PLUS will not apply the
brakes.
Function PRE-SAFE
®
PLUS intervenes in certain situa-
tions if the radar sensor system detects an
imminent head-on or rear-end collision.
PRE-SAFE ®
PLUS takes the following measures
depending on the hazardous situation detected:
R if the radar sensor system detects that a
head-on collision is imminent, the seat belts
are pre-tensioned
R if the radar sensor system detects that a rear-
end collision is imminent:
- the rear hazard warning lamps are activa-
ted and flash at a higher frequency
- the brake pressure is increased if the driver
applies the brakes when the vehicle is sta-
tionary
- the seat belts are pre-tensioned.
The PRE-SAFE ®
PLUS braking application is can-
celled:
R if the accelerator pedal is depressed when a
gear is engaged
R if the risk of a collision passes or is no longer
detected
R if DISTRONIC PLUS indicates an intention to
pull away
If the hazardous situation passes without result- ing in an accident, the original settings are
restored. Automatic measures after an acci-
dent
Immediately after an accident, the following
measures may be implemented, depending on
the type and severity of the impact:
R the hazard warning lamps are activated
R the emergency lighting is activated
R the vehicle doors are unlocked
R the front side windows are lowered
R vehicles with a memory function: the electri-
cally adjustable steering wheel is raised
R the engine is switched off and the fuel supply
is cut off
R vehicles with the Mercedes-Benz emergency
call system: automatic emergency call Children in the vehicle
Important safety notes
Accident statistics show that children secured
in the rear seats are safer than children secured in the front-passenger seat. For this reason,
Mercedes-Benz strongly advises that you installa child restraint system on a rear seat. Children
are generally better protected there.
If a child younger than twelve years old and
under 1.50 m in height is travelling in the vehi-
cle:
R always secure the child in a child restraint
system suitable for Mercedes-Benz vehicles.
The child restraint system must be appropri-
ate to the age, weight and size of the child.
R be sure to observe the instructions and safety
notes in this section in addition to the child
restraint system manufacturer's installation
instructions.
R always pay attention to the instructions and
safety notes on the automatic front-
passenger front airbag deactivation system
(Y page 45). 52
Children in the vehicleSafety
Page 82 of 393
Key functions
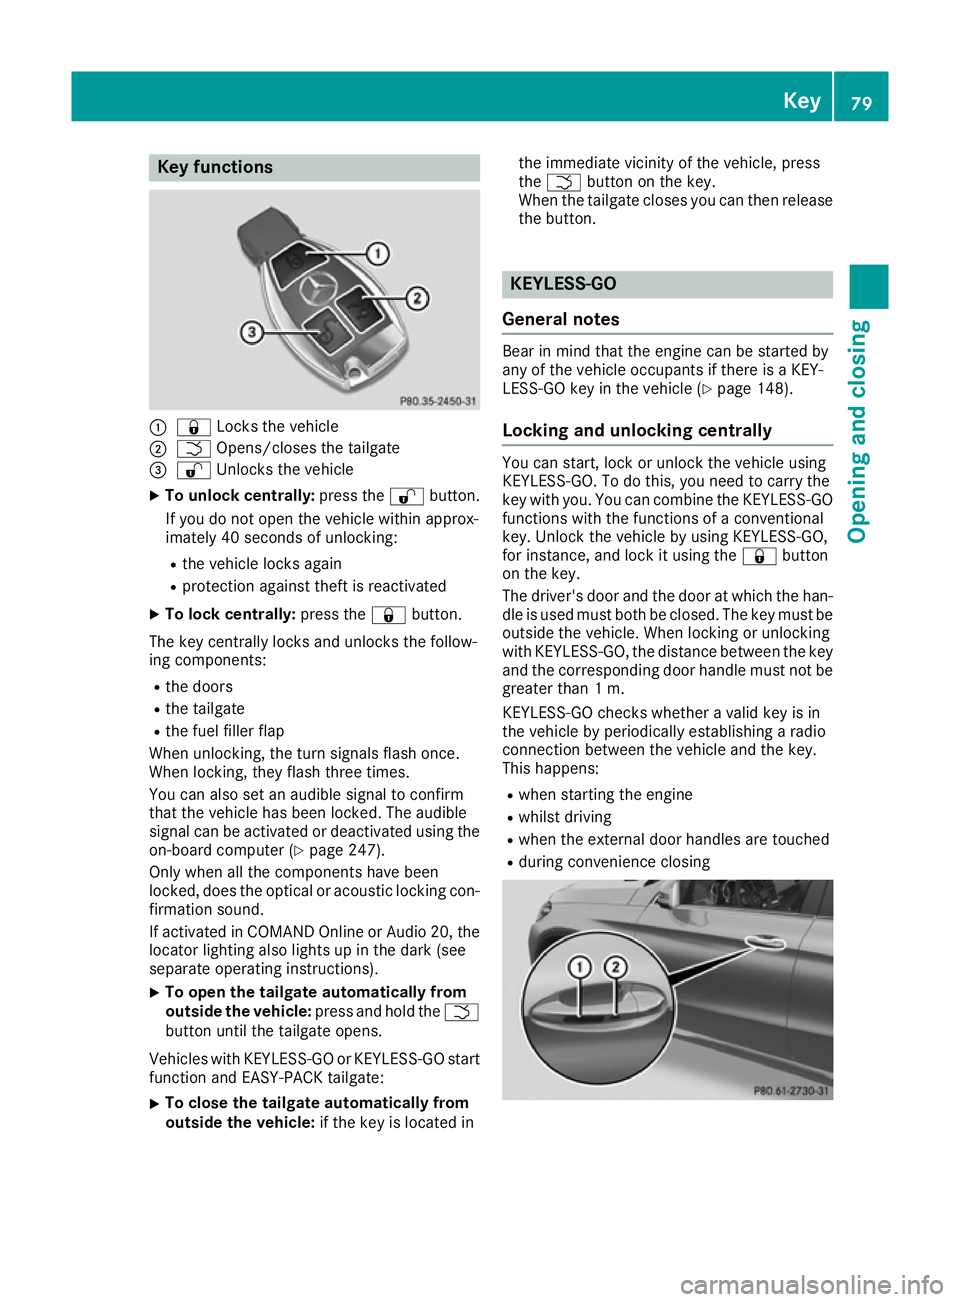
:
& Locks the vehicle
; F Opens/closes the tailgate
= % Unlocks the vehicle
X To unlock centrally: press the%button.
If you do not open the vehicle within approx-
imately 40 seconds of unlocking:
R the vehicle locks again
R protection against theft is reactivated
X To lock centrally: press the&button.
The key centrally locks and unlocks the follow-
ing components: R the doors
R the tailgate
R the fuel filler flap
When unlocking, the turn signals flash once.
When locking, they flash three times.
You can also set an audible signal to confirm
that the vehicle has been locked. The audible
signal can be activated or deactivated using the
on-board computer (Y page 247).
Only when all the components have been
locked, does the optical or acoustic locking con- firmation sound.
If activated in COMAND Online or Audio 20, the
locator lighting also lights up in the dark (see
separate operating instructions).
X To open the tailgate automatically from
outside the vehicle:
press and hold theF
button until the tailgate opens.
Vehicles with KEYLESS-GO or KEYLESS-GO start
function and EASY-PACK tailgate:
X To close the tailgate automatically from
outside the vehicle: if the key is located in the immediate vicinity of the vehicle, press
the
F button on the key.
When the tailgate closes you can then release the button. KEYLESS-GO
General notes Bear in mind that the engine can be started by
any of the vehicle occupants if there is a KEY-
LESS-GO key in the vehicle (Y
page 148).
Locking and unlocking centrally You can start, lock or unlock the vehicle using
KEYLESS-GO. To do this, you need to carry the
key with you. You can combine the KEYLESS-GO functions with the functions of a conventional
key. Unlock the vehicle by using KEYLESS-GO,
for instance, and lock it using the &button
on the key.
The driver's door and the door at which the han- dle is used must both be closed. The key must be
outside the vehicle. When locking or unlocking
with KEYLESS-GO, the distance between the key and the corresponding door handle must not be greater than 1 m.
KEYLESS-GO checks whether a valid key is in
the vehicle by periodically establishing a radio
connection between the vehicle and the key.
This happens:
R when starting the engine
R whilst driving
R when the external door handles are touched
R during convenience closing Key
79Opening and closing Z
Page 83 of 393
X
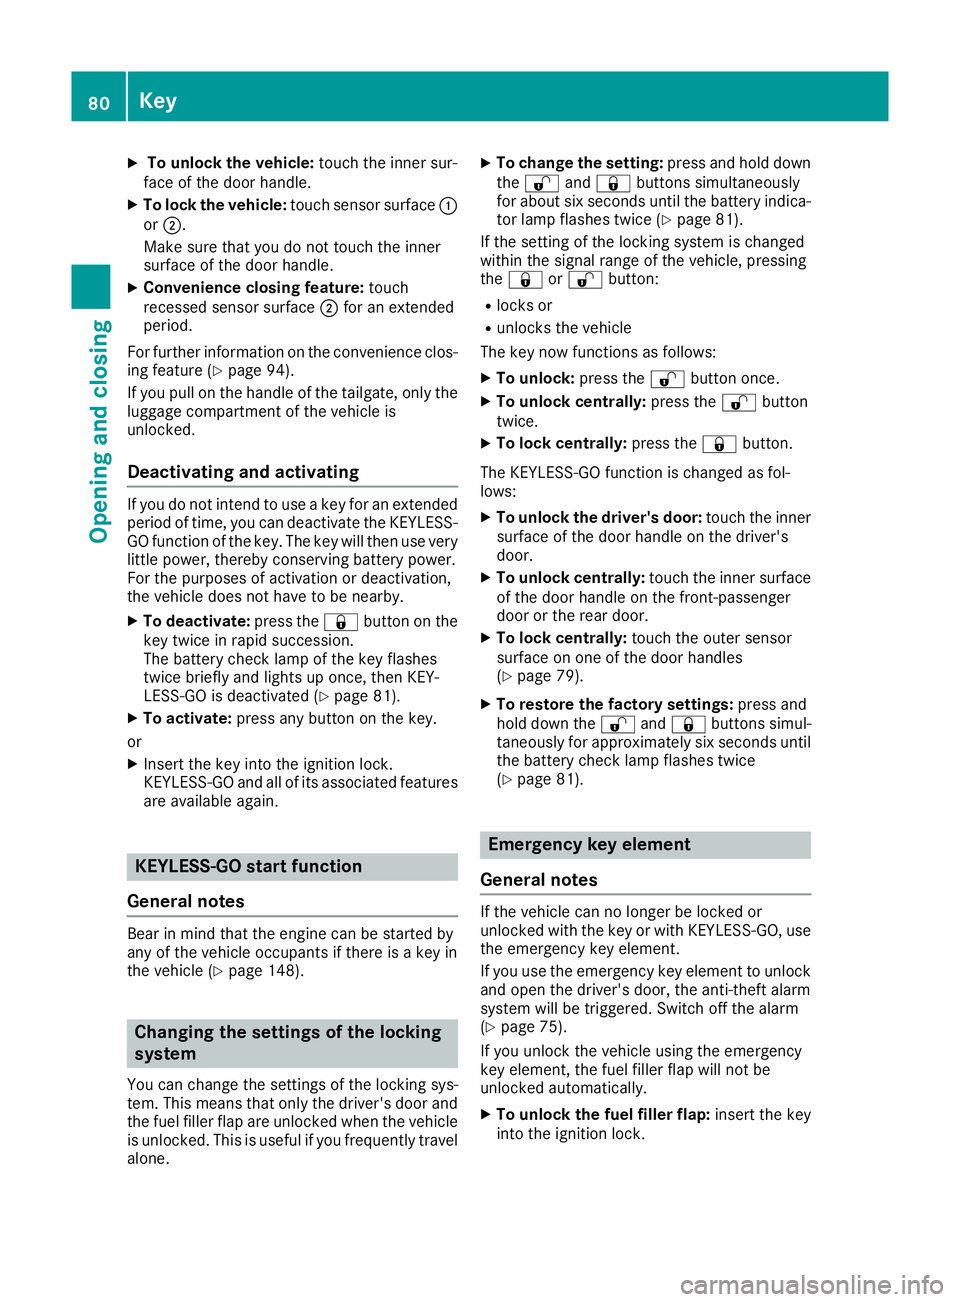
To unlock the vehicle: touch the inner sur-
face of the door handle.
X To lock the vehicle: touch sensor surface :
or ;.
Make sure that you do not touch the inner
surface of the door handle.
X Convenience closing feature: touch
recessed sensor surface ;for an extended
period.
For further information on the convenience clos-
ing feature (Y page 94).
If you pull on the handle of the tailgate, only the
luggage compartment of the vehicle is
unlocked.
Deactivating and activating If you do not intend to use a key for an extended
period of time, you can deactivate the KEYLESS-
GO function of the key. The key will then use very little power, thereby conserving battery power.
For the purposes of activation or deactivation,
the vehicle does not have to be nearby.
X To deactivate: press the&button on the
key twice in rapid succession.
The battery check lamp of the key flashes
twice briefly and lights up once, then KEY-
LESS-GO is deactivated (Y page 81).
X To activate: press any button on the key.
or
X Insert the key into the ignition lock.
KEYLESS-GO and all of its associated features
are available again. KEYLESS-GO start function
General notes Bear in mind that the engine can be started by
any of the vehicle occupants if there is a key in
the vehicle (Y page 148). Changing the settings of the locking
system
You can change the settings of the locking sys-
tem. This means that only the driver's door and
the fuel filler flap are unlocked when the vehicle is unlocked. This is useful if you frequently travel
alone. X
To change the setting: press and hold down
the % and& buttons simultaneously
for about six seconds until the battery indica-
tor lamp flashes twice (Y page 81).
If the setting of the locking system is changed
within the signal range of the vehicle, pressing
the & or% button:
R locks or
R unlocks the vehicle
The key now functions as follows:
X To unlock: press the%button once.
X To unlock centrally: press the%button
twice.
X To lock centrally: press the&button.
The KEYLESS-GO function is changed as fol-
lows:
X To unlock the driver's door: touch the inner
surface of the door handle on the driver's
door.
X To unlock centrally: touch the inner surface
of the door handle on the front-passenger
door or the rear door.
X To lock centrally: touch the outer sensor
surface on one of the door handles
(Y page 79).
X To restore the factory settings: press and
hold down the %and& buttons simul-
taneously for approximately six seconds until the battery check lamp flashes twice
(Y page 81). Emergency key element
General notes If the vehicle can no longer be locked or
unlocked with the key or with KEYLESS-GO, use
the emergency key element.
If you use the emergency key element to unlock
and open the driver's door, the anti-theft alarm
system will be triggered. Switch off the alarm
(Y page 75).
If you unlock the vehicle using the emergency
key element, the fuel filler flap will not be
unlocked automatically.
X To unlock the fuel filler flap: insert the key
into the ignition lock. 80
KeyOpening and closing
Page 88 of 393
G
WARNING
When the double locks are activated, the
doors can no longer be opened from the
inside. People in the vehicle can no longer get out, e.g. in hazardous situations. There is a
risk of injury.
Therefore, do not leave any people unsuper-
vised in the vehicle, particularly children, eld-
erly people or people in need of special assis-
tance. Do not activate the double lock when
people are in the vehicle.
If the vehicle has been locked with the key or
with KEYLESS-GO, the double lock function is
activated as standard. It is then not possible to
open the doors from inside the vehicle. You can deactivate the double lock function by deacti-
vating the interior motion sensor (Y page 76).
The doors can then be opened from the inside
after the vehicle has been locked from the out-
side. You can only open the rear doors from
inside the vehicle if they are not secured by the child-proof locks (Y page 63). The anti-theft
alarm system is triggered if the door is opened
from the inside. Switch off the alarm
(Y page 75). Unlocking and opening the doors
from the inside
For all countries except the United Kingdom: you can open a door from inside the vehicle even
if it has been locked. You can only open the rear doors from inside the vehicle if they are not
secured by the child-proof locks (Y page 63).
If the vehicle has previously been locked from
the outside, opening a door from the inside will
trigger the anti-theft alarm system. Switch off
the alarm (Y page 75).
Only for the United Kingdom: if the vehicle
has been locked with the key from the outside,
the double lock function is activated as stand-
ard. It is then not possible to open the doors
from inside the vehicle. You can deactivate the
double lock function by deactivating the interior motion sensor (Y page 76). The doors can then
be opened from the inside after the vehicle has
been locked from the outside. The anti-theft
alarm system is triggered if the door is opened
from the inside. Switch off the alarm
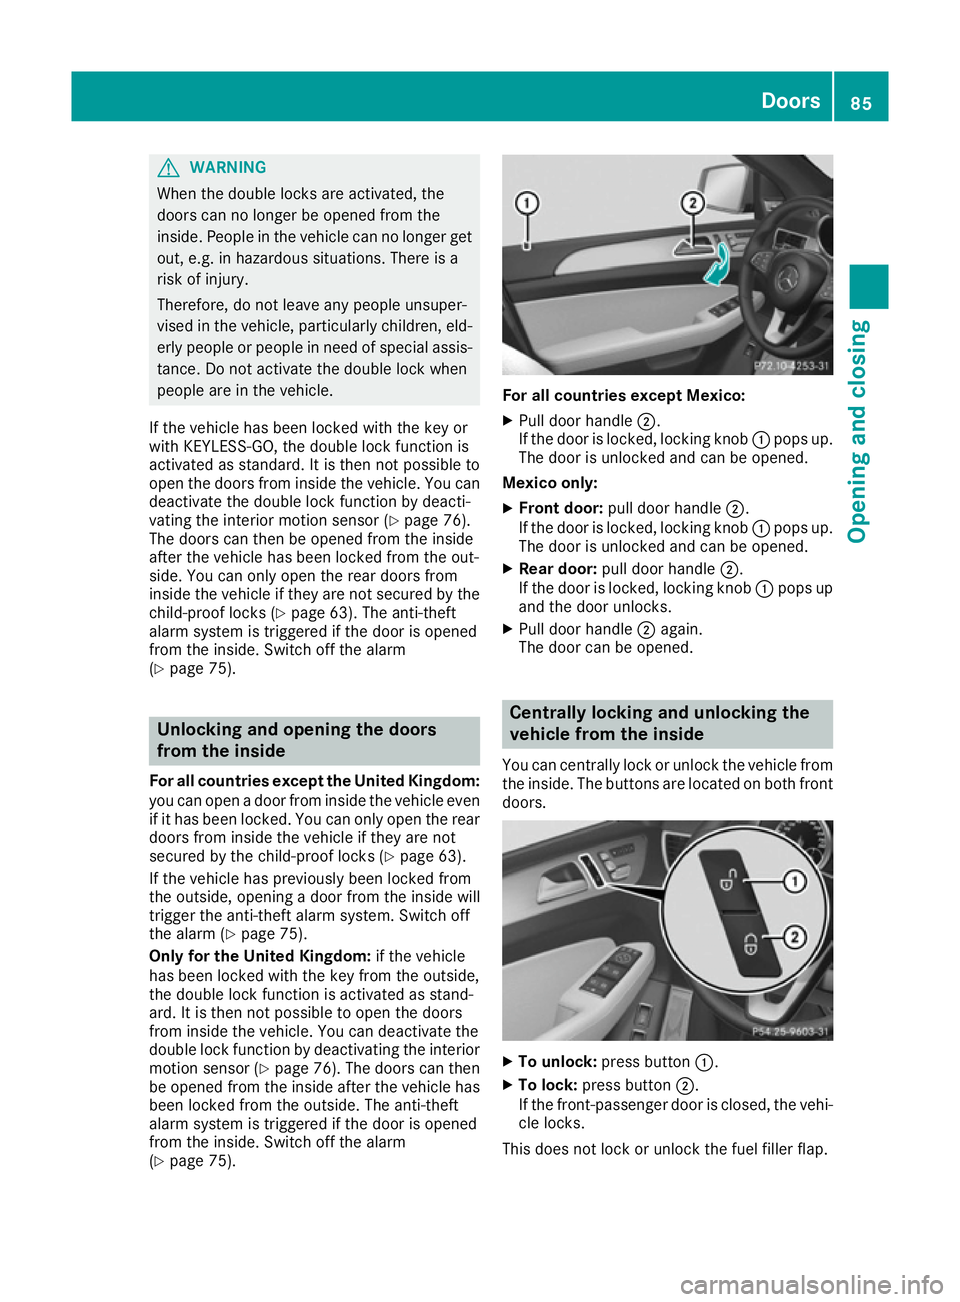
(Y page 75). For all countries except Mexico:
X Pull door handle ;.
If the door is locked, locking knob :pops up.
The door is unlocked and can be opened.
Mexico only: X Front door: pull door handle ;.
If the door is locked, locking knob :pops up.
The door is unlocked and can be opened.
X Rear door: pull door handle ;.
If the door is locked, locking knob :pops up
and the door unlocks.
X Pull door handle ;again.
The door can be opened. Centrally locking and unlocking the
vehicle from the inside
You can centrally lock or unlock the vehicle from the inside. The buttons are located on both frontdoors. X
To unlock: press button :.
X To lock: press button ;.
If the front-passenger door is closed, the vehi-
cle locks.
This does not lock or unlock the fuel filler flap. Doors
85Opening and closing Z
Page 91 of 393
If you lock the vehicle as described above, the
fuel filler flap is not locked. The anti-theft alarm
system is not primed. Luggage compartment
Important safety notes
G
WARNING
Combustion engines emit poisonous exhaust
gases such as carbon monoxide. If the tailgate is open when the engine is running, particu-
larly if the vehicle is moving, exhaust fumes
could enter the passenger compartment.
There is a risk of poisoning.
Turn off the engine before opening the tail-
gate. Never drive with the tailgate open. G
WARNING
If objects, luggage or loads are not secured or not secured sufficiently, they could slip, tip
over or be flung around and thereby hit vehicle
occupants. There is a risk of injury, especially when braking or abruptly changing directions.
Always store objects so that they cannot be
flung around. Secure objects, luggage or
loads against slipping or tipping before the
journey.
! The tailgate swings upwards and to the rear
when opened. Therefore, make sure that
there is sufficient clearance above and behind
the tailgate.
The opening dimensions of the tailgate can be
found in the "Vehicle data" section
(Y page 381).
Stow luggage or loads preferably in the luggage
compartment. Observe the loading guidelines
(Y page 299).
Do not leave the key in the luggage compart-
ment. You could otherwise lock yourself out.
You can:
R close the tailgate manually from outside
R open and close the tailgate automatically
from outside
R open and close the tailgate automatically
from inside R
limit the opening angle of the tailgate
R unlock the tailgate from inside with the emer-
gency release Tailgate reversing function
The tailgate is equipped with automatic obstacle
detection with reversing feature. If a solid object blocks or restricts the tailgate when automati-
cally opening or closing, this procedure is stop- ped. If the tailgate is stopped during the closing
procedure, it will open again automatically. The
automatic obstacle detection with reversing
function is only an aid. It is not a substitute for
your attentiveness when opening and closing
the tailgate. G
WARNING
The reversing function does not react:
R to soft, light and thin objects, e.g. small fin-
gers
R over the last 8 mm of the closing path
This means that the reversing feature cannot
prevent someone being trapped in these sit-
uations. There is a risk of injury.
When closing make sure that no body parts
are in the closing area.
If someone is trapped:
R press the Fbutton on the key or
R pull or press the remote operating switch
on the driver's door or
R press the closing or locking button on the
tailgate or
R pull the handle on the tailgate 88
Luggage compartmentOpening and closing
Page 141 of 393
Auxiliary heating
Important safety notes G
DANGER
If the exhaust pipe is blocked or sufficient
ventilation is not possible, toxic exhaust
fumes can enter the vehicle, especially car-
bon monoxide. This is the case, e.g. in
enclosed spaces, or if the vehicle is stuck in
snow. There is a risk of fatal injuries.
You should switch off the auxiliary heating in
enclosed spaces which do not have an extrac- tion system, e.g. a garage. If the vehicle is
stuck in snow and you must leave the auxiliary
heating running, keep the exhaust pipe and
the area around the vehicle clear of snow. To guarantee a sufficient supply of fresh air, open
a window on the side of the vehicle away from the wind. G
WARNING
When the auxiliary heating is switched on,
parts of the vehicle can become very hot.
Flammable materials such as leaves, grass or twigs may ignite if they come into contact
with:
R hot parts of the exhaust system
R the exhaust gas itself
There is a risk of fire.
When the auxiliary heating is switched on,
make sure that:
R no flammable materials come into contact
with hot vehicle components
R the exhaust gas can escape from the
exhaust pipe unhindered
R the exhaust gas does not come into contact
with flammable materials.
The auxiliary heating is fitted under the front
wing on the left-hand side of the vehicle. The
emissions outlet is found behind the left front
wheel.
! Operating the auxiliary heating/ventilation
draws on the vehicle battery. After you have
heated or ventilated the vehicle a maximum of two times, drive for a longer distance. Switch the auxiliary heating on regularly once a
month for about ten minutes.
The auxiliary heating heats the air in the vehicle
interior to the set temperature. This occurs with- out using the heat of the running engine. The
auxiliary heating is operated directly using the
vehicle's fuel. For this reason, the tank content
must be at least at reserve fuel level to ensure
that the auxiliary heating functions.
The auxiliary heating or auxiliary ventilation
automatically adjusts to changes in tempera-
ture and weather conditions. For this reason,
the auxiliary heating could switch from ventila-
tion mode to heating mode or from heating
mode to ventilation mode.
The auxiliary heating switches off when the
engine is switched off. The auxiliary ventilation
switches off when you turn the key to position 2
(Y page 146).
The auxiliary heating switches off automatically after 50 minute s.This time limit can be altered.
To do this, visit a qualified specialist workshop.
You cannot use the auxiliary ventilation to cool
the vehicle interior to a temperature lower than
the outside temperature.
Before switching on X
Turn the key to position 2in the ignition lock
(Y page 146).
X Set the desired temperature.
The auxiliary heating/ventilation can be activa-
ted even when climate control is set to manual.
Optimum comfort can be attained when the sys-
tem is set to automatic mode. Set the temper-
ature to 22 †.
The auxiliary heating or auxiliary ventilation can
be switched on/off using the button on the
centre console or the remote control.
The on-board computer can be used to specify
up to three departure times, one of which may
be preselected (Y page 247).138
Operating the climate control systemClimate control
Page 145 of 393
Problems with the auxiliary heating/ventilation
Problem
Possible causes/consequences and
M
MSolutions FAIL¨ The signal transmission between the transmitter and the vehicle is
faulty.
X
Change your position in relation to the vehicle, moving closer if
necessary.
X Make another attempt to switch the auxiliary heating or auxiliary
ventilation on or off using the remote control. FAIL The auxiliary heating/ventilation cannot be switched on or has
switched itself off.
The starter battery is not sufficiently charged.
X Charge the starter battery.
X Make another attempt to switch on the auxiliary heating/ventilation
using the remote control. The auxiliary heating cannot be switched on or has switched itself off.
The fuel tank content is below the reserve fuel level.
X Refuel at the nearest filling station.
X Make another attempt to switch on the auxiliary heating/ventilation
using the remote control. The auxiliary heating/ventilation cannot be switched on or has
switched itself off.
The auxiliary heating/ventilation is malfunctioning.
X Have the auxiliary heating/ventilation checked at a qualified spe-
cialist workshop. Adjusting the air vents
Important safety notes
G
WARNING
Very hot or very cold air can flow from the air vents. This could result in burns or frostbite in the immediate vicinity of the air vents. There
is a risk of injury.
Make sure that all vehicle occupants always
maintain a sufficient distance to the air out-
lets. If necessary, redirect the airflow to
another area of the vehicle interior.
In order to ensure the direct flow of fresh air
through the air vents into the vehicle interior,
please observe the following notes:
R keep the air inlet grille on the bonnet and in
the engine compartment on the front- passenger side free of blockages, such as ice,
snow or leaves.
R never cover the vents or ventilation grilles in
the vehicle interior
i For virtually draught-free ventilation, adjust
the sliders of the air vents to the centre posi- tion. 142
Adjusting the air ventsClimate control
Page 152 of 393
Pulling away
General notes G
WARNING
If the engine speed is above the idling speed
and you engage transmission position Dor R,
the vehicle could pull away suddenly. There is a risk of an accident.
When engaging transmission position Dor R,
always firmly depress the brake pedal and do not simultaneously accelerate.
Depress the accelerator carefully when pulling
away.
The vehicle locks centrally once you have pulled
away. The locking knobs in the doors drop down.
You can open the doors from the inside at any
time.
You can also deactivate the automatic locking
feature (Y page 247).
It is only possible to shift the transmission from position Pto the desired position if you depress
the brake pedal. Only then is the parking lock
released. If you do not depress the brake pedal,
the DIRECT SELECT lever can still be moved but the parking lock remains engaged.
i Upshifts take place at higher engine speeds
after a cold start. This helps the catalytic con- verter to reach its operating temperature
more quickly.
Information on automatically releasing the elec-
trical parking brake (Y page 169).
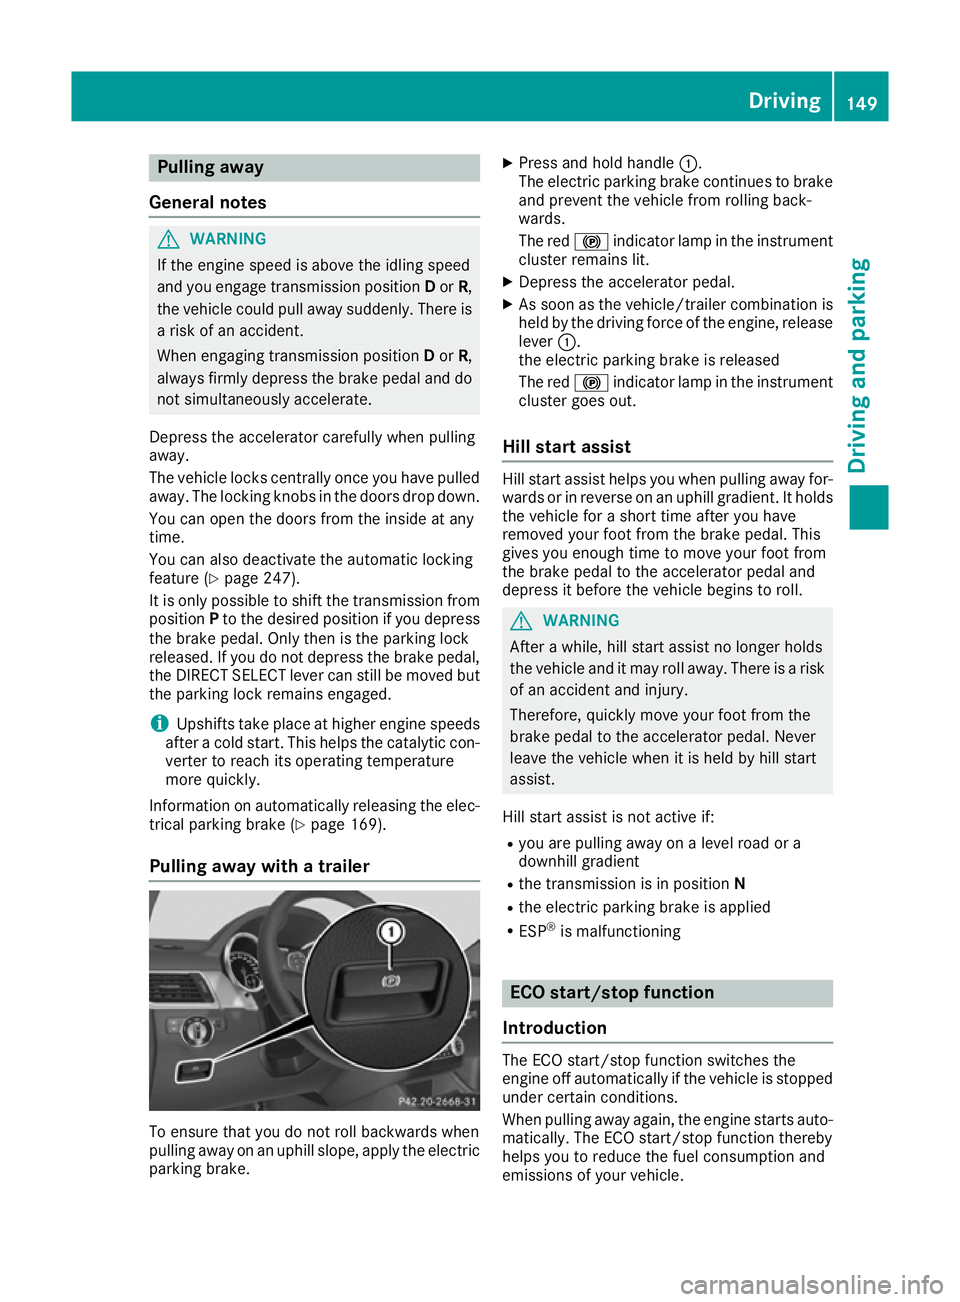
Pulling away with a trailer To ensure that you do not roll backwards when
pulling away on an uphill slope, apply the electric
parking brake. X
Press and hold handle :.
The electric parking brake continues to brake
and prevent the vehicle from rolling back-
wards.
The red !indicator lamp in the instrument
cluster remains lit.
X Depress the accelerator pedal.
X As soon as the vehicle/trailer combination is
held by the driving force of the engine, release
lever :.
the electric parking brake is released
The red !indicator lamp in the instrument
cluster goes out.
Hill start assist Hill start assist helps you when pulling away for-
wards or in reverse on an uphill gradient. It holds the vehicle for a short time after you have
removed your foot from the brake pedal. This
gives you enough time to move your foot from
the brake pedal to the accelerator pedal and
depress it before the vehicle begins to roll. G
WARNING
After a while, hill start assist no longer holds
the vehicle and it may roll away. There is a risk of an accident and injury.
Therefore, quickly move your foot from the
brake pedal to the accelerator pedal. Never
leave the vehicle when it is held by hill start
assist.
Hill start assist is not active if:
R you are pulling away on a level road or a
downhill gradient
R the transmission is in position N
R the electric parking brake is applied
R ESP ®
is malfunctioning ECO start/stop function
Introduction The ECO start/stop function switches the
engine off automatically if the vehicle is stopped
under certain conditions.
When pulling away again, the engine starts auto-
matically. The ECO start/stop function thereby
helps you to reduce the fuel consumption and
emissions of your vehicle. Driving
149Driving and parking Z
Page 155 of 393
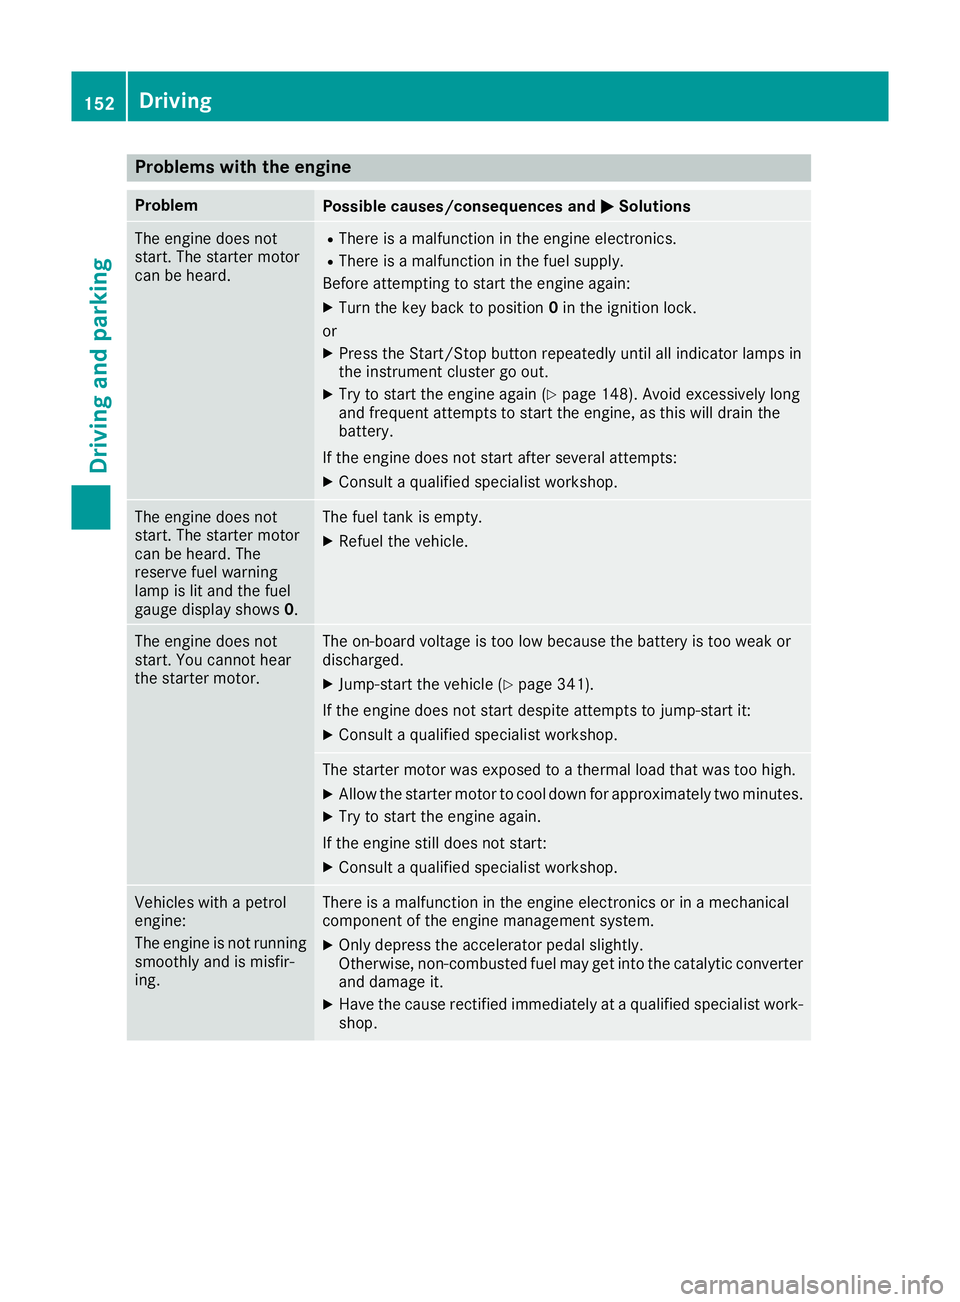
Problems with the engine
Problem
Possible causes/consequences and
M
MSolutions The engine does not
start. The starter motor
can be heard. R
There is a malfunction in the engine electronics.
R There is a malfunction in the fuel supply.
Before attempting to start the engine again:
X Turn the key back to position 0in the ignition lock.
or X Press the Start/Stop button repeatedly until all indicator lamps in
the instrument cluster go out.
X Try to start the engine again (Y page 148). Avoid excessively long
and frequent attempts to start the engine, as this will drain the
battery.
If the engine does not start after several attempts:
X Consult a qualified specialist workshop. The engine does not
start. The starter motor
can be heard. The
reserve fuel warning
lamp is lit and the fuel
gauge display shows
0. The fuel tank is empty.
X Refuel the vehicle. The engine does not
start. You cannot hear
the starter motor. The on-board voltage is too low because the battery is too weak or
discharged.
X Jump-start the vehicle (Y page 341).
If the engine does not start despite attempts to jump-start it:
X Consult a qualified specialist workshop. The starter motor was exposed to a thermal load that was too high.
X Allow the starter motor to cool down for approximately two minutes.
X Try to start the engine again.
If the engine still does not start: X Consult a qualified specialist workshop. Vehicles with a petrol
engine:
The engine is not running
smoothly and is misfir-
ing. There is a malfunction in the engine electronics or in a mechanical
component of the engine management system.
X Only depress the accelerator pedal slightly.
Otherwise, non-combusted fuel may get into the catalytic converter
and damage it.
X Have the cause rectified immediately at a qualified specialist work-
shop. 152
DrivingDriving and parking
Page 161 of 393
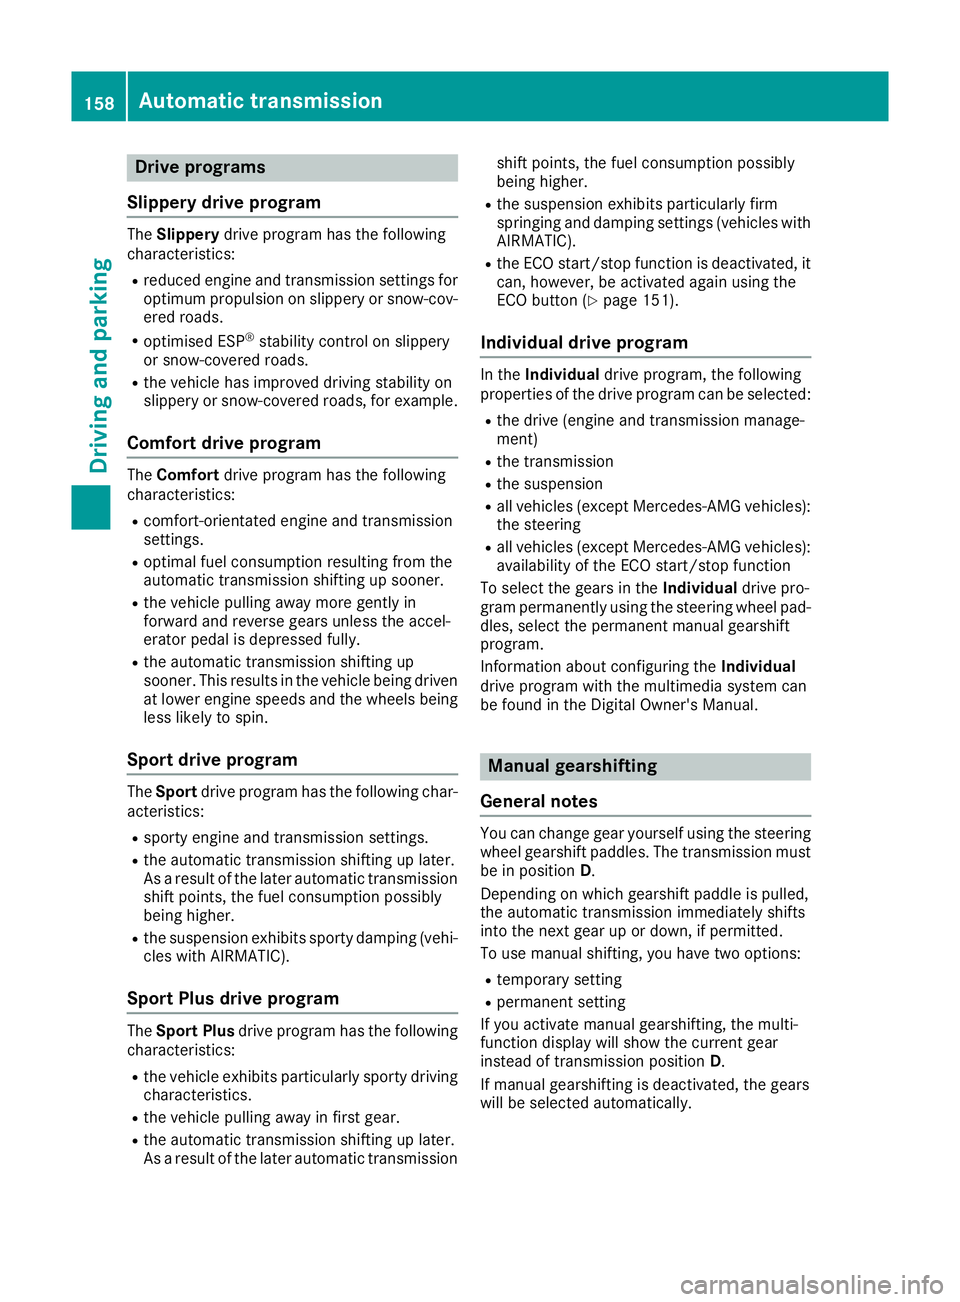
Drive programs
Slippery drive program The
Slippery drive program has the following
characteristics:
R reduced engine and transmission settings for
optimum propulsion on slippery or snow-cov-
ered roads.
R optimised ESP ®
stability control on slippery
or snow-covered roads.
R the vehicle has improved driving stability on
slippery or snow-covered roads, for example.
Comfort drive program The
Comfort drive program has the following
characteristics:
R comfort-orientated engine and transmission
settings.
R optimal fuel consumption resulting from the
automatic transmission shifting up sooner.
R the vehicle pulling away more gently in
forward and reverse gears unless the accel-
erator pedal is depressed fully.
R the automatic transmission shifting up
sooner. This results in the vehicle being driven
at lower engine speeds and the wheels being less likely to spin.
Sport drive program The
Sport drive program has the following char-
acteristics:
R sporty engine and transmission settings.
R the automatic transmission shifting up later.
As a result of the later automatic transmission
shift points, the fuel consumption possibly
being higher.
R the suspension exhibits sporty damping (vehi-
cles with AIRMATIC).
Sport Plus drive program The
Sport Plus drive program has the following
characteristics:
R the vehicle exhibits particularly sporty driving
characteristics.
R the vehicle pulling away in first gear.
R the automatic transmission shifting up later.
As a result of the later automatic transmission shift points, the fuel consumption possibly
being higher.
R the suspension exhibits particularly firm
springing and damping settings (vehicles with
AIRMATIC).
R the ECO start/stop function is deactivated, it
can, however, be activated again using the
ECO button (Y page 151).
Individual drive program In the
Individual drive program, the following
properties of the drive program can be selected:
R the drive (engine and transmission manage-
ment)
R the transmission
R the suspension
R all vehicles (except Mercedes-AMG vehicles):
the steering
R all vehicles (except Mercedes-AMG vehicles):
availability of the ECO start/stop function
To select the gears in the Individualdrive pro-
gram permanently using the steering wheel pad- dles, select the permanent manual gearshift
program.
Information about configuring the Individual
drive program with the multimedia system can
be found in the Digital Owner's Manual. Manual gearshifting
General notes You can change gear yourself using the steering
wheel gearshift paddles. The transmission must be in position D.
Depending on which gearshift paddle is pulled,
the automatic transmission immediately shifts
into the next gear up or down, if permitted.
To use manual shifting, you have two options:
R temporary setting
R permanent setting
If you activate manual gearshifting, the multi-
function display will show the current gear
instead of transmission position D.
If manual gearshifting is deactivated, the gears
will be selected automatically. 158
Automatic transmissionDriving and pa
rking