fog light MERCEDES-BENZ GLE COUPE 2015 Owners Manual
[x] Cancel search | Manufacturer: MERCEDES-BENZ, Model Year: 2015, Model line: GLE COUPE, Model: MERCEDES-BENZ GLE COUPE 2015Pages: 393, PDF Size: 12.71 MB
Page 15 of 393
K
Key Changing the battery ...................... .81
Checking the battery ...................... .81
Convenience closing feature ............ 94
Convenience opening feature .......... 93
Display message ............................ 285
Door central locking/unlocking ...... .79
Emergency key element ................... 80
Important safety note s.................... 78
KEYLESS-GO start function .............. 80
Loss ................................................. 83
Modifying the programming ............. 80
Overview .......................................... 78
Positions (ignition lock) ................. 146
Problem (malfunction) ..................... 83
Starting the engine ........................ 148
Key positions
Key ................................................ 146
Start/Stop button .......................... 146
KEYLESS-GO
Convenience closing ........................ 94
Deactivation ..................................... 79
Display message ............................ 285
Locking ............................................ 79
Start function ................................... 80
Starting the engine ........................ 148
Unlocking ......................................... 79
Kickdown
Driving tip s.................................... 157
Manual gearshifting ....................... 160
Kneebag ............................................... 44 L
Lamps see Warning and indicator lamps
Lane Keeping Assist
Activating/deactivating ................. 245
Display message ............................ 274
Function/information .................... 220
see Active Lane Keeping Assist
Lap time (RACETIMER) ...................... 250
Lashing eyelets ................................. 303
Level control (display message) ...... 273
Licence plate lamp (display mes-
sage) ................................................... 267 Light sensor (display message)
....... 268
Lights
Activating/deactivating the Intel-
ligent Light System ........................ 246
Active light function ....................... 118
Adaptive Highbeam Assist PLUS .... 119
Automatic headlamp mode ............ 115
Cornering light function ................. 118
Dipped-beam headlamp s............... 116
Driving abroad ............................... 115
Foglamps (extended range) ........... 119
Hazard warning lamps ................... 117
Headlamp flashe r........................... 117
Light switch ................................... 115
Main-beam headlamp s................... 117
Motorway mode ............................. 118
Parking lamps ................................ 116
Rear foglamp ................................. 116
Side lamps ..................................... 116
Turn signals ................................... 117
see Interior lighting
LIM indicator lamp
Cruise control ................................ 179
DISTRONIC PLUS ........................... 184
Variable SPEEDTRONIC ................. 181
Limiting the speed
see SPEEDTRONIC
Loading guidelines ............................ 299
Locking
see Central locking
Locking (doors)
Automatic ........................................ 86
Emergency locking ........................... 87
From inside (central locking but-
ton) .................................................. 85
Locking centrally
see Central locking
Locking verification signal (on-
board computer) ............................... 247
Luggage compartment enlarge-
ment
Important safety notes .................. 302
Luggage compartment floor
Important safety notes .................. 305
opening/closing ............................ 305
stowage well, under ....................... 305
Lumbar support
Adjusting (on the seat) .................. 105 12
Index
Page 118 of 393
Useful information
i This Owner's Manual describes all models,
series and optional equipment for your vehi-
cle that were available at the time of going to
press. National variations are possible. Note
that your vehicle may not be equipped with all
of the functions described. This is also the
case for systems and functions relevant to
safety.
i Read the information on qualified specialist
workshops: (Y page 25). Exterior lighting
General notes
For reasons of safety, Mercedes-Benz recom-
mends that you drive with the lights switched on
even during the daytime. In some countries,
operation of the headlamps varies due to legal
requirements and self-imposed obligations. Driving abroad
General notes If your journey takes you to countries where
vehicles are driven on the opposite side of the
road to the country in which the vehicle is reg-
istered, your headlamps must be switched to
symmetrical dipped beam as soon as possible
after crossing the border. This prevents oncom-
ing traffic from being dazzled. Symmetrical
lights do not illuminate as large an area of the
edge of the carriageway.
Vehicles with Intelligent Light System X
Before crossing the border, set the head-
lamps to symmetrical dipped beam and after
returning back to asymmetrical dipped beam via the "Dipped-beam headlamps for driving
on the right/left" function in the on-board
computer (Y page 246).
If the headlamps are converted to symmetrical
dipped beam, the "motorway mode" and "exten- ded range foglamps" functions are not available. Setting the exterior lighting
Setting options Exterior lighting can be set by:
R using the light switch
R using the combination switch (Y page 117)
R using the on-board computer (Y page 246)
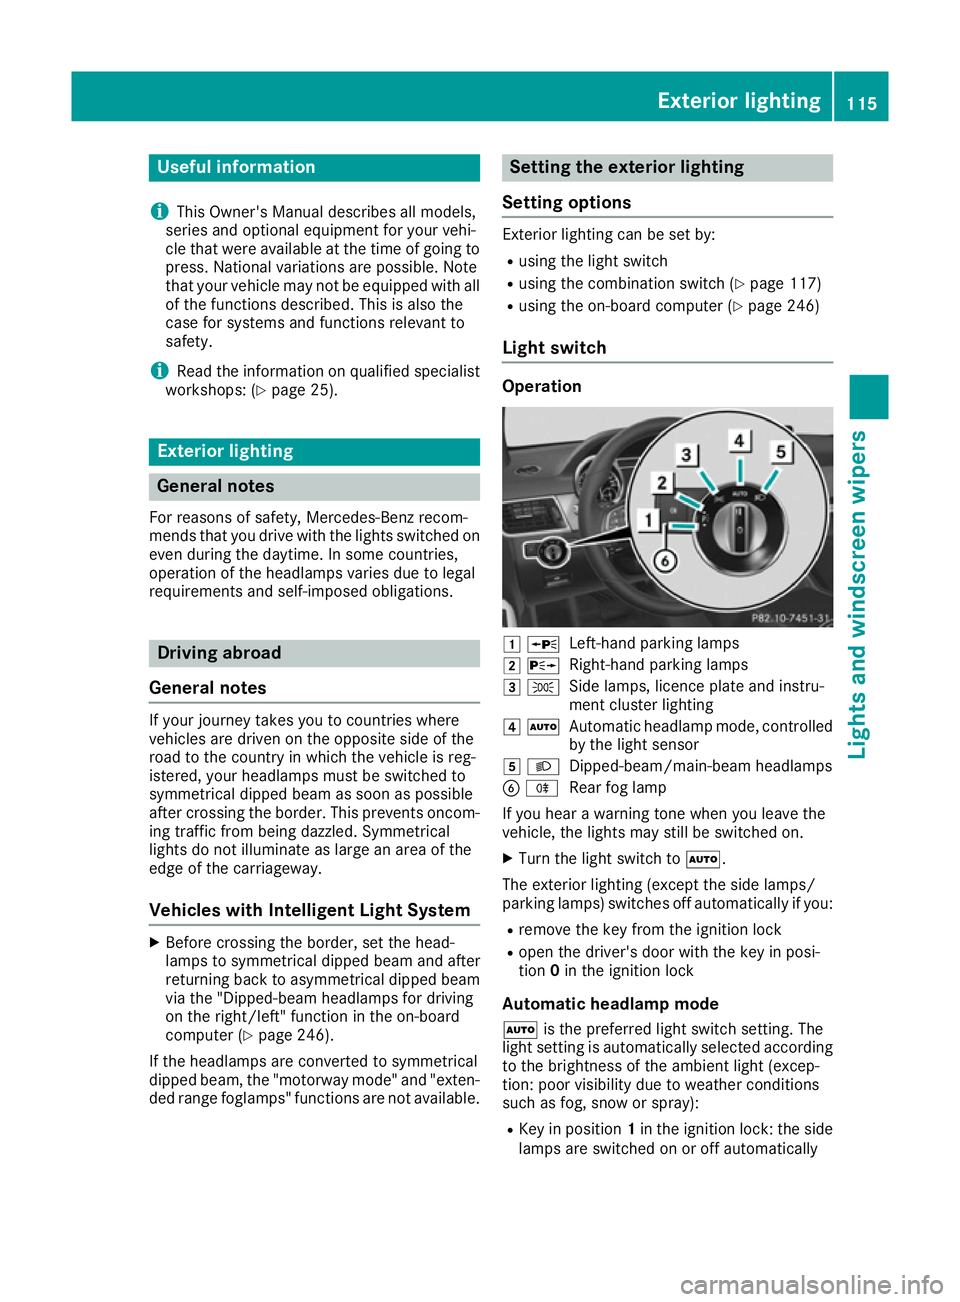
Light switch Operation
1
W
Left-hand parking lamps
2 X
Right-hand parking lamps
3 T
Side lamps, licence plate and instru-
ment cluster lighting
4 Ã
Automatic headlamp mode, controlled
by the light sensor
5 L
Dipped-beam/main-beam headlamps
B R
Rear fog lamp
If you hear a warning tone when you leave the
vehicle, the lights may still be switched on.
X Turn the light switch to Ã.
The exterior lighting (except the side lamps/
parking lamps) switches off automatically if you: R remove the key from the ignition lock
R open the driver's door with the key in posi-
tion 0in the ignition lock
Automatic headlamp mode
à is the preferred light switch setting. The
light setting is automatically selected according to the brightness of the ambient light (excep-
tion: poor visibility due to weather conditions
such as fog, snow or spray):
R Key in position 1in the ignition lock: the side
lamps are switched on or off automatically Exterior lighting
115Lights and windscreen wipers
Page 119 of 393
depending on the brightness of the ambient
light
R With the engine running: depending on the
ambient light conditions, the daytime driving
lights or the side lamps and dipped-beam
headlamps are switched on or off automati-
cally
X To switch on automatic headlamp mode:
turn the light switch to Ã.G
WARNING
When the light switch is set to Ã, the
dipped-beam headlamps may not be switched on automatically if there is fog, snow or othercauses of poor visibility due to the weather
conditions such as spray. There is a risk of an
accident.
In such situations, turn the light switch to
L.
The automatic headlamp feature is only an aid.
The driver is responsible for the vehicle lighting at all times.
The daytime driving lights improve the detecta-
bility of your vehicle during the day.
When the side lamps and dipped-beam head-
lamps are switched on, the green T(side
lamps) and L(dipped-beam headlamps)
indicator lamps in the instrument cluster light
up.
Dipped-beam headlamps When the ignition is switched on and the light
switch is in the Lposition, the side lamps
and dipped-beam headlamps are switched on
even if the light sensor does not sense dark
ambient light conditions. This is advantageous
when there is fog or rain.
X To switch on the dipped-beam headlamps:
turn the key in the ignition lock to position 2
or start the engine.
X Turn the light switch to L.
The green Lindicator lamp in the instru-
ment cluster lights up.
Rear fog lamp The rear foglamp improves the visibility of your
vehicle in heavy fog for the following traffic.
Please observe the country-specific laws on the
use of rear foglamps. X
To switch on the rear foglamp: turn the key
in the ignition lock to position 2or start the
engine.
X Turn the light switch to LorÃ.
X Press the Rbutton.
The yellow Rindicator lamp in the instru-
ment cluster lights up.
X To switch off the rear foglamp: press the
R button.
The yellow Rindicator lamp in the instru-
ment cluster goes out.
Side lamps ! If the battery has been excessively dis-
charged, the side lamps or parking lamps are
automatically switched off to enable the next engine start. Always park your vehicle safely
and sufficiently lit according to legal stand-
ards. Avoid the continuous use of the T
side lamps for several hours. If possible,
switch on the Xright or the Wleft
parking lamp.
X To switch on: turn the light switch to T.
The green Tindicator lamp in the instru-
ment cluster lights up.
Parking lamps Switches on the parking lamps ensures that the
corresponding side of the vehicle is illuminated.
X To switch on the parking lamps: the key
should not be in the ignition lock or it should
be in position 0.
X Turn the light switch to W(left-hand side of
the vehicle) or X(right-hand side of the
vehicle). 116
Exterior lightingLights and windscreen wipers
Page 121 of 393
offers advanced functions for improved illumi-
nation of the road surface, e.g. depending on the vehicle speed or weather conditions. The sys-
tem includes the active light function, corneringlight function, motorway mode and extended
range foglamps. The system is only active when
it is dark.
You can activate or deactivate the "Intelligent
Light System" function using the on-board com-
puter (Y page 246).
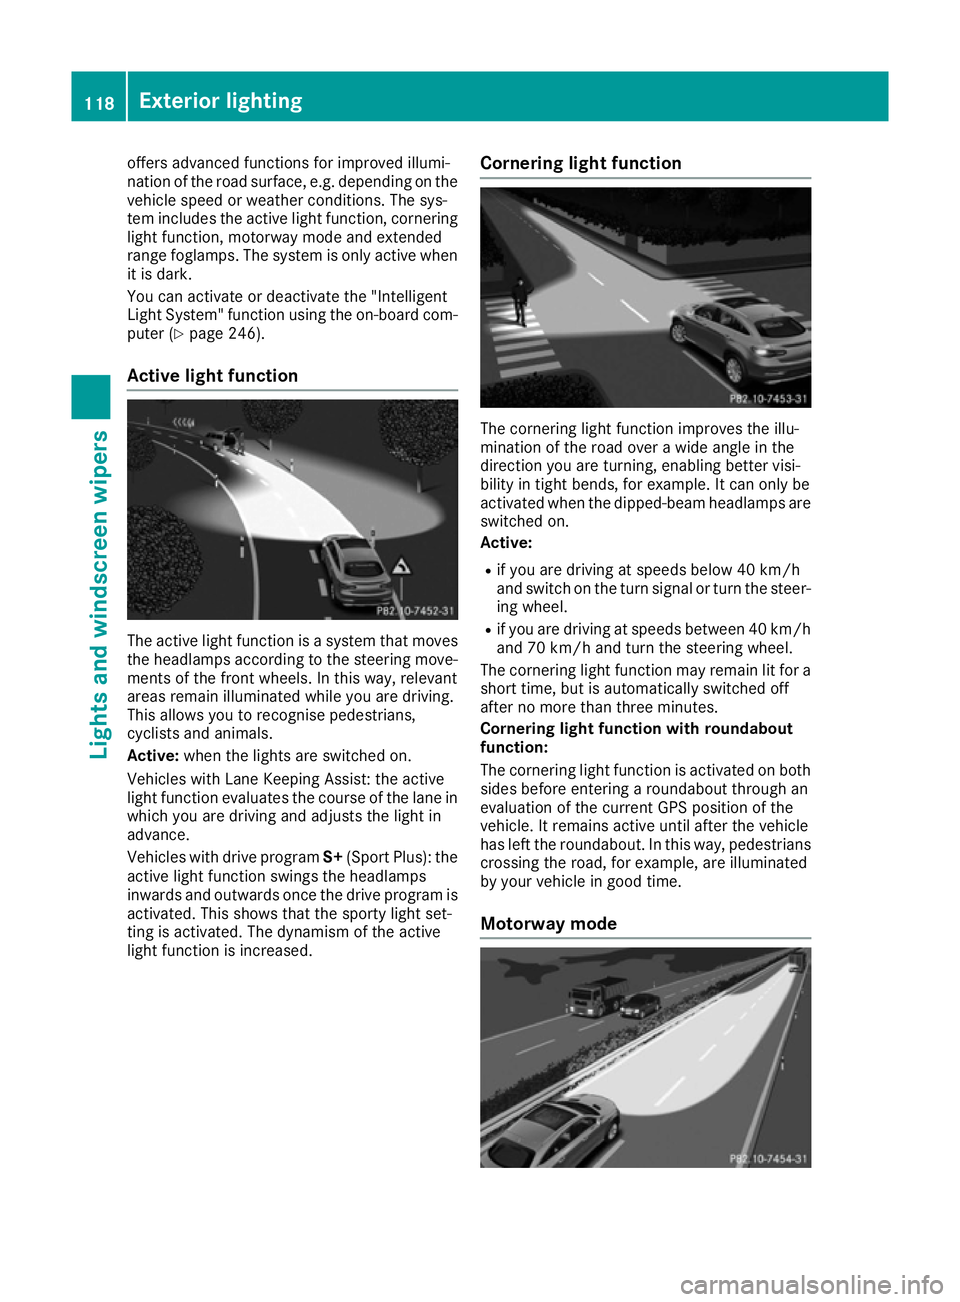
Active light function The active light function is a system that moves
the headlamps according to the steering move- ments of the front wheels. In this way, relevant
areas remain illuminated while you are driving.
This allows you to recognise pedestrians,
cyclists and animals.
Active: when the lights are switched on.
Vehicles with Lane Keeping Assist: the active
light function evaluates the course of the lane in which you are driving and adjusts the light in
advance.
Vehicles with drive program S+(Sport Plus): the
active light function swings the headlamps
inwards and outwards once the drive program is activated. This shows that the sporty light set-
ting is activated. The dynamism of the active
light function is increased. Cornering light function The cornering light function improves the illu-
mination of the road over a wide angle in the
direction you are turning, enabling better visi-
bility in tight bends, for example. It can only be
activated when the dipped-beam headlamps are
switched on.
Active:
R if you are driving at speeds below 40 km/h
and switch on the turn signal or turn the steer- ing wheel.
R if you are driving at speeds between 40 km/h
and 70 km/h and turn the steering wheel.
The cornering light function may remain lit for a
short time, but is automatically switched off
after no more than three minutes.
Cornering light function with roundabout
function:
The cornering light function is activated on both sides before entering a roundabout through an
evaluation of the current GPS position of the
vehicle. It remains active until after the vehicle
has left the roundabout. In this way, pedestrians crossing the road, for example, are illuminated
by your vehicle in good time.
Motorway mode 118
Exterior lightingLights and windscreen wipers
Page 122 of 393
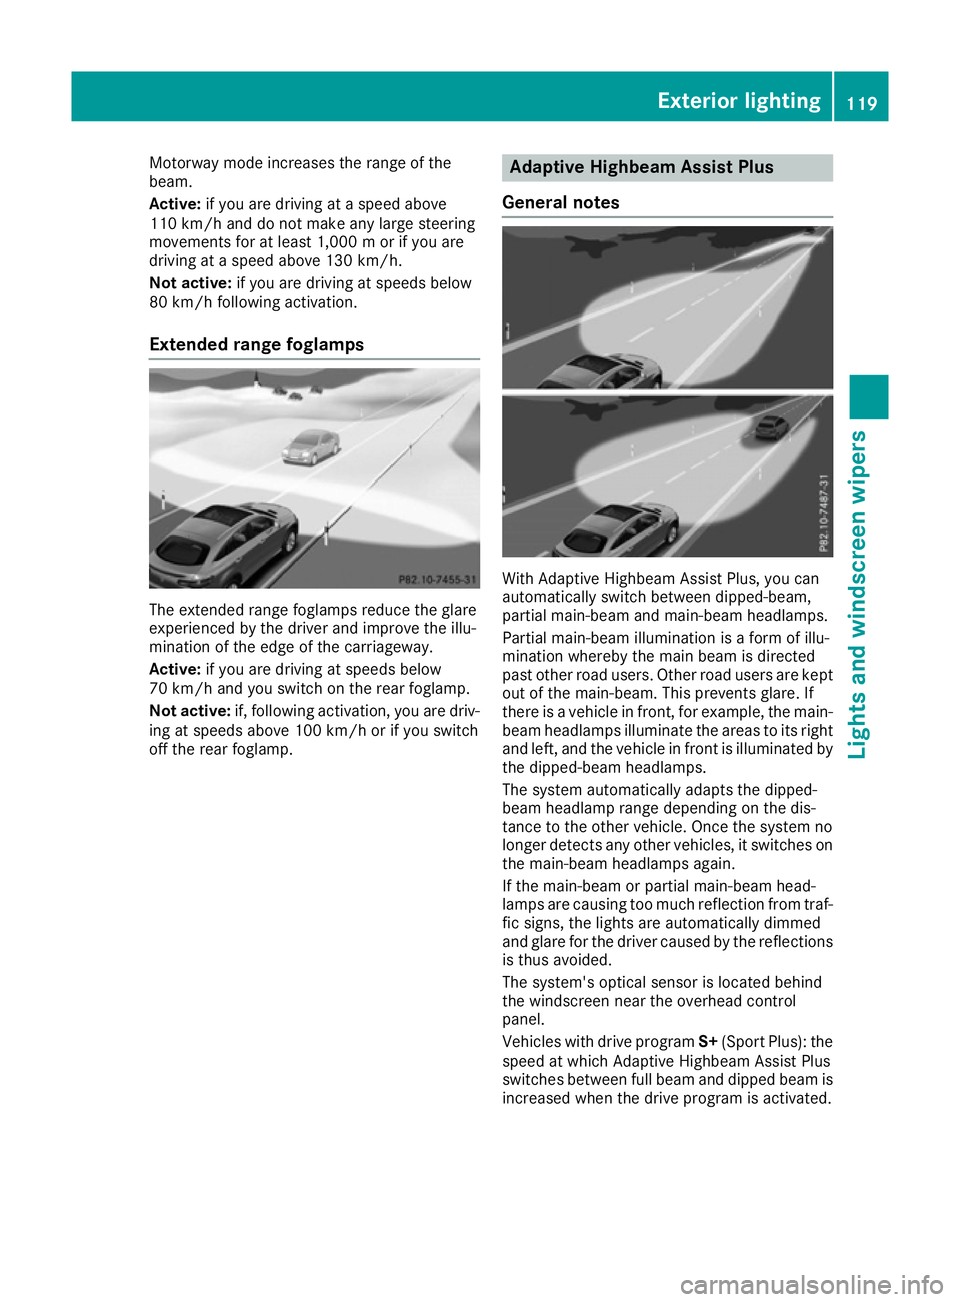
Motorway mode increases the range of the
beam.
Active: if you are driving at a speed above
110 km/h and do not make any large steering
movements for at least 1,000 m or if you are
driving at a speed above 130 km/h.
Not active: if you are driving at speeds below
80 km/h following activation.
Extended range foglamps The extended range foglamps reduce the glare
experienced by the driver and improve the illu-
mination of the edge of the carriageway.
Active: if you are driving at speeds below
70 km/h and you switch on the rear foglamp.
Not active: if, following activation, you are driv-
ing at speeds above 100 km/h or if you switch
off the rear foglamp. Adaptive Highbeam Assist Plus
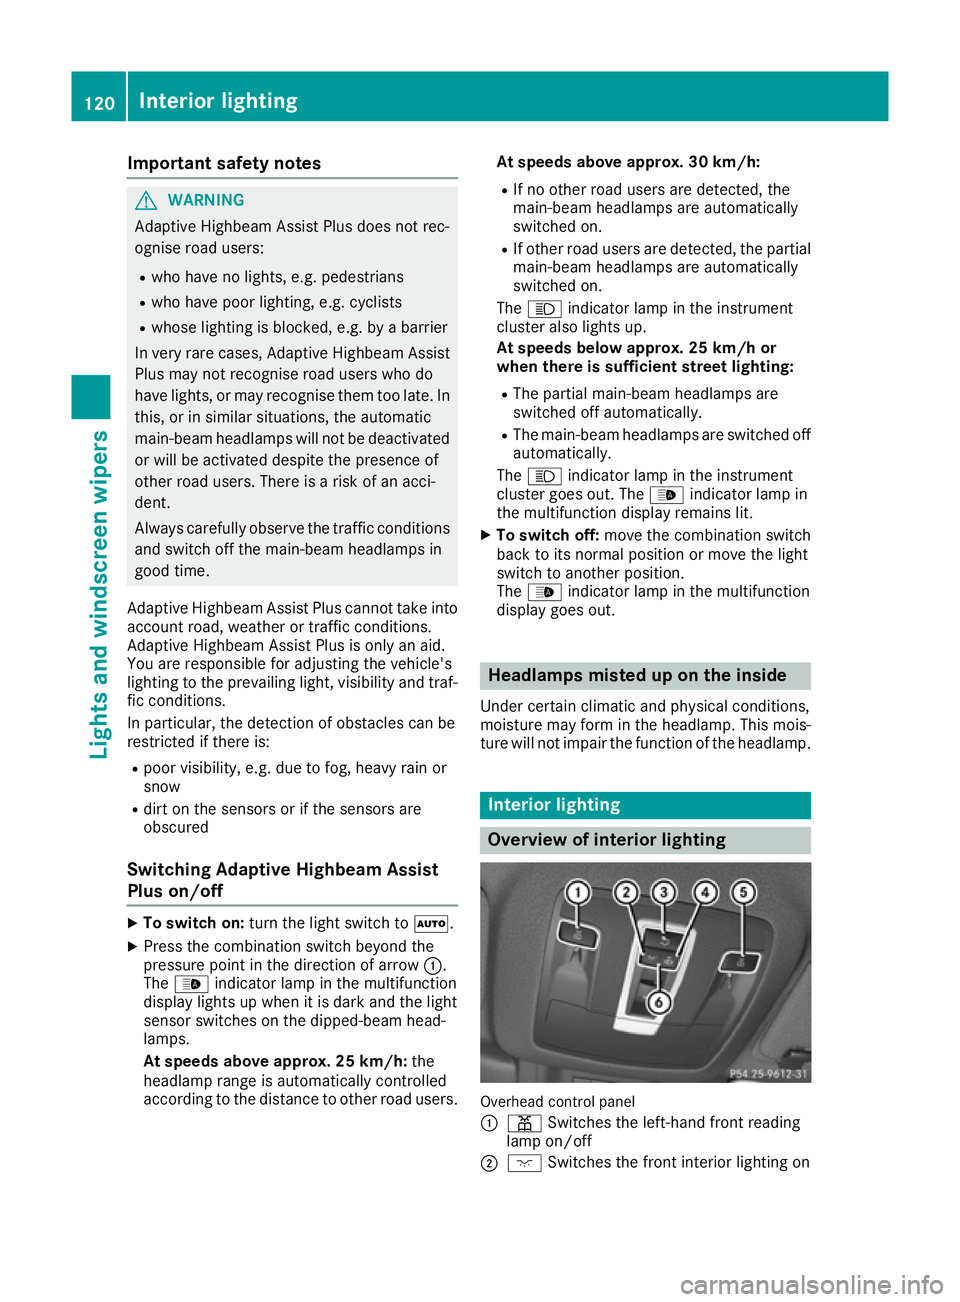
General notes With Adaptive Highbeam Assist Plus, you can
automatically switch between dipped-beam,
partial main-beam and main-beam headlamps.
Partial main-beam illumination is a form of illu-
mination whereby the main beam is directed
past other road users. Other road users are kept
out of the main-beam. This prevents glare. If
there is a vehicle in front, for example, the main- beam headlamps illuminate the areas to its right
and left, and the vehicle in front is illuminated by
the dipped-beam headlamps.
The system automatically adapts the dipped-
beam headlamp range depending on the dis-
tance to the other vehicle. Once the system no
longer detects any other vehicles, it switches on the main-beam headlamps again.
If the main-beam or partial main-beam head-
lamps are causing too much reflection from traf-fic signs, the lights are automatically dimmed
and glare for the driver caused by the reflections
is thus avoided.
The system's optical sensor is located behind
the windscreen near the overhead control
panel.
Vehicles with drive program S+(Sport Plus): the
speed at which Adaptive Highbeam Assist Plus
switches between full beam and dipped beam is
increased when the drive program is activated. Exterior lighting
119Lights and windscreen wipers Z
Page 123 of 393
Important safety notes
G
WARNING
Adaptive Highbeam Assist Plus does not rec-
ognise road users:
R who have no lights, e.g. pedestrians
R who have poor lighting, e.g. cyclists
R whose lighting is blocked, e.g. by a barrier
In very rare cases, Adaptive Highbeam Assist
Plus may not recognise road users who do
have lights, or may recognise them too late. In this, or in similar situations, the automatic
main-beam headlamps will not be deactivated
or will be activated despite the presence of
other road users. There is a risk of an acci-
dent.
Always carefully observe the traffic conditions and switch off the main-beam headlamps in
good time.
Adaptive Highbeam Assist Plus cannot take into
account road, weather or traffic conditions.
Adaptive Highbeam Assist Plus is only an aid.
You are responsible for adjusting the vehicle's
lighting to the prevailing light, visibility and traf-
fic conditions.
In particular, the detection of obstacles can be
restricted if there is:
R poor visibility, e.g. due to fog, heavy rain or
snow
R dirt on the sensors or if the sensors are
obscured
Switching Adaptive Highbeam Assist
Plus on/off X
To switch on: turn the light switch to Ã.
X Press the combination switch beyond the
pressure point in the direction of arrow :.
The _ indicator lamp in the multifunction
display lights up when it is dark and the light
sensor switches on the dipped-beam head-
lamps.
At speeds above approx. 25 km/h: the
headlamp range is automatically controlled
according to the distance to other road users. At speeds above approx. 30 km/h:
R If no other road users are detected, the
main-beam headlamps are automatically
switched on.
R If other road users are detected, the partial
main-beam headlamps are automatically
switched on.
The K indicator lamp in the instrument
cluster also lights up.
At speeds below approx. 25 km/h or
when there is sufficient street lighting:
R The partial main-beam headlamps are
switched off automatically.
R The main-beam headlamps are switched off
automatically.
The K indicator lamp in the instrument
cluster goes out. The _indicator lamp in
the multifunction display remains lit.
X To switch off: move the combination switch
back to its normal position or move the light
switch to another position.
The _ indicator lamp in the multifunction
display goes out. Headlamps misted up on the inside
Under certain climatic and physical conditions,
moisture may form in the headlamp. This mois-
ture will not impair the function of the headlamp. Interior lighting
Overview of interior lighting
Overhead control panel
:
p Switches the left-hand front reading
lamp on/off
; c Switches the front interior lighting on 120
Interior lightingLights and windscreen wipers
Page 182 of 393
Important safety notes
If you fail to adapt your driving style, cruise con-
trol can neither reduce the risk of an accident
nor override the laws of physics. Cruise control
cannot take into account road, weather or traffic
conditions. Cruise control is only an aid. You are responsible for the distance to the vehicle in
front, for vehicle speed, for braking in good time, and for staying in lane.
Do not use cruise control:
R in road and traffic conditions which do not
allow you to maintain a constant speed (e.g. in
heavy traffic or on winding roads)
R on smooth or slippery roads. Braking or accel-
erating can cause the drive wheels to lose
traction and the vehicle could then skid
R when there is poor visibility, e.g. due to fog,
heavy rain or snow
If there is a change of drivers, advise the new
driver of the speed stored.
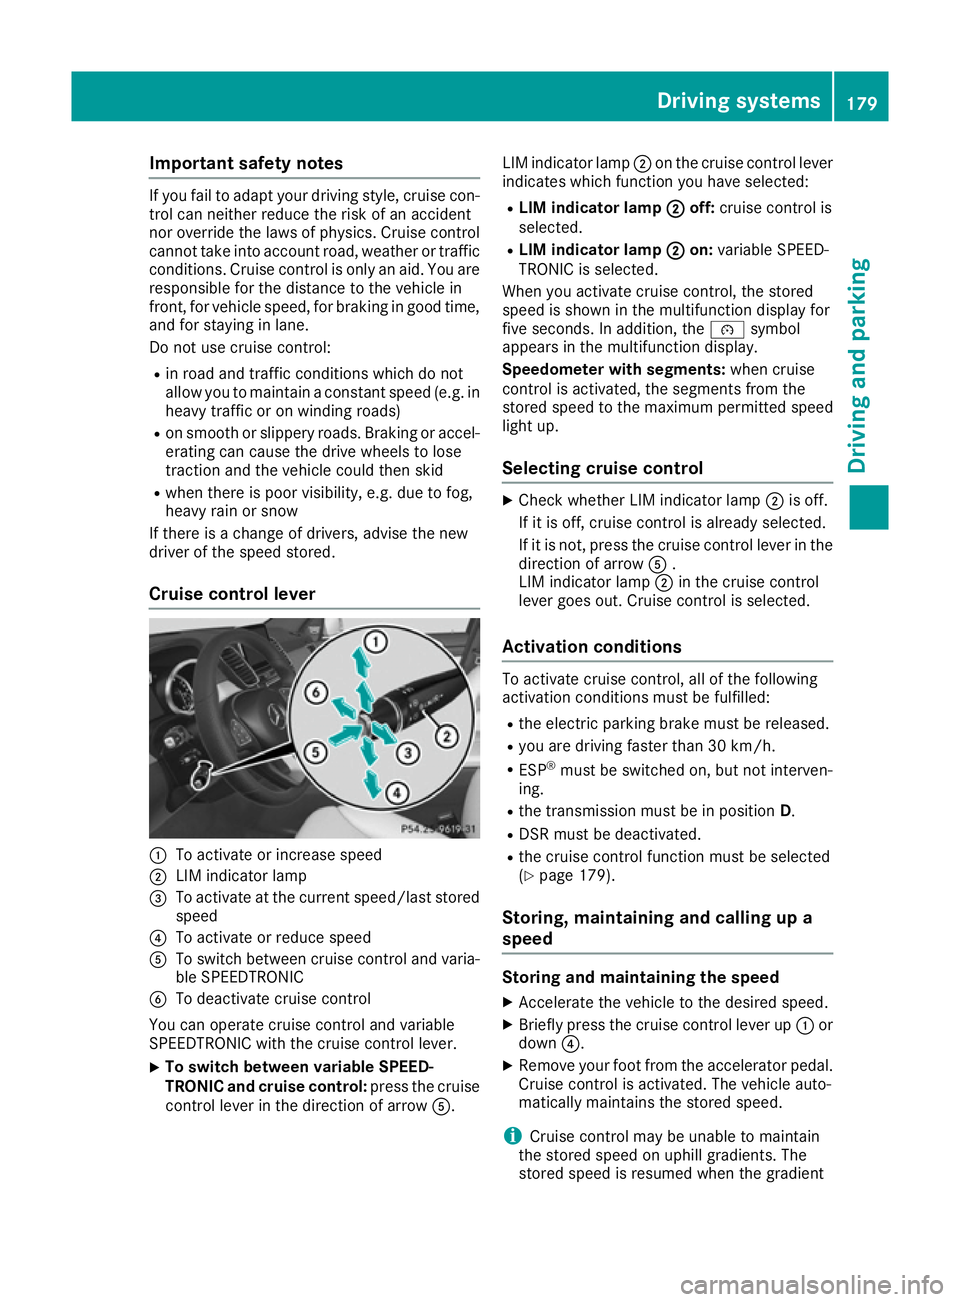
Cruise control lever :
To activate or increase speed
; LIM indicator lamp
= To activate at the current speed/last stored
speed
? To activate or reduce speed
A To switch between cruise control and varia-
ble SPEEDTRONIC
B To deactivate cruise control
You can operate cruise control and variable
SPEEDTRONIC with the cruise control lever. X To switch between variable SPEED-
TRONIC and cruise control:
press the cruise
control lever in the direction of arrow A.LIM indicator lamp
;on the cruise control lever
indicates which function you have selected:
R LIM indicator lamp ;
; off: cruise control is
selected.
R LIM indicator lamp ; ;on: variable SPEED-
TRONIC is selected.
When you activate cruise control, the stored
speed is shown in the multifunction display for
five seconds. In addition, the ésymbol
appears in the multifunction display.
Speedometer with segments: when cruise
control is activated, the segments from the
stored speed to the maximum permitted speed
light up.
Selecting cruise control X
Check whether LIM indicator lamp ;is off.
If it is off, cruise control is already selected.
If it is not, press the cruise control lever in the direction of arrow A.
LIM indicator lamp ;in the cruise control
lever goes out. Cruise control is selected.
Activation conditions To activate cruise control, all of the following
activation conditions must be fulfilled:
R the electric parking brake must be released.
R you are driving faster than 30 km/h.
R ESP ®
must be switched on, but not interven-
ing.
R the transmission must be in position D.
R DSR must be deactivated.
R the cruise control function must be selected
(Y page 179).
Storing, maintaining and calling up a
speed Storing and maintaining the speed
X Accelerate the vehicle to the desired speed.
X Briefly press the cruise control lever up :or
down ?.
X Remove your foot from the accelerator pedal.
Cruise control is activated. The vehicle auto-
matically maintains the stored speed.
i Cruise control may be unable to maintain
the stored speed on uphill gradients. The
stored speed is resumed when the gradient Driving systems
179Driving and parking Z
Page 186 of 393
DISTRONIC PLUS cannot prevent a collision. An
intermittent warning tone will then sound and
the distance warning lamp will light up in the
instrument cluster. Brake immediately to
increase the distance to the vehicle driving in
front, or take evasive action, provided it is safe
to do so.
For DISTRONIC PLUS to assist you, the radar
sensor system must be operational.
DISTRONIC PLUS operates in the range
between 0 km/h and 200 km/h.
Do not use DISTRONIC PLUS while driving on
roads with steep gradients.
Important safety notes G
WARNING
DISTRONIC PLUS does not react to:
R people or animals
R stationary obstacles on the road, e.g. stop-
ped or parked vehicles
R oncoming and crossing traffic
As a result, DISTRONIC PLUS may neither give
warnings nor intervene in such situations.
There is a risk of an accident.
Always pay careful attention to the traffic sit- uation and be ready to brake. G
WARNING
DISTRONIC PLUS cannot always clearly rec-
ognise other road users and complex traffic
conditions.
In such cases, DISTRONIC PLUS may:
R give an unnecessary warning and then
brake the vehicle
R neither give a warning nor intervene
R accelerate or brake unexpectedly
There is a risk of an accident.
Continue to drive carefully and be prepared to
brake, particularly if DISTRONIC PLUS warns
you. G
WARNING
DISTRONIC PLUS brakes your vehicle with up to 50% of the maximum possible deceleration.
If this deceleration is not sufficient, DISTRONIC PLUS alerts you with a visual and
acoustic warning. There is a risk of an acci-
dent.
Apply the brakes yourself in these situations
and try to take evasive action.
! When DISTRONIC PLUS or the HOLD func-
tion is activated, the vehicle brakes automat- ically in certain situations.
To avoid damage to the vehicle, deactivate
DISTRONIC PLUS and the HOLD function in
the following or similar situations:
R when towing away
R in a car wash
If you fail to adapt your driving style, DISTRONIC PLUS can neither reduce the risk of an accident
nor override the laws of physics. DISTRONIC
PLUS cannot take road and weather conditions
or traffic conditions into account. DISTRONIC
PLUS is only an aid. You are responsible for the distance to the vehicle in front, for vehicle
speed, for braking in good time and for staying in
lane.
Do not use DISTRONIC PLUS:
R in road and traffic conditions which do not
allow you to maintain a constant speed, e.g. in
heavy traffic or on winding roads
R on smooth or slippery roads. Braking or accel-
erating can cause the drive wheels to lose
traction and the vehicle could then skid
R when there is poor visibility, e.g. due to fog,
heavy rain or snow
DISTRONIC PLUS may not detect narrow vehi-
cles driving in front, e.g. motorcycles, or vehi-
cles driving on a different line.
In particular, the detection of obstacles can be
impaired in the case of:
R dirt on the sensors or obscured sensors
R snow or heavy rain
R interference by other radar sources
R the possibility of strong radar reflections, for
example, in multi-storey car parks
If DISTRONIC PLUS no longer detects a vehicle
in front, it may unexpectedly accelerate to the
speed stored. Driving systems
183Driving and parking Z
Page 193 of 393
DISTRONIC PLUS at traffic lights with crossing
traffic, for example, could cause your vehicle to pull away unintentionally.
DISTRONIC PLUS with Steering Assist
and Stop&Go Pilot General notes
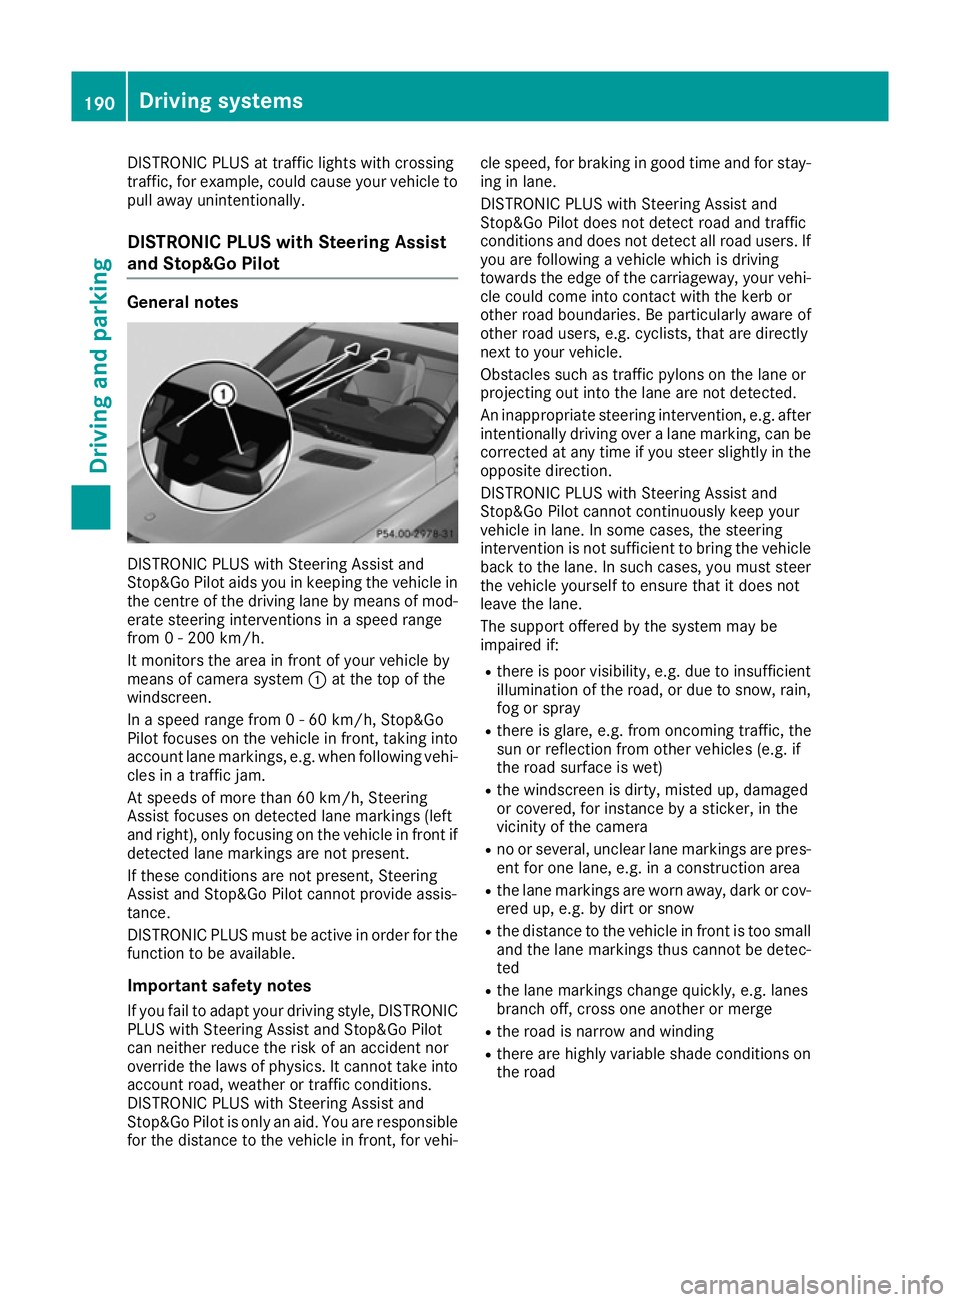
DISTRONIC PLUS with Steering Assist and
Stop&Go Pilot aids you in keeping the vehicle in
the centre of the driving lane by means of mod-
erate steering interventions in a speed range
from 0 - 200 km/h.
It monitors the area in front of your vehicle by
means of camera system :at the top of the
windscreen.
In a speed range from 0 - 60 km/h, Stop&Go
Pilot focuses on the vehicle in front, taking into
account lane markings, e.g. when following vehi- cles in a traffic jam.
At speeds of more than 60 km/h, Steering
Assist focuses on detected lane markings (left
and right), only focusing on the vehicle in front if
detected lane markings are not present.
If these conditions are not present, Steering
Assist and Stop&Go Pilot cannot provide assis-
tance.
DISTRONIC PLUS must be active in order for the
function to be available.
Important safety notesIf you fail to adapt your driving style, DISTRONIC
PLUS with Steering Assist and Stop&Go Pilot
can neither reduce the risk of an accident nor
override the laws of physics. It cannot take into account road, weather or traffic conditions.
DISTRONIC PLUS with Steering Assist and
Stop&Go Pilot is only an aid. You are responsible
for the distance to the vehicle in front, for vehi- cle speed, for braking in good time and for stay-
ing in lane.
DISTRONIC PLUS with Steering Assist and
Stop&Go Pilot does not detect road and traffic
conditions and does not detect all road users. If
you are following a vehicle which is driving
towards the edge of the carriageway, your vehi- cle could come into contact with the kerb or
other road boundaries. Be particularly aware of
other road users, e.g. cyclists, that are directly
next to your vehicle.
Obstacles such as traffic pylons on the lane or
projecting out into the lane are not detected.
An inappropriate steering intervention, e.g. after intentionally driving over a lane marking, can be
corrected at any time if you steer slightly in the
opposite direction.
DISTRONIC PLUS with Steering Assist and
Stop&Go Pilot cannot continuously keep your
vehicle in lane. In some cases, the steering
intervention is not sufficient to bring the vehicle back to the lane. In such cases, you must steer the vehicle yourself to ensure that it does not
leave the lane.
The support offered by the system may be
impaired if:
R there is poor visibility, e.g. due to insufficient
illumination of the road, or due to snow, rain, fog or spray
R there is glare, e.g. from oncoming traffic, the
sun or reflection from other vehicles (e.g. if
the road surface is wet)
R the windscreen is dirty, misted up, damaged
or covered, for instance by a sticker, in the
vicinity of the camera
R no or several, unclear lane markings are pres-
ent for one lane, e.g. in a construction area
R the lane markings are worn away, dark or cov-
ered up, e.g. by dirt or snow
R the distance to the vehicle in front is too small
and the lane markings thus cannot be detec-
ted
R the lane markings change quickly, e.g. lanes
branch off, cross one another or merge
R the road is narrow and winding
R there are highly variable shade conditions on
the road 190
Driving systemsDriving an
d parking
Page 209 of 393
Cancelling Active Parking Assist
X
Stop the movement of the multifunction
steering wheel or steer yourself.
Active Parking Assist will be cancelled at
once. The Park Assist cancelled
Park Assist cancelled mes-
sage appears in the multifunction display.
or X Press the PARKTRONIC button (Y page 201).
PARKTRONIC is switched off and Active Park-
ing Assist is immediately cancelled. The
Park Assist cancelled Park Assist cancelled message appears
in the multifunction display.
Active Parking Assist is cancelled automatically if:
R the electric parking brake is applied
R transmission position Pis selected
R parking using Active Parking Assist is no lon-
ger possible
R you are driving faster than 10 km/h
R a wheel spins and ESP ®
intervenes or fails.
The ÷ warning lamp lights up in the instru-
ment cluster.
A warning tone sounds. The parking symbol dis-
appears and the multifunction display shows the
Park Assist cancelled
Park Assist cancelled message.
When Active Parking Assist is cancelled, you
must steer and brake again yourself.
If a system malfunction occurs, the vehicle is
braked to a standstill. To drive on, depress the
accelerator pedal again. Reversing camera
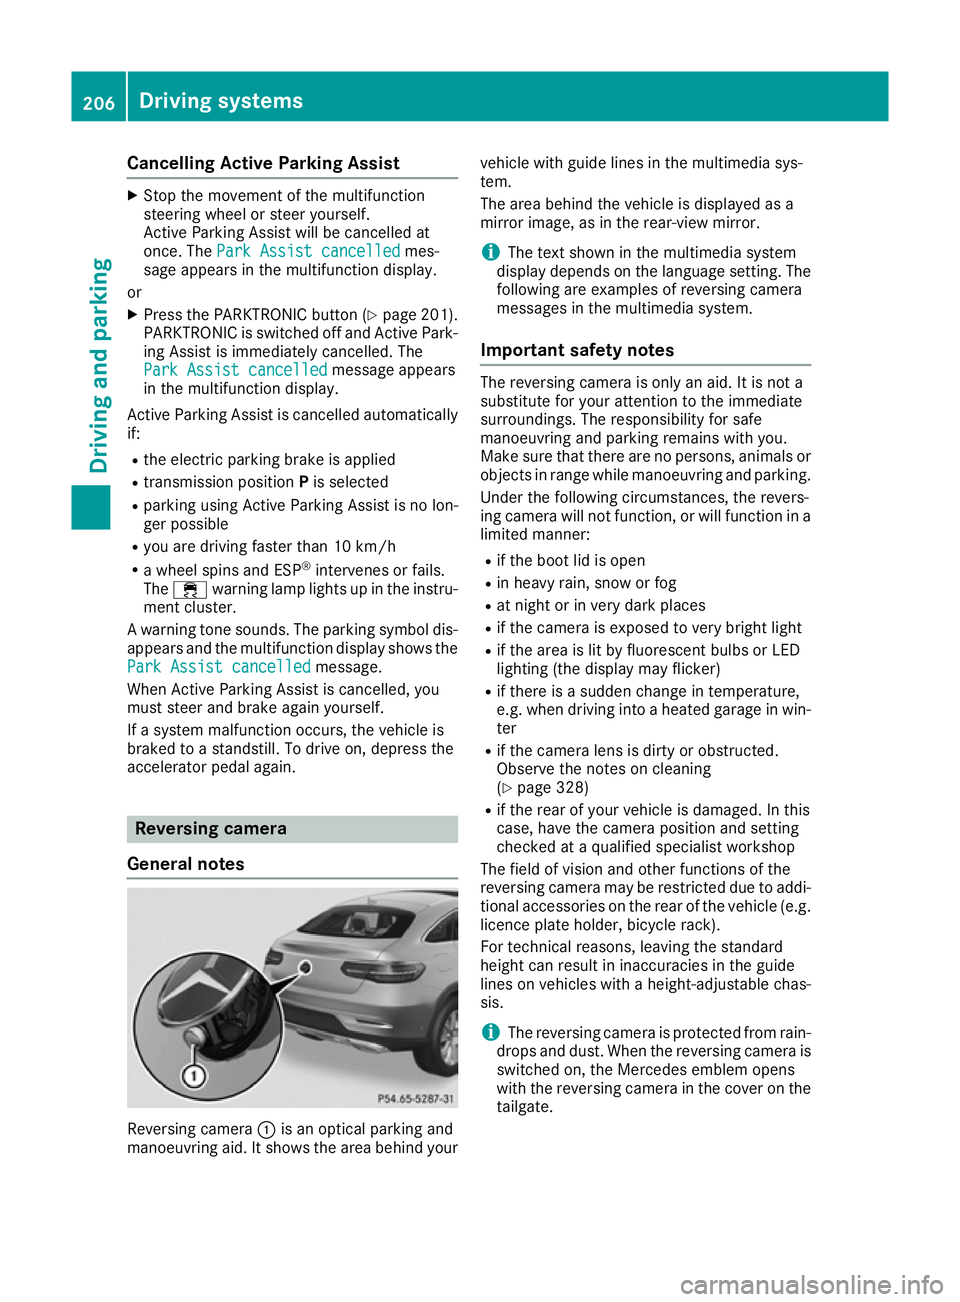
General notes Reversing camera
:is an optical parking and
manoeuvring aid. It shows the area behind your vehicle with guide lines in the multimedia sys-
tem.
The area behind the vehicle is displayed as a
mirror image, as in the rear-view mirror.
i The text shown in the multimedia system
display depends on the language setting. The
following are examples of reversing camera
messages in the multimedia system.
Important safety notes The reversing camera is only an aid. It is not a
substitute for your attention to the immediate
surroundings. The responsibility for safe
manoeuvring and parking remains with you.
Make sure that there are no persons, animals or
objects in range while manoeuvring and parking.
Under the following circumstances, the revers-
ing camera will not function, or will function in a limited manner:
R if the boot lid is open
R in heavy rain, snow or fog
R at night or in very dark places
R if the camera is exposed to very bright light
R if the area is lit by fluorescent bulbs or LED
lighting (the display may flicker)
R if there is a sudden change in temperature,
e.g. when driving into a heated garage in win-
ter
R if the camera lens is dirty or obstructed.
Observe the notes on cleaning
(Y page 328)
R if the rear of your vehicle is damaged. In this
case, have the camera position and setting
checked at a qualified specialist workshop
The field of vision and other functions of the
reversing camera may be restricted due to addi-
tional accessories on the rear of the vehicle (e.g. licence plate holder, bicycle rack).
For technical reasons, leaving the standard
height can result in inaccuracies in the guide
lines on vehicles with a height-adjustable chas-
sis.
i The reversing camera is protected from rain-
drops and dust. When the reversing camera is switched on, the Mercedes emblem opens
with the reversing camera in the cover on the
tailgate. 206
Driving systemsDriving and parking