sunroof MERCEDES-BENZ GLE COUPE 2015 Owners Manual
[x] Cancel search | Manufacturer: MERCEDES-BENZ, Model Year: 2015, Model line: GLE COUPE, Model: MERCEDES-BENZ GLE COUPE 2015Pages: 393, PDF Size: 12.71 MB
Page 17 of 393
Odometer
see Total distance recorder
see Trip meter
Off-road driving
Approach/departure angle ............ 383
Checklist after driving off-road ...... 176
Checklist before driving off-road ....1 76
Fording depth ................................ 383
General information ....................... 176
Important safety notes .................. 175
Maximum gradient climbing abil-
ity ................................................. .384
Travelling uphill .............................. 177
Off-road system
4MATIC .......................................... 193
DSR ............................................... 193
Oil
see Engine oil
On-board computer
AMG menu ..................................... 250
Assistance menu ........................... 243
Audio menu ................................... 241
Convenience submenu .................. 248
Display messages .......................... 253
Displaying a service message ....... .323
DISTRONIC PLUS ........................... 188
Factory setting submenu .............. .249
Heating submenu ........................... 247
Important safety notes .................. 235
Instrument cluster submenu .......... 246
Light submenu ............................... 246
Menu overview .............................. 238
Message memory .......................... 253
Navigation menu ............................ 239
Operating the TV ............................ 242
Operating video DVD ..................... 241
Operation ....................................... 236
RACETIMER ................................... 250
Service menu ................................. 245
Settings menu ............................... 245
Standard displa y............................ 238
Telephone menu ............................ 242
Trip menu ...................................... 238
Vehicle submenu ........................... 247
Operating instructions
Vehicle equipment ........................... 23
Operating safety
Declaration of conformity ................ 24 Important safety note ...................... 23
Operating system
see On-board computer
Outside temperature display ........... 236
Overhead control panel ...................... 35
Override feature
Rear side window s........................... 63 P
Paint code .......................................... 373
Paintwork (cleaning instructions) ... 325
Panic alarm .......................................... 37
Panorama sliding sunroof
Important safety information ........... 96
Operating ......................................... 97
Operating the roller sunblinds for
the sliding sunroof ........................... 98
Problem (malfunction) ................... 100
Rain-closing feature (when driv-
ing) .................................................. 98
Rain-closing feature (when the
engine is switched off) ..................... 98
Reversing feature ............................. 97
Parking
Important safety notes .................. 167
Parking brake ................................ 169
Position of exterior mirror, front-
passenger side ............................... 113
Reversing camera .......................... 206
see PARKTRONIC
Parking aid
Active Parking Assist ..................... 202
see 360° camera
see Exterior mirrors
see PARKTRONIC
Parking brake
Display message ............................ 257
Electric parking brake .................... 169
Warning lamp ................................. 294
Parking lamps
Display message ............................ 267
Switching on/of f........................... 116
PARKTRONIC
Deactivating/activating ................. 201
Driving system ............................... 199
Function/note s............................. 199
Important safety notes .................. 199 14
Index
Page 19 of 393
Replacing the battery (auxiliary
heating remote control)
.................... 141
Rescue card ......................................... 25
Reserve (fuel tank)
see Fuel
Reserve fuel
Display messag e............................ 271
Warning lamp ................................. 294
Residual heat (climate control) ........ 137
Restraint system
Display message ............................ 262
Introduction ..................................... 37
Warning lamp ................................. 294
Warning lamp (function) ................... 38
Rev counter ........................................ 235
Reversing camera
Cleaning instructions ..................... 328
Display in the multimedia system .. 207
Function/note s............................. 206
Switching on/of f........................... 207
Reversing feature
Panorama sliding sunroo f................ 97
Side windows ................................... 92
Tailgate ............................................ 88
Reversing function
Roller sunblind ................................. 98
Reversing lamp (display message) .. 267
Roller sunblind
Panorama sliding sunroo f................ 98
Roof carrier ........................................ 305
Roof lining and carpets (cleaning
instructions) ...................................... 330
Roof load (maximum) ........................ 381
Route (navigation)
see Route guidance (navigation)
Route guidance (navigation) ............ 239S
Safety Children in the vehicle ..................... 52
see Occupant safety
SD memory card
Selecting ........................................ 241
Seat belt
Correct usage .................................. 40
Switching belt adjustment on/off
(on-board computer) ...................... 249 Seat belts
Adjusting the driver's and front-
passenger seat belt ......................... 41
Adjusting the height ......................... 41
Cleaning ......................................... 330
Display message ............................ 261
Fastening ......................................... 41
Important safety guidelines ............. 39
Introduction ..................................... 39
Rear seat belt status indicator ......... 42
Releasing ......................................... 41
Warning lamp ................................. 286
Warning lamp (function) ................... 41
Seats
Adjusting (electrically) ................... 103
Adjusting the head restraint .......... 103
Cleaning the cover ......................... 330
Correct driver's seat position ........ 101
Folding the rear bench seat for-
wards/back ................................... 302
Important safety notes .................. 102
Overview ........................................ 102
Seat heating problem .................... 107
Seat ventilation problem ................ 108
Storing settings (memory func-
tion) ............................................... 114
Switching seat heating on/of f....... 105
Switching the seat ventilation on/ off .................................................. 107
Section
Sliding sunroof ................................. 96
Selector lever
Cleaning ......................................... 329
Sensors (cleaning instructions) ....... 327
Service menu (on-board com-
puter) .................................................. 245
Service message
see ASSYST PLUS
Service products
AdBlue ®
special additive s.............. 377
Brake fluid ..................................... 380
Coolant (engine) ............................ 380
Engine oil ....................................... 378
Fuel ................................................ 375
Important safety notes .................. 374
Washer fluid ................................... 381
Setting the air distribution ............... 13316
Index
Page 20 of 393
Setting the airflow
............................1 33
Settings
Factory (on-board computer) ......... 249
On-board computer ....................... 245
SETUP (on-board computer) ............. 250
Side lamps
Switching on/off ........................... 116
Side marker lamp Display mes-
sage .................................................... 267
Side windows
Convenience closing ........................ 94
Convenience opening ..................... .93
Important safety notes .................... 92
Opening/closing .............................. 93
Overview .......................................... 92
Problem (malfunction) .....................96
Resetting ........................................ .95
Reversing feature ............................ .92
Sidebag ................................................ 44
Sliding sunroof
see Panorama sliding sunroof
Snow chains
Information .................................... 351
Socket
Luggage compartment ...................3 10
Sockets
Centre console .............................. 309
General notes ................................ 309
Rear compartment ......................... 310
Specialist workshop ............................ 25
Spectacles compartment ................. 301
Speed, controlling
see Cruise control
Speedometer
Digital ............................................ 239
In the Instrument cluster ................. 29
Segments ...................................... 235
Selecting a display unit .................. 246
SPEEDTRONIC
Activating variable ......................... 181
Deactivating variable ..................... 182
Display message ............................ 277
Function/notes ............................ .180
Important safety notes .................. 181
LIM indicator lamp ......................... 181
Permanent ..................................... 182
Selecting ........................................ 181 Storing the current spee
d.............. 181
Variabl e......................................... 181
Start/Stop button
Removing ....................................... 147
Start/stop function
see ECO start/stop function
Starting (engine) ................................ 148
STEER CONTROL .................................. 74
Steering
Display message ............................ 284
Steering Assist and Stop&Go Pilot
(DISTRONIC PLUS)
Activating/deactivating ................. 244
Display message ............................ 277
Steering assistant STEER CON-
TROL
see STEER CONTROL
Steering wheel
Adjusting (electrically) ................... 109
Adjusting (manually) ...................... 108
Button overview ............................... 32
Buttons (on-board computer) ......... 236
Cleaning ......................................... 329
Important safety notes .................. 108
Steering wheel heating .................. 109
Storing settings (memory func-
tion) ............................................... 114
Steering wheel gearshift paddles .... 158
Steering wheel heating
Problem (malfunction) ................... 110
Switching on/of f........................... 109
Stopwatch (RACETIMER) ................... 250
Stowage areas ................................... 299
Stowage compartments
Armrest (under) ............................. 300
Centre console .............................. 301
Centre console (rear) ..................... 301
Cup holde r..................................... 306
Glove compartment ....................... 300
Important safety information ......... 299
Spectacles compartment ............... 301
Stowage net ....................................... 301
Stowage space
Stowage net ................................... 301
Summer tyres .................................... 350
Sun visor ............................................ 308 Index
17
Page 38 of 393
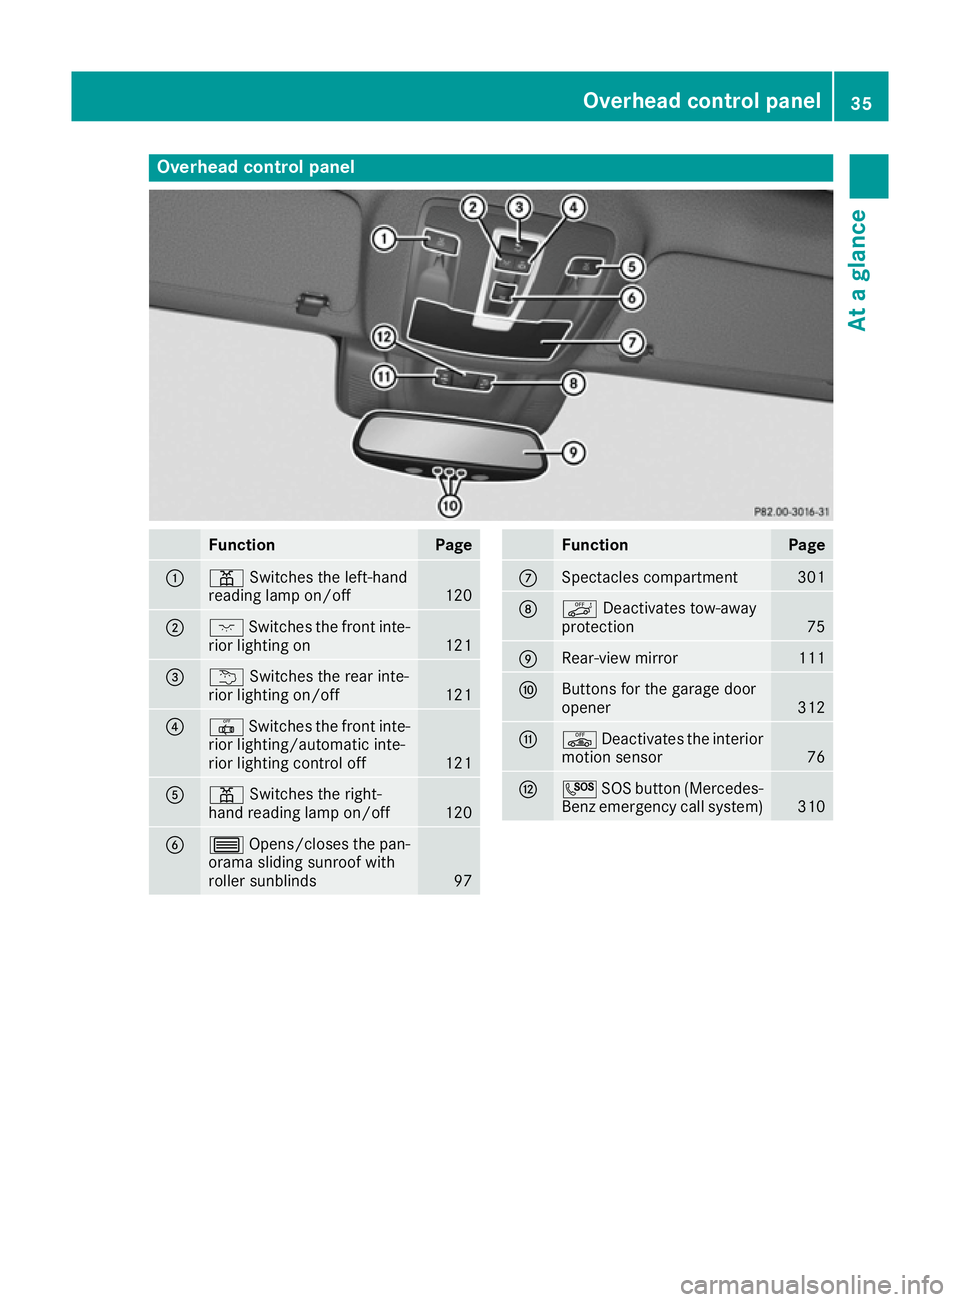
Overhead control panel
Function Page
:
p
Switches the left-hand
reading lamp on/off 120
;
c
Switches the front inte-
rior lighting on 121
=
u
Switches the rear inte-
rior lighting on/off 121
?
|
Switches the front inte-
rior lighting/automatic inte-
rior lighting control off 121
A
p
Switches the right-
hand reading lamp on/off 120
B
3
Opens/closes the pan-
orama sliding sunroof with
roller sunblinds 97 Function Page
C
Spectacles compartment 301
D
ë
Deactivates tow-away
protection 75
E
Rear-view mirror 111
F
Buttons for the garage door
opener
312
G
ê
Deactivates the interior
motion sensor 76
H
G
SOS button (Mercedes-
Benz emergency call system) 310Overhead control panel
35At a glance
Page 54 of 393
Vehicles with the automatic front-passenger
airbag deactivation system: the sidebag on
the front-passenger side deploys under the
following conditions:
- an occupant is detected on the front-
passenger seat or
- the belt tongue is engaged in the belt
buckle of the front-passenger seat
R Windowbag on the side on which an impact
occurs, independent of seat belt usage and
regardless of whether the front-passenger
seat is occupied
R Seat belt tensioners, if the system determines
that deployment can offer additional protec-
tion for the vehicle occupants in this situation
R Windowbags on the driver's and front-
passenger side in certain situations if the
vehicle overturns and if the system deter-
mines that deployment can offer additional
protection to that provided by the seat belt
i Not all airbags are deployed in an accident.
The different airbag systems work independ-
ently of each other.
How the airbag system works is determined
by the severity of the accident detected,
especially the vehicle deceleration or accel-
eration, and the apparent type of accident:
R frontal collision
R side impact
R overturn PRE-SAFE
®
(anticipatory occupant
protection)
Introduction In certain hazardous situations, PRE-SAFE
®
takes pre-emptive measures to protect the vehi- cle occupants.
Important safety notes !
Make sure that there are no objects in the
footwell or behind the seats. There is a risk
that the seats and/or the objects could be
damaged when PRE-SAFE ®
is activated.
Although your vehicle is equipped with PRE-
SAFE ®
, the possibility of injury in the event of an
accident cannot be ruled out. Always adapt your
driving style to suit the prevailing road and weather conditions and maintain a safe distance
from the vehicle in front. Drive carefully.
Function PRE-SAFE
®
intervenes:
R in emergency braking situations, e.g. when
BAS is activated
R in critical driving situations, e.g. when physi-
cal limits are exceeded and the vehicle under-
steers or oversteers severely
R on vehicles with the Driving Assistance pack-
age: if BAS PLUS intervenes powerfully or the
radar sensor system detects an imminent
danger of collision in certain situations
PRE-SAFE ®
takes the following measures
depending on the hazardous situation detected:
R the front seat belts are pre-tensioned.
R if the vehicle skids, the side windows and the
sliding sunroof are closed.
R vehicles with the memory function: the front-
passenger seat is adjusted if it is in an unfav-
ourable position.
R vehicles with a multicontour seat: the air pres-
sure in the side bolsters of the backrest is
increased.
If the hazardous situation passes without result- ing in an accident, PRE-SAFE ®
slackens the belt
pre-tensioning. On vehicles with multicontour
seats, the air pressure in the side bolsters is
reduced again. All settings made by PRE-SAFE ®
can then be reversed.
If the seat belt pre-tensioning is not reduced:
X Move the seat backrest or seat back slightly
when the vehicle is stationary.
Seat belt pre-tensioning is reduced and the
locking mechanism is released.
The seat-belt adjustment is an integral part of
the PRE-SAFE ®
convenience function. Informa-
tion about the convenience function can be
found under "Belt adjustment" (Y page 41). PRE-SAFE
®
PLUS (anticipatory occu-
pant protection PLUS)
Introduction PRE-SAFE
®
PLUS is only available in vehicles
with the Driving Assistance package. Occupant safety
51Safety Z
Page 79 of 393
R
the doors are closed
R the tailgate is closed
Only then is tow-away protection primed.
X Lock the vehicle with the key or KEYLESS-GO.
Tow-away protection is primed after approx-
imately 30 seconds.
Switching off X
Unlock the vehicle with the key or KEYLESS-
GO.
or X Insert the key into the ignition lock.
Tow-away protection is switched off automat- ically.
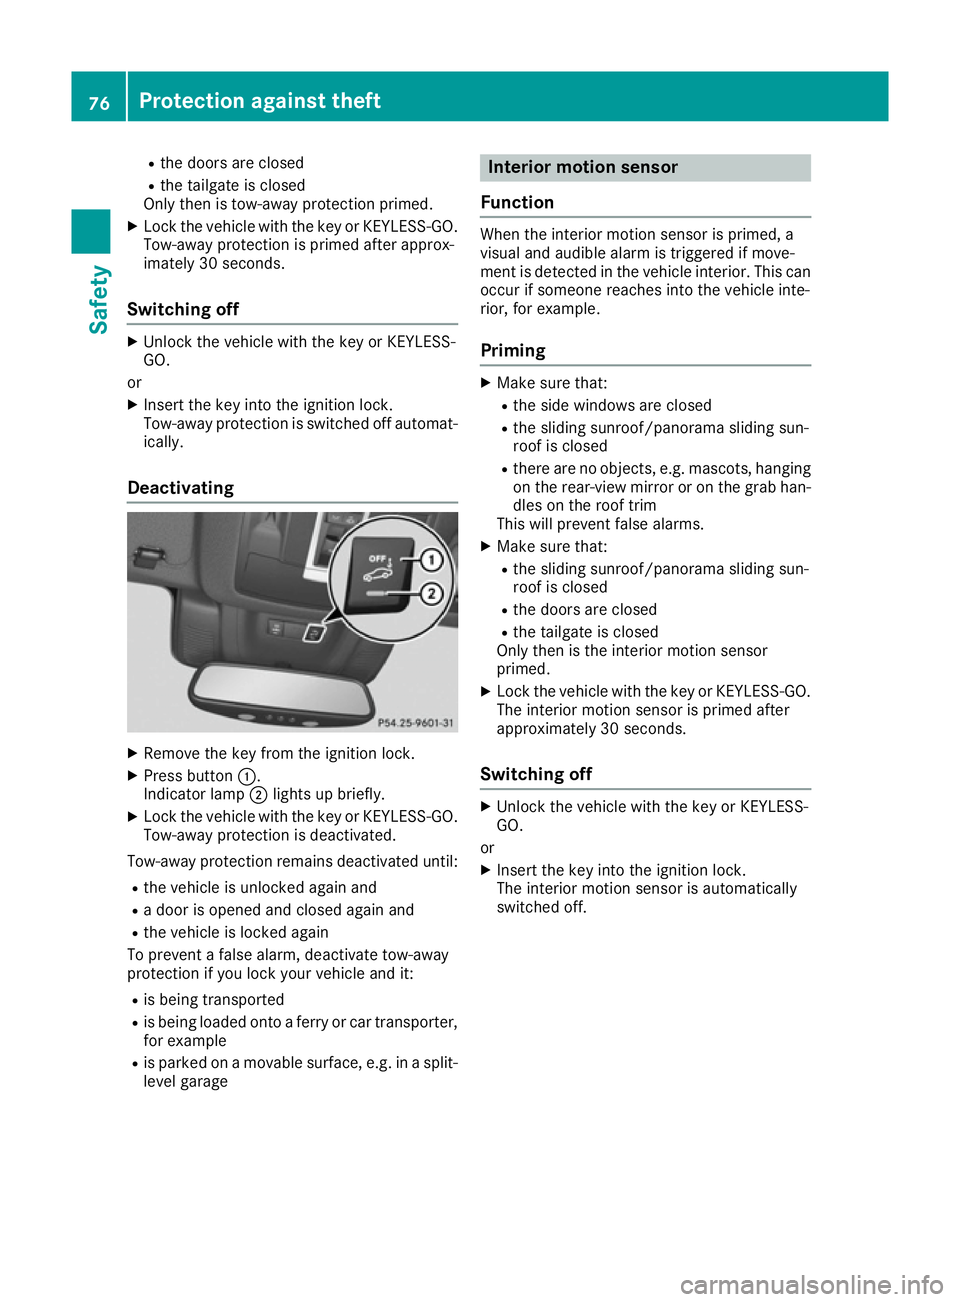
Deactivating X
Remove the key from the ignition lock.
X Press button :.
Indicator lamp ;lights up briefly.
X Lock the vehicle with the key or KEYLESS-GO.
Tow-away protection is deactivated.
Tow-away protection remains deactivated until:
R the vehicle is unlocked again and
R a door is opened and closed again and
R the vehicle is locked again
To prevent a false alarm, deactivate tow-away
protection if you lock your vehicle and it:
R is being transported
R is being loaded onto a ferry or car transporter,
for example
R is parked on a movable surface, e.g. in a split-
level garage Interior motion sensor
Function When the interior motion sensor is primed, a
visual and audible alarm is triggered if move-
ment is detected in the vehicle interior. This can
occur if someone reaches into the vehicle inte-
rior, for example.
Priming X
Make sure that:
R the side windows are closed
R the sliding sunroof/panorama sliding sun-
roof is closed
R there are no objects, e.g. mascots, hanging
on the rear-view mirror or on the grab han-
dles on the roof trim
This will prevent false alarms.
X Make sure that:
R the sliding sunroof/panorama sliding sun-
roof is closed
R the doors are closed
R the tailgate is closed
Only then is the interior motion sensor
primed.
X Lock the vehicle with the key or KEYLESS-GO.
The interior motion sensor is primed after
approximately 30 seconds.
Switching off X
Unlock the vehicle with the key or KEYLESS-
GO.
or X Insert the key into the ignition lock.
The interior motion sensor is automatically
switched off. 76
Protection against theftSafety
Page 80 of 393
Deactivating
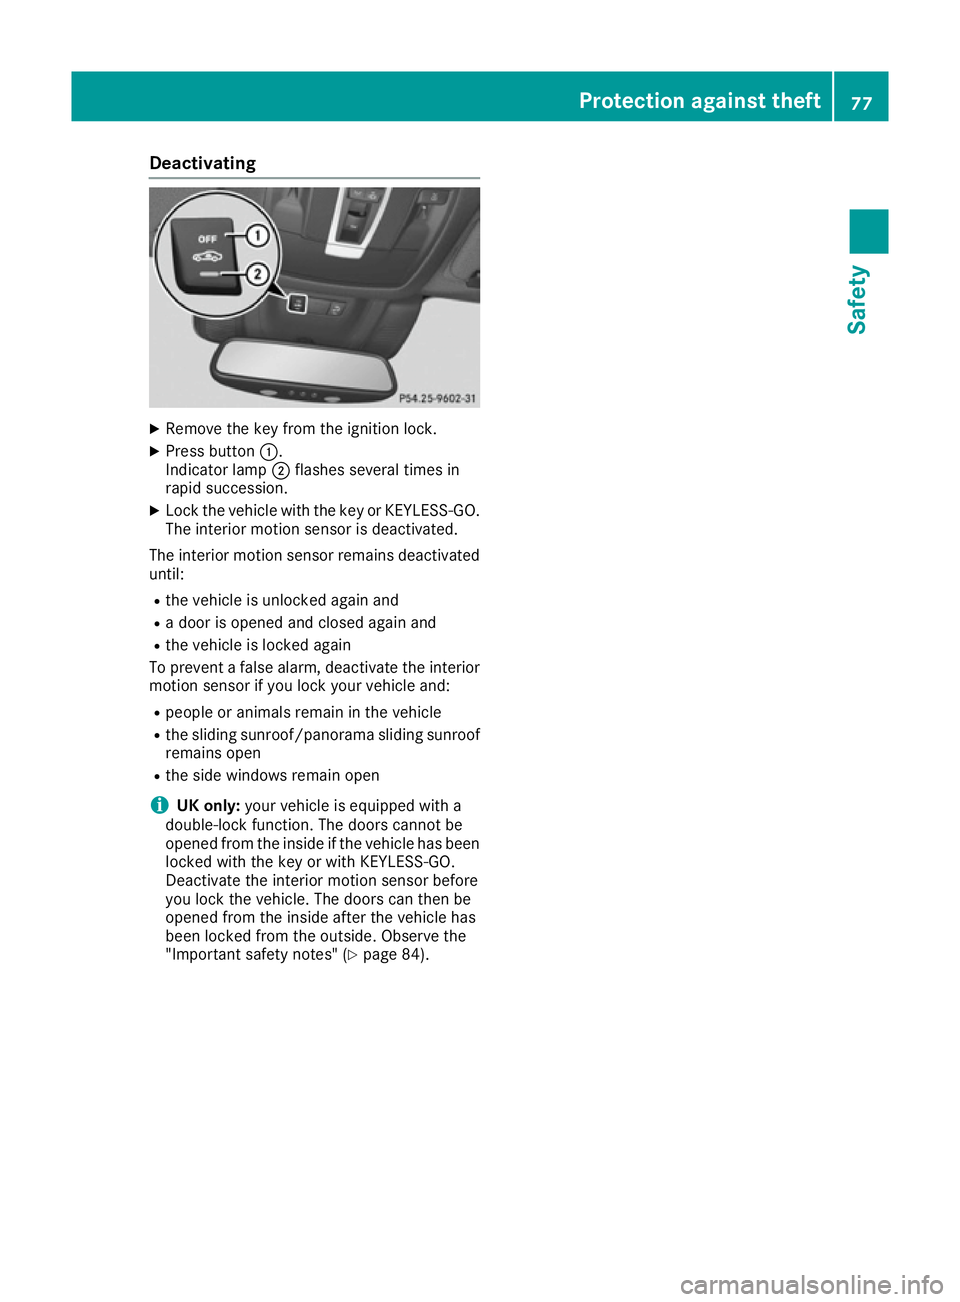
X
Remove the key from the ignition lock.
X Press button :.
Indicator lamp ;flashes several times in
rapid succession.
X Lock the vehicle with the key or KEYLESS-GO.
The interior motion sensor is deactivated.
The interior motion sensor remains deactivated until:
R the vehicle is unlocked again and
R a door is opened and closed again and
R the vehicle is locked again
To prevent a false alarm, deactivate the interior
motion sensor if you lock your vehicle and:
R people or animals remain in the vehicle
R the sliding sunroof/panorama sliding sunroof
remains open
R the side windows remain open
i UK only:
your vehicle is equipped with a
double-lock function. The doors cannot be
opened from the inside if the vehicle has been
locked with the key or with KEYLESS-GO.
Deactivate the interior motion sensor before
you lock the vehicle. The doors can then be
opened from the inside after the vehicle has
been locked from the outside. Observe the
"Important safety notes" (Y page 84). Protection against theft
77Safety Z
Page 96 of 393
ically. The automatic reversing feature is, how-
ever, only an aid and is no substitute for your
attention when closing a side window. G
WARNING
The reversing function does not react:
R to soft, light and thin objects, e.g. small fin-
gers
R over the last 4 mm of the closing movement
R during resetting
R when closing the side window again man-
ually immediately after automatic reversing
This means that the reversing function cannot prevent someone being trapped in these sit-
uations. There is a risk of injury.
When closing make sure that no parts of the
body are in the closing area. If someone
becomes trapped, press the switch to open
the side window again. Opening and closing the side win-
dows
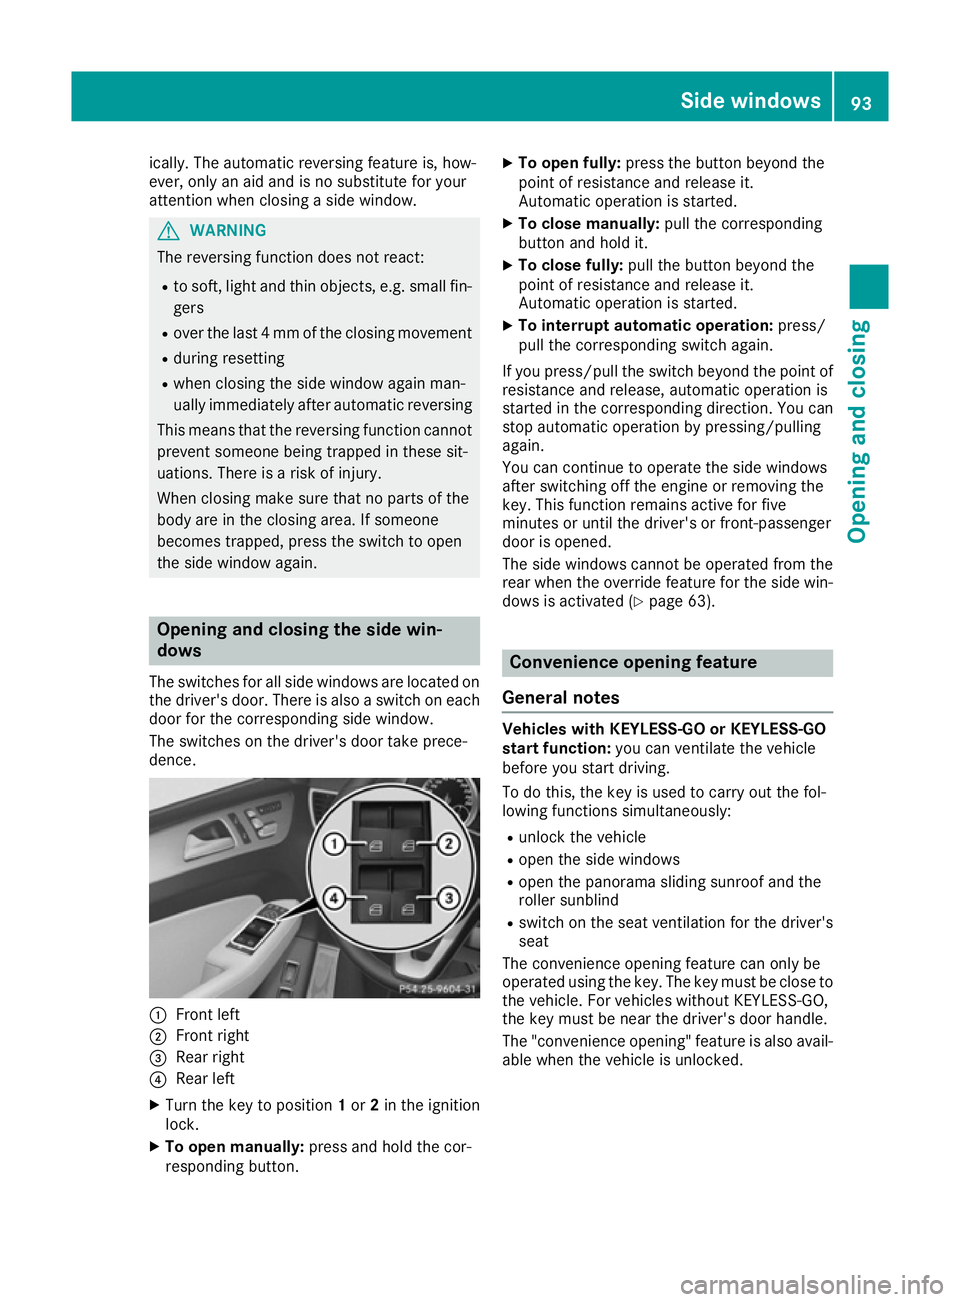
The switches for all side windows are located on
the driver's door. There is also a switch on each door for the corresponding side window.
The switches on the driver's door take prece-
dence. :
Front left
; Front right
= Rear right
? Rear left
X Turn the key to position 1or 2in the ignition
lock.
X To open manually: press and hold the cor-
responding button. X
To open fully: press the button beyond the
point of resistance and release it.
Automatic operation is started.
X To close manually: pull the corresponding
button and hold it.
X To close fully: pull the button beyond the
point of resistance and release it.
Automatic operation is started.
X To interrupt automatic operation: press/
pull the corresponding switch again.
If you press/pull the switch beyond the point of resistance and release, automatic operation is
started in the corresponding direction. You can
stop automatic operation by pressing/pulling
again.
You can continue to operate the side windows
after switching off the engine or removing the
key. This function remains active for five
minutes or until the driver's or front-passenger
door is opened.
The side windows cannot be operated from the
rear when the override feature for the side win-
dows is activated (Y page 63). Convenience opening feature
General notes Vehicles with KEYLESS-GO or KEYLESS-GO
start function:
you can ventilate the vehicle
before you start driving.
To do this, the key is used to carry out the fol-
lowing functions simultaneously:
R unlock the vehicle
R open the side windows
R open the panorama sliding sunroof and the
roller sunblind
R switch on the seat ventilation for the driver's
seat
The convenience opening feature can only be
operated using the key. The key must be close to
the vehicle. For vehicles without KEYLESS-GO,
the key must be near the driver's door handle.
The "convenience opening" feature is also avail-
able when the vehicle is unlocked. Side windows
93Opening and closing Z
Page 97 of 393
Convenience opening feature
X
Vehicles without KEYLESS-GO: point the tip
of the key at the door handle on the driver's
door.
X Press and hold the %button until the side
windows and the panorama sliding sunroof
are in the desired position.
If the roller sunblind of the panorama sliding
sunroof is closed, the roller sunblind is
opened first.
X Press and hold the %button again until the
panorama sliding sunroof is in the desired
position.
X To interrupt convenience opening: release
the % button. Convenience closing feature
Important safety notes G
WARNING
When the convenience closing feature is oper- ating, parts of the body could become trapped
in the closing area of the side window and the
sliding sunroof. There is a risk of injury.
Observe the complete closing procedure
when the convenience closing feature is oper-
ating. When closing make sure that no parts of the body are in the closing area.
When you lock the vehicle, you can simultane-
ously:
R close the side windows
R close the panorama sliding sunroof
On vehicles with a panorama sliding sunroof,
you can then close the roller sunblind.
Proceed as follows if someone is trapped:
R Release the &button to interrupt the clos-
ing procedure.
R Press and hold the %button to open.
Vehicles with KEYLESS-GO:
R Release the sensor surfaces on the exterior
door handle to interrupt the closing proce-
dure.
R To open, pull the same door handle immedi-
ately and hold it firmly. The side windows and the sliding sunroof open for as long as the door handle is held and the door is not
opened.
Notes on the automatic reversing feature for:
R the side windows (Y page 92)
R the panorama sliding sunroof (Y page 97)
Using the key The key must be close to the vehicle. For vehi-
cles without KEYLESS-GO, the key must be near
the driver's door handle.
X Vehicles without KEYLESS-GO: point the tip
of the key at the door handle on the driver's
door.
X Press and hold the &button until the side
windows and the panorama sliding sunroof
are fully closed.
X Make sure that all the side windows and the
panorama sliding sunroof are closed.
On vehicles with a panorama sliding sunroof: X Press and hold the &button again until the
roller sunblind of the panorama sliding sun-
roof closes.
X To interrupt convenience closing: release
the & button.
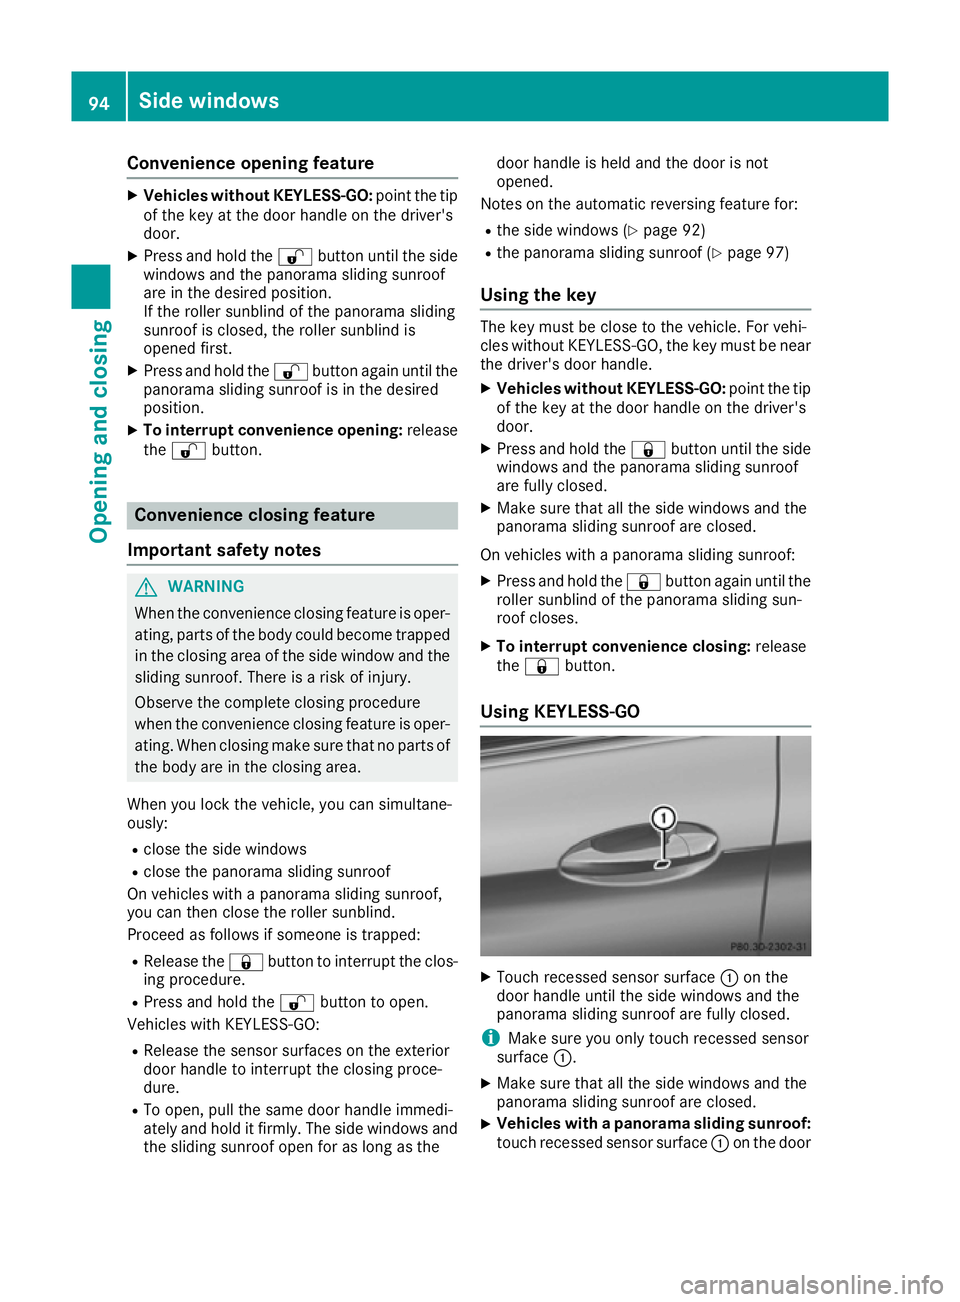
Using KEYLESS-GO X
Touch recessed sensor surface :on the
door handle until the side windows and the
panorama sliding sunroof are fully closed.
i Make sure you only touch recessed sensor
surface :.
X Make sure that all the side windows and the
panorama sliding sunroof are closed.
X Vehicles with a panorama sliding sunroof:
touch recessed sensor surface :on the door 94
Side windowsOpening and closing
Page 98 of 393
handle again until the roller sunblinds of the
panorama sliding sunroof close.
X To interrupt convenience closing: release
recessed sensor surface :on the door han-
dle. Resetting the side windows
If a side window can no longer be closed fully,
you must reset it.
X Close all doors.
X Turn the key to position 1or 2in the ignition
lock.
X Pull the corresponding switch on the door
control panel until the side window is com-
pletely closed (Y page 93).
X Hold the switch for an additional second.
If the side window opens again slightly: X Immediately pull the corresponding switch on
the door control panel until the side window is completely closed (Y page 93).
X Hold the switch for an additional second.
X If the corresponding side window remains
closed after the button has been released, the
side window has been reset correctly. If this is
not the case, repeat the steps above again. Side windows
95Opening and closing Z