bulb MERCEDES-BENZ GLE COUPE 2019 Owner's Manual
[x] Cancel search | Manufacturer: MERCEDES-BENZ, Model Year: 2019, Model line: GLE COUPE, Model: MERCEDES-BENZ GLE COUPE 2019Pages: 370, PDF Size: 11.22 MB
Page 4 of 370
Index
....................................................... 4Digital Operator's Manual
..................25
Introduction .......................................... .25
Operation ............................................... 25 Introduction
......................................... 26
Protecting the environment ...................26
Genuine Mercedes-Benz parts .............. .26
Operator's Manual ................................. 27
Service and vehicle operation ................27
Operating safety .................................... 29
QR code for rescue card ........................ 31
Data stored in the vehicle ......................31
Information on copyright ....................... 34 At a glance
........................................... 35
Cockpit .................................................. 35
Instrument cluster .................................36
Multifunction steering wheel ................. 37
Center console ...................................... 38
Overhead control panel .........................40
Door control panel ................................. 41 Safety
................................................... 42
Panic alarm ............................................ 42
Occupant safety .................................... 42
Children in the vehicle ........................... 57
Pets in the vehicle ................................. 63
Driving safety systems ........................... 64
Protection against theft ........................ .73Opening and closing
...........................74
SmartKey ............................................... 74
Doors ..................................................... 80
Cargo compartment ...............................82
Side windows ......................................... 86
Sliding sunroof ....................................... 89 Seats, steering wheel and mirrors
....94
Correct driver's seat position ................ 94
Seats ..................................................... 94
Steering wheel ....................................... 99
Mirrors ................................................. 102 Memory function ................................. 105 Lights and windshield wipers
..........106
Exterior lighting ................................... 106
Interior lighting .................................... 110
Replacing bulbs (vehicles with LED
headlamps) .......................................... 111
Windshield wipers ................................ 111 Climate control
................................. 115
Overview of climate control systems ... 115
Operating the climate control sys-
tems .................................................... 119
Setting the air vents ............................ 124 Driving and parking
..........................126
Notes on breaking-in a new vehicle ..... 126
Driving ................................................. 126
DYNAMIC SELECT controller ............... 134
Automatic transmission ....................... 135
Refueling ............................................. 142
Parking ................................................ 144
Driving tips .......................................... 147
Driving systems ................................... 156
Towing a trailer .................................... 199
Bicycle rack ......................................... 205
Notes on towing vehicles ..................... 207 On-board computer and displays
....208
Important safety notes ........................ 208
Displays and operation ........................ 208
Menus and submenus ......................... 211
Display messages ................................ 222
Warning and indicator lamps in the
instrument cluster ............................... 251 Multimedia system
...........................264
General notes ...................................... 264
Important safety notes ........................ 264
Function restrictions ............................ 264
Operating system ................................ 265 Stowage and features
......................272
Stowage areas ..................................... 272
Features .............................................. 280 2
Contents
Page 19 of 370
Radio
Selecting a station ......................... 214
Radio mode
see also Digital Operator's Man-
ual .................................................. 264
Radio-wave reception/transmis-
sion in the vehicle
Declaration of conformity ................ 29
Rain closing feature (panorama
roof with power tilt/sliding panel) .... 91
REACH Regulation ............................... 30
Reading lamp ..................................... 110
Rear bench seat
Folding forwards/back .................. 276
Rear compartment
Setting the air vents ...................... 125
Setting the temperature ................ 120
Rear fog lamp
Display messag e............................ 235
Switching on/of f........................... 107
Rear Seat Entertainment System
AUX jacks ...................................... 271
AUX jacks CD/DVD drive .............. 271
Rear seats
Adjusting ......................................... 97
Rear view camera
Cleaning instructions ..................... 305
Display in the multimedia system .. 181
Function/note s............................. 180
Switching on/of f........................... 181
Rear window defroster
Problem (malfunction) ................... 123
Switching on/of f........................... 123
Rear-view mirror
Anti-glare (manual) ........................ 102
Dipping (automatic) ....................... 103
Reflective safety jacket .................... 309
Refrigerant (air-conditioning sys-
tem)
Important safety notes .................. 363
Refueling
Fuel gaug e....................................... 36
Important safety notes .................. 142
Refueling process .......................... 142
see Fuel
Remote control
Garage door opener ....................... 292 Replacing bulbs
General notes ................................ 111
Reporting safety defects .................... 31
Rescue card ......................................... 31
Reserve (fuel tank)
see Fuel
Reserve fuel
Display message ............................ 238
Warning lamp ................................. 259
Residual heat (climate control) ........ 123
Restraint system
Display message ............................ 231
Introduction ..................................... 42
Warning lamp ................................. 259
Warning lamp (function) ................... 43
Reversing feature
Panorama sliding sunroo f................ 90
Roller sunblind ................................. 91
Side windows ................................... 86
Tailgate ............................................ 82
Reversing lamps (display mes-
sage) ................................................... 235
Roadside Assistance (breakdown) .... 28
Roller sunblind
Panorama roof with power tilt/
sliding panel ..................................... 91
Roof carrier ........................................ 279
Roof lining and carpets (cleaning
guidelines) ......................................... 308
Roof load (maximum) ........................ 364
Route (navigation)
see Route guidance (navigation)
Route guidance
see also Digital Operator's Man-
ual .................................................. 264
Route guidance (navigation) ............ 212
Route guidance active ...................... 213 S
Safety Children in the vehicle ..................... 57
see Occupant safety
see Operating safety
SD card
Inserting ........................................ 270
Inserting/removing ........................ 270
Removing ....................................... 270 Index
17
Page 113 of 370
Replacing bulbs (vehicles with LED
headlamps)
The front and rear light clusters of your vehicle
are equipped with light-emitting diodes. Do not
replace the vehicle's bulbs yourself. Contact a
qualified specialist workshop which has the nec-
essary specialist knowledge and tools to carry
out the work required.
Lamps are an important aspect of vehicle safety. You must therefore make sure that these func-
tion correctly at all times. Have the headlamp
setting checked regularly. Windshield wipers
Switching the windshield wipers
on/off
! Do not operate the windshield wipers when
the windshield is dry, as this could damage
the wiper blades. Moreover, dust that has col-
lected on the windshield can scratch the glass
if wiping takes place when the windshield is
dry.
If it is necessary to switch on the windshield
wipers in dry weather conditions, always use
washer fluid when operating the windshield
wipers.
! If the windshield wipers leave smears on the
windshield after the vehicle has been washed
in an automatic car wash, wax or other resi-
dues may be the reason for this. Clean the
windshield using washer fluid after washing
the vehicle in an automatic car wash.
! Intermittent wiping with rain sensor: due to
optical influences and the windshield becom- ing dirty in dry weather conditions, the wind-
shield wipers may be activated inadvertently. This could then damage the windshield wiper
blades or scratch the windshield.
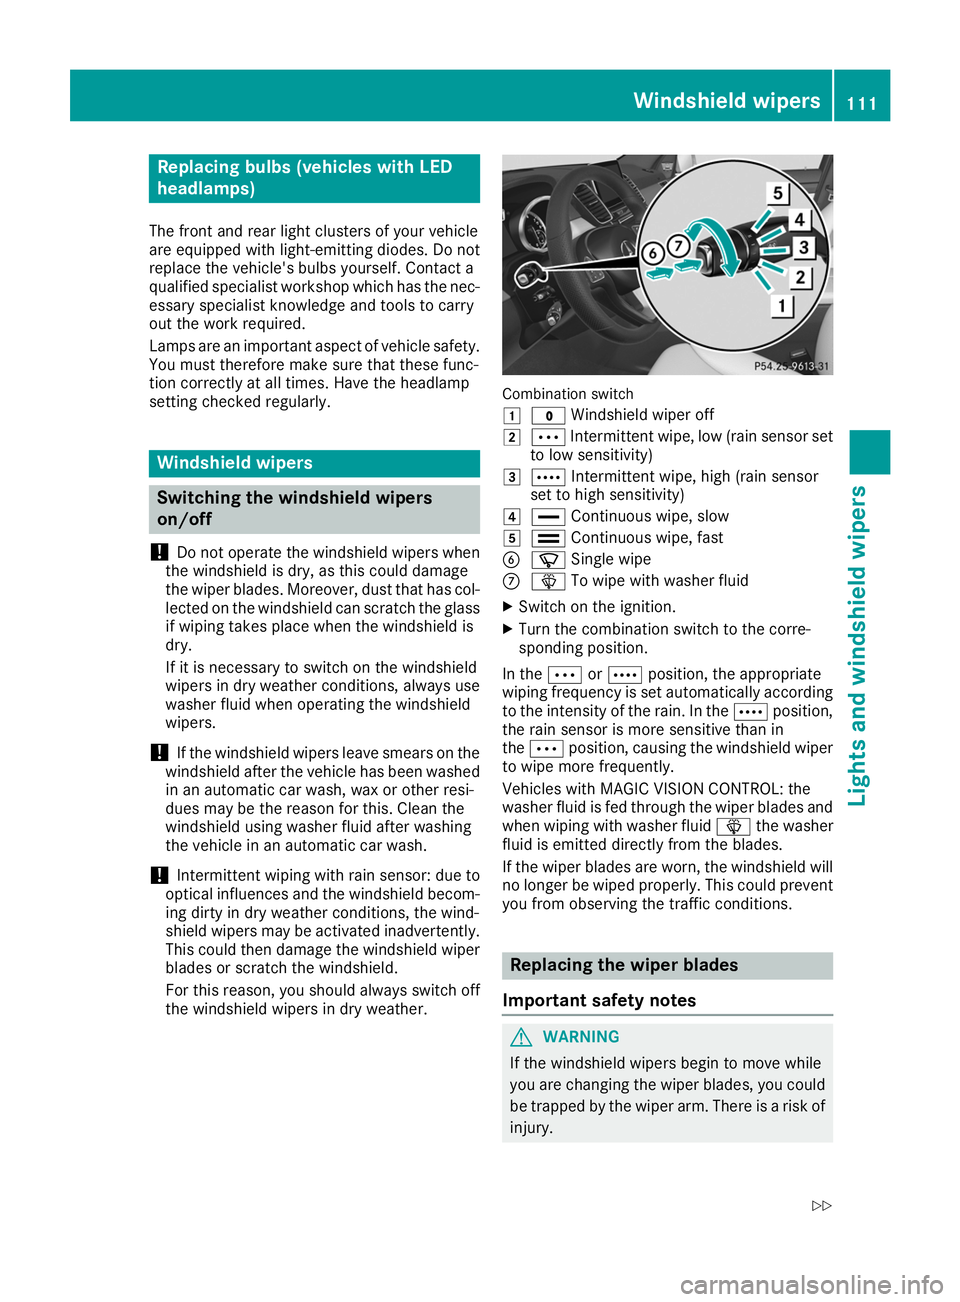
For this reason, you should always switch off the windshield wipers in dry weather. Combination switch
0047
003F Windshield wiper off
0048 0062 Intermittent wipe, low (rain sensor set
to low sensitivity)
0049 0063 Intermittent wipe, high (rain sensor
set to high sensitivity)
004A 00AA Continuous wipe, slow
004B 00A9 Continuous wipe, fast
0084 00D3 Single wipe
006B 00D4 To wipe with washer fluid
X Switch on the ignition.
X Turn the combination switch to the corre-
sponding position.
In the 0062or0063 position, the appropriate
wiping frequency is set automatically according
to the intensity of the rain. In the 0063position,
the rain sensor is more sensitive than in
the 0062 position, causing the windshield wiper
to wipe more frequently.
Vehicles with MAGIC VISION CONTROL: the
washer fluid is fed through the wiper blades and when wiping with washer fluid 00D4the washer
fluid is emitted directly from the blades.
If the wiper blades are worn, the windshield will no longer be wiped properly. This could prevent
you from observing the traffic conditions. Replacing the wiper blades
Important safety notes G
WARNING
If the windshield wipers begin to move while
you are changing the wiper blades, you could be trapped by the wiper arm. There is a risk of
injury. Windshield wipers
111Lights and windshield wipers
Z
Page 187 of 370
The cameras cover the immediate surroundings
of the vehicle. The 360° camera assists you, for
instance when parking or at exits with reduced
visibility.
You can show pictures from the 360° camera in full-screen mode or in seven different split-
screen views on the multimedia system display.
A split-screen view also includes a top view of
the vehicle. This view is calculated from the data supplied by the installed cameras (virtual cam-
era).
The six split-screen views are:
R Top view and picture from the rear view cam-
era (130° viewing angle)
R Top view and image from the front camera
(130° viewing angle without displaying the
maximum steering wheel angle)
R Top view and enlarged rear view
R Top view and enlarged front view
R Top view and trailer view (vehicles with trailer
tow hitch)
R Top view and rear-view images from the exte-
rior mirror cameras (rear wheel view)
R Top view and forward-view images from the
exterior mirror cameras (front wheel view)
When the function is active and you shift the
transmission from 005Bor005E to005C, the dynamic
guide lines are hidden.
When you shift between transmission positions 005B and 005E, you see the previously selected front
or rear view.
Distances measured by Parking Assist
PARKTRONIC will also be optically displayed:
R in split screen view as red or yellow brackets
around the vehicle icon in the top view, or
R at the bottom right as red or yellow brackets
around the vehicle symbol in full-screen mode
The line thickness and color of the brackets
show how far the vehicle is away from an object:
R yellow brackets with thin lines: Parking Assist
PARKTRONIC is active
R yellow brackets with normal lines: an object is
present in close range of the vehicle
R red line: an object is present in the immediate
close range of the vehicle i
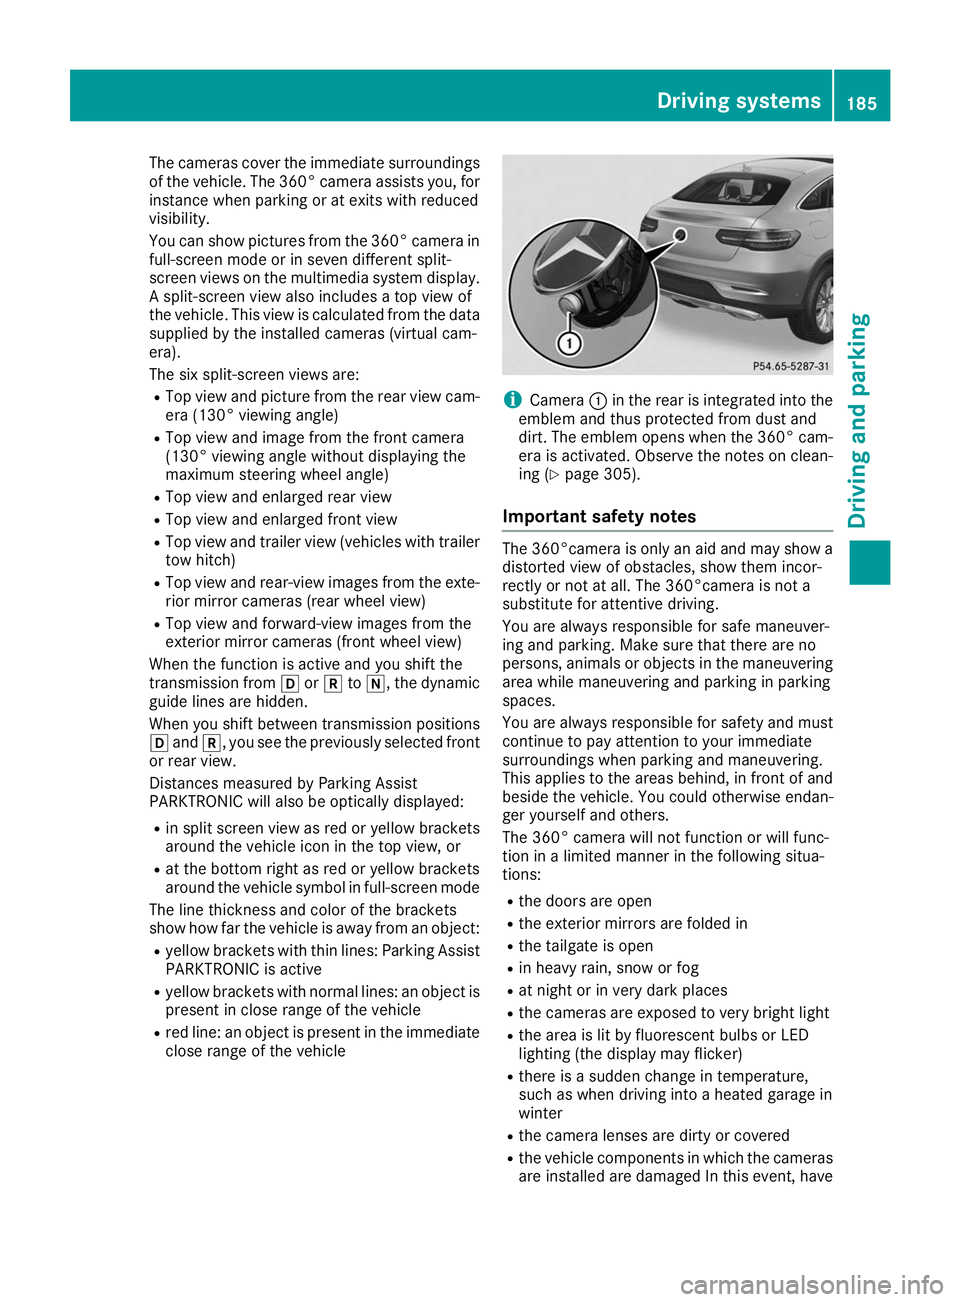
Camera
0043in the rear is integrated into the
emblem and thus protected from dust and
dirt. The emblem opens when the 360° cam-
era is activated. Observe the notes on clean-
ing (Y page 305).
Important safety notes The 360°camera is only an aid and may show a
distorted view of obstacles, show them incor-
rectly or not at all. The 360°camera is not a
substitute for attentive driving.
You are always responsible for safe maneuver-
ing and parking. Make sure that there are no
persons, animals or objects in the maneuvering area while maneuvering and parking in parking
spaces.
You are always responsible for safety and must
continue to pay attention to your immediate
surroundings when parking and maneuvering.
This applies to the areas behind, in front of and
beside the vehicle. You could otherwise endan-
ger yourself and others.
The 360° camera will not function or will func-
tion in a limited manner in the following situa-
tions:
R the doors are open
R the exterior mirrors are folded in
R the tailgate is open
R in heavy rain, snow or fog
R at night or in very dark places
R the cameras are exposed to very bright light
R the area is lit by fluorescent bulbs or LED
lighting (the display may flicker)
R there is a sudden change in temperature,
such as when driving into a heated garage in
winter
R the camera lenses are dirty or covered
R the vehicle components in which the cameras
are installed are damaged In this event, have Driving systems
185Driving and parking Z
Page 237 of 370
Display messages
Possible causes/consequences and
0050
0050Solutions X
Visit a qualified specialist workshop immediately.
For further information about the Occupant Classification System, see (Y page 50). Lights
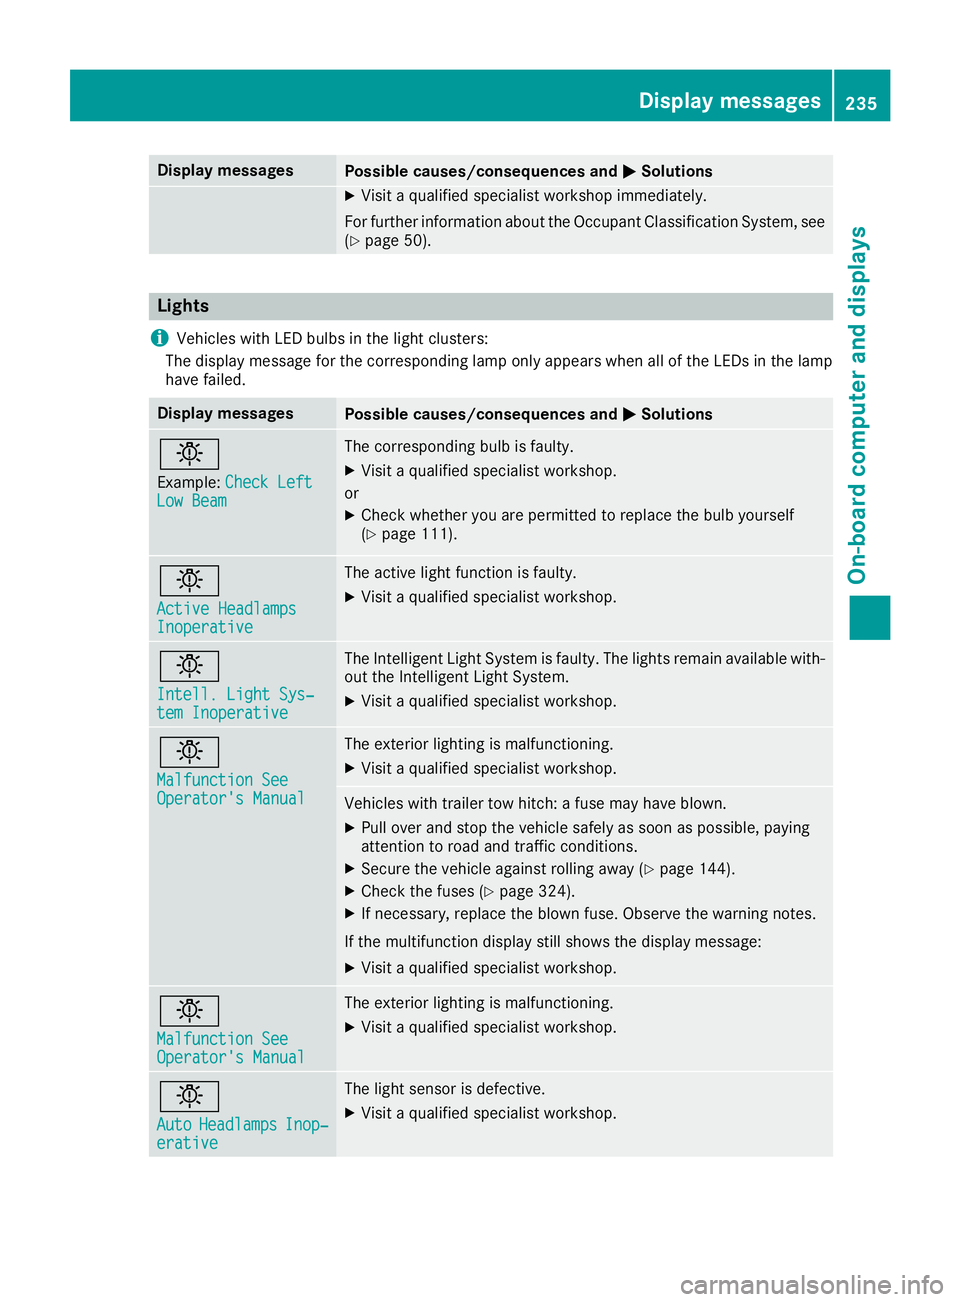
i Vehicles with LED bulbs in the light clusters:
The display message for the corresponding lamp only appears when all of the LEDs in the lamp
have failed. Display messages
Possible causes/consequences and
0050
0050Solutions 0049
Example: Check Left
Check Left
Low Beam
Low Beam The corresponding bulb is faulty.
X Visit a qualified specialist workshop.
or X Check whether you are permitted to replace the bulb yourself
(Y page 111). 0049
Active Headlamps Active Headlamps
Inoperative Inoperative The active light function is faulty.
X Visit a qualified specialist workshop. 0049
Intell. Light Sys‐ Intell. Light Sys‐
tem Inoperative tem Inoperative The Intelligent Light System is faulty. The lights remain available with-
out the Intelligent Light System.
X Visit a qualified specialist workshop. 0049
Malfunction See Malfunction See
Operator's Manual Operator's Manual The exterior lighting is malfunctioning.
X Visit a qualified specialist workshop. Vehicles with trailer tow hitch: a fuse may have blown.
X Pull over and stop the vehicle safely as soon as possible, paying
attention to road and traffic conditions.
X Secure the vehicle against rolling away (Y page 144).
X Check the fuses (Y page 324).
X If necessary, replace the blown fuse. Observe the warning notes.
If the multifunction display still shows the display message:
X Visit a qualified specialist workshop. 0049
Malfunction See Malfunction See
Operator's Manual Operator's Manual The exterior lighting is malfunctioning.
X Visit a qualified specialist workshop. 0049
Auto Auto
Headlamps
Headlamps Inop‐
Inop‐
erative
erative The light sensor is defective.
X Visit a qualified specialist workshop. Display
messages
235On-board computer and displays Z
Page 304 of 370
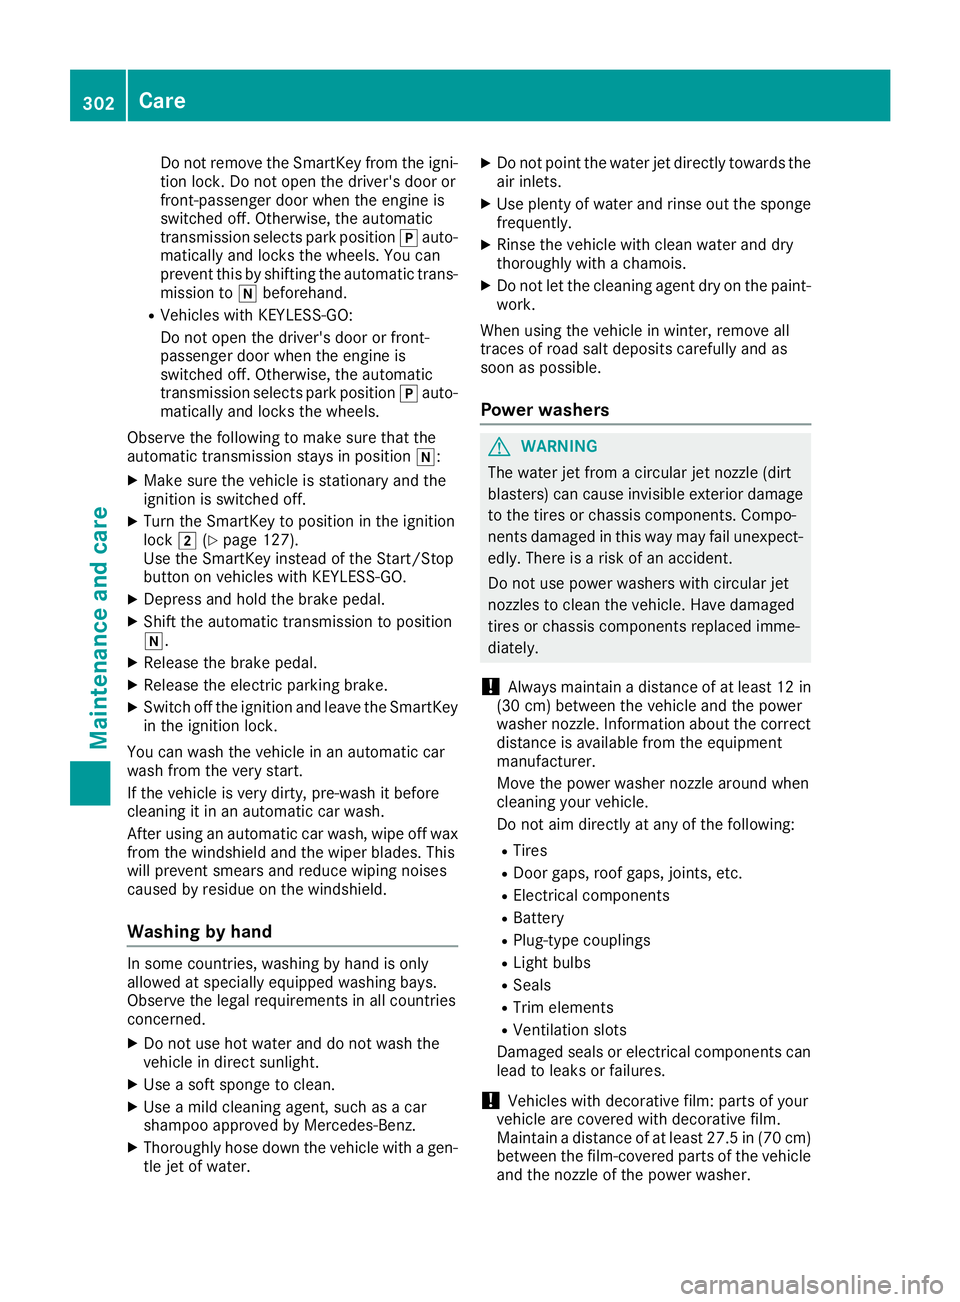
Do not remove the SmartKey from the igni-
tion lock. Do not open the driver's door or
front-passenger door when the engine is
switched off. Otherwise, the automatic
transmission selects park position 005Dauto-
matically and locks the wheels. You can
prevent this by shifting the automatic trans- mission to 005Cbeforehand.
R Vehicles with KEYLESS-GO:
Do not open the driver's door or front-
passenger door when the engine is
switched off. Otherwise, the automatic
transmission selects park position 005Dauto-
matically and locks the wheels.
Observe the following to make sure that the
automatic transmission stays in position 005C:
X Make sure the vehicle is stationary and the
ignition is switched off.
X Turn the SmartKey to position in the ignition
lock 0048(Ypage 127).
Use the SmartKey instead of the Start/Stop
button on vehicles with KEYLESS-GO.
X Depress and hold the brake pedal.
X Shift the automatic transmission to position
005C.
X Release the brake pedal.
X Release the electric parking brake.
X Switch off the ignition and leave the SmartKey
in the ignition lock.
You can wash the vehicle in an automatic car
wash from the very start.
If the vehicle is very dirty, pre-wash it before
cleaning it in an automatic car wash.
After using an automatic car wash, wipe off wax
from the windshield and the wiper blades. This
will prevent smears and reduce wiping noises
caused by residue on the windshield.
Washing by hand In some countries, washing by hand is only
allowed at specially equipped washing bays.
Observe the legal requirements in all countries
concerned.
X Do not use hot water and do not wash the
vehicle in direct sunlight.
X Use a soft sponge to clean.
X Use a mild cleaning agent, such as a car
shampoo approved by Mercedes-Benz.
X Thoroughly hose down the vehicle with a gen-
tle jet of water. X
Do not point the water jet directly towards the
air inlets.
X Use plenty of water and rinse out the sponge
frequently.
X Rinse the vehicle with clean water and dry
thoroughly with a chamois.
X Do not let the cleaning agent dry on the paint-
work.
When using the vehicle in winter, remove all
traces of road salt deposits carefully and as
soon as possible.
Power washers G
WARNING
The water jet from a circular jet nozzle (dirt
blasters) can cause invisible exterior damage to the tires or chassis components. Compo-
nents damaged in this way may fail unexpect-edly. There is a risk of an accident.
Do not use power washers with circular jet
nozzles to clean the vehicle. Have damaged
tires or chassis components replaced imme-
diately.
! Always maintain a distance of at least 12 in
(30 cm) between the vehicle and the power
washer nozzle. Information about the correct
distance is available from the equipment
manufacturer.
Move the power washer nozzle around when
cleaning your vehicle.
Do not aim directly at any of the following:
R Tires
R Door gaps, roof gaps, joints, etc.
R Electrical components
R Battery
R Plug-type couplings
R Light bulbs
R Seals
R Trim elements
R Ventilation slots
Damaged seals or electrical components can
lead to leaks or failures.
! Vehicles with decorative film: parts of your
vehicle are covered with decorative film.
Maintain a distance of at least 27.5 in (70 cm)
between the film-covered parts of the vehicle and the nozzle of the power washer. 302
CareMaintenance and care