clock MERCEDES-BENZ GLE COUPE 2019 Owner's Manual
[x] Cancel search | Manufacturer: MERCEDES-BENZ, Model Year: 2019, Model line: GLE COUPE, Model: MERCEDES-BENZ GLE COUPE 2019Pages: 370, PDF Size: 11.22 MB
Page 83 of 370
Automatic locking feature
X
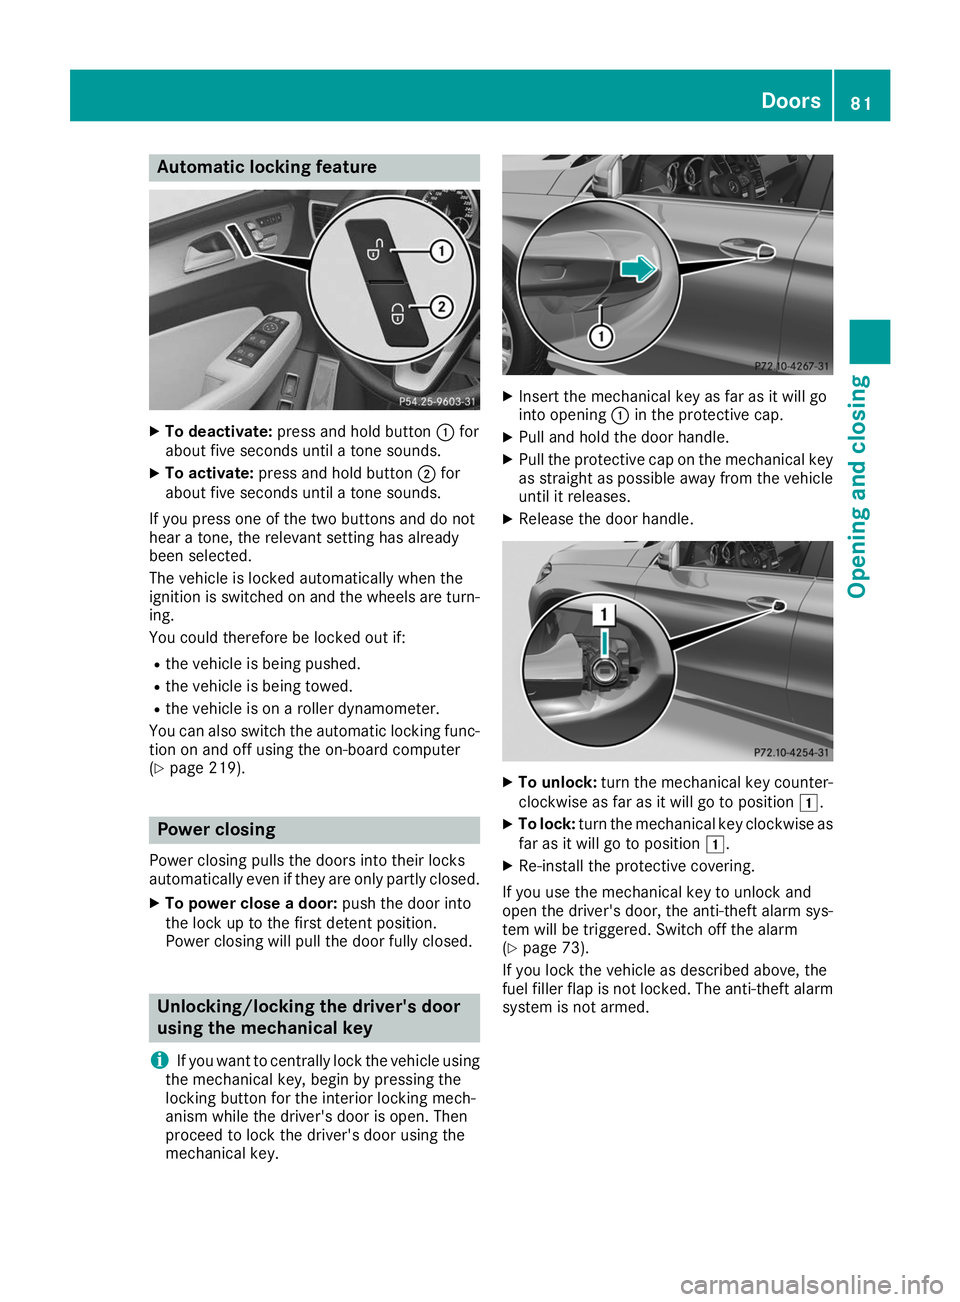
To deactivate: press and hold button 0043for
about five seconds until a tone sounds.
X To activate: press and hold button 0044for
about five seconds until a tone sounds.
If you press one of the two buttons and do not
hear a tone, the relevant setting has already
been selected.
The vehicle is locked automatically when the
ignition is switched on and the wheels are turn-
ing.
You could therefore be locked out if:
R the vehicle is being pushed.
R the vehicle is being towed.
R the vehicle is on a roller dynamometer.
You can also switch the automatic locking func-
tion on and off using the on-board computer
(Y page 219). Power closing
Power closing pulls the doors into their locks
automatically even if they are only partly closed.
X To power close a door: push the door into
the lock up to the first detent position.
Power closing will pull the door fully closed. Unlocking/locking the driver's door
using the mechanical key
i If you want to centrally lock the vehicle using
the mechanical key, begin by pressing the
locking button for the interior locking mech-
anism while the driver's door is open. Then
proceed to lock the driver's door using the
mechanical key. X
Insert the mechanical key as far as it will go
into opening 0043in the protective cap.
X Pull and hold the door handle.
X Pull the protective cap on the mechanical key
as straight as possible away from the vehicleuntil it releases.
X Release the door handle. X
To unlock: turn the mechanical key counter-
clockwise as far as it will go to position 0047.
X To lock: turn the mechanical key clockwise as
far as it will go to position 0047.
X Re-install the protective covering.
If you use the mechanical key to unlock and
open the driver's door, the anti-theft alarm sys- tem will be triggered. Switch off the alarm
(Y page 73).
If you lock the vehicle as described above, the
fuel filler flap is not locked. The anti-theft alarm
system is not armed. Doors
81Opening and closing Z
Page 122 of 370
tion" function has a delayed switch-off fea-
ture.
Problems with the "Cooling with air dehumidification" function Problem
Possible causes/consequences and
0050
0050Solutions The indicator lamp in the
005A or0056 button
flashes three times or
remains off. The "Cool-
ing with air dehumidifi-
cation" function cannot
be switched on. Cooling with air dehumidification has been deactivated due to a mal-
function.
X Visit a qualified specialist workshop. Setting climate control to automatic
General notes In automatic mode, the set temperature is main-
tained automatically at a constant level. The
system automatically regulates the temperature of the dispensed air, the airflow and the air dis- tribution.
The "Cooling with air dehumidification" function
is activated automatically in automatic mode.
In the rear compartment, you can also switch
climate control for the rear seats to automatic
mode using the 0058button.
Automatic control X
Turn the SmartKey to position 0048in the igni-
tion lock (Y page 127).
X Set the desired temperature.
X To activate: press the0058button.
The indicator lamp in the 0058button lights
up. Automatic air distribution and airflow are
activated.
X To switch to manual mode: press the008F
button.
3-zone automatic climate control: when auto-
matic mode is activated, you can select a cli-
mate mode (Y page 120). Adjusting the climate mode settings
You can select the following climate mode set-
tings in automatic mode:
FOCUS high airflow, slightly cooler setting
MEDIU Mmedium airflow, standard setting
DIFFUSEl ow airflow, slightly warmer and draft-
free setting
X Turn the SmartKey to position 0048in the igni-
tion lock (Y page 127).
X Press the 0058button.
X Press the 00F0button repeatedly until the
desired climate mode appears in the display. Setting the temperature
Dual-zone automatic climate control Different temperatures can be set for the driv-
er's and front-passenger sides.
X Turn the SmartKey to position 0048in the igni-
tion lock (Y page 127).
X To increase or decrease: turn control0043or
0084 counter-clockwise or clockwise
(Y page 115).
Only change the temperature setting in small
increments. Start at 72 ‡ (22 †). 120
Operating the climate control systemsClimate control
Page 123 of 370
3-zone automatic climate control
You can select different temperature settings
for the driver's and front-passenger sides as well
as for the rear compartment.
X Turn the SmartKey to position 0048in the igni-
tion lock (Y page 127).
X To increase or decrease temperature in
the front compartment: turn control0043or
0084 counter-clockwise or clockwise
(Y page 117).
Only change the temperature setting in small
increments. Start at 72 ‡ (22 †).
X To increase or reduce the temperature in
the rear compartment using the front con-
trol panel: press the00D6button.
The indicator lamp in the 00D6button goes
out.
The temperature setting for the driver's side
is adopted for the rear compartment and the
front-passenger side.
X Turn thumbwheel 0043to the left or right
(Y page 117).
Only change the temperature setting in small
increments. Start at 72 ‡ (22 †).
X To increase or decrease the rear compart-
ment temperature using the rear control
panel: turn control 0075counter-clockwise or
clockwise on the rear control panel
(Y page 117).
Only change the temperature setting in small
increments. Start at 72 ‡ (22 †). Setting the air distribution
Air distribution settings Front control panel
009C
Directs the airflow through the center
vents
009B Directs air through the footwell air vents
009F Directs the airflow through the center
and footwell vents
0061 Directs air through the defroster vents
0087 Directs the airflow through the defroster
and center vents (Canada only) 0086
Directs air through the defroster and
footwell vents
008F Directs the airflow through the defroster,
center and footwell air vents (Canada
only)
Rear control panel
0099 Directs the airflow through the rear cen-
ter and B-pillar air vents
009B Directs air through the footwell air vents
i Using the rear control panel, you can also
activate both air distribution positions simul-
taneously. In order to do this, press both air
distribution buttons. The air is then routed
through all rear air vents.
i Regardless of the air distribution setting,
airflow is always directed through the side air vents. The side air vents can only be closed
when the controls on the side air vents are
turned downwards.
Setting X
Turn the SmartKey to position 0048in the igni-
tion lock (Y page 127).
X Press the 008Fbutton repeatedly until the
desired symbol appears in the display. Setting the airflow
X Turn the SmartKey to position 0048in the igni-
tion lock (Y page 127).
X To increase: press the0097button.
X To reduce: press the0095button.
i You can use 3-zone automatic climate con-
trol to set the airflow in the rear compartment
separately. Switching the ZONE function on/off
X To activate: press the00D6button.
The indicator lamp above the 00D6button
lights up.
Dual-zone automatic climate control: the tem-
perature setting for the driver's side is not
adopted for the front-passenger side.
3-zone automatic climate control: the tem-
perature setting for the driver's side is not Operating the climate control systems
121Climate control
Page 145 of 370
Opening the fuel filler flap
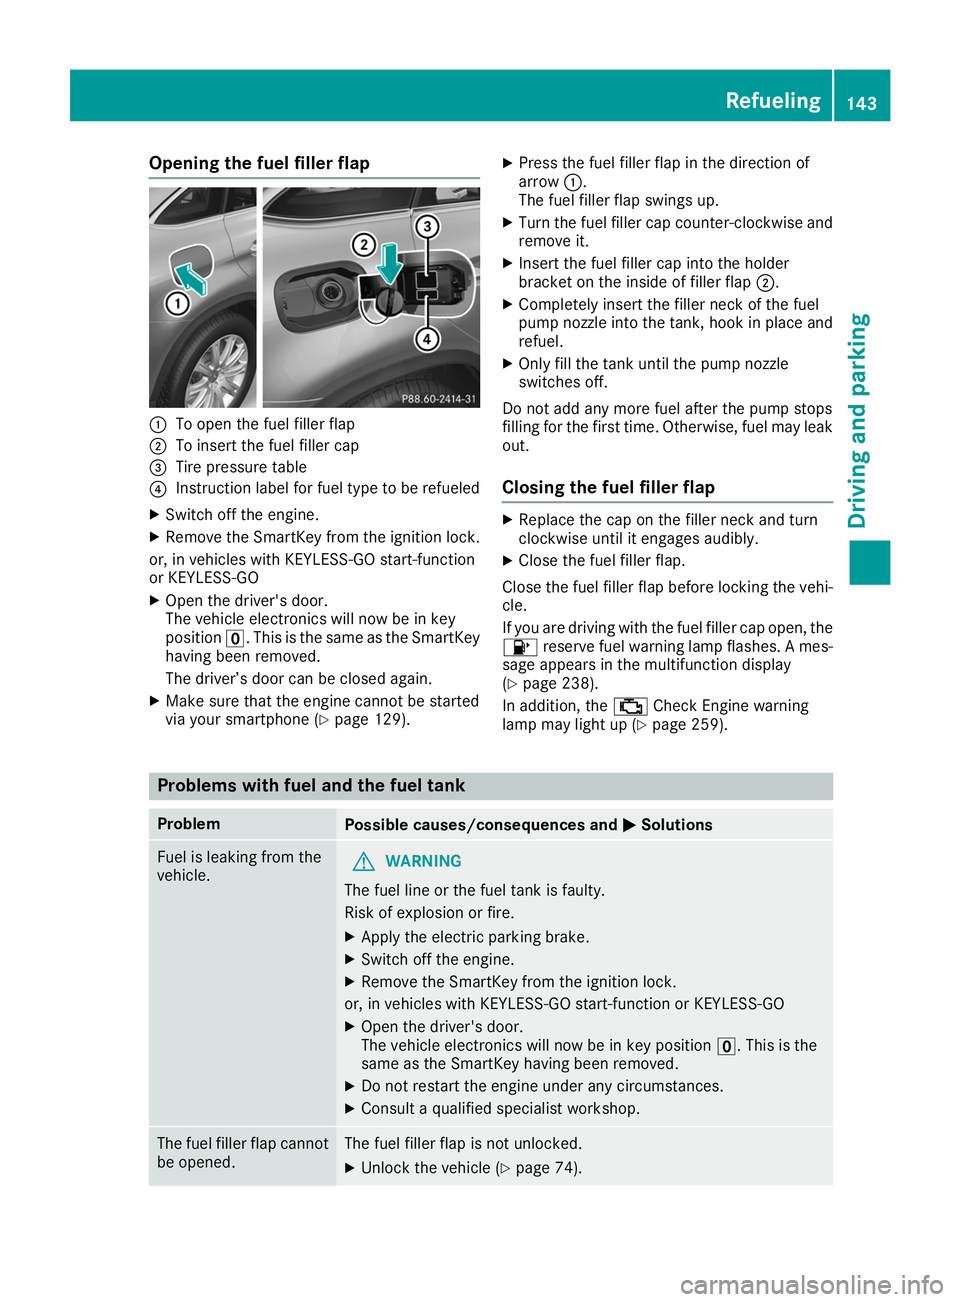
0043
To open the fuel filler flap
0044 To insert the fuel filler cap
0087 Tire pressure table
0085 Instruction label for fuel type to be refueled
X Switch off the engine.
X Remove the SmartKey from the ignition lock.
or, in vehicles with KEYLESS-GO start-function
or KEYLESS‑GO
X Open the driver's door.
The vehicle electronics will now be in key
position 0092. This is the same as the SmartKey
having been removed.
The driver’s door can be closed again.
X Make sure that the engine cannot be started
via your smartphone (Y page 129).X
Press the fuel filler flap in the direction of
arrow 0043.
The fuel filler flap swings up.
X Turn the fuel filler cap counter-clockwise and
remove it.
X Insert the fuel filler cap into the holder
bracket on the inside of filler flap 0044.
X Completely insert the filler neck of the fuel
pump nozzle into the tank, hook in place and
refuel.
X Only fill the tank until the pump nozzle
switches off.
Do not add any more fuel after the pump stops
filling for the first time. Otherwise, fuel may leak out.
Closing the fuel filler flap X
Replace the cap on the filler neck and turn
clockwise until it engages audibly.
X Close the fuel filler flap.
Close the fuel filler flap before locking the vehi-
cle.
If you are driving with the fuel filler cap open, the 00B6 reserve fuel warning lamp flashes. A mes-
sage appears in the multifunction display
(Y page 238).
In addition, the 00B9Check Engine warning
lamp may light up (Y page 259). Problems with fuel and the fuel tank
Problem
Possible causes/consequences and
0050 0050Solutions Fuel is leaking from the
vehicle.
G
WARNING
The fuel line or the fuel tank is faulty.
Risk of explosion or fire. X Apply the electric parking brake.
X Switch off the engine.
X Remove the SmartKey from the ignition lock.
or, in vehicles with KEYLESS-GO start-function or KEYLESS ‑GO
X Open the driver's door.
The vehicle electronics will now be in key position 0092. This is the
same as the SmartKey having been removed.
X Do not restart the engine under any circumstances.
X Consult a qualified specialist workshop. The fuel filler flap cannot
be opened. The fuel filler flap is not unlocked.
X Unlock the vehicle (Y page 74). Refueling
143Driving and parking Z
Page 210 of 370
Important safety notes
G
WARNING
If you operate information systems and com-
munication equipment integrated in the vehi- cle when driving, you may be distracted from
the traffic situation. You could also lose con-
trol of the vehicle. There is a risk of an acci-
dent.
Only operate this equipment when the traffic
situation permits. If you are not sure that this
is possible, park the vehicle paying attention
to traffic conditions and operate the equip-
ment when the vehicle is stationary.
You must observe the legal requirements for the country in which you are currently driving whenoperating the on-board computer. G
WARNING
If the instrument cluster has failed or mal-
functioned, you may not recognize function
restrictions in systems relevant to safety. The operating safety of your vehicle may be
impaired. There is a risk of an accident.
Drive on carefully. Have the vehicle checked
at a qualified specialist workshop immedi-
ately.
If the operating safety of your vehicle is
impaired, pull over as soon as it is safe to do so.
Contact a qualified specialist workshop.
The on-board computer only shows messages or warnings from certain systems in the multifunc-tion display. You should therefore make sure
your vehicle is operating safely at all times.
For an overview, see the instrument panel illus-
tration (Y page 36). Displays and operation
Instrument cluster lighting
The lighting in the instrument cluster, in the dis-
plays and the controls in the vehicle interior can be adjusted using the brightness control knob.
The brightness control knob is located on the
bottom left of the instrument cluster
(Y page 36). X
Turn the brightness control knob clockwise or
counter-clockwise.
If you turn the light switch to 0058,0060or
0058, the brightness is dependent upon the
brightness of the ambient light.
i The light sensor in the instrument cluster
automatically controls the brightness of the
multifunction display.
In daylight, the displays in the instrument
cluster are not illuminated. Speedometer with segments
The segments in the speedometer indicate
which speed range is available.
R Cruise control activated (Y page 156):
The segments light up from the stored speed to the maximum speed.
R Active Distance Assist DISTRONIC activated
(Y page 157):
One or two segments in the set speed range
light up.
R Active Distance Assist DISTRONIC detects a
vehicle in front moving more slowly than the
stored speed:
The segments between the speed of the vehi- cle in front and the stored speed light up. Tachometer
! Do not drive in the overrevving range, as this
could damage the engine.
The red band in the tachometer indicates the
engine's overrevving range.
The fuel supply is interrupted to protect the
engine when the red band is reached. Outside temperature display
You should pay special attention to road condi-
tions when temperatures are around freezing
point.
Bear in mind that the outside temperature dis-
play indicates the temperature measured and
does not record the road temperature.
The outside temperature display is in the multi-
function display (Y page 210).208
Displays and operationOn-board computer and displays
Page 221 of 370
Vehicle submenu
Activating/deactivating the automatic
door locking mechanism
If you activate the Automatic
Automatic Door
DoorLock
Lockfunc-
tion, the vehicle is centrally locked above a
speed of approximately 9 mph (15 km/h).
X Press the 0059or0065 button on the steering
wheel to select the Sett.
Sett.menu.
X Press the 0064or0063 button to select the
Vehicle
Vehicle submenu.
X Press 0076to confirm.
X Press the 0064or0063 button to select the
Automatic Door Lock
Automatic Door Lock function.
When the Automatic Door Lock
Automatic Door Lock function is
activated, the vehicle doors are displayed in
orange in the multifunction display.
X Press the 0076button to save the setting.
For further information on the automatic locking
feature, see (Y page 81).
Activating/deactivating the acoustic
locking verification signal
If you switch on the Acoustic
AcousticLock
Lock function, an
acoustic signal sounds when you lock the vehi-
cle.
X Press the 0059or0065 button on the steering
wheel to select the Settings
Settings menu.
X Press the 0064or0063 button to select the
Vehicle
Vehicle submenu.
X Press 0076to confirm.
X Press the 0064or0063 button to select the
Acoustic Lock Acoustic Lock function.
If the Acoustic Lock
Acoustic Lock function is activated,
the 0037 symbol in the multifunction display
lights up orange.
X Press the 0076button to save the setting.
Convenience submenu Activating/deactivating the EASY-
ENTRY/EXIT feature G
WARNING
When the EASY-ENTRY/EXIT feature adjusts
the steering wheel, you and other vehicle
occupants – particularly children – could
become trapped. There is a risk of injury.
While the EASY-ENTRY/EXIT feature is mak-
ing adjustments, make sure that no one has any body parts in the sweep of the steering
wheel.
If somebody becomes trapped:
R press one of the memory function position
buttons, or
R move the switch for steering wheel adjust-
ment in the opposite direction to that in
which the steering wheel is moving.
The adjustment process is stopped.
X Press the 0059or0065 button on the steering
wheel to select the Sett.
Sett. menu.
X Press the 0064or0063 button to select the
Convenience Convenience submenu.
X Press 0076to confirm.
X Using 0064or0063, select the Easy
EasyEntry/
Entry/
Exit
Exit function.
If the Easy
Easy Entry/Exit
Entry/Exit function is activated,
the vehicle steering wheel is displayed in
orange in the multifunction display.
X Press the 0076button to save the setting.
Further information on the EASY-ENTRY/EXIT
feature (Y page 101).
Switching the seat belt adjustment on/off X Press the 0059or0065 button on the steering
wheel to select the Settings Settingsmenu.
X Press the 0064or0063 button to select the
Convenience
Convenience submenu.
X Press 0076to confirm.
X Press the 0064or0063 button to select the
Belt Adjustment
Belt Adjustment function.
If the Belt
Belt Adjustment
Adjustment function is activated,
the vehicle seat belt is shown in orange in the multifunction display.
X Press the 0076button to save the setting.
For further information on belt adjustment, see
(Y page 46).
Switching the fold-in mirrors when lock-
ing feature on/off
This function is only available when the vehicle is
equipped with the electrical fold-in function.
When you activate the Auto. Auto.Mirror
Mirror Folding
Folding
function, the exterior mirrors are folded in when the vehicle is locked. The exterior mirrors fold
out automatically again as soon as you unlock
the vehicle. Menus and submenus
219On-board computer and displays Z
Page 300 of 370
When checking the oil level:
R
park the vehicle on a level surface.
R the engine should be switched off for approx-
imately five minutes if the engine is at normal
operating temperature.
R if the engine is not at normal operating tem-
perature, e.g. if the engine was only started
briefly, wait about 30 minutes before carrying
out the measurement.
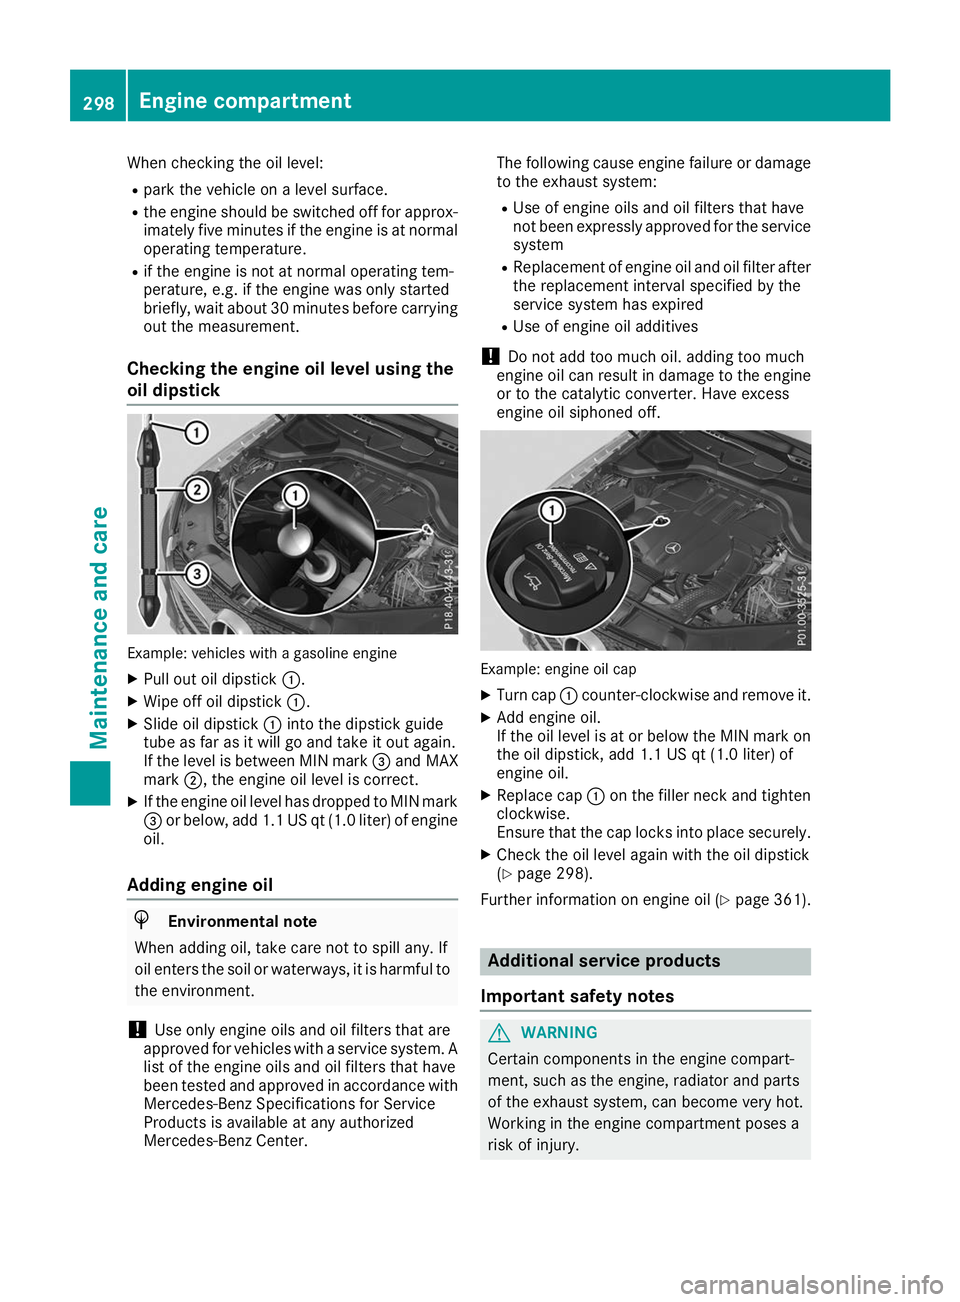
Checking the engine oil level using the
oil dipstick Example: vehicles with a gasoline engine
X Pull out oil dipstick 0043.
X Wipe off oil dipstick 0043.
X Slide oil dipstick 0043into the dipstick guide
tube as far as it will go and take it out again.
If the level is between MIN mark 0087and MAX
mark 0044, the engine oil level is correct.
X If the engine oil level has dropped to MIN mark
0087 or below, add 1.1 US qt (1.0 liter) of engine
oil.
Adding engine oil H
Environmental note
When adding oil, take care not to spill any. If
oil enters the soil or waterways, it is harmful to the environment.
! Use only engine oils and oil filters that are
approved for vehicles with a service system. A list of the engine oils and oil filters that have
been tested and approved in accordance with
Mercedes-Benz Specifications for Service
Products is available at any authorized
Mercedes-Benz Center. The following cause engine failure or damage
to the exhaust system:
R Use of engine oils and oil filters that have
not been expressly approved for the service
system
R Replacement of engine oil and oil filter after
the replacement interval specified by the
service system has expired
R Use of engine oil additives
! Do not add too much oil. adding too much
engine oil can result in damage to the engine or to the catalytic converter. Have excess
engine oil siphoned off. Example: engine oil cap
X Turn cap 0043counter-clockwise and remove it.
X Add engine oil.
If the oil level is at or below the MIN mark on
the oil dipstick, add 1.1 US qt (1.0 liter) of
engine oil.
X Replace cap 0043on the filler neck and tighten
clockwise.
Ensure that the cap locks into place securely.
X Check the oil level again with the oil dipstick
(Y page 298).
Further information on engine oil (Y page 361). Additional service products
Important safety notes G
WARNING
Certain components in the engine compart-
ment, such as the engine, radiator and parts
of the exhaust system, can become very hot.
Working in the engine compartment poses a
risk of injury. 298
Engine compartmentMaintenance and care
Page 301 of 370
Where possible, let the engine cool down and
touch only the components described in the
following. G
WARNING
The cooling system is pressurized, particularly when the motor is warm. If you open the cap, you could be scalded if hot coolant sprays out.
There is a risk of injury.
Let the engine cool down before you open the
cap. Wear protective gloves and protective
eyewear when opening. Open the cap slowly
to release pressure.
The coolant level may only be checked and cool- ant refilled when the engine and engine coolingsystem have cooled down. G
WARNING
Windshield washer concentrate is highly flam- mable. If windshield washer concentrate getsonto hot components of the engine or the
exhaust system, it can ignite. There is a risk of
fire and injury.
Make sure that windshield washer concen-
trate is not spilled in the vicinity of the filler
neck.
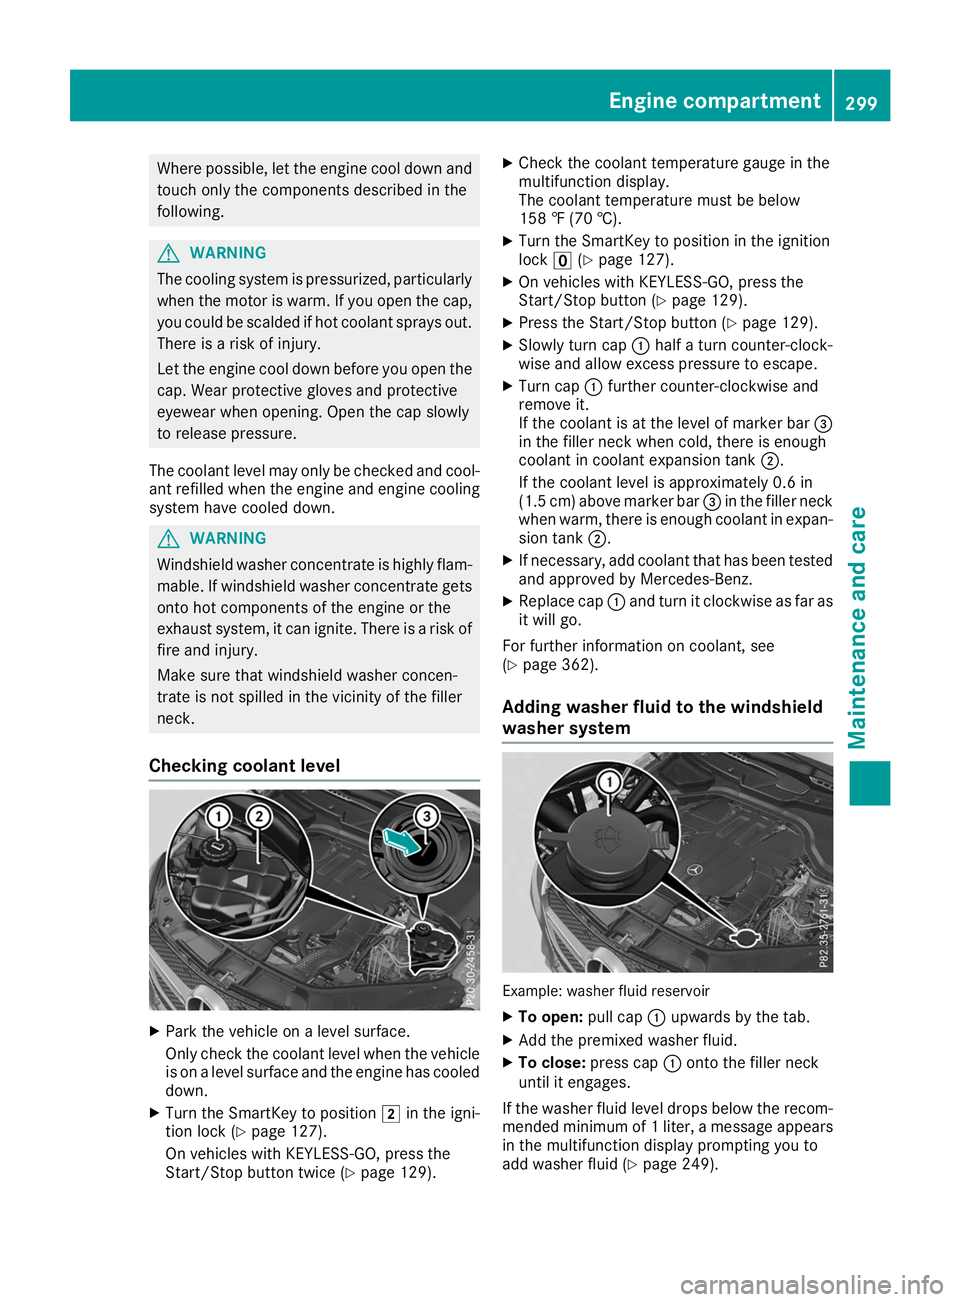
Checking coolant level X
Park the vehicle on a level surface.
Only check the coolant level when the vehicle
is on a level surface and the engine has cooled
down.
X Turn the SmartKey to position 0048in the igni-
tion lock (Y page 127).
On vehicles with KEYLESS-GO, press the
Start/Stop button twice (Y page 129).X
Check the coolant temperature gauge in the
multifunction display.
The coolant temperature must be below
158 ‡ (70 †).
X Turn the SmartKey to position in the ignition
lock 0092(Ypage 127).
X On vehicles with KEYLESS-GO, press the
Start/Stop button (Y page 129).
X Press the Start/Stop button (Y page 129).
X Slowly turn cap 0043half a turn counter-clock-
wise and allow excess pressure to escape.
X Turn cap 0043further counter-clockwise and
remove it.
If the coolant is at the level of marker bar 0087
in the filler neck when cold, there is enough
coolant in coolant expansion tank 0044.
If the coolant level is approximately 0.6 in
(1.5 cm) above marker bar 0087in the filler neck
when warm, there is enough coolant in expan- sion tank 0044.
X If necessary, add coolant that has been tested
and approved by Mercedes-Benz.
X Replace cap 0043and turn it clockwise as far as
it will go.
For further information on coolant, see
(Y page 362).
Adding washer fluid to the windshield
washer system Example: washer fluid reservoir
X To open: pull cap0043upwards by the tab.
X Add the premixed washer fluid.
X To close: press cap 0043onto the filler neck
until it engages.
If the washer fluid level drops below the recom- mended minimum of 1 liter, a message appears in the multifunction display prompting you to
add washer fluid (Y page 249). Engine compartment
299Maintenance and care Z
Page 319 of 370
Have the battery charge state checked more
frequently if you use the vehicle mainly for short trips or if you leave it standing idle for a lengthy
period. Consult a qualified specialist workshop
if you wish to leave your vehicle parked for a long
period of time.
Remove the SmartKey if you park the vehicle
and do not require any electrical consumers.
The vehicle will then use very little energy, thus conserving battery power.
If the power supply has been interrupted, e.g. if
you reconnect the battery, you will have to:
R set the clock (see the Digital Operator's Man-
ual)
On vehicles with a multimedia system and
navigation system, the clock is set automati-
cally.
R reset the function for automatically folding
the exterior mirrors in/out by folding the mir-
rors out once( Ypage 103) Charging the 12 V battery
G
WARNING
During charging and jump-starting, explosive
gases can escape from the battery. There is a risk of an explosion.
Particularly avoid fire, open flames, creating
sparks and smoking. Ensure there is sufficient
ventilation while charging and jump-starting.
Do not lean over a battery. G
WARNING
Battery acid is caustic. There is a risk of injury. Avoid contact with skin, eyes or clothing. Do
not inhale any battery gases. Do not lean over
the battery. Keep children away from batter-
ies. Wash away battery acid immediately with
plenty of clean water and seek medical atten- tion. G
WARNING
A discharged battery can freeze at tempera-
tures below freezing point. When jump-start-
ing the vehicle or charging the battery, gases can escape from the battery. There is a risk of
an explosion. Allow the frozen battery to thaw out before
charging it or jump-starting.
! Only use battery chargers with a maximum
charging voltage of 14.8 V.
! Only
charge the battery using the jump-
starting connection point.
The jump-starting connection point is in the
engine compartment (Y page 318).
X Open the hood.
X Connect the battery charger to the positive
terminal and ground point in the same order
as when connecting the donor battery in the
jump-starting procedure (Y page 318).
Keep away from fire and open flames. Do not
lean over a battery. Never charge the battery if it is still installed in the vehicle, unless you use a
battery charger which has been tested and
approved by Mercedes-Benz. A battery charger
unit specially adapted for Mercedes-Benz vehi-
cles and tested and approved by Mercedes-
Benz is available as an accessory. It permits the
charging of the battery in its installed position.
Contact an authorized Mercedes-Benz Center
for further information and availability. Read the battery charger's operating instructions before
charging the battery.
If, at low temperatures, the indicator lamps/
warning lamps in the instrument cluster do not
light up, it is highly likely that the discharged
battery has frozen. In this case you may neither
jump-start the vehicle nor charge the battery.
The service life of a thawed-out battery may be
shorter. The starting characteristics can be
impaired, particularly at low temperatures. Have
the thawed-out battery checked at a qualified
specialist workshop. Replacing the 12 V battery
Observe the notes on the 12 V battery.
Mercedes-Benz recommends that you have the
12 V battery replaced at a qualified specialist
workshop, e.g. at an authorized Mercedes-Benz
Center.
If you want to replace the battery yourself,
observe the following notes:
R Always replace a defective battery with a bat-
tery which meets the specific requirements of
the vehicle. Battery (vehicle)
317Breakdown assistance Z
Page 324 of 370
speed of 30 mph (50 km/h) must not be
exceeded.
For towing distances over 30 miles
(50 kilometers), the entire vehicle must be
raised and transported.
It is better to have the vehicle transported than
to have it towed away.
If the vehicle has suffered transmission damage, have it transported on a transporter or trailer.
The automatic transmission must be in position
005C when the vehicle is being towed.
The battery must be connected and charged.
Otherwise, you:
R cannot turn the SmartKey to position 0048in
the ignition lock
R cannot release the electric parking brake
R cannot shift the automatic transmission to
position 005C
Disarm the automatic locking feature before the vehicle is towed (Y page 219). You could other-
wise be locked out when pushing or towing the
vehicle. Permitted towing methods
Mercedes-Benz recommends transporting your
vehicle in the case of a breakdown, rather than
towing it away.
When towing away, use a towing rope or a tow-
ing bar with both axles on the ground. Do not use any tow bar systems. Installing/removing the towing eye
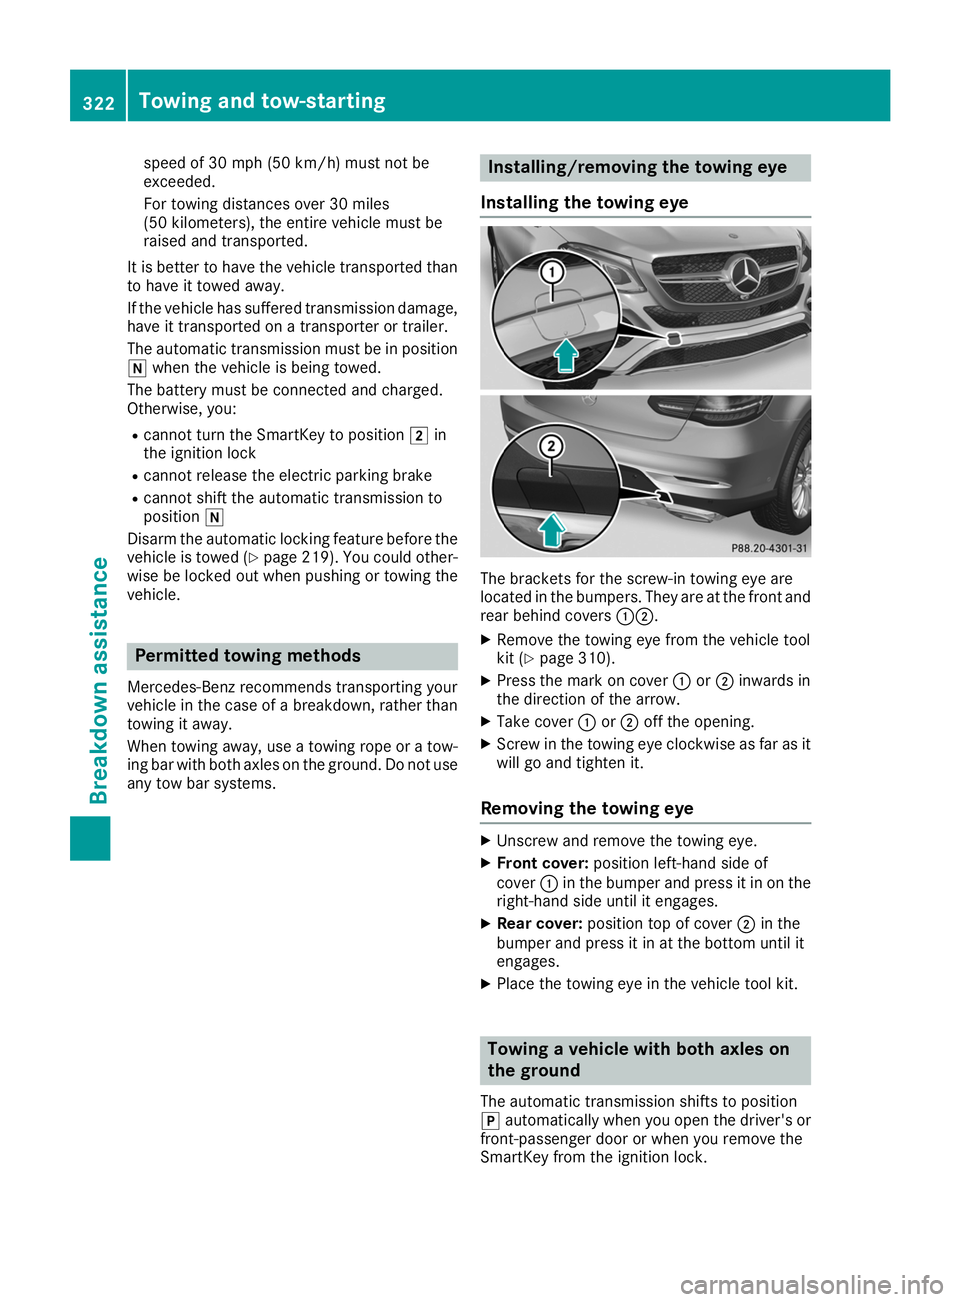
Installing the towing eye The brackets for the screw-in towing eye are
located in the bumpers. They are at the front and
rear behind covers 00430044.
X Remove the towing eye from the vehicle tool
kit (Y page 310).
X Press the mark on cover 0043or0044 inwards in
the direction of the arrow.
X Take cover 0043or0044 off the opening.
X Screw in the towing eye clockwise as far as it
will go and tighten it.
Removing the towing eye X
Unscrew and remove the towing eye.
X Front cover: position left-hand side of
cover 0043in the bumper and press it in on the
right-hand side until it engages.
X Rear cover: position top of cover 0044in the
bumper and press it in at the bottom until it
engages.
X Place the towing eye in the vehicle tool kit. Towing a vehicle with both axles on
the ground
The automatic transmission shifts to position
005D automatically when you open the driver's or
front-passenger door or when you remove the
SmartKey from the ignition lock. 322
Towing and tow-startingBreakdown assistance