heating MERCEDES-BENZ GLE COUPE 2020 Owner's Manual
[x] Cancel search | Manufacturer: MERCEDES-BENZ, Model Year: 2020, Model line: GLE COUPE, Model: MERCEDES-BENZ GLE COUPE 2020Pages: 757, PDF Size: 11.84 MB
Page 321 of 757
Switching on
voice inter ruption #
Select Voice barge-in.
If th e function is active, a command can be
interjecte d duringvoice output of the sys‐
te m. Using LINGU
ATRO NIC ef fectively LINGU
ATRO NIC audible help functions Using
the cor responding voice commands you
re cei vethefo llowing information and assis tance
in thefo llowing cases:
R For optimum ope ration: call up the Digital
Owner's Manual with "Open the operating
instructions for LINGUATRONIC for me", for
ex ample. The full extent of the Digital Own‐
er's Manual is available when theve hicle is
st ationar y.
R Cur rent application: onthe multifunction
st eering wheel, press the£ rocker switch
up and say the"Help" voice command. Yo u
will recei vesuggestions and information
about operation of LINGU ATRO NIC forthe
cur rent application. R
Continued dialogue: saythe"Help" voice
command during a voice dialogue. Forev ery
st ep of the dialogue youre cei vematching
information.
R Speci fic function: saythevo ice command
fo rth e desired function, e.g. with "Hello
Mercedes, I need help with thera dio" or af ter
pressing the£ rock er switch on the multi‐
function steering wheel up, say the"Help for
the telephone" voice command, forex ample. Note
s on optimal use of LINGU ATRO NIC No
tes on how toimpr overecognition:
R Activate online voice control (/ page317).
R Say thevo ice commands cohe rently and
clearly, but do not exaggerate thewo rds.
R Avoid loud noises that cause inter fere nce
while making a voice command ent ry, e.g.
th e enter tainment in there ar-passen ger
compa rtment.
R Forte lephone or add ress book entries:
- Only create sensible address book entri es
in the sy stem/mobile phone, e.g. enter surname and
firs t name in the cor rect
fi eld.
- Do not use any abbr eviations, unneces‐
sary spaces or special characters.
R Forra dio or TVprog ramme names: say
th e"Read out station list" voice command
and say the desired station name in theway
th evo ice output reads aloud to you.
% Toimpr overecognition, depending on the
outside temp erature, either the blo wersfor
ve ntilation or heating are reduced when LIN‐
GU ATRO NIC is star ted. Note
s on online voice control Online
voice control impr oves recognition and
makes additional results available as a result of
ex tern al information, e.g. information about POIs
and about thewe ather. Wetherefore recom‐
mend that you activate online voice control.
Yo u will need a Mercedes me user account for
th is. If you do not yet ha vea user account you
ha ve tocrea teone and connect it with your vehi‐
cle (/ page 466). 318
LINGU ATRO NIC
Page 336 of 757
Vo
ice command Colloquialexample Function
Seat heating driver on I would like to switch on the seat
heating for the driver's seatSwitches on
the seat heating forth e driver's or front passenger seat.
Seat heating front passenger level
2 Seat heating front-passenger on
level 2Sets
the seat heating forth e driver's or front passenger seat toleve l 2.
Current speed limit I would like to hear the speed limitCalls up
the cur rent speed limit.
Outside temperature I would like to find out what the
temperature outside is likeCalls up
the outside temp erature.
Average consumption What is the current average con-
sumption?Calls up
average consu mption.
Vehicle data Can you please display the vehicle
data menu?Calls up
theve hicle data.
Range Tell me the current rangeCalls up
the cur rent range da ta.
Assistance menu Show me the driver assistance set-
tingsDispl
aysth e assis tance settings.
Climate control menu I would like to see the climate con-
trol menu Displa
ys the climate control settings. LINGU
ATRO NIC 333
Page 514 of 757
Re
ar seats Ad
justing the rear seats on theRe ar Seat
Entertainment Sy stem
Re ar Seat En tertainment Sy stem:
4 © 5
Comfort 5
Seat comfort
Setting seat climate control % The functions are available depending on the
ve hicle equipment. #
Select Seat Climate. #
Toset seat heating: tap on the bar until the
desired heating le vel is set or the seat heat‐
ing is switched off.
Depending on the heating le vel, up tothree
indicator lamps will light up.
% The indicator lamps are also lit in the seat
button in the side door. #
Toswitch the panel heating on/off: switch
Panel heating on or off.
When panel heating is switched on, the armr‐
ests, the cent repanels on the doors and the
centre console are hea ted. #
Toadjust distribution of seat heating/
seat ventilation: slidethe control knob.
Settings can be made for dif fere nt areas of
th e seat, forex ample:
R Sitting sur face
R Sitting su rface and backrest
R Backrest #
Toset seat ventilation: tap on the bar until
th e desired ventilation le vel is set or the seat
ve ntilation is switched off.
Depending on theve ntilation le vel, up to
th re e indicator lamps will light up.
% The indicator lamps are also lit in the seat
button in the side door.
Ad justing the backrest contour in the lumbar
re gion of the seat backrest (lumbar)
% The function is available depending on the
ve hicle equipment. #
Select Lumbar. #
Select the seat. #
Select the seat again and set the air cushion. Ad
justing the backrest side bols ters
% The function is available depending on the
ve hicle equipment. #
Select Side bolsters. #
Select the seat. #
Adjust the air cushions.
Selecting the massage prog ramme for the
re ar seats
Re ar Seat En tertainment Sy stem:
4 © 5
Comfort 5
Massage #
Select the seat. #
Select a massage programme.
% For an overview of the massage and workout
programmes (/ page110). #
Tostart a massage prog ramme: select
00D0. #
Toset the massage intensit y:switch the
HIGH display button on or off.
Massage intensity is increased when the dis‐
play button is switched on. MBUX multimedia sy
stem 511
Page 527 of 757
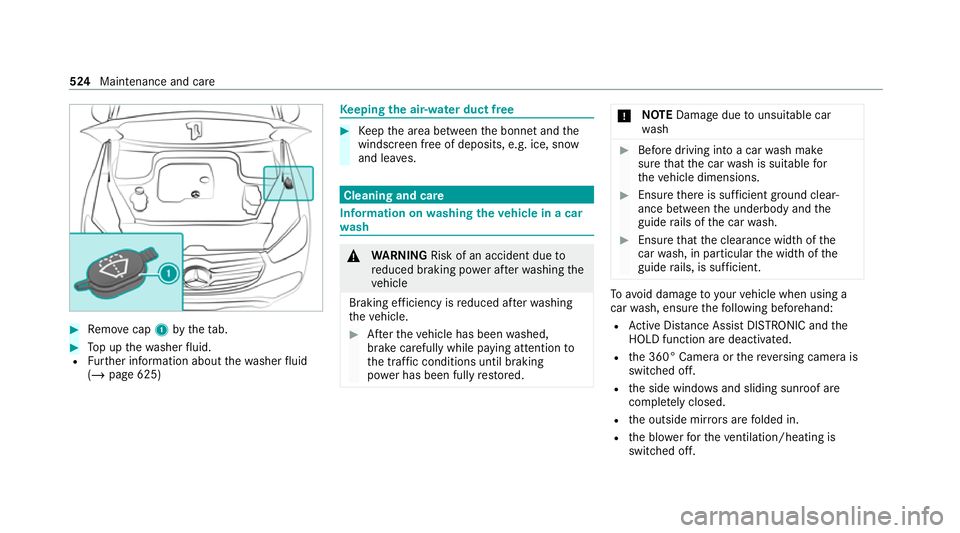
#
Remo vecap 1bytheta b. #
Top up thewa sher fluid.
R Further information about thewa sher fluid
(/ page 625) Ke
eping the air-water duct free #
Keep the area between the bonn etand the
windscreen free of deposits, e.g. ice, sn ow
and lea ves. Cleaning and care
Information on
washing theve hicle in a car
wa sh &
WARNING Risk of an accident due to
re duced braking po wer af terwa shing the
ve hicle
Braking ef ficiency is reduced af terwa shing
th eve hicle. #
Afterth eve hicle has been washed,
brake carefully while paying attention to
th e traf fic conditions until braking
po we r has been fully restored. *
NO
TEDama gedue tounsuitable car
wa sh #
Before driving into a car wash make
sure that the car wash is suitable for
th eve hicle dimensions. #
Ensure there is suf ficient ground clear‐
ance between the underbody and the
guide rails of the car wash. #
Ensure that the clearance width of the
car wash, in particular the width of the
guide rails, is suf ficient. To
avo id damage to yourvehicle when using a
car wash, ensure thefo llowing beforehand:
R Active Dis tance Assi stDISTRONIC and the
HOLD function are deactivated.
R the 360° Camera or there ve rsing camera is
switched off.
R the side windo wsand sliding sun roof are
comple tely closed.
R the outside mir rors are folded in.
R the blo werfo rth eve ntilation/heating is
switched off. 524
Maintenance and care
Page 536 of 757
Note
s on care of the interior &
WARNING Risk of inju ryfrom pla stic
parts breaking off af terth e use of sol‐
ve nt-based care products
Ca reand cleaning products con taining sol‐
ve nts can cause su rfaces in the cockpit to
become porous. When
the airbags are deplo yed, plastic parts
may break away. #
Do not use any care or cleaning prod‐
ucts containing sol vents toclean the
cockpit. &
WARNING Risk of inju ryor death from
bleached seat belts
Bleaching or dyeing seat belts can se verely
we aken them.
This can, forex ample, cause seat belts to
te ar or fail in an accident. #
Never blea chor dye seat belts. Obser
vethefo llowing information: Cleaning and car
eA voiding vehicle damage
Seat belts Clean with lukewarmand soapy water. R
Do not use chemical cleaning agents.
R Do not dry seat belts byheating them toove r 80 °C or
ex posing them todirect sunlight.
Display Cleanthe sur face carefully wi tha mic rofibre clo thand a suit‐
able display care product (TFT/LCD). R
Swit choff the display and let it cool down.
R Do not use any other agents.
Plastic trim R
Clean with a damp microfibre clo th.
R For heavy soiling: use a care product recommended for
Mercedes-Benz. R
Do not attach sticke rs,fi lms or similar materials.
R Do not allow cosmetics, insect repellent or sun cream to
come in contact wi th the plastic trim. Maintenance and care
533
Page 543 of 757
#
If tyre sealant gets into your eyes, thor‐
oughly rinse them using clean water
immediatel y. #
If tyre sealant has been swallowe d,
th oroughly rinse out your mouth imme‐
diately and drink plenty of water.Do not
induce vomiting and seek medical
attention immediately. #
Change out of clo thing which has come
into con tact wi thtyre sealant immedi‐
ately. #
If an alle rgic reaction occurs, seek med‐
ical attention immediatel y.*
NO
TEOverheating due tothe tyre infla‐
tion compressor running too long #
Do not runth e tyre inflation compres‐
sor for longer than ten minu tes without
inter ruption. Comply with
the manufacturer's saf ety no tes on
th est icke r on the tyre inflation compressor. Ha
ve the tyre sealant bottle replaced in a quali‐
fi ed specialist workshop every five years. #
Do not remo veany fore ign objects which
ha ve entered the tyre. #
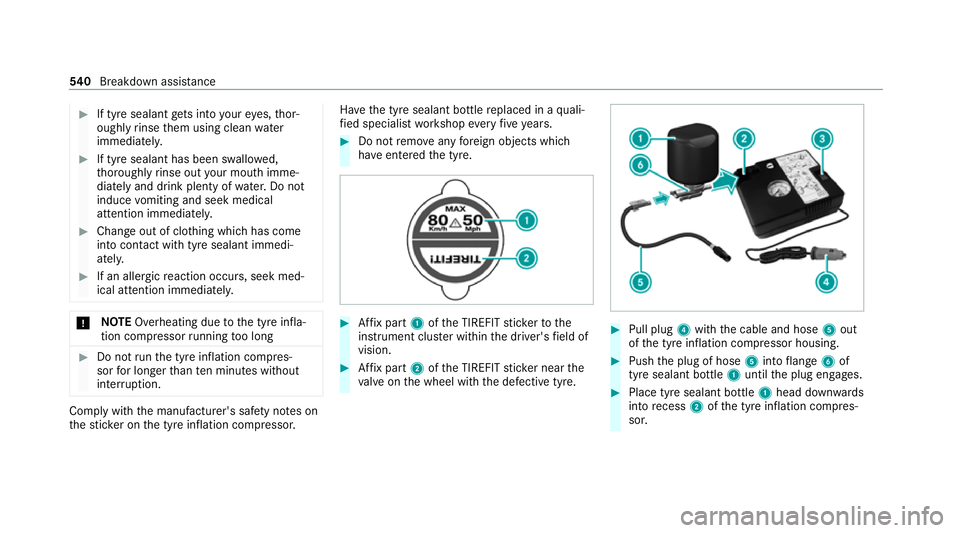
Affix pa rt1 ofthe TIREFIT sticke rto the
instrument clus ter within the driver's field of
vision. #
Affix pa rt2 ofthe TIREFIT sticke r near the
va lve on the wheel with the defective tyre. #
Pull plug 4with the cable and hose 5out
of the tyre inflation compressor housing. #
Push the plug of hose 5into flange 6of
tyre sealant bottle 1until the plug engages. #
Place tyre sealant bottle 1head down wards
into recess 2ofthe tyre inflation compres‐
sor. 540
Breakdown assis tance
Page 578 of 757
shop. The new wheel must ha
vethe
cor rect dimensions. Check
the tyre pressure of the emer gency spa re
wheel fitted. Co rrect the pressure as necessar y.
The maximum permissible speed with an emer‐
ge ncy spa rewheel fitted is 80 km/h.
Do not fit th e emer gency spa rewheel with sn ow
ch ains.
Re place the emer gency spa rewheel af ter six
ye ars at the latest, rega rdless of wear.
% Ve
hicles with a tyre pressure monitoring
sy stem: if an emer gency spa rewheel is fit‐
te dth e tyre pressure monitoring sy stem can‐
not function reliabl y.Fo r a few minutes af ter
an emer gency spa rewheel is fitted, the sys‐
te m may still display the tyre pressure of the
re mo ved wheel. Only restart the sy stem
again when the emer gency spa rewheel has
been replaced with a new wheel.
Be sure toalso obse rveth efo llowing fur ther
re lated subjects:
R Notes on tyre pressure (/ page 557)R
Tyre pressure table (/ page 558) Re
moving the eme rgency spa rewheel The eme
rgency spare wheel is located under the
load compartment floor.
% Not for Mercedes-Maybach vehicles. #
Obser vethe information on mounting tyres
(/ page 564). #
Open theta ilgate. #
Open the load compartment floor
(/ page 128). #
Remo vethe emer gency spa rewheel bag with
th e emer gency spa rewheel. #
Open the emer gency spa rewheel bag and
re mo vethe emer gency spa rewheel. Inflating
the emer gency spare wheel *
NO
TEOverheating due tothe tyre infla‐
tion compressor running too long #
Do not runth e tyre inflation compres‐
sor for longer than ten minu tes without
inter ruption. %
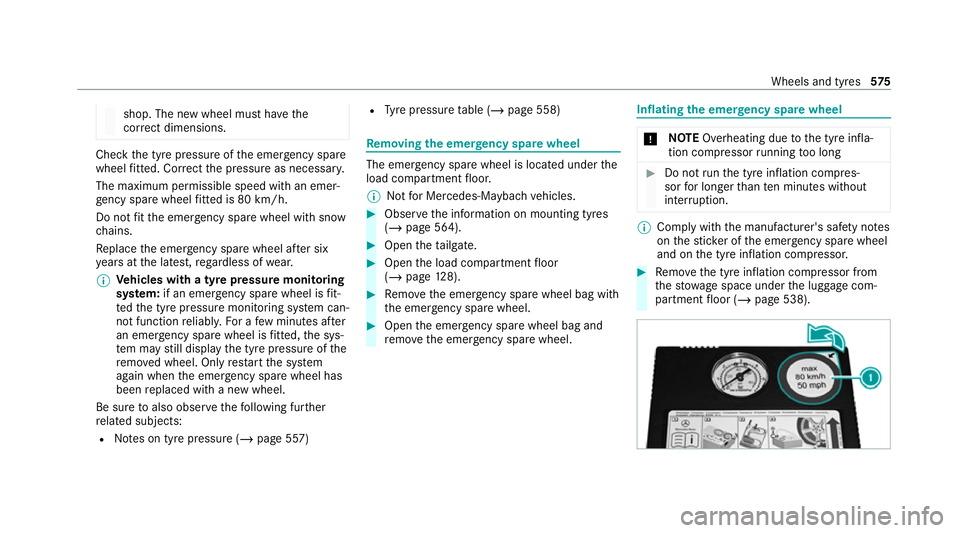
Comply with the manufacturer's saf ety no tes
on thest icke r of the emer gency spa rewheel
and on the tyre inflation compressor. #
Remo vethe tyre inflation compressor from
th estow age space under the luggage com‐
partment floor (/ page 538). Wheels and tyres
575
Page 581 of 757
#
Alw aysst ore the collapsible spare
wheel in the emer gency spa rewheel
bag and attach it tothe brac ket in the
load compartment. #
Alw ays ensure that the lashing stra ps
on the emer gency spa rewheel bag are
safely secured on there ar tie-down
ey es on the load compartment floor. Depending on
theve hicle's equipment, the col‐
lapsible spare wheel is located in an emer gency
spa rewheel bag on a brac ket in the load com‐
partment. The collapsible spare wheel in the
emer gency spa rewheel bag and the brac ket are
lashed wi thstra ps and secured using there ar
tie-down eyes on the load compartment floor. Re
moving the collapsible spare wheel Ve
hicles without a Burmes ter sound sy stem
The collapsible spare wheel is located under the
load compartment floor. #
Obser vethe information on mounting tyres
(/ page 564). #
Open theta ilgate. #
Open the load compartment floor
(/ page 128). #
Remo vethe collapsible spare wheel.
Ve hicles with a Burmes ter sound sy stem
The collapsible spare wheel is secured in the col‐
lapsible spare wheel bag in the load compart‐
ment. #
Obser vethe information on mounting tyres
(/ page 564). #
Open the load compartment. #
Detach the securing stra ps. #
Unhook there taining spring hooks of the
securing stra ps from the brac kets. #
Remo vethe collapsible spare wheel bag
to ge ther with the collapsible spare wheel. #
Open the collapsible spare wheel bag and
re mo vethe collapsible spare wheel. Inflating
the collapsible spa rewheel Re
quirements: R
Mount the collapsible spare wheel as descri‐
bed (/ page572).
R Remo vethe tyre inflation compressor from
th estow age space under the boot floor
(/ page 538).
* NO
TEDama getothe collapsible spare
wheel when lo wering theve hicle Lo
we ring theve hicle without pr eviously
inflating the collapsible spare wheel can
damage its rim. #
Inflate the collapsible spare wheel using
th e tyre inflation compressor before
lo we ring theve hicle. *
NO
TEOverheating due tothe tyre infla‐
tion compressor running too long #
Do not runth e tyre inflation compres‐
sor for longer than ten minu tes without
inter ruption. 578
Wheels and tyres
Page 623 of 757
The
recommended octane number foryo ur vehi‐
cle can also be found on the information label in
th e fuel filler flap (/ page197).
As a temp orary measure, if there commended
fuel is not available, you may also use regular
unleaded petrol with at least 91RON. This may
re duce engine output and increase fuel con‐
sum ption.
Ne verre fuel using petrol with an even lo wer
RO N.
Fu rther information on fuel can be obtained at a
fi lling station or a qualified specialist workshop.
Information on additives in petrol
Obser vethe no tes on operating fluids
(/ page 617).
* NO
TEDama gefrom use of unsuitable
additives Even small amounts of
the wrong additive
may lead tomalfunctions occur ring. #
Only add cleaning additives recommen‐
ded byMercedes-Benz tothe fuel. Mercedes-Benz
recommends that you use fuel
brands that ha veadditives.
In some countries, the fuel available may not
ha ve suf ficient additives. Residue could build up
in the fuel injection sy stem as a result. In this
case, in consultation with a Mercedes-Benz
service centre, the fuel may be mixed with the
cleaning additive recommended byMercedes-
Benz. Be sure toobser vethe no tes and mixing
ra tios speci fied on the conta iner.
Information on fuel grades forve hicles with
a diesel engine
Gene ral no tes
Obser vethe no tes on operating fluids
(/ page 617). &
WARNING Risk offire from fuel mixture
If yo u mix diesel fuel with petrol, theflash
point of the fuel mixture is lo werth an that of
pure diesel fuel.
While the engine is running, component
pa rts in theex haust sy stem may overheat
without warning. #
Neverre fuel using petrol in diesel
engines. #
Never mix petrol with diesel fuel. *
NO
TEDama gecaused bythe wrong fuel Even small amounts of
the wrong fuel could
re sult in damage tothe fuel sy stem, the
engine and the emission control sy stem. #
Only refuel using sulphu r-free diesel
fuel that con form sto European stand‐
ard EN 590, or an equivalent specifica‐
tion.
In countries without sulphur-f ree diesel
fuel, refuel using only lo w-sulphur diesel
fuel with a sulphur content less than
50 ppm.
Ne verre fuel with one of thefo llowing fuels:
R petrol
R marine diesel
R heating oil
R pure bio-diesel fuel or vege table oil 620
Tech nical da ta
Page 628 of 757
*
NO
TEDama gecaused byincor rect cool‐
ant #
Only add coolant that has been pre‐
mixed with therequ ired antifreeze pro‐
te ction.
Information on coolant is available at thefo l‐
lowing locations:
R inthe Mercedes-Benz Specifications for
Operating Fluids 310.1
- at https://be vo.mercedes-benz.com
- inthe Mercedes-Benz BeVo App
R at a qualified specialist workshop *
NO
TEOverheating at high outside tem‐
peratures If an inapp
ropriate coolant is used, the
engine cooling sy stem is not suf ficiently pro‐
te cted against overheating and cor rosion at
high outside temp eratures. #
Alw ays use coolant appr ovedby
Mercedes-Benz. #
Obser vethe instructions in the
Mercedes-Benz Specifications for Oper‐
ating Fluids 310.1. Ha
ve the coolant regularly replaced at a qualified
specialist workshop.
The proportion of cor rosion inhibitor/antifreeze
concentrate in the engine cooling sy stem should
be:
R a minimum of 50% (antifreeze pr otection
down toappr oximately -37 °C)
R a maximum of 55% (antifreeze pr otection
down to-45 °C) Note
s on windscreen washer fluid Obser
vethe no tes on operating fluids
(/ page 617). &
WARNING ‑ Risk of fire and injury due to
windscreen washer concentrate
Wi ndsc reen washer concentrate is highly
fl ammable. It could ignite if it comes into con
tact wi thhot engine component parts or
th eex haust sy stem. #
Make sure that no windsc reen washer
concentrate spills out next tothefiller
opening. *
NO
TEDama getotheex terior lighting
due tounsuitable windsc reen washer
fl uid Uns
uitable windsc reen washer fluids may
damage the plastic sur face of theex terior
lighting. #
Only use windscreen washer fluids
which are also suitable for use on plas‐
tic sur faces, e.g. MB SummerFit or MB
Wi nterFit. *
NO
TEBlocked spr aynozzles caused by
mixing windscreen washer fluids #
Do not mix MB SummerFit and MB Win‐
te rFit with other windscreen washer flu‐
ids. Te
ch nical da ta625