fuel pressure MERCEDES-BENZ GLE COUPE 2020 Owners Manual
[x] Cancel search | Manufacturer: MERCEDES-BENZ, Model Year: 2020, Model line: GLE COUPE, Model: MERCEDES-BENZ GLE COUPE 2020Pages: 757, PDF Size: 11.84 MB
Page 14 of 757
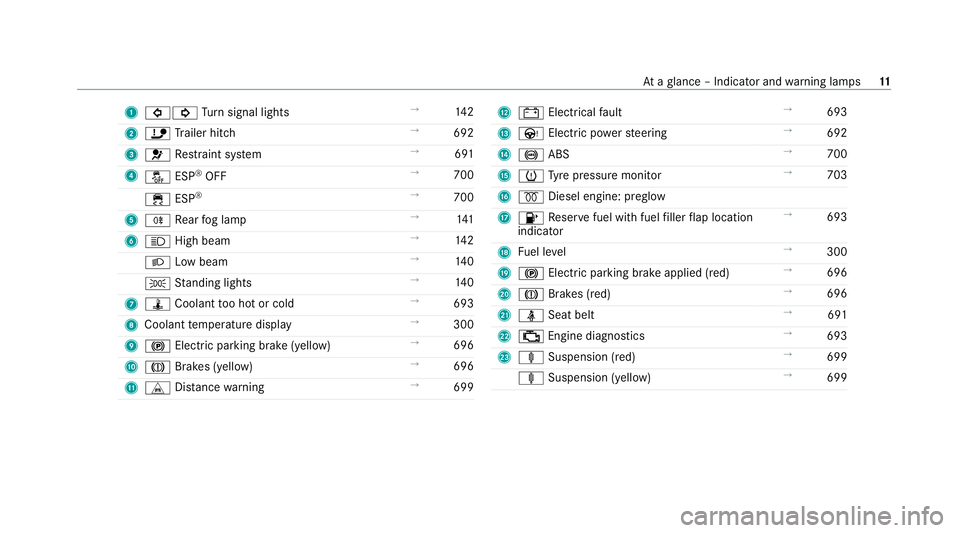
1
003E003D Turn signal lights →
14 2
2 ï Trailer hit ch →
692
3 0075 Restra int sy stem →
691
4 00BB ESP®
OFF →
700
00E5 ESP®
→
700
5 005E Rear fog lamp →
141
6 0057 High beam →
14 2
0058 Low beam →
14 0
0060 Standing lights →
14 0
7 ÿ Coolant too hot or cold →
693
8 Coolant temp erature display →
300
9 0024 Electric pa rking brake (yellow) →
696
A 004D Brakes (yellow) →
696
B L Distance warning →
699 C
003D Electrical fault →
693
D Ù Electric po werst eering →
692
E 0025 ABS →
700
F 0077 Tyre pressure monitor →
703
G 0028 Diesel engine: preglow
H 00B6 Reser vefuel with fuel filler flap location
indicator →
693
I Fuel le vel →
300
J 0024 Electric parking brake applied (red) →
696
K 004D Brakes (red) →
696
L 00E9 Seat belt →
691
M 00B9 Engine diagnostics →
693
N ä Suspension (red) →
699
ä Suspension (yell ow) →
699 At
aglance – Indicator and warning lamps 11
Page 25 of 757
Pr
otection of the environment
Plug-in hybrid: obser vethe no tes in the Supple‐
ment. Otherwise, you may failto recognise dan‐
ge rs.
+ ENVIRONMENTAL
NOTEEnvironmental
dama gedue tooperating conditions and
personal driving style The pollutant emission of
theve hicle is
directly related tothewa yyo u operate the
ve hicle.
Operate your vehicle in an environmentally
re sponsible manner tohelp pr otect the envi‐
ro nment. Please obser vethefo llowing rec‐
ommendations on ope rating conditions and
pe rsonal driving style.
Operating conditions: #
Make sure that the tyre pressure is cor‐
re ct. #
Do not car ryany unnecessary weight
(e.g. roof luggage rack s once you no
lon ger need them). #
Adhere tothe service inter vals.
A regularly serviced vehicle will contri b‐
ute toenvironmen tal pr otection. #
Alw ays ha vemaintenance workcar ried
out at a qualified specialist workshop.
Pe rsonal driving style: #
Do not depress the accelera tor pedal
when starting the engine. #
Do not warm upthe engine while the
ve hicle is stationar y. #
Drive carefully and maintain a suitable
di st ance from theve hicle in front. #
Avoid frequent, sudden acceleration
and braking. #
Change gear in good time and use each
ge ar on lyup to00C3 of its maximum
engine speed. #
Switch off the engine in stationary traf‐
fi c, e.g. byusing the ECO start/ stop
function. #
Drive fuel-ef ficiently. Obser vethe ECO
display for a fuel-ef ficient driving style. +
ENVIRONMEN
TALNO TEEnvironmental
pollution caused byirre sponsible dis‐
posal of the high-voltage battery A high-voltage battery conta
ins materials
which are harmful tothe environment. #
Dispose of faulty high-voltage bat teries
at a qualified specialist workshop. Ta
ke -back of end-of-life vehicles
EU countries onl y:
Mercedes-Benz will take back your end-of-life
ve hicle for environment-friendly disposal in
accordance with the European Union(EU) End-
of-Life Vehicles Directive.
A network of vehicle take -ba ckpoints and dis‐
mantlers has been es tablished foryo uto return
yo ur vehicle. You can lea veit at any of these
points free of charge . This makes an impor tant
contribution toclosing there cycling circle and
conse rving resources.
Fo r fur ther information about there cycling and
disposal of end-of-li fevehicles, and theta ke- 22
General no tes
Page 36 of 757
Fo
rth is reason, thefo llowing can occur in isola‐
te d cases, depending on the aids used:
R Aids malfunctioning
R Adverse health ef fects
Obser vethe no tes and warnings of the manufac‐
turer of the aids; if in doubt, conta ctthe device
manufacturer and your doc tor.Mercedes-
Benz AGrecommends using only few electrical
ve hicle sy stems if there is continuing uncer tainty
concerning the possibility of aids malfunction‐
ing.
Ha ve repairs and maintenance workinthe area
of vehicle components car rying live voltage and
transmission aerials car ried out byaqu alified
specialist workshop. Implied
warra nty
* NO
TEDama getotheve hicle arising
from violation of these operating instruc‐
tions. Damage
totheve hicle can arise from viola‐
tion of these operating instructions. This damage is not co
vered either bythe
Mercedes-Benz implied warranty or bythe
New‑ or Used- Vehicle Warrant y. #
Follow the instructions in these operat‐
ing instructions on proper operation of
yo ur vehicle as well as on possible vehi‐
cle damage. QR code
forre scue card
The QR code is secured in the fuel filler flap and
on the opposite side on the B-pillar. In theeve nt
of an accident, rescue services can use the QR
code toquickly find the appropriate rescue card
fo ryo ur vehicle. The cur rent rescue card con‐
ta ins the most impor tant information about your
ve hicle in a compact form , e.g. thero uting of the
electric lines.
Fu rther information can be obtained at https://
www.mercedes-benz.de/qr-code. Data
storage Electronic control units
Elect
ronic control units are fitted in your vehicle.
Some of these are necessary forth e safe opera‐
tion of your vehicle, while some assist you when
driving (driver assis tance sy stems). In addition,
yo ur vehicle pr ovides com fort and enter tainment
functions, which are also made possible byelec‐
tronic control units.
Elect ronic control units contain da tamemories
which cantemp orarily or permanently store
te ch nical information about theve hicle's operat‐
ing state, component loads, main tenance
re qu irements and tech nical events or faults.
In general, this information documents thest ate
of a component part, a module, a sy stem or the
sur roundings such as:
R operating status of sy stem components (e.g.
fi ll le vels, battery status, tyre pressure)
R status messages concerning theve hicle or
its individual components (e.g. number of
wheel revo lutions/speed, longitudinal accel‐ General no
tes33
Page 54 of 757
PRE-SAFE
®
PLUS can implement thefo llowing
measures independently of each other:
R Tightening the seat belts on the driver's seat
and front passenger seat.
R Activating there ar hazard warning lights at a
higher flashing frequenc y.
R Increasing brake pressure when theve hicle
is stationar y.This brake application is cancel‐
led automatically when theve hicle pulls
aw ay.
If an accident did not occur, the pre-em ptive
measures that we retake n are reve rsed.
Sy stem limits
The sy stem will not initiate any action in thefo l‐
lowing situations:
R when reve rsing
or
R when theve hicle is towing a trailer and there
is a risk of a rear impact The sy
stem will not initiate any braking applica‐
tion in thefo llowing situations:
R whilst driving
or
R when entering or exiting a parking space
while using Active Parking Assist Fu
nction of PRE-SAFE ®
Impulse Side If an imminent side impact is de
tected, PRE-
SA FE®
Impulse Side can pre-emptively mo vethe
front seat vehicle occupant's upper body
to wa rdsth e cent reoftheve hicle. It does this by
ra pidly inflating an air cushion in the outer seat
side bols ter of the seat backrest on the side on
which the impact is anticipated. This increases
th e dis tance between the door and theve hicle
occupant.
If PRE-SAFE ®
Impulse Side has been deplo yed or
is faulty, thePRE-SAFE impulse side inoperative
See Owner's Manual (/page 633) display mes‐
sage appears. Au
tomatic measures af ter an accident
Depending on the type and se verity of the acci‐
dent, and depending on theve hicle's equipment,
th efo llowing measures can be implemen ted, for
ex ample:
R automatic braking (post-collision brake)
R activating the hazard warning lights
R triggering an automatic emer gency call
(/ page 468)
R switching off the engine
To restart theve hicle, switch the ignition off
and switch it back on (/ page174).
Depending on the type and se verity of the
accident, it is possible that theve hicle can
no longer be star ted.
R switching off the fuel supply
R unlocking theve hicle doors
R lowe ring the side windo ws
R displaying the emer gency guide in the multi‐
media sy stem display
R switching on the interior lighting Occupant saf
ety51
Page 180 of 757
Ensu
rethefo llowing before starting the engine:
R the legal stipulations in the area where your
ve hicle is par ked allow engine starting via
smartphone.
R it is safe tostart and runth e engine where
yo ur vehicle is par ked.
R the fuel tank is su fficiently full.
St arting theve hicle (Remo teOnline) &
WARNING Risk of crushing or entrap‐
ment due tounin tentional starting of the
engine
Limbs could be crushed or trapped if the
engine is star ted unintentionally during
service or maintenance work. #
Alw ays secure the engine against unin‐
te ntional starting before car rying out
maintenance or repair work. Re
quirements:
R park position 005Dis selected.
R the anti- theft alarm sy stem is not activated. R
the panic alarm is not activated.
R the hazard warning light sy stem is switched
off.
R The bonn etis closed.
R the doors are closed and loc ked.
R the windo wsand sliding sun roof are closed. #
Start theve hicle using the smartphone.
Af tereve ryvehicle start, the engine runs for
te n minu tes.
Yo u can car ryout a maximum of two consecu‐
tive starting attem pts. The vehicle must be star‐
te d once with theke y before trying tostart the
ve hicle again with the smartphone. you can stop
th eve hicle again at any time.
% Further information can be found in the
smartphone app.
Securing the engine against starting before
car rying out maintenance or repair work: #
switch on the hazard warning light sy stem.
or #
unlock the doors. or #
open a side window or the sliding sunroof. Ru
nning-in no tes Mercedes-AMG
vehicles: observeth e no tes in
th e Supplement. Otherwise, you may failto rec‐
ognise dangers.
To preser vethe engine during thefirs t1, 500 km:
R drive at varying road speeds and engine
speeds.
R drive theve hicle in drive program A
or ;.
R shift tothe next highest gear at theve ry lat‐
est when the needle reaches the last third
before there d area in there v counter.
R do not shift down a gear manually in order to
brake.
R avoidoverstra ining theve hicle, e.g. driving at
full thro ttle.
R do not depress the accelera tor pedal past
th e pressure point (kickdown). Driving and parking
17 7
Page 199 of 757
Gearshift
recommendation Mercedes
-AMG vehicles: observeth e no tes in
th e Supplement. You could otherwise failto rec‐
ognise dangers.
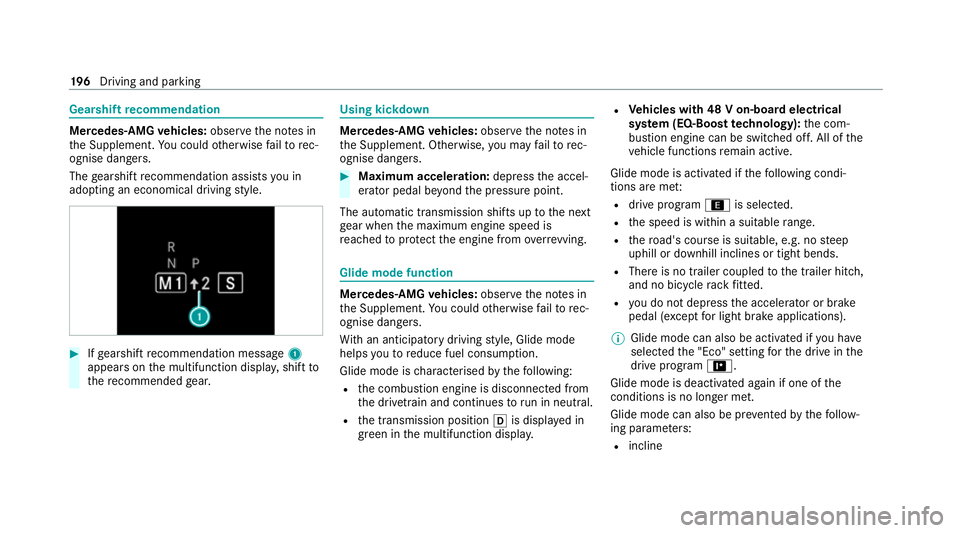
The gearshift recommendation assists you in
adopting an economical driving style. #
Ifge arshift recommendation message 1
appea rson the multifunction displa y,shift to
th ere commended gear. Using kickd
own Mercedes-AMG
vehicles: observeth e no tes in
th e Supplement. Otherwise, you may failto rec‐
ognise dangers. #
Maximum acceleration: depress the accel‐
erator pedal be yond the pressure point.
The automatic transmission shifts up tothe next
ge ar when the maximum engine speed is
re ached toprotect the engine from overrev ving. Glide mode function
Mercedes-AMG
vehicles: observeth e no tes in
th e Supplement. You could otherwise failto rec‐
ognise dangers.
Wi th an anticipatory driving style, Glide mode
helps youto reduce fuel consum ption.
Glide mode is characterised bythefo llowing:
R the combustion engine is disconnected from
th e driv etra in and continues torun in neutral.
R the transmission position 005Bis displa yed in
green in the multifunction displa y.R
Vehicles with 48 V on-board electrical
sy stem (EQ-Boost tech nology): the com‐
bustion engine can be switched off. All of the
ve hicle functions remain active.
Glide mode is activated if thefo llowing condi‐
tions are me t:
R drive program ;is selected.
R the speed is within a suitable range.
R thero ad's course is suitable, e.g. no steep
uphill or downhill inclines or tight bends.
R There is no trailer coupled tothe trailer hitch,
and no bicycle rack fitted.
R you do not depress the accelerator or brake
pedal (e xcept for light brake applications).
% Glide mode can also be activated if you ha ve
selected the "Eco" setting forth e drive in the
drive prog ram =.
Glide mode is deactivated again if one of the
conditions is no longer met.
Glide mode can also be pr evented bythefo llow‐
ing parame ters:
R incline 19 6
Driving and pa rking
Page 203 of 757
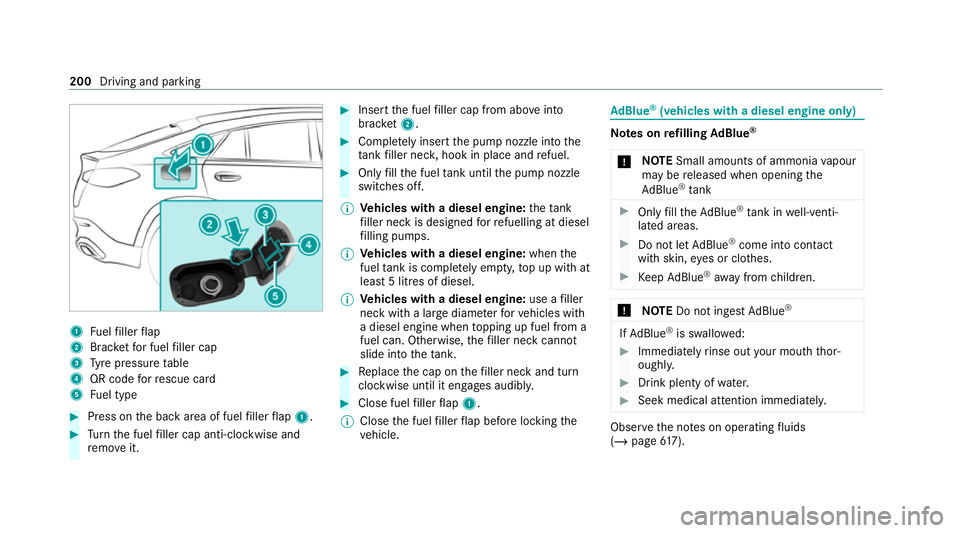
1
Fuelfiller flap
2 Brac ketfo r fuel filler cap
3 Tyre pressure table
4 QR code forre scue card
5 Fuel type #
Press on the back area of fuel filler flap 1. #
Turn the fuel filler cap anti-clockwise and
re mo veit. #
Insert the fuel filler cap from abo veinto
brac ket2. #
Comp lete ly inse rtthe pump nozzle into the
ta nk filler nec k,hook in place and refuel. #
Only fill th e fuel tank until the pump nozzle
switches off.
% Vehicles with a diesel engine: theta nk
fi ller neck is designed forre fuelling at diesel
fi lling pumps.
% Vehicles with a diesel engine: whenthe
fuel tank is compl etely em pty, top up with at
least 5 litres of diesel.
% Vehicles with a diesel engine: use afiller
neck with a lar gediame terfo rve hicles with
a diesel engine when topping up fuel from a
fuel can. Otherwise, thefiller neck cannot
slide into theta nk. #
Replace the cap on thefiller neck and turn
clockwise until it engages audibl y. #
Close fuel filler flap 1.
% Close the fuel filler flap before locking the
ve hicle. Ad
Blue ®
(vehicles with a diesel engine on ly) Note
s onrefilling AdBlue ®
* NO
TESmall amounts of ammonia vapour
may be released when opening the
Ad Blue ®
tank #
Only fill th eAd Blue ®
tank in well-venti‐
lated areas. #
Do not let AdBlue ®
come into contact
wi th skin, eyes or clo thes. #
Keep AdBlue ®
aw ay from children. *
NOTEDo not ingest AdBlue ® If
Ad Blue ®
is swallo wed: #
Immediately rinse out your mouth thor‐
oughl y. #
Drink plenty of water. #
Seek medical attention immediately. Obser
vethe no tes on operating fluids
(/ page 617). 200
Driving and parking
Page 561 of 757
&
WARNING Risk of accident from repea‐
te d tyre pressure drop
If th e tyre pressure drops repeatedl y,the
wheel, valve or tyre may be damaged.
Insuf ficient tyre pressure can cause the tyres
to bur st. #
Inspect the tyre for signs of fore ign
objects. #
Check whe ther the wheel or valve has a
leak. #
Ifyo u are unable torectify the damage,
conta ct aqualified specialist workshop. Information on
there commended tyre pressure
fo rth eve hicle's factor y-fitted tyres can be found
on the tyre pressure table on the inside of the
fuel filler flap (/ page 558).
Use a suitable pressure gauge tocheck the tyre
pressure. The outer appearance of a tyre does
not permit any reliable conclusion about the tyre
pressure. Ve
hicles with a tyre pressure monitoring sys‐
te m: you can also check the tyre pressure using
th e on-board computer.
Only cor rect tyre pressures when the tyres are
cold. Conditions for cold tyres:
R The vehicle has been par ked with the tyres
out of direct sunlight for at least thre e hours.
R The vehicle has tr avelled less than 1.6 km.
A rise in the tyre temp erature of 10°C increases
th e tyre pressure byappr ox.10 kPa (0.1 bar/
1. 5 psi). Take this into account when checking
th e tyre pressure of warm tyres.
Note s on trailer operation
Alw ays inflate there ar axle tyres tothere com‐
mended tyre pressures on the tyre pressure
ta ble for increased load. Ty
re pressure table The tyre pressure
table is on the inside of the
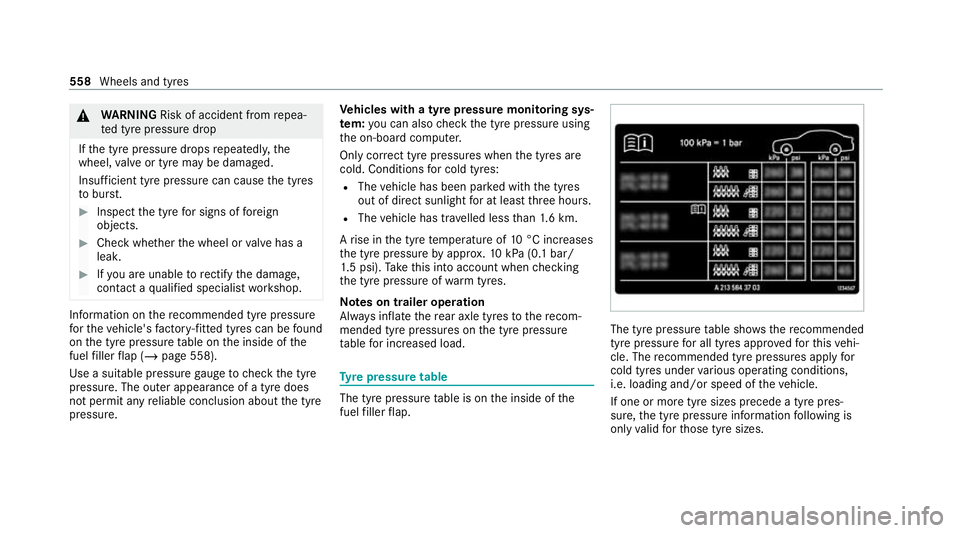
fuel filler flap. The tyre pressure
table sho ws there commended
tyre pressure for all tyres appro vedfo rth is vehi‐
cle. The recommended tyre pressures apply for
cold tyres under various operating conditions,
i.e. loading and/or speed of theve hicle.
If one or more tyre sizes precede a tyre pres‐
sure, the tyre pressure information following is
only valid forth ose tyre sizes. 558
Wheels and tyres
Page 562 of 757
If
th e preceding tyre sizes are complemented by
th e0091 symbol, the tyre pressure information
fo llowing sho wsalternative tyre pressures.
These tyre pressures may impr oveyour vehicle's
ri de comfort. Fuel consum ption may then
increase slightl y.
The load conditions "partially laden" and "fully
laden" are defined in theta ble for dif fere nt num‐
be rs of passengers and amounts of luggage. The
actual number of seats may dif fer from this.
Be sure toalso obse rveth efo llowing fur ther
re lated subjects:
R Notes on tyre pressure (/ page 557)Ty
re pressure moni toring sy stem Fu
nction of the ty repressure moni toring sys‐
tem
The sy stem checks the tyre pressure and the
tyre temp erature of the tyres fitted totheve hicle
by means of a tyre pressu resensor.
New tyre pressure sensors, e.g. in winter tyres,
are automatically taught-in during thefirs t jour‐
ney they are used. The tyre pressure and
the tyre temp erature
appear in the multifunction display
(/ page 559).
If th ere is a subs tantial pressure loss or if the
tyre temp erature is excessive, you will be
wa rned in thefo llowing ways:
R via display messa ges (/ page 680)
R viathe0077 warning lamp in the instrument
clus ter (/ page 703)
The tyre pressu remonitoring sy stem is only an
aid. It is the driver's responsibility toset the tyre
pressure tothere commended cold tyre pressure
suitable forth e operating situation. Set the tyre
pressure for cold tyres using a tyre pressu re
ga uge. No tethat the cor rect tyre pressure for
th e cur rent operating situation mu stfirs t be
ta ught-in tothe tyre pressure monitoring sys‐
te m.
In most cases, the tyre pressure monitoring sys‐
te m will auto maticallyupdate the new refere nce
va lues af teryo u ha vechanged the tyre pressure.
Yo u can, ho wever,also update there fere nce val‐
ues byrestarting the tyre pressure monitoring
sy stem manually (/ page 560). Sy
stem limits
The sy stem may be impaired or may not function
in thefo llowing situations:
R the tyre pressure has been set incor rectly
R there is a sudden pressure loss caused, for
ex ample, byafo re ign object penetrating the
tyre
R there is a malfunction caused byano ther
ra dio signal source
Be sure toalso pay attention tothefo llowing
re lated topic:
R notes on tyre pressure (/ page 557)
Checking the ty repressure with the tyre
pressure moni toring sy stem
Re quirements:
R The ignition is switched on.
On-board computer: 4 Service 5
Tyres
One of thefo llowing displa ysappears:
R Cur rent tyre pressure and tyre temp erature
of the individual wheels: Wheels and tyres
559
Page 571 of 757
Be sure
toalso obse rveth efo llowing fur ther
re lated subjects:
R Notes on tyre pressure (/ page 557)
R Tyre pressure table (/ page 558)
R Notes on the emer gency spa rewheel
(/ page 574) Note
s on inter changing wheels &
WARNING Risk of inju rythro ugh dif fer‐
ent wheel sizes
Inter changing the front and rear wheels if the
wheels or tyres ha vediffere nt dimensions
may se verely impair the driving characteris‐
tics.
The disk brakes or wheel suspension compo‐
nents may also be damaged. #
Rotate front and rear wheels on lyifthe
wheels and tyres are of the same
dimensions. Inter
changing the front and rear wheels if the
wheels or tyres ha vediffere nt dimensions can
re nder thege neral operating pe rmit in valid.
The wear pat tern s on the front and rear wheels
dif fer:
R Front wheels wear more on the shoulder of
th e tyre
R Rear wheels wear more in the cent reofthe
tyre
Do not drive wi thtyres that ha vetoo little tread
dep th. This significantly reduces traction on wet
ro ads (aquaplaning).
On vehicles with the same front and rear wheel
size, you can inter change the wheels every
5,000 to10,000 km, depending on thewe ar.
Ensure the direction of rotation is maintained for
th e wheels.
Obser vethe instructions and saf ety no tes on
"Changing a wheel" when doing so
(/ page 569). Note
s onstoring wheels When
storing wheels, obser vethefo llowing
no tes:
R Afterre moving wheels, store them in a cool,
dry and preferably dark place.
R Protect the tyres from conta ct withoil,
grease or fuel. Overview of
the ty re-change tool kit Apart from some countr
y-specific variants, vehi‐
cles are not equipped with a tyre-change tool kit.
Fo r more information on which tools are
re qu ired and appr ovedto per form a wheel
ch ange on your vehicle, consult a qualified spe‐
cialist workshop.
Re quired tyre-change tools may include, for
ex ample:
R Jack
R Chock
R Wheel wrench
% The jack weighs appr oximately 3.4 kg. 568
Wheels and tyres