warning light MERCEDES-BENZ GLE COUPE 2021 Owner's Guide
[x] Cancel search | Manufacturer: MERCEDES-BENZ, Model Year: 2021, Model line: GLE COUPE, Model: MERCEDES-BENZ GLE COUPE 2021Pages: 525, PDF Size: 8.83 MB
Page 148 of 525
Re
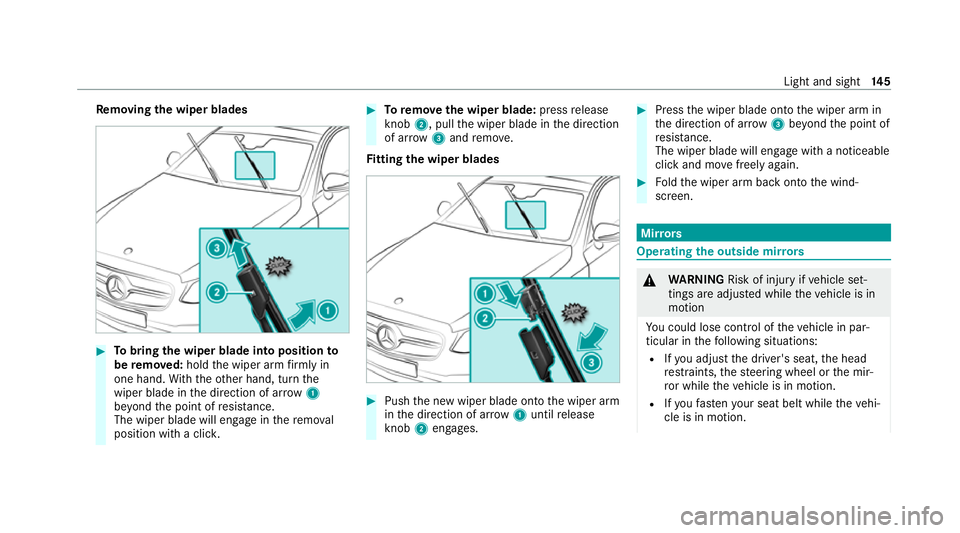
moving the wiper blades #
Tobring the wiper blade into position to
be remo ved: hold the wiper arm firm ly in
one hand. With th eot her hand, turn the
wiper blade in the direction of ar row1
be yond the point of resis tance.
The wiper blade will engage in there mo val
position with a clic k. #
Toremo vethe wiper blade: pressrelease
knob 2, pull the wiper blade in the direction
of ar row3and remo ve.
Fi tting the wiper blades #
Push the new wiper blade onto the wiper arm
in the direction of ar row1until release
knob 2engages. #
Press the wiper blade onto the wiper arm in
th e direction of ar row3beyond the point of
re sis tance.
The wiper blade will engage wi tha noticeable
click and mo vefreely again. #
Foldthe wiper arm back onto the wind‐
screen. Mir
rors Operating
the outside mir rors &
WARNING Risk of injury ifve hicle set‐
tings are adjus ted while theve hicle is in
motion
Yo u could lose cont rol of theve hicle in par‐
ticular in thefo llowing situations:
R Ifyo u adjust the driver's seat, the head
re stra ints, thesteering wheel or the mir‐
ro r while theve hicle is in motion.
R Ifyo ufast enyour seat belt while theve hi‐
cle is in motion. Light and sight
14 5
Page 149 of 525
#
Before starting the engine: adjust the
driver's seat, head restra ints, steering
wheel and mir ror in particular and fas‐
te nyo ur seat belt. &
WARNING Risk of accident due tomis‐
judgement of dis tance when using the
outside mir ror
The outside mir rors reflect objects on a
smaller scale. The objects in view are in fact
closer than they appear. #
Therefore, alw ays look over your shoul‐
der in order toensure that you are
aw are of the actual dis tance between
yo u and thero ad users driving behind
yo u. Fo
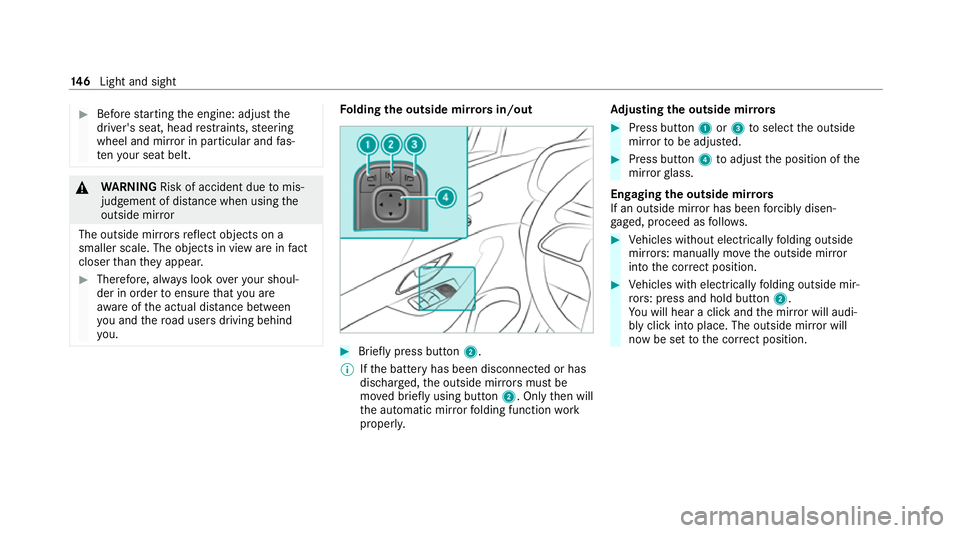
lding the outside mir rors in/out #
Brief lypress button 2.
% Ifth e battery has been disconnected or has
dischar ged, the outside mir rors must be
mo ved briefly using button 2. Onlythen will
th e automatic mir rorfo lding function work
proper ly. Ad
justing the outside mir rors #
Press button 1or3 toselect the outside
mir rorto be adjus ted. #
Press button 4toadjust the position of the
mir rorgl ass.
Engaging the outside mir rors
If an outside mir ror has been forc ibly disen‐
ga ge d, proceed as follo ws. #
Vehicles without electrically folding outside
mir rors: manually mo vethe outside mir ror
into the cor rect position. #
Vehicles with electrically folding outside mir‐
ro rs: press and hold button 2.
Yo u will hear a click and the mir ror will audi‐
bly click into place. The outside mir ror will
now be set tothe cor rect position. 14 6
Light and sight
Page 150 of 525

Au
tomatic anti-dazzle mir rors function &
WARNING Risk of acid burn s and poi‐
soning due tothe anti-dazzle mir ror elec‐
trolyte
Electrolyte may escape if theglass in an
automatic anti-dazzle mir ror breaks.
The electrolyte is hazardous tohealth and
causes ir rita tion. It mu stnot come into con‐
ta ct with your skin, eyes,respiratory or gans
or clo thing or be swallo wed. #
Ifyo u come into contact with electro‐
ly te , obser vethefo llowing:
R Immediately rinse the electrolyte
from your skin with water and seek
medical attention.
R If electrolyte comes into contact
with your eyes, immediately rinse
th em thoroughly with clean water
and seek medical attention.
R Ifth e electrolyte is swallo wed,
immediately rinse your mouth out
th oroughl y.Do not induce vomiting.
Seek medical attention immediately. R
Immedia tely ch ange out of clo thing
which has been con taminated with
electrolyte.
R If an allergic reaction occurs, seek
medical attention immediatel y. The inside
rear-view mir ror and the outside mir‐
ro r on the driver's side will automatically go into
anti-dazzle mode if light from a headlamp hits
th e sensor on the inside rear-view mir ror.
Sy stem limits
The sy stem will not go into anti-dazzle mode if:
R The engine is switched off.
R Reversege ar is engaged.
R The interior lighting is swit ched on. Fr
ont-passenger outside mir ror parking posi‐
tion function %
The pa rking position is available on ly invehi‐
cles with a memory function.
The parking position makes parking easier. In
thefo llowing situations, the front-passen ger
outside mir ror will swive l downwards in the
direction of there ar wheel on the front passeng‐
er's side:
R the parking position is stored (/ page148)
R The front-passenger mir ror is selected
R Reversege ar is engaged.
The front-passenger outside mir ror will mo ve
back toits original position in thefo llowing sit‐
uations:
R You shift the transmission toano ther trans‐
mission position
R You are tra velling at speeds greaterth an
15 km/h
R You press the button forth e outside mir ror
on the driver's side Light and sight
147
Page 159 of 525
#
Alw ays switch thest ationary heater off
in enclosed spaces without an air
ex traction sy stems, e.g. in garage s. #
Keep theta ilpipe and the area around
th eve hicle free from snow when the
engine or thest ationary heater are run‐
ning. #
Open a window on the windward side of
th eve hicle toensure an adequate sup‐
ply of fresh air. &
WARNING Risk offire due tohot station‐
ary heater components and exhaust
ga ses
Flammable materials such as lea ves, grass or
twigs may ignite. #
When thest ationary heater is swit ched
on, make sure that:
R hot vehicle parts do not come into
contact with flammable materials.
R theex haust gas can flow out of the
st ationary heater exhaust pipe
unhindered. R
theex haust gas does not come into
contact with flammable materials. *
NO
TEBattery discharge caused bysta‐
tionary heater or stationary ventilation
operation Ope
rating thest ationary heater or stationary
ve ntilation drains the batter y. #
After heating or ventilating theve hicle
twice, drive for a longer period of time. Re
quirements:
R The fuel tank is su fficiently full.
% Please no tethat if theta nk fill le vel is too
lo w, it can result in function restrictions dur‐
ing auxiliary heating operation. #
Set the desired temp erature using the0082
button. #
Press the003B button.
The red or blue indicator lamp on the003B
button will light up or go out. Indicator lamp colours:
R Blue: stationary ventilation is switched on.
R Red:thest ationary heater is swit ched on.
R Yello w: the departure time has been prese‐
lected.
The stationary heater/ ventilation will switch off
au tomatically af ter 50 minutes.
Operation using the app: thest ationary
heater/ ventilation can also be operated via the
Mercedes me connect app. You can find fur ther
information in the separate Owner's Manual at
https://moba.i.daimler.com/mar kets/ece-r ow/
baix/cars/connectme/en_GB/#emotions/
St artseite.html.
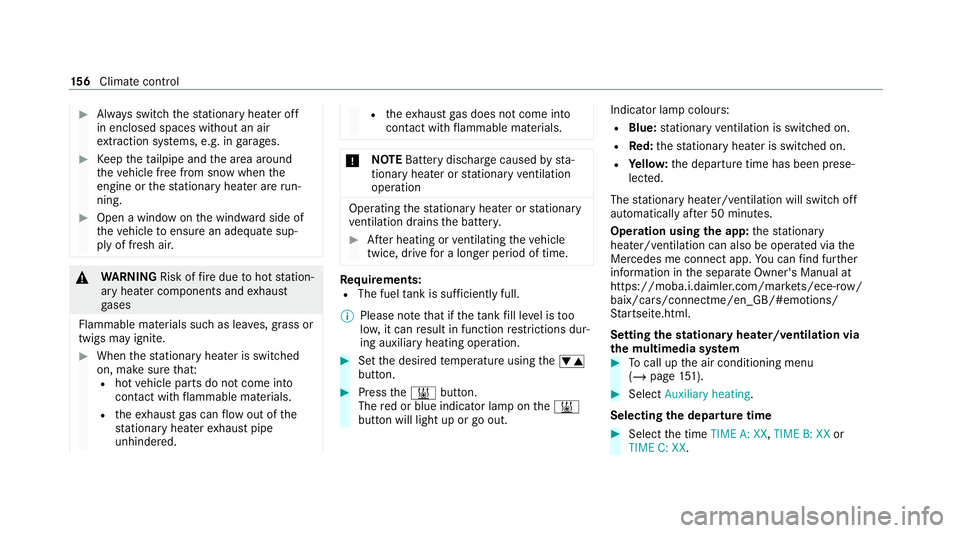
Setting thest ationary heater/ventilation via
th e multimedia sy stem #
Tocall up the air conditioning menu
(/ page 151). #
Select Auxiliary heating.
Selecting the departure time #
Select the time TIME A: XX, TIME B: XXor
TIME C: XX. 15 6
Climate cont rol
Page 168 of 525
Ensu
rethefo llowing before starting the engine:
R the legal stipulations in the area where your
ve hicle is par ked allow engine starting via
smartphone.
R it is safe tostart and runth e engine where
yo ur vehicle is par ked.
R the fuel tank is su fficiently full.
St arting theve hicle (Remo teOnline) &
WARNING Risk of crushing or entrap‐
ment due tounin tentional starting of the
engine
Limbs could be crushed or trapped if the
engine is star ted unintentionally during
service or maintenance work. #
Alw ays secure the engine against unin‐
te ntional starting before car rying out
maintenance or repair work. Re
quirements:
R Park position 005Dis selected.
R The anti- theft alarm sy stem is not activated.
R The panic alarm is not activated. R
The hazard warning light sy stem is switched
off.
R The bonn etis closed.
R The doors are closed and loc ked.
R The windo wsand sliding sun roof are closed. #
Start theve hicle using the smartphone.
Af tereve ryengine start, the engine runs for
te n minu tes.
Yo u can car ryout a maximum of two consecu‐
tive starting attem pts. Yo u must start the engine
with theke y before trying tostart the engine
again with the smartphone.
Yo u can swit choff the engine at any time as fol‐
lo ws:
R Viath e Smartphone App
R By pressing theÜ orß button on the
key
% Further information can be found in the
smartphone app. Securing
the engine against starting before
car rying out maintenance or repair work: #
Switch on the hazard warning light sy stem.
or #
Unlock the doors.
or #
Open a side window or the sliding sunroof. Ru
nning-in no tes To
preser vethe engine during thefirs t1, 500 km:
R Drive at varying road speeds and engine
speeds.
R Do not drive at speeds greater than
14 0 km/h.
R Drive theve hicle in drive program A
or ;.
R Shift tothe next highest gear at theve ry lat‐
est when the needle reaches the last third
before there d area in there v counter.
R Do not shift down a gear manually in order to
brake. Driving and parking
16 5
Page 188 of 525
Glide mode is activated if
thefo llowing condi‐
tions are me t:
R Drive program ;is selec ted.
R The speed is within a suitable range.
R The road's course is suitable, e.g. no steep
uphill or downhill inclines or tight bends.
R There is no trailer hitched up tothe trailer
hitch, and no bicycle rack Fitted.
R You do not depress the accelera tor or brake
pedal (e xcept for light brake applications).
% Glide mode can also be activated if you ha ve
selected the "Eco" setting forth e drive in the
drive prog ram =.
Glide mode is deactivated again if one of the
conditions is no longer met.
Glide mode can also be pr evented bythefo llow‐
ing parame ters:
R Incline
R Downhill gradient
R Temp erature
R Height R
Speed
R Operating status of the engine
R Traf fic situation Fu
nction of the 4MATIC
4MATIC ensures that all four wheels are driven.
To ge ther with ESP ®
and 4ETS, 4MATIC impr oves
th e traction of your vehicle whene ver a driven
wheel spins due toinsuf ficient traction.
If yo ufa ilto adapt your driving style, 4MATIC can
neither reduce therisk of an accident nor over‐
ri de the la wsof ph ysics. 4MATIC cannot take
account of road, weather and traf fic conditions.
4MATIC is only an aid. You are responsible espe‐
cially for maintaining a safe dis tance from the
ve hicle in front, forve hicle speed, for braking in
good time and forst ay ing in lane.
% In wint ryroad conditions, the maximum
ef fect of 4MATIC can be achie ved only if you
use winter tyres (M+S tyres), with sn ow
ch ains if necessar y. Re
fuelling Re
fuelling theve hicle &
WARNING Risk offire or explosion from
fuel
Fu els are highly flammable. #
Fire, naked flames, smoking and crea‐
tion of spar ksmust be avoided. #
Swit choff the ignition and, if available,
th est ationary heater, before and while
re fuelling theve hicle. &
WARNING Risk of injury from fuels
Fu els are poisonous and hazardous to your
health. #
Do not swallow fuel or let it come into
contact with skin, eyes or clo thing. #
Do not inhale fuel vapour. #
Keep children away from fuel. #
Keep doors and windo wsclosed du ring
th ere fuelling process. Driving and parking
18 5
Page 194 of 525
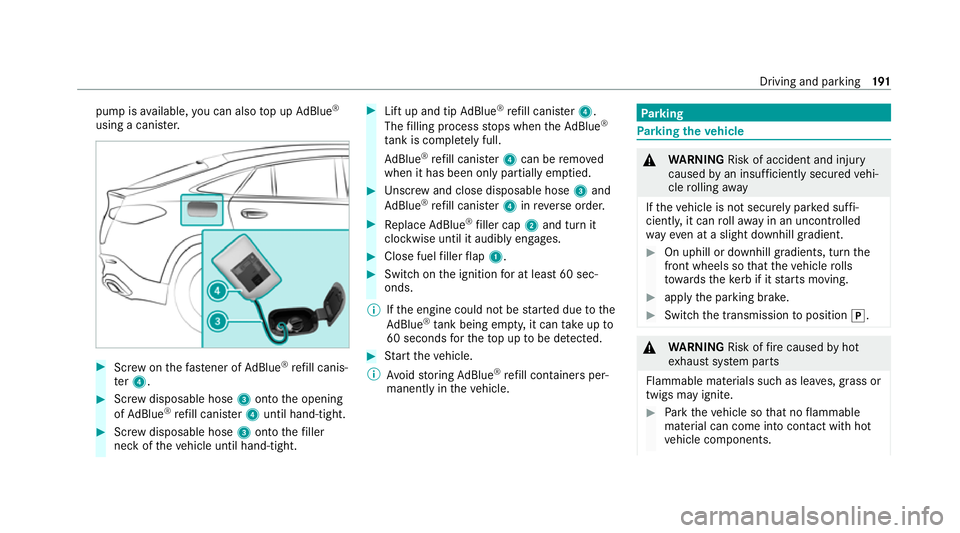
pump is
available, you can also top up AdBlue ®
using a cani ster. #
Screw onthefast ener of AdBlue ®
re fill canis‐
te r4. #
Screw disposable hose 3onto the opening
of Ad Blue ®
re fill canis ter4 until hand-tight. #
Screw disposable hose 3onto thefiller
neck of theve hicle until hand-tight. #
Lift up and tip AdBlue ®
re fill canis ter4.
The filling process stops when theAd Blue ®
ta nk is compl etely full.
Ad Blue ®
re fill canis ter4 can be remo ved
when it has been only partially em ptied. #
Unscr ew and close disposable hose 3and
Ad Blue ®
re fill canis ter4 inreve rse order. #
Replace AdBlue ®
filler cap 2and turn it
clockwise until it audibly engages. #
Close fuel filler flap 1. #
Swit chon the ignition for at least 60 sec‐
onds.
% Ifth e engine could not be star ted due tothe
Ad Blue ®
tan k being empty, it can take up to
60 seconds forth eto p up tobe de tected. #
Start theve hicle.
% Avoid storing AdBlue ®
re fill conta iners per‐
manently in theve hicle. Pa
rking Pa
rking theve hicle &
WARNING Risk of accident and inju ry
caused byan insuf ficiently secu redve hi‐
cle rolling away
If th eve hicle is not securely par ked suf fi‐
ciently, it can rollaw ay in an uncontro lled
wa yev en at a slight downhill gradient. #
On uphill or downhill gradients, turn the
front wheels so that theve hicle rolls
to wa rdsth eke rb if it starts moving. #
apply the parking brake. #
Switch the transmission toposition 005D. &
WARNING Risk offire caused byhot
ex haust sy stem parts
Flammable materials such as lea ves, grass or
twigs may ignite. #
Park theve hicle so that no flammable
material can come into con tact with hot
ve hicle components. Driving and parking
191
Page 198 of 525
#
If indicator lamp 4flashes yellow af ter
appr oximately 20 seconds: press and hold
th e pr eviously pressed button again until the
door opens or closes.
Clearing thega rage door opener memo ry#
Press and hold buttons 1and 3.
Indicator lamp 4lights up yello w. #
If indicator lamp 4flashes green: release
buttons 1and 3.
The entire memo ryhas been dele ted. Electric parking brake
Fu
nction of the electric pa rking brake (apply‐
ing automatically) &
WARNING Risk of accident and inju ry
due toleaving children unat tended in the
ve hicle
If ch ildren are left unat tended in theve hicle,
th ey could, in part icular:
R open doors, thereby endangering other
persons or road users. R
get out and be stru ck byoncoming traf‐
fi c.
R ope rate ve hicle equipment and become
trapped, forex ample.
In addition, thech ildren could also set the
ve hicle in motion by,fo rex ample:
R releasing the parking brake.
R changing the transmission position.
R starting theve hicle. #
Never lea vechildren unat tended in the
ve hicle. #
When leaving theve hicle, alw aysta ke
th eke y with you and lock theve hicle. #
Keep theve hicle key out of there ach of
ch ildren. The electric park
ing brake is applied if the
tr ansmission is in position 005D 005Dand one of the
fo llowing conditions is fulfilled:
R The engine is switched off. R
The seat belt tongue is not inser ted in the
seat belt buckle of the driver's seat and the
driver's door is opened.
% Toprev ent application: pull the handle of the
electric parking brake (/ page196).
In thefo llowing situations, the electric pa rk‐
ing brake is also applied:
R The HOLD function is keeping theve hicle sta‐
tionar y.
R Active Parking Assist is keeping theve hicle
st ationar y.
R Active Dis tance Assi stDISTRONIC is bringing
th eve hicle toast andstill.
R In addition, one of thefo llowing condi‐
tions mu stbe fulfilled:
- The engine is switched off.
- The seat belt tongue is not inser ted in the
seat belt buckle of the driver's seat and
th e driver's door is opened.
- There is a sy stem malfunction.
- The po wer supp lyis insuf ficient. Driving and park
ing19 5
Page 202 of 525
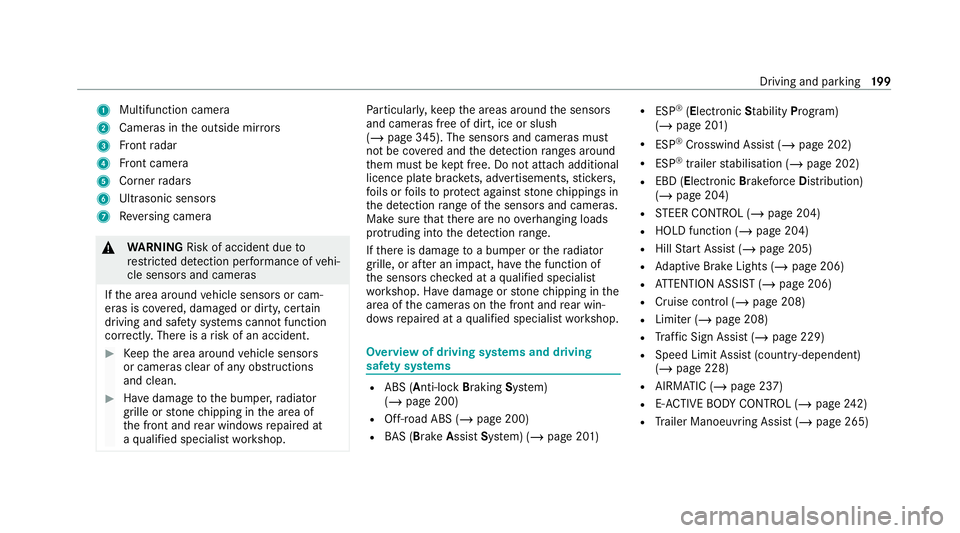
1
Multifunction camera
2 Cameras in the outside mir rors
3 Front radar
4 Front camera
5 Corner radars
6 Ultrasonic sensors
7 Reversing camera &
WARNING Risk of accident due to
re stricted de tection per form ance of vehi‐
cle sensors and cameras
If th e area around vehicle sensors or cam‐
eras is co vered, damaged or dirty, cer tain
driving and saf ety sy stems cann otfunction
cor rectly. The reis a risk of an accident. #
Keep the area around vehicle sensors
or cameras clear of any obstructions
and clean. #
Have damage tothe bumper, radiator
grille or stone chipping in the area of
th e front and rear wind owsrepaired at
a qu alified specialist workshop. Pa
rticular ly,ke ep the areas around the sensors
and cameras free of dirt, ice or slush
(/ page 345). The sensors and cameras must
not be co vered and the de tection ranges around
th em must be kept free. Do not attach additional
licence plate brackets, ad vertisements, sticke rs,
fo ils or foils toprotect against stone chippings in
th e de tection range of the sensors and cameras.
Make sure that there are no overhanging loads
pr otru ding into the de tection range.
If th ere is damage toa bumper or thera diator
grille, or af ter an impact, ha vethe function of
th e sensors checked at a qualified specialist
wo rkshop. Ha vedamage or stone chipping in the
area of the cameras on the front and rear win‐
do ws repaired at a qualified specialist workshop. Overview of driving sy
stems and driving
saf ety sy stems R
ABS (Anti-lo ckBra king System)
(/ page 200)
R Off-road ABS (/ page 200)
R BAS (Bra keAssist System) (/ page 201) R
ESP ®
(Electronic Stability Program)
(/ page 201)
R ESP ®
Crosswind Assist (/ page 202)
R ESP ®
trailer stabilisation (/ page 202)
R EBD (Electronic Brakeforc eDistribution)
(/ page 204)
R STEER CONTROL (/ page 204)
R HOLD function (/ page 204)
R Hill Start Assist (/ page 205)
R Adaptive Brake Lights (/ page 206)
R ATTENTION ASSIST (/ page 206)
R Cruise contro l (/page 208)
R Limiter (/ page 208)
R Traf fic Sign Assi st (/ page 229)
R Speed Limit Assist (count ry-dependent)
(/ page 228)
R AIRMATIC (/ page 237)
R E-AC TIVE BODY CONTROL (/ page242)
R Trailer Manoeuv ring Assi st (/ page 265) Driving and parking
19 9
Page 203 of 525
Driving Assistance pa
ckage
The following functions are part of the Driving
Assis tance Package. Cer tain functions are only
av ailable in some countries. Some functions are
also available without the Driving Assis tance
Pa ckage, albeit with restricted functionality.
R Active Dis tance Assi stDISTRONIC
(/ page 211)
R Active Speed Limit Assi st(countr y-depend‐
ent) (/ page216)
R Route-based speed adap tation (countr y-
dependent) (/ page216)
R DSR (D ownhill Speed Regulation)
(/ page 218)
R Active Brake Assi st (/ page 223)
R Active Steering Assist (count ry-dependent)
(/ page 220)
R Active Emergency Stop Assist (countr y-
dependent) (/ page 222)
R Active Stop-and-Go Assist (countr y-depend‐
ent) (/ page218)
R Blind Spot Assist and Active Blind Spot Assi st
with exitwa rning (/ page 232) R
Active Lane Keeping Assist (/ page 234)
Pa rking Package
R Reversing camera (/ page248)
R 360° Camera (/ page 250)
R Parking Assist PARKTRONIC (/ page 254)
R Active Parking Assist (/ page 259) Fu
nctions of ABS (Anti-lock Braking Sy stem) ABS
regulates the brake pressure in critical driv‐
ing situations:
R During braking, e.g. at maximum full-s top
braking or insuf ficient tyre traction, the
wheels are pr evented from lock ing.
R Vehicle steerability while braking is ensured.
If ABS inter venes when braking, you will feel a
pulsing in the brake pedal. The pulsating brake
pedal can be an indication of hazardous road
conditions and can ser veas a reminder totake
ex tra care while driving. Sy
stem limits
R ABS is active from speeds of appr ox.
5 km/h.
R ABS may be impai red or may not function if a
malfunction has occur red and theye l‐
low 0025 ABSwarning lamp lights up contin‐
uously in the instrument clus ter af terthe
engine is star ted. Fu
nctions of Off-road ABS %
Off-road ABS is activated automatically when
you select theF drive program.
Off-road ABS is specially adap tedfo r driving off-
ro ad:
R The front wheels lock cyclically during brak‐
ing.
R The braking dis tance is sho rtened due tothe
digging-in ef fect.
Sy stem limits
R Off-ro ad ABS functions at speeds below
40 km/h. 200
Driving and parking