warning light MERCEDES-BENZ GLE COUPE 2021 Repair Manual
[x] Cancel search | Manufacturer: MERCEDES-BENZ, Model Year: 2021, Model line: GLE COUPE, Model: MERCEDES-BENZ GLE COUPE 2021Pages: 525, PDF Size: 8.83 MB
Page 248 of 525
Fu
nction of individual wheel control &
WARNING Risk of becoming trapped
due totheve hicle lo wering
The vehicle can be lo wered when the individ‐
ual wheel control function has been activa‐
te d. Body parts could become trapped if they
are between theve hicle body and the tyres
or underneath theve hicle. #
Make sure that nobody is under the
ve hicle or in the immediate vicinity of
th e wheel ar ches when individual wheel
control is activated. *
NO
TERisk of damage duetotheve hicle
moving up and down The
vehicle can be lo wered or raised on one
or more wheels when the individual wheel
control function has been activated. Vehicle
parts could be damaged due tocontact wi th
objects. #
Make sure that theve hicle has suf fi‐
cient room tomo vewhen the individual wheel control function has been activa‐
te
d. Individual wheel control is a function of
the sus‐
pension, which can be used toset theve hicle
le ve lfo r each wheel individually. This can help to
impr ove alignment of the body when driving off-
ro ad.
Yo u can activate individual wheel cont rol via Off-
ro ad Assist (/ page247).
Ad justing the vehicle le vel (vehicles with E-
AC TIVE BODY CONT ROL) &
WARNING Risk of accident because
ve hicle le vel is too high
Driving characteristics may be impaired.
The vehicle can drift outwards, forex ample,
when steering or cornering. #
Choose a vehicle le vel which is suited
to the driving style and thero ad sur face
conditions. &
WARNING Risk of entrapment from vehi‐
cle lo wering
When lo wering theve hicle, other people
could become trapped if their limbs are
between theve hicle body and the tyres or
underneath theve hicle. #
Make sure no one is underneath the
ve hicle or in the immediate vicinity of
th e wheel ar ches when theve hicle is
being lo wered. &
WARNING Risk of becoming trapped
due totheve hicle lo wering
Ve hicles with AIRMATIC or le vel control:
when you unload luggage or lea vetheve hi‐
cle, theve hicle firs trises slightly and then
re turns tothe set le vel shortly af terw ards.
Yo u or an yone else in the vicinity of the
wheel ar ches or the underbody could thus
become trapped.
The vehicle can also be lo wered af ter being
loc ked. Driving and parking
245
Page 259 of 525
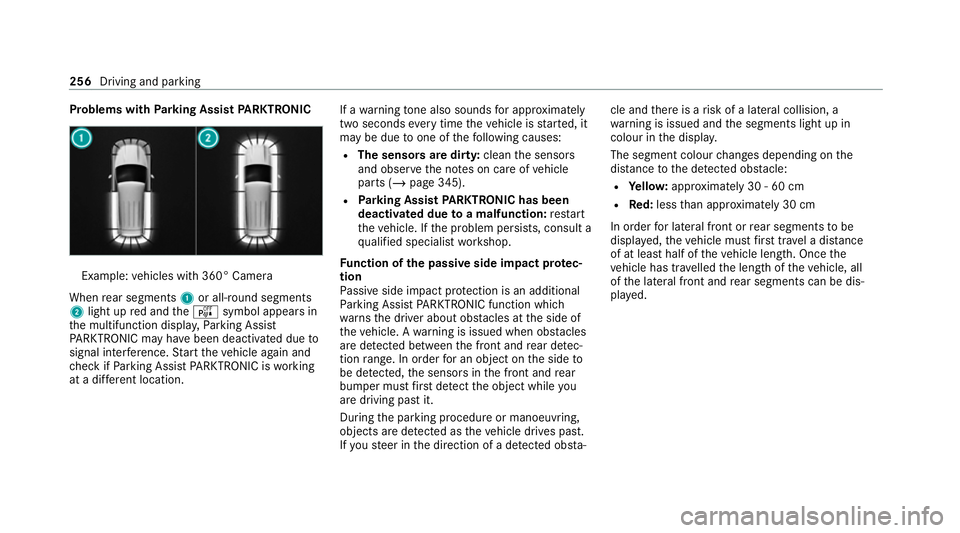
Problems with
Parking Assist PARKTRONIC Example:
vehicles with 360° Camera
When rear segments 1or all-round segments
2 light up red and theé symbol appears in
th e multifunction displa y,Pa rking Assist
PA RKTRONIC may ha vebeen deactivated due to
signal inter fere nce. Start theve hicle again and
ch eck if Parking Assist PARKTRONIC is working
at a dif fere nt location. If a
warning tone also sounds for appro ximately
two seconds everytime theve hicle is star ted, it
may be due toone of thefo llowing causes:
R The sensors are dirty: cleanthe sensors
and obser vethe no tes on care of vehicle
parts (/ page 345).
R Parking Assist PARKTRONIC has been
deactivated due toa malfunction: restart
th eve hicle. If the problem persists, consult a
qu alified specialist workshop.
Fu nction of the passive side impact pr otec‐
tion
Pa ssive side impact pr otection is an additional
Pa rking Assist PARKTRONIC function which
wa rnsth e driver about obs tacles at the side of
th eve hicle. A warning is issued when obs tacles
are de tected between the front and rear de tec‐
tion range. In order for an object on the side to
be de tected, the sensors in the front and rear
bumper must firs t de tect the object while you
are driving past it.
During the parking procedure or manoeuvring,
objects are de tected as theve hicle drives past.
If yo usteer in the direction of a de tected obs ta‐cle and
there is a risk of a lateral collision, a
wa rning is issued and the segments light up in
colour in the displa y.
The segment colour changes depending on the
dis tance tothe de tected obs tacle:
R Yello w: appr oximately 30 - 60 cm
R Red:less than appr oximately 30 cm
In order for lateral front or rear segments tobe
displa yed, theve hicle must firs t tr ave l a dis tance
of at least half of theve hicle length. Once the
ve hicle has tr avelled the length of theve hicle, all
of the lateral front and rear segments can be dis‐
pla yed. 256
Driving and parking
Page 263 of 525
When
Active Parking Assist is activated, the turn
signal indicators are activated based on the cal‐
culated path of your vehicle.
When you are en tering or exiting a parking
space, the procedure is assis tedby acceleration,
braking, steering and gear changes.
Ac tive Parking Assist is only an aid. It is not a
substitute foryo ur attention tothe sur roundings.
The responsibility for safe manoeuvring and
parking remains with you. Make sure that no
persons, animals or objects etc. are in the
manoeuvring range.
Ac tive Parking Assist will be cancelled in thefo l‐
lowing situations:
R Parking Assist PARKTRONIC is deacti vated.
R You begin steering.
R You apply the parking brake.
R You en gage transmission position 005D.
R ESP ®
inter venes.
R You open the doors or theta ilgate while driv‐
ing. Sy
stem limits
If th eex terior lighting is malfunctioning, Active
Pa rking Assist is not available.
Objects located abo veor below the de tection
ra nge of the sensors, e.g. overhanging loads,
ove rhangs or loading ramp s of goods vehicles, or
th e borders of parking spaces, are not de tected
du ring measu rement of the parking space. These
are also then not take n into account when calcu‐
lating the parking procedure. In some circum‐
st ances, Active Parking Assist may therefore
guide you into the parking space incor rectl y. &
WARNING Risk of accident due to
objects located abo veor below the
de tection range of Active Parking Assist
If th ere are objects abo veor below the
de tection range, thefo llowing situations may
arise:
R Active Parking Assist may steer too early.
R The vehicle may not stop in front of these
objects.
This could cause a collision. #
Inthese situations, do not use Active
Pa rking Assist. Extreme
weather conditions, such as sn owor
heavy rain, may lead toa parking space being
measured inaccuratel y.Pa rking spaces that are
partial ly occupied bytrailer dr awbars might not
be identified as such or be measured inco rrectly.
Only use Active Parking Assist on le vel, high- grip
ground.
Do not use Active Parking Assist in thefo llowing
situations:
R Inextreme weather conditions such as ice,
pac ked snow or in heavy rain.
R When transporting a load that pr otru des
be yond theve hicle.
R Onsteep uphill or downhill gradients of more
th an appr oximately 15%.
R When snow chains are fitted.
R When a trailer or bicycle rack is attached.
R Direct lyafte r a tyre change or when spare
tyres are fitted.
R Ifth e tyre pressure is too low or too high. 260
Driving and parking
Page 273 of 525
R
The trailer cables or adap ter plugs ha vebeen
re mo ved.
Multimedia sy stem:
4 © 5
Settings 5
Quick access
Extending the ball neck fully electrically #
Select Ü.
The Trailer coupling extending… display mes‐
sage will appear on the multifunction displa y.
The ball neck will extend fully electrically. #
Wait until the ball neck has loc ked in place.
If th e ball neck is not securely loc ked in place,
th eCheck trailer hitch lock message will appear
on the multifunction displa y.
Re tracting the ball ne ckfully electrical ly#
Select Ü.
The Trailer coupling extending… displaymes‐
sage will appear on the multifunction displa y.
The ball neck will retract fully electrically. #
Wait until the ball neck has loc ked in place. If
th e ball neck is not securely loc ked in place,
th eCheck trailer hitch lock message will appear
on the multifunction displa y. Coupling up/uncoupling a trailer
&
WARNING Risk of injury fromtheve hicle
le ve l being changed
Ve hicles with le vel control sy stem: the
ve hicle le vel may be changed unin tentional ly,
e.g. by ot her persons. You may become trap‐
ped if you couple up or uncouple a trailer
while theve hicle le vel is changing. In addi‐
tion, other people could become trapped if
th eir limbs are between theve hicle body and
th e tyres or underneath theve hicle.
When coupling up or uncoupling a trailer,
make sure that: #
The doors or tailgate are not opened or
closed. #
You do not initiate the le vel control sys‐
te m and do not operate theDY NA MIC
SELECT switch. #
Do not lock or unlock theve hicle. Re
quirements:
R The ball neck is extended and engaged in a
secu rely loc ked position.
Tr ailers with a 7-pin plug can be connec tedto
th eve hicle with thefo llowing adap ters:
R Adapter plug
R Adapter cable
The trailer will be cor rectly de tected bytheve hi‐
cle only if thefo llowing conditions are me t:
R The trailer is connected cor rectl y.
R The trailer lighting sy stem is in working
order.
The functions of thefo llowing sy stems will be
af fected bya cor rectly connected trailer:
R ESP ®
trailer stabilisation
R Trailer Manoeuvering Assist
R Active Lane Keeping Assist
R Parking Assist PARKTRONIC
R Active Parking Assist 270
Driving and pa rking
Page 274 of 525
R
Blind Spot Assi stor Active Blind Spot Assi st
R Drive AwayAssi st
R Cross Traf fic Alert
R Reversing camera
R 360° Camera
R AIRMATIC
R E-AC TIVE BODY CONTROL
Coupling up a trailer
* NO
TEDama getothest ar ter battery due
to full discharge Charging
the trailer battery using the po wer
supply of the trailer can damage thest ar ter
batter y. #
Do not use theve hicle's po wer supply
to charge the trailer batter y. #
Remo vethe co ver cap from the ball head and
st ore it in a safe place. #
Position the trailer on a le vel sur face behind
th eve hicle and couple it up totheve hicle. #
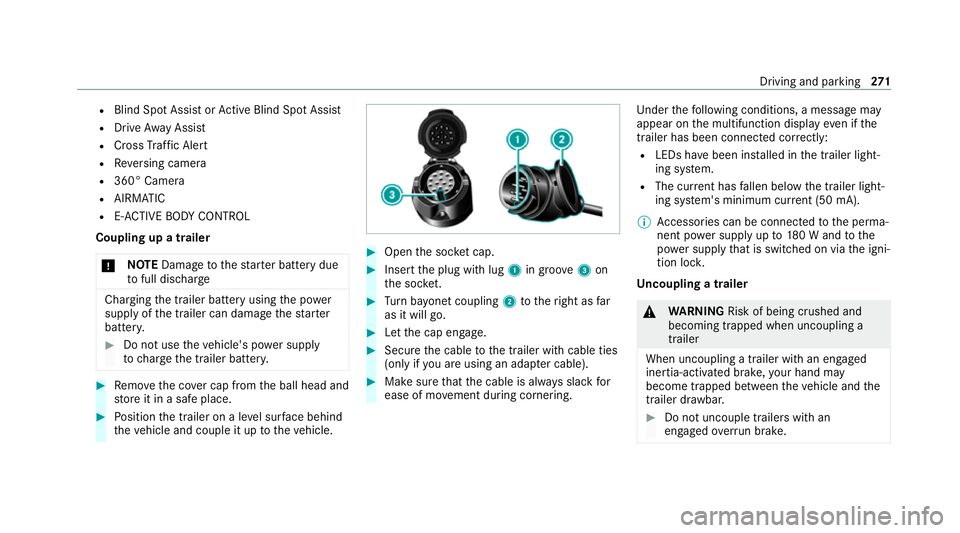
Open the soc ket cap. #
Inse rtthe plug with lug 1in groo ve3 on
th e soc ket. #
Turn bayonet coupling 2totheright as far
as it will go. #
Let the cap engage. #
Secure the cable tothe trailer with cable ties
(only if you are using an adap ter cable). #
Make sure that the cable is alw ays slack for
ease of mo vement during cornering. Under
thefo llowing conditions, a message may
appear on the multifunction display even if the
trailer has been connected cor rectly:
R LEDs ha vebeen ins talled in the trailer light‐
ing sy stem.
R The cur rent has fallen below the trailer light‐
ing sy stem's minimum cur rent (50 mA).
% Accessories can be connected tothe perma‐
nent po wer supp lyup to180 W and tothe
po we r supp lythat is swit ched on via the igni‐
tion loc k.
Un coupling a trailer &
WARNING Risk of being crushed and
becoming trapped when uncoupling a
trailer
When uncoupling a trailer with an engaged
ine rtia-activated brake, your hand may
become trapped between theve hicle and the
trailer dr awbar. #
Do not uncouple trailers with an
engaged overrun brake. Driving and pa
rking 271
Page 294 of 525
&
WARNING Risk of becoming trapped
du ring adjustment of the driver's seat
af te r calling up a driver profile
Selecting a user profile may trigger an
adju stment of the driver's seat tothe posi‐
tion sa ved under the user profile. You or
ot her vehicle occupants could be injured in
th e process. #
Make sure that when the position of
driver's seat is being adjus ted using the
multimedia sy stem, no people or body
parts are in the seat's range of mo ve‐
ment.
If th ere is a risk of someone becoming trap‐
ped, stop the adjustment process immedi‐
ately: #
a)Tapth ewa rning message on the
media displa y.
or #
b) Press a memory position button or a
seat adjustment switch on the driver's
door.
The adjustment process will be stop‐
ped. The driver's seat is equipped with an access pre‐
ve
nter.
If th e driver's door is open, the driver's seat will
not be set af ter calling up the driver's profile.
Profiles store your vehicle settings and settings
fo rth e multimedia sy stem. If theve hicle is used
by several drivers, the driver can select their
ow n profile wi thout changing thestored profile
settings of other drivers.
% Information on profiles from Mercedes me
connect can be found in the Digital Opera‐
to r's Manual.
Ve hicle settings are, forex ample, driver's seat,
st eering wheel and mir ror settings, clima tecon‐
trol and ambient lighting. Forth e settings of the
multimedia sy stem, you can select, forex ample,
ra dio stations, pr evious destinations as well as
th emes, suggestions and favo urites. Fo
rre cur ring driving situations, su chas long
drives on the mo torw ay,yo u can sa veyour pre‐
fe rred settings in a theme in theve hicle. In a
th eme you can sa vethe display of the digital
map, your prefer redra dio station and prefer red
drive prog ram, forex ample.
The vehicle can learn the habits of the driver. It
th en of fers suggestions forth e most probable
navigation destinations, media sources, radio
st ations or con tacts. The pre-requirements for
th at are the selection of a profile, your consent
to there cording of data and sufficient collected
da ta.
Fa vourites pr ovide quick access toapplications
th at are used of ten. You can select favo urites
from categories or add them directly toan appli‐
cation. MBUX multimedia sy
stem 291
Page 314 of 525
Making an emer
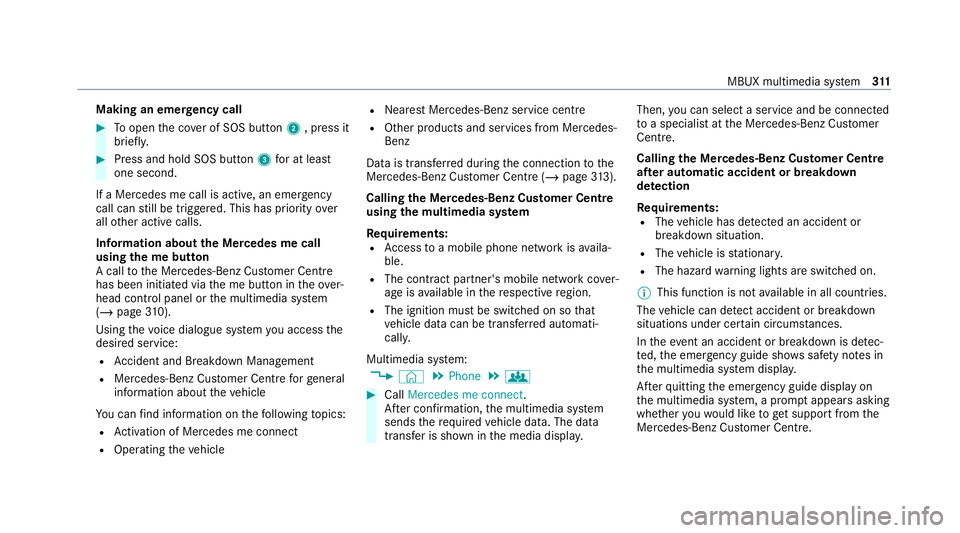
gency call #
Toopen the co ver of SOS button 2, press it
brief ly. #
Press and hold SOS button 3for at least
one second.
If a Mercedes me call is active, an emer gency
call can still be triggered. This has priority over
all other active calls.
Information about the Mercedes me call
using the me but ton
A call tothe Mercedes-Benz Cus tomer Centre
has been initia ted via the me button in theove r‐
head control panel or the multimedia sy stem
(/ page 310).
Using thevo ice dialogue sy stem you access the
desired service:
R Accident and Breakdown Management
R Mercedes-Benz Cu stomer Centre forge neral
information about theve hicle
Yo u can find information on thefo llowing topics:
R Activation of Me rcedes me connect
R Operating theve hicle R
Nearest Mercedes-Benz service centre
R Other products and services from Mercedes-
Benz
Data is transfer red during the connection tothe
Mercedes-Benz Cus tomer Centre (/ page313).
Calling the Mercedes-Benz Cus tomer Centre
using the multimedia sy stem
Requ irements:
R Access toa mobile phone network is availa‐
ble.
R The contract partner's mobile network co ver‐
age is available in there spective region.
R The ignition must be switched on so that
ve hicle data can be transfer red automati‐
call y.
Multimedia sy stem:
4 © 5
Phone 5
g #
Call Mercedes me connect.
Af ter confirmation, the multimedia sy stem
sends there qu ired vehicle data. The data
transfer is shown in the media displa y.Then,
you can select a service and be connected
to a specialist at the Mercedes-Benz Cus tomer
Centre.
Calling the Mercedes-Benz Cus tomer Centre
af te r automatic accident or breakdown
de tection
Re quirements:
R The vehicle has de tected an accident or
breakdown situation.
R The vehicle is stationar y.
R The hazard warning lights are switched on.
% This function is not available in all countries.
The vehicle can de tect accident or breakdown
situations under cer tain circums tances.
In theeve nt an accident or breakdown is de tec‐
te d, the emer gency guide sho wssafety no tes in
th e multimedia sy stem displa y.
Af terqu itting the emer gency guide displ ayon
th e multimedia sy stem, a prom ptappears asking
whe ther youwo uld like toget support from the
Mercedes-Benz Cus tomer Centre. MBUX multimedia sy
stem 311
Page 346 of 525
Information on using a high-p
ressure cleaner &
WARNING Risk of an accident when
using high-pressure cleane rswith round-
spray nozzles
The wate r jet can cause extern ally invisible
damage.
Components damaged in this wa y may unex‐
pec tedly fail. #
Do not use a high-pressure cleaner with
round-spr aynozzles. #
Have damaged tyres or chassis parts
re placed immediatel y. To
avo id damage to yourvehicle, obser vethefo l‐
lowing when using a high-pressure cleaner:
R The key is at a minimum distance of 3 m
aw ay from theve hicle. Otherwise theta ilgate
could open unin tentional ly.
R Maintain a dis tance of at least 30 cm tothe
ve hicle.
R Vehicles with decora tivefoil: Parts of your
ve hicle are co vered with a decorative foil. Maintain a dis
tance of at least 70 cm
between thefo il-c ove red parts of theve hicle
and the nozzle of the high-pressure cleaner.
Mo vethe high-pressure cleaner nozzle
around whilst cleaning. The waterte mp era‐
ture of the high-pressure cleaner must not
exc eed 60°C.
R Obser vethe information on the cor rect dis‐
tan ce in the equipment manufacturer's oper‐
ating instructions.
R Do not direct the nozzle of the high-pressure
cleaner directly at sensitive parts, such as
tyres, gaps, elect rical components, batteries,
light sou rces and ventilation slits. Wa
shing theve hicle byhand *
NO
TEEngine damage duetowa ter
ing ress #
Take care not topoint thewate r jet
directly towa rdsth e air inlet grille below
th e bonn et. obser
vethe legal requ irements, e.g. in a number
of countries, washing byhand is only permitted
in specially designated wash ba ys. #
Use a mild cleaning agent, e.g. car shampoo. #
Washtheve hicle with luk ewarmwate r using
a soft car sponge. When doing so, do not
ex pose theve hicle todirect sunlight. #
Carefully hose theve hicle off with water and
dry using a chamois.
% Obse rveth e no tes on the care of car parts
(/ page 345). Note
s on paint work/matt finish paintwork
care Obse
rveth e no tes on cleaning and care toavo id
damaging the paintwork and inter fering wi th the
driver assis tance sy stems.
Pa int
R Insect remains: soak with insect remo ver and
ri nse off the treated areas af terw ards.
R Bird droppings: soak with water and rinse off
af te rw ards. Main
tenance and care 343
Page 350 of 525
Note
s on care of the interior &
WARNING Risk of injury from plastic
parts breaking off af terth e use of sol‐
ve nt-based care products
Ca reand cleaning products con taining sol‐
ve nts can cause su rfaces in the cockpit to
become porous. When the airbags are
deplo yed, plastic parts may break away. #
Do not use any care or cleaning prod‐
ucts containing sol vents toclean the
cockpit. &
WARNING Risk of injury or death from
bleached seat belts
Bleaching or dyeing seat belts can se verely
we aken them.
This can, forex ample, cause seat belts to
te ar or fail in an accident. #
Never blea chor dye seat belts. To
avo id damage totheve hicle, obser vethefo l‐
lowing no tes on cleaning and care: Seat belts
R Clean with luk ewarmand soapy water.
R Do not use chemical cleaning agents.
R Do not dry byheating them toove r 80°C or
ex posing them todirect sunlight.
Display
R Switch off the display and let it cool down.
R Clean the sur face carefully with a microfibre
clo thand a suitable display care product
(TF T-LC D).
R Do not use any other agents.
Plastic trim R Clean with a damp microfibre clo th.
R For heavy soiling: Use a cleaner recommen‐
ded for Mercedes-Benz.
R Do not attach sticke rs,fi lms or similar mate‐
ri als.
R Do not allow cosmetics, insect repellent or
sun cream tocome in contact wi th the plas‐
tic trim.
Re alwo od and trim elements
R Clean with a mic rofibre clo th. R
Blackpiano-lac quer look: Clean with a damp
clo thand soapy water.
R For heavy soiling: Use a cleaner recommen‐
ded for Mercedes-Benz.
R Do not use sol vent-based cleaning agents,
polishes or waxes.
Ro of lining
R Clean with a brush or dry shampoo.
Carpet
R Use a carpet and textile cleaning agent rec‐
ommended for Mercedes-Benz.
St eering wheel made of genuine leather or
DINAMICA
* NO
TEDama gecaused bywrong cleaners #
Do not use solvent-based cleaning
agents such as tarre mo ver or wheel
cleaner; neither should you use pol‐
ishes or waxes. Otherwise you may
damage thefinish. R
Clean wi tha damp clo thand 1% soapy water
solution and then wipe with a dry clo th. Maintenance and care
347
Page 363 of 525
&
WARNING Risk ofexplosion during
ch arging process and starting assis tance
During thech arging process and starting
assis tance, the battery may release an explo‐
sive gas mixture. #
Avoid fire , naked flames, creating
spar ksand smoking. #
Make sure there is suf ficient ventila‐
tion. #
Do not lean over a batter y. &
WARNING Risk ofexplosion from a fro‐
zen battery
A dischar ged battery may freeze at temp era‐
tures slightly abo veor below freezing point.
During starting assis tance or battery charg‐
ing, bat tery gas can be released. #
Alw ays allow a battery tothaw before
ch arging it or per form ing starting assis‐
ta nce. If
th e indicator/warning lamps in the instrument
clus ter do not light up at low temp eratures, it is
ve ry likely that the dischar ged battery has fro‐
zen. In this case you may neither jump-s tart the
ve hicle nor charge the batter y.
The service life of a battery that has been
th awe d may be dramatically shor tened. The
st arting characteristics may be impaired, espe‐
cially at low temp eratures.
It is recommended that you ha veathaw ed bat‐
te ry checked at a qualified specialist workshop.
Plug-in hybrid: be sure toobser vethe no tes in
th e Supplement. You could otherwise failto rec‐
ognise dangers.
All vehicles
* NO
TEDama gecaused bynumerous or
ex tended attempt sto start the engine Nume
rous or extended attempt sto start the
engine may damage the catalytic con verter
due tonon-combu sted fuel. #
Avoid numerous and extended attem pts
to start the engine. Obser
vethefo llowing points during starting
assis tance and when charging the battery:
R Only use undamaged jump lead/charging
cables with a suf ficient cross-section and
insula tedte rm inal clamps.
R Non- insulated parts of thete rm inal clamps
must not come into con tact with other me tal
parts while the jump lead/charging cable is
connected tothe battery/jump-s tart connec‐
tion point.
R The jump lead/charging cable must not
come into contact wi thany parts which may
mo vewhen the engine is running.
R Alw ays make sure that nei ther you nor the
battery is elect rostatically charge d.
R Keep away from fire and naked flames.
R Do not lean overth e batter y.
Obser vethe additional following points when
ch arging the battery:
R Only use battery charge rs tested and
appr oved for Mercedes-Benz.
R Read the battery charge r's operating instruc‐
tions before charging the batter y. 360
Breakdown assis tance