brake light MERCEDES-BENZ GLE SUV 2019 User Guide
[x] Cancel search | Manufacturer: MERCEDES-BENZ, Model Year: 2019, Model line: GLE SUV, Model: MERCEDES-BENZ GLE SUV 2019Pages: 398, PDF Size: 12.25 MB
Page 76 of 398
R
a vehicle is traveling in front on a different line
relative to the center of your vehicle
R vehicles quickly move into the radar sensor
system detection range
Recognition by the camera system is also
impaired in the event of:
R dirt on the camera or if the camera is covered
R glare on the camera system, e.g. from the sun
being low in the sky
R darkness
R or if:
-
pedestrians move quickly, e.g. into the path
of the vehicle
- the camera system no longer recognizes a
pedestrian as a person due to special cloth-
ing or other objects
- a pedestrian is concealed by other objects
- the typical outline of a person is not distin-
guishable from the background
Following damage to the front end of the vehicle, have the configuration and operation of the
radar sensors checked at a qualified specialist
workshop. This also applies to collisions at slow speeds where there is no visible damage to thefront of the vehicle.
Following damage to the windshield, have the
configuration and operation of the camera sys-
tem checked at a qualified specialist workshop.
Function X
To activate or deactivate: activate or deac-
tivate Active Brake Assist with cross-traffic
function using the on-board computer
(Y page 238).
If the Active Brake Assist with cross-traffic
function is deactivated, the 00D4symbol
appears in the multifunction display.
If you have activated DSR (Y page 214), the
Active Brake Assist with cross-traffic function is
deactivated.
Starting at a speed of around 4 mph (7 km/h),
this function warns you if you rapidly approach a
vehicle in front. An intermittent warning tone
will then sound and the 00BAdistance warning
lamp will light up in the instrument cluster.
X Brake immediately to defuse the situation.
or
X Take evasive action provided it is safe to do
so. Active Brake Assist with cross-traffic function
can also brake the vehicle automatically under
the following conditions:
R the driver and front-passenger have their seat
belts fastened
and
R the vehicle speed is between approximately
4 mph (7 km/h) and 124 mph (200 km/h)
Up to a speed of approximately 44 mph
(70 km/h), Active Brake Assist with cross-traffic function may react to:
R stationary objects in the path of your vehicle,
e.g. stopped or parked vehicles
R pedestrians in the path of your vehicle
i If there is an increased risk of a collision,
preventive passenger protection measures
(PRE-SAFE ®
) are triggered (Y page 58).
If the risk of collision with the vehicle in front
remains and you do not brake, take evasive
action or accelerate significantly, the vehicle
may perform automatic emergency braking, up
to the point of full brake application. Automatic emergency braking is not performed until imme-
diately prior to an imminent accident.
If you apply the brake yourself in a critical sit-
uation or during autonomous braking, braking
assistance is provided according to the situa-
tion. If necessary, this increases the brake pres- sure up to full brake application.
To avoid a collision, Active Brake Assist with
cross-traffic function calculates the brake force
necessary if:
R you approach an obstacle, and
R Active Brake Assist with cross-traffic function
has detected a risk of a collision
When driving at a speed under 20 mph
(30 km/h): if you depress the brake pedal,
Active Brake Assist with cross-traffic function is
activated. The increase in brake pressure from
Active Brake Assist with cross-traffic function is
carried out at the last possible moment.
When driving at a speed above 20 mph
(30 km/h) : if you depress the brake pedal
sharply, Active Brake Assist with cross-traffic
function automatically increases the brake pres- sure to a degree suited to the traffic situation.
Active Brake Assist with cross-traffic function
provides braking assistance in hazardous situa-
tions with vehicles in front within a speed range
between 4 mph (7 km/h) and 155 mph
(250 km/h). 74
Driving safety systemsSafety
Page 114 of 398
The blue
0057indicator lamp in the instru-
ment cluster lights up when the high-beam
headlamps are switched on.
X To switch off the high-beam headlamps:
move the combination switch back to its nor- mal position.
The blue 0057indicator lamp in the instru-
ment cluster goes out.
Vehicles with Adaptive Highbeam Assist: if
Adaptive Highbeam Assist is activated, it auto-
matically controls activation and deactivation of
the high-beam headlamps (Y page 113).Hazard warning lamps
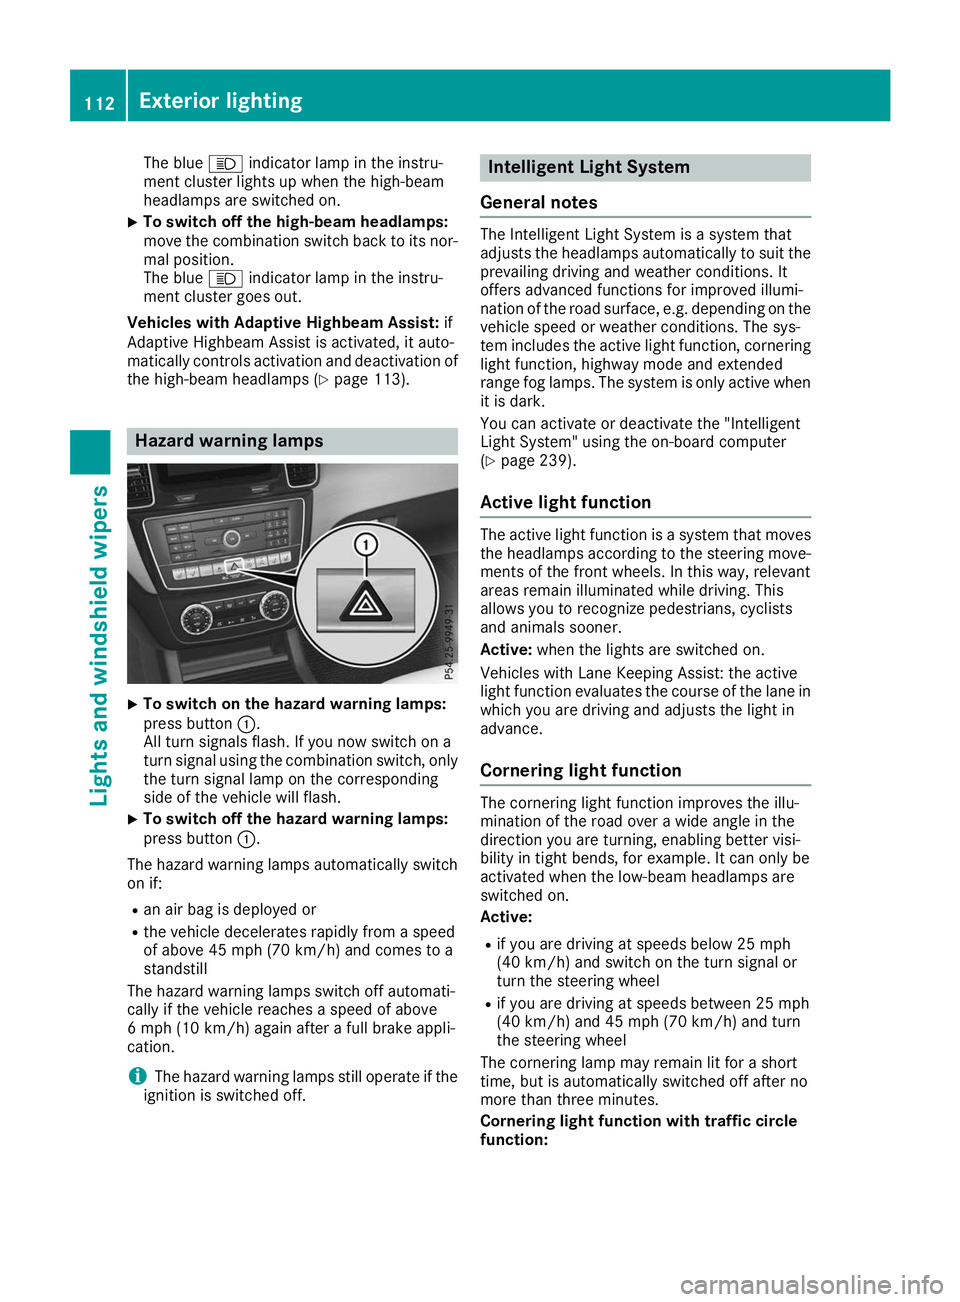
X
To switch on the hazard warning lamps:
press button
0043.
All turn signals flash. If you now switch on a
turn signal using the combination switch, only the turn signal lamp on the corresponding
side of the vehicle will flash.
X To switch off the hazard warning lamps:
press button
0043.
The hazard warning lamps automatically switch
on if:
R an air bag is deployed or
R the vehicle decelerates rapidly from a speed
of above 45 mph (70 km/h) and comes to a
standstill
The hazard warning lamps switch off automati-
cally if the vehicle reaches a speed of above
6 mph (10 km/h) again after a full brake appli-
cation.
i The hazard warning lamps still operate if the
ignition is switched off. Intelligent Light System
General notes The Intelligent Light System is a system that
adjusts the headlamps automatically to suit the
prevailing driving and weather conditions. It
offers advanced functions for improved illumi-
nation of the road surface, e.g. depending on the vehicle speed or weather conditions. The sys-
tem includes the active light function, corneringlight function, highway mode and extended
range fog lamps. The system is only active when it is dark.
You can activate or deactivate the "Intelligent
Light System" using the on-board computer
(Y page 239).
Active light function The active light function is a system that moves
the headlamps according to the steering move- ments of the front wheels. In this way, relevant
areas remain illuminated while driving. This
allows you to recognize pedestrians, cyclists
and animals sooner.
Active: when the lights are switched on.
Vehicles with Lane Keeping Assist: the active
light function evaluates the course of the lane in which you are driving and adjusts the light in
advance.
Cornering light function The cornering light function improves the illu-
mination of the road over a wide angle in the
direction you are turning, enabling better visi-
bility in tight bends, for example. It can only be
activated when the low-beam headlamps are
switched on.
Active:
R if you are driving at speeds below 25 mph
(40 km/h) and switch on the turn signal or
turn the steering wheel
R if you are driving at speeds between 25 mph
(40 km/h) and 45 mph (70 km/h) and turn
the steering wheel
The cornering lamp may remain lit for a short
time, but is automatically switched off after no
more than three minutes.
Cornering light function with traffic circle
function: 112
Exterior lightingLights and windshield wipers
Page 120 of 398
If the wiper blades are worn, the windshield will
no longer be wiped properly. This could preventyou from observing the traffic conditions. Switching the rear window wipers
on/off
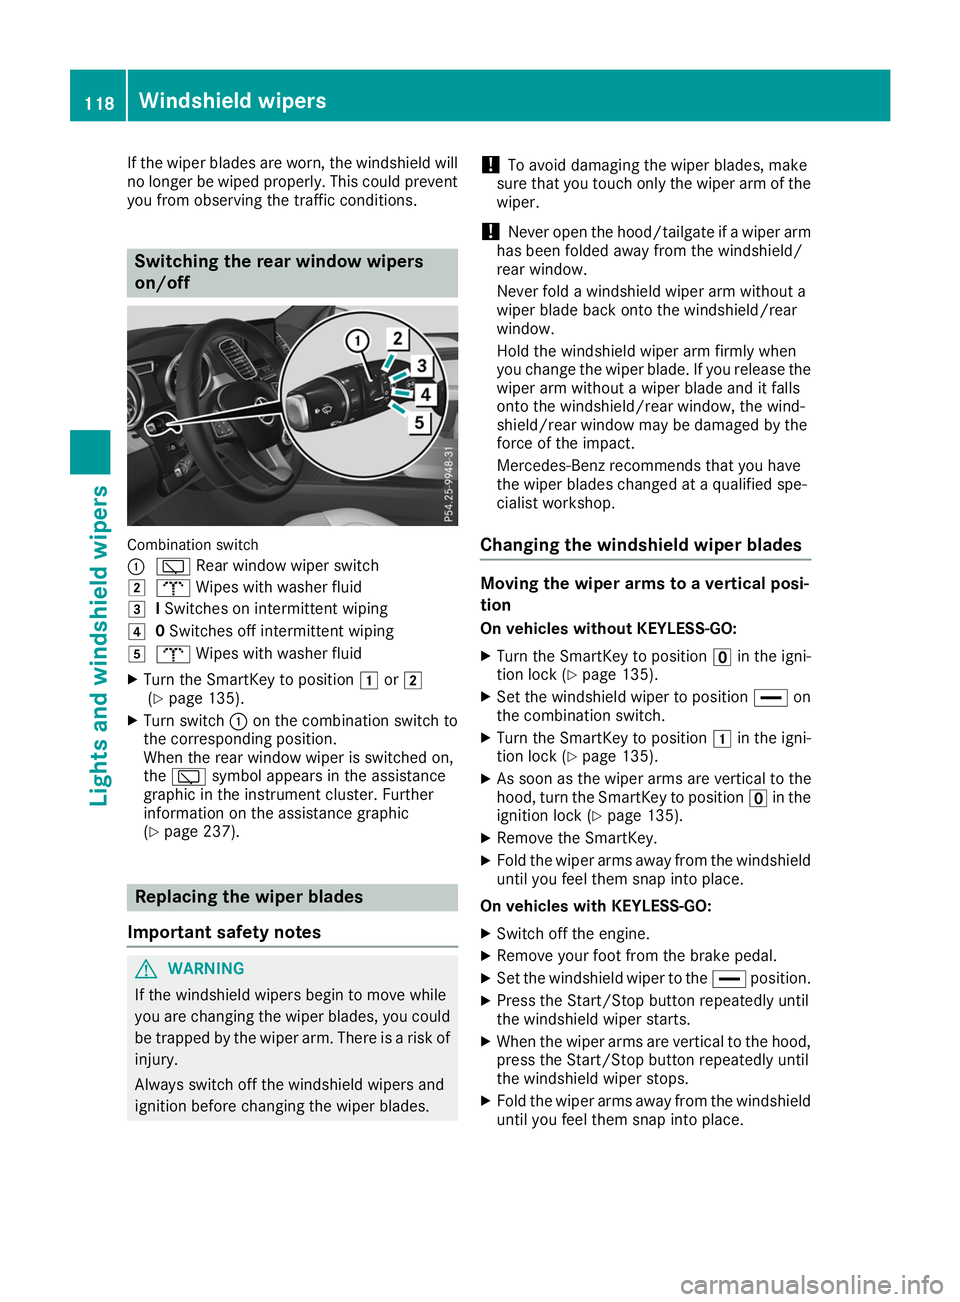
Combination switch
0043
00C5 Rear window wiper switch
0048 008E Wipes with washer fluid
0049 ISwitches on intermittent wiping
004A 0Switches off intermittent wiping
004B 008E Wipes with washer fluid
X Turn the SmartKey to position 0047or0048
(Y page 135).
X Turn switch 0043on the combination switch to
the corresponding position.
When the rear window wiper is switched on,
the 00C5 symbol appears in the assistance
graphic in the instrument cluster. Further
information on the assistance graphic
(Y page 237). Replacing the wiper blades
Important safety notes G
WARNING
If the windshield wipers begin to move while
you are changing the wiper blades, you could be trapped by the wiper arm. There is a risk of
injury.
Always switch off the windshield wipers and
ignition before changing the wiper blades. !
To avoid damaging the wiper blades, make
sure that you touch only the wiper arm of the
wiper.
! Never open the hood/tailgate if a wiper arm
has been folded away from the windshield/
rear window.
Never fold a windshield wiper arm without a
wiper blade back onto the windshield/rear
window.
Hold the windshield wiper arm firmly when
you change the wiper blade. If you release the
wiper arm without a wiper blade and it falls
onto the windshield/rear window, the wind-
shield/rear window may be damaged by the
force of the impact.
Mercedes-Benz recommends that you have
the wiper blades changed at a qualified spe-
cialist workshop.
Changing the windshield wiper blades Moving the wiper arms to a vertical posi-
tion
On vehicles without KEYLESS-GO:
X Turn the SmartKey to position 0092in the igni-
tion lock (Y page 135).
X Set the windshield wiper to position 00AAon
the combination switch.
X Turn the SmartKey to position 0047in the igni-
tion lock (Y page 135).
X As soon as the wiper arms are vertical to the
hood, turn the SmartKey to position 0092in the
ignition lock (Y page 135).
X Remove the SmartKey.
X Fold the wiper arms away from the windshield
until you feel them snap into place.
On vehicles with KEYLESS-GO:
X Switch off the engine.
X Remove your foot from the brake pedal.
X Set the windshield wiper to the 00AAposition.
X Press the Start/Stop button repeatedly until
the windshield wiper starts.
X When the wiper arms are vertical to the hood,
press the Start/Stop button repeatedly until
the windshield wiper stops.
X Fold the wiper arms away from the windshield
until you feel them snap into place. 118
Windshield wipersLights and windshield wipers
Page 121 of 398
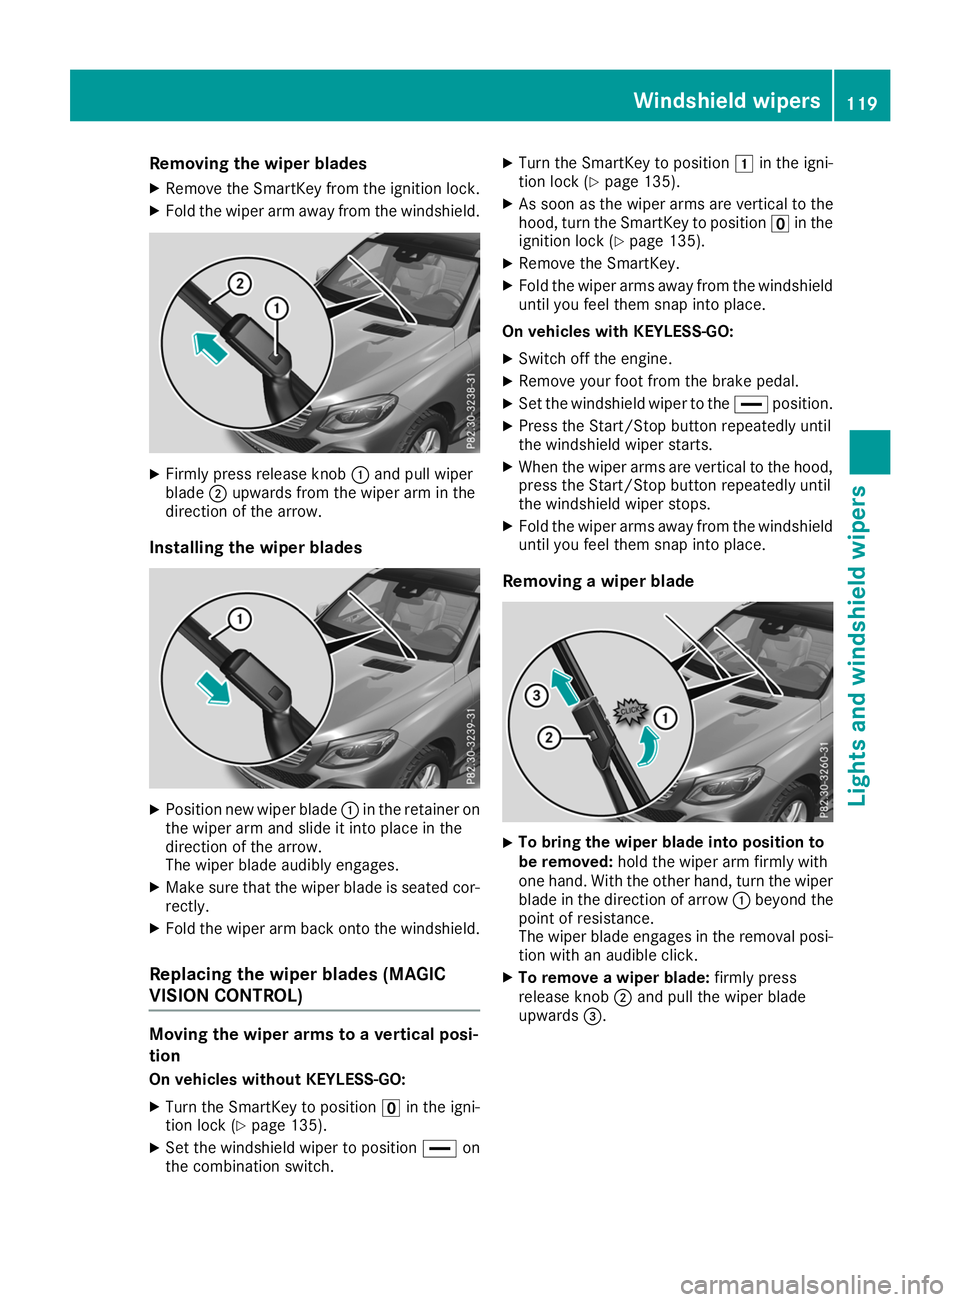
Removing the wiper blades
X Remove the SmartKey from the ignition lock.
X Fold the wiper arm away from the windshield. X
Firmly press release knob 0043and pull wiper
blade 0044upwards from the wiper arm in the
direction of the arrow.
Installing the wiper blades X
Position new wiper blade 0043in the retainer on
the wiper arm and slide it into place in the
direction of the arrow.
The wiper blade audibly engages.
X Make sure that the wiper blade is seated cor-
rectly.
X Fold the wiper arm back onto the windshield.
Replacing the wiper blades (MAGIC
VISION CONTROL) Moving the wiper arms to a vertical posi-
tion
On vehicles without KEYLESS-GO:
X Turn the SmartKey to position 0092in the igni-
tion lock (Y page 135).
X Set the windshield wiper to position 00AAon
the combination switch. X
Turn the SmartKey to position 0047in the igni-
tion lock (Y page 135).
X As soon as the wiper arms are vertical to the
hood, turn the SmartKey to position 0092in the
ignition lock (Y page 135).
X Remove the SmartKey.
X Fold the wiper arms away from the windshield
until you feel them snap into place.
On vehicles with KEYLESS-GO:
X Switch off the engine.
X Remove your foot from the brake pedal.
X Set the windshield wiper to the 00AAposition.
X Press the Start/Stop button repeatedly until
the windshield wiper starts.
X When the wiper arms are vertical to the hood,
press the Start/Stop button repeatedly until
the windshield wiper stops.
X Fold the wiper arms away from the windshield
until you feel them snap into place.
Removing a wiper blade X
To bring the wiper blade into position to
be removed:
hold the wiper arm firmly with
one hand. With the other hand, turn the wiper blade in the direction of arrow 0043beyond the
point of resistance.
The wiper blade engages in the removal posi-
tion with an audible click.
X To remove a wiper blade: firmly press
release knob 0044and pull the wiper blade
upwards 0087. Windshield wipers
119Lights and windshield wipers Z
Page 137 of 398
!
Do not warm up the engine while stationary.
Pull away immediately. Avoid high engine
speeds and full throttle until the engine has
reached its operating temperature.
In vehicles with automatic transmission,
engage positions P and R only when the vehi-
cle is stationary.
Where possible, avoid spinning the drive
wheels when pulling away on slippery roads.
You could otherwise damage the drive train.
! Mercedes-AMG vehicles:
at low engine oil
temperatures below 68 ‡ (+20 †), the max-
imum engine speed is restricted in order to
protect the engine. To protect the engine and
maintain smooth engine operation, avoid driv-
ing at full throttle when the engine is cold.
Plug-in hybrid: be sure to read the separate
Operator's Manual. Otherwise, you may not rec-
ognize dangers. Key positions
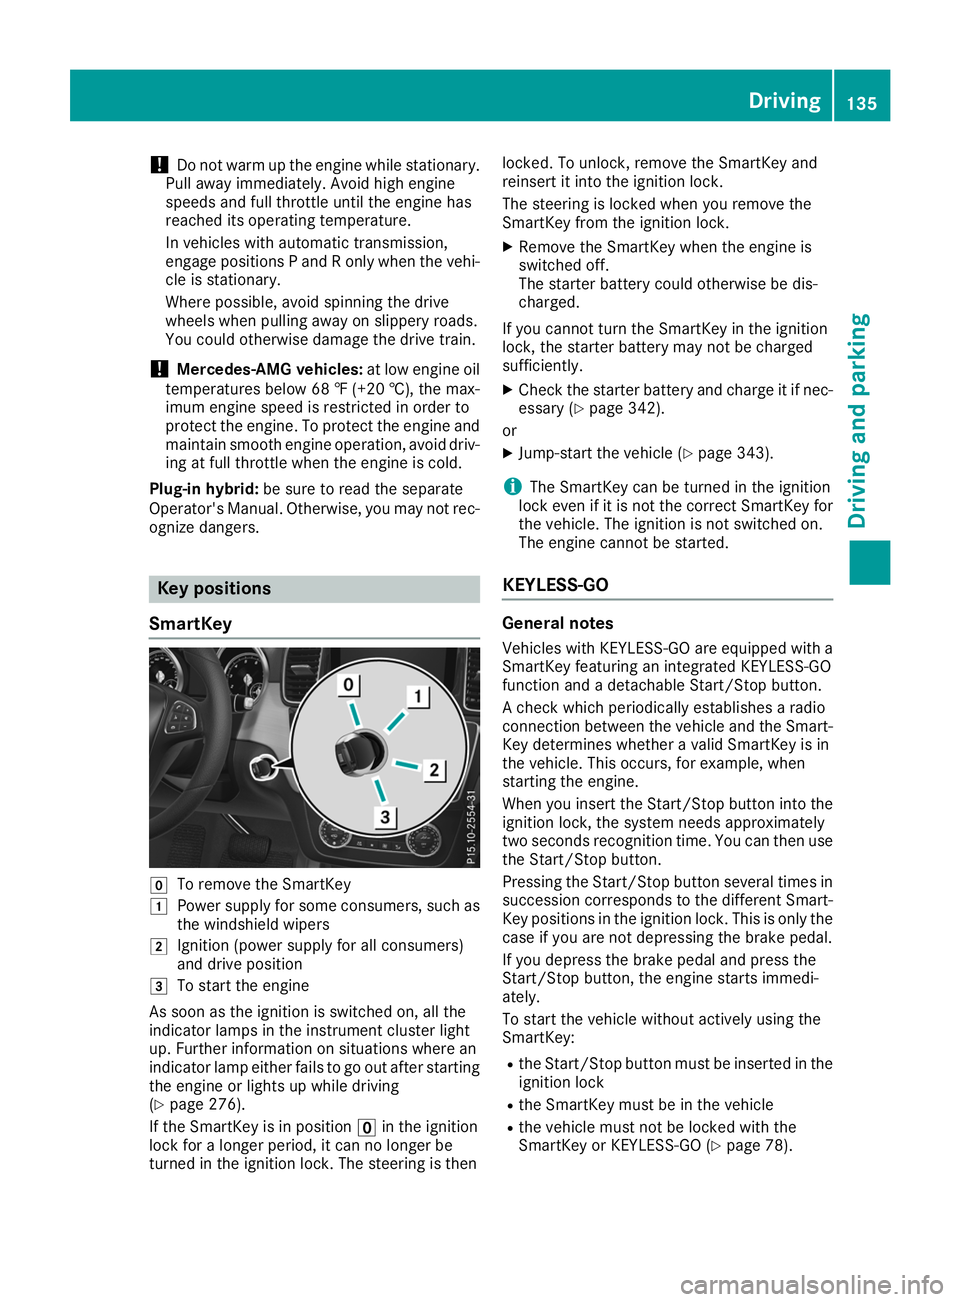
SmartKey 005A
To remove the SmartKey
0047 Power supply for some consumers, such as
the windshield wipers
0048 Ignition (power supply for all consumers)
and drive position
0049 To start the engine
As soon as the ignition is switched on, all the
indicator lamps in the instrument cluster light
up. Further information on situations where an
indicator lamp either fails to go out after starting the engine or lights up while driving
(Y page 276).
If the SmartKey is in position 0092in the ignition
lock for a longer period, it can no longer be
turned in the ignition lock. The steering is then locked. To unlock, remove the SmartKey and
reinsert it into the ignition lock.
The steering is locked when you remove the
SmartKey from the ignition lock.
X Remove the SmartKey when the engine is
switched off.
The starter battery could otherwise be dis-
charged.
If you cannot turn the SmartKey in the ignition
lock, the starter battery may not be charged
sufficiently.
X Check the starter battery and charge it if nec-
essary (Y page 342).
or
X Jump-start the vehicle (Y page 343).
i The SmartKey can be turned in the ignition
lock even if it is not the correct SmartKey for
the vehicle. The ignition is not switched on.
The engine cannot be started.
KEYLESS-GO General notes
Vehicles with KEYLESS-GO are equipped with a
SmartKey featuring an integrated KEYLESS-GO
function and a detachable Start/Stop button.
A check which periodically establishes a radio
connection between the vehicle and the Smart-
Key determines whether a valid SmartKey is in
the vehicle. This occurs, for example, when
starting the engine.
When you insert the Start/Stop button into the ignition lock, the system needs approximately
two seconds recognition time. You can then usethe Start/Stop button.
Pressing the Start/Stop button several times in
succession corresponds to the different Smart-
Key positions in the ignition lock. This is only the
case if you are not depressing the brake pedal.
If you depress the brake pedal and press the
Start/Stop button, the engine starts immedi-
ately.
To start the vehicle without actively using the
SmartKey:
R the Start/Stop button must be inserted in the
ignition lock
R the SmartKey must be in the vehicle
R the vehicle must not be locked with the
SmartKey or KEYLESS-GO (Y page 78). Driving
135Driving and parking Z
Page 139 of 398
Additionally, children could set the vehicle in
motion if, for example, they:
R release the parking brake.
R shifting the automatic transmission out of
park position P
R Start the engine.
There is a risk of an accident and injury.
When leaving the vehicle, always take the
SmartKey with you and lock the vehicle. Never
leave children or animals unattended in the
vehicle. Always keep the SmartKey out of
reach of children. G
WARNING
Combustion engines emit poisonous exhaust
gases such as carbon monoxide. Inhaling
these exhaust gases leads to poisoning. There is a risk of fatal injury. Therefore never leave
the engine running in enclosed spaces with-
out sufficient ventilation. G
WARNING
Flammable materials introduced through
environmental influence or by animals can
ignite if in contact with the exhaust system or parts of the engine that heat up. There is a risk
of fire.
Carry out regular checks to make sure that
there are no flammable foreign materials in
the engine compartment or in the exhaust
system.
General notes Vehicles with a gasoline engine:
the catalytic
converter is preheated for up to 30 seconds
after a cold start. The sound of the engine may
change during this time.
Automatic transmission X
Shift the transmission to position 005D
(Y page 144).
The transmission position indicator on the
multifunction display shows 005D
(Y page 145). i
You can start the engine in transmission
position 005Dand 005C.
Starting procedure with the SmartKey X
To start a diesel engine: turn the SmartKey
to position 0048in the ignition lock
(Y page 135).
The 0028 indicator lamp on the instrument
cluster lights up.
X Turn the SmartKey to position 0049in the igni-
tion lock (Y page 135) and release it as soon
as the engine is running.
i Vehicles with a diesel engine:
you can
start the engine without preglow if the engine
is warm.
Using KEYLESS-GO to start the engine The Start/Stop button can be used to start the
vehicle without inserting the SmartKey into the
ignition lock. The Start/Stop button must be
inserted in the ignition lock and the SmartKey
must be in the vehicle. This mode for starting the engine operates independently of the ECO
start/stop automatic engine start function.
X Depress the brake pedal and keep it
depressed.
X Press the Start/Stop button once
(Y page 135).
Vehicles with a gasoline engine: the engine
starts.
Vehicles with a diesel engine: preglow is
activated and the engine starts.
Starting procedure via smartphone Observe the important safety notes on starting
the engine (Y
page 136).
You can also start your engine via your smart-
phone from outside the vehicle. In this case, the previously selected climate control setting is
activated. In this way you can cool or heat the
interior of the vehicle before starting the jour-
ney.
Only start the engine via your smartphone if it is
safe to start and run the engine where your vehi-
cle is parked.
Observe the legal stipulations in the area where your vehicle is parked. Engine start via smart-
phone may be limited to certain countries or
regions. Driving
137Driving an d parking Z
Page 142 of 398
R
the outside temperature and the atmospheric
air pressure is within the range that is suitablefor the system
R the engine is at normal operating temperature
R the set temperature for the vehicle interior
has been reached
R the battery is sufficiently charged
R the system detects that the windshield is not
fogged up when the air-conditioning system is
switched on
R the hood is closed
R the driver's door is closed and the driver's
seat belt is fastened
All of the vehicle's systems remain active when
the engine is stopped automatically.
The HOLD function can also be activated if the
engine has been switched off automatically. It is then not necessary to continue applying the
brakes during the automatic stop phase. When
you depress the accelerator pedal, the engine
starts automatically and the braking effect of
the HOLD function is deactivated.
All vehicles (except Mercedes-AMG vehi-
cles): automatic engine switch-off can take
place a maximum of four times in a row (initial
stop, then three subsequent stops).
Mercedes-AMG vehicles: the number of con-
secutive automatic engine switch-offs is unlimi- ted.
Automatic engine start The engine starts automatically if:
R you switch off the ECO start/stop function by
pressing the ECO button
R in transmission position 005Bor005C, the brake
pedal is released and the HOLD function is not
active
R you depress the accelerator pedal
R you engage reverse gear 005E
R you move the transmission out of position 005D
R you switch to the Sport Plusdrive program
(Mercedes-AMG GLE 43 4MATIC)
R you switch to the Sport PlusorSport drive
program (Mercedes-AMG vehicles)
R you activate manual gearshifting (Mercedes-
AMG vehicles)
R you switch to the Offroaddrive program
(vehicles without Off-road Engineering Pack-
age) R
you switch to the OffroadorOffroad Plus
drive program (vehicles with Off-road Engi-
neering Package)
R you unfasten your seat belt or open the driv-
er's door
R the vehicle starts to roll
R the brake system requires this
R the temperature in the vehicle interior devi-
ates from the set range
R the system detects moisture on the wind-
shield when the air-conditioning system is
switched on
R the battery's condition of charge is too low
Shifting the transmission to position 005Ddoes
not start the engine.
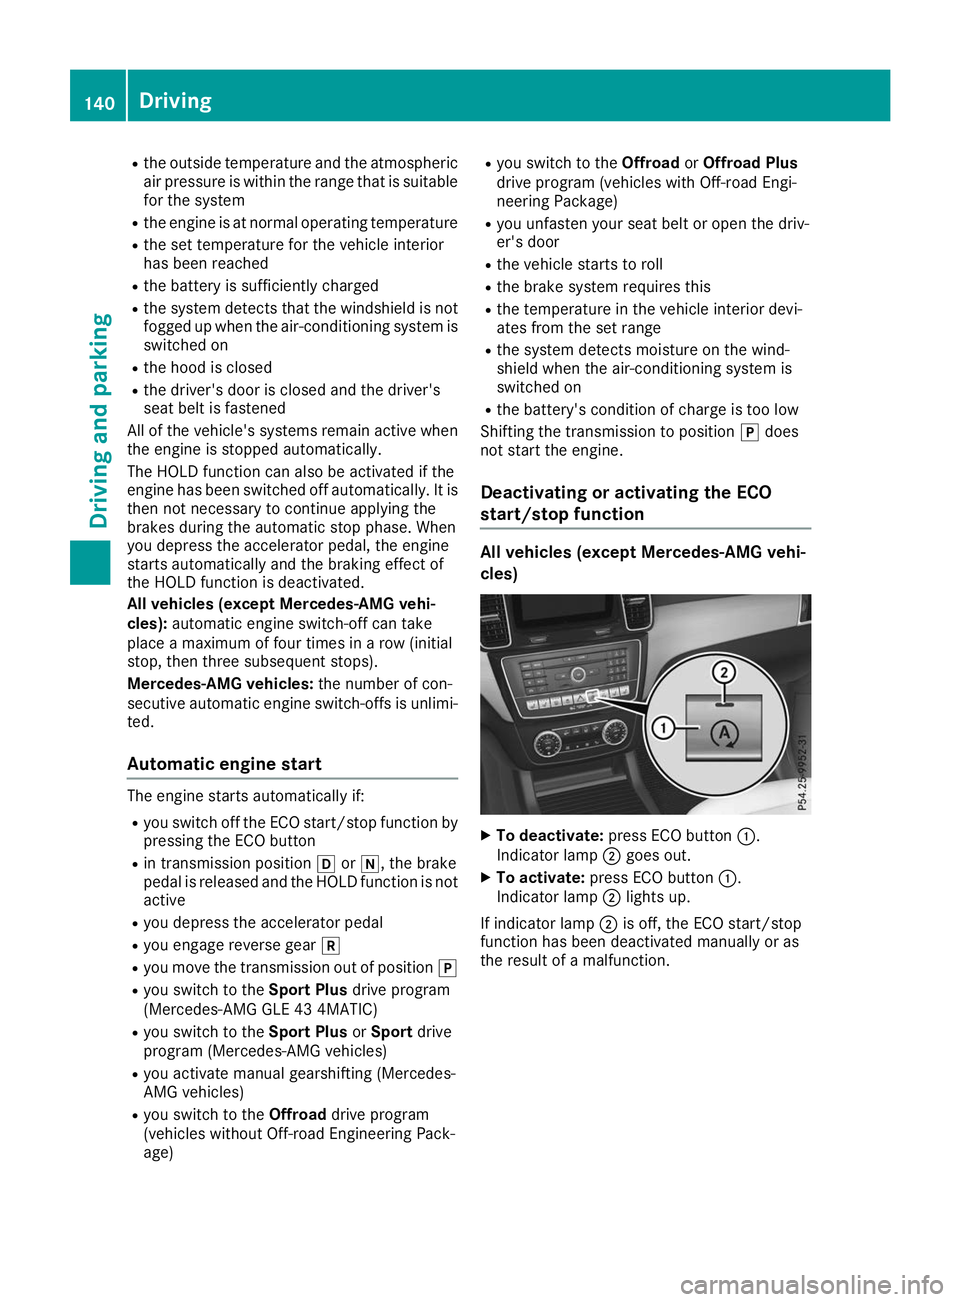
Deactivating or activating the ECO
start/stop function All vehicles (except Mercedes-AMG vehi-
cles)
X
To deactivate: press ECO button 0043.
Indicator lamp 0044goes out.
X To activate: press ECO button 0043.
Indicator lamp 0044lights up.
If indicator lamp 0044is off, the ECO start/stop
function has been deactivated manually or as
the result of a malfunction. 140
DrivingDriving an
d parking
Page 160 of 398
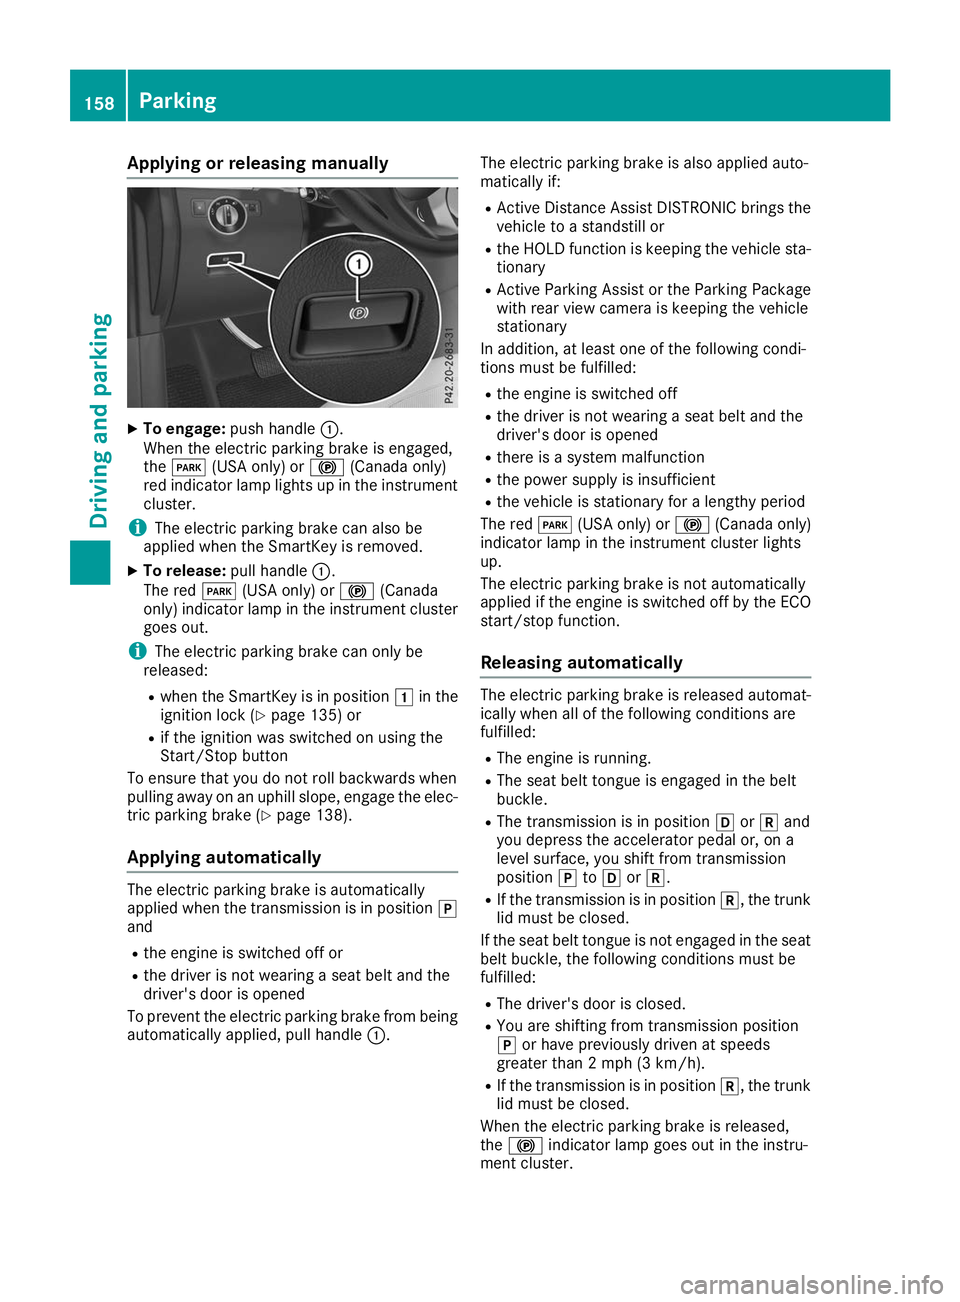
Applying or releasing manually
X
To engage: push handle 0043.
When the electric parking brake is engaged,
the 0049 (USA only) or 0024(Canada only)
red indicator lamp lights up in the instrument
cluster.
i The electric parking brake can also be
applied when the SmartKey is removed.
X To release: pull handle0043.
The red 0049(USA only) or 0024(Canada
only) indicator lamp in the instrument cluster goes out.
i The electric parking brake can only be
released:
R when the SmartKey is in position 0047in the
ignition lock (Y page 135) or
R if the ignition was switched on using the
Start/Stop button
To ensure that you do not roll backwards when
pulling away on an uphill slope, engage the elec-
tric parking brake (Y page 138).
Applying automatically The electric parking brake is automatically
applied when the transmission is in position 005D
and
R the engine is switched off or
R the driver is not wearing a seat belt and the
driver's door is opened
To prevent the electric parking brake from being automatically applied, pull handle 0043.The electric parking brake is also applied auto-
matically if:
R Active Distance Assist DISTRONIC brings the
vehicle to a standstill or
R the HOLD function is keeping the vehicle sta-
tionary
R Active Parking Assist or the Parking Package
with rear view camera is keeping the vehicle
stationary
In addition, at least one of the following condi-
tions must be fulfilled:
R the engine is switched off
R the driver is not wearing a seat belt and the
driver's door is opened
R there is a system malfunction
R the power supply is insufficient
R the vehicle is stationary for a lengthy period
The red 0049(USA only) or 0024(Canada only)
indicator lamp in the instrument cluster lights
up.
The electric parking brake is not automatically
applied if the engine is switched off by the ECO
start/stop function.
Releasing automatically The electric parking brake is released automat-
ically when all of the following conditions are
fulfilled:
R The engine is running.
R The seat belt tongue is engaged in the belt
buckle.
R The transmission is in position 005Bor005E and
you depress the accelerator pedal or, on a
level surface, you shift from transmission
position 005Dto005B or005E.
R If the transmission is in position 005E, the trunk
lid must be closed.
If the seat belt tongue is not engaged in the seat belt buckle, the following conditions must be
fulfilled:
R The driver's door is closed.
R You are shifting from transmission position
005D or have previously driven at speeds
greater than 2 mph (3 km/h).
R If the transmission is in position 005E, the trunk
lid must be closed.
When the electric parking brake is released,
the 0024 indicator lamp goes out in the instru-
ment cluster. 158
ParkingDriving and parking
Page 163 of 398
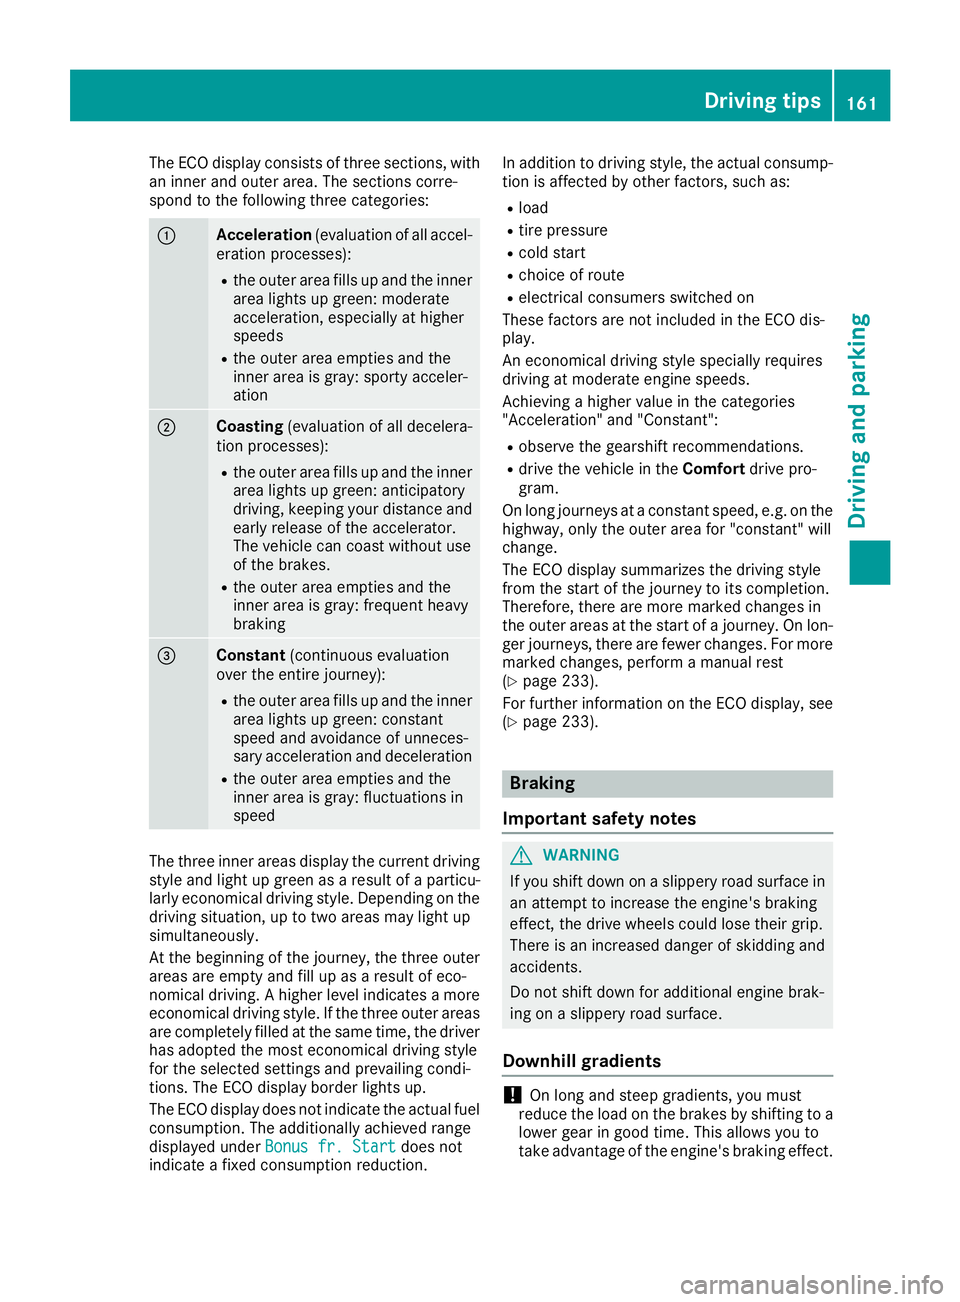
The ECO display consists of three sections, with
an inner and outer area. The sections corre-
spond to the following three categories: 0043
Acceleration
(evaluation of all accel-
eration processes):
R the outer area fills up and the inner
area lights up green: moderate
acceleration, especially at higher
speeds
R the outer area empties and the
inner area is gray: sporty acceler-
ation 0044
Coasting
(evaluation of all decelera-
tion processes):
R the outer area fills up and the inner
area lights up green: anticipatory
driving, keeping your distance and
early release of the accelerator.
The vehicle can coast without use
of the brakes.
R the outer area empties and the
inner area is gray: frequent heavy
braking 0087
Constant
(continuous evaluation
over the entire journey):
R the outer area fills up and the inner
area lights up green: constant
speed and avoidance of unneces-
sary acceleration and deceleration
R the outer area empties and the
inner area is gray: fluctuations in
speed The three inner areas display the current driving
style and light up green as a result of a particu-
larly economical driving style. Depending on the driving situation, up to two areas may light up
simultaneously.
At the beginning of the journey, the three outer
areas are empty and fill up as a result of eco-
nomical driving. A higher level indicates a more
economical driving style. If the three outer areas
are completely filled at the same time, the driver
has adopted the most economical driving style
for the selected settings and prevailing condi-
tions. The ECO display border lights up.
The ECO display does not indicate the actual fuel consumption. The additionally achieved range
displayed under Bonus fr. Start
Bonus fr. Start does not
indicate a fixed consumption reduction. In addition to driving style, the actual consump-
tion is affected by other factors, such as:
R load
R tire pressure
R cold start
R choice of route
R electrical consumers switched on
These factors are not included in the ECO dis-
play.
An economical driving style specially requires
driving at moderate engine speeds.
Achieving a higher value in the categories
"Acceleration" and "Constant":
R observe the gearshift recommendations.
R drive the vehicle in the Comfortdrive pro-
gram.
On long journeys at a constant speed, e.g. on the highway, only the outer area for "constant" will
change.
The ECO display summarizes the driving style
from the start of the journey to its completion.
Therefore, there are more marked changes in
the outer areas at the start of a journey. On lon- ger journeys, there are fewer changes. For more
marked changes, perform a manual rest
(Y page 233).
For further information on the ECO display, see (Y page 233). Braking
Important safety notes G
WARNING
If you shift down on a slippery road surface in an attempt to increase the engine's braking
effect, the drive wheels could lose their grip.
There is an increased danger of skidding and
accidents.
Do not shift down for additional engine brak-
ing on a slippery road surface.
Downhill gradients !
On long and steep gradients, you must
reduce the load on the brakes by shifting to a
lower gear in good time. This allows you to
take advantage of the engine's braking effect. Driving tips
161Driving and parking Z
Page 164 of 398
This helps you to avoid overheating the
brakes and wearing them out excessively.
When you take advantage of engine braking, a
drive wheel may not turn for some time, e.g.
on a slippery road surface. This could cause
damage to the drive train. This type of damage is not covered by the Mercedes-Benz war-
ranty.
Do not depress the brake pedal continuously
while the vehicle is in motion, e.g. causing the
brakes to rub by constantly applying light pres-
sure to the pedal. This results in excessive and
premature wear to the brake pads.
Use the left-hand steering wheel paddle shifter
to shift into a lower gear in good time on long
and steep downhill gradients. This is especially
important if the vehicle is laden.
This also applies if you have activated cruise
control, the limiter or Active Distance Assist
DISTRONIC.
This will use the braking effect of the engine, so
that less braking will be required to maintain the
speed. This relieves the load on the brake sys-
tem and prevents the brakes from overheating
and wearing too quickly.
Heavy and light loads G
WARNING
If you rest your foot on the brake pedal while
driving, the braking system can overheat. This increases the stopping distance and can even
cause the braking system to fail. There is a
risk of an accident.
Never use the brake pedal as a footrest. Never
depress the brake pedal and the accelerator
pedal at the same time.
! Depressing the brake pedal constantly
results in excessive and premature wear to
the brake pads.
If the brakes have been subjected to a heavy
load, do not stop the vehicle immediately. Drive on for a short while. This allows the airflow to
cool the brakes more quickly.
Wet roads If you have driven for a long time in heavy rain
without braking, there may be a delayed reac-
tion from the brakes when braking for the first time. This may also occur after the vehicle has
been washed or driven through deep water.
You then have to depress the brake pedal more
firmly. Maintain a greater distance from the
vehicle in front.
After driving on a wet road or having the vehicle
washed, brake firmly while paying attention to
the traffic conditions. This will warm up the
brake discs, thereby drying them more quickly
and protecting them against corrosion.
Limited braking performance on salt-
treated roads If you drive on salted roads, a layer of salt resi-
due may form on the brake discs and brake
pads. This can result in a significantly longer
braking distance.
R Brake occasionally to remove any possible
salt residue. Make sure that you do not
endanger other road users when doing so.
R Carefully depress the brake pedal and the
beginning and end of a journey.
R Maintain a greater distance to the vehicle
ahead.
Servicing the brakes !
The brake fluid level may be too low, if:
R if the red brake warning lamp lights up in
the instrument cluster and
R you hear a warning tone while the engine is
running
Observe additional warning messages in the
multifunction display.
The brake fluid level may be too low due to
brake pad wear or leaking brake lines.
Have the brake system checked immediately.
Consult a qualified specialist workshop to
arrange this.
! A function or performance test should only
be carried out on a 2-axle dynamometer. If
you wish to operate the vehicle on such a
dynamometer, please consult a qualified spe- cialist workshop in advance. You could oth-
erwise damage the drive train or the brake
system.
! Because ESP ®
is an automatic system, the
engine and ignition must be switched off
(SmartKey in position 0or 1or Start/Stop
button in position 0or 1) when the electric 162
Driving tipsDriving and parking