check engine light MERCEDES-BENZ GLE SUV 2019 Owner's Guide
[x] Cancel search | Manufacturer: MERCEDES-BENZ, Model Year: 2019, Model line: GLE SUV, Model: MERCEDES-BENZ GLE SUV 2019Pages: 398, PDF Size: 12.25 MB
Page 209 of 398
If the lanes are narrow, vehicles driving in the
lane beyond the lane next to your vehicle may be
indicated, especially if the vehicles are not driv-
ing in the middle of their lane. This may be the
case if there are vehicles driving at the inner
edge of their lanes.
Due to the nature of the system:
R warnings may be issued in error when driving
close to crash barriers or similar solid lane
borders.
R the warning is canceled when driving for an
extended period next to long vehicles, such as
trucks.
Warning lamp
Blind Spot Assist is not active at speeds below
approximately 20 mph (30 km/h). Vehicles in
the monitoring range are then not indicated. 0043
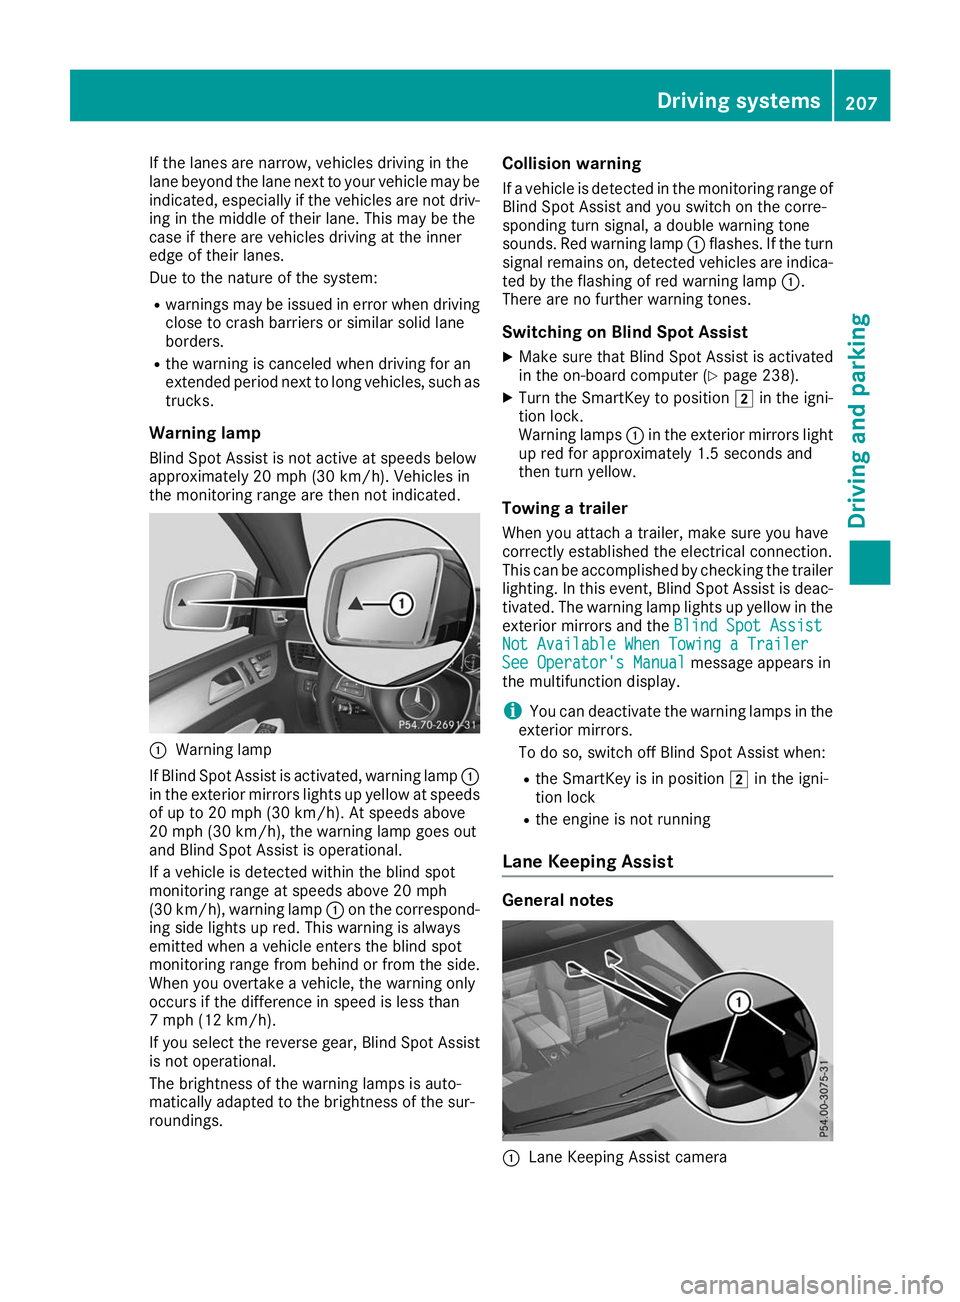
Warning lamp
If Blind Spot Assist is activated, warning lamp 0043
in the exterior mirrors lights up yellow at speeds
of up to 20 mph (30 km/h). At speeds above
20 mph (30 km/h), the warning lamp goes out
and Blind Spot Assist is operational.
If a vehicle is detected within the blind spot
monitoring range at speeds above 20 mph
(30 km/h), warning lamp 0043on the correspond-
ing side lights up red. This warning is always
emitted when a vehicle enters the blind spot
monitoring range from behind or from the side.
When you overtake a vehicle, the warning only
occurs if the difference in speed is less than
7 mph (12 km/h).
If you select the reverse gear, Blind Spot Assist
is not operational.
The brightness of the warning lamps is auto-
matically adapted to the brightness of the sur-
roundings. Collision warning
If a vehicle is detected in the monitoring range of
Blind Spot Assist and you switch on the corre-
sponding turn signal, a double warning tone
sounds. Red warning lamp 0043flashes. If the turn
signal remains on, detected vehicles are indica-
ted by the flashing of red warning lamp 0043.
There are no further warning tones.
Switching on Blind Spot Assist X Make sure that Blind Spot Assist is activated
in the on-board computer (Y page 238).
X Turn the SmartKey to position 0048in the igni-
tion lock.
Warning lamps 0043in the exterior mirrors light
up red for approximately 1.5 seconds and
then turn yellow.
Towing a trailer
When you attach a trailer, make sure you have
correctly established the electrical connection.
This can be accomplished by checking the trailer
lighting. In this event, Blind Spot Assist is deac-
tivated. The warning lamp lights up yellow in the
exterior mirrors and the Blind Spot Assist
Blind Spot Assist
Not Available When Towing a Trailer Not Available When Towing a Trailer
See Operator's Manual See Operator's Manual message appears in
the multifunction display.
i You can deactivate the warning lamps in the
exterior mirrors.
To do so, switch off Blind Spot Assist when:
R the SmartKey is in position 0048in the igni-
tion lock
R the engine is not running
Lane Keeping Assist General notes
0043
Lane Keeping Assist camera Driving systems
207Driving and parking Z
Page 213 of 398
Visual and acoustic collision warning
If you switch on the turn signals to change lanes
and a vehicle is detected in the side monitoring range, you receive a visual and acoustic collision
warning. You then hear a double warning tone
and red warning lamp 0043flashes. If the turn sig-
nal remains on, detected vehicles are indicated
by the flashing of red warning lamp 0043. There are
no further warning tones.
Course-correcting brake application If Active Blind Spot Assist detects a risk of a lat-
eral collision in the monitoring range, a course-
correcting brake application is carried out. This is meant to assist you in avoiding a collision. G
WARNING
A course-correcting brake application cannot always prevent a collision. There is a risk of an
accident.
Always steer, brake or accelerate yourself,
especially if Active Blind Spot Assist warns
you or makes a course-correcting brake appli-
cation. Always maintain a safe distance at the sides.
If a course-correcting brake application occurs, red warning lamp 0043flashes in the exterior mir-
ror and a double warning tone sounds. In addi-
tion, a display underlining the danger of a side
collision appears in the multifunction display.
In very rare cases, the system may make an
inappropriate brake application. A course-cor-
recting brake application may be interrupted at
any time by countersteering slightly or acceler-
ating.
The course-correcting brake application is avail-
able in the speed range between 20 mph
(30 km/h) and 120 mph (200 km/h).
Either no braking application, or a course-cor-
recting brake application adapted to the driving situation occurs if:
R there are vehicles or obstacles, e.g. crash
barriers, located on both sides of your vehicle.
R a vehicle approaches you too closely at the
side.
R you have adopted a sporty driving style with
high cornering speeds.
R you clearly brake or accelerate.
R a driving safety system intervenes, e.g. ESP ®
or PRE-SAFE ®
Brake. R
ESP ®
is switched off.
R the offroad program is activated (vehicles
without the Offroad Engineering package).
R the Offroad or Offroad Plus drive program is
activated (vehicles with the Off-Road Engi-
neering package).
R the LOW RANGE offroad gear is activated
(vehicles with the Offroad Engineering pack-
age).
R a loss of tire pressure or a defective tire is
detected.
Switching on Active Blind Spot Assist
X Make sure that Active Blind Spot Assist
(Y page 238) is activated in the on-board
computer.
X Turn the SmartKey to position 0048in the igni-
tion lock.
Warning lamps 0043in the exterior mirrors light
up red for approximately 1.5 seconds and
then turn yellow.
Towing a trailer
When you attach a trailer, make sure you have
correctly established the electrical connection.
This can be accomplished by checking the trailer
lighting. Active Blind Spot Assist is then deacti-
vated. The indicator lamp lights up yellow in the
exterior mirrors and the Active Blind Spot
Active Blind Spot
Asst. Not Available When Towing a Asst. Not Available When Towing a
Trailer See Operator's Manual Trailer See Operator's Manual message
appears in the multifunction display.
Active Lane Keeping Assist General notes
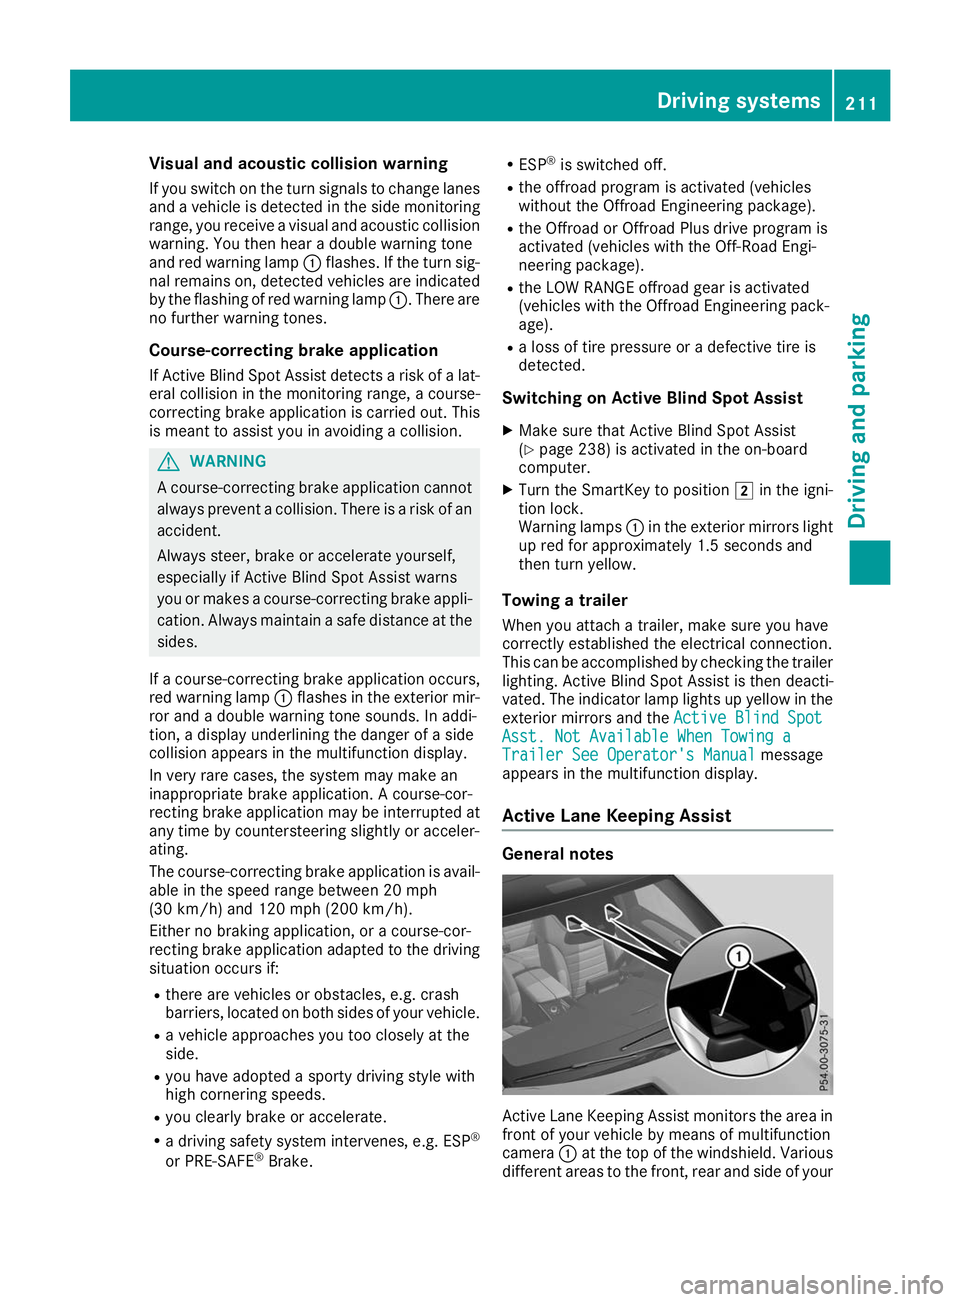
Active Lane Keeping Assist monitors the area in
front of your vehicle by means of multifunction
camera 0043at the top of the windshield. Various
different areas to the front, rear and side of your Driving systems
211Driving and parking Z
Page 225 of 398
X
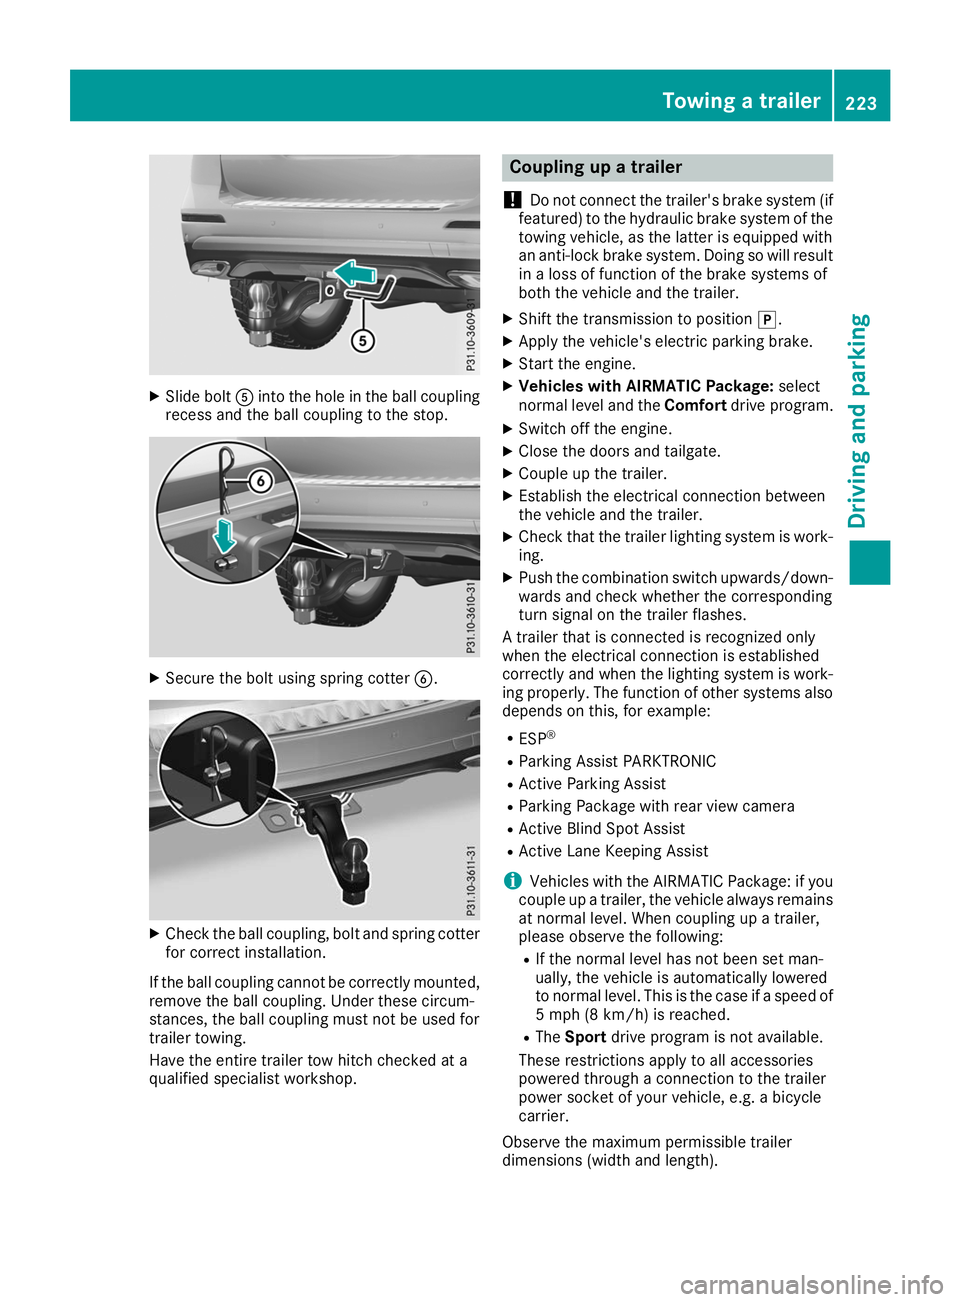
Slide bolt 0083into the hole in the ball coupling
recess and the ball coupling to the stop. X
Secure the bolt using spring cotter 0084.X
Check the ball coupling, bolt and spring cotter
for correct installation.
If the ball coupling cannot be correctly mounted,
remove the ball coupling. Under these circum-
stances, the ball coupling must not be used for
trailer towing.
Have the entire trailer tow hitch checked at a
qualified specialist workshop. Coupling up a trailer
! Do not connect the trailer's brake system (if
featured) to the hydraulic brake system of the towing vehicle, as the latter is equipped with
an anti-lock brake system. Doing so will result
in a loss of function of the brake systems of
both the vehicle and the trailer.
X Shift the transmission to position 005D.
X Apply the vehicle's electric parking brake.
X Start the engine.
X Vehicles with AIRMATIC Package: select
normal level and the Comfortdrive program.
X Switch off the engine.
X Close the doors and tailgate.
X Couple up the trailer.
X Establish the electrical connection between
the vehicle and the trailer.
X Check that the trailer lighting system is work-
ing.
X Push the combination switch upwards/down-
wards and check whether the corresponding
turn signal on the trailer flashes.
A trailer that is connected is recognized only
when the electrical connection is established
correctly and when the lighting system is work-
ing properly. The function of other systems also depends on this, for example:
R ESP ®
R Parking Assist PARKTRONIC
R Active Parking Assist
R Parking Package with rear view camera
R Active Blind Spot Assist
R Active Lane Keeping Assist
i Vehicles with the AIRMATIC Package: if you
couple up a trailer, the vehicle always remains
at normal level. When coupling up a trailer,
please observe the following:
R If the normal level has not been set man-
ually, the vehicle is automatically lowered
to normal level. This is the case if a speed of
5 mph (8 km/h) is reached.
R The Sport drive program is not available.
These restrictions apply to all accessories
powered through a connection to the trailer
power socket of your vehicle, e.g. a bicycle
carrier.
Observe the maximum permissible trailer
dimensions (width and length). Towing a trailer
223Driving and parking Z
Page 226 of 398
Most U.S. states and all Canadian provinces
require by law:
R Safety chains between the towing vehicle and
the trailer. The chains should be cross-woundunder the trailer drawbar. They must be fas-
tened to the vehicle's trailer coupling, not to
the bumper or the axle.
Leave enough play in the chains to make tight
cornering possible.
R A separate brake system for certain types of
trailer.
R Safety switch for braked trailers. Check the
specific legal requirements applicable to your
state.
If the trailer becomes detached from the tow-
ing vehicle, the safety feature triggers the
trailer brakes. Towing a trailer
There are numerous legal requirements con-
cerning the towing of a trailer, e.g. speed restric-
tions. Make sure that your car/trailer combina- tion complies with the local regulations:
R in your place of residence
R in the location to which you are driving
The police and local authorities can provide reli-
able information.
Observe the following when towing a trailer:
R To gain driving experience and to become
accustomed to the new handling characteris-
tics, you should practice the following in a
traffic-free location:
- cornering
- stopping
- backing up
R Before driving, check:
- trailer tow hitch
- safety switch for braked trailers
- safety chains
- electrical connections
- lights
- wheels
R Adjust the exterior mirrors to provide an
unobstructed view of the rear section of the
trailer.
R If the trailer has electronically controlled
brakes, pull away carefully. Brake manually using the brake controller and check whether
the brakes function correctly.
R Secure any objects on the trailer to prevent
the cargo from slipping when the vehicle is in
motion.
R When you couple up a trailer, check at regular
intervals that the load is firmly secured. If the trailer is equipped with trailer lights and
brakes, check the trailer to ensure that these
are working.
R Bear in mind that the handling will be less
stable when towing a trailer than when driving
without one. Avoid sudden steering move-
ments.
R The vehicle/trailer combination is heavier,
accelerates more slowly, has a decreased
gradient climbing capability and a longer
braking distance.
It is more susceptible to side winds and
requires more careful steering.
R If possible, do not brake suddenly, but instead
depress the brake pedal moderately at first sothat the trailer can activate its brakes. Then
increase the pressure on the brake pedal.
R If the automatic transmission repeatedly
shifts between gears on uphill or downhill gra-
dients, shift to a lower gear using the left-hand
steering wheel paddle shifter.
A lower gear and lower speed reduce the risk of engine failure.
R When driving downhill, shift to a lower gear to
utilize the engine's braking effect.
Avoid continuous brake application as this
may overheat the vehicle brakes and, if instal- led, the trailer brakes.
R If the coolant temperature increases dramat-
ically while the air-conditioning system is
switched on, switch off the air-conditioning
system.
Coolant heat can also be dissipated by open-
ing the windows and switching the ventilation blower and the interior temperature to the
highest level.
R When overtaking, pay particular attention to
the extended length of your vehicle/trailer
combination.
Due to the length of the vehicle/trailer com-
bination, you require additional road space in
relation to the vehicle you are overtaking
before you can change back to the original
lane. 224
Towing a trailerDriving and parking
Page 252 of 398
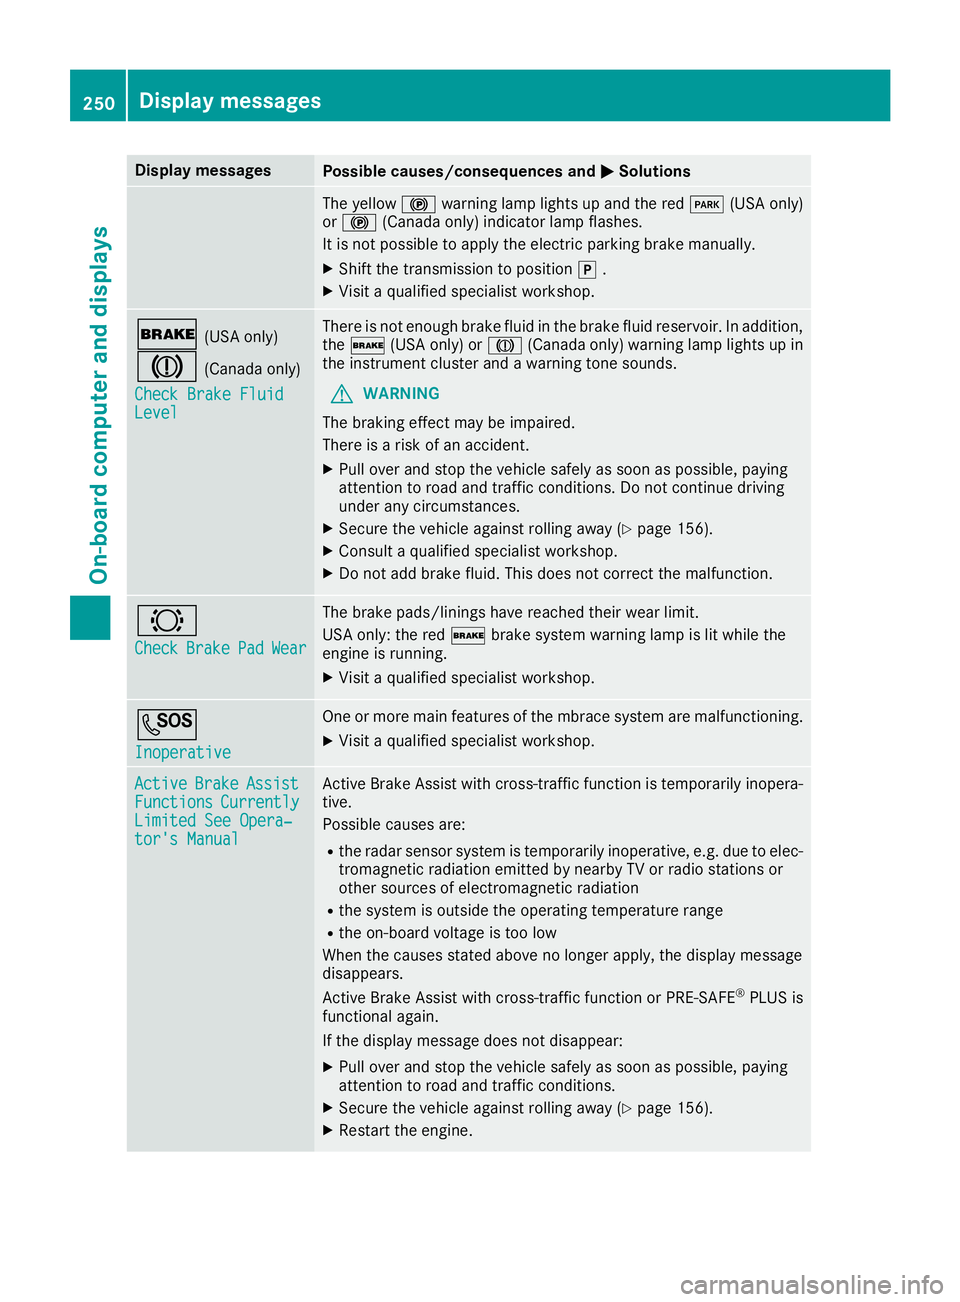
Display messages
Possible causes/consequences and
0050
0050Solutions The yellow
0024warning lamp lights up and the red 0049(USA only)
or 0024 (Canada only) indicator lamp flashes.
It is not possible to apply the electric parking brake manually.
X Shift the transmission to position 005D.
X Visit a qualified specialist workshop. 0027
(USA only)
004D (Canada only)
Check Brake Fluid
Check Brake Fluid
Level
Level There is not enough brake fluid in the brake fluid reservoir. In addition,
the 0027 (USA only) or 004D(Canada only) warning lamp lights up in
the instrument cluster and a warning tone sounds.
G WARNING
The braking effect may be impaired.
There is a risk of an accident.
X Pull over and stop the vehicle safely as soon as possible, paying
attention to road and traffic conditions. Do not continue driving
under any circumstances.
X Secure the vehicle against rolling away (Y page 156).
X Consult a qualified specialist workshop.
X Do not add brake fluid. This does not correct the malfunction. 0026
Check Check
Brake
Brake Pad
PadWear
Wear The brake pads/linings have reached their wear limit.
USA only: the red
0027brake system warning lamp is lit while the
engine is running.
X Visit a qualified specialist workshop. 0053
Inoperative Inoperative One or more main features of the mbrace system are malfunctioning.
X Visit a qualified specialist workshop. Active
Active
Brake
Brake Assist
Assist
Functions
Functions Currently
Currently
Limited See Opera‐
Limited See Opera‐
tor's Manual tor's Manual Active Brake Assist with cross-traffic function is temporarily inopera-
tive.
Possible causes are:
R the radar sensor system is temporarily inoperative, e.g. due to elec-
tromagnetic radiation emitted by nearby TV or radio stations or
other sources of electromagnetic radiation
R the system is outside the operating temperature range
R the on-board voltage is too low
When the causes stated above no longer apply, the display message
disappears.
Active Brake Assist with cross-traffic function or PRE ‑SAFE®
PLUS is
functional again.
If the display message does not disappear:
X Pull over and stop the vehicle safely as soon as possible, paying
attention to road and traffic conditions.
X Secure the vehicle against rolling away (Y page 156).
X Restart the engine. 250
Display
messagesOn-board computer and displays
Page 259 of 398
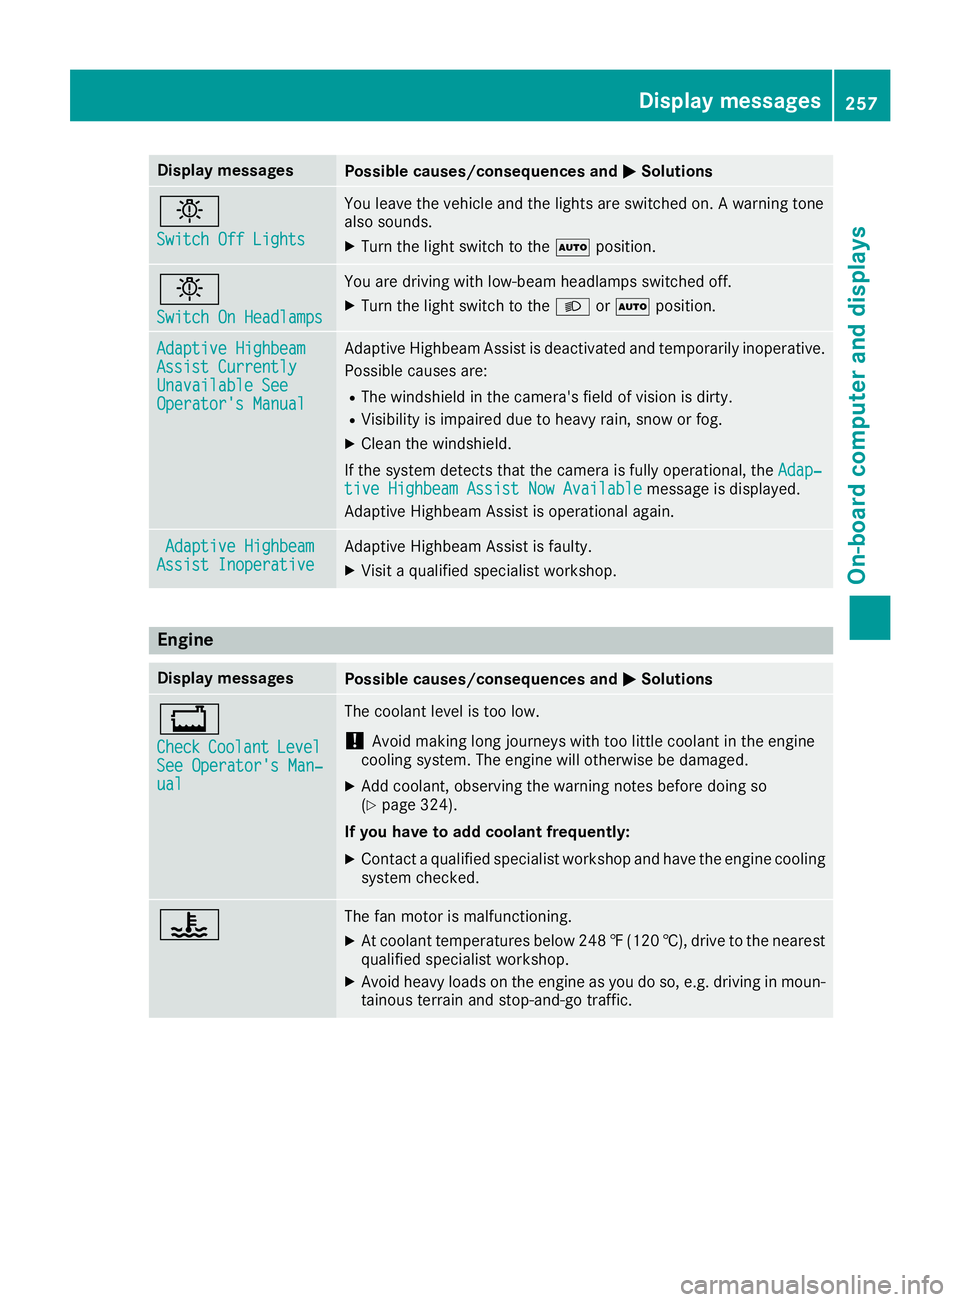
Display messages
Possible causes/consequences and
0050
0050Solutions 0049
Switch Off Lights Switch Off Lights You leave the vehicle and the lights are switched on. A warning tone
also sounds.
X Turn the light switch to the 0058position. 0049
Switch On Headlamps Switch On Headlamps You are driving with low-beam headlamps switched off.
X Turn the light switch to the 0058or0058 position. Adaptive Highbeam
Adaptive Highbeam
Assist Currently Assist Currently
Unavailable See Unavailable See
Operator's Manual Operator's Manual Adaptive Highbeam Assist is deactivated and temporarily inoperative.
Possible causes are:
R The windshield in the camera's field of vision is dirty.
R Visibility is impaired due to heavy rain, snow or fog.
X Clean the windshield.
If the system detects that the camera is fully operational, the Adap‐
Adap‐
tive Highbeam Assist Now Available
tive Highbeam Assist Now Available message is displayed.
Adaptive Highbeam Assist is operational again. Adaptive Highbeam
Adaptive Highbeam
Assist Inoperative
Assist Inoperative Adaptive Highbeam Assist is faulty.
X
Visit a qualified specialist workshop. Engine
Display messages
Possible causes/consequences and
0050 0050Solutions 00BD
Check Check
Coolant Coolant Level
Level
See Operator's Man‐
See Operator's Man‐
ual ual The coolant level is too low.
! Avoid making long journeys with too little coolant in the engine
cooling system. The engine will otherwise be damaged.
X Add coolant, observing the warning notes before doing so
(Y page 324).
If you have to add coolant frequently: X Contact a qualified specialist workshop and have the engine cooling
system checked. 00AC The fan motor is malfunctioning.
X At coolant temperatures below 248 ‡(120 †), drive to the nearest
qualified specialist workshop.
X Avoid heavy loads on the engine as you do so, e.g. driving in moun-
tainous terrain and stop-and-go traffic. Display messages
257On-board computer and displays Z
Page 285 of 398
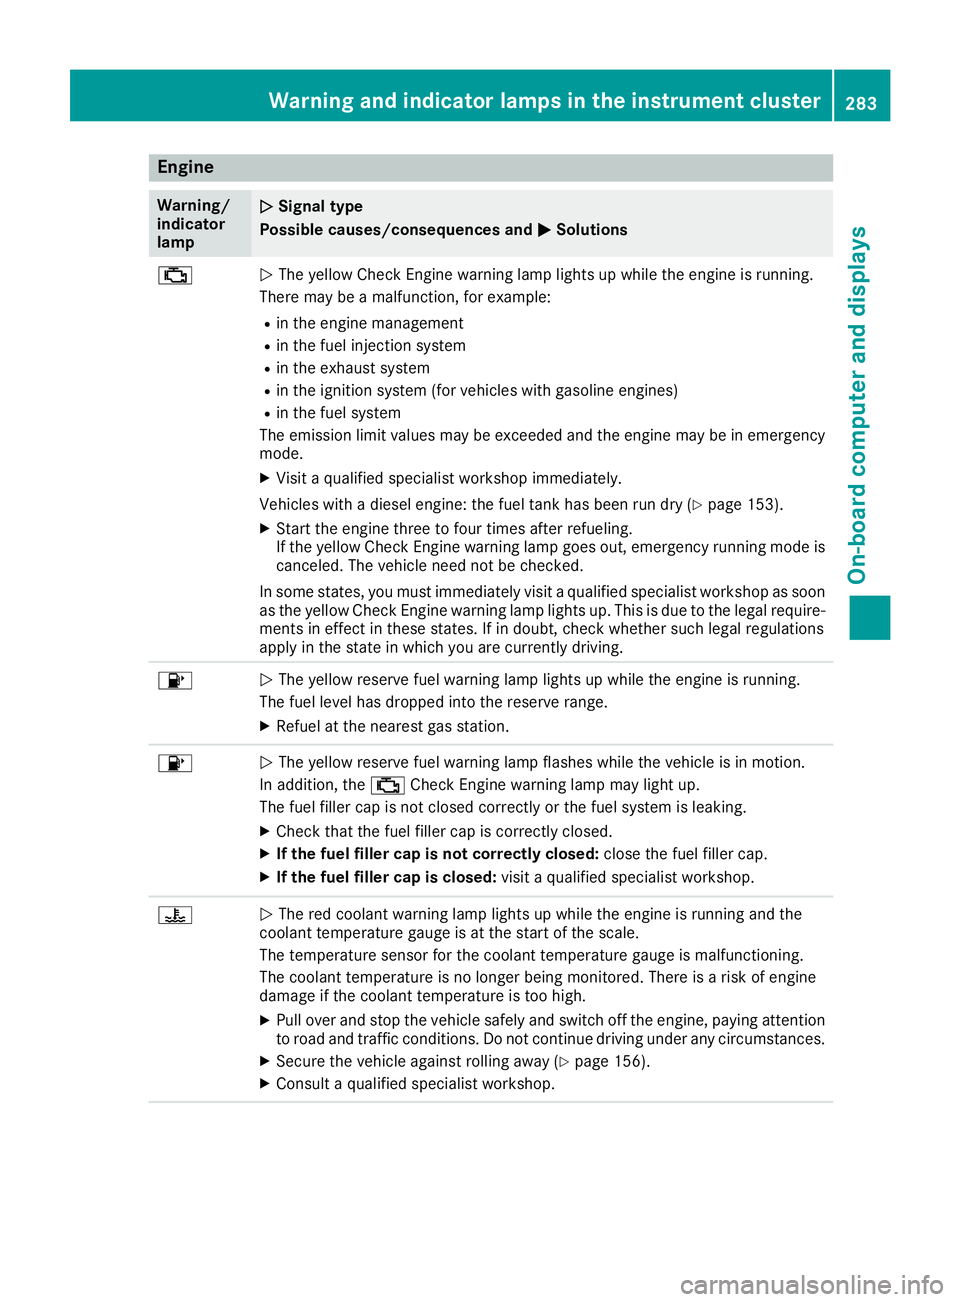
Engine
Warning/
indicator
lamp
0051 0051
Signal type
Possible causes/consequences and 0050
0050Solutions 00B9
0051
The yellow Check Engine warning lamp lights up while the engine is running.
There may be a malfunction, for example:
R in the engine management
R in the fuel injection system
R in the exhaust system
R in the ignition system (for vehicles with gasoline engines)
R in the fuel system
The emission limit values may be exceeded and the engine may be in emergency mode.
X Visit a qualified specialist workshop immediately.
Vehicles with a diesel engine: the fuel tank has been run dry (Y page 153).
X Start the engine three to four times after refueling.
If the yellow Check Engine warning lamp goes out, emergency running mode is
canceled. The vehicle need not be checked.
In some states, you must immediately visit a qualified specialist workshop as soon
as the yellow Check Engine warning lamp lights up. This is due to the legal require- ments in effect in these states. If in doubt, check whether such legal regulations
apply in the state in which you are currently driving. 00B6
0051
The yellow reserve fuel warning lamp lights up while the engine is running.
The fuel level has dropped into the reserve range.
X Refuel at the nearest gas station. 00B6
0051
The yellow reserve fuel warning lamp flashes while the vehicle is in motion.
In addition, the 00B9Check Engine warning lamp may light up.
The fuel filler cap is not closed correctly or the fuel system is leaking.
X Check that the fuel filler cap is correctly closed.
X If the fuel filler cap is not correctly closed: close the fuel filler cap.
X If the fuel filler cap is closed: visit a qualified specialist workshop.00AC
0051
The red coolant warning lamp lights up while the engine is running and the
coolant temperature gauge is at the start of the scale.
The temperature sensor for the coolant temperature gauge is malfunctioning.
The coolant temperature is no longer being monitored. There is a risk of engine
damage if the coolant temperature is too high.
X Pull over and stop the vehicle safely and switch off the engine, paying attention
to road and traffic conditions. Do not continue driving under any circumstances.
X Secure the vehicle against rolling away (Y page 156).
X Consult a qualified specialist workshop. Warning and indicator lamps in the instrument cluster
283On-board computer and displays Z
Page 310 of 398
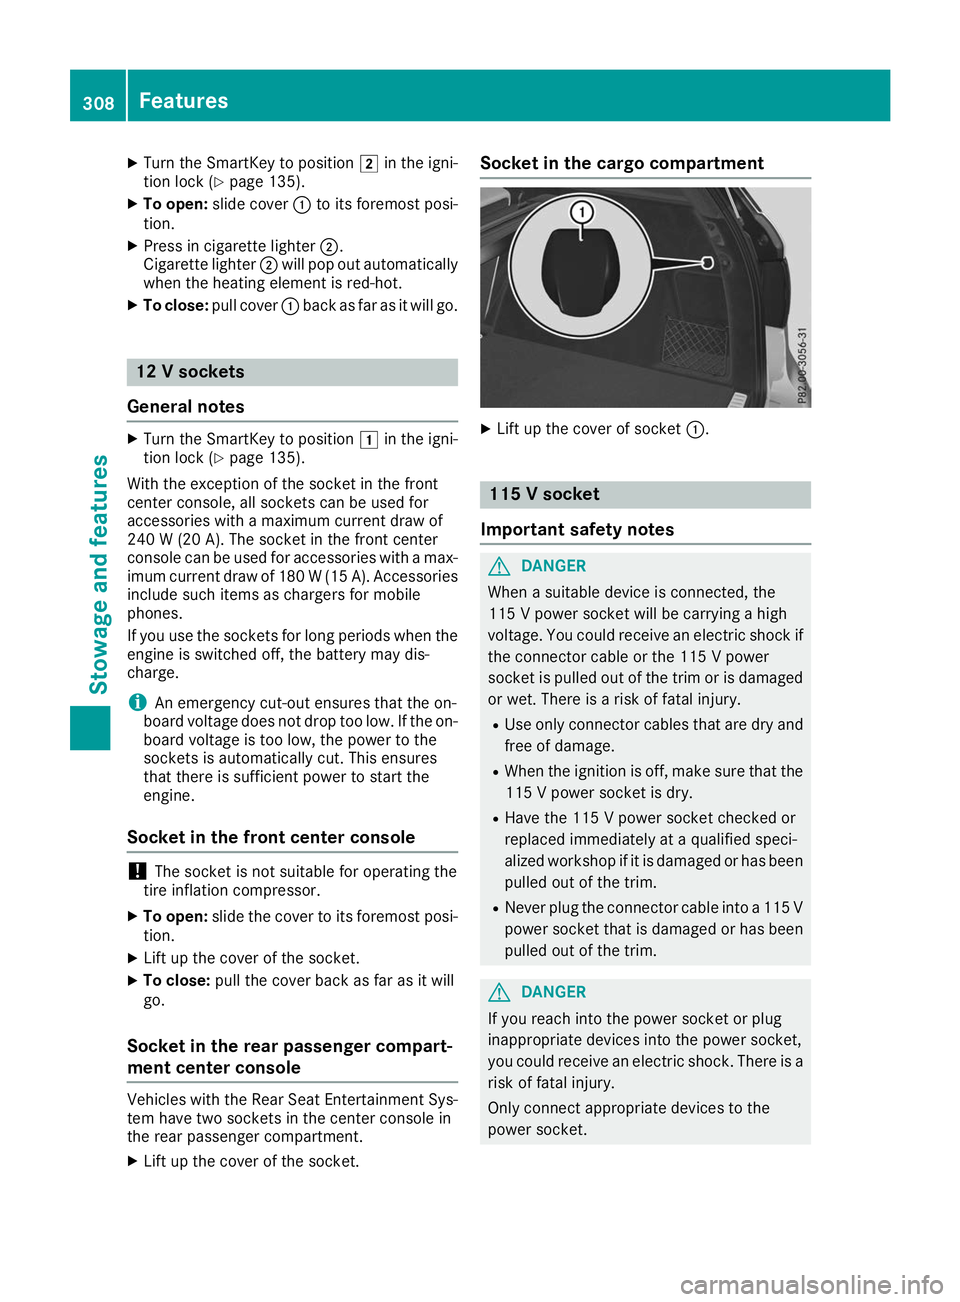
X
Turn the SmartKey to position 0048in the igni-
tion lock (Y page 135).
X To open: slide cover 0043to its foremost posi-
tion.
X Press in cigarette lighter 0044.
Cigarette lighter 0044will pop out automatically
when the heating element is red-hot.
X To close: pull cover 0043back as far as it will go. 12 V sockets
General notes X
Turn the SmartKey to position 0047in the igni-
tion lock (Y page 135).
With the exception of the socket in the front
center console, all sockets can be used for
accessories with a maximum current draw of
240 W (20 A). The socket in the front center
console can be used for accessories with a max-
imum current draw of 180 W(15 A). Accessories
include such items as chargers for mobile
phones.
If you use the sockets for long periods when the engine is switched off, the battery may dis-
charge.
i An emergency cut-out ensures that the on-
board voltage does not drop too low. If the on-
board voltage is too low, the power to the
sockets is automatically cut. This ensures
that there is sufficient power to start the
engine.
Socket in the front center console !
The socket is not suitable for operating the
tire inflation compressor.
X To open: slide the cover to its foremost posi-
tion.
X Lift up the cover of the socket.
X To close: pull the cover back as far as it will
go.
Socket in the rear passenger compart-
ment center console Vehicles with the Rear Seat Entertainment Sys-
tem have two sockets in the center console in
the rear passenger compartment.
X Lift up the cover of the socket. Socket in the cargo compartment
X
Lift up the cover of socket 0043. 115 V socket
Important safety notes G
DANGER
When a suitable device is connected, the
115 V powe r socket will be carrying a high
voltage. You could receive an electric shock if the connector cable or the 115 V power
socket is pulled out of the trim or is damaged
or wet. There is a risk of fatal injury.
R Use only connector cables that are dry and
free of damage.
R When the ignition is off, make sure that the
115 V powe r socket is dry.
R Have the 115 V power socket checked or
replaced immediately at a qualified speci-
alized workshop if it is damaged or has been
pulled out of the trim.
R Never plug the connector cable into a 115 V
power socket that is damaged or has been pulled out of the trim. G
DANGER
If you reach into the power socket or plug
inappropriate devices into the power socket,
you could receive an electric shock. There is a risk of fatal injury.
Only connect appropriate devices to the
power socket. 308
FeaturesStowage and features
Page 324 of 398
X
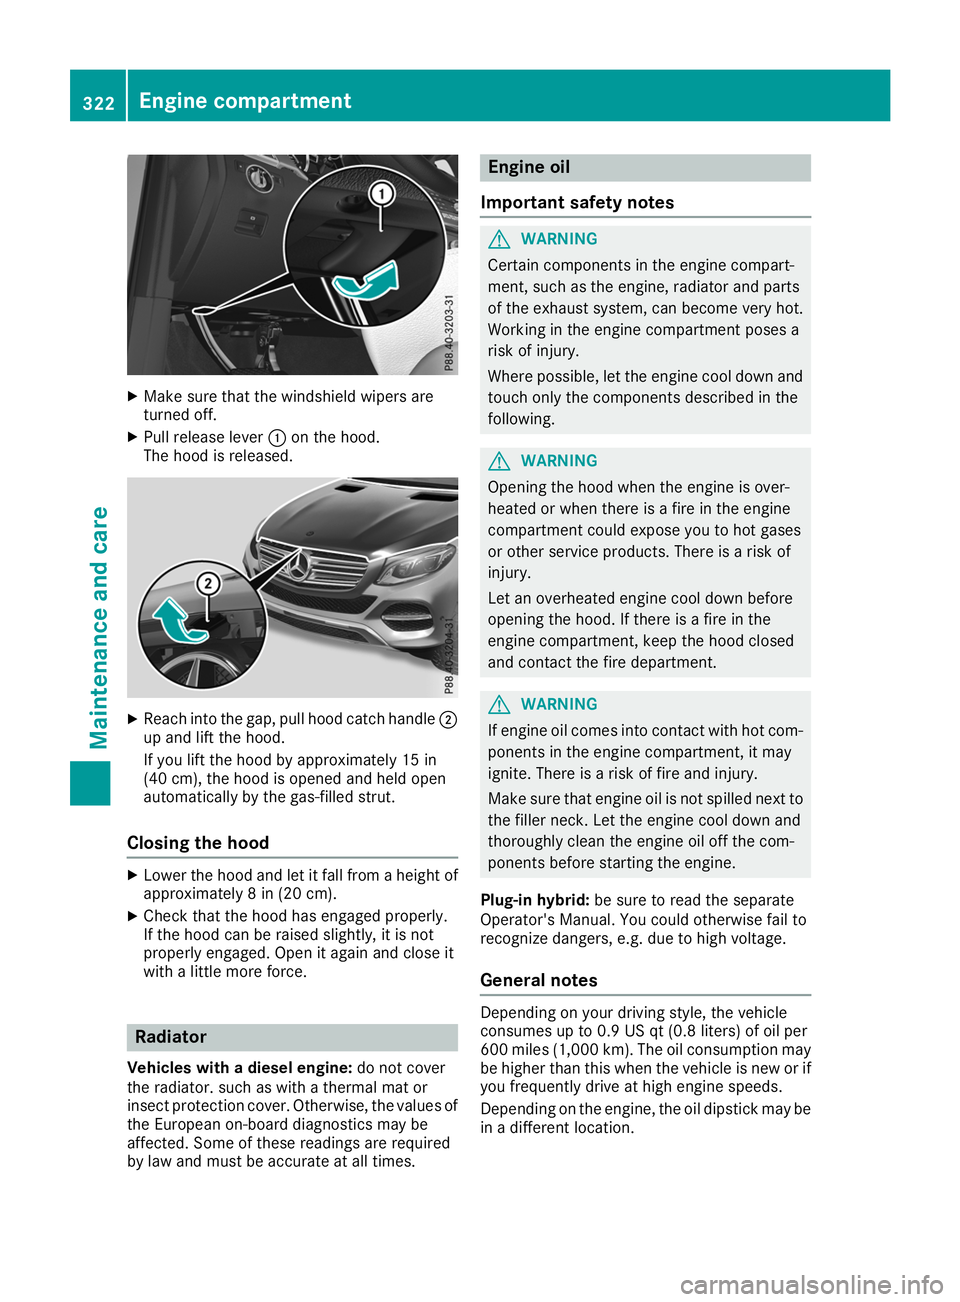
Make sure that the windshield wipers are
turned off.
X Pull release lever 0043on the hood.
The hood is released. X
Reach into the gap, pull hood catch handle 0044
up and lift the hood.
If you lift the hood by approximately 15 in
(40 cm), the hood is opened and held open
automatically by the gas-filled strut.
Closing the hood X
Lower the hood and let it fall from a height of
approximately 8 in (20 cm).
X Check that the hood has engaged properly.
If the hood can be raised slightly, it is not
properly engaged. Open it again and close it
with a little more force. Radiator
Vehicles with a diesel engine: do not cover
the radiator. such as with a thermal mat or
insect protection cover. Otherwise, the values of the European on-board diagnostics may be
affected. Some of these readings are required
by law and must be accurate at all times. Engine oil
Important safety notes G
WARNING
Certain components in the engine compart-
ment, such as the engine, radiator and parts
of the exhaust system, can become very hot.
Working in the engine compartment poses a
risk of injury.
Where possible, let the engine cool down and touch only the components described in the
following. G
WARNING
Opening the hood when the engine is over-
heated or when there is a fire in the engine
compartment could expose you to hot gases
or other service products. There is a risk of
injury.
Let an overheated engine cool down before
opening the hood. If there is a fire in the
engine compartment, keep the hood closed
and contact the fire department. G
WARNING
If engine oil comes into contact with hot com- ponents in the engine compartment, it may
ignite. There is a risk of fire and injury.
Make sure that engine oil is not spilled next to
the filler neck. Let the engine cool down and
thoroughly clean the engine oil off the com-
ponents before starting the engine.
Plug-in hybrid: be sure to read the separate
Operator's Manual. You could otherwise fail to
recognize dangers, e.g. due to high voltage.
General notes Depending on your driving style, the vehicle
consumes up to 0.9 US qt (0.8 liters) of oil per
600 miles (1,000 km). The oil consumption may
be higher than this when the vehicle is new or if
you frequently drive at high engine speeds.
Depending on the engine, the oil dipstick may be in a different location. 322
Engine compartmentMaintenance and care
Page 344 of 398
occupants from suffering acid burns should the
battery be damaged in the event of an accident.
In order for the battery to achieve the maximum possible service life, it must always be suffi-
ciently charged.
Like other batteries, the vehicle battery may
discharge over time if you do not use the vehicle. In this case, have the battery disconnected at a
qualified specialist workshop. However, you can also charge the battery with a charger recom-
mended by Mercedes-Benz. Contact a qualified
specialist workshop for further information.
Have the battery charge state checked more
frequently if you use the vehicle mainly for short trips or if you leave it standing idle for a lengthyperiod. Consult a qualified specialist workshop
if you wish to leave your vehicle parked for a long
period of time.
Remove the SmartKey if you park the vehicle
and do not require any electrical consumers.
The vehicle will then use very little energy, thus
conserving battery power.
If the power supply has been interrupted, e.g. if
you reconnect the battery, you will have to:
R set the clock (see the Digital Operator's Man-
ual)
On vehicles with a multimedia system and
navigation system, the clock is set automati-
cally.
R reset the function for automatically folding
the exterior mirrors in/out by folding the mir-
rors out once(Y page 106) Charging the 12 V battery
G
WARNING
During charging and jump-starting, explosive
gases can escape from the battery. There is a risk of an explosion.
Particularly avoid fire, open flames, creating
sparks and smoking. Ensure there is sufficient
ventilation while charging and jump-starting.
Do not lean over a battery. G
WARNING
Battery acid is caustic. There is a risk of injury. Avoid contact with skin, eyes or clothing. Do
not inhale any battery gases. Do not lean over
the battery. Keep children away from batter- ies. Wash away battery acid immediately with
plenty of clean water and seek medical atten-tion. G
WARNING
A discharged battery can freeze at tempera-
tures below freezing point. When jump-start-
ing the vehicle or charging the battery, gases can escape from the battery. There is a risk of
an explosion.
Allow the frozen battery to thaw out before
charging it or jump-starting.
! Only use battery chargers with a maximum
charging voltage of 14.8 V.
! Only charge the battery using the jump-
starting connection point.
The jump-starting connection point is in the
engine compartment (Y page 343).
X Open the hood.
X Connect the battery charger to the positive
terminal and ground point in the same order
as when connecting the donor battery in the
jump-starting procedure (Y page 343).
Keep away from fire and open flames. Do not
lean over a battery. Never charge the battery if it is still installed in the vehicle, unless you use a
battery charger which has been tested and
approved by Mercedes-Benz. A battery charger
unit specially adapted for Mercedes-Benz vehi-
cles and tested and approved by Mercedes-
Benz is available as an accessory. It permits the
charging of the battery in its installed position.
Contact an authorized Mercedes-Benz Center
for further information and availability. Read the battery charger's operating instructions before
charging the battery.
If, at low temperatures, the indicator lamps/
warning lamps in the instrument cluster do not
light up, it is highly likely that the discharged
battery has frozen. In this case you may neither
jump-start the vehicle nor charge the battery.
The service life of a thawed-out battery may be
shorter. The starting characteristics can be
impaired, particularly at low temperatures. Have
the thawed-out battery checked at a qualified
specialist workshop. 342
Battery (vehicle)Breakdown assistance