lock MERCEDES-BENZ GLE SUV 2019 Owner's Guide
[x] Cancel search | Manufacturer: MERCEDES-BENZ, Model Year: 2019, Model line: GLE SUV, Model: MERCEDES-BENZ GLE SUV 2019Pages: 681, PDF Size: 11.7 MB
Page 135 of 681
Fi
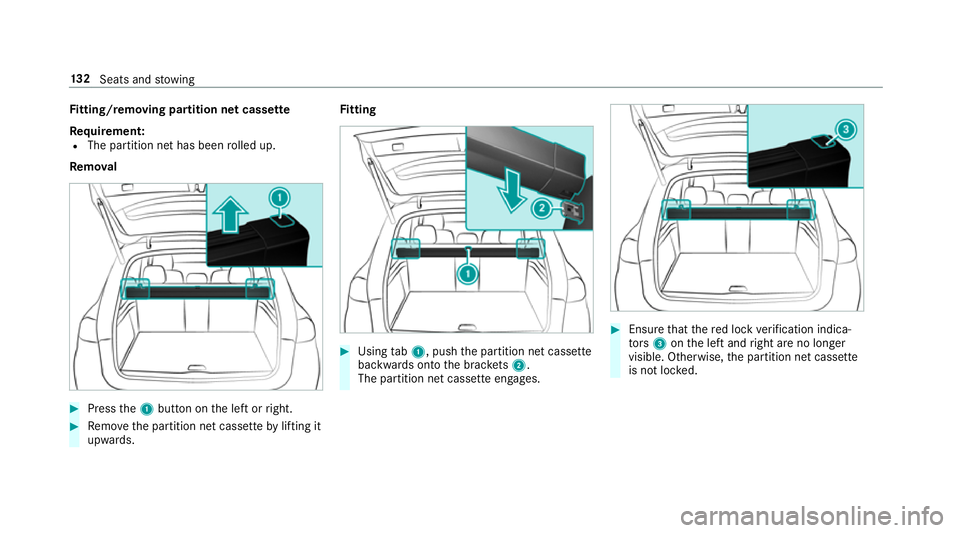
tting/ removing partition net cass ette
Re quirement:
R The partition net has been rolled up.
Re mo val #
Press the1 button on the left or right. #
Remo vethe partition net cassette bylifting it
upwards. Fi
tting #
Using tab1, push the partition net cassette
backwards onto the brac kets 2.
The pa rtition net cassette engages. #
Ensure that there d lock verification indica‐
to rs 3 onthe left and right are no longer
visible. Otherwise, the partition net cassette
is not loc ked. 13 2
Seats and stowing
Page 140 of 681
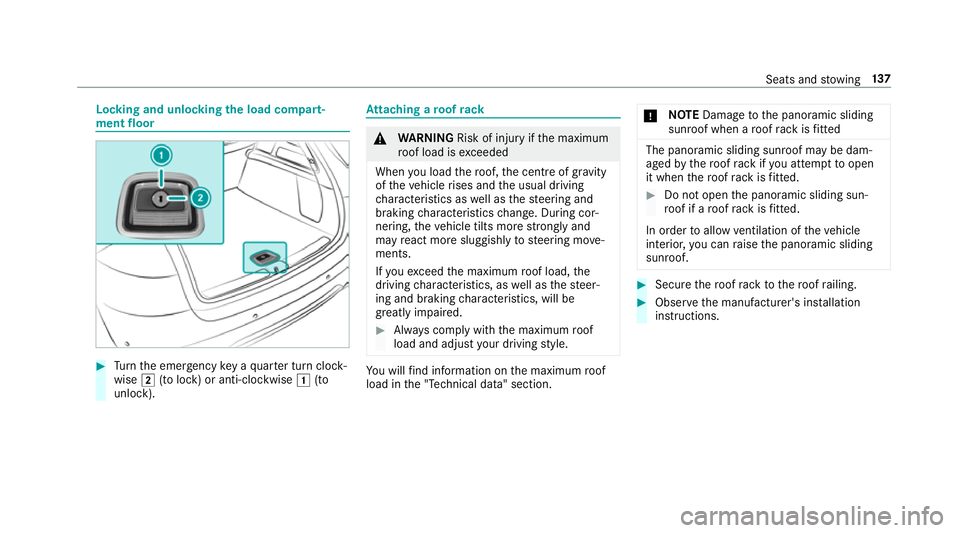
Locking and unlocking
the load compa rt‐
ment floor #
Turn the emer gency key a quarter turn clock‐
wise 2(to lock) or anti-clockwise 1(to
unlock). At
taching a roof rack &
WARNING Risk of inju ryifth e maximum
ro of load is exceeded
When you load thero of, the cent reof gr avity
of theve hicle rises and the usual driving
ch aracteristics as well as thesteering and
braking characteristics change. During cor‐
nering, theve hicle tilts more strongly and
may react more sluggishly tosteering mo ve‐
ments.
If yo uexc eed the maximum roof load, the
driving characteristics, as well as thesteer‐
ing and braking characteristics, will be
great lyimpaired. #
Alw ays comply with the maximum roof
load and adjust your driving style. Yo
u will find information on the maximum roof
load in the "Technical data" section. *
NO
TEDama getothe panoramic sliding
sunroof when a roof rack isfitted The panoramic sliding sunroof may be dam‐
aged
bythero of rack ifyo u attem pttoopen
it when thero of rack isfitted. #
Do not open the panoramic sliding sun‐
ro of if a roof rack isfitted.
In order toallow ventilation of theve hicle
interior, you can raise the panoramic sliding
sunroof. #
Secure thero of rack tothero of railing. #
Obser vethe manufacturer's ins tallation
instructions. Seats and
stowing 137
Page 148 of 681
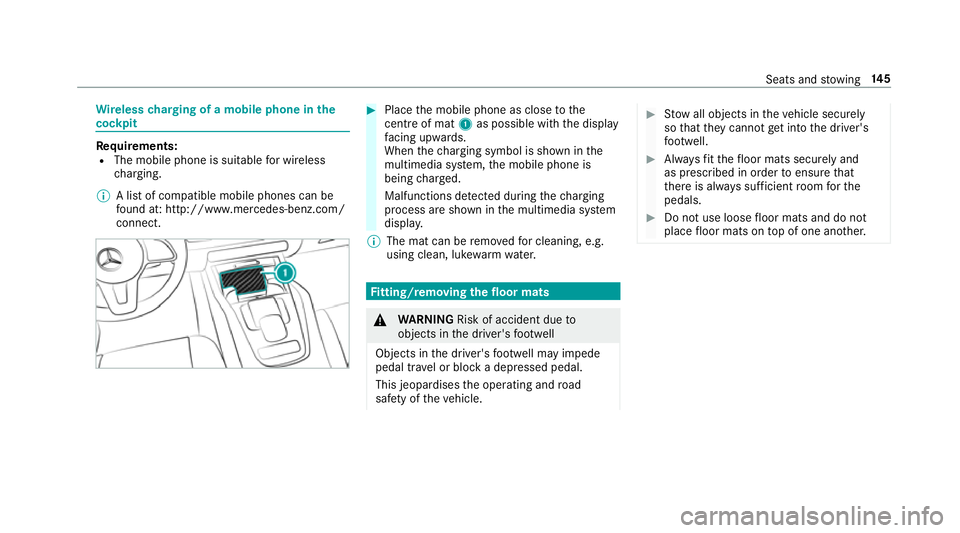
Wire
lesscharging of a mobile phone in the
cockpit Re
quirements:
R The mobile phone is suitable for wireless
ch arging.
% A list of compatible mobile phones can be
found at: http://www.mercedes-benz.com/
connect. #
Place the mobile phone as close tothe
centre of mat 1as possible wi th the display
fa cing up wards.
When thech arging symbol is shown in the
multimedia sy stem, the mobile phone is
being charge d.
Malfunctions de tected du ring thech arging
process are shown in the multimedia sy stem
displa y.
% The mat can be remo vedfo r cleaning, e.g.
using clean, luk ewarmwate r. Fi
tting/ removing the floormats &
WARNING Risk of accident due to
objects in the driver's foot we ll
Objects in the driver's foot we ll may impede
pedal tr avel or block a depressed pedal.
This jeopardises the operating and road
saf ety of theve hicle. #
Stow all objects in theve hicle securely
so that they cannot getinto the driver's
fo ot we ll. #
Alw aysfit th efloor mats securely and
as prescribed in order toensure that
th ere is alw ays suf ficient room forthe
pedals. #
Do not use loose floor mats and do not
place floor mats on top of one ano ther. Seats and
stowing 14 5
Page 161 of 681
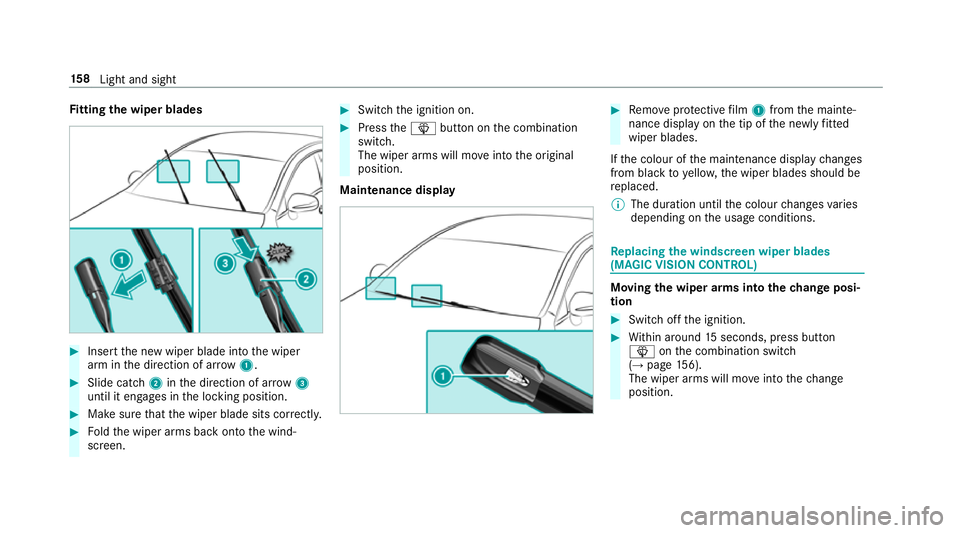
Fi
tting the wiper blades #
Inse rtthe new wiper blade into the wiper
arm in the direction of ar row1. #
Slide catch 2inthe direction of ar row 3
until it engages in the locking position. #
Make sure that the wiper blade sits cor rectly. #
Foldthe wiper arms back onto the wind‐
screen. #
Switch the ignition on. #
Press theî button on the combination
switch.
The wiper arms will mo veinto the original
position.
Maintenance display #
Remo veprotective film 1 from the mainte‐
nance display on the tip of the newly fitted
wiper blades.
If th e colour of the maintenance display changes
from black to yellow, the wiper blades should be
re placed.
% The duration until the colour changes varies
depending on the usage conditions. Re
placing the windsc reen wiper blades
(MAGIC VISION CONT ROL) Moving
the wiper arms into thech ange posi‐
tion #
Switch off the ignition. #
Within around 15seconds, press button
î onthe combination switch
(→ page 156).
The wiper arms will mo veinto thech ange
position. 15 8
Light and sight
Page 181 of 681
Driving
Swit
ching the po wer supp lyor ignition on
without starting the engine &
WARNING Risk of accident and inju ry
due tochildren left unat tended in the
ve hicle
If ch ildren are left unat tended in theve hicle,
th ey could:
R open doo rs,th ereby endangering other
persons or road users.
R get out of theve hicle and be hit by
oncoming traf fic.
R ope rate ve hicle equipment and become
trapped, forex ample.
Moreo ver,ch ildren could also set theve hicle
in motion by,fo rex ample:
R releasing the parking brake.
R shifting the automatic transmission out of
park position j.
R starting the engine. #
Never lea vechildren and animals unat‐
te nded in theve hicle. #
When leaving theve hicle, alw aysta ke
th eke y with you and lock theve hicle.
This also applies tothe Digital Vehicle
Ke y if the "Digital Vehicle Key" function
is activated via Mercedes me connect. #
Keep theve hicle key out of reach of
ch ildren. This also applies tothe Digital
Ve hicle Key if the "Digital Vehicle Key"
function is activated via Mercedes me
connect. &
DANG ER Risk of fata l injuries due to
ex haust gases
Combustion engines emit poisonous exhaust
ga ses such as carbon monoxide. Inhaling
th ese exhaust gases is hazardous tohealth
and can lead topoisoning. #
Never lea vethe engine running in an
enclosed space wi thout suf ficient venti‐
lation. &
WARNING Risk offire caused byflam‐
mable material on theex haust sy stem
Flammable materials brought in byeither ani‐
mals or environmen tal influences may ignite
if th ey come into contact wi thhot parts of
th e engine or exhaust sy stem. #
Therefore, check regularly that there
are no flammable materials in the
engine compartment or on theex haust
sy stem. Re
quirements:
R theke y is in theve hicle and is recognised.
R or: a Digi talVe hicle Key is located in the
mar ked space (→ page179).
R the brake pedal is not depressed. 17 8
Driving and pa rking
Page 185 of 681
R
drive theve hicle in drive program A
or ;.
R change gear before there v counter needle is
Ô ofthewa yto there d area of there v coun‐
te r.
R do not shift down a gear manually in order to
brake.
R avoidoverstra ining theve hicle, e.g. driving at
full thro ttle.
R do not depress the accelera tor pedal past
th e pressure point (kickdown).
R only increase the engine speed gradually and
accelerate theve hicle tofull speed af ter
1, 500 km.
This also applies when the engine or parts of the
driv etra in ha vebeen replaced.
Please also obser vethefo llowing running-in
no tes:
R in cer tain driving and driving saf ety sy stems,
th e sensor sy stem adjusts automatically
while a cer tain dis tance is driven af terthe
ve hicle has been delivered or af terre pairs. Fu
ll sy stem ef fectiveness is not achie ved
until the end of this teach-in process.
R brakepads, brake discs and tyres that are
either new or ha vebeen replaced only ach‐
ie ve optimum braking ef fect and grip af ter
se veral hundred kilom etre s of driving. Com‐
pensate forth ere duced braking ef fect by
applying greater forc eto the brake pedal. Note
s on driving &
WARNING Risk of accident due to
objects in the driver's foot we ll
Objects in the driver's foot we ll may impede
pedal tra vel or block a depressed pedal.
This jeopardises the operating and road
saf ety of theve hicle. #
Stow all objects in theve hicle securely
so that they cannot getinto the driver's
fo ot we ll. #
Alw aysfit th efloor mats securely and
as prescribed in order toensure that th
ere is alw ays suf ficient room forthe
pedals. #
Do not use loose floor mats and do not
place floor mats on top of one ano ther. &
WARNING Risk of accident due to
unsuitable foot we ar
Operating the pedals may be impaired by
we aring unsuitable foot we ar, e.g.:
R plat form shoes
R high-heeled shoes
R slippers #
Alw ayswe ar suitable foot we ar when
driving so that you can operate the ped‐
als safel y. &
WARNING Risk of accident when switch‐
ing off the ignition when driving
If yo u swit choff the ignition while driving,
saf ety functions are restricted or no longer
av ailable. This may af fect the po werst eering 18 2
Driving and pa rking
Page 196 of 681
Au
tomatic transmission DIRECT SELECT le
verFu
nction of the DIRECT SELECT le ver&
WARNING Risk of accident and inju ry
due tochildren left unat tended in the
ve hicle
If ch ildren are left unat tended in theve hicle,
th ey could:
R open doo rs,th ereby endangering other
persons or road users.
R get out of theve hicle and be hit by
oncoming traf fic.
R ope rate ve hicle equipment and become
trapped, forex ample.
Moreo ver,ch ildren could also set theve hicle
in motion by,fo rex ample:
R releasing the parking brake.
R shifting the automatic transmission out of
park position j.
R starting the engine. #
Never lea vechildren and animals unat‐
te nded in theve hicle. #
When leaving theve hicle, alw aysta ke
th eke y with you and lock theve hicle.
This also applies tothe Digital Vehicle
Ke y if the "Digital Vehicle Key" function
is activated via Mercedes me connect. #
Keep theve hicle key out of reach of
ch ildren. This also applies tothe Digital
Ve hicle Key if the "Digital Vehicle Key"
function is activated via Mercedes me
connect. &
WARNING Risk of accident due toincor‐
re ct gearshifting
If th e engine speed is higher than the idle
speed and you en gage the transmission posi‐
tion hork, theve hicle may accelerate
sharply. #
Ifyo u en gage the transmission position
h ork always depress the brake
pedal firm lyand do not accelerate at
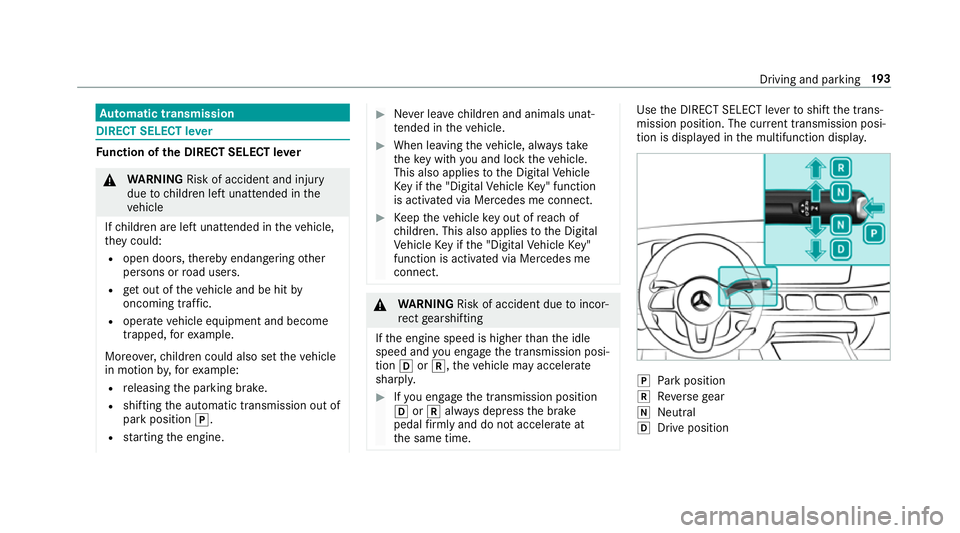
th e same time. Use
the DIRECT SELECT le verto shift the trans‐
mission position. The cur rent transmission posi‐
tion is displ ayed in the multifunction displa y. j
Park position
k Reversege ar
i Neut ral
h Drive position Driving and pa
rking 19 3
Page 205 of 681
%
Do not get into theve hicle again during the
re fuelling process. Otherwise, electros tatic
ch arge could build up again.
Obser vethe no tes on operating fluids
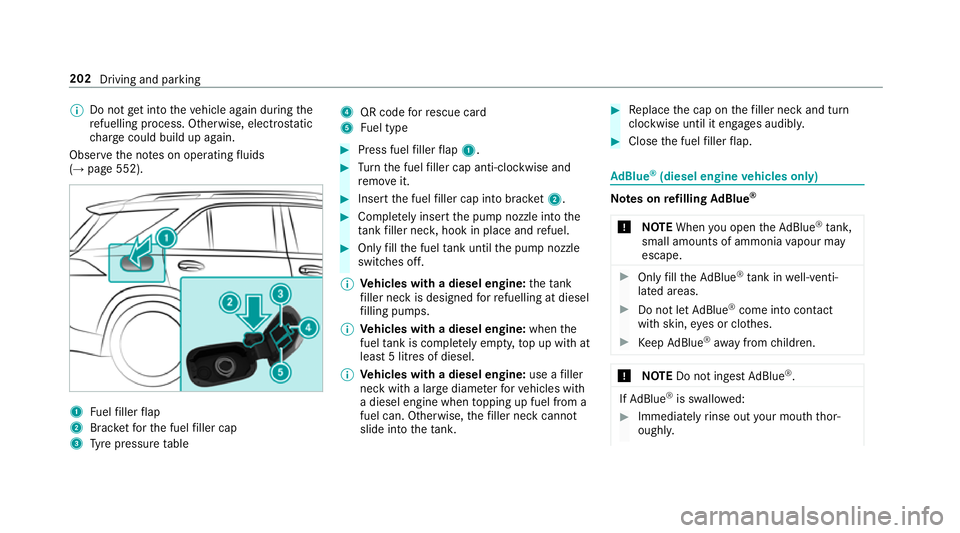
(→ page 552). 1
Fuelfiller flap
2 Brac ketfo rth e fuel filler cap
3 Tyre pressure table 4
QR code forre scue card
5 Fuel type #
Press fuel filler flap 1. #
Turn the fuel filler cap anti-clockwise and
re mo veit. #
Insert the fuel filler cap into brac ket2. #
Comp lete ly inse rtthe pump nozzle into the
ta nk filler nec k,hook in place and refuel. #
Only fill th e fuel tank until the pump nozzle
switches off.
% Vehicles with a diesel engine: theta nk
fi ller neck is designed forre fuelling at diesel
fi lling pumps.
% Vehicles with a diesel engine: whenthe
fuel tank is compl etely em pty, top up with at
least 5 litres of diesel.
% Vehicles with a diesel engine: use afiller
neck with a lar gediame terfo rve hicles with
a diesel engine when topping up fuel from a
fuel can. Otherwise, thefiller neck cannot
slide into theta nk. #
Replace the cap on thefiller neck and turn
clockwise until it engages audibl y. #
Close the fuel filler flap. Ad
Blue ®
(diesel engine vehicles only) Note
s onrefilling AdBlue ®
* NOTEWhen you open theAd Blue ®
tank,
small amounts of ammonia vapour may
escape. #
Only fill th eAd Blue ®
tank in well-venti‐
lated areas. #
Do not let AdBlue ®
come into contact
wi th skin, eyes or clo thes. #
Keep AdBlue ®
aw ay from children. *
NOTEDo not ingest AdBlue ®
. If
Ad Blue ®
is swallo wed: #
Immediately rinse out your mouth thor‐
oughl y. 202
Driving and parking
Page 207 of 681
R
Refill AdBlue Eng. start not possible . The
ve hicle can no longer be star ted.
Yo u can see theAd Blue ®
ra nge and le vel in the
multifunction display (→ page 305).
% The AdBlue ®
ra nge shown depends strongly
on the driving style and operating condi‐
tions. The actual range can therefore deviate
from the calculated range. Opening the
AdBlue ®
filler cap #
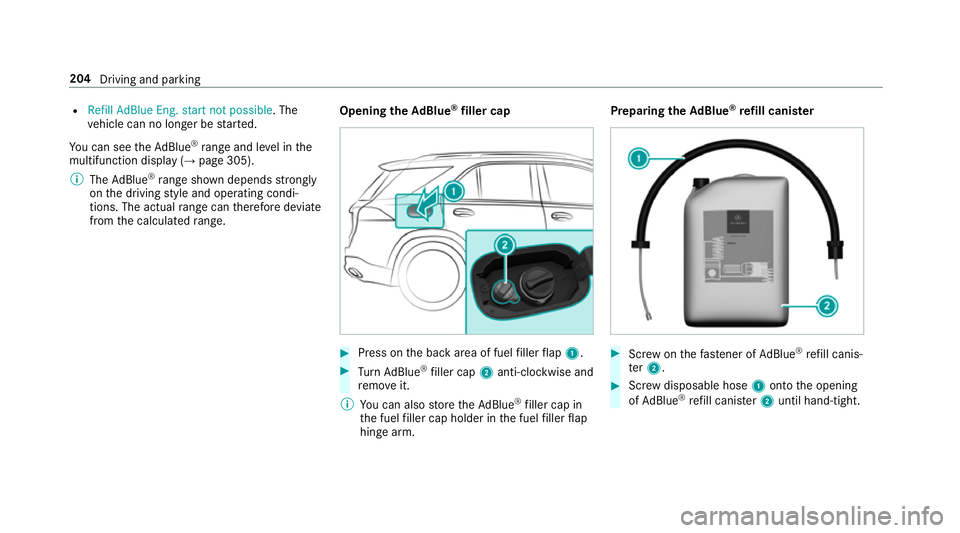
Press on the back area of fuel filler flap 1. #
Turn AdBlue ®
filler cap 2anti-clockwise and
re mo veit.
% You can also store theAd Blue ®
filler cap in
th e fuel filler cap holder in the fuel filler flap
hin gearm. Prepa
ring theAd Blue ®
re fill canis ter #
Screw onthefast ener of AdBlue ®
re fill canis‐
te r2. #
Screw disposable hose 1onto the opening
of Ad Blue ®
re fill canis ter2 until hand-tight. 204
Driving and parking
Page 208 of 681
To
pping up AdBlue ® #
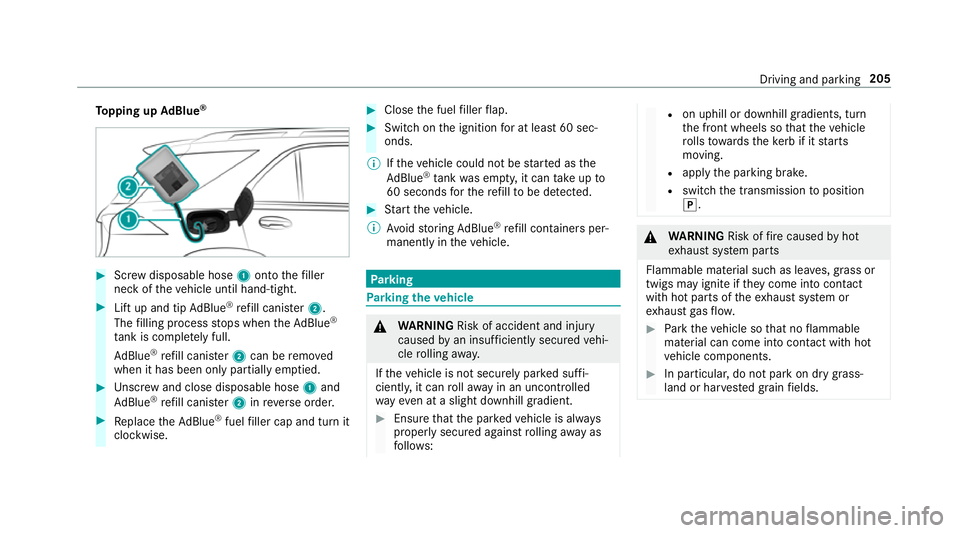
Screw disposable hose 1onto thefiller
neck of theve hicle until hand-tight. #
Lift up and tip AdBlue ®
re fill canis ter2.
The filling process stops when theAd Blue ®
ta nk is compl etely full.
Ad Blue ®
re fill canis ter2 can be remo ved
when it has been only partially em ptied. #
Unscr ew and close disposable hose 1and
Ad Blue ®
re fill canis ter2 inreve rse order. #
Replace theAd Blue ®
fuel filler cap and turn it
clockwise. #
Close the fuel filler flap. #
Swit chon the ignition for at least 60 sec‐
onds.
% Ifth eve hicle could not be star ted as the
Ad Blue ®
tan kwa s em pty, it can take up to
60 seconds forth ere fill to be de tected. #
Start theve hicle.
% Avoid storing AdBlue ®
re fill con tainers per‐
manently in theve hicle. Pa
rking Pa
rking theve hicle &
WARNING Risk of accident and inju ry
caused byan insuf ficiently secu redve hi‐
cle rolling away.
If th eve hicle is not securely par ked suf fi‐
ciently, it can rollaw ay in an uncont rolled
wa yev en at a slight downhill gradient. #
Ensure that the par kedve hicle is alw ays
properly secured against rolling away as
fo llo ws: R
on uphill or downhill gradients, turn
th e front wheels so that theve hicle
ro lls towa rdsth eke rb if it starts
moving.
R apply the parking brake.
R switch the transmission toposition
j. &
WARNING Risk offire caused byhot
ex haust sy stem parts
Flammable material such as lea ves, grass or
twigs may ignite if they come into contact
wi th hot parts of theex haust sy stem or
ex haust gasflow. #
Park theve hicle so that no flammable
material can come into con tact wi thhot
ve hicle components. #
In particular, do not park on dry grass‐
land or har vested grain fields. Driving and parking
205