brake fluid MERCEDES-BENZ GLE43AMG SUV 2017 C292 Owner's Manual
[x] Cancel search | Manufacturer: MERCEDES-BENZ, Model Year: 2017, Model line: GLE43AMG SUV, Model: MERCEDES-BENZ GLE43AMG SUV 2017 C292Pages: 366, PDF Size: 8.61 MB
Page 8 of 366
Ball couplingInstalling ........................................ 201
Removing ....................................... 205
BAS (Brake Assist System) ................. 61
Battery (SmartKey)
Checking .......................................... 74
Important safety notes .................... 74
Replacing ......................................... 74
Battery (vehicle)
Charging ........................................ 313
Display message ............................ 235
Important safety notes .................. 311
Jump starting ................................. 313
Overview ........................................ 311
Blind Spot Assist
Activating/deactivating ................. 214
Display message ............................ 240
Notes/function .............................. 191
Trailer towing ................................. 193
see Active Blind Spot Assist
Blootooth
®
Connecting a different mobile
phone ............................................ 268
BlueTEC
Adding DEF .................................... 142
BlueTEC (DEF) .................................... 355
Bluetooth
®
Searching for a mobile phone ........ 267
see also Digital Operator's Man-
ual .................................................. 263
Telephony ...................................... 266
Brake fluid
Display message ............................ 227
Notes ............................................. 356
Brake force distribution
see EBD (electronic brake force
distribution)
Brake lamps
Display message ............................ 233
Brakes
ABS .................................................. 61
Adaptive Brake Assist ...................... 63
BAS .................................................. 61
Brake fluid (notes) ......................... 356
Display message ............................ 222
Hill start assist ............................... 128
Important safety notes .................. 150 Maintenance .................................. 151
Parking brake ................................ 146
Riding tips ...................................... 150
Warning lamp ................................. 252
Breakdown
Where will I find...? ........................ 306
see Flat tire
see Towing away
Brightness control (instrument
cluster lighting) ................................... 33
C
California
Important notice for retail cus-
tomers and lessees .......................... 25
Calling up a malfunction
see Display messages
Care
360° camera ................................. 303
Car wash ........................................ 299
Carpets .......................................... 305
Display ........................................... 304
Exhaust pipe .................................. 303
Exterior lights ................................ 302
Gear or selector lever .................... 304
Interior ........................................... 304
Matte finish ................................... 301
Notes ............................................. 299
Paint .............................................. 301
Plastic trim .................................... 304
Power washer ................................ 300
Rear view camera .......................... 303
Roof lining ...................................... 305
Seat belt ........................................ 305
Seat cover ..................................... 305
Sensors ......................................... 303
Side running board ........................ 302
Steering wheel ............................... 304
Trim pieces .................................... 305
Washing by hand ........................... 300
Wheels ........................................... 301
Windows ........................................ 302
Wiper blades .................................. 302
Wooden trim .................................. 305
Cargo compartment enlargement
Important safety notes .................. 273
6Index
Page 20 of 366
Overview .......................................... 91
Seat heating problem ......................96
Seat ventilation problem .................. 96
Storing settings (memory func-
tion) ............................................... 102
Switching seat heating on/off ......... 95
Switching seat ventilation on/off .... 96
Section
Sliding sunroof ................................. 86
Selector lever
Cleaning ......................................... 304
Sensors (cleaning instructions) ....... 303
Service message
see ASSYST PLUS
Service products
Brake fluid ..................................... 356
Coolant (engine) ............................ 356
DEF special additives ..................... 355
Engine oil ....................................... 355
Fuel ................................................ 353
Important safety notes .................. 352
Refrigerant (air-conditioning sys-
tem) ............................................... 357
Washer fluid ................................... 357
Setting the air distribution ............... 119
Setting the airflow ............................ 119
Setting the date/time format
see also Digital Operator's Man-
ual .................................................. 263
Setting the language
see also Digital Operator's Man-
ual .................................................. 263
Setting the time
see also Digital Operator's Man-
ual .................................................. 263
Settings
Factory (on-board computer) ......... 217
On-board computer ....................... 215
SETUP (on-board computer) ............. 218
Side impact air bag ............................. 46
Side marker lamp (display mes-
sage) ................................................... 233
Side windows
Cleaning ......................................... 302
Convenience closing feature ............ 84
Convenience opening feature .......... 84
Important safety information ........... 83 Opening/closing .............................. 83
Overview .......................................... 83
Problem (malfunction) ..................... 85
Resetting ......................................... 85
Reversing feature ............................. 83
SIRIUS services
see also Digital Operator's Man-
ual .................................................. 263
Sliding sunro
of
see Panorama roof with power
tilt/sliding panel
SmartKey
Changing the battery ....................... 74
Changing the programming ............. 73
Checking the battery ....................... 74
Convenience closing feature ............ 85
Convenience opening feature .......... 84
Display message ............................ 249
Door central locking/unlocking ....... 71
Important safety notes .................... 71
KEYLESS-GO start function .............. 73
Loss ................................................. 75
Mechanical key ................................ 73
Overview .......................................... 71
Positions (ignition lock) ................. 125
Problem (malfunction) ..................... 75
Starting the engine ........................ 127
Smartphone
Starting the engine ........................ 127
SMS
see also Digital Operator's Man-
ual .................................................. 263
Snow chains
Information .................................... 323
Sockets
Center console .............................. 281
General notes ................................ 280
Luggage compartment ................... 281
Rear compartment ......................... 281
Sound
Switching on/off ........................... 264
Special seat belt retractor .................. 55
Specialist workshop ............................ 28
Speed, controlling
see Cruise control
Speedometer
Digital ............................................ 210
In the Instrument cluster ................. 33
18Index
Page 25 of 366
Overview .......................................... 33
Parking brake ................................ 258
PASSENGER AIR BAG ......................40
Reserv efuel .................................. .259
Restraint system ............................ 258
Seat belt ........................................ 250
Tire pressure monitor .................... 262
Warranty .............................................. 25
Washer fluid
Display message ............................ 248
Weather display (COMAND)
see also Digital Operator's Man-
ual ..................................................2 63
Wheel and tire combinations
Tires ............................................... 345
Wheel bolt tightening torque ........... 345
Wheel chock ...................................... 342
Wheels
Changing a wheel .......................... 341
Checking ........................................ 321
Cleaning ......................................... 301
Emergency spare wheel ................. 346
Important safety notes .................. 321
Information on driving .................... 321
Interchanging/changing ................ 341
Mounting a new wheel ................... 344
Mounting a wheel .......................... 341
Overview ........................................ 321
Removing a wheel .......................... 343
Snow chains .................................. 323
Storing ...........................................3 41
Tightening torque ........................... 345
Wheel size/tire size ....................... 345
Window curtain air bag
Display message ............................ 230
Operation ......................................... 46
Windows
see Side windows
Windshield
Defrosting ...................................... 120
Windshield washer fluid
see Windshield washer system
Windshield washer system
Adding washer fluid ....................... 297
Important safety notes .................. 357
Windshield wi pers
Probl
em (malfunction) ................... 112
Replacing the wiper blades ............ 110 Switching on/off ........................... 109
Winter driving
Slippery road surfaces ................... 153
Winter operation
Overview ........................................ 323
Radiator cover ............................... 295
Winter tires
M+S tires ....................................... 323
Wiper blades
Cleaning ......................................... 302
Replacing ....................................... 110
Replacing (windshield) ................... 110
Wooden trim (cleaning instruc-
tions) .................................................. 305
Z
ZONE function
Switching on/off ........................... 120
Index23
Page 31 of 366
Mercedes-Benz USA, LLC
3 Mercedes Drive
Montvale, NJ 07645-0350
In Canada
Customer Relations Department
Mercedes-Benz Canada, Inc.
98 Vanderhoof Avenue
Toronto, Ontario M4G 4C9
Reporting safety defects
USA only:
The following text is reproduced as required of
all manufacturers under Title 49, Code of U.S.
Federal Regulations, Part 575 pursuant to the
National Traffic and Motor Vehicle Safety Act of
1966.
If you believe that your vehicle has a defect
which could cause a crash or could cause injury
or death, you should immediately inform the
National Highway Traffic Safety Administration
(NHTSA) in addition to notifying Mercedes-Benz
USA, LLC.
If NHTSA receives similar complaints, it may
open an investigation, and if it finds that a safety
defect exists in a group of vehicles, it may order
a recall and remedy campaign. However, NHTSA
cannot become involved in individual problems
between you, your dealer, or Mercedes-Benz
USA, LLC.
To contact NHTSA, you may call the Vehicle
Safety Hotline toll-free at 1-888-327-4236
(TTY: 1-800-424-9153); go to http://
www.safercar.gov; or write to: Administrator,
NHTSA, 400 Seventh Street, SW., Washington,
DC 20590.
You can also obtain other information about
motor vehicle safety from
http://www.safercar.gov
Limited Warranty
!
Follow the instructions in this manual about
the proper operation of your vehicle as well as
about possible vehicle damage. Damage to
your vehicle that arises from culpable contra-
ventions against these instructions is not cov-
ered either by the Mercedes-Benz Limited
Warranty or by the New or Used-Vehicle War-
ranty.
QR codes for the rescue card
The QR codes are secured in the fuel filler flap
and on the opposite side on the B-pillar. In the
event of an accident, rescue services can use
the QR code to quickly find the appropriate res- cue card for your vehicle. The current rescue
card contains the most important information
about your vehicle in a compact form, e.g. the
routing of the electric cables.
You can find more information under http://
portal.aftersales.i.daimler.com/public/
content/asportal/en/communication/
informationen_fuer/QRCode.html.
Data stored in the vehicle
Data storage
A wide range of electronic components in your
vehicle contain data memories.
These data memories temporarily or perma-
nently store technical information about:
Rthe vehicle's operating state
Rincidents
Rmalfunctions
In general, this technical information docu-
ments the state of a component, a module, a
system or the surroundings.
These include, for example:
Roperating conditions of system components,
e.g. fluid levels
Rthe vehicle's status messages and those of its
individual components, e.g. number of wheel
revolutions/speed, deceleration in move-
ment, lateral acceleration, accelerator pedal
position
Rmalfunctions and defects in important system
components, e.g. lights, brakes
Rvehicle reactions and operating conditions in
special driving situations, e.g. air bag deploy-
ment, intervention of stability control sys-
tems
Rambient conditions, e.g. outside temperature
Introduction29
Z
Page 112 of 366
XSwitch on the ignition.
XTurn the combination switch to the corre-
sponding position.
In the ÄorÅ position, the appropriate
wiping frequency is set automatically according
to the intensity of the rain. In the Åposition,
the rain sensor is more sensitive than in
the Ä position, causing the windshield wiper
to wipe more frequently.
Vehicles with MAGIC VISION CONTROL: the
washer fluid is fed through the wiper blades and
when wiping with washer fluid îthe washer
fluid is emitted directly from the blades.
If the wiper blades are worn, the windshield will
no longer be wiped properly. This could prevent
you from observing the traffic conditions.
Replacing the wiper blades
Important safety notes
GWARNING
If the windshield wipers begin to move while
you are changing the wiper blades, you could be trapped by the wiper arm. There is a risk of
injury.
Always switch off the windshield wipers and
ignition before changing the wiper blades.
!Always position the windshield wiper arms
vertically before folding them away from the
windshield. By doing so, you will avoid dam-
age to the hood.
!To avoid damaging the wiper blades, make
sure that you touch only the wiper arm of the
wiper.
!Never open the hood if a windshield wiper
arm has been folded away from the wind-
shield.
Never fold a windshield wiper arm without a
wiper blade back onto the windshield.
Hold the windshield wiper arm firmly when
you change the wiper blade. If you release the
windshield wiper arm without a wiper blade
and it falls onto the windshield, the windshield
may be damaged by the force of the impact.
Mercedes-Benz recommends that you have
the wiper blades changed at a qualified spe-
cialist workshop.
Replacing the wiper blades (standard
wiper blades)
Moving the wiper arms to a vertical posi-
tion
On vehicles without KEYLESS-GO:
XTurn the SmartKey to position 0in the ignition
lock (Ypage 125).
XSet the windshield wiper to position °on
the combination switch.
XTurn the SmartKey to position 1in the ignition
lock (Ypage 125).
XAs soon as the wiper arms are vertical to the
hood, turn the SmartKey to position 0in the
ignition lock (
Ypage 125).
XRemove the SmartKey.
XFold the wiper arms away from the windshield
until you feel them snap into place.
On vehicles with KEYLESS-GO:
XSwitch off the engine.
XRemove your foot from the brake pedal.
XSet the windshield wiper to the °position.
XPress the Start/Stop button repeatedly until
the windshield wiper starts.
XWhen the wiper arms are vertical to the hood,
press the Start/Stop button repeatedly until
the windshield wiper stops.
XFold the wiper arms away from the windshield
until you feel them snap into place.
Removing the wiper blades
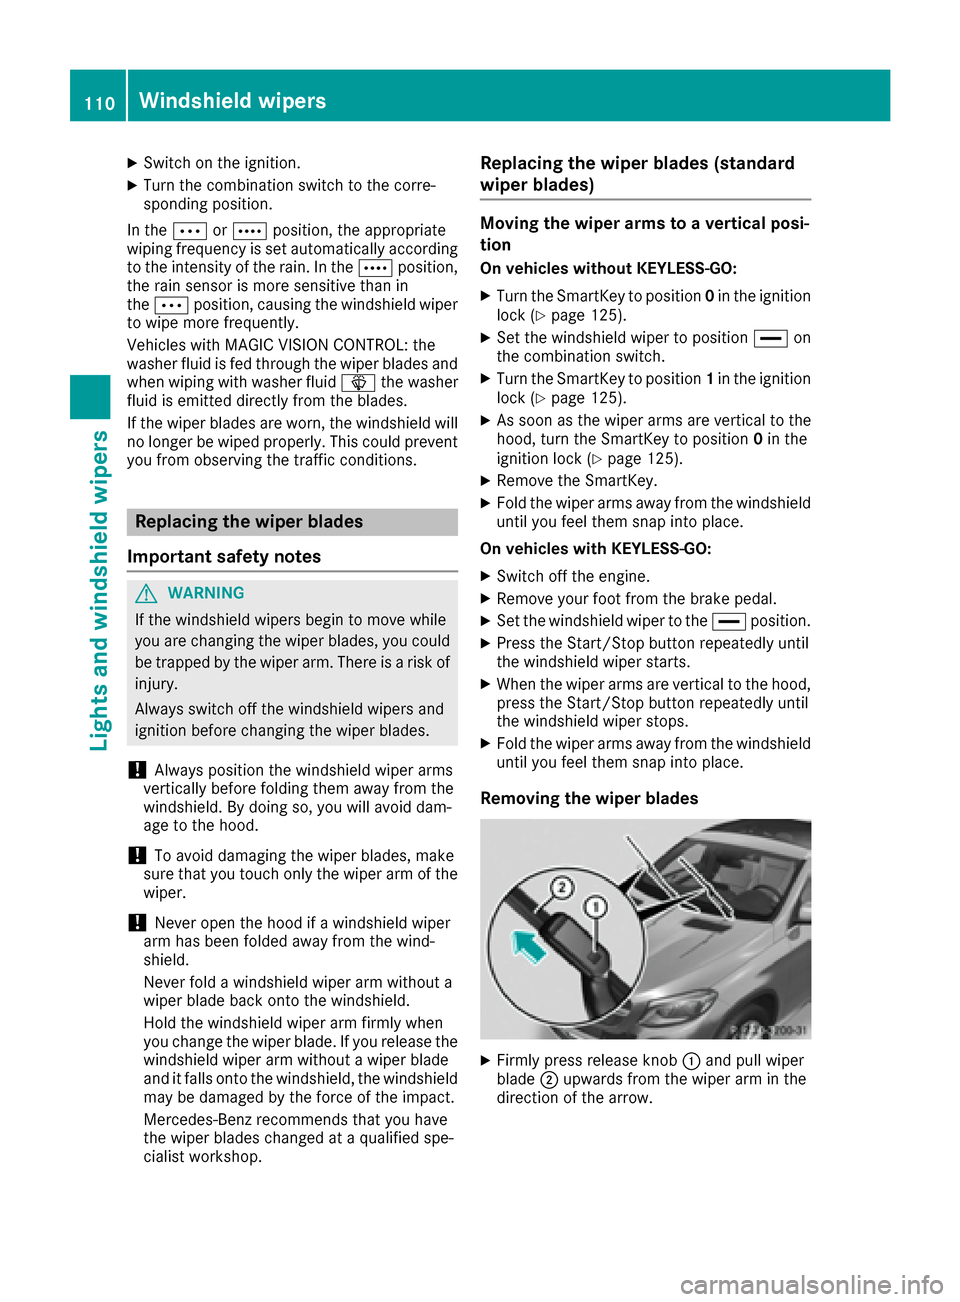
XFirmly press release knob :and pull wiper
blade ;upwards from the wiper arm in the
direction of the arrow.
110Windshield wipers
Lights and windshield wipers
Page 153 of 366
This helps you to avoid overheating the
brakes and wearing them out excessively.
When you take advantage of engine braking, a
drive wheel may not turn for some time, e.g.
on a slippery road surface. This could cause
damage to the drive train. This type of damage is not covered by the Mercedes-Benz war-
ranty.
Do not depress the brake pedal continuously
while the vehicle is in motion, e.g. causing the
brakes to rub by constantly applying light pres-
sure to the pedal. This results in excessive and
premature wear to the brake pads.
Use the left-hand steering wheel paddle shifter
to shift into a lower gear in good time on long
and steep downhill gradients. This is especially
important if the vehicle is laden.
This also applies if you have activated cruise
control, the speed limiter or Distance Pilot
DISTRONIC.
This will use the braking effect of the engine, so
that less braking will be required to maintain the
speed. This relieves the load on the brake sys-
tem and prevents the brakes from overheating
and wearing too quickly.
Heavy and light loads
GWARNING
If you rest your foot on the brake pedal while
driving, the braking system can overheat. This increases the stopping distance and can even
cause the braking system to fail. There is a
risk of an accident.
Never use the brake pedal as a footrest. Never
depress the brake pedal and the accelerator
pedal at the same time.
!Depressing the brake pedal constantly
results in excessive and premature wear to
the brake pads.
If the brakes have been subjected to a heavy
load, do not stop the vehicle immediately. Drive
on for a short while. This allows the airflow to
cool the brakes more quickly.
Wet roads
If you have driven for a long time in heavy rain
without braking, there may be a delayed reac-
tion from the brakes when braking for the first time. This may also occur after the vehicle has
been washed or driven through deep water.
You then have to depress the brake pedal more
firmly. Maintain a greater distance from the
vehicle in front.
After driving on a wet road or having the vehicle
washed, brake firmly while paying attention to
the traffic conditions. This will warm up the
brake discs, thereby drying them more quickly
and protecting them against corrosion.
Limited braking performance on salt-
treated roads
If you drive on salted roads, a layer of salt resi-
due may form on the brake discs and brake
pads. This can result in a significantly longer
braking distance.
RBrake occasionally to remove any possible
salt residue. Make sure that you do not
endanger other road users when doing so.
RCarefully depress the brake pedal and the
beginning and end of a journey.
RMaintain a greater distance to the vehicle
ahead.
Servicing the brakes
!The brake fluid level may be too low, if:
Rif the red brake warning lamp lights up in
the instrument cluster and
Ryou hear a warning tone while the engine is
running
Observe additional warning messages in the
multifunction display.
The brake fluid level may be too low due to
brake pad wear or leaking brake lines.
Have the brake system checked immediately.
Consult a qualified specialist workshop to
arrange this.
!A function or performance test should only
be carried out on a 2-axle dynamometer. If
you wish to operate the vehicle on such a
dynamometer, please consult a qualified spe-
cialist workshop in advance. You could oth-
erwise damage the drive train or the brake
system.
!Because ESP®is an automatic system, the
engine and ignition must be switched off
(SmartKey in position 0or 1or Start/Stop
button in position 0or 1) when the electric
Driving tips151
Driving and parking
Z
Page 154 of 366
parking brake is being tested on a brake dyna-
mometer (maximum 10 seconds).
Braking triggered automatically by ESP
®may
seriously damage the brake system.
All checks and maintenance work on the brake
system must be carried out at a qualified spe-
cialist workshop.
Have brake pads installed and brake fluid
replaced at a qualified specialist workshop.
If the brake system has only been subject to
moderate loads, you should test the functional-
ity of your brakes at regular intervals. To do so,
depress the brake pedal firmly when driving at a high speed. This improves the grip of the brake
pads.
You can find a description of Brake Assist (BAS)
on (
Ypage 61) or of BAS PLUS on (Ypage 67).
Mercedes-Benz recommends that you only have
brake pads/linings installed on your vehicle
which have been approved for Mercedes-Benz
vehicles or which correspond to an equivalent
quality standard. Brake pads/linings which have
not been approved for Mercedes-Benz vehicles
or which are not of an equivalent quality could
affect your vehicle's operating safety.
Mercedes-Benz recommends that you only use
brake fluid that has been specially approved for
your vehicle by Mercedes-Benz, or which corre-
sponds to an equivalent quality standard. Brake
fluid which has not been approved for
Mercedes-Benz vehicles or which is not of an
equivalent quality could affect your vehicle's
operating safety.
Driving on wet roads
Hydroplaning
If water has accumulated to a certain depth on
the road surface, there is a danger of hydro-
planing occurring, even if:
Ryou drive at low speeds.
Rthe tires have adequate tread depth.
For this reason, in the event of heavy rain or in
conditions in which hydroplaning may occur,
you must drive in the following manner:
Rlower your speed.
Ravoid ruts.
Ravoid sudden steering movements.
Rbrake carefully.
Driving on flooded roads
!Do not drive through flooded areas. Check
the depth of any water before driving through
it. Drive slowly through standing water. Oth-
erwise, water may enter the vehicle interior or
the engine compartment. This can damage
the electronic components in the engine or
the automatic transmission. Water can also
be drawn in by the engine's air suction nozzles
and this can cause engine damage.
iVehicles with the AIRMATIC package:
select the raised vehicle level before driving
through a body of water.
Off-road fording
!Under no circumstances should you accel-
erate before entering the water. The bow
wave could cause water to enter and damage
the engine and other assemblies.
!Do not open any of the vehicle's doors while
fording. Otherwise, water could get into the
vehicle interior and damage the vehicle's
electronics and interior equipment.
REstablish how deep the water is and the char-
acteristics of the body of water before ford-
ing.
RSelect the highest possible vehicle level.
RShift to a lower gear using the left-hand steer-
ing wheel paddle shifter.
RAvoid high engine speeds.
REnter and exit the water at a flat place and at
a steady walking pace.
RDrive slowly and at an even speed through the
water.
REnsure that a bow wave does not form as you
drive.
RDo not stop and do not switch off the engine. Water offers a high degree of resistance, and
the ground is slippery and in some cases
unstable. Therefore, it is difficult and danger-
ous to pull away in the water.
RClean any mud from the tire tread after ford-
ing.
RApply the brakes to dry them after fording.
Always observe the fording depth values
(
Ypage 359).
152Driving tips
Driving and parking
Page 229 of 366
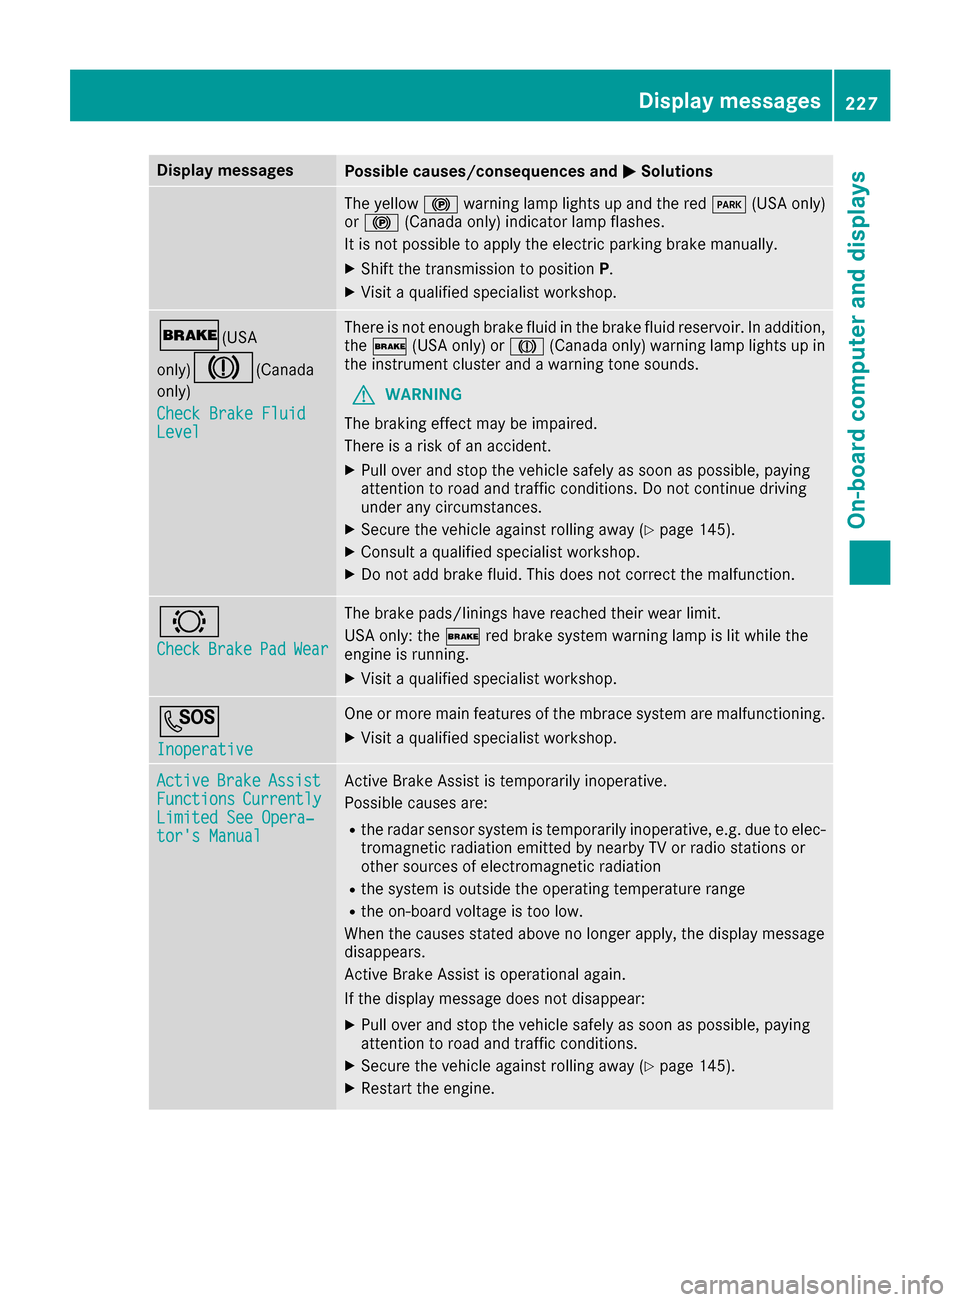
Display messagesPossible causes/consequences andMSolutions
The yellow!warning lamp lights up and th ered F (USAonly)
or ! (Canada only) indicator lamp flashes .
It is no tpossibl eto apply th eelectric parking brak emanually.
XShift th etransmission to position P.
XVisitaqualified specialist workshop .
$(USA
only)
J( Canada
only)
Check Brake Fluid
Level
There is no tenough brak efluid in th ebrak efluid reservoir .In addition ,
th e$ (USAonly) or J(Canada only) warning lamp lights up in
th einstrumen tcluste rand awarning tone sounds.
GWARNIN G
The braking effec tmay be impaired.
There is aris kof an accident.
XPull ove rand stop th evehicl esafely as soo nas possible, payin g
attention to roa dand traffic conditions. Do no tcontinu edrivin g
under any circumstances.
XSecur eth evehicl eagainst rollin gaway (Ypage 145).
XConsult aqualified specialist workshop .
XDo notadd brak efluid .This does no tcorrec tth emalfunction .
#
CheckBrakePadWear
The brak epads/linings hav ereached their wear limit.
US Aonly: th e$ red brak esystem warning lamp is lit while th e
engin eis running.
XVisit aqualified specialist workshop .
G
Inoperative
Oneor mor emain features of th embrace system are malfunctioning .
XVisitaqualified specialist workshop .
ActiveBrakeAssistFunctionsCurrentlyLimitedSee Opera‐tor's Manual
Active Brake Assis tis temporarily inoperative.
Possibl ecauses are:
Rth eradar sensor system is temporarily inoperative, e.g. due to elec -
tromagneti cradiation emitted by nearby TV or radi ostation sor
other source sof electromagneti cradiation
Rth esystem is outside th eoperating temperature range
Rth eon-boar dvoltag eis to olow.
Whe nth ecauses state dabov eno longer apply, th edisplay message
disappears.
Active Brake Assis tis operational again .
If th edisplay message does no tdisappear :
XPull overand stop th evehicl esafely as soo nas possible, payin g
attention to roa dand traffic conditions.
XSecur eth evehicl eagainst rollin gaway (Ypage 145).
XRestart th eengine.
Display messages22 7
On-board computer and displays
Z
Page 254 of 366
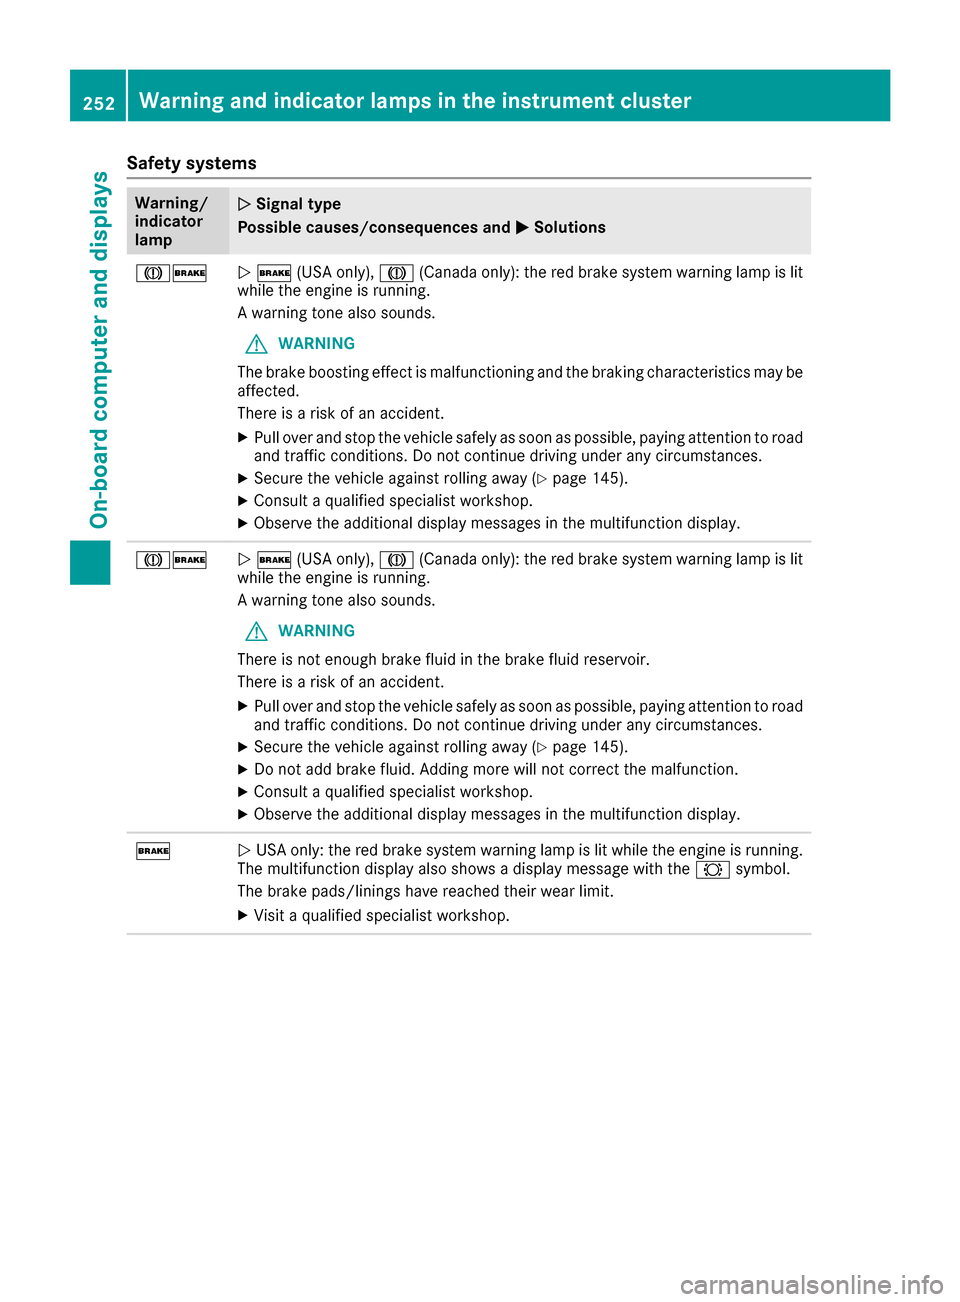
Safety systems
Warning/
indicator
lampNSignal type
Possible causes/consequences and M
Solutions
J$N$ (USA only), J(Canada only): the red brake system warning lamp is lit
while the engine is running.
A warning tone also sounds.
GWARNING
The brake boosting effect is malfunctioning and the braking characteristics may be
affected.
There is a risk of an accident.
XPull over and stop the vehicle safely as soon as possible, paying attention to road
and traffic conditions. Do not continue driving under any circumstances.
XSecure the vehicle against rolling away (Ypage 145).
XConsult a qualified specialist workshop.
XObserve the additional display messages in the multifunction display.
J$N $ (USA only), J(Canada only): the red brake system warning lamp is lit
while the engine is running.
A warning tone also sounds.
GWARNING
There is not enough brake fluid in the brake fluid reservoir.
There is a risk of an accident.
XPull over and stop the vehicle safely as soon as possible, paying attention to road
and traffic conditions. Do not continue driving under any circumstances.
XSecure the vehicle against rolling away (Ypage 145).
XDo not add brake fluid. Adding more will not correct the malfunction.
XConsult a qualified specialist workshop.
XObserve the additional display messages in the multifunction display.
$N USA only: the red brake system warning lamp is lit while the engine is running.
The multifunction display also shows a display message with the #symbol.
The brake pads/linings have reached their wear limit.
XVisit a qualified specialist workshop.
252Warning and indicator lamps in the instrument cluster
On-board computer and displays
Page 303 of 366
Damaged seals or electrical components can
lead to leaks or failures.
Cleaning the paintwork
!Do not affix:
Rstickers
Rfilms
Rmagnetic plates or similar items
to painted surfaces. You could otherwise
damage the paintwork.
Scratches, corrosive deposits, areas affected by
corrosion and damage caused by inadequate
care cannot always be completely repaired. In
such cases, visit a qualified specialist workshop.
XRemove dirt immediately, where possible,
while avoiding rubbing too hard.
XSoak insect remains with insect remover and
rinse off the treated areas afterwards.
XSoak bird droppings with water and rinse off
the treated areas afterwards.
XRemove coolant, brake fluid, tree resin, oils,
fuels and greases by rubbing gently with a
cloth soaked in petroleum ether or lighter
fluid.
XUse tar remover to remove tar stains.
XUse silicone remover to remove wax.
If water no longer forms "beads" on the paint
surface, use the paint care products recommen-
ded and approved by Mercedes-Benz. This is the
case approximately every three to five months,
depending on the climate conditions and the
care product used.
If dirt has penetrated the paint surface or if the
paint has become dull, the paint cleaner reco m-
me
nded and approved by Mercedes-Benz
should be used.
Do not use these care products in the sun or on
the hood while the hood is hot.
XUse a suitable touch-up stick, e.g. MB Touch-
Up Stick, to repair slight damage to the paint- work quickly and provisionally.
Matte finish care
!Never polish the vehicle or the light alloy
wheels. Polishing causes the finish to shine.
!The following may cause the paint to
become shiny and thus reduce the matte
effect:
Rstrong rubbing of the paintwork with
unsuitable materials
Rfrequent use of automatic car washes
Rwashing the vehicle in direct sunlight
!Never use paint cleaner, buffing or polishing
products, or gloss preserver, e.g. wax, for the
purpose of paintwork care. These products
are only suitable for high-gloss surfaces. Their
use on vehicles with matte paintwork leads to considerable surface damage or, more spe-
cifically, to shiny, spotted areas.
Always have paintwork repairs carried out at a
qualified specialist workshop.
!Do not use wash programs with a hot wax
treatment under any circumstances.
Observe these notes if your vehicle has a clear
matte finish. This will help you to avoid damage to the paintwork due to incorrect treatment.
These notes also apply to light alloy wheels with
a clear matte finish.
iThe vehicle should ideally be washed by
hand using a soft sponge, car shampoo and
plenty of water.
iUse only insect remover and car shampoo
from the range of recommended and
approved Mercedes-Benz care products.
Cleaning the vehicle parts
Cleaning the wheels
GWARNING
The water jet from a circular jet nozzle (dirt
blasters) can cause invisible exterior damage
to the tires or chassis components. Compo-
nents damaged in this way may fail unexpect-
edly. There is a risk of an accident.
Do not use power washers with circular jet
nozzles to clean the vehicle. Have damaged
tires or chassis components replaced imme-
diately.
!Do not use acidic wheel cleaning products
to remove brake dust. This could damage
wheel bolts and brake components.
Care301
Maintenance and care
Z