center console MERCEDES-BENZ GLK-Class 2011 X204 Owner's Manual
[x] Cancel search | Manufacturer: MERCEDES-BENZ, Model Year: 2011, Model line: GLK-Class, Model: MERCEDES-BENZ GLK-Class 2011 X204Pages: 304, PDF Size: 13.08 MB
Page 7 of 304
Important safety guidelines
(SmartKey) ....................................... 72
Jump-starting ................................. 256
Replacing (SmartKey) ......................72
Safety notes .................................. 253
Belt
see Seat belts
Brake fluid
Notes ............................................. 298
Brake fluid level ................................ 236
Brake lamp (display message) ......... 184
Brakes ABS .................................................. 62
BAS .................................................. 62
Brake fluid (notes) .........................298
Display message ............................ 182
Important safety notes ..................145
Maintenance .................................. 146
Parking brake ........................ 143, 147
Warning lamp ................................. 195
Breakdown
see Accident (notes)
see Flat tire
Bulbs
Backup lamp .................................. 112
Brake lamp .................................... 112
High-beam headlamps ...................110
License plate lamp .........................113
Low-beam headlamps ....................110
Overview ........................................ 108
Parking lamps ................................ 111
Rear fog lamp ................................ 112
Replacing ....................................... 112
Standing lamps (front) ...................111
Tail lamp ........................................ 112
Turn signal lamp ............................ 112
Turn signals (front) ......................... 111
C
CAC (Customer Assistance Center) .........20
California
Important notice for retail
customers and lessees ....................18
Calling up a malfunction
see Display messages
Capacities
see Technical data
Care
Carpets .......................................... 242
Car wash ........................................ 237
Display ........................................... 241
Gear or selector lever ....................241
Headlamps ..................................... 240
Notes ............................................. 237
Paint .............................................. 239
Plastic trim .................................... 241
Power washer ................................ 238
Rear view camera .......................... 240
Roof lining ...................................... 242
Seat belt ........................................ 242
Seat covers .................................... 242
Sensors ......................................... 240
Steering wheel ............................... 241
Tail pipes ....................................... 241
Trim strips ..................................... 241
Washing by hand ........................... 238
Wheels ........................................... 238
Windows ........................................ 239
Wiper blades .................................. 239
Wooden trim .................................. 241
Cargo compartment cover ............... 210
Cargo compartment enlargement ... 208
Cargo compartment floor Opening/closing ............................ 212
Stowage well (under) .....................212
Cargo net
Attaching ....................................... 211
Important safety information .........211
Cargo tie down rings ......................... 209
CD player/CD changer (on-board
computer) .......................................... 169
Center console ..................................... 29
Central locking Automatic locking (on-board
computer) ...................................... 173
SmartKey ......................................... 68
Changing bulbs
Headlamps ..................................... 107
Changing gears .................................. 136
Changing the programming SmartKey ......................................... 71
Child-proof locks
Rear doors ....................................... 60Index5BA 204.9 USA, CA Edition A 2011; 1; 6, en-USd2mwentsVersion: 3.0.3.62010-06-15T08:58:39+02:00 - Seite 5
Page 8 of 304
ChildrenIn the vehicle ................................... 55
Restraint systems ............................ 56
Child seat
Automatic recognition .....................46
Automatic recognition/air bag
deactivation, self-test ......................48
Display message ............................ 177
LATCH-type (ISOFIX ) child seat
anchors ............................................ 58
Special seat belt retractor ...............58
Top Tether ....................................... 59
Troubleshooting ............................... 49
Cigarette lighter ................................ 216
Classification system for
occupants (OCS) Faults ............................................... 45
Operation ......................................... 41
System self-test ............................... 44
Climate control
Activating/deactivating .................120
Activating/deactivating air-
recirculation mode .........................123
Controlling automatically ...............121
Cooling with air dehumidification ..120
Defrosting the windshield ..............122
Demisting the windows .................. 123
Dual-zone automatic climate
control ........................................... 119
Important safety information .........118
Indicator lamp ................................ 121
Maximum cooling .......................... 122
Problems with "cooling with air
dehumidification" ........................... 121
Problems with the rear window
heating .......................................... 123
Refrigerant ..................................... 298
Setting the air distribution .............121
Setting the airflow .........................122
Setting the air vents ......................124
Setting the temperature ................121
Switching the MONO function on/
off .................................................. 122
Switching the rear window
heating on/off ............................... 123
Clock (on-board computer) ............... 171
Coat hooks ......................................... 212
Cockpit ................................................. 25Collapsible spare wheel
Inflating ......................................... 251
see Emergency spare wheel
Combination switch .......................... 104
Compass ............................................ 227
Consumption statistics (on-board
computer) .......................................... 166
Convenience closing feature .............. 83
Convenience opening feature ............ 83
Coolant (engine) Checking the level .........................234
Display message ............................ 186
Notes ............................................. 298
Temperature gauge ........................ 162
Warning lamp ................................. 201
Cooling
see Climate control
Cornering light (display message) ... 183
Crash-responsive emergency
lighting ............................................... 107
Cruise control Cruise control lever .......................150
Display message ............................ 189
Function/notes ............................. 149
Cup holder ......................................... 214
Center console .............................. 214
Rear compartment .........................214
Current fuel consumption (on-
board computer) ............................... 166
Customer Assistance Center (CAC) ............................................... 20
Customer Relations Department ....... 21
D
Dashboard see Cockpit
Date (on-board computer) ................ 171
Daytime running lamps Display message ............................ 186
Switching on/off (on-board
computer) ...................................... 172
Delayed switch-off
Exterior lighting (on-board
computer) ...................................... 172
Interior lighting (on-board
computer) ...................................... 173
Digital speedometer ......................... 166
6IndexBA 204.9 USA, CA Edition A 2011; 1; 6, en-USd2mwentsVersion: 3.0.3.62010-06-15T08:58:39+02:00 - Seite 6
Page 25 of 304
Exterior view ....................................... 24
Cockpit ................................................. 25
Instrument cluster ..............................26
Multifunction steering wheel .............28
Center console .................................... 29
Overhead control panel ......................30
Door control panel .............................. 3123At a glanceBA 204.9 USA, CA Edition A 2011; 1; 6, en-USd2mwentsVersion: 3.0.3.62010-06-15T08:58:39+02:00 - Seite 23
Page 31 of 304
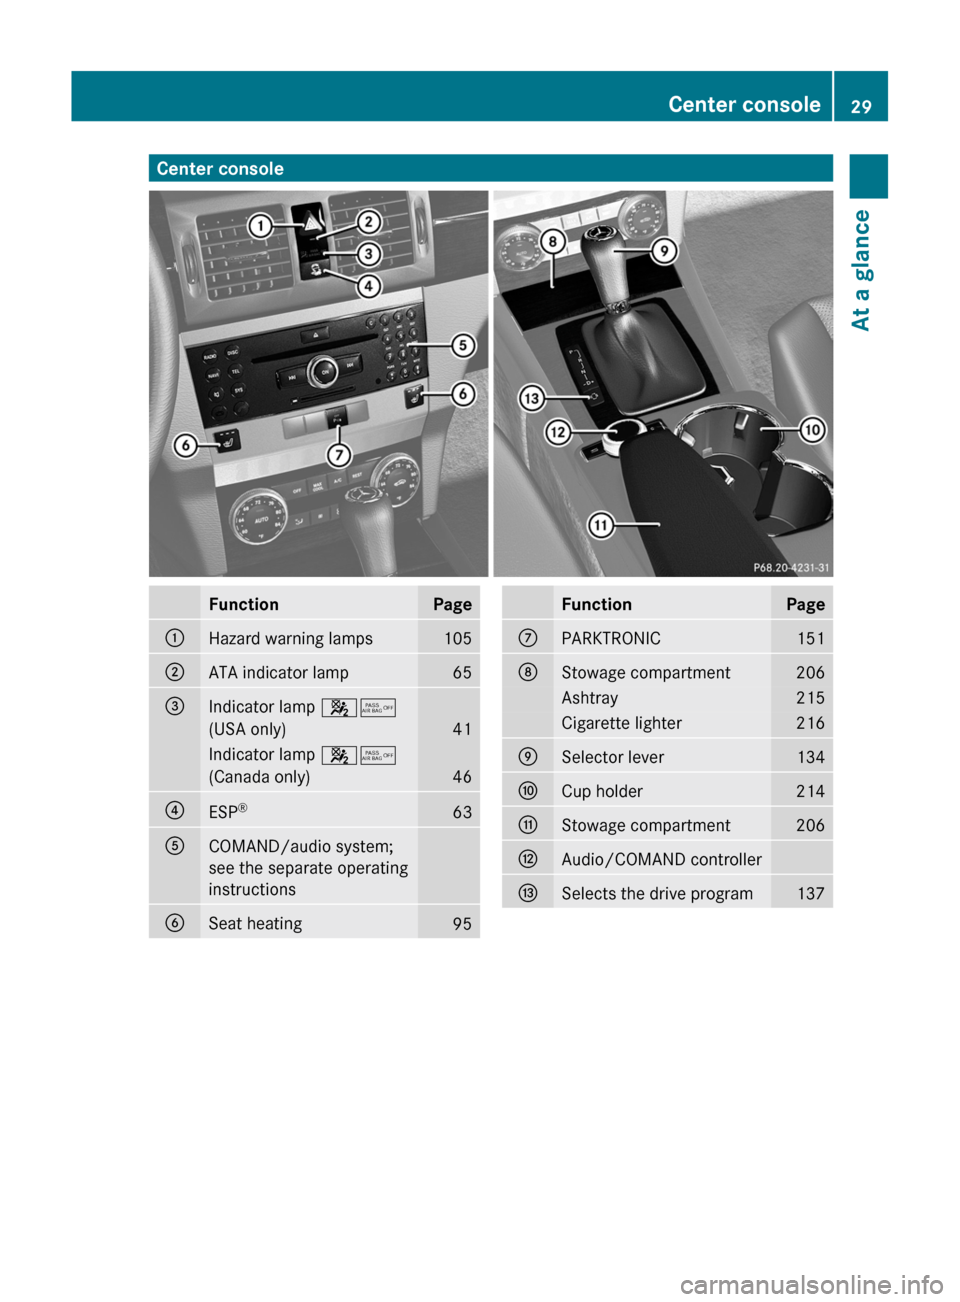
Center consoleFunctionPage:Hazard warning lamps105;ATA indicator lamp65=Indicator lamp 45
(USA only)41
Indicator lamp 45
(Canada only)46
?ESP®63ACOMAND/audio system;
see the separate operating
instructions
BSeat heating95FunctionPageCPARKTRONIC151DStowage compartment206Ashtray215Cigarette lighter216ESelector lever134FCup holder214GStowage compartment206HAudio/COMAND controllerISelects the drive program137Center console29At a glanceBA 204.9 USA, CA Edition A 2011; 1; 6, en-USd2mwentsVersion: 3.0.3.62010-06-15T08:58:39+02:00 - Seite 29
Page 40 of 304
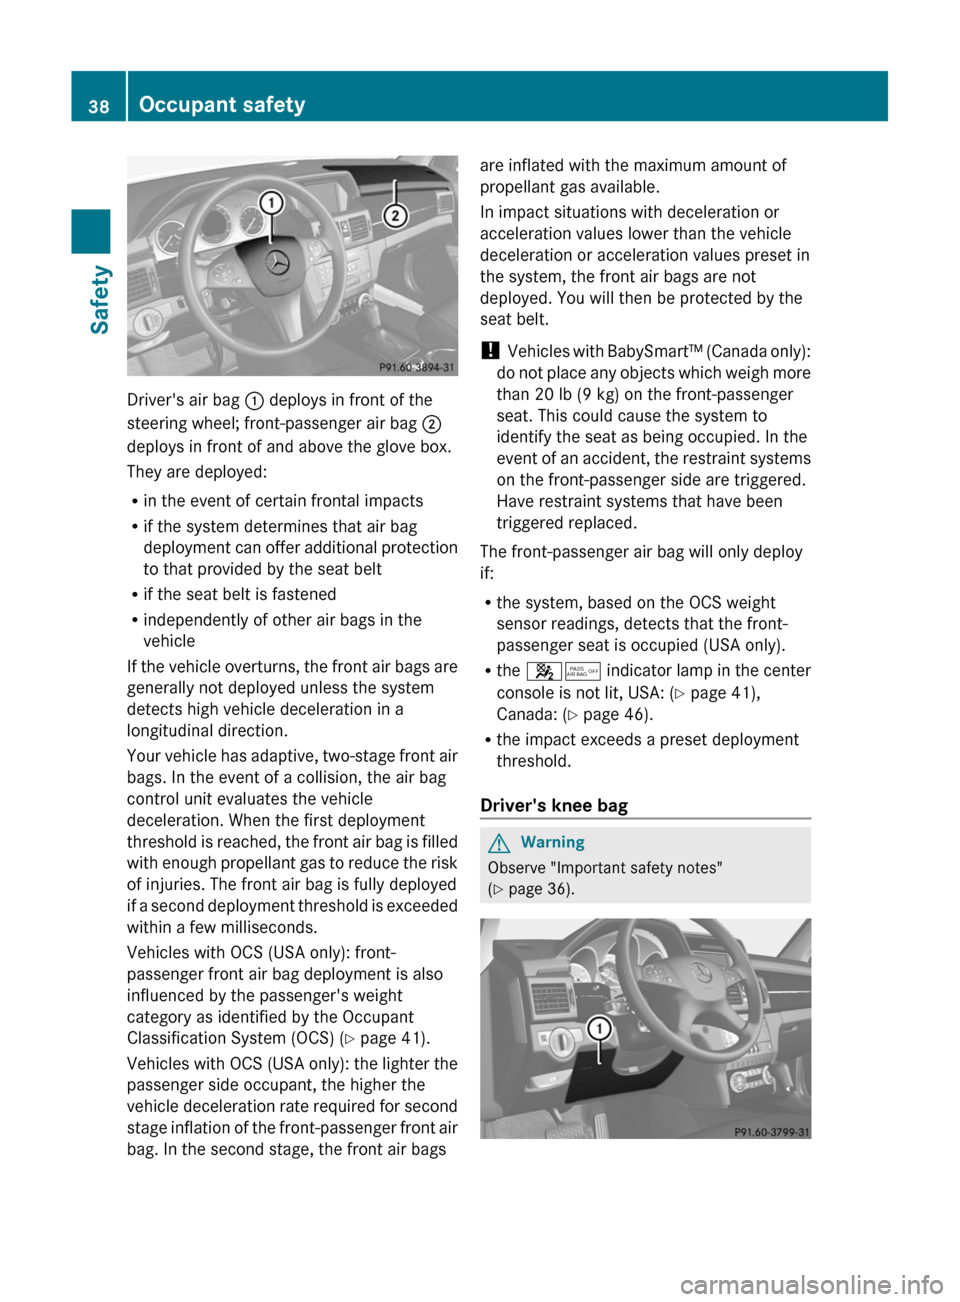
Driver's air bag : deploys in front of the
steering wheel; front-passenger air bag ;
deploys in front of and above the glove box.
They are deployed:
Rin the event of certain frontal impacts
Rif the system determines that air bag
deployment can offer additional protection
to that provided by the seat belt
Rif the seat belt is fastened
Rindependently of other air bags in the
vehicle
If the vehicle overturns, the front air bags are
generally not deployed unless the system
detects high vehicle deceleration in a
longitudinal direction.
Your vehicle has adaptive, two-stage front air
bags. In the event of a collision, the air bag
control unit evaluates the vehicle
deceleration. When the first deployment
threshold is reached, the front air bag is filled
with enough propellant gas to reduce the risk
of injuries. The front air bag is fully deployed
if a second deployment threshold is exceeded
within a few milliseconds.
Vehicles with OCS (USA only): front-
passenger front air bag deployment is also
influenced by the passenger's weight
category as identified by the Occupant
Classification System (OCS) (Y page 41).
Vehicles with OCS (USA only): the lighter the
passenger side occupant, the higher the
vehicle deceleration rate required for second
stage inflation of the front-passenger front air
bag. In the second stage, the front air bags
are inflated with the maximum amount of
propellant gas available.
In impact situations with deceleration or
acceleration values lower than the vehicle
deceleration or acceleration values preset in
the system, the front air bags are not
deployed. You will then be protected by the
seat belt.
! Vehicles with BabySmart™ (Canada only):
do not place any objects which weigh more
than 20 lb (9 kg) on the front-passenger
seat. This could cause the system to
identify the seat as being occupied. In the
event of an accident, the restraint systems
on the front-passenger side are triggered.
Have restraint systems that have been
triggered replaced.
The front-passenger air bag will only deploy
if:
Rthe system, based on the OCS weight
sensor readings, detects that the front-
passenger seat is occupied (USA only).
Rthe 45 indicator lamp in the center
console is not lit, USA: (Y page 41),
Canada: (Y page 46).
Rthe impact exceeds a preset deployment
threshold.
Driver's knee bag
GWarning
Observe "Important safety notes"
(Y page 36).
38Occupant safetySafety
BA 204.9 USA, CA Edition A 2011; 1; 6, en-USd2mwentsVersion: 3.0.3.62010-06-15T08:58:39+02:00 - Seite 38
Page 141 of 304
Problems with the transmissionProblemPossible causes/consequences and M SolutionsThe acceleration ability
is deteriorating.
The transmission no
longer changes gear.The transmission is in emergency mode.
It is only possible to shift into 2nd gear and reverse gear.XStop the vehicle.XShift the transmission to position P.XSwitch off the engine.XWait at least 10 seconds before restarting the engine.XShift the transmission to position D or R.
If D is selected, the transmission shifts into 2nd gear; if R is
selected, the transmission shifts into reverse gear.XHave the transmission checked at a qualified specialist
workshop immediately.Releasing the parking lock manually
In the event of an electrical malfunction, it is
possible to release the selector lever lock
manually to move it out of position P, e.g. if
you wish to tow the vehicle away.
! Do not use any sharp-edged objects to
remove the selector lever cover in the
center console. This can damage the
selector lever cover.
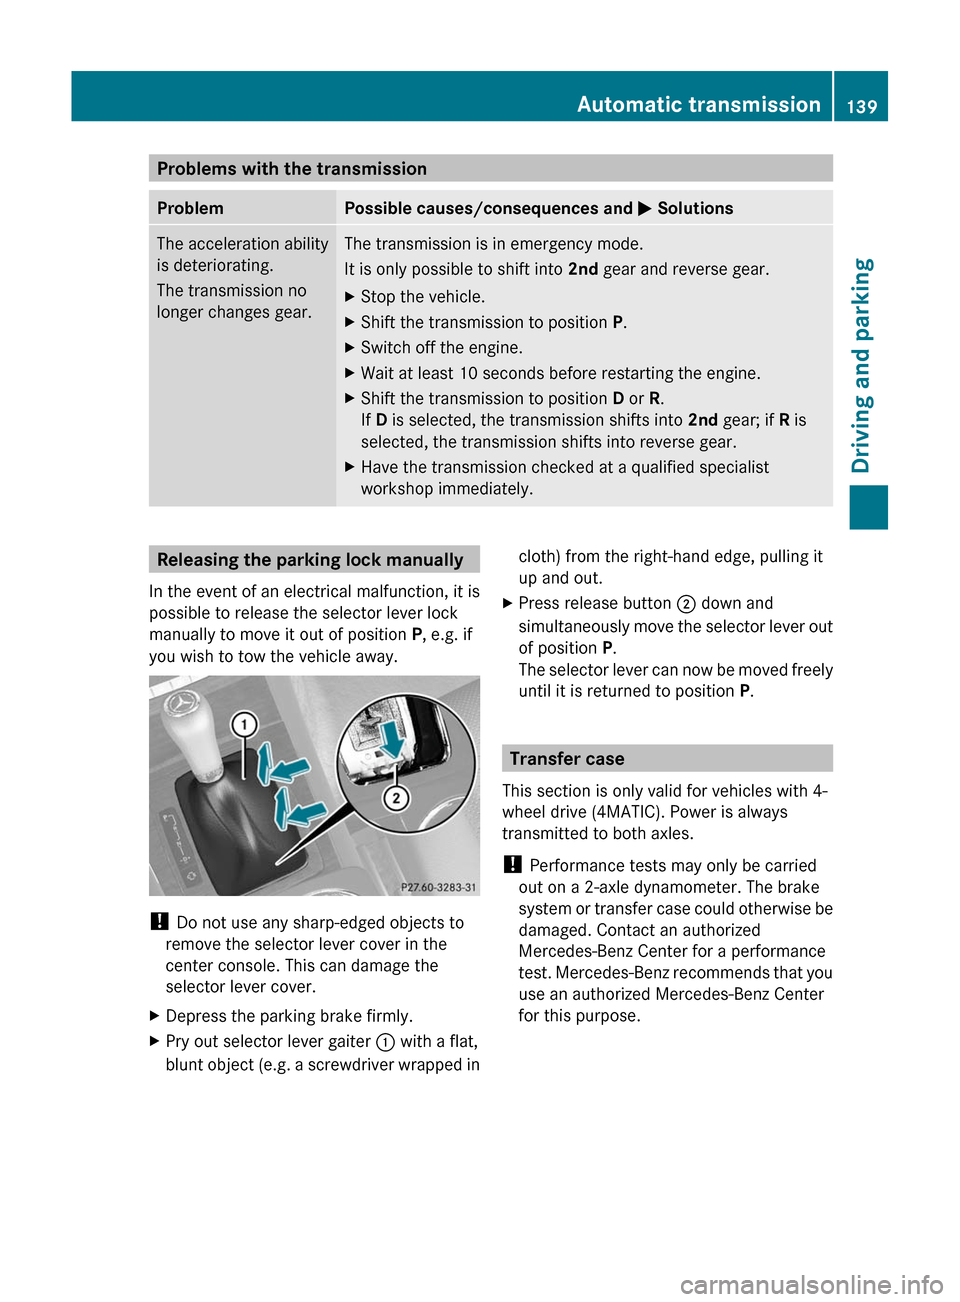
XDepress the parking brake firmly.XPry out selector lever gaiter : with a flat,
blunt object (e.g. a screwdriver wrapped incloth) from the right-hand edge, pulling it
up and out.XPress release button ; down and
simultaneously move the selector lever out
of position P.
The selector lever can now be moved freely
until it is returned to position P.
Transfer case
This section is only valid for vehicles with 4-
wheel drive (4MATIC). Power is always
transmitted to both axles.
! Performance tests may only be carried
out on a 2-axle dynamometer. The brake
system or transfer case could otherwise be
damaged. Contact an authorized
Mercedes-Benz Center for a performance
test. Mercedes-Benz recommends that you
use an authorized Mercedes-Benz Center
for this purpose.
Automatic transmission139Driving and parkingBA 204.9 USA, CA Edition A 2011; 1; 6, en-USd2mwentsVersion: 3.0.3.62010-06-15T08:58:39+02:00 - Seite 139Z
Page 216 of 304
! Mercedes-Benz recommends that you
only use roof carriers that have been tested
and approved for Mercedes-Benz vehicles.
This helps to prevent damage to the
vehicle.
Position the cargo on the roof rack in such
a way that the vehicle will not sustain
damage even when it is in motion.
Ensure that, depending on the vehicle's
equipment, you can raise the panorama
roof with power tilt/sliding panel fully and
open the tailgate fully when the roof carrier
is installed.
Fastening the roof carrierXSecure the roof carrier to the roof rails.XObserve the manufacturer's installation
instructions.
Features
Cup holder
Points to observe before use
GWarning
In order to help prevent spilling liquids on
vehicle occupants and/or vehicle equipment,
only use containers that fit into the cup
holder. Use lids on open containers and do
not fill containers to a height where the
contents, especially hot liquids, could spill
during braking, vehicle maneuvers, or in an
accident. Liquids spilled on vehicle occupants
may cause serious personal injury. Liquids
spilled on vehicle equipment may cause
damage not covered by the Mercedes-Benz
Limited Warranty.
When not in use, keep the cup holder closed.
An open cup holder may cause injury to you
or others when contacted during braking,
vehicle maneuvers, or in an accident.
Keep in mind that objects placed in the cup
holder may come loose during braking,
vehicle maneuvers, or in an accident and be
thrown around in the vehicle interior. Objects
thrown around in the vehicle interior may
cause an accident and/or serious personal
injury.
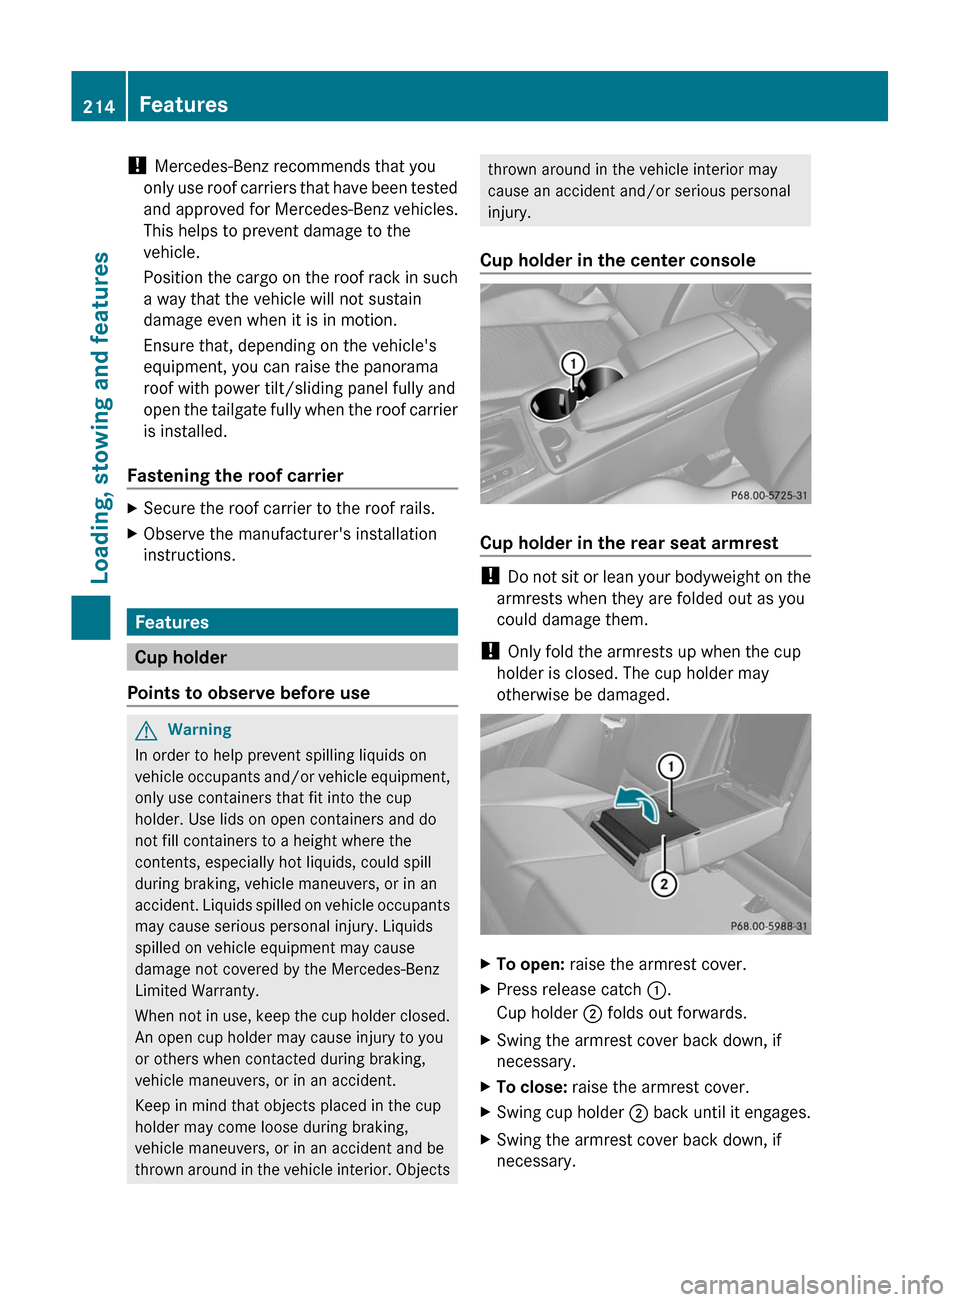
Cup holder in the center console
Cup holder in the rear seat armrest
! Do not sit or lean your bodyweight on the
armrests when they are folded out as you
could damage them.
! Only fold the armrests up when the cup
holder is closed. The cup holder may
otherwise be damaged.
XTo open: raise the armrest cover.XPress release catch :.
Cup holder ; folds out forwards.XSwing the armrest cover back down, if
necessary.XTo close: raise the armrest cover.XSwing cup holder ; back until it engages.XSwing the armrest cover back down, if
necessary.214FeaturesLoading, stowing and features
BA 204.9 USA, CA Edition A 2011; 1; 6, en-USd2mwentsVersion: 3.0.3.62010-06-15T08:58:39+02:00 - Seite 214
Page 218 of 304
XTo refit the insert: press insert = into the
holder until it engages.
XTo close: press cover : briefly at the
front.
The cover moves back.
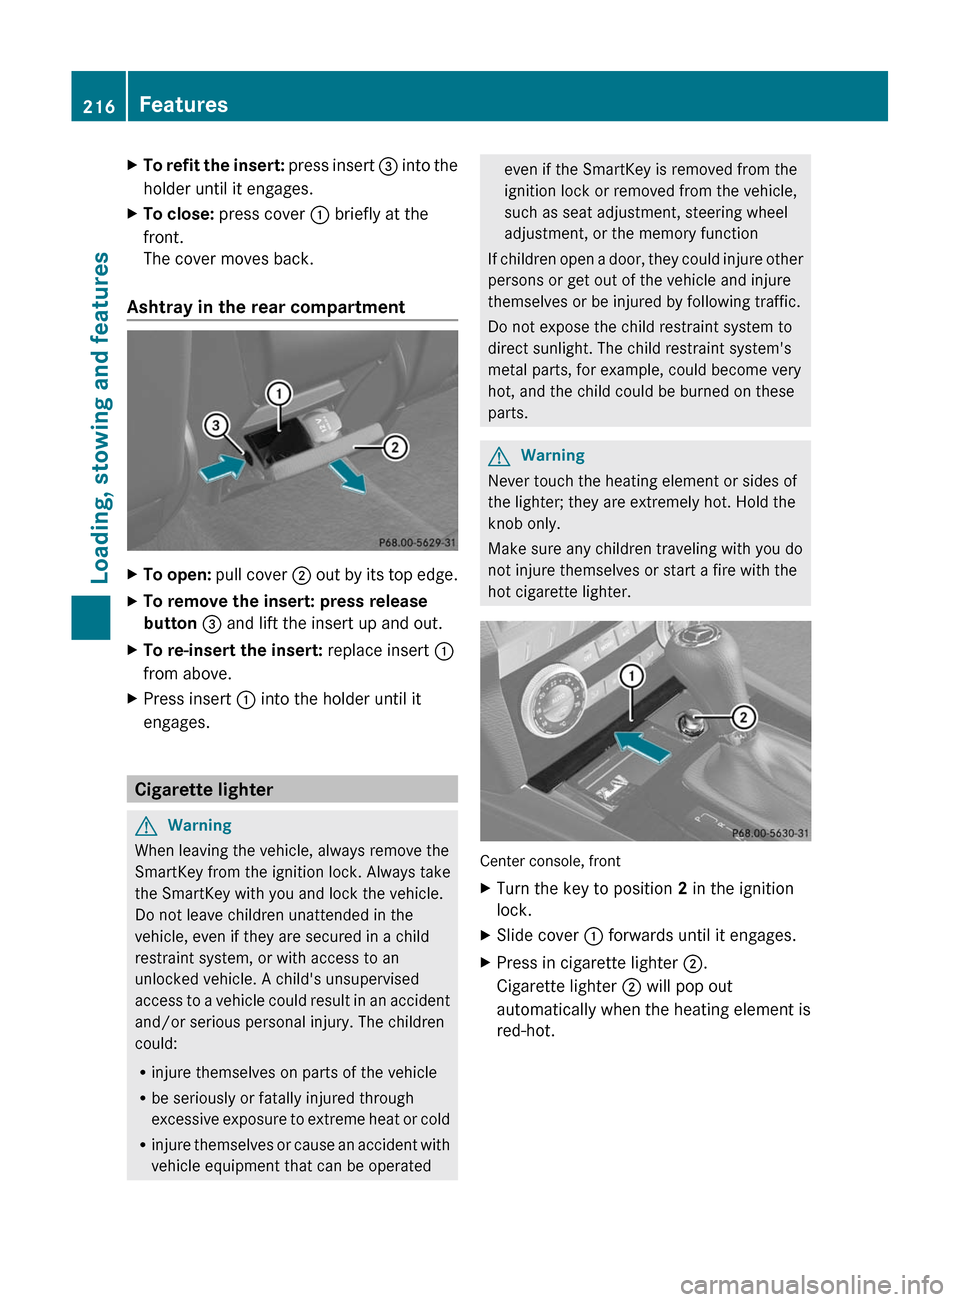
Ashtray in the rear compartment
XTo open: pull cover ; out by its top edge.XTo remove the insert: press release
button = and lift the insert up and out.
XTo re-insert the insert: replace insert :
from above.
XPress insert : into the holder until it
engages.
Cigarette lighter
GWarning
When leaving the vehicle, always remove the
SmartKey from the ignition lock. Always take
the SmartKey with you and lock the vehicle.
Do not leave children unattended in the
vehicle, even if they are secured in a child
restraint system, or with access to an
unlocked vehicle. A child's unsupervised
access to a vehicle could result in an accident
and/or serious personal injury. The children
could:
Rinjure themselves on parts of the vehicle
Rbe seriously or fatally injured through
excessive exposure to extreme heat or cold
Rinjure themselves or cause an accident with
vehicle equipment that can be operated
even if the SmartKey is removed from the
ignition lock or removed from the vehicle,
such as seat adjustment, steering wheel
adjustment, or the memory function
If children open a door, they could injure other
persons or get out of the vehicle and injure
themselves or be injured by following traffic.
Do not expose the child restraint system to
direct sunlight. The child restraint system's
metal parts, for example, could become very
hot, and the child could be burned on these
parts.
GWarning
Never touch the heating element or sides of
the lighter; they are extremely hot. Hold the
knob only.
Make sure any children traveling with you do
not injure themselves or start a fire with the
hot cigarette lighter.
Center console, front
XTurn the key to position 2 in the ignition
lock.
XSlide cover : forwards until it engages.XPress in cigarette lighter ;.
Cigarette lighter ; will pop out
automatically when the heating element is
red-hot.
216FeaturesLoading, stowing and features
BA 204.9 USA, CA Edition A 2011; 1; 6, en-USd2mwentsVersion: 3.0.3.62010-06-15T08:58:39+02:00 - Seite 216
Page 219 of 304
12 V sockets
Points to observe before use
! If you are using all sockets in the vehicle,
make sure that you do not exceed the
maximum current draw of 55 A. Otherwise,
you will overload the fuses.
The socket can be used for accessories with
a maximum power consumption of 180 W,
e.g. lamps or chargers for mobile phones.
If you use the socket for long periods when
the engine is switched off, the battery may
discharge.
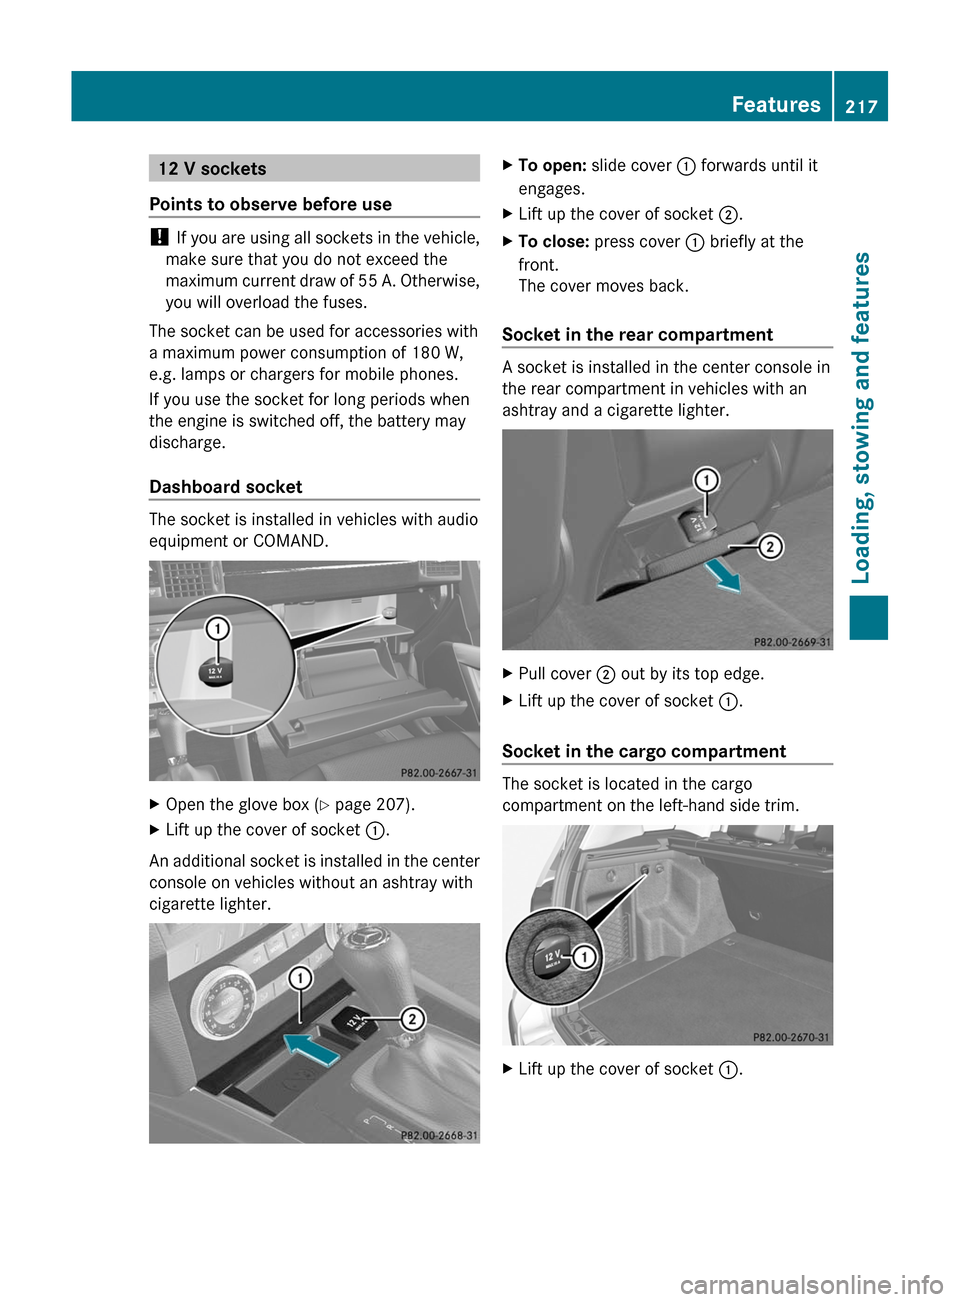
Dashboard socket
The socket is installed in vehicles with audio
equipment or COMAND.
XOpen the glove box (Y page 207).XLift up the cover of socket :.
An additional socket is installed in the center
console on vehicles without an ashtray with
cigarette lighter.
XTo open: slide cover : forwards until it
engages.
XLift up the cover of socket ;.XTo close: press cover : briefly at the
front.
The cover moves back.
Socket in the rear compartment
A socket is installed in the center console in
the rear compartment in vehicles with an
ashtray and a cigarette lighter.
XPull cover ; out by its top edge.XLift up the cover of socket :.
Socket in the cargo compartment
The socket is located in the cargo
compartment on the left-hand side trim.
XLift up the cover of socket :.Features217Loading, stowing and featuresBA 204.9 USA, CA Edition A 2011; 1; 6, en-USd2mwentsVersion: 3.0.3.62010-06-15T08:58:39+02:00 - Seite 217Z
Page 220 of 304
115 V socketGWarning!
The 115V AC socket operates at high voltage.
Use the 115V AC socket in the vehicle with
the same caution and prudence that you
exercise when using power outlets at home.
Keep any fluids away from the 115V AC
socket. Do not clean the socket with fluids or
tapered objects. Keep the 115V AC socket
cover in the closed position, when not in use.
Otherwise, you could suffer an electric shock
and be seriously or even fatally injured.
GWarning!
A device that you connect must have a
suitable plug that complies with U.S.
standards. Never pull on the cable to unplug
a plug from the 115V AC socket. Do not use
a damaged connection cable. The 115V AC
socket may not be connected to another
115V AC power source. Do not use converters
to a grounding plug with the 115V AC socket.
This could cause serious personal injury to
you and/or others.
GWarning!
If the 115V AC socket is damaged or torn out
of the trim, do not use or touch the 115V AC
socket. Using a 115V AC socket that is
damaged or torn out of the trim could cause
serious personal injury to you and/or others.
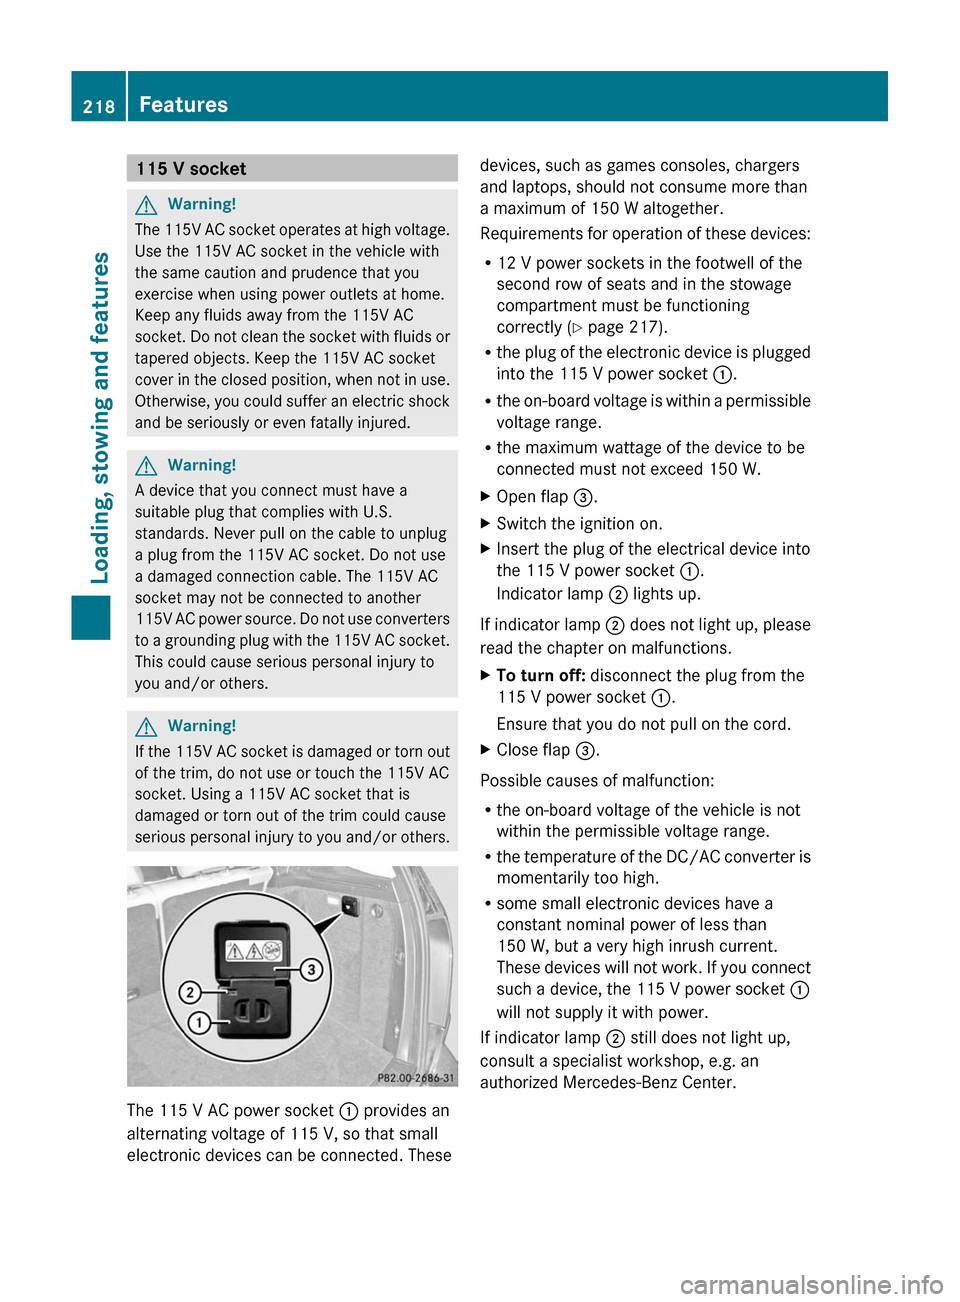
The 115 V AC power socket : provides an
alternating voltage of 115 V, so that small
electronic devices can be connected. These
devices, such as games consoles, chargers
and laptops, should not consume more than
a maximum of 150 W altogether.
Requirements for operation of these devices:
R12 V power sockets in the footwell of the
second row of seats and in the stowage
compartment must be functioning
correctly (Y page 217).
Rthe plug of the electronic device is plugged
into the 115 V power socket :.
Rthe on-board voltage is within a permissible
voltage range.
Rthe maximum wattage of the device to be
connected must not exceed 150 W.
XOpen flap =.XSwitch the ignition on.XInsert the plug of the electrical device into
the 115 V power socket :.
Indicator lamp ; lights up.
If indicator lamp ; does not light up, please
read the chapter on malfunctions.
XTo turn off: disconnect the plug from the
115 V power socket :.
Ensure that you do not pull on the cord.
XClose flap =.
Possible causes of malfunction:
Rthe on-board voltage of the vehicle is not
within the permissible voltage range.
Rthe temperature of the DC/AC converter is
momentarily too high.
Rsome small electronic devices have a
constant nominal power of less than
150 W, but a very high inrush current.
These devices will not work. If you connect
such a device, the 115 V power socket :
will not supply it with power.
If indicator lamp ; still does not light up,
consult a specialist workshop, e.g. an
authorized Mercedes-Benz Center.
218FeaturesLoading, stowing and features
BA 204.9 USA, CA Edition A 2011; 1; 6, en-USd2mwentsVersion: 3.0.3.62010-06-15T08:58:39+02:00 - Seite 218