height adjustment MERCEDES-BENZ GLK-Class 2011 X204 Owner's Manual
[x] Cancel search | Manufacturer: MERCEDES-BENZ, Model Year: 2011, Model line: GLK-Class, Model: MERCEDES-BENZ GLK-Class 2011 X204Pages: 304, PDF Size: 13.08 MB
Page 54 of 304
ribs or abdomen, which could severely
injure internal organs such as your liver or
spleen.
Adjust the seat belt so that the shoulder
section is located as close as possible to
the middle of the shoulder. It should not
touch the neck. Never pass the shoulder
portion of the seat belt under your arm. For
this purpose, you can adjust the height of
the seat belt outlet.
R Position the lap belt as low as possible on
your hips and not across the abdomen. If
the lap belt is positioned across your
abdomen, it could cause serious injuries in
a crash.
R Never wear seat belts over rigid or
breakable objects in or on your clothing,
such as eyeglasses, pens, keys etc., as
these might cause injuries.
R Make sure the seat belt is always fitted
snugly. Take special care of this when
wearing loose clothing.
R Never use a seat belt for more than one
person at a time. Do not fasten a seat belt
around a person and another person or
other objects at the same time.
R Seat belts should not be worn twisted. In a
crash, you would not have the full width of
the seat belt to distribute impact forces.
The twisted seat belt against your body
could cause injuries.
R Pregnant women should also always use a
lap-shoulder belt. The lap belt portion
should be positioned as low as possible on
the hips to avoid any possible pressure on
the abdomen.
R Place the seat backrest in a position that is
as upright as possible.
R Check your seat belt during travel to make
sure it is properly positioned.
R Never place your feet on the instrument
panel, dashboard, or on the seat. Alwayskeep both feet on the floor in front of the
seat.
R When using a seat belt to secure infant
restraints, toddler restraints, or children in
booster seats, always follow the child seat
manufacturer's instructions.GWarning
Do not pass seat belts over sharp edges. They
could tear.
Do not allow the seat belt to get caught in the
door or in the seat adjustment mechanism.
This could damage the seat belt.
Never attempt to make modifications to seat
belts. This could impair the effectiveness of
the seat belts.
Fastening seat belts
GWarning
According to accident statistics, children are
safer when properly restrained on the rear
seats than on the front-passenger seat. Thus,
we strongly recommend that children be
placed in the rear seat whenever possible.
Regardless of seating position, children 12
years old and under must be seated and
properly secured in an appropriately sized
child restraint system or booster seat
recommended for the size and weight of the
child. For additional information, see the
"Children in the vehicle" section.
A child's risk of serious or fatal injuries is
significantly increased if the child restraints
are not properly secured in the vehicle and/
or the child is not properly secured in the child
restraint.
GWarning
Canada only: children 12 years old and under
may ride on the front seat if a BabySmart™
compatible child restraint system is installed
on the front-passenger seat. Use only
Mercedes-Benz approved BabySmart™
compatible child restraint systems. A
BabySmart™ compatible child restraint
52Occupant safetySafety
BA 204.9 USA, CA Edition A 2011; 1; 6, en-USd2mwentsVersion: 3.0.3.62010-06-15T08:58:39+02:00 - Seite 52
Page 55 of 304
system will deactivate the front-passenger
front air bag when installed correctly. The
front-passenger front air bag will not be
deactivated if the child restraint systems that
are installed are not BabySmart™ compatible
or if BabySmart™ compatible child restraint
systems are not installed correctly. If the
front-passenger front air bag is deployed in a
collision, the child will be struck by the air bag.
If this happens, serious or fatal injury will
result.
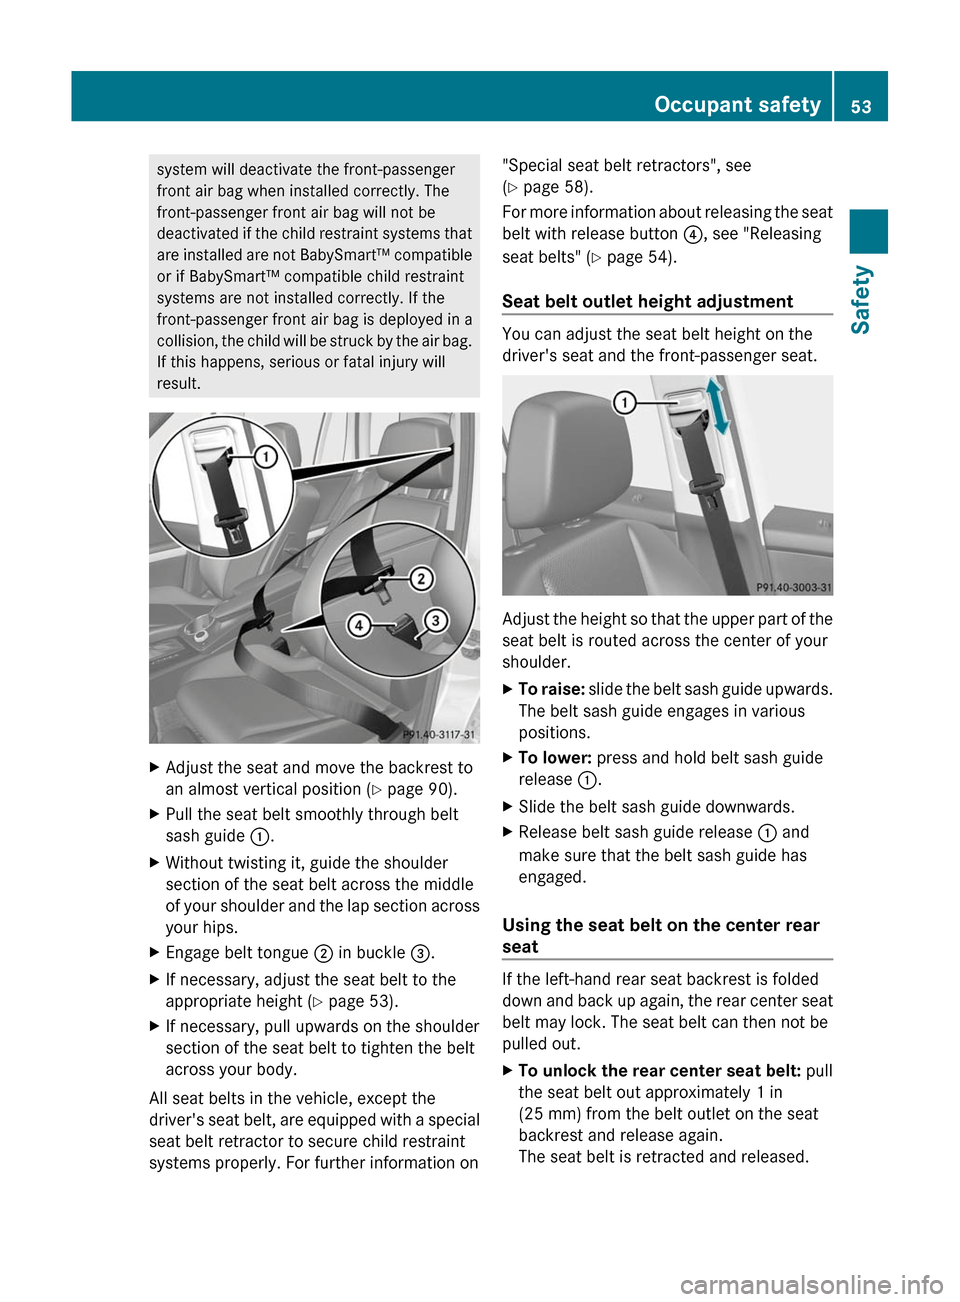
XAdjust the seat and move the backrest to
an almost vertical position (Y page 90).
XPull the seat belt smoothly through belt
sash guide :.
XWithout twisting it, guide the shoulder
section of the seat belt across the middle
of your shoulder and the lap section across
your hips.
XEngage belt tongue ; in buckle =.XIf necessary, adjust the seat belt to the
appropriate height (Y page 53).
XIf necessary, pull upwards on the shoulder
section of the seat belt to tighten the belt
across your body.
All seat belts in the vehicle, except the
driver's seat belt, are equipped with a special
seat belt retractor to secure child restraint
systems properly. For further information on
"Special seat belt retractors", see
(Y page 58).
For more information about releasing the seat
belt with release button ?, see "Releasing
seat belts" (Y page 54).
Seat belt outlet height adjustment
You can adjust the seat belt height on the
driver's seat and the front-passenger seat.
Adjust the height so that the upper part of the
seat belt is routed across the center of your
shoulder.
XTo raise: slide the belt sash guide upwards.
The belt sash guide engages in various
positions.
XTo lower: press and hold belt sash guide
release :.
XSlide the belt sash guide downwards.XRelease belt sash guide release : and
make sure that the belt sash guide has
engaged.
Using the seat belt on the center rear
seat
If the left-hand rear seat backrest is folded
down and back up again, the rear center seat
belt may lock. The seat belt can then not be
pulled out.
XTo unlock the rear center seat belt: pull
the seat belt out approximately 1 in
(25 mm) from the belt outlet on the seat
backrest and release again.
The seat belt is retracted and released.
Occupant safety53SafetyBA 204.9 USA, CA Edition A 2011; 1; 6, en-USd2mwentsVersion: 3.0.3.62010-06-15T08:58:39+02:00 - Seite 53Z
Page 94 of 304
Do not drive the vehicle without the seat head
restraints. Head restraints are intended to
help reduce injuries during an accident.
! To avoid damage to the seats and the seat
heating, observe the following information:
R do not spill any liquids on the seats. If
liquid is spilled on the seats, dry them as
soon as possible.
R if the seat covers are damp or wet, do not
switch on the seat heating. The seat
heating should also not to be used to dry
the seats.
R clean the seat covers as recommended;
see the " Interior care" section.
R do not transport heavy loads on the
seats. Do not place sharp objects on the
seat cushions, e.g. knives, nails or tools.
The seats should only be occupied by
passengers, if possible.
R when the seat heating is in operation, do
not cover the seats with insulating
materials, e.g. covers, bags, seat covers,
child seats or booster seats.
! When you move the seats, make sure that
there are no objects in the footwell or
behind the seats. Otherwise, you could
damage the seats and the objects.
i The head restraints in the front seats are
installed with the NECK-PRO system
( Y page 49). For this reason, it is not
possible to remove the head restraints
from the front seats.
The rear-compartment head restraints can
be removed ( Y page 94).
Please contact an authorized Mercedes-
Benz Center for more information.
i Related topics:
R Cargo compartment enlargement
(folding the rear bench seat forwards)
( Y page 208)Adjusting the seats
i Vehicles without the memory function:
the seats can be adjusted within five
minutes of opening a front door.
The time span starts over if, within these
five minutes, you:
R open or close a front door
R insert the key into or remove the key
from the ignition lock
R switch the ignition on or off.
If the key is in position 2 in the ignition, you
can adjust the seats at any time.
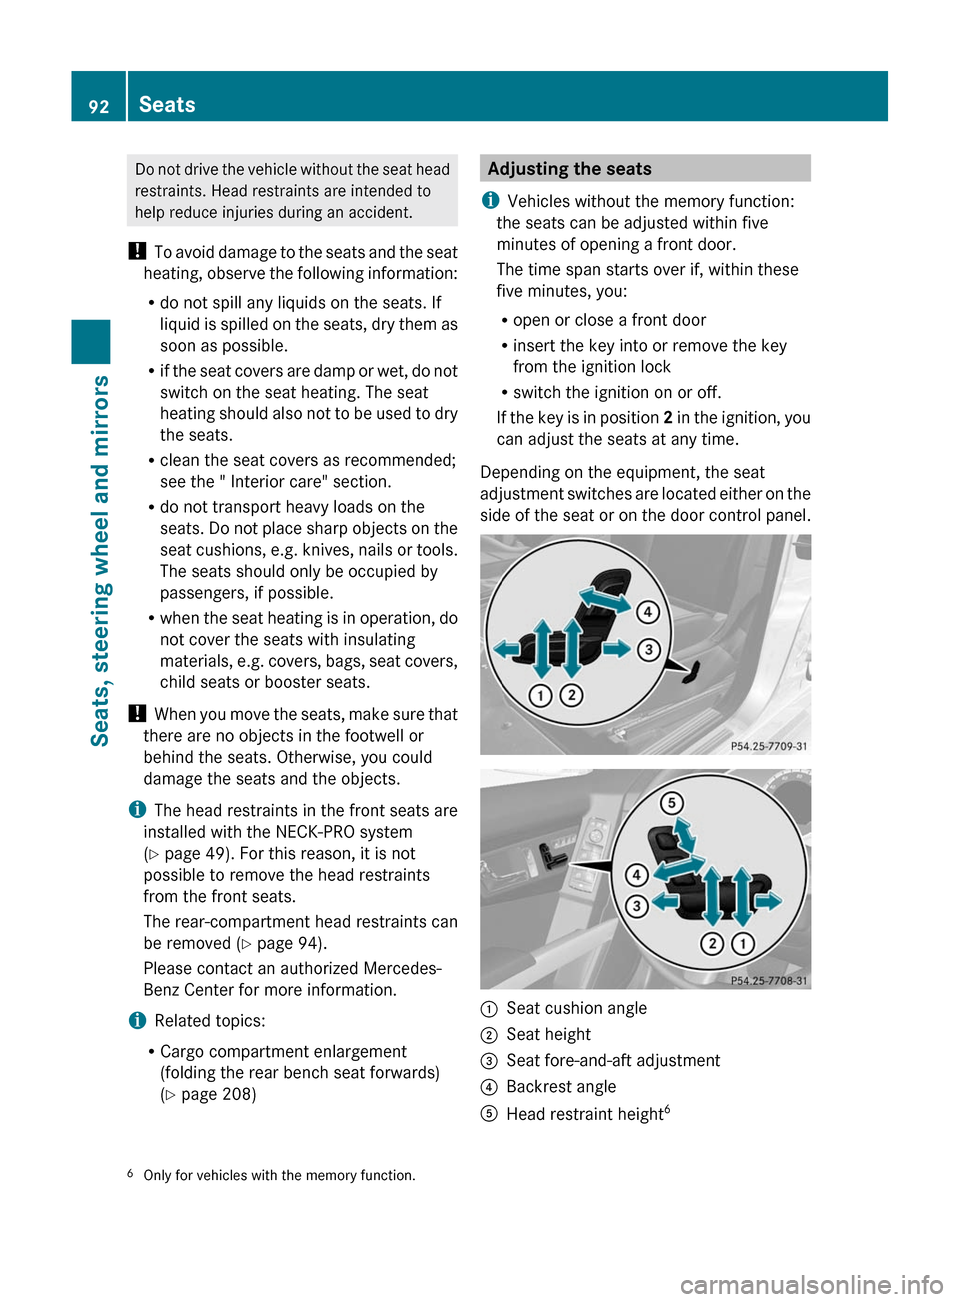
Depending on the equipment, the seat
adjustment switches are located either on the
side of the seat or on the door control panel.:Seat cushion angle;Seat height=Seat fore-and-aft adjustment?Backrest angleAHead restraint height 66
Only for vehicles with the memory function.92SeatsSeats, steering wheel and mirrors
BA 204.9 USA, CA Edition A 2011; 1; 6, en-USd2mwentsVersion: 3.0.3.62010-06-15T08:58:39+02:00 - Seite 92
Page 95 of 304
iYou can store the seat settings using the
memory function (Y page 100).
Adjusting the head restraints
Adjusting the head restraints manually
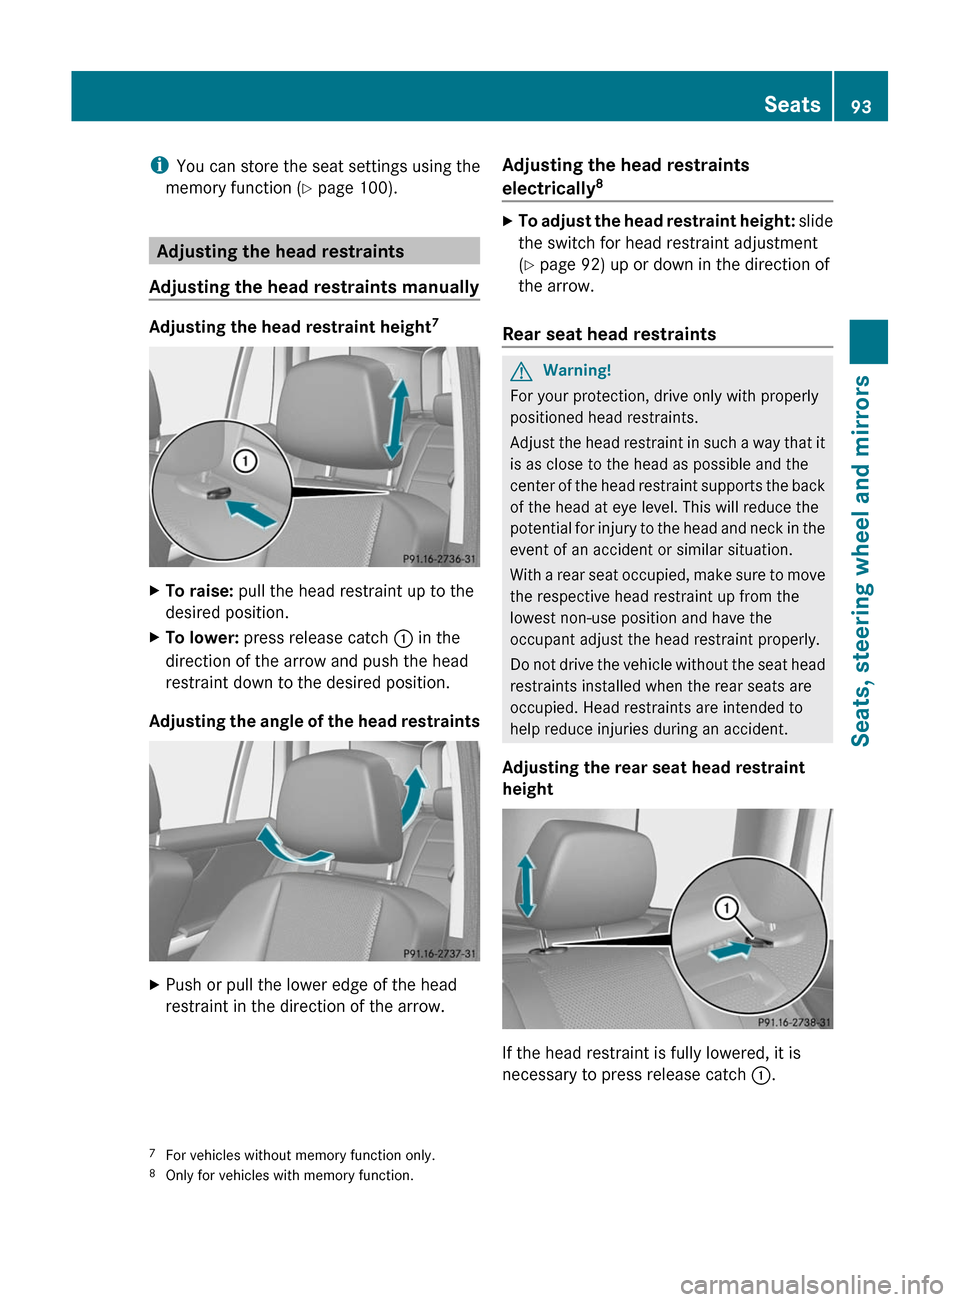
Adjusting the head restraint height7
XTo raise: pull the head restraint up to the
desired position.
XTo lower: press release catch : in the
direction of the arrow and push the head
restraint down to the desired position.
Adjusting the angle of the head restraints
XPush or pull the lower edge of the head
restraint in the direction of the arrow.
Adjusting the head restraints
electrically8XTo adjust the head restraint height: slide
the switch for head restraint adjustment
(Y page 92) up or down in the direction of
the arrow.
Rear seat head restraints
GWarning!
For your protection, drive only with properly
positioned head restraints.
Adjust the head restraint in such a way that it
is as close to the head as possible and the
center of the head restraint supports the back
of the head at eye level. This will reduce the
potential for injury to the head and neck in the
event of an accident or similar situation.
With a rear seat occupied, make sure to move
the respective head restraint up from the
lowest non-use position and have the
occupant adjust the head restraint properly.
Do not drive the vehicle without the seat head
restraints installed when the rear seats are
occupied. Head restraints are intended to
help reduce injuries during an accident.
Adjusting the rear seat head restraint
height
If the head restraint is fully lowered, it is
necessary to press release catch :.
7For vehicles without memory function only.8Only for vehicles with memory function.
Seats93Seats, steering wheel and mirrorsBA 204.9 USA, CA Edition A 2011; 1; 6, en-USd2mwentsVersion: 3.0.3.62010-06-15T08:58:39+02:00 - Seite 93Z
Page 98 of 304
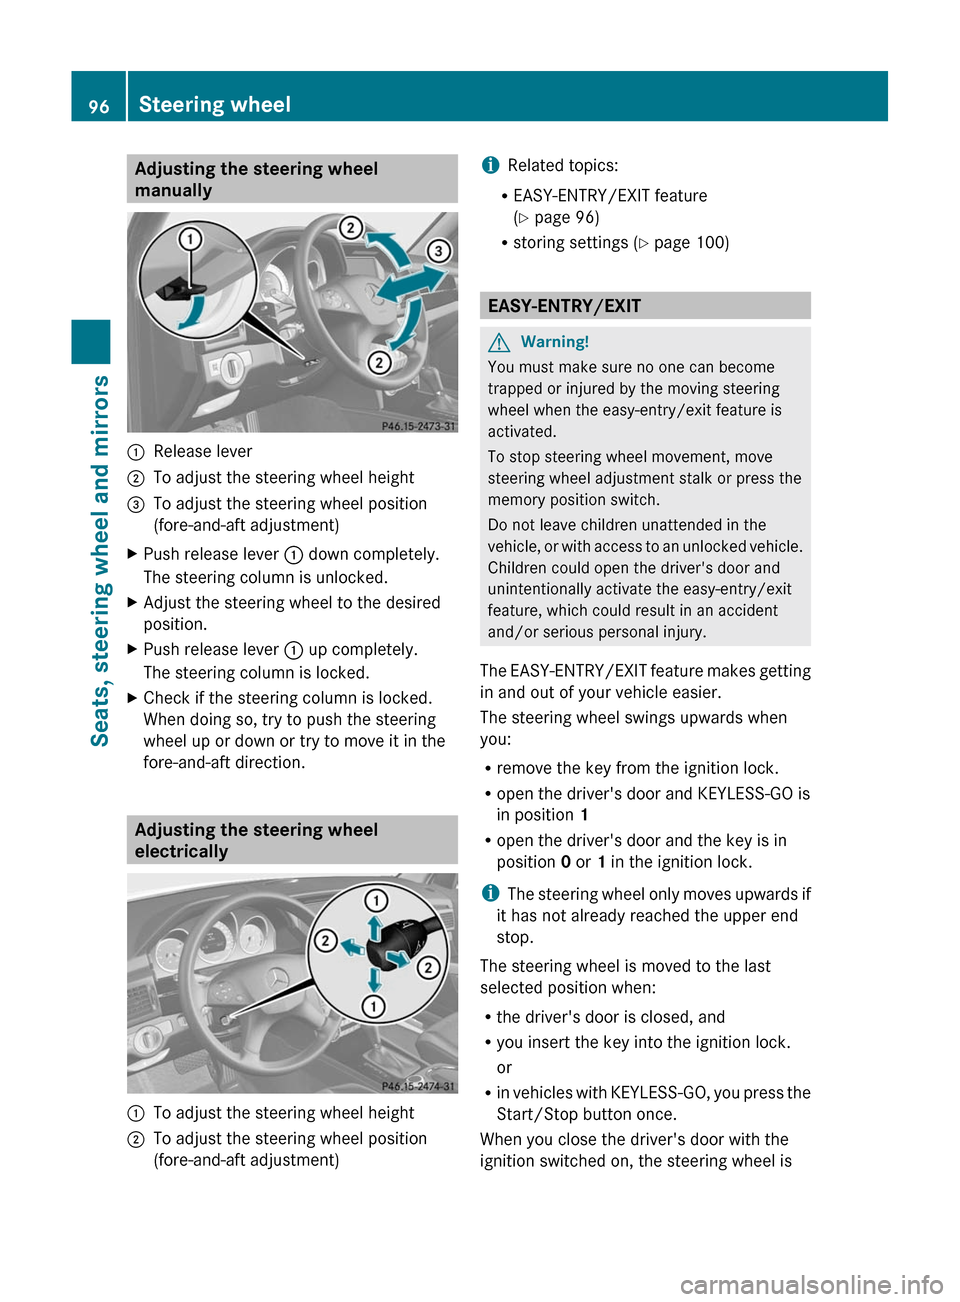
Adjusting the steering wheel
manually
:Release lever;To adjust the steering wheel height=To adjust the steering wheel position
(fore-and-aft adjustment)
XPush release lever : down completely.
The steering column is unlocked.
XAdjust the steering wheel to the desired
position.
XPush release lever : up completely.
The steering column is locked.
XCheck if the steering column is locked.
When doing so, try to push the steering
wheel up or down or try to move it in the
fore-and-aft direction.
Adjusting the steering wheel
electrically
:To adjust the steering wheel height;To adjust the steering wheel position
(fore-and-aft adjustment)
iRelated topics:
REASY-ENTRY/EXIT feature
(Y page 96)
Rstoring settings (Y page 100)
EASY-ENTRY/EXIT
GWarning!
You must make sure no one can become
trapped or injured by the moving steering
wheel when the easy-entry/exit feature is
activated.
To stop steering wheel movement, move
steering wheel adjustment stalk or press the
memory position switch.
Do not leave children unattended in the
vehicle, or with access to an unlocked vehicle.
Children could open the driver's door and
unintentionally activate the easy-entry/exit
feature, which could result in an accident
and/or serious personal injury.
The EASY-ENTRY/EXIT feature makes getting
in and out of your vehicle easier.
The steering wheel swings upwards when
you:
Rremove the key from the ignition lock.
Ropen the driver's door and KEYLESS-GO is
in position 1
Ropen the driver's door and the key is in
position 0 or 1 in the ignition lock.
iThe steering wheel only moves upwards if
it has not already reached the upper end
stop.
The steering wheel is moved to the last
selected position when:
Rthe driver's door is closed, and
Ryou insert the key into the ignition lock.
or
Rin vehicles with KEYLESS-GO, you press the
Start/Stop button once.
When you close the driver's door with the
ignition switched on, the steering wheel is
96Steering wheelSeats, steering wheel and mirrors
BA 204.9 USA, CA Edition A 2011; 1; 6, en-USd2mwentsVersion: 3.0.3.62010-06-15T08:58:39+02:00 - Seite 96