tire type MERCEDES-BENZ GLK-Class 2015 X204 Owner's Manual
[x] Cancel search | Manufacturer: MERCEDES-BENZ, Model Year: 2015, Model line: GLK-Class, Model: MERCEDES-BENZ GLK-Class 2015 X204Pages: 386, PDF Size: 7.16 MB
Page 14 of 386
K
KEYLESS-GO Convenience closing feature ............ 93
Display message ............................ 259
Locking ............................................ 79
Start/Stop butto n.......................... 149
Starting the engine ........................ 151
Unlocking ......................................... 79
Key positions
KEYLESS-GO .................................. 149
SmartKey ....................................... 149
Kickdown
Driving tip s.................................... 159
Knee bag .............................................. 47 L
Lamps see Warning and indicator lamps
Lane Keeping Assist
Activating/deactivating ................. 230
Display message ............................ 252
Function/information .................... 205
Lane Tracking package ..................... 203
LATCH-type (ISOFIX) child seat
anchors ................................................ 64
License plate lamp (display mes-
sage) ................................................... 245
Light function, active Display message ............................ 246
Lights
Activating/deactivating the inte-
rior lighting delayed switch-off ....... 232
Active light function ....................... 119
Automatic headlamp mode ............ 117
Cornering light function ................. 120
Display message ............................ 243
Driving abroad ............................... 116
Fog lamps ...................................... 117
Hazard warning lamps ................... 119
High beam flasher .......................... 119
High-beam headlamp s................... 119
Light switch ................................... 116
Low-beam headlamp s.................... 117
Parking lamps ................................ 118
Rear fog lamp ................................ 118 Setting the brightness of the dis-
play/switch (on-board computer) .. 231
Standing lamps .............................. 118
Switching the daytime running
lamps on/off (on-board com-
puter) ............................................. 231
Switching the daytime running
lamps on/off (switch) .................... 117
Switching the exterior lighting
delayed switch-off on/off (on-
board computer) ............................ 231
Switching the surround lighting
on/off (on-board computer) .......... 231
Turn signals ................................... 118
see Interior lighting
see Replacing bulbs
Light sensor (display message) ....... 246
Loading guidelines ............................ 274
Locking see Central locking
Locking (doors)
Automatic ........................................ 85
Emergency locking ........................... 85
From inside (central locking but-
ton) .................................................. 84
Locking centrally
see Central locking
Locking verification signal (on-
board computer) ............................... 232
Low-beam headlamps Changing bulb s.............................. 124
Display message ............................ 243
Setting for driving abroad (sym-
metrical) ........................................ 116
Switching on/of f........................... 117
Lumbar support
Adjusting ....................................... 104
Adjusting the 4-way lumbar sup-
port ................................................ 105
Luxury head restraints ..................... 103 M
M+S tires ............................................ 335
Maintenance see ASSYST PLUS
Malfunction message
see Display messages 12
Index
Page 20 of 386
Information .................................... 372
Tires/wheels .................................3
60
Trailer loads ................................... 381
Vehicle data ................................... 380
TELEAID
Call priority ................................... .291
Downloading destinations
(COMAND) ..................................... 291
Downloading routes ....................... 294
Emergency call .............................. 288
General notes ................................ 287
Geo fencing ................................... 294
Locating a stolen vehicle .............. .293
MB info call button ........................ 290
Remote vehicle locking .................. 292
Roadside Assistance button .......... 289
Search & Send ............................... 292
Self-test ......................................... 288
Speed alert ................................... .294
System .......................................... 288
Triggering the vehicle alarm ........... 295
Vehicle remote malfunction diag-
nosis .............................................. 293
Vehicle remote unlocking .............. 292
Telephone
Accepting a call ............................ .227
Display message ............................ 259
Menu (on-board computer) ............ 227
Number from the phone book ....... .228
Redialing ........................................ 228
Rejecting/ending a call ................. 228
Temperature
Coolant .......................................... 220
Outside temperature ..................... .221
Setting (climate control) ................ 140
Time
see separate operating instructions
TIREFIT kit .......................................... 316
Tire pressure Calling up (on-board computer) ..... 339
Checking manually ........................ 339
Display message ............................ 256
Important safety notes .................. 339
Maximum ....................................... 338
Notes ............................................. 337
Not reached (TIREFIT) .................... 317 Reached (TIREFIT) .......................... 318
Recommended ............................... 336
Tire pressure monitor
Checking the tire pressure elec-
tronically ........................................ 341
Function/notes ............................ .339
General notes ................................ 339
Important safety notes .................. 339
Radio type approval for the tire
pressure monitor ........................... 342
Restarting ...................................... 341
Warning lamp ................................. 271
Warning message .......................... 341
Tires
Aspect ratio (definition) ................. 354
Average weight of the vehicle
occupants (definition) .................... 352
Bar (definition) ............................... 352
Changing a wheel .......................... 355
Characteristics .............................. 352
Checking ........................................ 333
Curb weight (definition) ................. 353
Definition of terms ......................... 352
Direction of rotatio n...................... 355
Display message ............................ 256
Distribution of the vehicle occu-
pants (definition) ............................ 355
DOT, Tire Identification Number
(TIN) ............................................... 351
DOT (Department of Transporta-
tion) (definition) ............................. 352
GAWR (Gross Axle Weight Rating)
(definition) ..................................... 353
GTW (Gross Trailer Weight) (defi-
nition) ............................................ 353
GVW (Gross Vehicle Weight) (def-
inition) ........................................... 353
GVWR (Gross Vehicle Weight Rat-
ing) (definition) .............................. 353
Important safety notes .................. 332
Increased vehicle weight due to
optional equipment (definition) ...... 352
Kilopascal (kPa) (definition) ........... 353
Labeling (overview) ........................ 348
Load bearing index (definition) ...... 354
Load index ..................................... 351
Load index (definition) ................... 353
M+S tire s....................................... 335 18
Index
Page 22 of 386
Trip odometer
Calling up ....................................... 223
Resetting (on-board computer) ...... 224
Turn signals
Changing bulbs (front) ................... 124
Display message ............................ 244
Switching on/off ........................... 118
TWR (Tongue Weight Rating) (defi-
nition) ................................................. 354
Type identification plate see Vehicle identification plate U
Unlocking Emergency unlocking ....................... 85
From inside the vehicle (central
unlocking button) ............................. 84 V
Vanity mirror (in the sun visor) ........ 283
Vehicle Correct use ...................................... 27
Data acquisition ............................... 28
Display message ............................ 258
Emergency locking ........................... 85
Emergency unlocking ....................... 85
Equipment ....................................... 23
Individual settings .......................... 230
Limited Warranty ............................. 28
Loading .......................................... 342
Locking (in an emergency) ............... 85
Locking (SmartKey) .......................... 78
Lowering ........................................ 359
Maintenance .................................... 24
Parking for a long period ................ 169
Pulling away ................................... 151
Raising ........................................... 357
Reporting problems ......................... 27
Securing from rolling away ............ 356
Towing away .................................. 325
Transporting .................................. 327
Unlocking (in an emergency) ........... 85
Unlocking (SmartKey) ...................... 78
Vehicle data ................................... 380
Vehicle data ....................................... 380
Vehicle dimensions ........................... 380 Vehicle emergency locking
................ 85
Vehicle identification number see VIN
Vehicle identification plate .............. 372
Vehicle maintenance see ASSYST PLUS
Vehicle tool kit .................................. 314
Video (DVD) ........................................ 227
VIN ...................................................... 372 W
Warning and indicator lamps ABS ................................................ 262
Brakes ........................................... 262
Check Engine ................................. 267
Coolant .......................................... 268
Distance warning ........................... 270
DISTRONIC PLUS ........................... 270
ESP ®
.............................................. 264
ESP ®
OFF ....................................... 265
Overview .......................................... 34
PASSENGER AIRBAG OFF ................ 49
Reserve fuel ................................... 267
Seat belt ........................................ 261
SRS ................................................ 266
Tire pressure monitor .................... 271
Warranty .............................................. 23
Washer fluid Display message ............................ 259
Wheel and tire combination
see Tires
Wheel bolt tightening torque ........... 359
Wheel chock ...................................... 356
Wheels Changing a whee l.......................... 355
Checking ........................................ 333
Cleaning ......................................... 307
Cleaning (warning) ......................... 356
Emergency spare wheel ................. 366
Important safety notes .................. 332
Interchanging/changing ................ 355
Mounting a new whee l................... 358
Mounting a whee l.......................... 356
Removing a whee l.......................... 358
Storing ........................................... 355 20
Index
Page 166 of 386
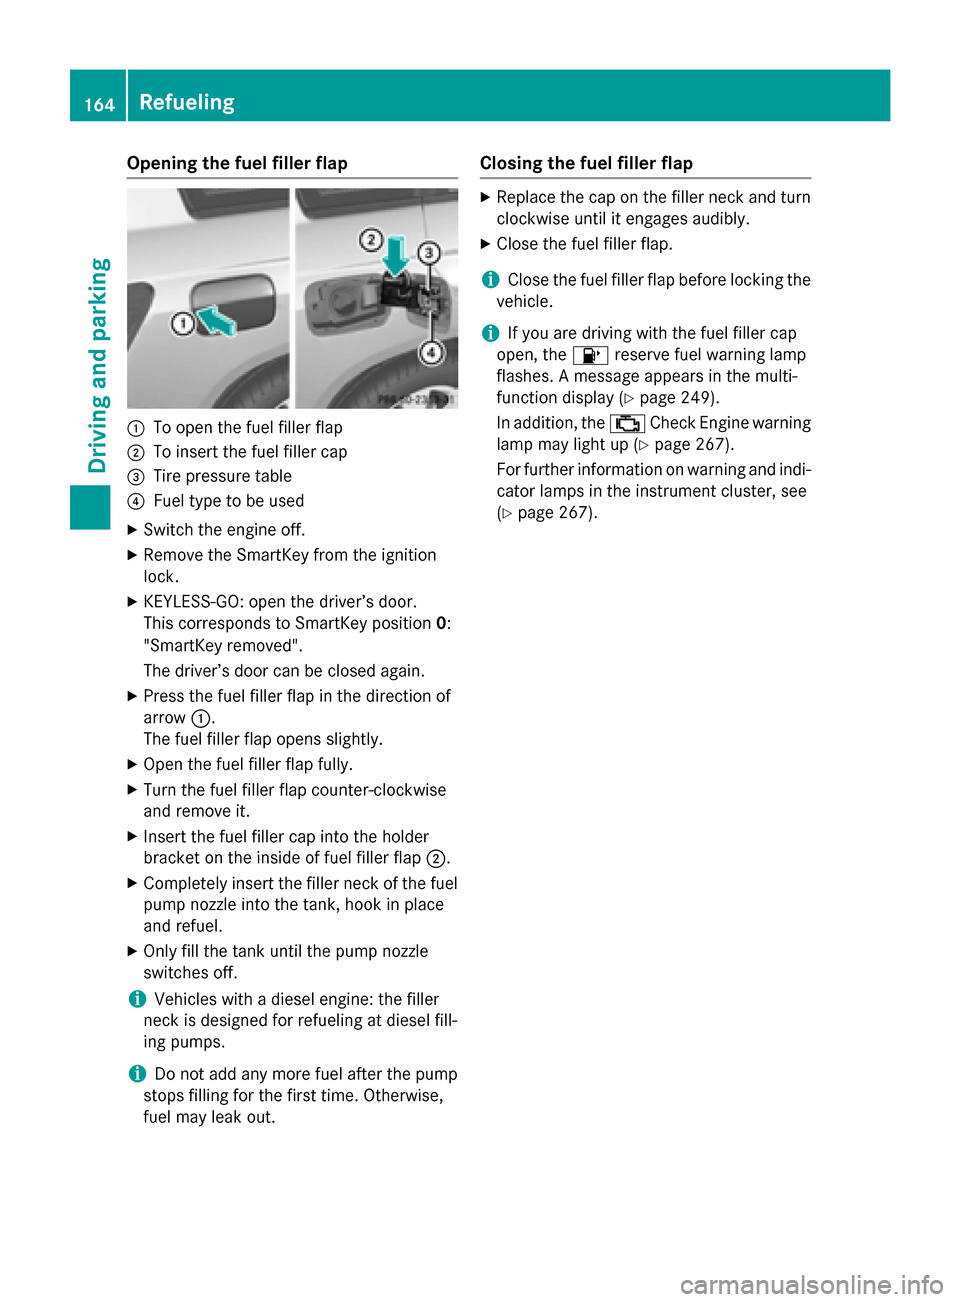
Opening the fuel filler flap
0043
To open the fuel filler flap
0044 To insert the fuel filler cap
0087 Tire pressure table
0085 Fuel type to be used
X Switch the engine off.
X Remove the SmartKey from the ignition
lock.
X KEYLESS-GO: open the driver’s door.
This corresponds to SmartKey position 0:
"SmartKey removed".
The driver’s door can be closed again.
X Press the fuel filler flap in the direction of
arrow 0043.
The fuel filler flap opens slightly.
X Open the fuel filler flap fully.
X Turn the fuel filler flap counter-clockwise
and remove it.
X Insert the fuel filler cap into the holder
bracket on the inside of fuel filler flap 0044.
X Completely insert the filler neck of the fuel
pump nozzle into the tank, hook in place
and refuel.
X Only fill the tank until the pump nozzle
switches off.
i Vehicles with a diesel engine: the filler
neck is designed for refueling at diesel fill-
ing pumps.
i Do not add any more fuel after the pump
stops filling for the first time. Otherwise,
fuel may leak out. Closing the fuel filler flap X
Replace the cap on the filler neck and turn
clockwise until it engages audibly.
X Close the fuel filler flap.
i Close the fuel filler flap before locking the
vehicle.
i If you are driving with the fuel filler cap
open, the 00B6reserve fuel warning lamp
flashes. A message appears in the multi-
function display (Y page 249).
In addition, the 00B9Check Engine warning
lamp may light up (Y page 267).
For further information on warning and indi- cator lamps in the instrument cluster, see
(Y page 267). 164
RefuelingDriving and parking
Page 313 of 386
X
Wipe the plastic trim with a damp, lint-free
cloth, e.g. a microfiber cloth.
X Heavy soiling: use care and cleaning prod-
ucts recommended and approved by
Mercedes-Benz.
The surface may change color temporarily.
Wait until the surface is dry again.
Cleaning the steering wheel and gear or selector lever X
Thoroughly wipe with a damp cloth or use
leather care agents that have been recom-
mended and approved by Mercedes-Benz.
Cleaning genuine wood and trim ele-
ments !
Do not use solvent-based cleaning agents
such as tar remover, wheel cleaners, pol-
ishes or waxes. There is otherwise a risk of damaging the surface.
! Do not use chrome polish on trim pieces.
The trim pieces have a chrome look but are mostly made of anodized aluminum and
can lose their shine if chrome polish is
used. Use a damp, lint-free cloth instead
when cleaning the trim pieces.
If the chrome-plated trim pieces are very
dirty, you can use a chrome polish. If you
are unsure as to whether the trim pieces
are chrome-plated or not, consult an
authorized Mercedes-Benz Center.
X Wipe the wooden trim and trim pieces with
a damp, lint-free cloth, e.g. a microfiber
cloth.
X Heavy soiling: use car care and cleaning
products recommended and approved by
Mercedes-Benz.
Cleaning the seat covers General notes
! Do not use microfiber cloths to clean gen-
uine leather, artificial leather or DINAMICA covers. If used often, these can damage the
cover.
i Note that regular care is essential to
ensure that the appearance and comfort of the covers is retained over time.
Genuine leather seat covers
Leather is a natural product.
It exhibits natural surface characteristics, for
example:
R differences in the texture
R marks caused by growth and injury
R slight nuances of color
These are characteristics of leather and not
material defects.
! To retain the natural appearance of the
leather, observe the following cleaning
instructions:
R Clean genuine leather covers carefully
with a damp cloth and then wipe the cov-
ers down with a dry cloth.
R Make sure that the leather does not
become soaked. It may otherwise
become rough and cracked.
R Only use leather care agents that have
been tested and approved by Mercedes-
Benz. You can obtain these from a quali- fied specialist workshop.
Seat covers of other materials
! Observe the following when cleaning:
R clean artificial leather covers with a cloth
moistened with a solution containing 1%
detergent (e.g. dish washing liquid).
R clean cloth covers with a microfiber cloth
moistened with a solution containing 1%
detergent (e.g. dish washing liquid). Rub
carefully and always wipe entire seat sec- tions to avoid leaving visible lines. Leave
the seat to dry afterwards. Cleaning
results depend on the type of dirt and
how long it has been there.
R clean DINAMICA covers with a damp
cloth. Make sure that you wipe entire Care
311Maintenance and care Z
Page 317 of 386
X
If possible, bring the front wheels into the
straight-ahead position.
X Switch off the engine.
X Vehicles without KEYLESS-GO: remove
the SmartKey from the ignition lock.
X Vehicles with KEYLESS-GO: open the
driver's door.
The on-board electronics have status 0,
which is the same as the SmartKey having
been removed.
X Vehicles with KEYLESS-GO: remove the
Start/Stop button from the ignition lock
(Y page 149).
X All occupants must get out of the vehicle.
Make sure that they are not endangered as
they do so.
X Make sure that no one is near the danger
area while a wheel is being changed. Any-
one who is not directly assisting in the
wheel change should, for example, stand
behind the barrier.
X Get out of the vehicle. Pay attention to traf-
fic conditions when doing so.
X Close the driver's door. MOExtended tires (tires with run-flat
properties)
General notes With MOExtended tires (tires with run flat
characteristics), you can continue to drive
your vehicle even if there is a total loss of
pressure in one or more tires. The affected
tire must not show any clearly visible damage.
You can recognize MOExtended tires by the
MOExtended marking which appears on the
sidewall of the tire. You will find this marking next to the tire size designation, the load-
bearing capacity and the speed index
(Y page 349).
MOExtended tires may only be used in con-
junction with an active tire pressure monitor. If the pressure loss warning message
appears in the multifunction display:
R Observe the instructions in the display
messages (Y page 256).
R Check the tire for damage.
R If driving on, observe the following notes.
The maximum driving distance is approx-
imately 50 miles (80 km) when the vehicle is
partially laden and approximately 18 miles
(30 km) when the vehicle is fully laden.
In addition to the vehicle load, the driving dis- tance possible depends upon:
R Speed
R Road condition
R Outside temperature
The driving distance possible in run-flat mode may be reduced by extreme driving condi-
tions/maneuvers, or it can be increased
through a moderate style of driving.
The maximum permissible distance which
can be driven in run-flat mode is counted from
the moment the tire pressure loss warning
appears in the multifunction display.
You must not exceed a maximum speed of
50 mph (80 km/h).
i When replacing one or all tires, make sure
that you use only tires:
R of the size specified for the vehicle and
R marked "MOExtended"
If a tire has gone flat and cannot be
replaced with a MOExtended tire, a stand-
ard tire may be used as a temporary meas-
ure. Make sure that you use the proper size and type (summer or winter tire).
i Vehicles equipped with MOExtended tires
are not equipped with a TIREFIT kit at the
factory. It is therefore recommended that
you additionally equip your vehicle with a
TIREFIT kit if you mount tires that do not
feature run-flat properties, e.g. winter tires. A TIREFIT kit may be obtained from a quali- fied specialist workshop. Flat tire
315Breakdown assistance
Page 327 of 386
X
First, remove the jumper cables from ground point 0083and negative terminal 0085, then from
positive clamp 0044and positive terminal 0087. Begin each time at the contacts on your own
vehicle first.
X Close cover 0043of positive terminal 0044after removing the jumper cables.
X Have the battery checked at a qualified specialist workshop.
i Jump-starting is not considered to be a normal operating condition.
i Jumper cables and further information regarding jump-starting can be obtained at any
qualified specialist workshop. Towing and tow-starting
Important safety notes
G
WARNING
You can no longer steer the vehicle if the
steering wheel lock has been engaged. There is a risk of an accident.
Always switch off the ignition when towing the
vehicle with a tow cable or a tow bar. G
WARNING
When towing or tow-starting another vehicle
and its weight is greater than the permissible gross weight of your vehicle, the:
R the towing eye could detach itself
R the vehicle/trailer combination could roll-
over.
There is a risk of an accident.
When towing or tow-starting another vehicle,
its weight should not be greater than the per- missible gross weight of your vehicle.
Details on the permissible gross vehicle
weight of your vehicle can be found on the
vehicle identification plate (Y page 372).
! If DISTRONIC PLUS or the HOLD function
is activated, the vehicle brakes automati-
cally in certain situations. To prevent dam-
age to the vehicle, deactivate DISTRONIC
PLUS and the HOLD function in the follow-
ing or other similar situations:
R when towing the vehicle
R in the car wash !
The vehicle can be towed a maximum of
30 miles (50km). The towing speed of
30 mph (50 km/h) must not be exceeded.
If the vehicle has to be towed more than
30 miles (50km), the entire vehicle must be
raised and transported.
! Only secure the tow rope or tow bar at the
towing eyes. Otherwise, the vehicle could
be damaged.
! Do not use the towing eyes for recovery
purposes as this could damage the vehicle.
If in doubt, recover the vehicle with a crane.
! When towing, pull away slowly and
smoothly. If the tractive power is too high,
the vehicles could be damaged.
! Do not tow with sling-type equipment.
This could damage the vehicle.
! On vehicles with KEYLESS-GO, use the
SmartKey instead of the Start/Stop but-
ton. Turn the SmartKey to position 2in the
ignition lock and shift the automatic trans- mission to N. Then, turn the SmartKey back
to 0and leave it in the ignition lock.
It is better to have the vehicle transported
than to have it towed.
The automatic transmission must be in posi-
tion Nwhen the vehicle is being towed. Towing and tow-starting
325Breakdown assistance Z
Page 334 of 386
Useful information
i This Operator's Manual describes all
models and all standard and optional equip- ment of your vehicle available at the time of
publication of the Operator's Manual.
Country-specific differences are possible.
Please note that your vehicle may not be
equipped with all features described. This
also applies to safety-related systems and
functions.
i Read the information on qualified special-
ist workshops (Y page 27). Important safety notes
G
WARNING
If wheels and tires of the wrong size are used, the wheel brakes or suspension components
may be damaged. There is a risk of an acci-
dent.
Always replace wheels and tires with those
that fulfill the specifications of the original
part.
When replacing wheels, make sure to use the
correct:
R designation
R model
When replacing tires, make sure to use the
correct:
R designation
R manufacturer
R model G
WARNING
A flat tire severely impairs the driving, steer-
ing and braking characteristics of the vehicle.
There is a risk of accident.
Tires without run-flat characteristics:
R do not drive with a flat tire.
R immediately replace the flat tire with your
emergency spare wheel or spare wheel, or
consult a qualified specialist workshop. Tires with run-flat characteristics:
R pay attention to the information and warn-
ing notices on MOExtended tires (tires with
run-flat characteristics).
Accessories that are not approved for your
vehicle by Mercedes-Benz or are not being
used correctly can impair the operating
safety.
Before purchasing and using non-approved
accessories, visit a qualified specialist work-
shop and inquire about:
R suitability
R legal stipulations
R factory recommendations
Information on the dimensions and types of
wheels and tires for your vehicle can be found in the "Wheel/tire combinations" section
(Y page 360).
Information on air pressure for the tires on
your vehicle can be found:
R on the vehicle's Tire and Loading Informa-
tion placard on the B-pillar (Y page 342)
R on the tire pressure label on the fuel filler
flap (Y page 164)
R under "Tire pressure" (Y page 336)
Modification work on the brake system and
wheels is not permitted. The use of spacers or
brake dust shields is not permitted. This inva- lidates the general operating permit for the
vehicle.
i Further information on wheels and tires
can be obtained at any qualified specialist
workshop. Operation
Information on driving
R If the vehicle is heavily loaded, check the
tire pressures and correct them if neces-
sary.
R While driving, pay attention to vibrations,
noises and unusual handling characteris- 332
OperationWheels and tires
Page 336 of 386
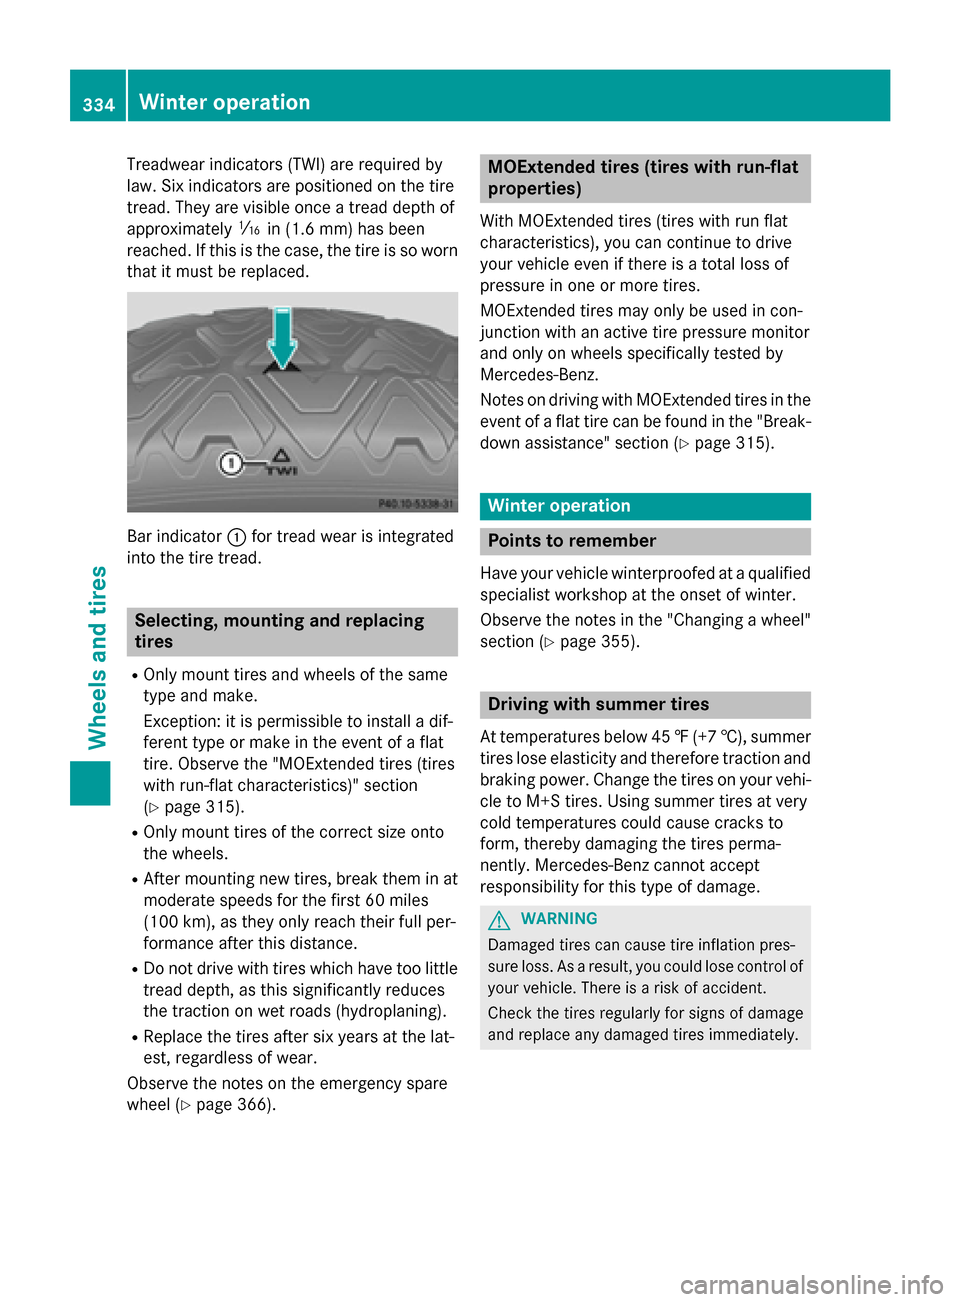
Treadwear indicators (TWI) are required by
law. Six indicators are positioned on the tire
tread. They are visible once a tread depth of
approximately 00CDin (1.6 mm) has been
reached. If this is the case, the tire is so worn that it must be replaced. Bar indicator
0043for tread wear is integrated
into the tire tread. Selecting, mounting and replacing
tires
R Only mount tires and wheels of the same
type and make.
Exception: it is permissible to install a dif-
ferent type or make in the event of a flat
tire. Observe the "MOExtended tires (tires
with run-flat characteristics)" section
(Y page 315).
R Only mount tires of the correct size onto
the wheels.
R After mounting new tires, break them in at
moderate speeds for the first 60 miles
(100 km), as they only reach their full per-
formance after this distance.
R Do not drive with tires which have too little
tread depth, as this significantly reduces
the traction on wet roads (hydroplaning).
R Replace the tires after six years at the lat-
est, regardless of wear.
Observe the notes on the emergency spare
wheel (Y page 366). MOExtended tires (tires with run-flat
properties)
With MOExtended tires (tires with run flat
characteristics), you can continue to drive
your vehicle even if there is a total loss of
pressure in one or more tires.
MOExtended tires may only be used in con-
junction with an active tire pressure monitor
and only on wheels specifically tested by
Mercedes-Benz.
Notes on driving with MOExtended tires in the event of a flat tire can be found in the "Break-
down assistance" section (Y page 315). Winter operation
Points to remember
Have your vehicle winterproofed at a qualified
specialist workshop at the onset of winter.
Observe the notes in the "Changing a wheel" section (Y page 355). Driving with summer tires
At temperatures below 45 ‡(+7 †), summer
tires lose elasticity and therefore traction and braking power. Change the tires on your vehi-cle to M+S tires. Using summer tires at very
cold temperatures could cause cracks to
form, thereby damaging the tires perma-
nently. Mercedes-Benz cannot accept
responsibility for this type of damage. G
WARNING
Damaged tires can cause tire inflation pres-
sure loss. As a result, you could lose control of your vehicle. There is a risk of accident.
Check the tires regularly for signs of damage
and replace any damaged tires immediately. 334
Winter operationWheels and tires
Page 337 of 386
M+S tires
G
WARNING
M+S tires with a tire tread depth of less than
00CF in (4 mm) are not suitable for use in winter
and do not provide sufficient traction. There is
a risk of an accident.
M+S tires with a tread depth of less than 00CFin
(4 mm) must be replaced immediately.
At temperatures below 45 ‡(+7 †), use win-
ter tires or all-season tires. Both types of tire are identified by the M+S marking.
Only winter tires bearing the 004Dsnowflake
symbol in addition to the M+S marking pro-
vide the best possible grip in wintry road con-
ditions. Only these tires will allow driving
safety systems such as ABS and ESP ®
to
function optimally in winter. These tires have
been developed specifically for driving in
snow.
Use M+S tires of the same make and tread on all wheels to maintain safe handling charac-
teristics.
Always observe the maximum permissible
speed specified for the M+S tires you have
mounted.
When you have mounted M+S tires:
X Check the tire pressures (Y page 339).
X Restart the tire pressure monitor
(Y page 339).
For more information on driving with the
emergency spare wheel, see (Y page 366).Snow chains
G
WARNING
If snow chains are installed to the front
wheels, they may drag against the vehicle
body or chassis components. This could
cause damage to the vehicle or the tires.
There is a risk of an accident. To avoid hazardous situations:
R never install snow chains to the front
wheels
R always install snow chains in pairs to the
rear wheels.
! On some tire sizes there is not enough
space for snow chains. To avoid damage to
the vehicle or tires, observe the "Wheel and tire combinations" section under "Tires and
wheels".
! Vehicles with steel wheels:
if you
mount snow chains on steel wheels, you
may damage the hub caps. Remove the hub caps from the relevant wheels before
mounting the snow chains.
For safety reasons, Mercedes-Benz recom-
mends that you only use snow chains that
have been specially approved for your vehicle
by Mercedes-Benz, or are of a corresponding standard of quality.
If you intend to mount snow chains, please
bear the following points in mind:
R Snow chains may not be mounted on all
wheel/tire combinations. Permissible
wheel-tire combinations (Y page 360).
R Only use snow chains when driving on
roads completely covered by snow.
Remove the snow chains as soon as possi-
ble when you come to a road that is not
snow-covered.
R Local regulations may restrict the use of
snow chains. Observe the appropriate reg-
ulations if you wish to mount snow chains.
R Do not exceed the maximum permissible
speed of 30 mph (50 km/h).
i You may wish to deactivate ESP ®
(Y page 71) when pulling away with snow
chains installed. You can thereby allow the wheels to spin in a controlled manner, ach-
ieving an increased driving force (cutting
action).
For more information on driving with the
emergency spare wheel, see (Y page 366). Winter operation
335Wheels and tires Z