fuel cap MERCEDES-BENZ GLK-Class 2015 X204 Owner's Manual
[x] Cancel search | Manufacturer: MERCEDES-BENZ, Model Year: 2015, Model line: GLK-Class, Model: MERCEDES-BENZ GLK-Class 2015 X204Pages: 386, PDF Size: 7.16 MB
Page 12 of 386
Starting the engine with the
SmartKey ....................................... 151
Starting with KEYLESS-GO ............. 151
Switching off .................................. 168
Tow-starting (vehicle) ..................... 328
Engine electronics
Problem (malfunction) ................... 155
Engine jump starting
see Jump starting (engine)
Engine oil
Adding ........................................... 302
Additives ........................................ 377
Checking the oil level ..................... 301
Checking the oil level using the
dipstick .......................................... 301
Display message ............................ 249
Filling capacity ............................... 377
Notes about oil grade s................... 377
Notes on oil level/consumption .... 301
Viscosity ........................................ 377
ESP ®
(Electronic Stability Pro-
gram) Deactivating/activating ................... 71
Display message ............................ 236
ETS/4ETS ........................................ 70
Function/note s................................ 70
General notes .................................. 70
Important safety information ........... 71
Trailer stabilization ........................... 72
Warning lamp ................................. 264
ETS/4ETS (Electronic Traction Sys-
tem) ...................................................... 70
Exhaust check ................................... 170
Exhaust tail pipe (cleaning instruc-
tions) .................................................. 309
Exterior lighting Setting options .............................. 116
see Lights
Exterior mirrors
Adjusting ....................................... 109
Dipping (automatic) ....................... 110
Folding in/out (automatically )....... 110
Folding in/out (electrically) ........... 110
Folding in when locking (on-board computer) ...................................... 233
Out of position (troubleshooting) ... 110
Setting ........................................... 110 Storing settings (memory func-
tion) ............................................... 112
Storing the parking position .......... 111 F
Filler cap see Fuel filler flap
Flat tire
MOExtended tire s.......................... 315
Preparing the vehicle ..................... 314
TIREFIT kit ...................................... 316
see Emergency spare wheel
Floormats ........................................... 298
Fog lamps Switching on/of f........................... 117
Folding the rear bench seat for-
wards/back ....................................... 276
Fording On flooded roads ........................... 174
Front fog lamps
Display message ............................ 245
Switching on/of f........................... 117
Fuel
Additives ........................................ 375
Consumption statistics .................. 223
Displaying the current consump-
tion ................................................ 224
Displaying the range ...................... 224
Driving tip s.................................... 170
Fuel gauge ....................................... 33
Grade (gasoline )............................ 374
Important safety notes .................. 373
Premium-grade unleaded gaso-
line ................................................. 374
Problem (malfunction) ................... 165
Quality (diesel )............................... 375
Refueling ........................................ 162
Tank content/reserve fue l............. 374
Fuel filler flap
Opening ......................................... 164
Fuel filter (display message) ............ 250
Fuel level Calling up the range (on-board
computer) ...................................... 224
Fuel tank
Capacity ........................................ 374
Problem (malfunction) ................... 165 10
Index
Page 19 of 386
Snow chains
...................................... 335
Sockets Center console .............................. 285
General notes ................................ 284
Rear compartment .........................2 85
Spare wheel
Storage location ............................ 366
Stowing .......................................... 367
Specialist workshop ............................ 27
Special seat belt retractor .................. 64
Speed, controlling see Cruise control
Speedometer
Digital ............................................ 224
In the Instrument cluster ................. 33
Segments ...................................... 221
Selecting the unit of measure-
ment .............................................. 230
see Instrument cluster
SRS (Supplemental Restraint Sys-
tem)
Display message ............................ 239
Introduction ..................................... 43
Warning lamp ................................. 266
Warning lamp (function) ................... 43
Standing lamps
Changing bulbs .............................. 124
Display message ............................ 245
Switching on/off ........................... 118
Start/stop function
see ECO start/stop function
Starting (engine) ................................ 150
Steering (display message) .............. 259
Steering wheel Adjusting (electrically) ................... 107
Adjusting (manually) ...................... 106
Button overview ............................... 35
Buttons (on-board computer) ......... 221
Cleaning ......................................... 311
Important safety notes .................. 106
Paddle shifters ............................... 160
Steering wheel heating .................. 107
Storing settings (memory func-
tion) ............................................... 112
Steering wheel heating
Problem (malfunction) ................... 108
Switching on/of f........................... 107 Steering wheel paddle shifters
........ 160
Stowage areas ................................... 275
Stowage compartments Armrest (under) ............................. 275
Cup holders ................................... 282
Glove box ....................................... 275
Important safety information ......... 275
Rear ............................................... 276
Stowage net ................................... 276
Stowage net ....................................... 276
Summer opening see Convenience opening feature
Summer tires ..................................... 334
Sun visor ............................................ 283
Supplemental Restraint System see SRS (Supplemental Restraint
System)
Surround lighting (on-board com-
puter) .................................................. 231
SUV (Sport Utility Vehicle) ....................... 25
Switching air-recirculation mode
on/off ................................................. 143 T
Tachometer ........................................ 220
Tailgate Display message ............................ 258
Emergency unlocking ....................... 90
Important safety notes .................... 86
Limiting the opening angle ............... 89
Opening/closing (automatically
from inside) ...................................... 89
Opening/closing (automatically
from outside) ................................... 87
Opening/closing (from outside) ....... 87
Opening dimensions ...................... 380
Tail lamps
Display message ............................ 244
Tank
see Fuel tank
Tank content
Fuel gauge ....................................... 33
Technical data
Capacities ...................................... 373
Emergency spare wheel ................. 369 Index
17
Page 165 of 386
If you or others come into contact with fuel,
observe the following:
R Wash away fuel from skin immediately
using soap and water.
R If fuel comes into contact with your eyes,
immediately rinse them thoroughly with
clean water. Seek medical assistance with- out delay.
R If fuel is swallowed, seek medical assis-
tance without delay. Do not induce vomit-
ing.
R Immediately change out of clothing which
has come into contact with fuel. G
WARNING
Electrostatic buildup can create sparks and
ignite fuel vapors. There is a risk of fire and
explosion.
Always touch the vehicle body before opening the fuel filler flap or touching the fuel pump
nozzle. Any existing electrostatic buildup is
thereby discharged. G
WARNING
Vehicles with a diesel engine:
If you mix diesel fuel with gasoline, the flash
point is lower than that of pure diesel fuel.
When the engine is running, exhaust system
components could overheat without being
noticed. There is a risk of fire.
Never refuel with gasoline. Never mix gasoline with diesel fuel.
! Do not use diesel to refuel vehicles with a
gasoline engine. Do not switch on the igni-
tion if you accidentally refuel with the
wrong fuel. Otherwise, the fuel will enter
the fuel system. Even small amounts of the wrong fuel could result in damage to the
fuel system and the engine. Notify a quali-
fied specialist workshop and have the fuel
tank and fuel lines drained completely.
! Do not use gasoline to refuel vehicles with
a diesel engine. Do not switch on the igni-
tion if you accidentally refuel with the wrong fuel. Otherwise, the fuel will enter
the fuel system. Even small amounts of the
wrong fuel could result in damage to the
fuel system and the engine. The repair
costs are high. Notify a qualified specialist
workshop and have the fuel tank and fuel
lines drained completely.
! Overfilling the fuel tank could damage the
fuel system.
! Take care not to spill any fuel on painted
surfaces. You could otherwise damage the
paintwork.
! Use a filter when refueling from a fuel can.
Otherwise, the fuel lines and/or injection
system could be blocked by particles from
the fuel can.
Do not get into the vehicle again during the
refueling process. Otherwise, electrostatic
charge could build up again.
If you overfill the fuel tank, fuel could spray
out when the fuel pump nozzle is removed.
For further information on fuel and fuel quality (Y page 373).
For further information on fuel and fuel qual-
ity, see the separate operating instructions. Refueling
General information The fuel filler flap is unlocked or locked auto-
matically when you open or close the vehicle with the SmartKey or with KEYLESS-GO.
The position of the 00B6fuel filler cap is dis-
played in the instrument cluster. The arrow
next to the filling pump indicates the side of
the vehicle. Refueling
163Driving and parking Z
Page 166 of 386
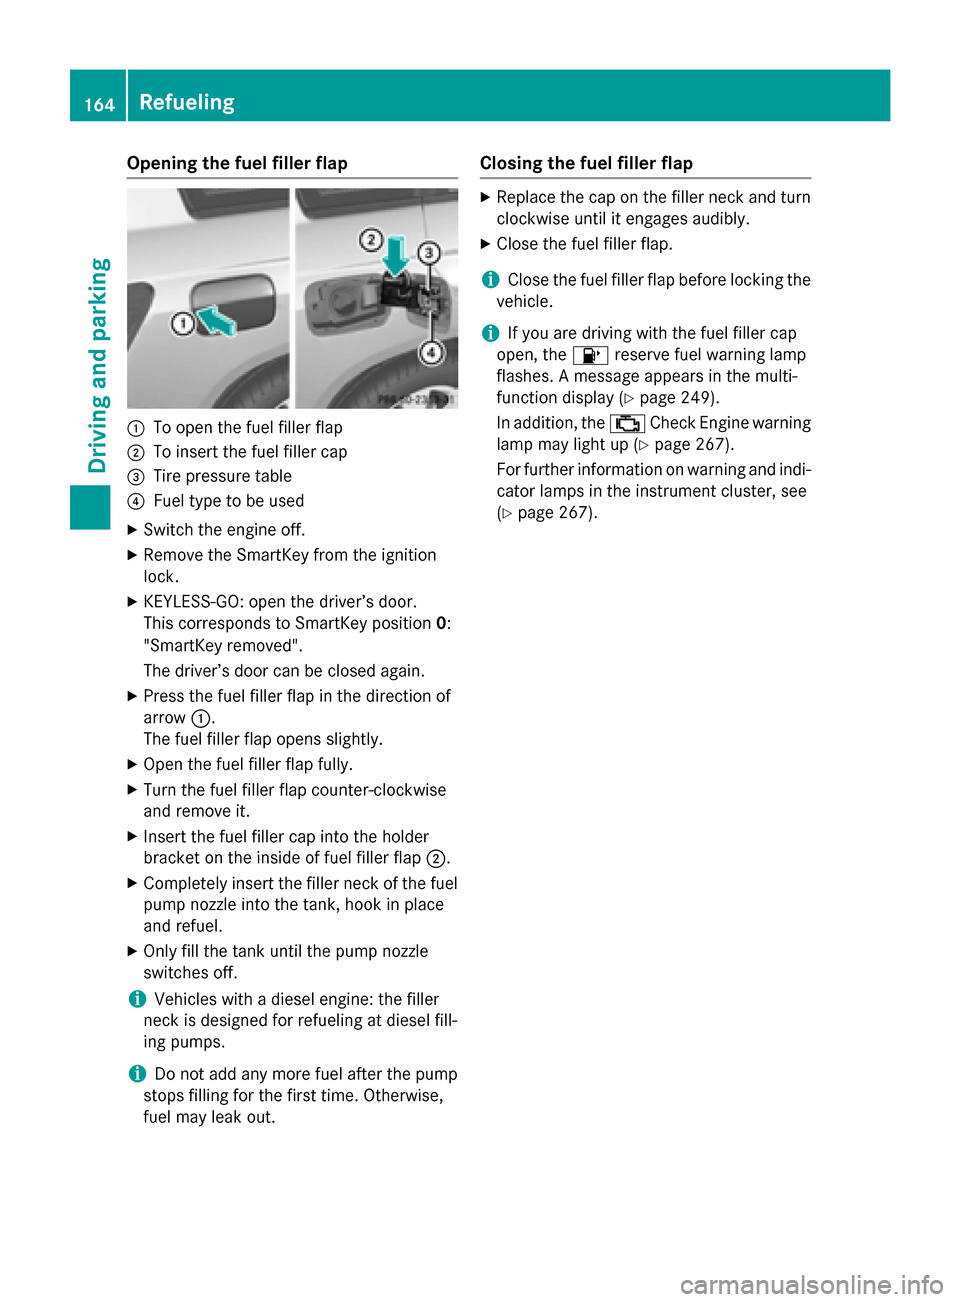
Opening the fuel filler flap
0043
To open the fuel filler flap
0044 To insert the fuel filler cap
0087 Tire pressure table
0085 Fuel type to be used
X Switch the engine off.
X Remove the SmartKey from the ignition
lock.
X KEYLESS-GO: open the driver’s door.
This corresponds to SmartKey position 0:
"SmartKey removed".
The driver’s door can be closed again.
X Press the fuel filler flap in the direction of
arrow 0043.
The fuel filler flap opens slightly.
X Open the fuel filler flap fully.
X Turn the fuel filler flap counter-clockwise
and remove it.
X Insert the fuel filler cap into the holder
bracket on the inside of fuel filler flap 0044.
X Completely insert the filler neck of the fuel
pump nozzle into the tank, hook in place
and refuel.
X Only fill the tank until the pump nozzle
switches off.
i Vehicles with a diesel engine: the filler
neck is designed for refueling at diesel fill-
ing pumps.
i Do not add any more fuel after the pump
stops filling for the first time. Otherwise,
fuel may leak out. Closing the fuel filler flap X
Replace the cap on the filler neck and turn
clockwise until it engages audibly.
X Close the fuel filler flap.
i Close the fuel filler flap before locking the
vehicle.
i If you are driving with the fuel filler cap
open, the 00B6reserve fuel warning lamp
flashes. A message appears in the multi-
function display (Y page 249).
In addition, the 00B9Check Engine warning
lamp may light up (Y page 267).
For further information on warning and indi- cator lamps in the instrument cluster, see
(Y page 267). 164
RefuelingDriving and parking
Page 169 of 386
residues crystallize after time and contam-
inate the affected surfaces.
! DEF is not a fuel additive and must not be
added to the fuel tank. If DEF is added to
the fuel tank, this can lead to engine dam-
age.
! Only screw on the DEF refill bottle hand-
tight. It could otherwise be damaged.
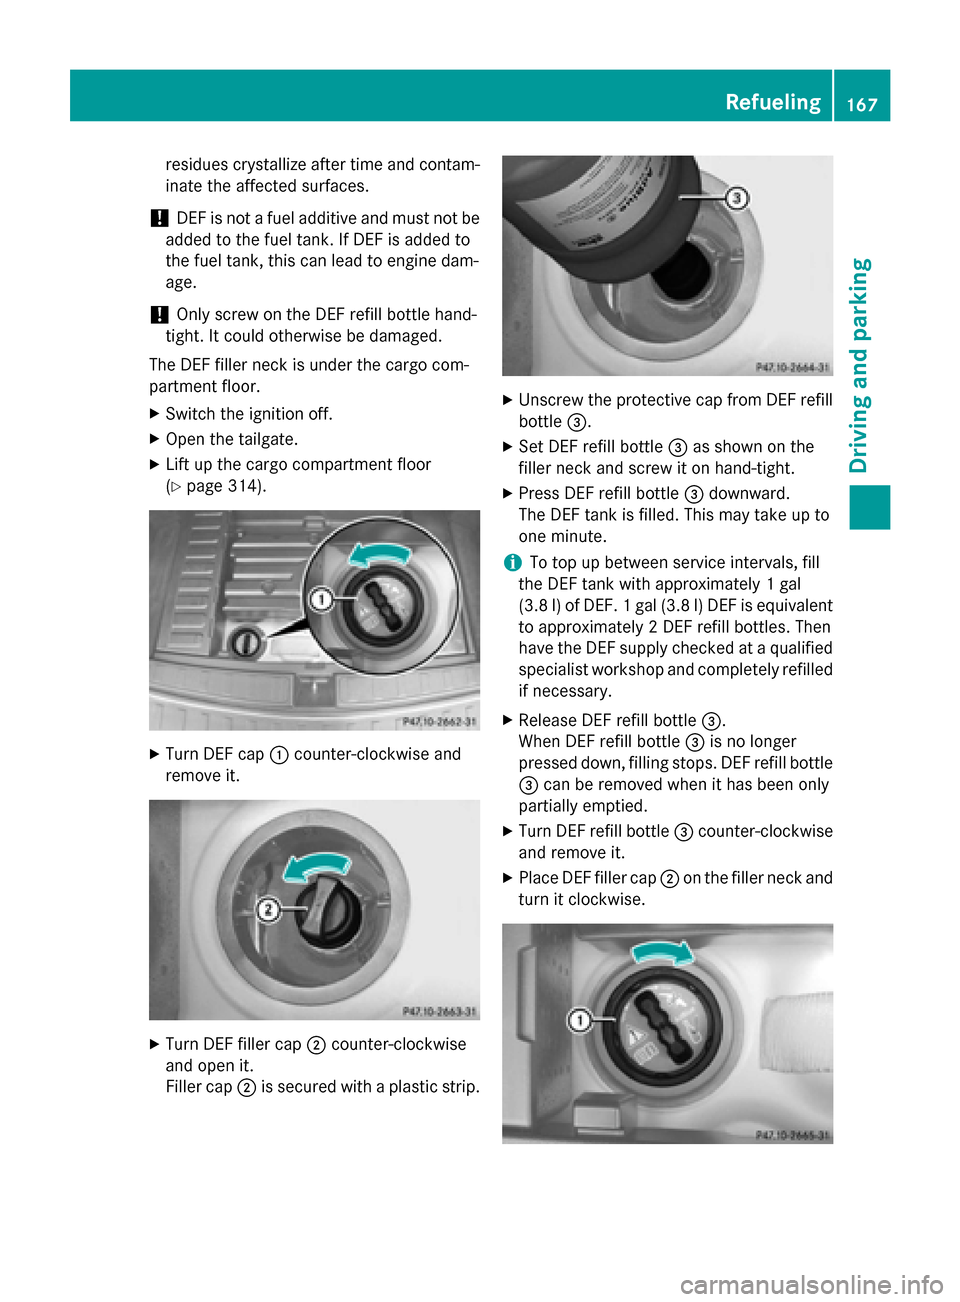
The DEF filler neck is under the cargo com-
partment floor.
X Switch the ignition off.
X Open the tailgate.
X Lift up the cargo compartment floor
(Y page 314). X
Turn DEF cap 0043counter-clockwise and
remove it. X
Turn DEF filler cap 0044counter-clockwise
and open it.
Filler cap 0044is secured with a plastic strip. X
Unscrew the protective cap from DEF refill
bottle 0087.
X Set DEF refill bottle 0087as shown on the
filler neck and screw it on hand-tight.
X Press DEF refill bottle 0087downward.
The DEF tank is filled. This may take up to
one minute.
i To top up between service intervals, fill
the DEF tank with approximately 1 gal
(3.8 l) of DEF. 1 gal (3.8 l)DEF is equivalent
to approximately 2 DEF refill bottles. Then
have the DEF supply checked at a qualified specialist workshop and completely refilled
if necessary.
X Release DEF refill bottle 0087.
When DEF refill bottle 0087is no longer
pressed down, filling stops. DEF refill bottle 0087 can be removed when it has been only
partially emptied.
X Turn DEF refill bottle 0087counter-clockwise
and remove it.
X Place DEF filler cap 0044on the filler neck and
turn it clockwise. Refueling
167Driving and parking Z
Page 215 of 386
!
Depressing the brake pedal constantly
results in excessive and premature wear to
the brake pads.
Please observe the manufacturer's operating
instructions for the trailer coupling if a
detachable trailer coupling is used.
Couple and uncouple the trailer carefully. If
you do not couple the trailer to the towing
vehicle correctly, the trailer could become
detached.
Make sure that the following values are not
exceeded:
R the permissible trailer drawbar noseweight
R the permissible trailer load
R the permissible rear axle load of the towing
vehicle
R the maximum permissible gross vehicle
weight of both the towing vehicle and the
trailer
The applicable permissible values, which
must not be exceeded, can be found:
R in the vehicle documents
R on the identification plates of the trailer tow
hitch, the trailer and the vehicle
If the values differ, the lowest value applies.
You will find the values approved by the man-
ufacturer on the vehicle identification plates
and those for the towing vehicle under "Tech- nical data" (Y page 381).
When towing a trailer, your vehicle's handling
characteristics will be different in comparison with when driving without a trailer.
The vehicle/trailer combination:
R is heavier
R is restricted in its acceleration and gradi-
ent-climbing capability
R has an increased braking distance
R is affected more by strong crosswinds
R demands more sensitive steering
R has a larger turning radius
This could impair the handling characteris-
tics. When towing a trailer, always adjust your
speed to the current road and weather con-
ditions. Do not exceed the maximum permis-
sible speed for your vehicle/trailer combina-
tion.
General notes R
Do not exceed the legally prescribed max-
imum speed for vehicle/trailer combina-
tions in the relevant country.
This lowers the risk of an accident.
R Only install an approved trailer coupling on
your vehicle.
Further information on availability and on
installation is available from any authorized
Mercedes-Benz Center.
R The bumpers of your vehicle are not suita-
ble for installing detachable trailer cou-
plings.
R Do not install hired trailer couplings or
other detachable trailer couplings on the
bumpers of your vehicle.
R To reduce the risk of damage to the ball
coupling, remove it from the ball coupling
recess when not in use.
i When towing a trailer, set the tire pres-
sure on the rear axle of the towing vehicle
for a maximum load; see the tire pressure
table in the fuel filler flap (Y page 352).
Please note that when towing a trailer, PARK-
TRONIC (Y page 186) is only available with
limitations or not at all.
i On vehicles without level control, the
height of the ball coupling will alter accord- ing to the load placed on the vehicle. If nec-essary, use a trailer with a height-adjusta-
ble drawbar.
You will find installing dimensions and loads
under "Technical data" (Y page 381).
Driving tips i
Observe the notes on ESP ®
trailer stabi-
lization (Y page 72). Towing a trailer
213Driving and parking Z
Page 252 of 386
Display messages
Possible causes/consequences and
0050
0050Solutions 00B6
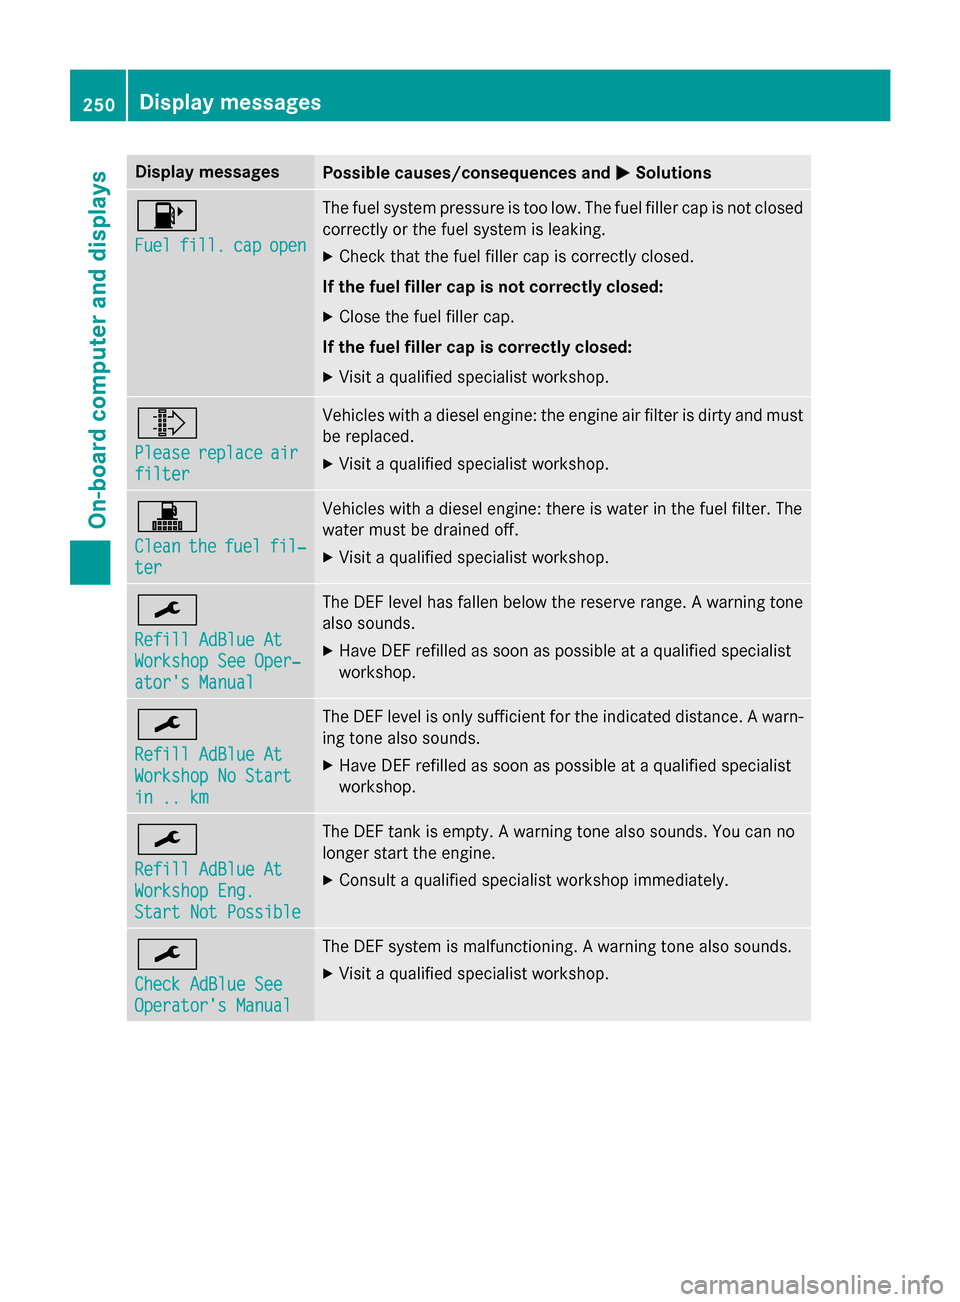
Fuel Fuel
fill.
fill. cap
capopen
open The fuel system pressure is too low. The fuel filler cap is not closed
correctly or the fuel system is leaking.
X Check that the fuel filler cap is correctly closed.
If the fuel filler cap is not correctly closed: X Close the fuel filler cap.
If the fuel filler cap is correctly closed: X Visit a qualified specialist workshop. 009E
Please Please
replace
replace air
air
filter
filter Vehicles with a diesel engine: the engine air filter is dirty and must
be replaced.
X Visit a qualified specialist workshop. 003A
Clean Clean
the
thefuel
fuel fil‐
fil‐
ter
ter Vehicles with a diesel engine: there is water in the fuel filter. The
water must be drained off.
X Visit a qualified specialist workshop. 0099
Refill AdBlue At Refill AdBlue At
Workshop See Oper‐ Workshop See Oper‐
ator's Manual ator's Manual The DEF level has fallen below the reserve range. A warning tone
also sounds.
X Have DEF refilled as soon as possible at a qualified specialist
workshop. 0099
Refill AdBlue At Refill AdBlue At
Workshop No Start Workshop No Start
in .. km in .. km The DEF level is only sufficient for the indicated distance. A warn-
ing tone also sounds.
X Have DEF refilled as soon as possible at a qualified specialist
workshop. 0099
Refill AdBlue At Refill AdBlue At
Workshop Eng. Workshop Eng.
Start Not Possible Start Not Possible The DEF tank is empty. A warning tone also sounds. You can no
longer start the engine.
X Consult a qualified specialist workshop immediately. 0099
Check AdBlue See Check AdBlue See
Operator's Manual Operator's Manual The DEF system is malfunctioning. A warning tone also sounds.
X Visit a qualified specialist workshop. 250
Display
messagesOn-board computer and displays
Page 269 of 386
Engine
Problem
Possible causes/consequences and
0050
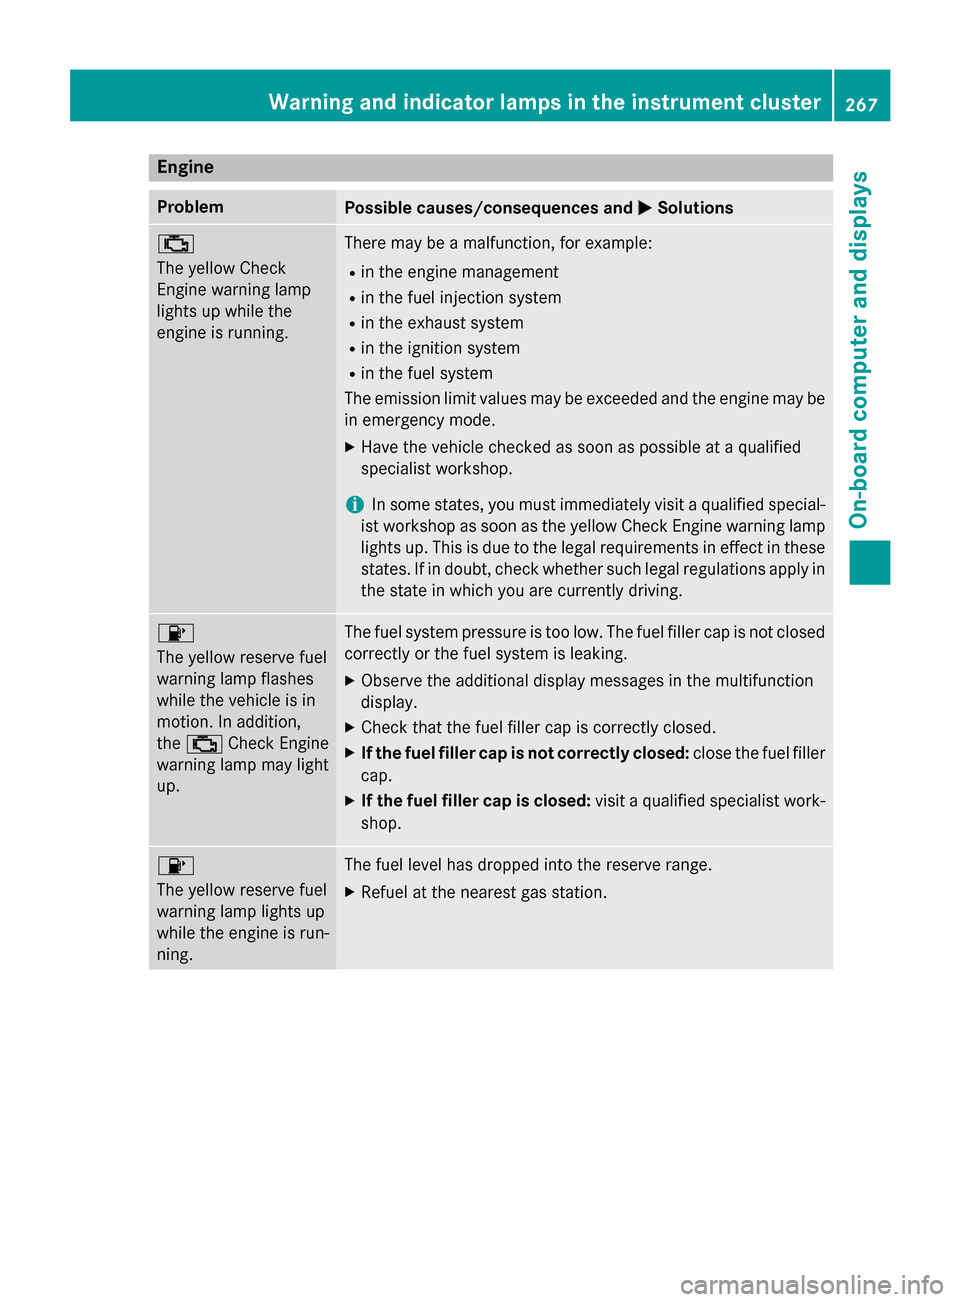
0050Solutions 00B9
The yellow Check
Engine warning lamp
lights up while the
engine is running.
There may be a malfunction, for example:
R in the engine management
R in the fuel injection system
R in the exhaust system
R in the ignition system
R in the fuel system
The emission limit values may be exceeded and the engine may be
in emergency mode.
X Have the vehicle checked as soon as possible at a qualified
specialist workshop.
i In some states, you must immediately visit a qualified special-
ist workshop as soon as the yellow Check Engine warning lamp
lights up. This is due to the legal requirements in effect in these
states. If in doubt, check whether such legal regulations apply in the state in which you are currently driving. 00B6
The yellow reserve fuel
warning lamp flashes
while the vehicle is in
motion. In addition,
the
00B9 Check Engine
warning lamp may light
up. The fuel system pressure is too low. The fuel filler cap is not closed
correctly or the fuel system is leaking.
X Observe the additional display messages in the multifunction
display.
X Check that the fuel filler cap is correctly closed.
X If the fuel filler cap is not correctly closed: close the fuel filler
cap.
X If the fuel filler cap is closed: visit a qualified specialist work-
shop. 00B6
The yellow reserve fuel
warning lamp lights up
while the engine is run-
ning.
The fuel level has dropped into the reserve range.
X Refuel at the nearest gas station. Warning and indicator lamps in the instrument cluster
267On-board computer and displays Z
Page 305 of 386
X
Replace cap 0043on the filler neck and turn
clockwise.
Ensure that the cap locks into place
securely.
X Check the oil level again with the oil dip-
stick (Y page 301).
Further information on engine oil
(Y page 377). Checking and adding other service
products
Checking coolant level G
WARNING
Certain components in the engine compart-
ment, such as the engine, radiator and parts
of the exhaust system, can become very hot.
Working in the engine compartment poses a
risk of injury.
Where possible, let the engine cool down and touch only the components described in the
following. G
WARNING
The engine cooling system is pressurized, par- ticularly when the engine is warm. When
opening the cap, you could be scalded by hotcoolant spraying out. There is a risk of injury.
Let the engine cool down before opening the
cap. Wear eye and hand protection when
opening the cap. Open the cap slowly half a
turn to allow pressure to escape.
Only check the coolant level when the vehicle
is on a level surface and the engine has cooled down.
X Turn the SmartKey to position 2in the igni-
tion lock (Y page 149).
On vehicles with KEYLESS-GO, press the
Start/Stop button twice (Y page 149).
X Check the coolant temperature display in
the instrument cluster.
The coolant temperature must be below
158 ‡ (70 †). X
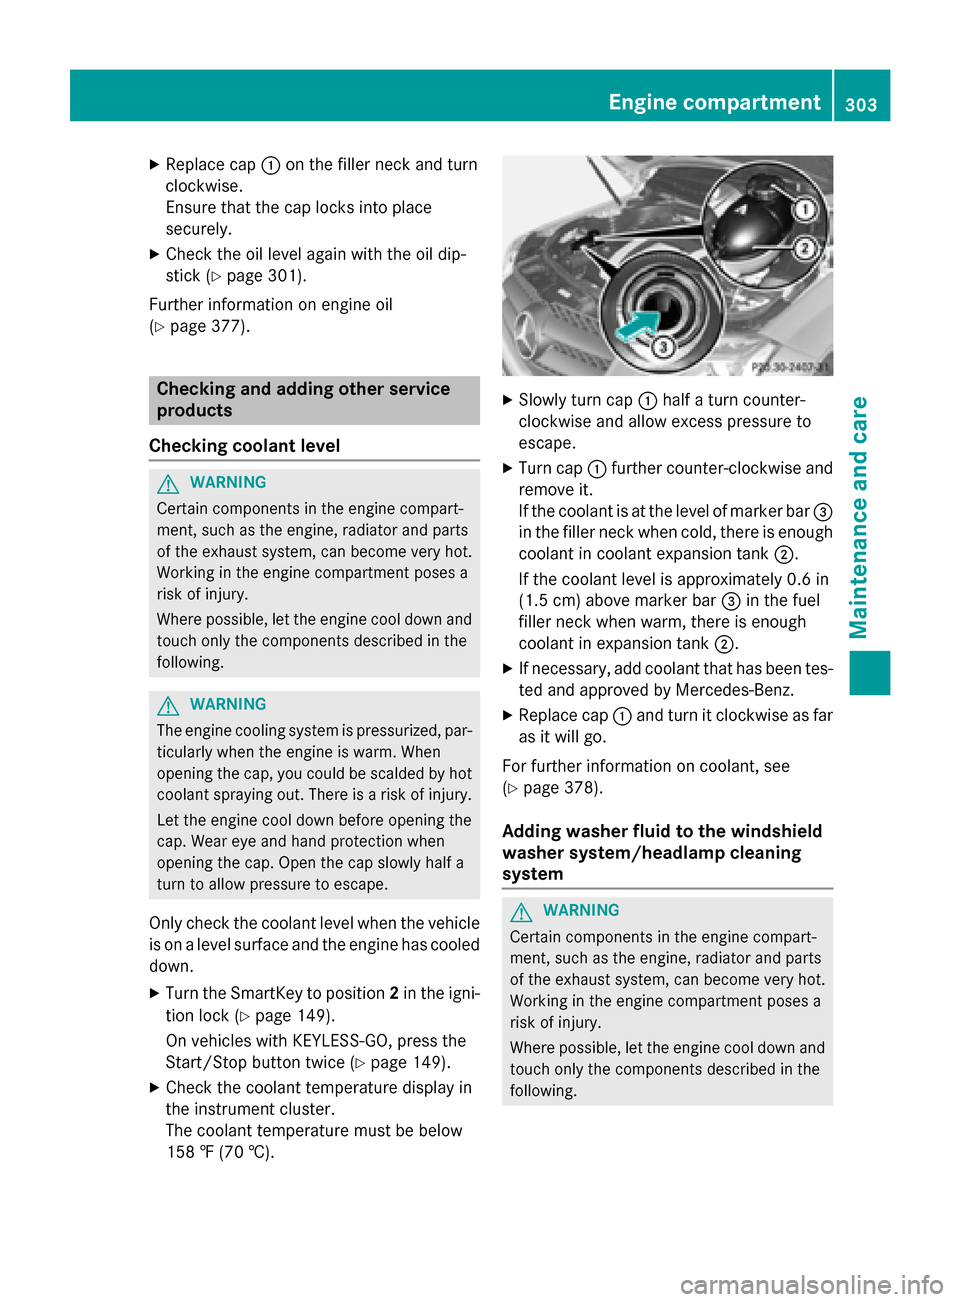
Slowly turn cap 0043half a turn counter-
clockwise and allow excess pressure to
escape.
X Turn cap 0043further counter-clockwise and
remove it.
If the coolant is at the level of marker bar 0087
in the filler neck when cold, there is enough coolant in coolant expansion tank 0044.
If the coolant level is approximately 0.6 in
(1.5 cm) above marker bar 0087in the fuel
filler neck when warm, there is enough
coolant in expansion tank 0044.
X If necessary, add coolant that has been tes-
ted and approved by Mercedes-Benz.
X Replace cap 0043and turn it clockwise as far
as it will go.
For further information on coolant, see
(Y page 378).
Adding washer fluid to the windshield
washer system/headlamp cleaning
system G
WARNING
Certain components in the engine compart-
ment, such as the engine, radiator and parts
of the exhaust system, can become very hot.
Working in the engine compartment poses a
risk of injury.
Where possible, let the engine cool down and touch only the components described in the
following. Engine compartment
303Maintenance and care Z
Page 325 of 386
Jump-starting
For the jump-starting procedure, use only the jump-starting connection point, consisting of a positive terminal and a ground point, in the engine compartment. G
WARNING
Battery acid is caustic. There is a risk of injury.
Avoid contact with the skin, eyes or clothing. Do not inhale any battery gases. Do not lean over the battery. Keep children away from batteries. Wash battery acid immediately with water and seek
medical attention. G
WARNING
During charging and jump-starting, explosive gases can escape from the battery. There is a risk of an explosion.
Particularly avoid fire, open flames, creating sparks and smoking. Ensure there is sufficient ven-
tilation while charging and jump-starting. Do not lean over a battery. G
WARNING
During the charging process, a battery produces hydrogen gas. If a short circuit occurs or sparks
are created, the hydrogen gas can ignite. There is a risk of an explosion.
R Make sure that the positive terminal of a connected battery does not come into contact with
vehicle parts.
R Never place metal objects or tools on a battery.
R It is important that you observe the described order of the battery terminals when connecting
and disconnecting a battery.
R When jump-starting, make sure that the battery poles with identical polarity are connected.
R It is particularly important to observe the described order when connecting and disconnecting
the jumper cables.
R Never connect or disconnect the battery terminals while the engine is running. G
WARNING
Non-combusted fuel can collect in the exhaust system and ignite. There is a risk of fire. Avoid
repeated and lengthy starting attempts.
! Vehicles with a gasoline engine:
avoid repeated and lengthy starting attempts. Other-
wise, the catalytic converter could be damaged by non-combusted fuel.
Do not start the vehicle using a rapid charging device. If your vehicle's battery is discharged,
the engine can be jump-started from another vehicle or from a second battery using jumper
cables. Observe the following points:
R The battery is not accessible in all vehicles. If the other vehicle's battery is not accessible,
jump-start the vehicle using a second battery or a jump-starting device.
R Vehicles with a gasoline engine: only jump-start the vehicle when the engine and exhaust
system are cold.
R Do not start the engine if the battery is frozen. Let the battery thaw first.
R Jump-starting may only be performed from batteries with a nominal voltage of 12 V. Jump-starting
323Breakdown assistance Z