oil level MERCEDES-BENZ GLK-CLASS SUV 2013 Owners Manual
[x] Cancel search | Manufacturer: MERCEDES-BENZ, Model Year: 2013, Model line: GLK-CLASS SUV, Model: MERCEDES-BENZ GLK-CLASS SUV 2013Pages: 380, PDF Size: 19.54 MB
Page 12 of 380
Starting the engine with the
SmartKey .......................................
143
Starting with KEYLESS-GO ............. 143
Switching off .................................. 160
Tow-starting (vehicle) ..................... 323
Engine, jump starting
see Jump starting (engine)
Engine electronics
Problem (malfunction) ...................147
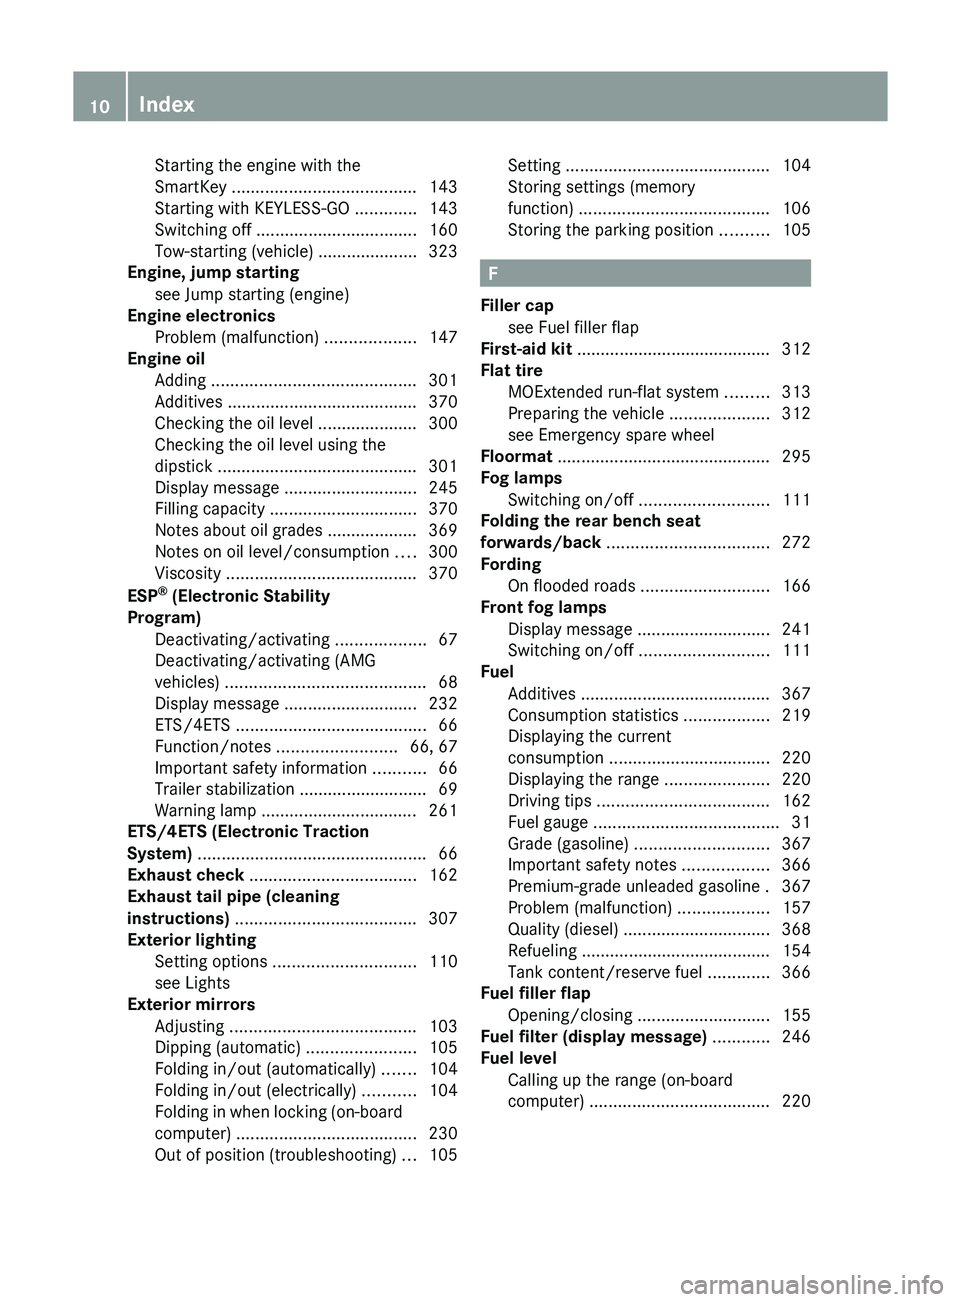
Engine oil
Adding ........................................... 301
Additives ........................................ 370
Checking the oil level ..................... 300
Checking the oil level using the
dipstick .......................................... 301
Display message ............................ 245
Filling capacity ............................... 370
Notes about oil grades ................... 369
Notes on oil level/consumption .... 300
Viscosity ........................................ 370
ESP ®
(Electronic Stability
Program) Deactivating/activating ................... 67
Deactivating/activating (AMG
vehicles) .......................................... 68
Display message ............................ 232
ETS/4ETS ........................................ 66
Function/notes ......................... 66, 67
Important safety information ........... 66
Trailer stabilization ........................... 69
Warning lamp ................................. 261
ETS/4ETS (Electronic Traction
System) ................................................ 66
Exhaust check ................................... 162
Exhaust tail pipe (cleaning
instructions) ...................................... 307
Exterior lighting Setting options .............................. 110
see Lights
Exterior mirrors
Adjusting ....................................... 103
Dipping (automatic) .......................105
Folding in/out (automatically) ....... 104
Folding in/out (electrically) ........... 104
Folding in when locking (on-board
computer) ...................................... 230
Out of position (troubleshooting) ...105 Setting ...........................................
104
Storing settings (memory
function) ........................................ 106
Storing the parking position ..........105 F
Filler cap see Fuel filler flap
First-aid kit ......................................... 312
Flat tire MOExtended run-flat system ......... 313
Preparing the vehicle .....................312
see Emergency spare wheel
Floormat ............................................. 295
Fog lamps Switching on/off ........................... 111
Folding the rear bench seat
forwards/back .................................. 272
Fording On flooded roads ........................... 166
Front fog lamps
Display message ............................ 241
Switching on/off ........................... 111
Fuel
Additives ........................................ 367
Consumption statistics ..................219
Displaying the current
consumption .................................. 220
Displaying the range ...................... 220
Driving tips .................................... 162
Fuel gauge ....................................... 31
Grade (gasoline) ............................ 367
Important safety notes .................. 366
Premium-grade unleaded gasoline . 367
Problem (malfunction) ...................157
Quality (diesel) ............................... 368
Refueling ........................................ 154
Tank content/reserve fuel .............366
Fuel filler flap
Opening/closing ............................ 155
Fuel filter (display message) ............246
Fuel level Calling up the range (on-board
computer) ...................................... 22010
Index
Page 169 of 380
i
For more information on driving with
snow chains, see ( Y page 331).
The outside temperature indicator is not
designed to serve as an ice-warning device
and is therefore unsuitable for that purpose.
Changes in the outside temperature are
displayed after a short delay.
Indicated temperatures just above the
freezing point do not guarantee
that the road
surface is free of ice. The road may still be icy,
especially in wooded areas or on bridges. The
vehicle could skid if you fail to adapt your
driving style. Always adapt your driving style
and drive at a speed to suit the prevailing
weather conditions.
You should pay special attention to road
conditions when temperatures are around
freezing point. Off-road driving
Important safety notes G
WARNING
If you drive on a steep incline at an angle or
turn when driving on an incline, the vehicle
could slip sideways, tip and rollover. There is
a risk of an accident.
Always drive on a steep incline in the line of
fall (straight up or down) and do not turn the
vehicle.
When driving off-road, sand, mud and water,
possibly mixed with oil, for
example, could get
into the brakes. This could result in a reduced
braking effect or in total brake failure and also
in increased wear and tear. The braking
characteristics change depending on the
material ingressing the brakes. Clean the
brakes after driving off-road. If you detect a
reduced braking effect or grinding noises,
have the brake system checked in a qualified
specialist workshop as soon as possible.
Adapt your driving style to the different
braking characteristics. Driving off-road increases the likelihood of
damage
to the vehicle, which,
in turn, can lead
to failure of the mechanical assembly or
systems. Adapt your driving style to suit the
terrain conditions. Drive carefully. Have
damage to the vehicle rectified immediately
at a qualified specialist workshop.
Do not switch to transmission position N
when driving off-road. If you try to brake the
vehicle using the service brake, you could
lose control of the vehicle. If the gradient is
too steep for your vehicle, drive back down in
reverse gear.
General notes H
Environmental note
Protection of the environment is of primary
importance. Treat nature with respect.
Observe all prohibiting signs.
Read this section carefully before
driving your
vehicle off-road. Practice by driving over more
gentle off-road terrain first.
Familiarize yourself with the characteristics
of your vehicle and the gear shift operation
before driving through difficult terrain.
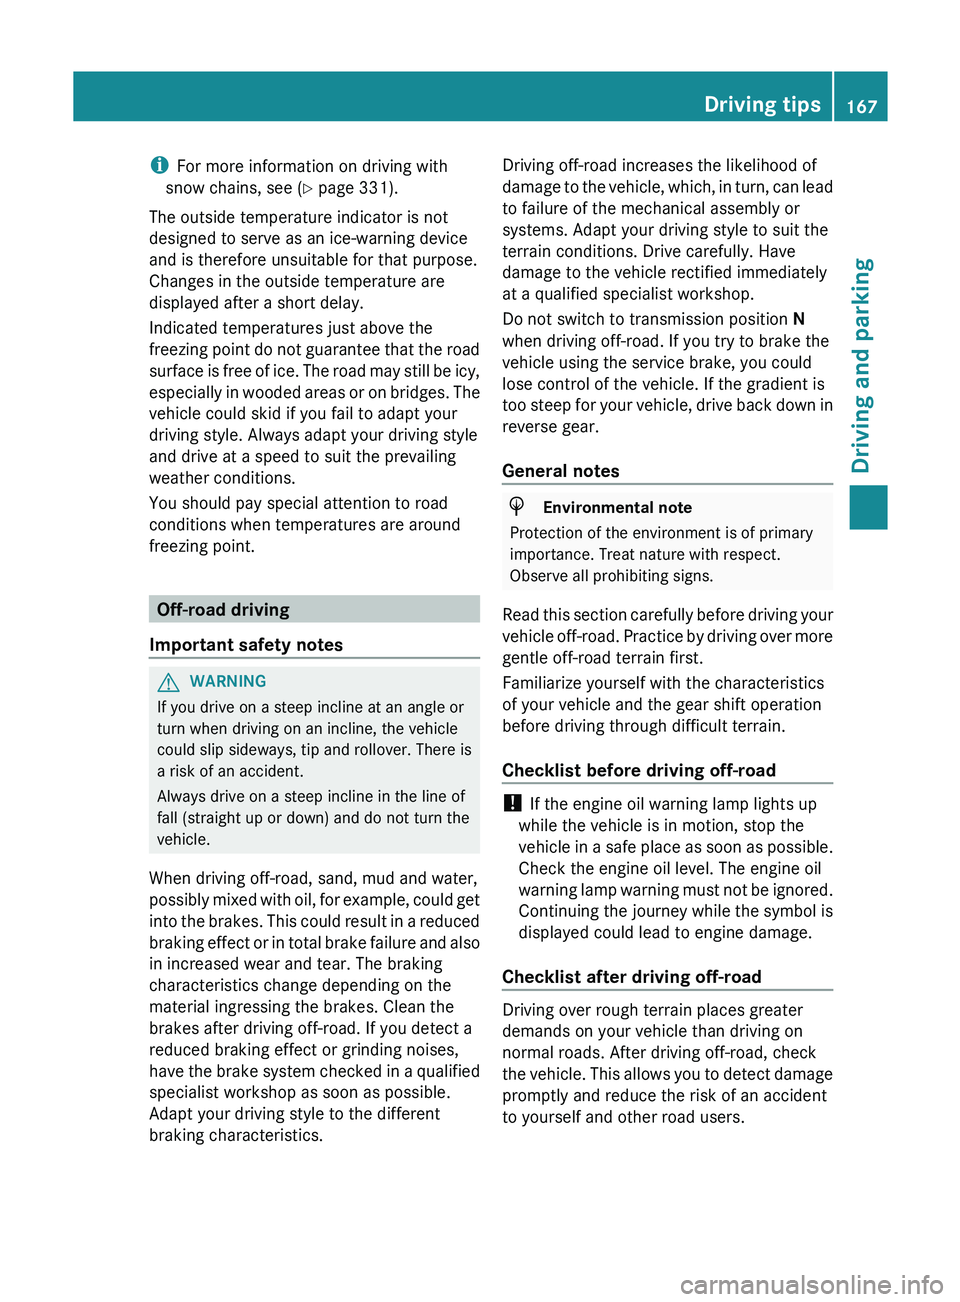
Checklist before driving off-road !
If the engine oil warning lamp lights up
while the vehicle is in motion, stop the
vehicle in a
safe place
as soon as possible.
Check the engine oil level. The engine oil
warning lamp warning must not be ignored.
Continuing the journey while the symbol is
displayed could lead to engine damage.
Checklist after driving off-road Driving over rough terrain places greater
demands on your vehicle than driving on
normal roads. After driving off-road, check
the vehicle. This allows
you
to detect damage
promptly and reduce the risk of an accident
to yourself and other road users. Driving tips
167
Driving and parking Z
Page 247 of 380
Display messages Possible causes/consequences and
0050 Solutions003D The battery is not being charged.
A warning tone also sounds.
Possible causes are:
R
a defective alternator
R a torn poly-V-belt
R a malfunction in the electronics
X Pull over and stop the vehicle safely and switch off the engine,
paying attention to road and traffic conditions.
X Secure the vehicle against rolling away ( Y page 160).
X Open the hood.
X Check whether the poly-V-belt is torn.
If the poly-V-belt is torn:
! Do not continue driving. The
engine could otherwise overheat.
X Consult a qualified specialist workshop.
If the poly-V-belt is not damaged:
X Visit a qualified specialist workshop. 00B2
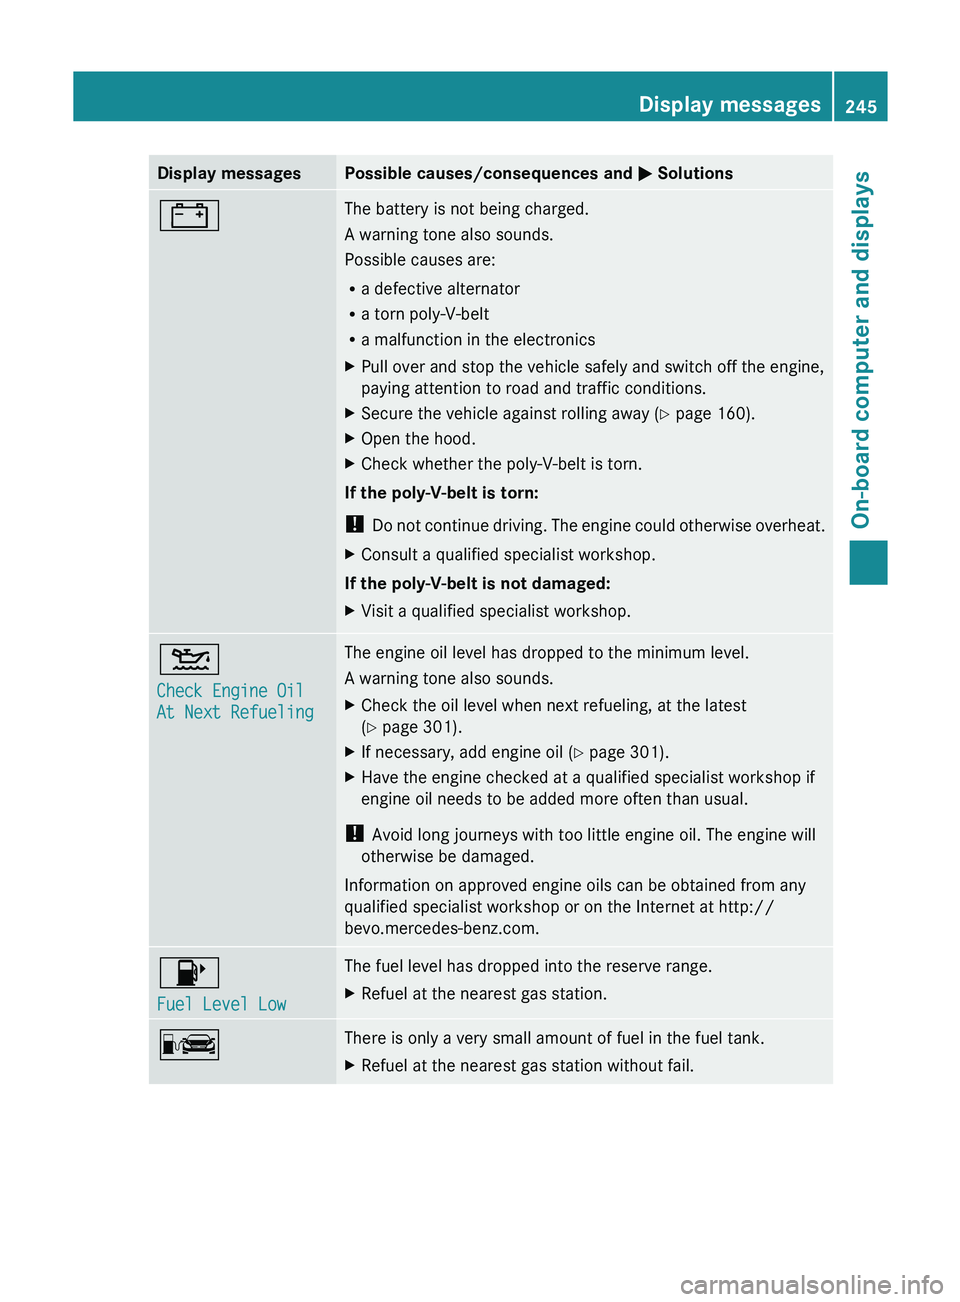
Check Engine Oil
At Next Refueling The engine oil level has dropped to the minimum level.
A warning tone also sounds.
X
Check the oil level when next refueling, at the latest
(Y page 301).
X If necessary, add engine oil ( Y page 301).
X Have the engine checked at a qualified specialist workshop if
engine oil needs to be added more often than usual.
! Avoid long journeys with too little engine oil. The engine will
otherwise be damaged.
Information on approved engine oils can be obtained from any
qualified specialist workshop or on the Internet at http://
bevo.mercedes-benz.com. 00B6
Fuel Level Low The fuel level has dropped into the reserve range.
X
Refuel at the nearest gas station. 00A8 There is only a very small amount of fuel in the fuel tank.
X
Refuel at the nearest gas station without fail. Display messages
245
On-board computer and displays Z
Page 292 of 380
appears. The vehicle data can now be sent to
the Customer Assistance center.
X
Press OK to confirm the message.
The voice connection with the Customer
Assistance center is terminated.
The Vehicle Diagnosis:
Transferring data... appears.
The vehicle data is sent to the Customer
Assistance center.
Depending on what the customer service
representative agreed with you, the voice
connection is re-established after
the
transfer
is complete. If necessary, you will be
contacted at a later time by another means,
e.g. by E-Mail or telephone.
Further functions of the vehicle remote
malfunction diagnosis include, for example:
R transfer of service data to the Customer
Assistance center. If a service is overdue,
the COMAND display shows a message
about various special offers at your
workshop.
R monthly status information E-Mail on oil
level, air pressure, maintenance, brakes,
etc. If applicable, you will receive
information on special offers in the E-Mail.
USA only: this information can also be
called up under "Owners Online" at http://
www.mbusa.com.
Information on the data stored in the vehicle
(Y page 28).
Information on roadside assistance
(Y page 24).
Downloading routes Downloading routes allows you to transfer
and save predefined routes in the navigation
system. To do this,
an
SD memory card must
be inserted into the COMAND system. If no
SD memory card is inserted, you must insert
the card into the card slot on the COMAND
system before saving.
A route can be prepared and sent either by a
customer service representative or via the
mbrace portal on the Internet. Each route can include up to 20 way points. When a route has
been received by the navigation system, the
'Route name' has been saved to
memory card. Do you want to start
route guidance? message appears on the
COMAND display. The route is saved to the
SD memory card.
X
To start route guidance: select Yes.
An overview of the route is shown in the
display.
i If you select No, the saved route can be
called up later in the navigation menu.
X Select Start.
Route guidance is started.
i Downloaded and saved data
can
be called
up again in COMAND.
You can find further information in the
separate COMAND operating instructions.
Speed alert You can define the upper speed limit, which
must not be exceeded by the vehicle. If this
selected speed is exceeded by the vehicle, a
message will be sent to the Customer
Assistance center. The Customer Assistance
center then forwards this information
to you.
You can select the way in which you receive
this information beforehand. Possible options
include SMS, E-Mail or an automated call.
The data which is sent to the Customer
Assistance center contains the following
information:
R the location where the speed limit was
exceeded
R the time at which the speed limit was
exceeded
R the selected speed limit which was
exceeded
Geo fencing Geo fencing allows you to select areas which
the vehicle should not
enter
or leave. You will
be informed if the vehicle crosses the
boundaries of the selected areas. You can 290
Features
Stowage and features
Page 300 of 380
Useful information
i This Operator's Manual describes all
models and all standard and optional
equipment of your vehicle available at the
time of publication of the Operator's
Manual. Country-specific differences are
possible. Please note that your
vehicle may
not be equipped with all features
described. This also applies to safety-
related systems and functions.
i Read the information on qualified
specialist workshops: ( Y page 27).ASSYST PLUS
Service messages
The ASSYST PLUS service interval display
informs you of the next service due date.
Information on the type of
service and service
intervals (see the separate Maintenance
Booklet).
You can obtain further information from an
authorized Mercedes-Benz Center or at
http://www.mbusa.com (USA only).
i The ASSYST PLUS service interval display
does not show any information on the
engine oil level. Observe the notes on the
engine oil level ( Y page 300).
The multifunction display shows a service
message for several seconds, e.g.:
R Next Service A in .. days
R Service A Due
R Service A Exceeded by .. days
Depending on the operating conditions of the
vehicle, the remaining time or distance until
the next service due date is displayed.
The letter A or B, possibly in connection with
a number or another letter, shows the type of
service. A stands for a minor service and B for
a major service.
You can obtain further information from an
authorized Mercedes-Benz Center. The ASSYST PLUS service interval display
does not take into account any periods of
time during which the battery is
disconnected.
Maintaining the time-dependent service
schedule:
X
Note down the service due date displayed
in the multifunction display before
disconnecting the battery.
or
X After reconnecting the battery, subtract
the battery disconnection periods
from
the
service date shown on the display. Hiding a service message
X Press the 0038 or 0076 button on the
steering wheel. Displaying service messages
X Switch on the ignition.
X Press the 0059 or 0065 button on the
steering wheel to select the Serv. menu.
X Press the 0063
or 0064 button to
select the
ASSYST PLUS submenu and confirm with
0076.
The service due date appears in the
multifunction display. Information about Service
Resetting the ASSYST PLUS service
interval display !
If the ASSYST PLUS service interval
display has been inadvertently reset, this
setting can be corrected at a qualified
specialist workshop.
Have service work carried out
as described
in the Maintenance Booklet. This may
otherwise lead to increased wear and
damage to the major assemblies or the
vehicle. 298
ASSYST PLUS
Maintenance and care
Page 302 of 380
If you need to do any work inside the engine
compartment,
R
switch off the ignition
R never reach into the area where there is a
risk of danger from moving components,
such as the fan rotation area
R keep clothing away from moving parts G
WARNING
The ignition system and the fuel injection
system work under high voltage.
If you touch
components which are under voltage, you
could get an electric shock. There is a risk of
injury.
Never touch components of the ignition
system or fuel injection system when the
ignition is switched on.
Opening the hood G
WARNING
The windshield wipers and wiper linkage
could be set in motion.
When the hood is open, you or others could
be injured by the wiper linkage.
Make sure that the windshield wipers are
switched off. Remove the SmartKey or make
sure that no ignition position has been
selected with KEYLESS-GO. All indicator
lamps must be off in the instrument panel.
! Make sure that
the windshield
wipers are
not folded away from the windshield. You
could otherwise damage the windshield
wipers or the hood.
X Make sure that the windshield wipers are
turned off. X
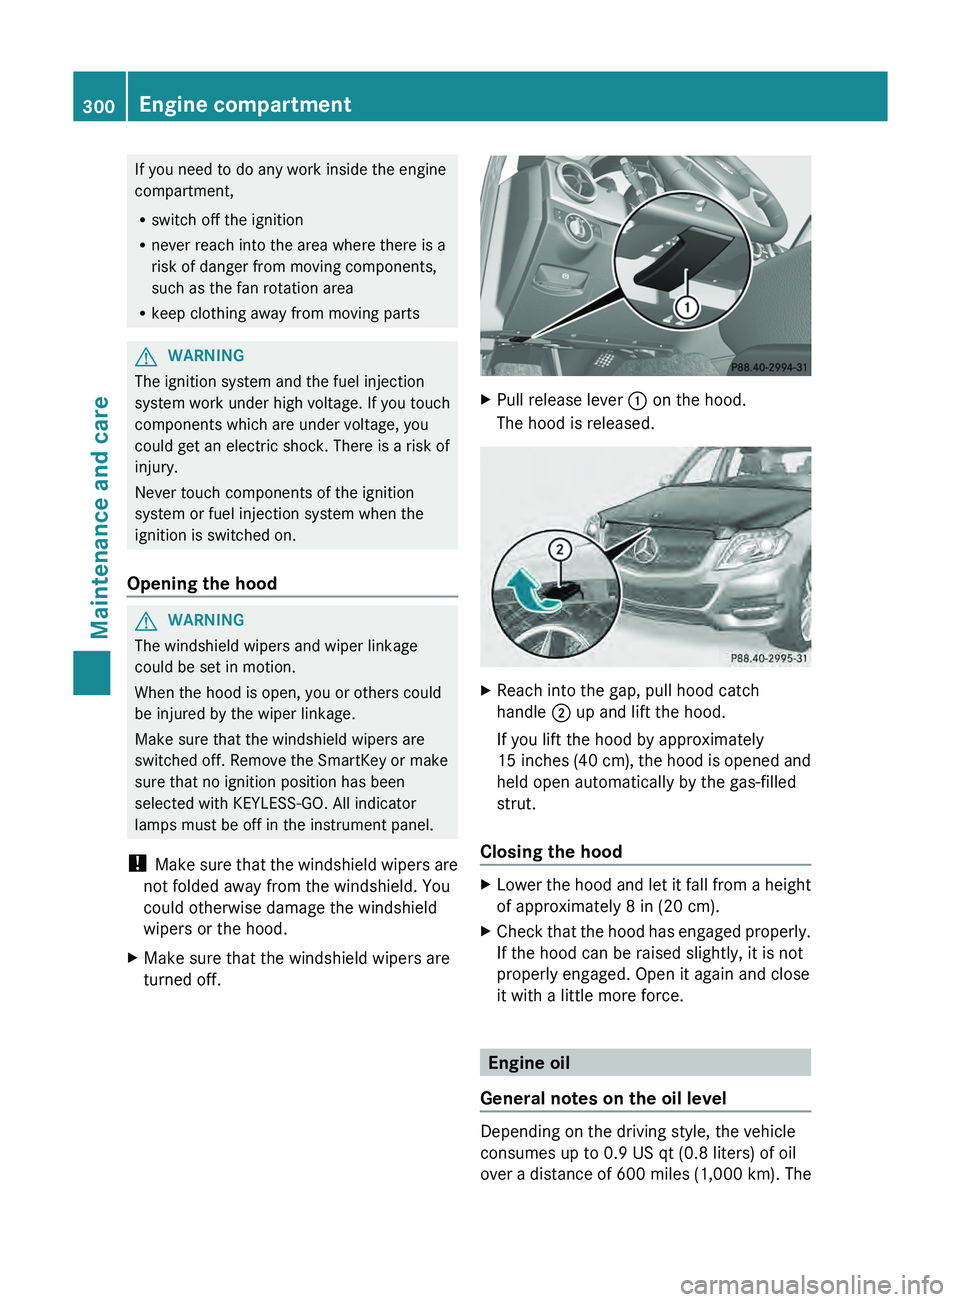
Pull release lever 0043 on the hood.
The hood is released. X
Reach into the gap, pull hood catch
handle 0044 up and lift the hood.
If you lift the hood by approximately
15 inches (40 cm
), the
hood is opened and
held open automatically by the gas-filled
strut.
Closing the hood X
Lower the hood and let it fall from a height
of approximately 8 in (20 cm).
X Check that the hood
has engaged properly.
If the hood can be raised slightly, it is not
properly engaged. Open it again and close
it with a little more force. Engine oil
General notes on the oil level Depending on the driving style, the vehicle
consumes up to 0.9 US qt
(0.8 liters) of oil
over a
distance of
600 miles (1,000 km). The300
Engine compartment
Maintenance and care
Page 303 of 380
oil consumption may be higher than this when
the vehicle is new
or
if you frequently drive at
high engine speeds.
Depending on the engine, the oil dipstick may
be in a different location.
When checking the oil level:
R park the vehicle on a level surface.
R the engine should be switched off for
approximately five minutes if the engine is
at normal operating temperature.
R if the engine is not at normal operating
temperature, e.g. if the engine was only
started briefly: wait about 30 minutes
before carrying out the measurement.
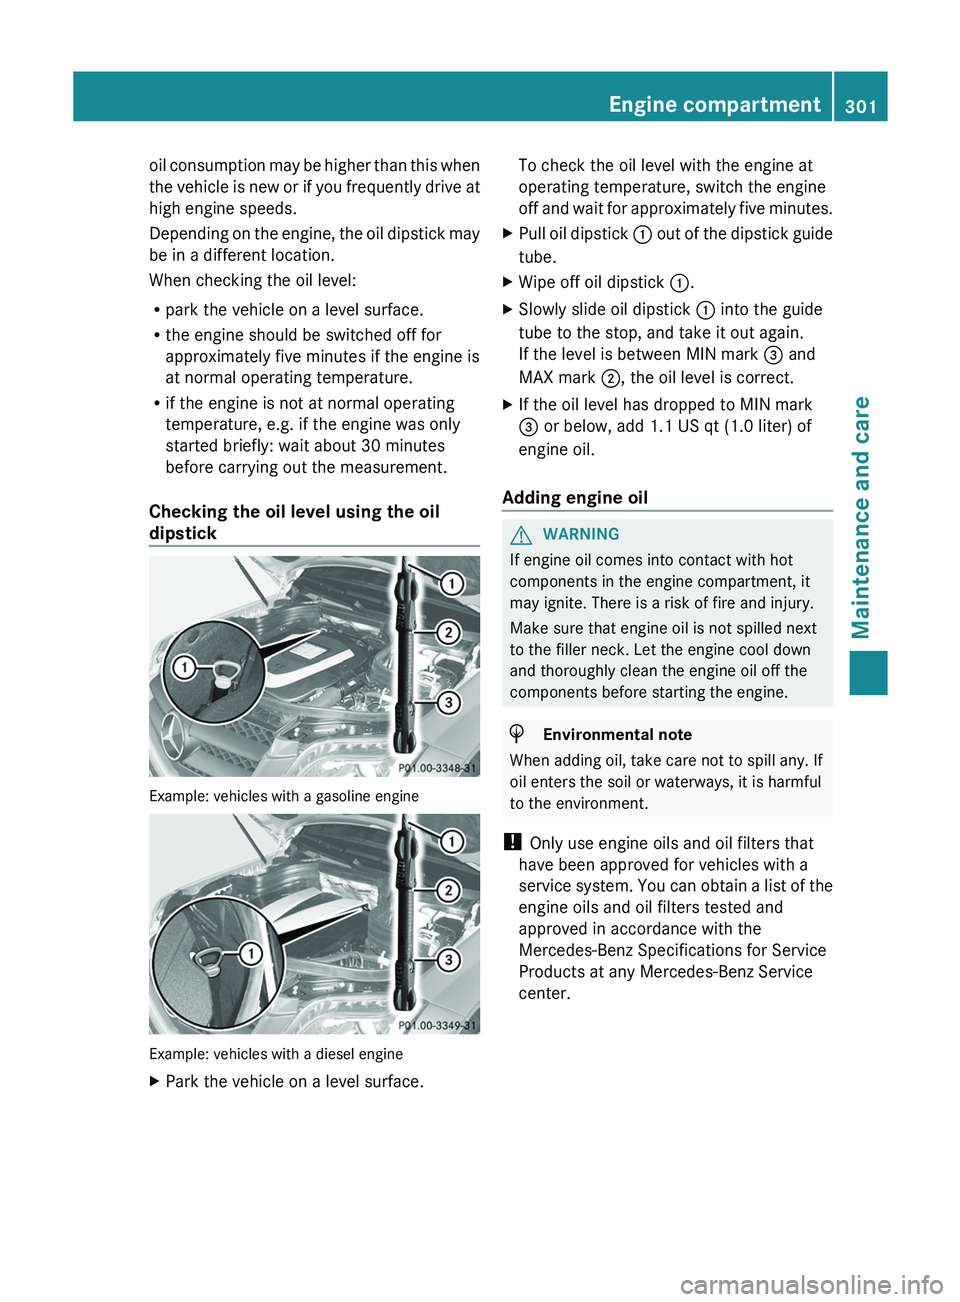
Checking the oil level using the oil
dipstick Example: vehicles with a gasoline engine
Example: vehicles with a diesel engine
X
Park the vehicle on a level surface. To check the oil level with the engine at
operating temperature, switch the engine
off
and wait for
approximately
five minutes.
X Pull oil dipstick 0043 out of the dipstick
guide
tube.
X Wipe off oil dipstick 0043.
X Slowly slide oil dipstick 0043 into the guide
tube to the stop, and take it out again.
If the level is between MIN mark 0087 and
MAX mark 0044, the oil level is correct.
X If the oil level has dropped to MIN mark
0087 or below, add 1.1 US qt (1.0 liter) of
engine oil.
Adding engine oil G
WARNING
If engine oil comes into contact with hot
components in the engine compartment, it
may ignite. There is a risk of fire and injury.
Make sure that engine oil is not spilled next
to the filler neck. Let the engine cool down
and thoroughly clean the engine oil off the
components before starting the engine. H
Environmental note
When adding oil, take care not to spill any. If
oil enters the soil or waterways, it is harmful
to the environment.
! Only use engine oils and oil filters that
have been approved for vehicles with a
service system. You can obtain
a list of the
engine oils and oil filters tested and
approved in accordance with the
Mercedes-Benz Specifications for Service
Products at any Mercedes-Benz Service
center. Engine compartment
301
Maintenance and care Z
Page 304 of 380
Damage to the engine or exhaust system is
caused by the following:
R
using engine oils and oil
filters that have
not been specifically approved for the
service system
R replacing engine oil and oil filters after
the interval for replacement specified by
the service system has been exceeded
R using engine oil additives.
! Do not add too much oil. If the oil level is
above the "max" mark on the dipstick, too
much oil has been added. This can lead to
damage to the engine or the catalytic
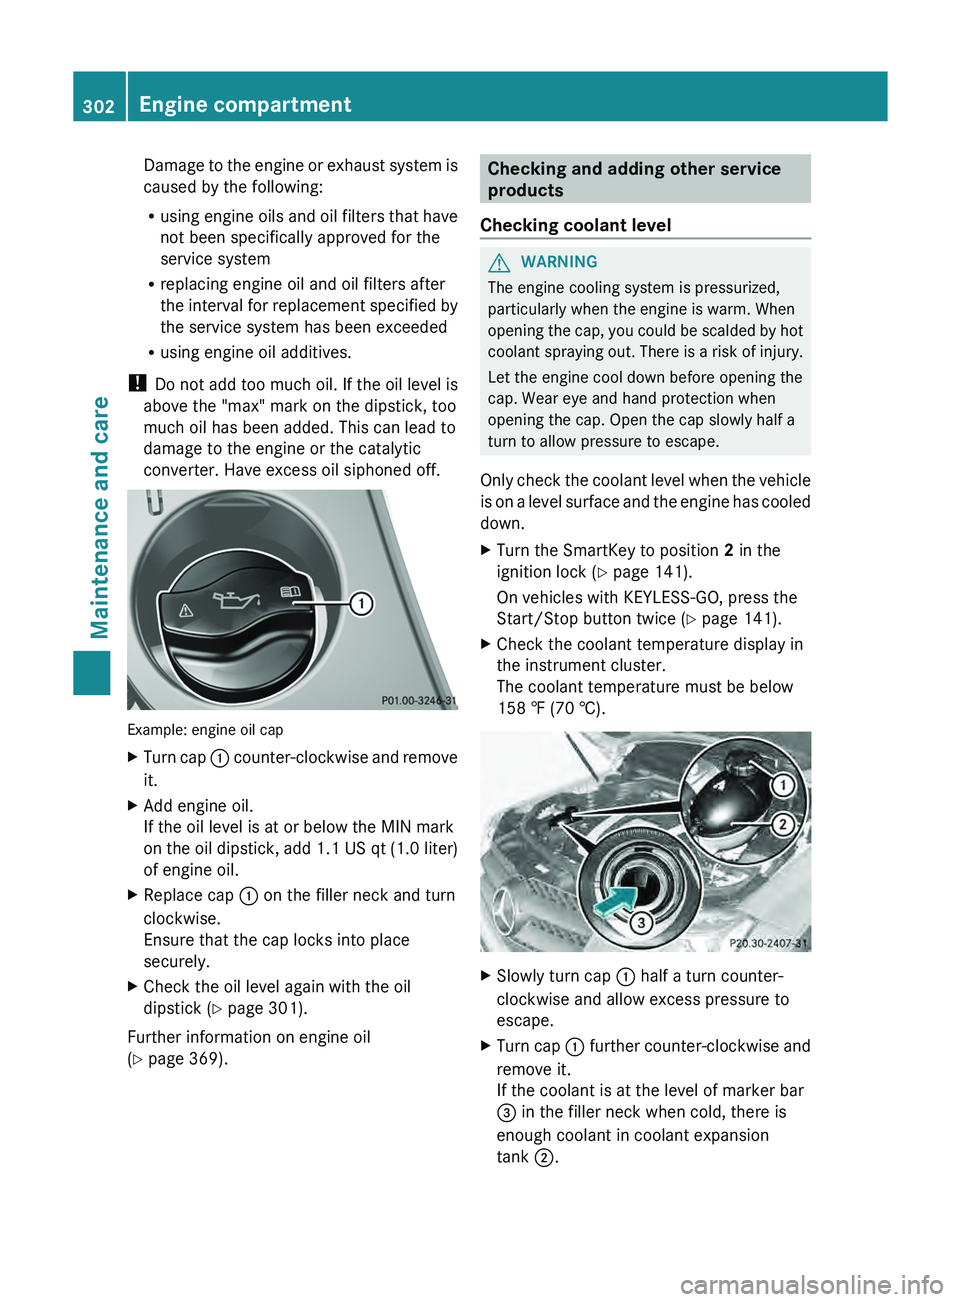
converter. Have excess oil siphoned off. Example: engine oil cap
X
Turn cap 0043 counter-clockwise and remove
it.
X Add engine oil.
If the oil level is at or below the MIN mark
on the oil dipstick, add
1.1 US qt (1.0 liter)
of engine oil.
X Replace cap 0043 on the filler neck and turn
clockwise.
Ensure that the cap locks into place
securely.
X Check the oil level again with the oil
dipstick (Y page 301).
Further information on engine oil
(Y page 369). Checking and adding other service
products
Checking coolant level G
WARNING
The engine cooling system is pressurized,
particularly when the engine is warm. When
opening the cap, you could
be scalded by hot
coolant spraying out. There is a risk of injury.
Let the engine cool down before opening the
cap. Wear eye and hand protection when
opening the cap. Open the cap slowly half a
turn to allow pressure to escape.
Only check the coolant level when the vehicle
is on a level surface and the engine has cooled
down.
X Turn the SmartKey to position 2 in the
ignition lock (Y page 141).
On vehicles with KEYLESS-GO, press the
Start/Stop button twice (Y
page 141).
X Check the coolant temperature display in
the instrument cluster.
The coolant temperature must be below
158 ‡ (70 †). X
Slowly turn cap 0043 half a turn counter-
clockwise and allow excess pressure to
escape.
X Turn cap 0043 further
counter-clockwise and
remove it.
If the coolant is at the level of marker bar
0087 in the filler neck when cold, there is
enough coolant in coolant expansion
tank 0044
.302
Engine compartment
Maintenance and care
Page 354 of 380
Treadwear indicators
Narrow bars (tread wear bars) that are
distributed over the tire tread.
If the tire tread
is level with the bars, the wear limit of 00CD in
(1.6 mm) has been reached. Occupant distribution
The distribution of occupants in a vehicle at
their designated seating positions. Total load limit
Nominal load and luggage load plus 68 kg
(150 lbs)
multiplied by
the number of seats in
the vehicle. Changing a wheel
Flat tire
You can find
information on
what to do in the
event of a flat tire in the "Flat tire" section
(Y page 312).
Information on driving with MOExtended tires
in the event of a flat tire can be found under
"MOExtended tires (tires with run-flat
characteristics" (Y page 313). Rotating the wheels
G
WARNING
Interchanging the front and rear wheels may
severely impair the driving characteristics if
the wheels or tires have
different dimensions.
The wheel brakes or suspension components
may also be damaged. There is a risk of
accident.
Rotate front and rear wheels only if the wheels
and tires are of the same dimensions.
! On vehicles equipped with a tire pressure
monitor, electronic components are
located in the wheel. Tire-mounting tools should not be used
near the valve. This could damage the
electronic components.
Only have tires changed at a qualified
specialist workshop.
Always observe the instructions and safety
notes in the "Mounting a wheel" section
(Y page 353).
The wear patterns on the front and rear tires
differ, depending on the operating
conditions.
Rotate the wheels before a clear wear pattern
has formed on the tires. Front tires typically
wear more on the shoulders and the rear tires
in the center.
If your vehicle's tire configuration allows, you
can rotate the wheels according to the
intervals in the tire manufacturer's warranty
book in your vehicle documents. If no
warranty book is available, the tires should be
rotated every 3,000 to 6,000 miles (5,000 to
10,000 km), or earlier if tire wear requires. Do
not change the direction of wheel rotation.
Clean the contact surfaces of the wheel and
the brake disc thoroughly every time a wheel
is rotated. Check the tire pressures.
Information on changing tires and mounting
the spare wheel ( Y page 352). Direction of rotation
Tires with a specified direction of rotation
have additional benefits, e.g. if
there is a risk
of hydroplaning. You will only gain these
benefits if the correct direction of rotation is
maintained.
An arrow on the sidewall of the tire indicates
its correct direction of rotation. Storing wheels
Store wheels that are not
being used in a cool,
dry and preferably dark place. Protect the
tires from oil, grease, gasoline and diesel. 352
Changing a wheel
Wheels and tires
Page 368 of 380
H
Environmental note
Dispose of service products in an
environmentally responsible manner.
Service products include the following:
R Fuels (e.g. gasoline, diesel)
R Exhaust gas aftertreatment additives, e.g.
DEF
R Lubricants (e.g. engine oil, transmission
oil)
R Coolant
R Brake fluid
R Windshield washer fluid
R Climate control system refrigerant
Comply with all valid regulations with respect
to handling, storing, and disposing of service
fluids.
Components and service products must be
matched. You should therefore only use
products that have been tested and approved
by Mercedes-Benz.
Information about tested and approved
products can be obtained from an authorized
Mercedes-Benz Center or on the Internet at
http://bevo.mercedes-benz.com.
You can recognize service products approved
by Mercedes-Benz by the following
inscription on the containers:
R MB-Freigabe (e.g. MB-Freigabe 229.51)
R MB Approval (e.g. MB Approval 229.51)
Other designations or recommendations
indicate a level of quality or a specification in
accordance with an MB Sheet number (e.g.
MB 229.5). They have not necessarily been
approved by Mercedes-Benz. Fuel
Important safety notes G
WARNING
Fuel is highly flammable. If you handle fuel
incorrectly, there is a risk of fire and
explosion. You must avoid fire, open flames, creating
sparks and smoking. Switch off the engine
and, if applicable, the
auxiliary
heating before
refueling. G
WARNING
Fuel is poisonous and hazardous to health.
There is a risk of injury.
You must make sure that
fuel does not come
into contact with your skin, eyes or clothing
and that it is not swallowed. Do not inhale fuel
vapors. Keep fuel away from children.
If you or others come into contact with fuel,
observe the following:
R Wash away fuel from skin immediately
using soap and water.
R If fuel comes into contact with your eyes,
immediately rinse them thoroughly with
clean water. Seek medical assistance
without delay.
R If fuel is swallowed, seek medical
assistance without delay. Do not induce
vomiting.
R Immediately change out of clothing which
has come into contact with fuel.
Tank capacity Model Total
capacity GLK 250 BlueTEC
15.6 US gal
(59.0 l) All other models
17.4 US gal
(66.0 l) Model Of which
reserve All models
approx.
2.1 US gal (8.0 l)366
Service products and filling capacities
Technical data