open hood MERCEDES-BENZ GLK-CLASS SUV 2013 Owners Manual
[x] Cancel search | Manufacturer: MERCEDES-BENZ, Model Year: 2013, Model line: GLK-CLASS SUV, Model: MERCEDES-BENZ GLK-CLASS SUV 2013Pages: 380, PDF Size: 19.54 MB
Page 13 of 380
Fuel tank
Capacity ........................................ 366
Problem (malfunction) ...................157
see Fuel tank
Fuse allocation chart (vehicle tool
kit) ...................................................... 312
Fuses Allocation chart ............................. 323
Before changing
.............................323
Dashboard fuse box ....................... 323
Fuse box in the cargo
compartment ................................. 324
Fuse box in the engine
compartment ................................. 324
Important safety notes .................. 323
see Fuses G
Garage door opener Clearing the memory ..................... 294
Important safety notes ..................291
Opening/closing the garage door ..293
Programming (button in the rear-
view mirror) ................................... 291
Gear or selector lever (cleaning
guidelines)
......................................... 308
Genuine ................................................ 22
Glove box ........................................... 271
GTW (Gross Trailer Weight)
(definition) ......................................... 350H
Handbrake see Parking brake
Hazard warning lamps ......................113
Headlamps Adding fluid to cleaning system .....303
Cleaning system (function) ............ 113
Cleaning system (notes) ................372
Fogging up ..................................... 115
see Automatic headlamp mode
Head restraints
Adjusting ......................................... 99
Adjusting (electrically) .....................99
Adjusting (manually) ........................ 99Adjusting (rear) ................................
99
Installing/removing (rear) .............. 100
see NECK-PRO head restraints/
NECK-PRO luxury head restraints
Heating
see Climate control
High-beam headlamps
Changing bulbs .............................. 118
Display message ............................ 241
Switching Adaptive Highbeam
Assist on/off ................................. 114
Switching on/off ........................... 113
Hill start assist .................................. 144
HOLD function Deactivating ................................... 180
Display message ............................ 247
Function/notes ............................. 179
Hood
Closing ........................................... 300
Display message ............................ 255
Important safety notes .................. 299
Opening ......................................... 300
Hydroplaning ..................................... 166 I
Ignition lock see Key positions
Immobilizer .......................................... 71
Indicator lamps see Warning and indicator lamps
Instrument cluster
Overview .......................................... 31
Settings ......................................... 226
Warning and indicator lamps ...........32
Instrument cluster lighting .............. 227
Interior lighting ................................. 115
Automatic control .......................... 116
Delayed switch-off (on-board
computer) ...................................... 228
Emergency lighting ........................ 116
Manual control ............................... 116
Overview ........................................ 115
Reading lamp ................................. 115
Setting the brightness of the
display/switch (on-board
computer) ...................................... 227 Index
11
Page 32 of 380
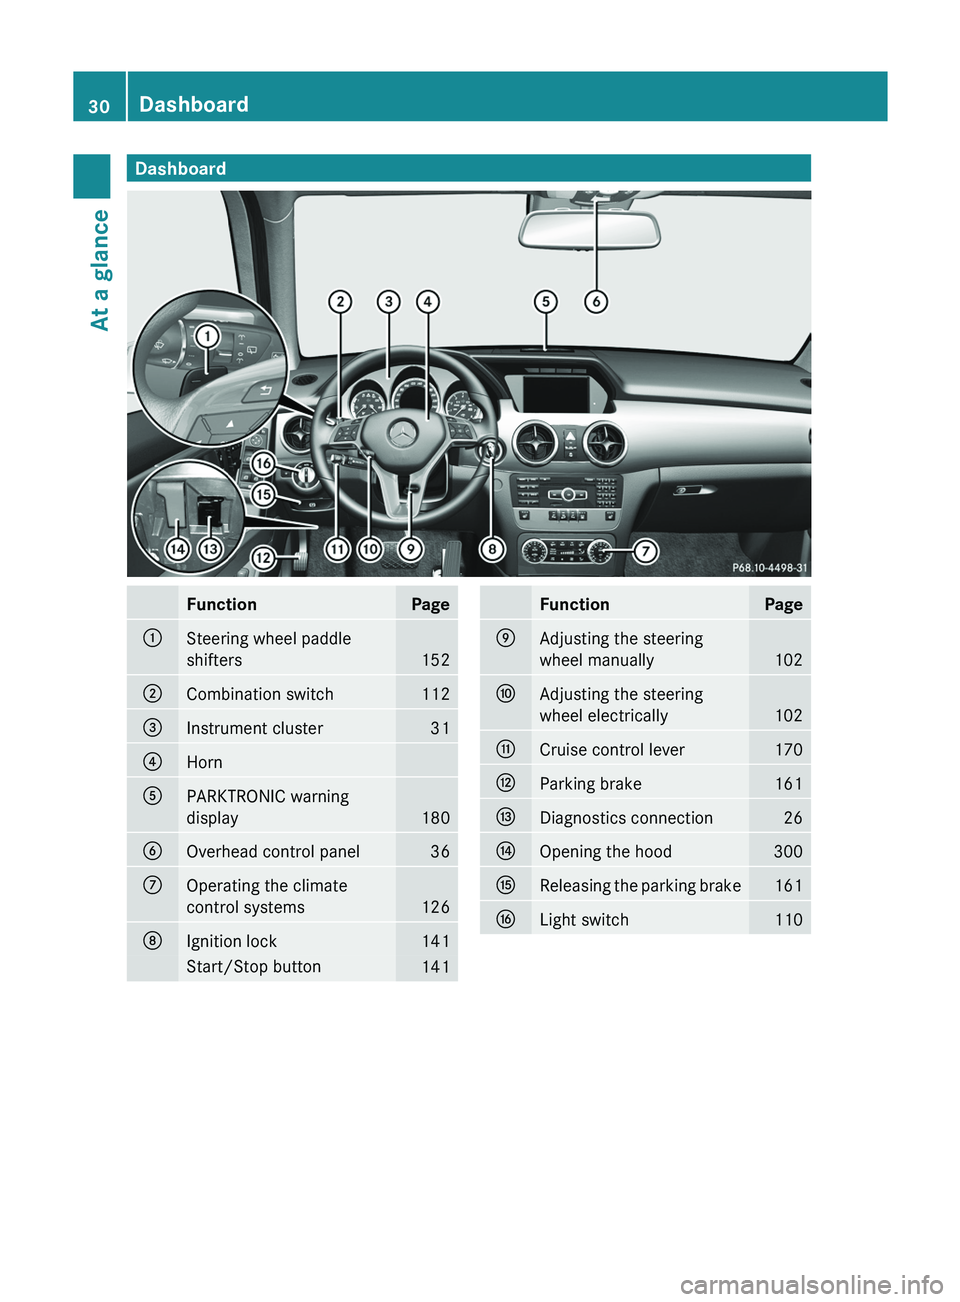
Dashboard
Function Page
0043
Steering wheel paddle
shifters
152
0044
Combination switch 112
0087
Instrument cluster 31
0085
Horn
0083
PARKTRONIC warning
display
180
0084
Overhead control panel 36
006B
Operating the climate
control systems
126
006C
Ignition lock 141
Start/Stop button
141 Function Page
006D
Adjusting the steering
wheel manually
102
006E
Adjusting the steering
wheel electrically
102
006F
Cruise control lever 170
0070
Parking brake 161
0071
Diagnostics connection 26
0072
Opening the hood 300
0073
Releasing the parking brake 161
0074
Light switch 11030
DashboardAt a glance
Page 73 of 380
R
interference by other radar sources
R there are strong radar reflections, for
example in parking garages
R a narrow vehicle traveling in front, e.g. a
motorbike
R a vehicle traveling in front
on a different line
relative to the center of your vehicle G
WARNING
PRE-SAFE ®
Brake does not react:
R to people or animals
R to oncoming vehicles
R to crossing traffic
R when cornering
As a result, PRE-SAFE ®
Brake may neither
give warnings nor intervene in all critical
situations. There is a risk of an accident.
Always pay careful attention to the traffic
situation and be ready to brake.
In order to maintain an appropriate distance
from the vehicle in front and thus prevent a
collision, you must apply the
brakes yourself.
X To activate/deactivate: activate or
deactivate PRE-SAFE ®
Brake in the on-
board computer ( Y page 225).
When PRE-SAFE ®
Brake is activated, the
00C7 symbol appears in the multifunction
display as long as the HOLD function is
deactivated ( Y page 179).
On vehicles with Parking Guidance, the
00C7 symbol is displayed when position P
is engaged or you are driving faster than
22 mph (35 km/h ).
Following damage to the front end of the
vehicle, have the configuration
and
operation
of the radar sensors checked at a qualified
specialist workshop. This also applies to
collisions at low speeds where there is no
visible damage to the front of the vehicle. Theft deterrent locking system
Immobilizer
The immobilizer prevents your vehicle from
being started without the correct SmartKey.
When leaving the vehicle, always take the
SmartKey with you and lock the vehicle. The
engine can be started by anyone with a valid
SmartKey that is left inside the vehicle.
X To activate with the SmartKey: remove
the SmartKey from the ignition lock.
X To activate with KEYLESS-GO: switch the
ignition off and open the driver's door.
X To deactivate: switch on the ignition.
i The immobilizer is always deactivated
when you start the engine.
In the event that the engine cannot be
started when the starter battery is fully
charged, the immobilizer may be faulty.
Contact an authorized Mercedes-Benz
Center or call 1-800-FOR-MERCedes
(in the
USA) or 1-800-387-0100 (in Canada). ATA (anti-theft alarm system)
A visual and audible alarm is triggered if the
alarm system is armed and you open:
R a door
R the vehicle with the mechanical key
R the tailgate
R the hood
The alarm is not switched off, even if you
close the open door that triggered it, for
example. Theft deterrent locking system
71
Safety Z
Page 120 of 380
Changing the front bulbs
Low-beam headlamps (halogen
headlamps) G
WARNING
These bulbs are pressurized.
They can explode when being changed if:
R they are still hot
R they hit an object when being removed
R they are dropped
There is a risk of injury.
You should wear eye protection and clean
gloves when you are changing a bulb. If
necessary, have bulbs changed at a qualified
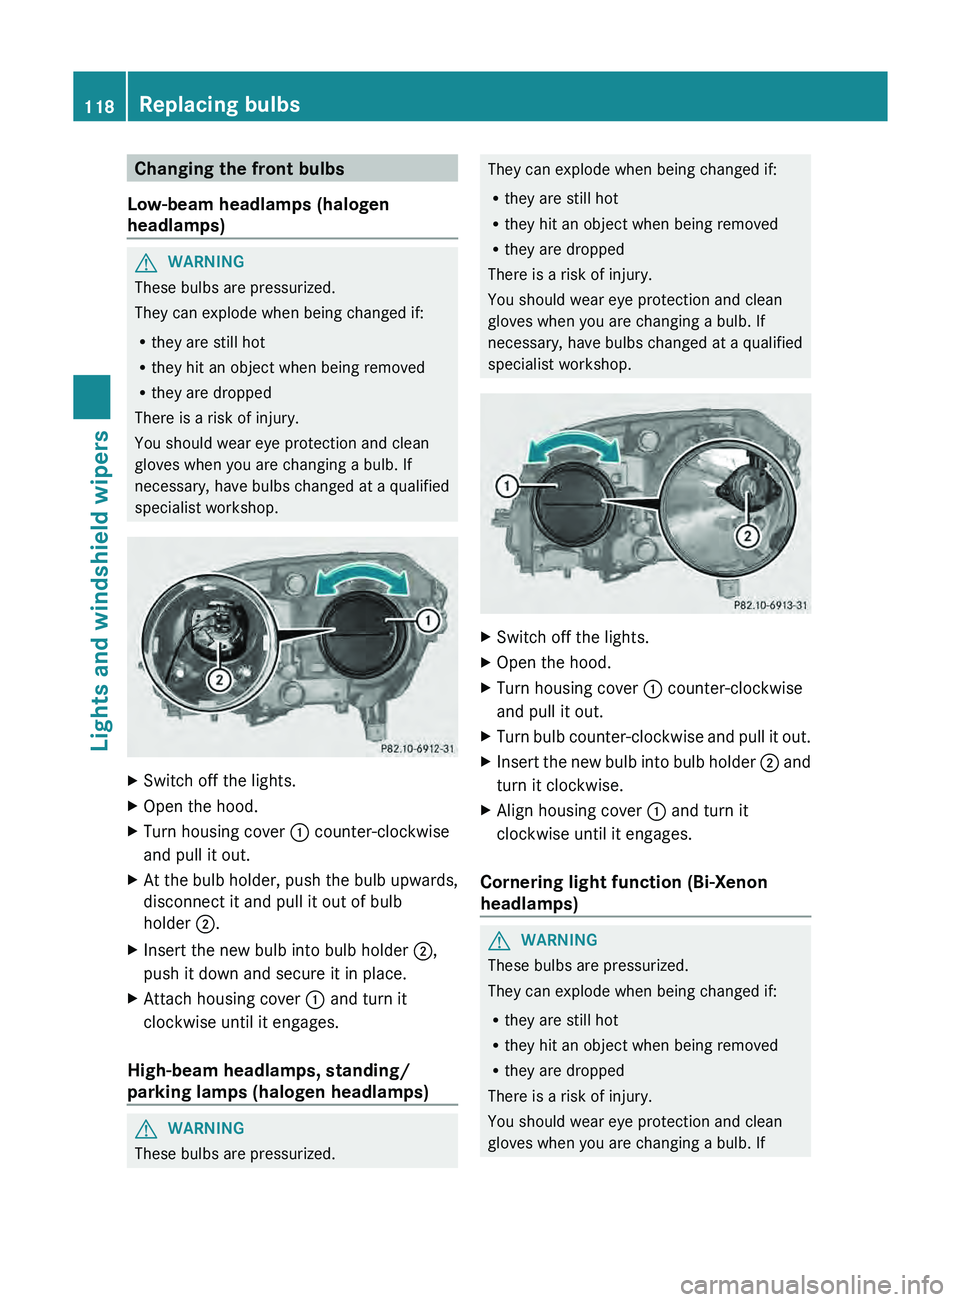
specialist workshop. X
Switch off the lights.
X Open the hood.
X Turn housing cover 0043 counter-clockwise
and pull it out.
X At the bulb holder, push the bulb upwards,
disconnect it and pull it out of bulb
holder 0044.
X Insert the new bulb into bulb holder 0044,
push it down and secure it in place.
X Attach housing cover 0043 and turn it
clockwise until it engages.
High-beam headlamps, standing/
parking lamps (halogen headlamps) G
WARNING
These bulbs are pressurized. They can explode when being changed if:
R
they are still hot
R they hit an object when being removed
R they are dropped
There is a risk of injury.
You should wear eye protection and clean
gloves when you are changing a bulb. If
necessary, have bulbs changed at a qualified
specialist workshop. X
Switch off the lights.
X Open the hood.
X Turn housing cover 0043 counter-clockwise
and pull it out.
X Turn bulb counter-clockwise and pull it out.
X Insert the new bulb into bulb holder 0044 and
turn it clockwise.
X Align housing cover 0043 and turn it
clockwise until it engages.
Cornering light function (Bi-Xenon
headlamps) G
WARNING
These bulbs are pressurized.
They can explode when being changed if:
R they are still hot
R they hit an object when being removed
R they are dropped
There is a risk of injury.
You should wear eye protection and clean
gloves when you are changing a bulb. If 118
Replacing bulbsLights and windshield wipers
Page 121 of 380
necessary, have bulbs changed at a qualified
specialist workshop.
X
Switch off the lights.
X Open the hood.
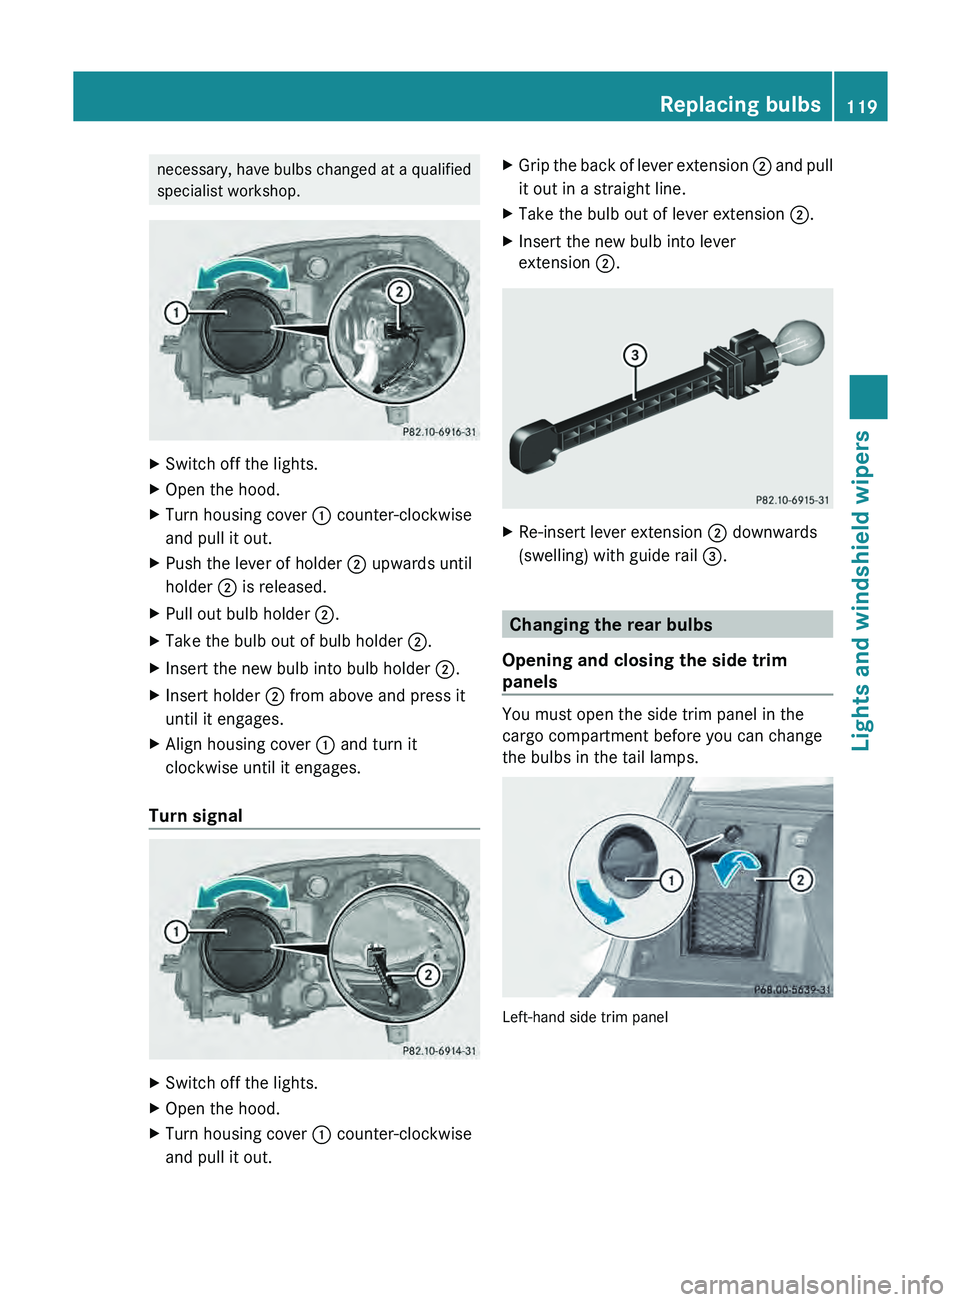
X Turn housing cover 0043 counter-clockwise
and pull it out.
X Push the lever of holder 0044 upwards until
holder 0044 is released.
X Pull out bulb holder 0044.
X Take the bulb out of bulb holder 0044.
X Insert the new bulb into bulb holder 0044.
X Insert holder 0044 from above and press it
until it engages.
X Align housing cover 0043 and turn it
clockwise until it engages.
Turn signal X
Switch off the lights.
X Open the hood.
X Turn housing cover 0043 counter-clockwise
and pull it out. X
Grip the back of lever extension 0044 and pull
it out in a straight line.
X Take the bulb out of lever extension 0044 .
X Insert the new bulb into lever
extension 0044
. X
Re-insert lever extension 0044 downwards
(swelling) with guide rail 0087. Changing the rear bulbs
Opening and closing the side trim
panels You must open the side trim panel in the
cargo compartment before you can change
the bulbs in the tail lamps.
Left-hand side trim panel Replacing bulbs
119
Lights and windshield wipers Z
Page 123 of 380
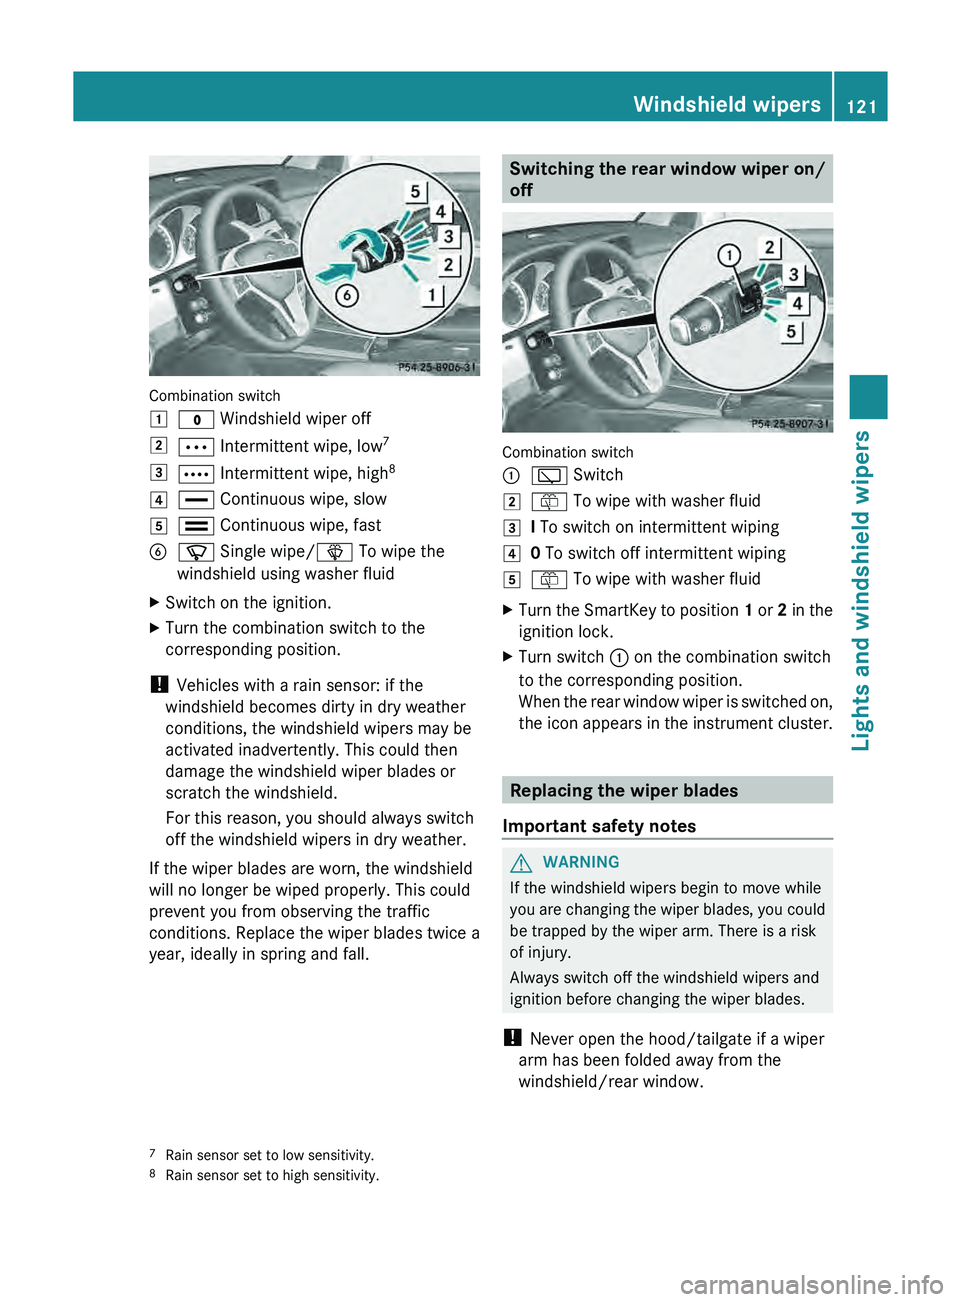
Combination switch
0047
003F Windshield wiper off
0048 0062 Intermittent wipe, low 7
0049 0063 Intermittent wipe, high 8
004A 00AA Continuous wipe, slow
004B 00A9 Continuous wipe, fast
0084 00D3 Single wipe/ 00D4 To wipe the
windshield using washer fluid
X Switch on the ignition.
X Turn the combination switch to the
corresponding position.
! Vehicles with a rain sensor: if the
windshield becomes dirty in dry weather
conditions, the windshield wipers may be
activated inadvertently. This could then
damage the windshield wiper blades or
scratch the windshield.
For this reason, you should always switch
off the windshield wipers in dry weather.
If the wiper blades are worn, the windshield
will no longer be wiped properly. This could
prevent you from observing the traffic
conditions. Replace the wiper blades twice a
year, ideally in spring and fall. Switching the rear window wiper on/
off
Combination switch
0043
00C5 Switch
0048 00E2 To wipe with washer fluid
0049 I To switch on intermittent wiping
004A 0 To switch off intermittent wiping
004B 00E2 To wipe with washer fluid
X Turn the SmartKey to position 1 or
2 in the
ignition lock.
X Turn switch
0043 on the combination switch
to the corresponding position.
When the rear window wiper
is switched on,
the icon appears in the instrument cluster. Replacing the wiper blades
Important safety notes G
WARNING
If the windshield wipers begin to move while
you are changing the wiper
blades, you could
be trapped by the wiper arm. There is a risk
of injury.
Always switch off the windshield wipers and
ignition before changing the wiper blades.
! Never open the hood/tailgate if a wiper
arm has been folded away from the
windshield/rear window.
7 Rain sensor set to low sensitivity.
8 Rain sensor set to high sensitivity. Windshield wipers
121
Lights and windshield wipers Z
Page 139 of 380
X
Turn the SmartKey to position 0 in the
ignition lock (Y page 141) or remove it.
X To activate: press the 004B button.
The indicator lamp in the 004B
button lights
up.
i If the residual heat function is activated,
the windows may fog up on the inside.
X To deactivate: press the 004B button.
The indicator lamp in the 004B
button goes
out.
i Residual heat is deactivated
automatically:
R after approximately 30 minutes
R when the ignition is switched on
R if the battery voltage drops
R when the auxiliary heating is activated Setting the air vents
Important safety notes
G
WARNING
Very hot or very cold air can flow from the air
vents. This could result in
burns or frostbite in
the immediate vicinity of the air vents. There
is a risk of injury.
Make sure that all vehicle occupants always
maintain a sufficient distance to the air
outlets. If necessary, redirect the airflow to
another area of the vehicle interior.
In order to ensure the direct flow of fresh air
through the air vents into the vehicle interior,
please observe the following notes:
R keep the air inlet between the windshield
and the hood free of blockages, such as ice,
snow or leaves.
R never cover the air vents or air intake grilles
in the vehicle interior.
i For virtually draft-free ventilation, adjust
the sliders of the air vents to the center
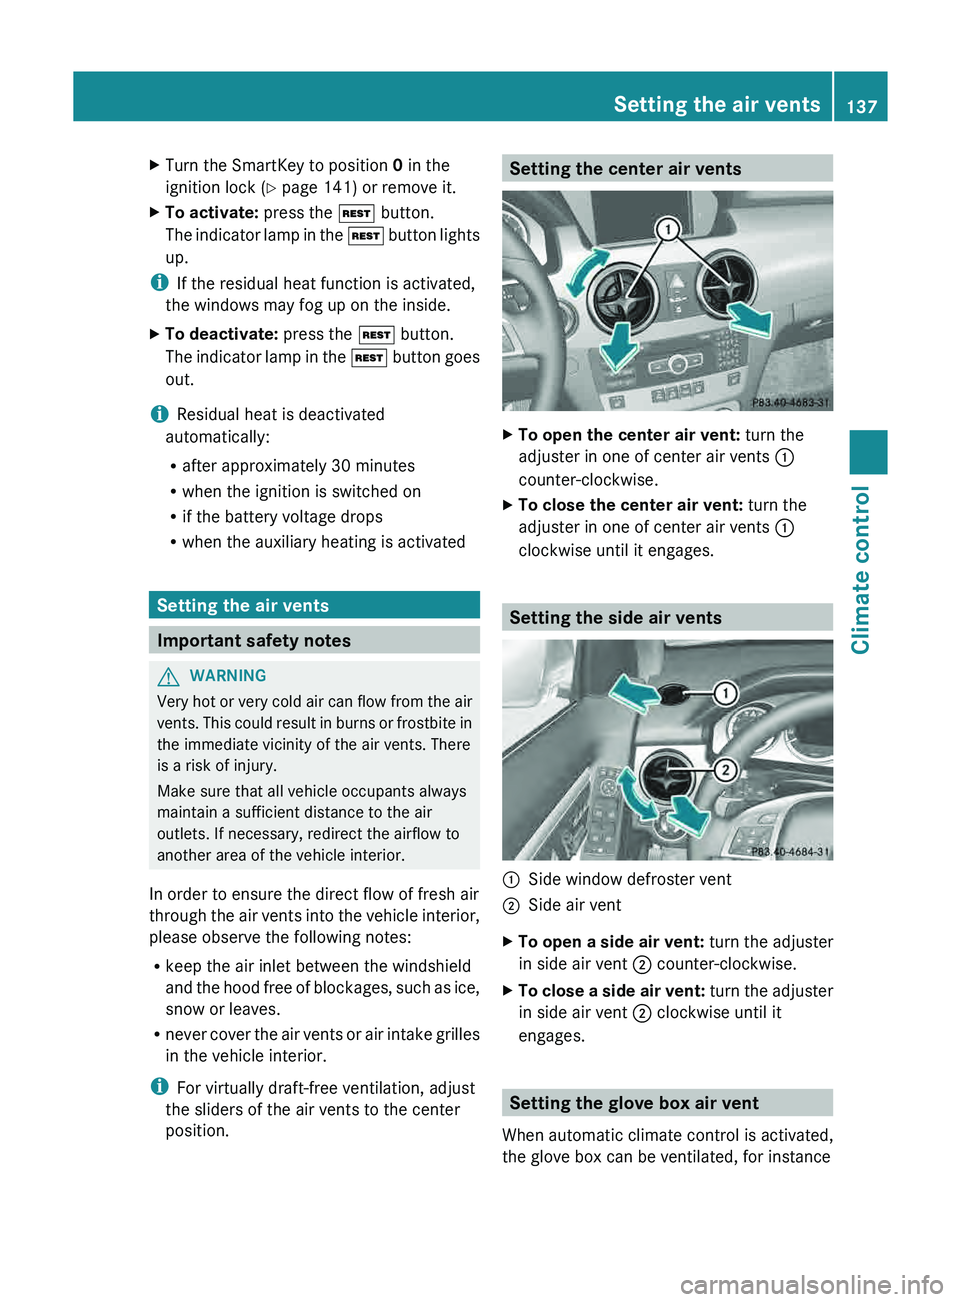
position. Setting the center air vents
X
To open the center air vent: turn the
adjuster in one of center air vents 0043
counter-clockwise.
X To close the center air vent: turn the
adjuster in one of center air vents 0043
clockwise until it engages. Setting the side air vents
0043
Side window defroster vent
0044 Side air vent
X To open a side air vent: turn the adjuster
in side air vent 0044 counter-clockwise.
X To close a side air vent: turn the adjuster
in side air vent 0044
clockwise until it
engages. Setting the glove box air vent
When automatic climate control is activated,
the glove box can be ventilated, for instance Setting the air vents
137
Climate control Z
Page 147 of 380
Every time you switch on the engine using the
SmartKey or the Start/Stop button, the ECO
start/stop function is activated.
If the ECO start/stop function has been
manually deactivated (
Y page 146) or a
malfunction has caused the system to be
deactivated, the 00A7 symbol is not
displayed.
Automatic engine switch-off General notes
The ECO start/stop function is operational
and the
00A7 symbol is displayed in green in
the multifunction display, if:
R the indicator lamp in the ECO button is lit
green.
R the outside temperature is within the
comfort range.
R the engine is at normal operating
temperature.
R the set temperature for the
vehicle interior
has been reached.
R the battery is sufficiently charged.
R the system detects that the windshield is
not fogged up when the air-conditioning
system is switched on.
R the hood is closed.
R the driver's door is closed and the driver's
seat belt is fastened.
If not all conditions for automatic engine
switch-off are fulfilled, the 00A7 symbol is
shown in yellow.
i All of the vehicle's systems remain active
when the engine has been stopped
automatically.
i The engine can be switched off
automatically a maximum of four times
(first stop and three subsequent stops) in
succession. The 00A7 symbol is shown in
yellow in the multifunction display after the
engine has been started automatically for
the fourth time. When the 00A7 symbol is
shown in green in the multifunction display, automatic engine switch-off is again
possible.
Vehicles with automatic transmission
If the vehicle is braked to a standstill in D or
N, the ECO start/stop function switches off
the engine automatically.
i The HOLD function can be
activated if the
engine has been switched off
automatically. It is then not necessary to
continue applying the brakes during the
automatic stop phase. When you depress
the accelerator pedal, the engine starts
automatically and the braking effect of the
HOLD function is deactivated.
Automatic engine start General notes
The engine starts automatically if:
R
you switch off the ECO
start/stop function
by pressing the ECO button.
R you engage reverse gear R.
R the vehicle starts to roll.
R the brake system requires this.
R the temperature in the vehicle interior
deviates from the set range.
R the system detects moisture on the
windshield when the air-conditioning
system is switched on.
R the condition of charge of the battery is too
low.
R the driver's seat belt is removed or the
driver's door is opened.
Vehicles with automatic transmission
The engine is started automatically if you:
R release the brake pedal when HOLD is not
activated and the transmission is in
position D or N.
R depress the accelerator pedal.
R move the transmission out of position P.
i Shifting the transmission to position P
does not start the engine. Driving
145
Driving and parking Z
Page 177 of 380
If you wish to exit the vehicle, always turn off
DISTRONIC PLUS and secure the vehicle
against rolling away.
Deactivating DISTRONIC PLUS
(Y page 177).
If DISTRONIC PLUS detects that the vehicle
in front is stopping, it
brakes your vehicle until
it is stationary.
Once your vehicle is stationary, it remains
stationary and you do not need to depress the
brake.
i Depending on the specified minimum
distance, your vehicle will come to a
standstill at a sufficient distance behind the
vehicle in front. The specified minimum
distance is set using the control on the
cruise control lever.
When DISTRONIC PLUS is activated, the
transmission is shifted automatically to
position P if:
R the driver's door is open and the driver's
seat belt is unfastened.
R the engine is switched off, unless it is
automatically switched off by the ECO
start/stop function.
R the hood is opened.
R a system malfunction occurs.
R the power supply is not sufficient.
Setting a speed X
Press the cruise control lever up 0043 for a
higher speed or down 0044
for a lower speed.
X To adjust the set speed in 1 mph
increments (1 km/h increments):
briefly
press the cruise control lever up 0043
or
down 0044 to the pressure point.
Every time the cruise control lever is
pressed up 0043 or down 0044 the last speed
stored is increased or reduced.
X To adjust the set speed in 5 mph
increments (10 km/h increments):
briefly press the cruise control lever up
0043 or down 0044 beyond the pressure
point.
Every time the cruise control lever is
pressed up 0043 or down 0044, the last speed
stored is increased or reduced.
i DISTRONIC PLUS is not
deactivated
if you
depress the accelerator pedal. If you
accelerate to overtake, DISTRONIC PLUS
adjusts the vehicle's speed to the last
speed stored after you have finished
overtaking.
Storing the current speed or calling up
a stored speed X
Briefly pull the cruise control lever towards
you 0085.
X Remove your foot from the accelerator
pedal.
DISTRONIC PLUS is activated. The first
time it is activated, the current speed is
stored. Otherwise, it sets the
vehicle cruise
speed to the previously stored value.
Setting the specified minimum distance You can set the specified minimum distance
for
DISTRONIC PLUS
by varying
the time span
between one and two seconds. With this
function, you can set the minimum distance
that DISTRONIC PLUS keeps to the vehicle in
front, dependent on vehicle speed. You can
see this distance in the multifunction display
(Y page 176).
i Make sure that you maintain a sufficient
distance to the vehicle in front and comply
with the minimum distance as required by
law. Adjust the distance to the vehicle in
front if necessary. Driving systems
175
Driving and parking Z
Page 182 of 380
Activating the HOLD function
X
Make sure that the activation conditions
are met.
X Depress the brake pedal.
X Quickly depress the brake pedal further
until 00D9 appears in the multifunction
display.
The HOLD function is activated. You can
release the brake pedal.
i If depressing the brake pedal the first
time does not activate the HOLD function,
wait briefly and then try again.
Deactivating the HOLD function The HOLD function is deactivated
automatically if:
R
you accelerate and the transmission is in
position D or R
R the transmission is in position P.
R you depress the brake pedal again with a
certain amount of pressure until 00D9
disappears from the multifunction display
R you activate DISTRONIC PLUS
When the HOLD function is activated, the
automatic transmission is shifted
automatically to position P if:
R the driver's door is open and the driver's
seat belt is unfastened.
R the engine is switched off, unless it is
automatically switched off by the ECO
start/stop function.
R the hood is opened.
R a system malfunction occurs.
R the power supply is not sufficient.
The horn will also sound
at regular intervals if
the HOLD function is activated and you:
R switch the engine off, open the driver's
door and remove your seat belt
R open the hood
The sounding of the horn alerts you to the fact
that the vehicle has been parked while the
HOLD function is still activated. If you attempt to lock the vehicle, the tone becomes louder.
The vehicle is not locked until the HOLD
function is deactivated.
i
If the engine has been switched off, it
cannot be started again until the HOLD
function has been deactivated.
If there is a malfunction in the system or
power supply while the HOLD function is
activated, the Brake Immediately message
is shown in the multifunction display.
Immediately depress the brake firmly until
the warning message in the multifunction
display goes out.
You can
also shift the transmission to position
P. This deactivates the HOLD function. PARKTRONIC
Important safety notes PARKTRONIC is an electronic parking aid with
ultrasonic sensors. It indicates visually and
audibly the distance between your vehicle
and an object.
PARKTRONIC is only an aid. It is not a
replacement for your attention to your
immediate surroundings. You are always
responsible for safe maneuvering, parking
and exiting a parking space. When
maneuvering, parking or pulling out of a
parking space, make sure that there are no
persons, animals or objects in the area in
which you are maneuvering.
!
When parking, pay particular attention
to
objects above or below the sensors, such
as flower pots or trailer drawbars.
PARKTRONIC does not detect such objects
when they are in the immediate vicinity of
the vehicle. You could damage the vehicle
or the objects.
The sensors may not detect snow and other
objects that absorb ultrasonic waves.
Ultrasonic sources such as an automatic
car wash, the compressed-air brakes on a 180
Driving systems
Driving and parking