fuel pressure MERCEDES-BENZ GLK SUV 2008 Owners Manual
[x] Cancel search | Manufacturer: MERCEDES-BENZ, Model Year: 2008, Model line: GLK SUV, Model: MERCEDES-BENZ GLK SUV 2008Pages: 261, PDF Size: 8.67 MB
Page 12 of 261
H
Headlamp cleaning system............... 149
Headlamps Cleaning. ........................................ 169
Cleaning system. .............................. 77
Misting up. ...................................... 210
Head restraint
Adjusting (front).......................... 63, 64
NECK-PRO. ....................................... 40
Removing (rear). ............................... 64
Resetting triggered head
restraints. ....................................... 215
Head restraints
Adjusting (rear). ................................ 64
Heating
see Air conditioning
High-pressure cleaners..................... 168
Hill start assist..................................... 84
Hook.................................................... 136I
Immobiliser........................................... 54
Indicator and warning lamp Automatic child seat recognition
(malfunction). ................................. 200
Brakes (red). ................................... 202
Coolant. .......................................... 202
Engine diagnostics ..........................203
PASSENGER AIRBAG OFF .........43, 200
Reserve fuel. ................................... 204
Seat belt. ........................................ 203
SRS........................................... 35, 202
Thermotronic (malfunction) ............199
Indicator and warning lamps............ 201
Indicator lamps see Warning and indicator lamps
Instrument cluster ............................... 90
On-board computer (luxury multi-
function steering wheel) .................101
Overview (luxury multi-function
steering wheel). ................................ 26
Overview (multi-function steering
wheel). .............................................. 24Intelligent Light System
......................77
Display message (luxury multi-
function steering wheel) .................192
On-board computer (luxury multi-
function steering wheel) .................103
Interior lighting
Automatic control system .................79
Emergency lighting. ..........................79
Manual control.................................. 79
On-board computer (luxury multi-
function steering wheel) .................103
Reading lamp .................................... 79
Interior motion sensor......................... 55
ISOFIX child seat securing system .....49 J
Jack...................................................... 175 Operation........................................ 227
Jump-starting ...................................... 234
Jump leads ...................................... 234 K
Key......................................................... 58 Changing the battery ......................216
Checking the battery ......................216
Display message (multi-function
steering wheel). .............................. 181
Loss. ............................................... 212
Malfunction..................................... 212
Modifying the programming. .............58
Key positions
Key. .................................................. 61
Kickdown........................................ 88, 89 L
Lamps see Warning and indicator lamps
Lashing eyelets.................................. 133
Licence plate lighting Display message ............................. 192
Lighting
see Lights
Lights
Active light function ..........................77
Automatic headlamp mode. ..............75
Cornering light function ....................78 Index
9 X204_AKB; 1; 5, en-GB
wobuchh,
Version: 2.11.4
2008-10-15T13:20:56+02:00 - Seite 9 Dateiname: 6515_0671_02_buchblock.pdf; preflight
Page 20 of 261
Protection of the environment
H
Environmental note
Daimler's declared policy is one of integrated
environmental protection.
The objectives are for the natural resources
which form the basis of our existence on this
planet to be used sparingly and in a manner
which takes the requirements of both nature
and humanity into account.
You too can help to protect the environment
by operating your vehicle in an environmen-
tally-responsible manner.
Fuel consumption and the rate of engine,
transmission, brake and tyre wear depend on
the following factors:
R operating conditions of your vehicle
R your personal driving style
You can influence both factors.
You should bear the following in mind:
Operating conditions
R avoid short trips as these increase fuel con-
sumption.
R make sure that the tyre pressures are
always correct.
R do not carry any unnecessary weight.
R keep an eye on the vehicle's fuel consump-
tion.
R remove roof racks once you no longer need
them.
R a regularly serviced vehicle will contribute
to environmental protection. You should
therefore adhere to the service intervals.
R always have maintenance work carried out
at a qualified specialist workshop, e.g. a
Mercedes-Benz Service Centre.
Personal driving style R
do not depress the accelerator pedal when
starting the engine.
R do not warm up the engine with the vehicle
stationary.
R drive carefully and maintain a safe distance
from the vehicle in front.
R avoid frequent, sudden acceleration.
R change gear in good time and use each gear
only up to 2
/ 3of its maximum engine speed.
R switch off the engine in stationary traffic. Returning used vehicles
Mercedes-Benz will take back your
Mercedes-Benz to dispose of it in an environ-
mentally-responsible manner, in accordance
with the European Union (EU) End of Life
Vehicles Directive.
The End of Life Vehicles Directive applies to
vehicles of up to 3.5 t gross vehicle weight, in
accordance with national regulations. For
several years, Mercedes-Benz has been
meeting all the legal requirements for a
design which allows for recycling and re-use.
There is a network of return points and dis-
assembly plants which can recycle your vehi-
cle in an environmentally-responsible man-
ner. The options for recycling vehicles and
parts are constantly being developed and
improved. This means that your Mercedes-
Benz will also continue to meet even the
increased recycling quotas in the future in
good time. You can obtain further information
from your national Mercedes-Benz homepage
or your national hotline number. Introduction
17X204_AKB; 1; 5, en-GB
wobuchh,
Version: 2.11.4 2008-10-15T13:20:56+02:00 - Seite 17 ZDateiname: 6515_0671_02_buchblock.pdf; preflight
Page 147 of 261
Running-in notes
The first 1,500 km
G
Risk of accident
New brake pads/linings only have optimal
braking performance after several hundred
kilometres. Until then, compensate for this by
applying greater force to the brake pedal. This
also applies when brake pads/linings or
brake discs have been changed.
If you treat the engine with sufficient care
from the very start, you will be rewarded with
excellent performance for the remainder of
the engine's life.
R Therefore, you should drive at varying road
and engine speeds for the first 1,500 km.
R Avoid heavy loads, e.g. driving at full throt-
tle, during this time. Do not exceed 2
/ 3 of
the maximum permissible engine speed for
each gear.
R Change gear in good time.
R Do not shift down a gear manually in order
to brake.
R try to avoid depressing the accelerator
pedal beyond the pressure point (kick-
down).
R only use ranges 3,2or 1for slow driving,
e.g. in mountainous terrain.
After 1,500 km, you can continuously
increase the engine speed and bring the vehi-
cle up to full road speed.
i You should also observe these notes on
running in if the engine or the axle gear on
your vehicle has been replaced. Refuelling
Refuelling
G
Risk of explosion
Fuel is highly flammable. Fire, naked flames
and smoking are therefore prohibited when
handling fuels.
Switch off the engine before refuelling. G
Risk of injury
Avoid any contact with fuels.
You can damage your health if your skin
comes into direct contact with fuel or if you
inhale fuel vapours. G
Risk of fire
Do not use petrol to refuel vehicles with a die-
sel engine. Never mix diesel with petrol. This
causes damage to the fuel system and engine
and could result in the vehicle catching fire.
! Do not use petrol to refuel vehicles with a
diesel engine. Do not use diesel to refuel
vehicles with a petrol engine. Even a small
quantity of the wrong fuel will damage the
injection system. Damage resulting from
adding the wrong fuel is not covered by the
warranty.
! Do not start the engine if you accidentally
refuel with the wrong fuel. Otherwise, the
fuel could enter the fuel lines. This would
require draining of the fuel tank and fuel
lines. Notify a qualified specialist workshop
and have the fuel tank and fuel lines
drained completely.
When you open or close the vehicle with the
key, the fuel filler flap is automatically
unlocked or locked.
The position of the fuel filler cap is to the rear
on the right. The position of the fuel filler cap
is displayed in the instrument cluster 8.144 RefuellingOperation
X204_AKB; 1; 5, en-GB
wobuchh,
Version: 2.11.4 2008-10-15T13:20:56+02:00 - Seite 144Dateiname: 6515_0671_02_buchblock.pdf; preflight
Page 148 of 261
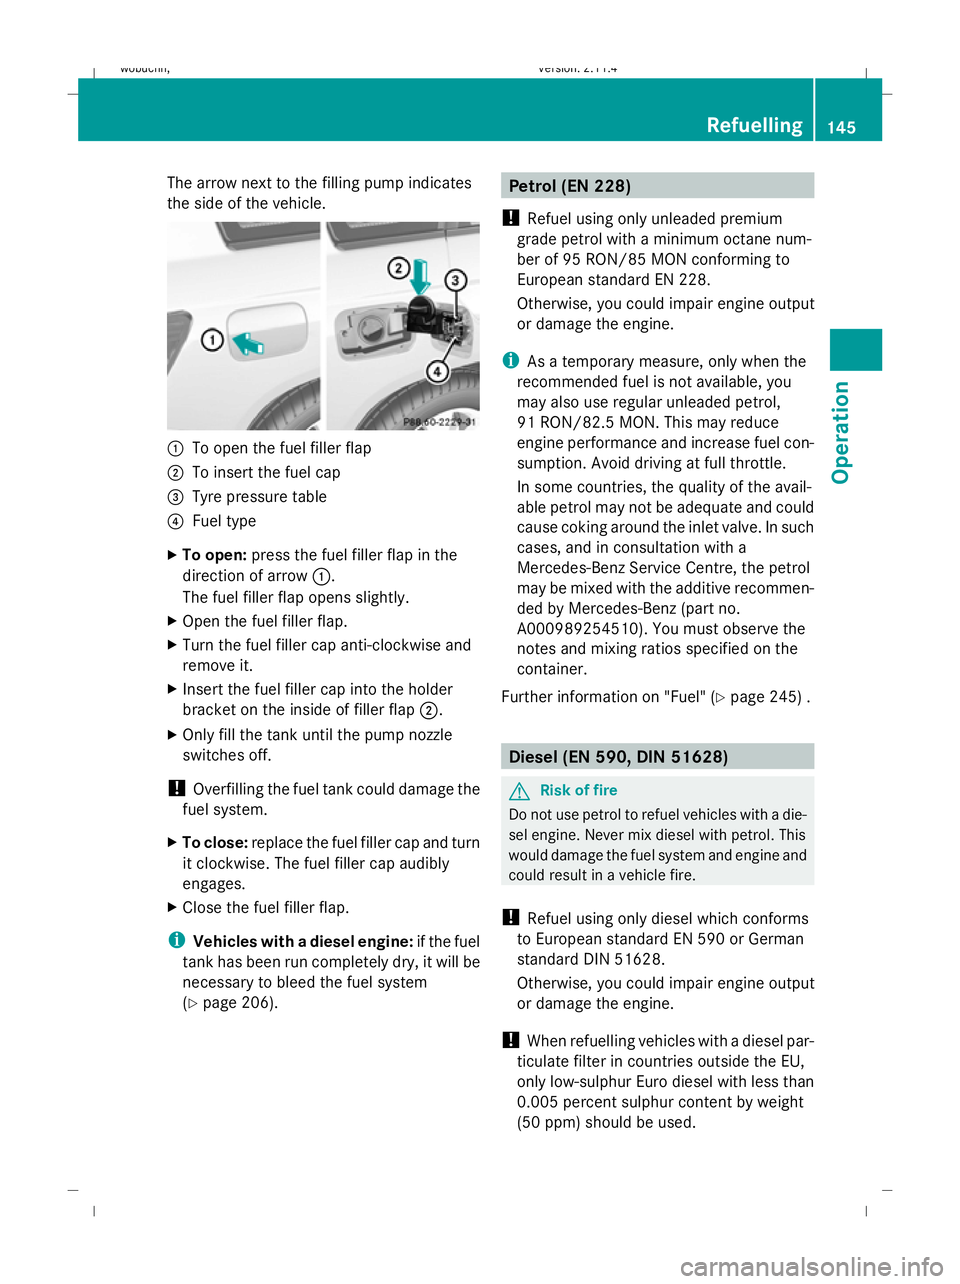
The arrow next to the filling pump indicates
the side of the vehicle.
:
To open the fuel filler flap
; To insert the fuel cap
= Tyre pressure table
? Fuel type
X To open: press the fuel filler flap in the
direction of arrow :.
The fuel filler flap opens slightly.
X Open the fuel filler flap.
X Turn the fuel filler cap anti-clockwise and
remove it.
X Insert the fuel filler cap into the holder
bracket on the inside of filler flap ;.
X Only fill the tank until the pump nozzle
switches off.
! Overfilling the fuel tank could damage the
fuel system.
X To close: replace the fuel filler cap and turn
it clockwise. The fuel filler cap audibly
engages.
X Close the fuel filler flap.
i Vehicles with a diesel engine: if the fuel
tank has been run completely dry, it will be
necessary to bleed the fuel system
(Y page 206). Petrol (EN 228)
! Refuel using only unleaded premium
grade petrol with a minimum octane num-
ber of 95 RON/85 MON conforming to
European standard EN 228.
Otherwise, you could impair engine output
or damage the engine.
i As a temporary measure, only when the
recommended fuel is not available, you
may also use regular unleaded petrol,
91 RON/82.5 MON. This may reduce
engine performance and increase fuel con-
sumption. Avoid driving at full throttle.
In some countries, the quality of the avail-
able petrol may not be adequate and could
cause coking around the inlet valve. In such
cases, and in consultation with a
Mercedes-Benz Service Centre, the petrol
may be mixed with the additive recommen-
ded by Mercedes-Benz (part no.
A000989254510). You must observe the
notes and mixing ratios specified on the
container.
Further information on "Fuel" (Y page 245) . Diesel (EN 590, DIN 51628)
G
Risk of fire
Do not use petrol to refuel vehicles with a die-
sel engine. Never mix diesel with petrol. This
would damage the fuel system and engine and
could result in a vehicle fire.
! Refuel using only diesel which conforms
to European standard EN 590 or German
standard DIN 51628.
Otherwise, you could impair engine output
or damage the engine.
! When refuelling vehicles with a diesel par-
ticulate filter in countries outside the EU,
only low-sulphur Euro diesel with less than
0.005 percent sulphur content by weight
(50 ppm) should be used. Refuelling
145Operation
X204_AKB; 1; 5, en-GB
wobuchh, Version: 2.11.4 2008-10-15T13:20:56+02:00 - Seite 145 ZDateiname: 6515_0671_02_buchblock.pdf; preflight
Page 155 of 261
Direction of rotation
Tyres with a specified direction of rotation
have additional benefits, e.g. if there is a risk
of aquaplaning. You will only gain these ben-
efits if the correct direction of rotation is
observed.
An arrow on the sidewall of the tyre indicates
its correct direction of rotation.
i An emergency spare wheel* may also be
fitted against the direction of rotation. Tyre tread
G
Risk of accident
Bear in mind that:
R tyre grip decreases rapidly on wet roads
when the tread depth is less than 3 mm.
Thus, you should replace tyres that have
insufficient tread.
R winter tyres should be replaced when the
tread depth is 4 mm or less as they will no
longer provide adequate grip.
R the tread on a tyre may not wear evenly.
Thus, you should regularly check the tread
depth and the condition of the tread across
the entire width of all tyres. If necessary,
turn the steering wheel so that you can see
the tyre tread more easily.
Otherwise, you could lose control of the vehi-
cle and cause an accident due to the reduced
grip of the tyres on the road. Tyre pressures
i You will find a table of tyre pressures for
various operating conditions on the inside
of your vehicle's fuel filler flap.
The valid value for the "Minispare" emer-
gency spare wheel* is stated on the spare
wheel and in the technical data section. G
Risk of accident
Tyre pressure that is either too high or too low
has a negative effect on the vehicle’s driving
safety, which could lead you to cause an acci-
dent. Therefore, you should regularly check
the pressure of all the tyres, particularly prior
to long trips, and correct the pressure as nec-
essary.
To test tyre pressure, use a suitable pressure
gauge. The outer appearance of a tyre does
not permit any reliable conclusion about the
tyre pressure. G
Risk of accident
Should the tyre pressure drop repeatedly:
R check the tyre for foreign bodies.
R check whether the wheel is losing air or the
valve is leaking.
R make sure that only a valve cap approved
by Mercedes-Benz has been fitted on the
tyre valve.
Tyre pressure that is too low has a negative
effect on the vehicle’s active safety, which
could lead to your causing an accident.
If possible, you should only correct tyre pres-
sures when the tyres are cold. Depending on
the ambient temperature, the speed you are
driving at and the load on the tyres, the tyre
temperature and thus the tyre pressure may
change by approximately 0.1 bar per 10 °C.
Take this into account when checking the
pressure of warm tyres and only correct it if
it is too low for the current operating condi-
tions.
Driving with tyre pressure that is too high or
too low can:
R shorten the service life of the tyres
R increase the likelihood of tyre damage
R have a negative effect on handling charac-
teristics (e.g. by causing aquaplaning) 152 Ty
res and wheelsOperation
* optional
X204_AKB; 1; 5, en-GB
wobuchh
,V ersion: 2.11.4
2008-10-15T13:20:56+02:00 - Seite 152 Dateiname: 6515_0671_02_buchblock.pdf; preflight
Page 156 of 261
H
Environmental note
Check the tyre pressure regularly, at least
every 14 days. Tyre pressure loss warning
While the vehicle is in motion, the tyre pres-
sure loss warning system monitors the set
tyre pressure using the rotational speed of
the wheels. This enables the system to detect
significant pressure loss in a tyre. If the speed
of rotation of a wheel changes as a result of
a loss of pressure, a corresponding warning
message will appear in the multi-function dis-
play. G
Risk of accident
The tyre pressure loss warning system does
not warn you of an incorrectly set tyre pres-
sure. The table on the inside of the fuel filler
flap will help you decide whether the tyre
pressures should be corrected.
The tyre pressure loss warning system does
not replace the need to regularly check your
vehicle's tyre pressures, since an even loss of
pressure on several tyres at the same time
cannot be detected by the tyre pressure loss
warning system.
The tyre pressure monitor is not able to warn
you of a sudden loss of pressure, e.g. if the
tyre is penetrated by a foreign object.
In the event of a sudden loss of pressure, bring
the vehicle to a halt by braking carefully. Do
not make any sudden steering movements
when doing so.
The function of the tyre pressure loss warning
system is limited or delayed if:
R snow chains are fitted to your vehicle's
tyres
R road conditions are wintry
R you are driving on sand or gravel R
you adopt a very sporty driving style (cor-
nering at high speeds or driving with high
rates of acceleration)
R you are towing a very heavy or large trailer
R you are driving with a heavy load (in the
vehicle or on the roof)
Restarting the tyre pressure loss warn-
ing system Restart the tyre pressure loss warning system
if you have:
R
changed the tyre pressure
R changed the wheels or tyres
R fitted new wheels or tyres
X Before restarting, consult the table of tyre
pressures on the inside of the fuel filler flap
to ensure that the tyre pressure in all four
tyres is set correctly for the operating con-
ditions concerned.
X Also observe the notes in the section on
tyre pressures ( Ypage 152). G
Risk of accident
The tyre pressure loss warning system can
only give reliable warnings if you have set the
correct tyre pressure.
If an incorrect tyre pressure is set, these
incorrect values will be monitored.
A tyre with insufficient pressure results in
vehicle instability when driving, thus increas-
ing the risk of an accident.
Configuring using the multi-function
steering wheel
X Make sure that the key is in position 2in
the ignition lock.
X Press èto select Tyre pressure
menu: R.
X Press the íbutton.
The following appears in the multi-function
display: RFI active Reactivate: R
X Press the íbutton.
The following appears in the multi-function
display: Tyre press. OK? Tyres and wheels
153Operation
X204_AKB; 1; 5, en-GB
wobuchh, Version: 2.11.4 2008-10-15T13:20:56+02:00 - Seite 153 ZDateiname: 6515_0671_02_buchblock.pdf; preflight
Page 162 of 261
R
Drive slowly and evenly, if necessary at a
walking pace.
R Ensure that the wheels are in contact with
the ground at all times.
R Drive with extreme care on unknown off-
road routes where visibility is poor. For
safety reasons, get out of the vehicle first
and survey the off-road route.
R Check the depth of water before fording
rivers and streams.
R Look out for obstacles such as rocks, holes,
tree stumps and furrows.
R Always keep the side windows and the pan-
orama sliding sunroof* closed during the
journey.
R Do not stray from marked routes or paths.
i Information about retrofitting special all-
terrain tyres is available from any
Mercedes-Benz Service Centre.
Checklist before driving off-road X
Engine oil level: check the engine oil and
top it up if necessary.
X Vehicle toolkit: check that the jack is
working and make sure you have the wheel-
brace, a robust tow cable and a folding
spade in the vehicle.
X Wheels and tyres: check the tyre tread
depth and tyre pressure.
X Check for damage and remove foreign
objects, e.g. small stones, from the
wheels/tyres.
X Replace any missing valve caps.
X Replace dented or damaged wheels.
Checklist after driving off-road Driving over rough terrain places greater
demands on your vehicle than driving on nor-
mal roads. After driving off-road, check the
vehicle. This allows you to detect damage
promptly and reduce the risk of an accident
to yourself and other road users. X
Deactivate DSR ( Ypage 105).
X Clean the headlamps and rear lights and
check for damage.
X Clean the front and rear licence plates.
X Clean the wheels/tyres with a water jet and
remove any foreign objects.
X Clean the wheels, wheel arches and the
vehicle underside with a water jet; check
for foreign objects and damage.
X Check whether twigs or other parts of
plants have become trapped. These
increase the risk of fire and can damage
fuel pipes, brake hoses or the rubber bel-
lows of the axle joints and propeller shafts.
X After the trip, examine without fail the
entire undercarriage, wheels, tyres, brakes,
bodywork structure, steering, chassis and
exhaust system for damage.
X After driving for extended periods across
sand, mud, gravel, water or in similarly dirty
conditions, have the brake discs, wheels,
brake pads /linings and axle joints checked
and cleaned.
X If you detect strong vibrations after off-road
travel, check for foreign objects in the
wheels and drive train and remove them if
necessary. Foreign objects can disturb the
balance and cause vibrations. Travelling uphill
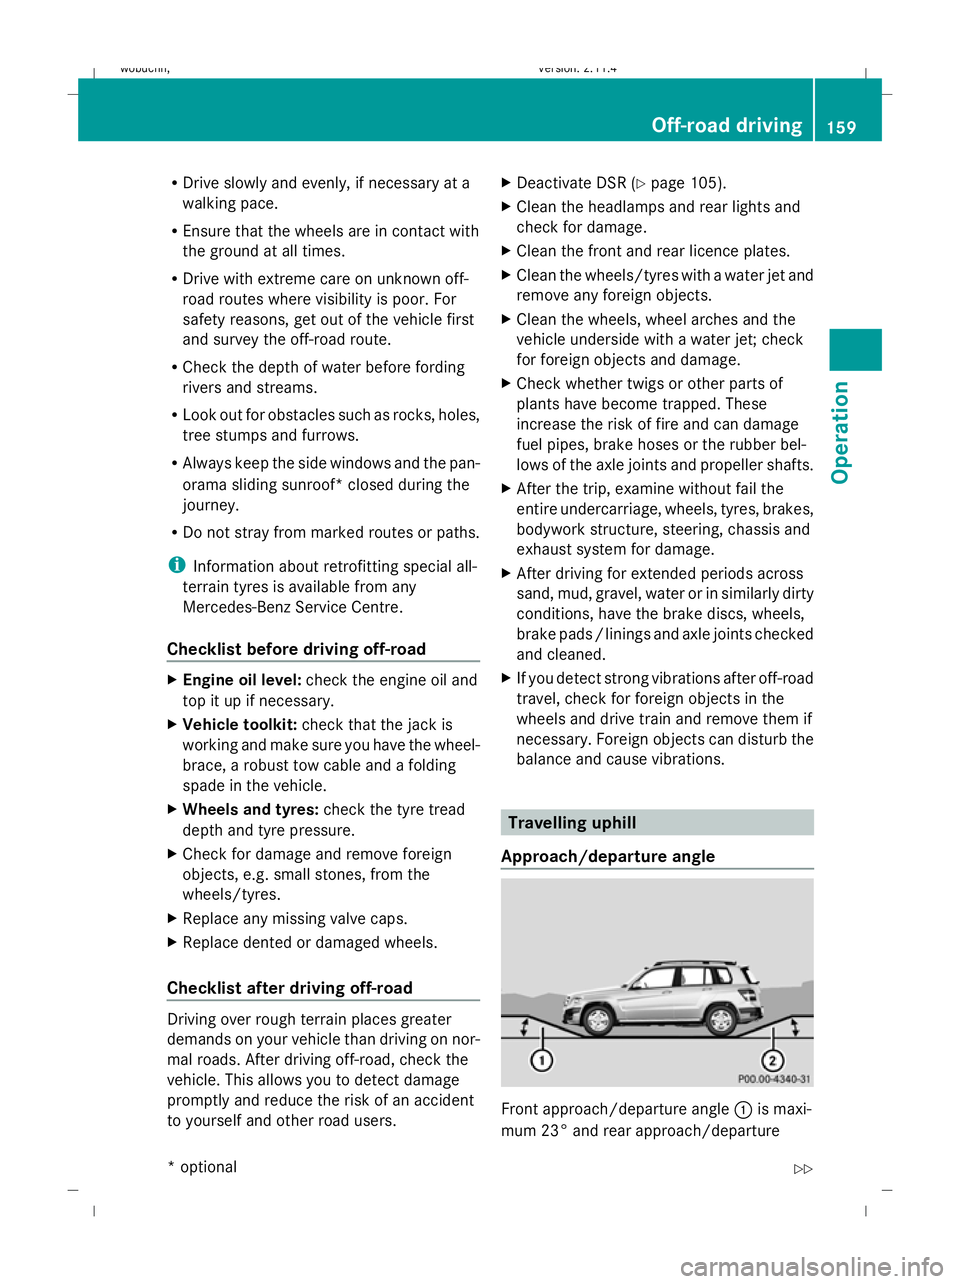
Approach/departure angle Front approach/departure angle
:is maxi-
mum 23° and rear approach/departure Off-road driving
159Operation
* optional
X204_AKB; 1; 5, en-GB
wobuchh,
Version: 2.11.4 2008-10-15T13:20:56+02:00 - Seite 159 ZDateiname: 6515_0671_02_buchblock.pdf; preflight
Page 168 of 261

G
Risk of accident
A maximum speed of 80 km/h should not be
exceeded, even in countries where higher
speeds are permitted for vehicle/trailer com-
binations. This lowers the risk of an accident.
When towing a trailer, your vehicle's handling
characteristics will be different in comparison
to when driving without a trailer.
The vehicle/trailer combination:
R is heavier
R is restricted in its acceleration and gradi-
ent-climbing capability
R has an increased braking distance
R is affected more by strong crosswinds
R demands more sensitive steering
R consumes more fuel
On long and steep downhill gradients, you
must select shift range 1,2or 3in good time.
i This also applies if you have activated
cruise control* or Speedtronic*.
This will use the braking effect of the engine,
so less braking will be required to maintain
the speed. This relieves the load on the brake
system and prevents the brakes from over-
heating and wearing too quickly. If you need
additional braking, depress the brake pedal
repeatedly rather than continuously. G
Risk of accident
Never depress the brake pedal continuously
while the vehicle is in motion, e.g. never cause
the brakes to rub by applying constant slight
pedal pressure. This causes the brake system
to overheat, increases the braking distance
and can lead to the brakes failing completely. Driving tips
R
Maintain a greater distance from the vehi-
cle in front than when driving without a
trailer.
R Avoid braking abruptly. If possible, brake
gently at first to allow the trailer to run on.
Then, increase the braking force rapidly.
R The values given for gradient-climbing
capabilities from a standstill refer to sea
level. When driving in mountainous areas,
note that the power output of the engine,
and consequently the vehicle's gradient-
climbing capability, decrease with increas-
ing altitude.
If the trailer swings from side to side:
X Do not accelerate.
X Do not counter-steer.
X Brake if necessary. G
Risk of accident
On no account should you attempt to draw the
vehicle/trailer combination out by increasing
speed. Removing the ball coupling
X Pull the protective cap off the lock in the
handwheel.
X Insert the key into the lock in the hand-
wheel.
X Turn the key clockwise.
The lock is unlocked.
X Hold the ball coupling. Pull the handwheel
away from the ball coupling and turn it
clockwise until it engages.
The green area on the ball coupling is
aligned with the red mark on the hand-
wheel.
X Pull out the ball coupling downwards.
X Clean the ball coupling if it is dirty.
X Open the stowage well under the luggage
compartment floor. Trailer towing*
165Operation
* optional
X204_AKB; 1; 5, en-GB
wobuchh,
Version: 2.11.4 2008-10-15T13:20:56+02:00 - Seite 165 ZDateiname: 6515_0671_02_buchblock.pdf; preflight
Page 171 of 261
and rinse off the treated surface afterwards.
Remove:
R tree resin, oils, fuels and greases by rub-
bing gently with a cloth soaked in petro-
leum ether or lighter fluid.
R tar stain with tar remover
R wax with silicone remover
! Do not affix to painted surfaces or plastic
surfaces:
R stickers
R films
R magnetic plates
R scented oil bottles or similar items
Otherwise, you could damage the paint fin-
ish or plastic. H
Environmental note
Dispose of empty packaging, cleaning cloths
and polishing wads in an environmentally
responsible manner. Vehicle care
! Do not park the vehicle for a long period
of time directly after cleaning, especially if
the wheels have just been cleaned with a
wheel cleaner. Wheel cleaners could cause
rapid corrosion of the brake discs and
brake pads/linings. After cleaning, park
the vehicle when it is at normal operating
temperature.
Automatic car wash You can wash the vehicle in an automatic car
wash from the beginning.
! Do not use a touch-free automatic car
wash that uses chemical agents to wash
the vehicle.
Preferably use automatic car washes without
brushes.
If the vehicle is very dirty, pre-wash it before
cleaning it in an automatic car wash. !
Make sure that the automatic car wash is
suitable for the size of the vehicle. Fold in
the exterior mirrors before the vehicle is
washed. There is otherwise a risk of dam-
age to the exterior mirrors.
! Make sure that the automatic transmis-
sion is not in position Pwhen washing your
vehicle in a tow-through car wash.
Do not remove the key from the ignition
lock. Do not open the driver's or front-
passenger door when the engine is
switched off, as this automatically shifts
the automatic transmission to park posi-
tion Pand locks the wheels, unless you
have previously shifted the automatic
transmission to N.
! Make sure that the side windows are com-
pletely closed, that the ventilation/heater
blower is fully turned off and that the wind-
screen wiper switch is set to 0. Otherwise,
the rain sensor may be activated, triggering
unintended wiper movements. This could
cause damage to the vehicle.
After using an automatic car wash, wipe off
wax and drying agents from the windscreen
and the wiper blades. This will prevent smears
and reduce wiping noises caused by residue
on the windscreen.
High-pressure cleaners G
Risk of accident
Do not use high-pressure cleaners with circu-
lar-jet nozzles (dirt grinders) to clean your
vehicle, in particular the tyres. Otherwise, you
could damage the tyres and cause an acci-
dent.
! Observe the instructions issued by the
equipment manufacturer concerning the
distance to be maintained between the
nozzle of the high-pressure cleaner and the
vehicle (at least 30 cm).
Move the high-pressure cleaner nozzle
around when cleaning your vehicle. 168 CareOperation
X204_AKB; 1; 5, en-GB
wobuchh,
Version: 2.11.4 2008-10-15T13:20:56+02:00 - Seite 168Dateiname: 6515_0671_02_buchblock.pdf; preflight
Page 228 of 261
required. Mercedes-Benz recommends that
you use a Mercedes-Benz Service Centre for
this purpose. In particular, work relevant to
safety or on safety-related systems must be
carried out at a qualified specialist workshop.
X If the tyre pressure is still at least 1.3 bar,
correct it (see fuel filler flap for values).
To increase the tyre pressure: switch on
the electric air pump.
To reduce the tyre pressure: open pres-
sure release screw Fon pressure
gauge G.
X Drive to the nearest workshop and have the
tyre changed there.
X Have the TIREFIT kit replaced as soon as
possible at a qualified specialist workshop,
e.g. at a Mercedes-Benz Service Centre. G
Risk of accident
Do not exceed the maximum speed of
80 km/h.
The "max. 80 km/h" label must be affixed in
the driver's field of vision.
The vehicle's handling characteristics may be
affected. H
Environmental note
Have the used TIREFIT kit disposed of profes-
sionally, e.g. at a Mercedes-Benz Service
Centre.
X Have the TIREFIT kit replaced every four
years at a qualified specialist workshop,
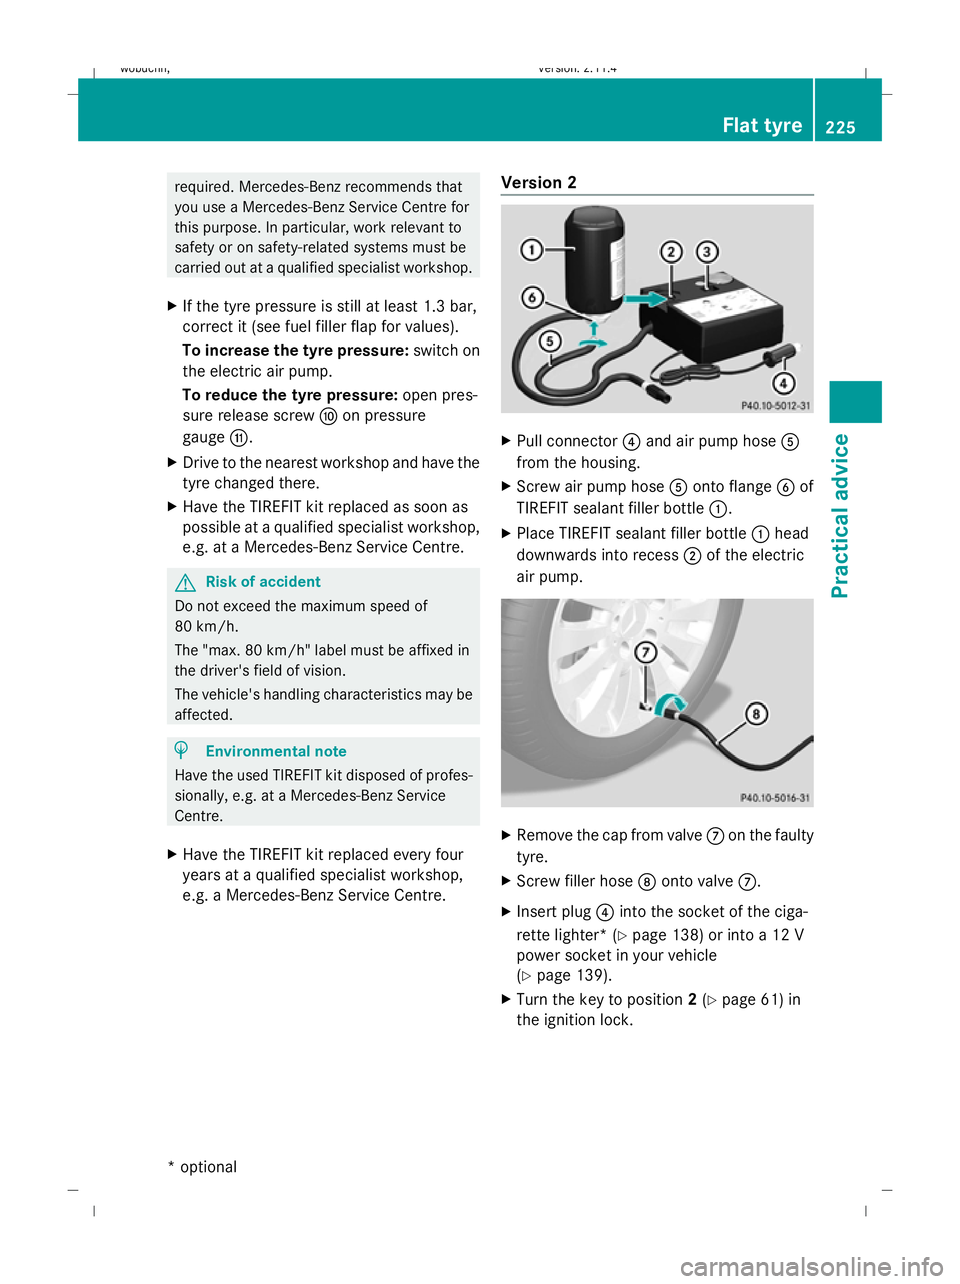
e.g. a Mercedes-Benz Service Centre. Version 2 X
Pull connector ?and air pump hose A
from the housing.
X Screw air pump hose Aonto flange Bof
TIREFIT sealant filler bottle :.
X Place TIREFIT sealant filler bottle :head
downwards into recess ;of the electric
air pump. X
Remove the cap from valve Con the faulty
tyre.
X Screw filler hose Donto valve C.
X Insert plug ?into the socket of the ciga-
rette lighter* (Y page 138) or into a 12 V
power socket in your vehicle
(Y page 139).
X Turn the key to position 2(Y page 61) in
the ignition lock. Flat tyre
225Practical advice
* optional
X204_AKB; 1; 5, en-GB
wobuchh,
Version: 2.11.4 2008-10-15T13:20:56+02:00 - Seite 225 ZDateiname: 6515_0671_02_buchblock.pdf; preflight