interior lights MERCEDES-BENZ GLK SUV 2008 Owners Manual
[x] Cancel search | Manufacturer: MERCEDES-BENZ, Model Year: 2008, Model line: GLK SUV, Model: MERCEDES-BENZ GLK SUV 2008Pages: 261, PDF Size: 8.67 MB
Page 9 of 261
Central locking
Automatic door locking feature
(on-board computer, luxury multi-
function steering wheel). ................104
Key. .................................................. 58
Central locking/unlocking button ......59
Central unlocking Key. .................................................. 58
Centre console
Overview. .......................................... 30
Changing a wheel
see Flat tyre
Checklist (off-road driving)............... 159
Child-proof locks Rear doors. ....................................... 50
Children
In the vehicle. ................................... 41
Restraint systems. ............................ 41
Child seat
Automatic recognition ......................43
Automatic recognition (malfunc-
tion). ............................................... 200
Display message ............................. 182
ISOFIX............................................... 49
Recommendations. ...........................46
Suitable positions. ............................ 44
Cigarette lighter................................. 138
Cleaning the panorama sliding
sunroof................................................ 170
Cleaning the windscreen ..................169
Collapsible wheel Technical data. ............................... 253
COMAND display
Cleaning. ........................................ 170
Constant headlamp mode
see Daytime driving lights
Convenience closing ............................82
Convenience opening ........................... 82
Coolant Checking the level. .........................149
Display message (luxury multi-
function steering wheel) .................186
Display message (multi-function
steering wheel). ......................180, 186
Mixture ratio ................................... 247
Temperature gauge ...........................90
Warning lamp.................................. 202 Cornering lights
Display message ............................. 187
Cruise control..................................... 108
Display message ............................. 182
Cup holder.......................................... 131
Current fuel consumption On-board computer (multi-func-
tion steering wheel). ...................93, 96 D
Dashboard Cleaning. ........................................ 170
see Instrument cluster
Date
Setting (on-board computer,
luxury multi-function steering
wheel). ............................................ 102
Setting (on-board computer,
multi-function steering wheel) ..........93
Daytime driving lights.......................... 75
On-board computer (luxury multi-
function steering wheel) .................102
Delayed switch-off
Exterior lighting (luxury multi-
function steering wheel) .................103
Interior lighting (on-board com-
puter, luxury multi-function steer-
ing wheel). ...................................... 103
Diesel
Low outside temperatures. .............146
Diesel engine
Winter driving. ................................ 146
Digital speedometer............................ .96
Dipped-beam headlamps Display message ............................. 188
Symmetrical. .................................. 162
Display message................................ 176
Display messages Service interval display. ..................167
Symbol messages. ..........................182
Text messages. ............................... 177
Distance recorder
see Total distance recorder
see Trip meter 6 Index
X204_AKB; 1; 5, en-GB
wobuchh,
Version: 2.11.4 2008-10-15T13:20:56+02:00 - Seite 6Dateiname: 6515_0671_02_buchblock.pdf; preflight
Page 12 of 261
H
Headlamp cleaning system............... 149
Headlamps Cleaning. ........................................ 169
Cleaning system. .............................. 77
Misting up. ...................................... 210
Head restraint
Adjusting (front).......................... 63, 64
NECK-PRO. ....................................... 40
Removing (rear). ............................... 64
Resetting triggered head
restraints. ....................................... 215
Head restraints
Adjusting (rear). ................................ 64
Heating
see Air conditioning
High-pressure cleaners..................... 168
Hill start assist..................................... 84
Hook.................................................... 136I
Immobiliser........................................... 54
Indicator and warning lamp Automatic child seat recognition
(malfunction). ................................. 200
Brakes (red). ................................... 202
Coolant. .......................................... 202
Engine diagnostics ..........................203
PASSENGER AIRBAG OFF .........43, 200
Reserve fuel. ................................... 204
Seat belt. ........................................ 203
SRS........................................... 35, 202
Thermotronic (malfunction) ............199
Indicator and warning lamps............ 201
Indicator lamps see Warning and indicator lamps
Instrument cluster ............................... 90
On-board computer (luxury multi-
function steering wheel) .................101
Overview (luxury multi-function
steering wheel). ................................ 26
Overview (multi-function steering
wheel). .............................................. 24Intelligent Light System
......................77
Display message (luxury multi-
function steering wheel) .................192
On-board computer (luxury multi-
function steering wheel) .................103
Interior lighting
Automatic control system .................79
Emergency lighting. ..........................79
Manual control.................................. 79
On-board computer (luxury multi-
function steering wheel) .................103
Reading lamp .................................... 79
Interior motion sensor......................... 55
ISOFIX child seat securing system .....49 J
Jack...................................................... 175 Operation........................................ 227
Jump-starting ...................................... 234
Jump leads ...................................... 234 K
Key......................................................... 58 Changing the battery ......................216
Checking the battery ......................216
Display message (multi-function
steering wheel). .............................. 181
Loss. ............................................... 212
Malfunction..................................... 212
Modifying the programming. .............58
Key positions
Key. .................................................. 61
Kickdown........................................ 88, 89 L
Lamps see Warning and indicator lamps
Lashing eyelets.................................. 133
Licence plate lighting Display message ............................. 192
Lighting
see Lights
Lights
Active light function ..........................77
Automatic headlamp mode. ..............75
Cornering light function ....................78 Index
9 X204_AKB; 1; 5, en-GB
wobuchh,
Version: 2.11.4
2008-10-15T13:20:56+02:00 - Seite 9 Dateiname: 6515_0671_02_buchblock.pdf; preflight
Page 38 of 261
Never tamper with electronic components
and their software.
SRS (Supplemental Restraint System)
The SRS reduces the risk of occupants com-
ing into contact with the vehicle's interior in
the event of an accident. It can also reduce
the forces to which occupants are subjected
during an accident.
The SRS consists of:
R the 6 SRS warning lamp
R belt tensioners
R belt force limiters
R airbags
The 6 6SRS warning lamp The SRS functions are checked regularly
when you turn on the ignition and when the
engine is running. Therefore, malfunctions
can be detected in good time.
The
6 warning lamp in the instrument
cluster lights up when the ignition is switched
on. It goes out no later than a few seconds
after the engine is started. G
Risk of injury
If SRS is malfunctioning, individual systems
may be activated unintentionally or not be
deployed in the event of an accident with
heavy braking.
A malfunction has occurred if the 6warn-
ing lamp:
R does not light up when you switch on the
ignition
R does not go out after the engine has been
running for a few seconds
R lights up again once the engine is running
In this case, have SRS checked immediately
at a qualified specialist workshop. Triggering of belt tensioners, belt force
limiters and airbags In the event of a collision, the sensor in the
airbag control unit evaluates important phys-
ical data such as duration, direction and force
of the vehicle deceleration or acceleration.
Based on the evaluation of this data and
depending on the vehicle's rate of longitudi-
nal deceleration in a collision, in the first
stage the airbag control unit pre-emptively
triggers the belt tensioners.
i
The front belt tensioners can only be trig-
gered if the belt tongue is correctly
engaged in the seat belt buckle.
The front airbags are only deployed if there is
an even higher rate of vehicle deceleration in
a longitudinal direction.
Your vehicle has adaptive, dual stage front
airbags. When the first activation threshold is
reached, the front airbag is filled with enough
propellant gas to reduce the risk of injuries.
The front airbag is only fully inflated if a sec-
ond threshold is reached within a few milli-
seconds, due to the control unit having detec-
ted further deceleration.
Criteria for triggering belt tensioners and
airbags
In the first stage of a collision, the airbag con-
trol unit evaluates the duration and direction
of vehicle acceleration or deceleration in
order to determine whether it is necessary to
trigger the belt tensioner and/or airbag.
The belt tensioner and airbag triggering
thresholds are variable and are adapted to the
rate of deceleration of the vehicle. This proc-
ess is pre-emptive in nature as the airbag
must be deployed during – and not at the end
of – the collision.
i Airbags are not deployed in all types of
accidents. They are controlled by complex
sensor technology and evaluation logic.
This process is pre-emptive in nature as
airbag deployment must take place during
the impact and must be adapted to provide Occupant safety
35Safety
X204_AKB; 1; 5, en-GB
wobuchh,V ersion: 2.11.4
2008-10-15T13:20:56+02:00 - Seite 35 ZDateiname: 6515_0671_02_buchblock.pdf; preflight
Page 58 of 261
X
To prime: lock the vehicle using the key.
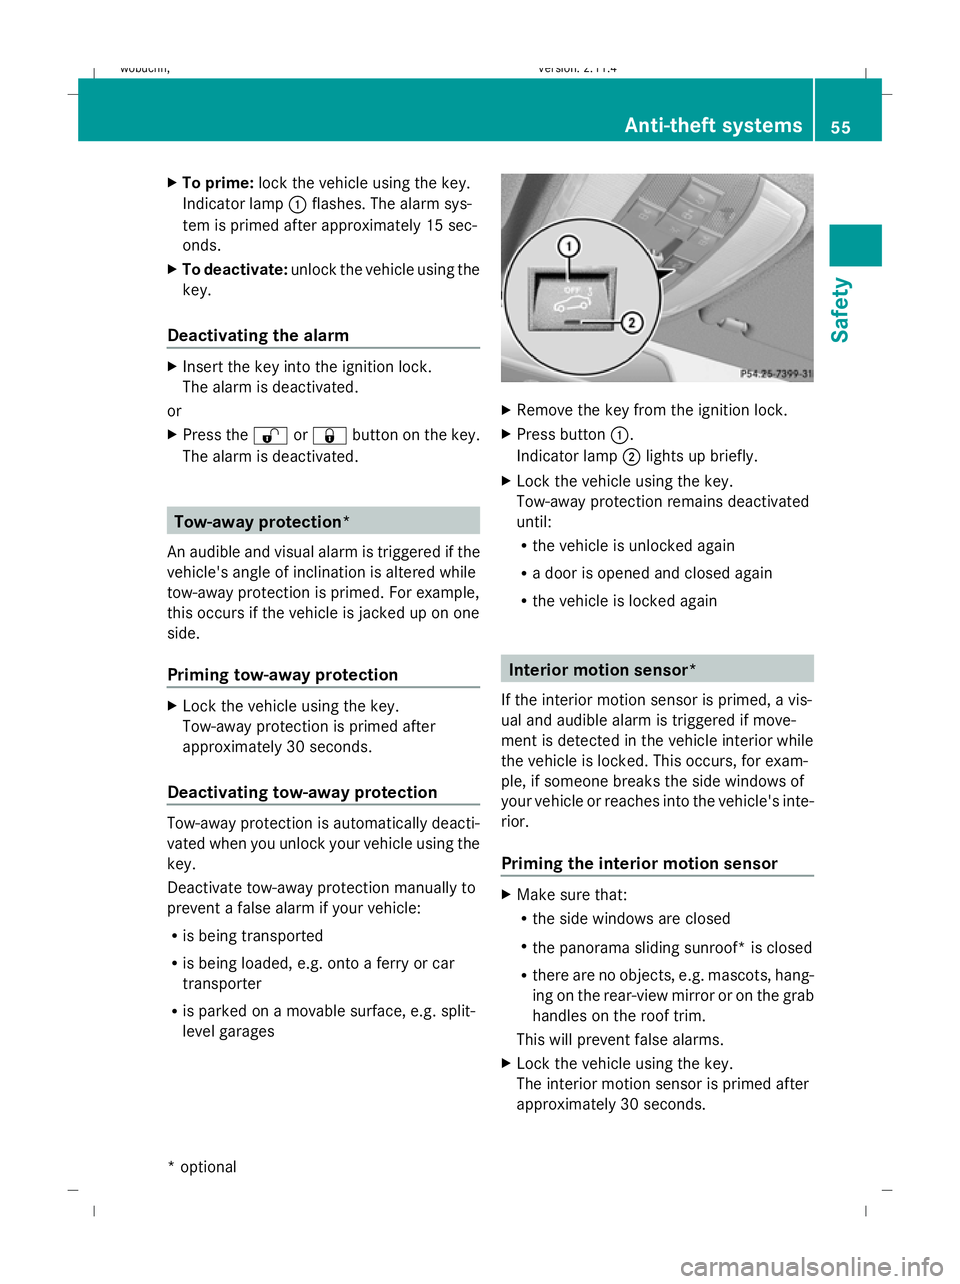
Indicator lamp :flashes. The alarm sys-
tem is primed after approximately 15 sec-
onds.
X To deactivate: unlock the vehicle using the
key.
Deactivating the alarm X
Insert the key into the ignition lock.
The alarm is deactivated.
or
X Press the %or& button on the key.
The alarm is deactivated. Tow-away protection*
An audible and visual alarm is triggered if the
vehicle's angle of inclination is altered while
tow-away protection is primed. For example,
this occurs if the vehicle is jacked up on one
side.
Priming tow-away protection X
Lock the vehicle using the key.
Tow-away protection is primed after
approximately 30 seconds.
Deactivating tow-away protection Tow-away protection is automatically deacti-
vated when you unlock your vehicle using the
key.
Deactivate tow-away protection manually to
prevent a false alarm if your vehicle:
R
is being transported
R is being loaded, e.g. onto a ferry or car
transporter
R is parked on a movable surface, e.g. split-
level garages X
Remove the key from the ignition lock.
X Press button :.
Indicator lamp ;lights up briefly.
X Lock the vehicle using the key.
Tow-away protection remains deactivated
until:
R
the vehicle is unlocked again
R a door is opened and closed again
R the vehicle is locked again Interior motion sensor*
If the interior motion sensor is primed, a vis-
ual and audible alarm is triggered if move-
ment is detected in the vehicle interior while
the vehicle is locked. This occurs, for exam-
ple, if someone breaks the side windows of
your vehicle or reaches into the vehicle's inte-
rior.
Priming the interior motion sensor X
Make sure that:
R
the side windows are closed
R the panorama sliding sunroof* is closed
R there are no objects, e.g. mascots, hang-
ing on the rear-view mirror or on the grab
handles on the roof trim.
This will prevent false alarms.
X Lock the vehicle using the key.
The interior motion sensor is primed after
approximately 30 seconds. Anti-theft systems
55Safety
* optional
X204_AKB; 1; 5, en-GB
wobuchh
,V ersion: 2.11.4
2008-10-15T13:20:56+02:00 - Seite 55 ZDateiname: 6515_0671_02_buchblock.pdf; preflight
Page 71 of 261
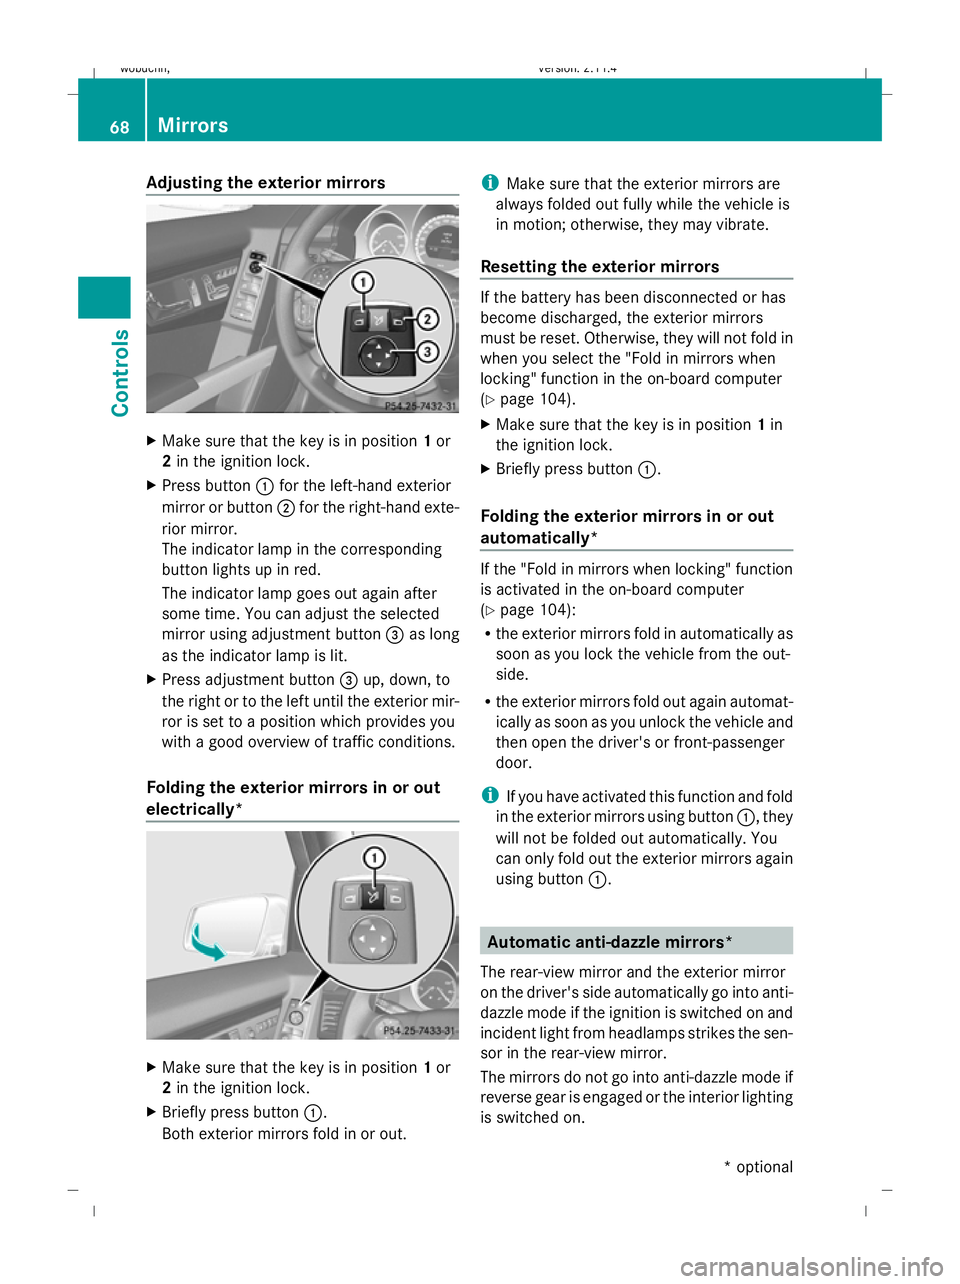
Adjusting the exterior mirrors
X
Make sure that the key is in position 1or
2 in the ignition lock.
X Press button :for the left-hand exterior
mirror or button ;for the right-hand exte-
rior mirror.
The indicator lamp in the corresponding
button lights up in red.
The indicator lamp goes out again after
some time. You can adjust the selected
mirror using adjustment button =as long
as the indicator lamp is lit.
X Press adjustment button =up, down, to
the right or to the left until the exterior mir-
ror is set to a position which provides you
with a good overview of traffic conditions.
Folding the exterior mirrors in or out
electrically* X
Make sure that the key is in position 1or
2 in the ignition lock.
X Briefly press button :.
Both exterior mirrors fold in or out. i
Make sure that the exterior mirrors are
always folded out fully while the vehicle is
in motion; otherwise, they may vibrate.
Resetting the exterior mirrors If the battery has been disconnected or has
become discharged, the exterior mirrors
must be reset. Otherwise, they will not fold in
when you select the "Fold in mirrors when
locking" function in the on-board computer
(Y page 104).
X Make sure that the key is in position 1in
the ignition lock.
X Briefly press button :.
Folding the exterior mirrors in or out
automatically* If the "Fold in mirrors when locking" function
is activated in the on-board computer
(Y
page 104):
R the exterior mirrors fold in automatically as
soon as you lock the vehicle from the out-
side.
R the exterior mirrors fold out again automat-
ically as soon as you unlock the vehicle and
then open the driver's or front-passenger
door.
i If you have activated this function and fold
in the exterior mirrors using button :, they
will not be folded out automatically. You
can only fold out the exterior mirrors again
using button :. Automatic anti-dazzle mirrors*
The rear-view mirror and the exterior mirror
on the driver's side automatically go into anti-
dazzle mode if the ignition is switched on and
incident light from headlamps strikes the sen-
sor in the rear-view mirror.
The mirrors do not go into anti-dazzle mode if
reverse gear is engaged or the interior lighting
is switched on. 68 MirrorsCont
rols
* optional
X204_AKB; 1; 5, en-GB
wobuchh,
Version: 2.11.4 2008-10-15T13:20:56+02:00 - Seite 68Dateiname: 6515_0671_02_buchblock.pdf; preflight
Page 106 of 261
X
Press the :or9 button to select the
Daytime driving lights: function.
You will see the selected setting: Onor
Off.
X Press the abutton to save the setting.
Activating/deactivating the Intelligent
Light System*
When you activate the Intell. Light Sys-
tem: function, you activate the following:
R motorway mode
R active light function
R cornering light function
R extended range foglamps
X Press the =or; button to select the
Settings menu.
X Press the :or9 button to select the
Light submenu.
X Press the abutton to confirm.
X Press the :or9 button to select the
Intell. Light System: function.
You will see the selected setting: Onor
Off.
X Press the abutton to save the setting.
Activating or deactivating the surround
lighting and exterior lighting delayed
switch-off
The Surround lighting: function allows
you to set whether the exterior lighting should
come on when it is dark:
R for 40 seconds after unlocking the vehicle
with the key.
The exterior lighting switches off when you
open the driver’s door.
R for 15 seconds after switching off the
engine and closing the doors.
If the engine is switched off and then none
of the doors are opened, or if an open door
is not closed, the exterior lighting goes out
after 60 seconds.
If you activate the Surround lighting:
function, the following light up: R
the side lamps
R the front foglamps
R the licence plate lighting
X Press the =or; button to select the
Settings menu.
X Press the :or9 button to select the
Light submenu.
X Press the abutton to confirm.
X Press the :or9 button to select the
Surround lighting: function.
You will see the selected setting: Onor
Off.
X Press the abutton to save the setting.
Deactivating the delayed switch-off tempora-
rily:
X Before leaving the vehicle, turn the key to
position 0in the ignition lock.
X Turn the key to position 2in the ignition
lock and back to position 0.
Delayed switch-off is deactivated.
Delayed switch-off is deactivated the next
time you start the engine.
Activating/deactivating the interior light-
ing delayed switch-off
When you activate the Interior lighting
delay sw. off: function and remove the
key from the ignition lock, the interior lighting
remains on for around 10 seconds if it is dark.
X Press the =or; button to select the
Settings menu.
X Press the :or9 button to select the
Light submenu.
X Press the abutton to confirm.
X Press the :or9 button to select the
Interior lighting delay sw. off:
function.
You will see the selected setting: Onor
Off.
X Press the abutton to save the setting. On-board computer (12-button multi-function steering wheel*)
103Controls
* optional
X204_AKB; 1; 5, en-GB
wobuchh,
Version: 2.11.4 2008-10-15T13:20:56+02:00 - Seite 103 ZDateiname: 6515_0671_02_buchblock.pdf; preflight
Page 125 of 261
Controlling the air conditioning auto-
matically
In automatic mode, the set temperature is
maintained automatically at a constant level.
The system automatically regulates the tem-
perature of the dispensed air, the airflow and
the air distribution.
The automatic air conditioning will achieve
optimal operation if "cooling with air dehu-
midification" is also activated. If necessary,
cooling with air dehumidification can be deac-
tivated.
X Turn the key to position 2in the ignition
lock.
X Set the desired temperature.
X To activate: press theÃbutton.
The indicator lamp in the Ãbutton lights
up. Automatic air distribution and airflow
are activated.
X To switch off: press theÃbutton.
The indicator lamp in the Ãbutton goes
out. Automatic air distribution and airflow
are deactivated. Setting the temperature
2-zone Thermatic Different temperatures can be set for the
driver's and front-passenger sides.
X Turn the key to position 2in the ignition
lock.
X To increase/reduce: turn thumb-
wheels :and Dclockwise or anti-clock-
wise ( Ypage 118). Only change the tem-
perature setting in small increments. Start
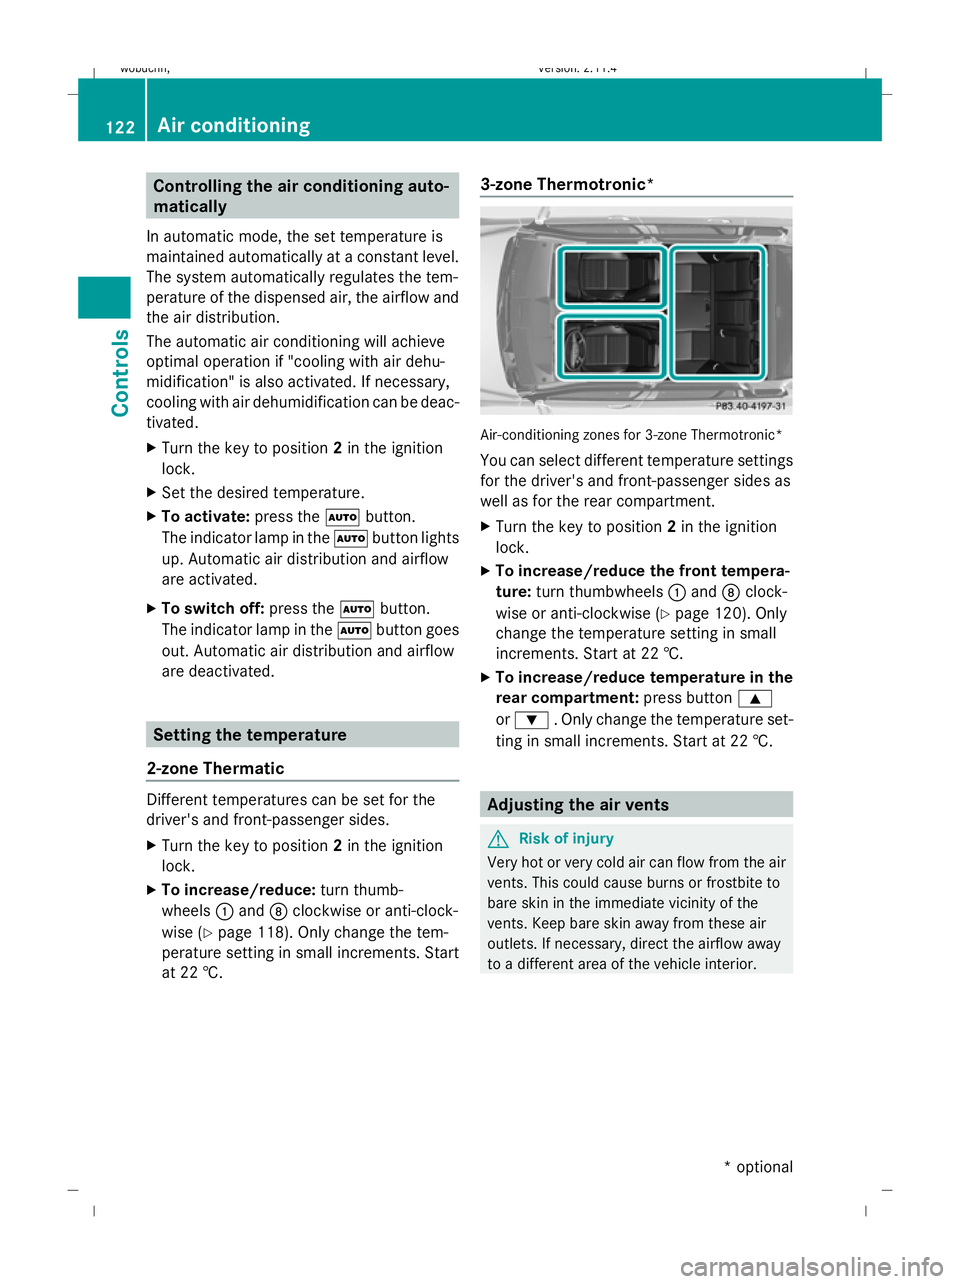
at 22 †. 3-zone Thermotronic* Air-conditioning zones for 3-zone Thermotronic*
You can select different temperature settings
for the driver's and front-passenger sides as
well as for the rear compartment.
X
Turn the key to position 2in the ignition
lock.
X To increase/reduce the front tempera-
ture: turn thumbwheels :and Dclock-
wise or anti-clockwise (Y page 120). Only
change the temperature setting in small
increments. Start at 22 †.
X To increase/reduce temperature in the
rear compartment: press button9
or : . Only change the temperature set-
ting in small increments. Start at 22 †. Adjusting the air vents
G
Risk of injury
Very hot or very cold air can flow from the air
vents. This could cause burns or frostbite to
bare skin in the immediate vicinity of the
vents. Keep bare skin away from these air
outlets. If necessary, direct the airflow away
to a different area of the vehicle interior. 122 Air conditioningControls
* optional
X204_AKB; 1; 5, en-GB
wobuchh,
Version: 2.11.4 2008-10-15T13:20:56+02:00 - Seite 122Dateiname: 6515_0671_02_buchblock.pdf; preflight
Page 127 of 261
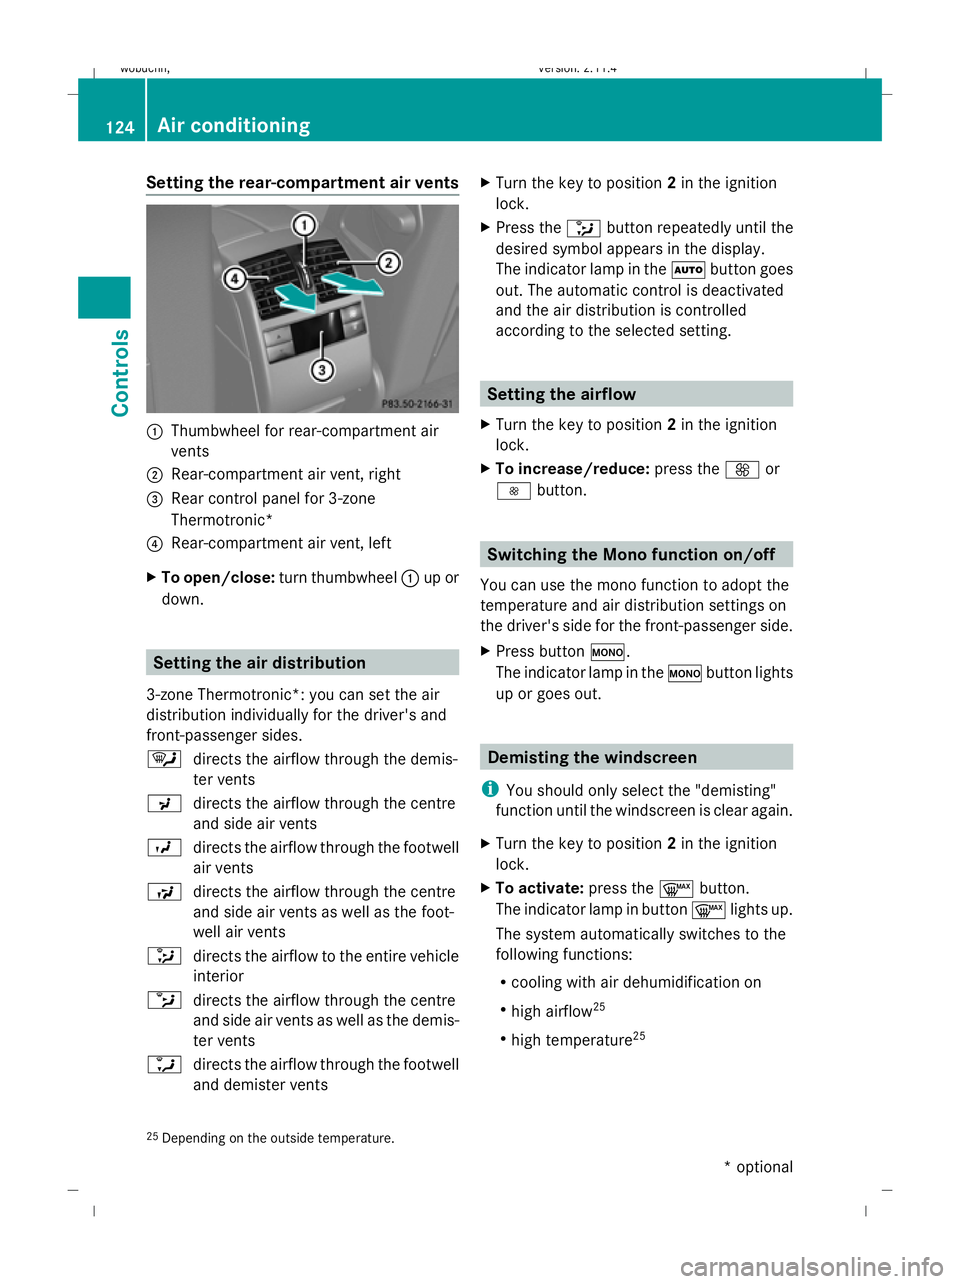
Setting the rear-compartment air vents
:
Thumbwheel for rear-compartment air
vents
; Rear-compartment air vent, right
= Rear control panel for 3-zone
Thermotronic*
? Rear-compartment air vent, left
X To open/close: turn thumbwheel :up or
down. Setting the air distribution
3-zone Thermotronic*: you can set the air
distribution individually for the driver's and
front-passenger sides.
¯ directs the airflow through the demis-
ter vents
P directs the airflow through the centre
and side air vents
O directs the airflow through the footwell
air vents
S directs the airflow through the centre
and side air vents as well as the foot-
well air vents
_ directs the airflow to the entire vehicle
interior
b directs the airflow through the centre
and side air vents as well as the demis-
ter vents
a directs the airflow through the footwell
and demister vents X
Turn the key to position 2in the ignition
lock.
X Press the _button repeatedly until the
desired symbol appears in the display.
The indicator lamp in the Ãbutton goes
out. The automatic control is deactivated
and the air distribution is controlled
according to the selected setting. Setting the airflow
X Turn the key to position 2in the ignition
lock.
X To increase/reduce: press theKor
I button. Switching the Mono function on/off
You can use the mono function to adopt the
temperature and air distribution settings on
the driver's side for the front-passenger side.
X Press button º.
The indicator lamp in the ºbutton lights
up or goes out. Demisting the windscreen
i You should only select the "demisting"
function until the windscreen is clear again.
X Turn the key to position 2in the ignition
lock.
X To activate: press the¬button.
The indicator lamp in button ¬lights up.
The system automatically switches to the
following functions:
R cooling with air dehumidification on
R high airflow 25
R high temperature 25
25 Depending on the outside temperature. 124 Air conditioningControls
* optional
X204_AKB; 1; 5, en-GB
wobuchh,
Version: 2.11.4 2008-10-15T13:20:56+02:00 - Seite 124Dateiname: 6515_0671_02_buchblock.pdf; preflight
Page 129 of 261
i
Air-recirculation mode is activated auto-
matically at high outside temperatures.
When air-recirculation mode is activated
automatically, the indicator lamp in
the , button is not lit.
Outside air is added after about 30
minutes.
X To deactivate: press the,button.
The indicator lamp in the ,button goes
out.
i Air-recirculation mode switches off auto-
matically:
R after approximately five minutes at out-
side temperatures below approximately
5 †
R after approximately five minutes if cool-
ing with air dehumidification is deactiva-
ted
R after approximately 30 minutes at out-
side temperatures above approximately
5 †
Convenience opening/closing G
Risk of injury
Make sure that nobody can become trapped
between the side window and the door frame
as the side windows are opened and closed.
Do not place objects or lean against the side
windows when they are being opened or
closed. You or the objects could be drawn in
or become trapped between the side window
and the door frame as the window moves. If
there is a risk of entrapment, press
the , button again. Press the button for
stopping, opening or closing the side windows
in the opposite direction as appropriate.
Make sure that nobody can become trapped
as the panorama sliding sunroof* is opened
and closed. If there is a risk of entrapment,
press the ,button again. Press the button
for stopping, opening or closing the panorama
sliding sunroof* in the opposite direction as
appropriate. X
Convenience closing: press and hold
the , button until the side windows and
the panorama sliding sunroof* have
closed.
The indicator lamp in the ,button
comes on. Air-recirculation mode is activa-
ted.
X Convenience opening: press and hold
the , button until the side windows and
the panorama sliding sunroof* have
reached their original position.
The indicator lamp in the ,button goes
out. Air-recirculation mode is deactivated.
i If you open the side windows or the pan-
orama sliding sunroof* manually after clos-
ing with the convenience closing feature,
they will remain in this position when
opened using the convenience opening fea-
ture. Switching the residual heat on/off
The residual heat function is only available in
vehicles featuring 3-zone Thermotronic*.
It is possible to make use of the residual heat
of the engine to continue heating the station-
ary vehicle for up to 30 minutes after the
engine has been switched off. The heating
time depends on the set interior temperature.
i The blower will run at a low speed regard-
less of the airflow setting.
i If you activate the "residual heat" function
at high temperatures, only the ventilation
will be activated. The blower runs at
medium speed.
X Turn the key to position 0in the ignition
lock or remove it.
X To activate: press theTbutton.
The indicator lamp in the Tbutton lights
up. 126 Air conditioningControls
* optional
X204_AKB; 1; 5, en-GB
wobuchh
,V ersion: 2.11.4
2008-10-15T13:20:56+02:00 - Seite 126 Dateiname: 6515_0671_02_buchblock.pdf; preflight