service reset MERCEDES-BENZ GLK SUV 2008 Owners Manual
[x] Cancel search | Manufacturer: MERCEDES-BENZ, Model Year: 2008, Model line: GLK SUV, Model: MERCEDES-BENZ GLK SUV 2008Pages: 261, PDF Size: 8.67 MB
Page 14 of 261
MP3
Operating (on-board computer,
luxury multi-function steering
wheel). .............................................. 99
Multi-function display
Luxury multi-function steering
wheel. ............................................... 94
Multi-function steering wheel. ..........91
Multi-function steering wheel............. 91
Overview. .......................................... 28
Multi-function steering wheel (12-
button)
see Luxury multi-function steering wheel N
Navigation On-board computer (luxury multi-
function steering wheel) ...................97
NECK-PRO head restraints ..................40
Resetting after being triggered. ......215
Notes on running in a new vehicle ...144 O
Odometer Total distance recorder. ..............92, 95
Trip meter. .................................. 92, 95
Off-road
4MATIC ........................................... 105
DSR. ............................................... 105
Off-road ABS. .................................... 51
Off-road drive program. ..................107
Off-road ABS ......................................... 51
Off-road drive program (vehicles
with off-road engineering package) .107
Off-road driving Checklist......................................... 159
Information. .................................... 158
Off-road ESP ®
........................................ 54
Off-road terrain Off-road ESP. .................................... 54
Oil
Consumption. ................................. 148
Topping up. ..................................... 148
On-board computer (luxury multi-
function steering wheel) ......................93
Audio menu ...................................... 98Convenience submenu.
..................104
Display messages ........................... 176
Factory settings submenu ..............104
Instrument cluster submenu ...........101
Lights submenu. ............................. 102
Navigation menu. .............................. 97
Overview. .......................................... 95
Service menu .................................. 101
Settings menu ................................ 101
Standard display submenu................ 95
Telephone menu. .............................. 99
Time/date submenu. ......................102
Trip computer menu. ........................95
Vehicle submenu. ........................... 104
On-board computer (multi-func-
tion steering wheel)............................. 91
Display messages ........................... 176
Overview. .......................................... 92
Range. .............................................. 93
Standard display. .............................. 92
Time/date. ....................................... 93
Trip computer. .................................. 92
On-board computer menu (luxury
multi-function steering wheel).......... 101
One-touch gearshifting........................ 86
Operating system see On-board computer (luxury
multi-function steering wheel)
see On-board computer (multi-
function steering wheel)
Outside temperature display .............90
Override feature Rear side windows ............................ 50 P
Paint code........................................... 244
Panorama sliding sunroof................. 127
Rain closing feature. .......................128
Resetting. ....................................... 129
Parking .................................................. 84
Parking aid Exterior mirror on the front-
passenger side.................................. 69
Parktronic. ...................................... 113
Reversing camera. ..........................115
Parking brake ....................................... 84
Display message ............................. 185 Index
11 X204_AKB; 1; 5, en-GB
wobuchh,
Version: 2.11.4
2008-10-15T13:20:56+02:00 - Seite 11 Dateiname: 6515_0671_02_buchblock.pdf; preflight
Page 44 of 261
cannot provide the intended level of protec-
tion. Do not use head restraint covers.
If the NECK-PRO head restraints are triggered
in an accident, you must reset the head
restraints on the driver's and front-passenger
seats (Y page 215). Head restraints that have
been triggered are tilted forwards. Children in the vehicle
If a child is travelling in your vehicle, secure
the child using a child restraint system which
is appropriate to the size and age of the child
and is recommended for Mercedes-Benz
vehicles. You should fit the restraint system
to a suitable rear seat. Ensure that the child
is secured throughout the trip.
You can obtain information about the correct
child restraint system from any Mercedes-
Benz Service Centre.
i It is advisable to use Mercedes-Benz care
products to clean child restraint systems.
Information about this can be obtained
from any Mercedes-Benz Service Centre. G
Risk of injury
Do not leave children unsupervised in the
vehicle, even if they are secured in a child
restraint system. Children could injure them-
selves on parts of the vehicle. They could also
be seriously or even fatally injured by pro-
longed exposure to extreme heat or cold.
Do not expose the child restraint system to
direct sunlight. Parts of the child restraint sys-
tem could heat up and the child could burn
herself/himself on them.
If a child opens a door, the child or other per-
sons could be injured as a result. The child
could get out and be injured in the process or
be injured by a passing vehicle. G
Risk of injury
An unsecured or an incorrectly positioned
load increases the risk of injury for the child
and all other occupants, during:
R an accident
R a braking manoeuvre
R a sudden change of direction
Do not carry heavy or hard objects inside the
vehicle unless they are secured. You will find
further information under "Loading guide-
lines" in the index.
Child restraint systems Mercedes-Benz recommends that you only
use the child restraint systems listed under
(Y
page 46). G
Risk of injury
To reduce the risk of serious or even fatal
injury to the child in the event of a sudden
change in direction, braking or an accident:
R children less than 1.50 m tall and under
twelve years of age must always be secured
in special child restraint systems on a suit-
able vehicle seat. This is necessary
because the seat belts are not designed for
children of this size.
R do not secure children less than 1.50 m tall
or under twelve years of age on the front-
passenger seat. Exception: the vehicle is
equipped with automatic child seat recog-
nition on the front-passenger seat* and the
child is secured in a child restraint system
with automatic child seat recognition.
R if you secure a forward-facing child
restraint system to the front-passenger
seat, you must move the front-passenger
seat as far back as possible.
R children must never travel sitting on the lap
of another occupant. Due to the forces
occurring in the event of a sudden change
of direction, heavy braking or an accident,
it would not be possible to restrain the Occupant safety
41Safety
* optional
X204_AKB; 1; 5, en-GB
wobuchh,
Version: 2.11.4 2008-10-15T13:20:56+02:00 - Seite 41 ZDateiname: 6515_0671_02_buchblock.pdf; preflight
Page 95 of 261
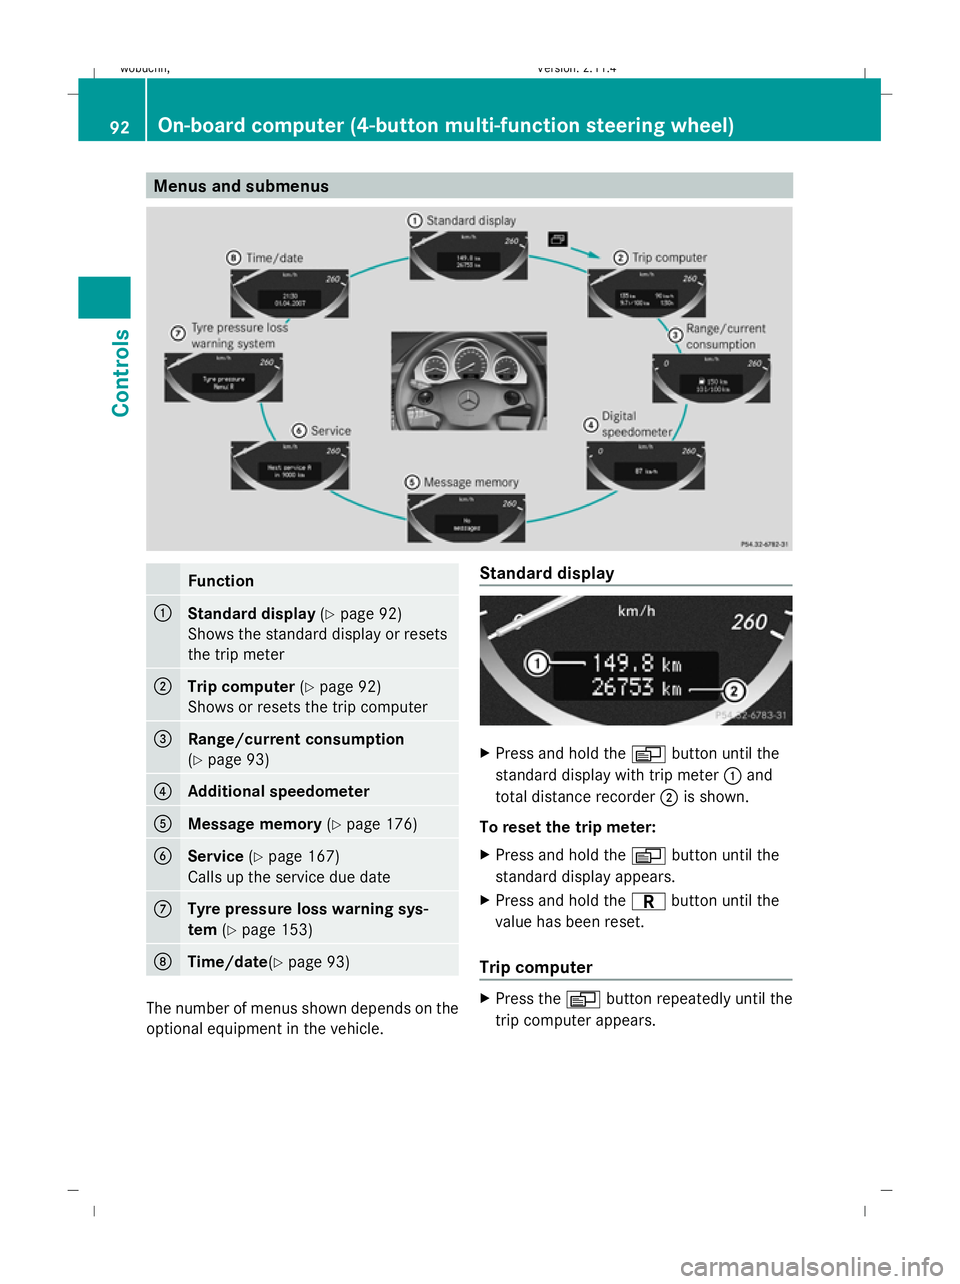
Menus and submenusFunction
:Standard display
(Ypage 92)
Shows the standard display or resets
the trip meter
;Trip computer (Ypage 92)
Shows or resets the trip computer
=Range/current consumption
(Y page 93)
?Additional speedometer
AMessage memory (Ypage 176)
BService (Ypage 167)
Calls up the service due date
CTyre pressure loss warning sys-
tem (Ypage 153)
DTime/date (Ypage 93)
The number of menus shown depends on the
optional equipment in the vehicle. Standard display
X
Press and hold the Vbutton until the
standard display with trip meter :and
total distance recorder ;is shown.
To reset the trip meter:
X Press and hold the Vbutton until the
standard display appears.
X Press and hold the Cbutton until the
value has been reset.
Trip computer
X Press the Vbutton repeatedly until the
trip computer appears.
92On-board computer (4-button multi-function steering wheel)
Controls
X204_AKB; 1; 5, en-GB
wobuchh, Version: 2.11.4
2008-10-15T13:20:56+02:00 - Seite 92 Dateiname: 6515_0671_02_buchblock.pdf; preflight
Page 98 of 261
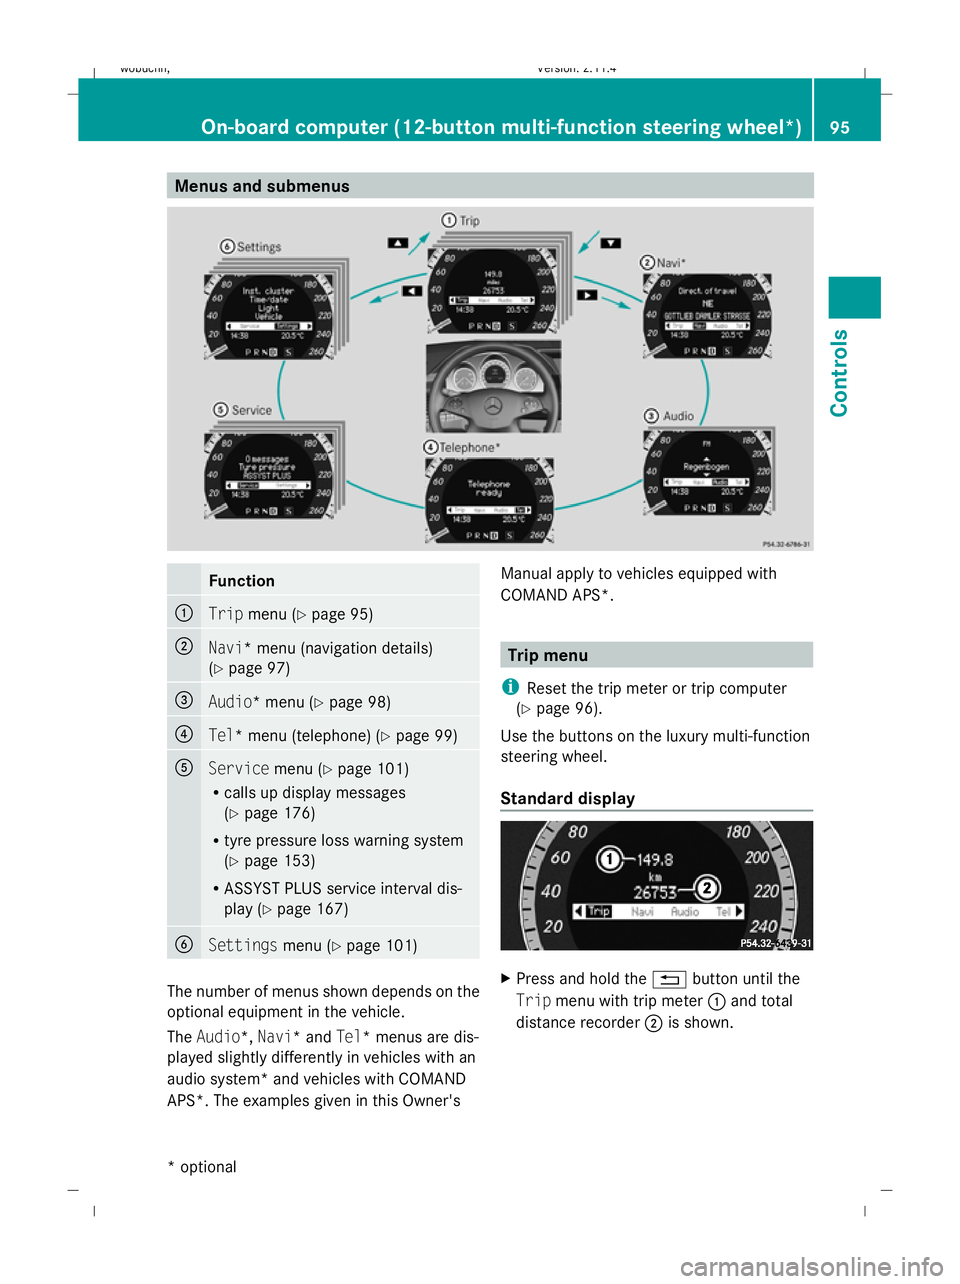
Menus and submenusFunction
:Trip
menu (Y page 95)
;Navi* menu (navigation details)
(Ypage 97)
=Audio* menu (Y page 98)
?Tel* menu (telephone) (Y page 99)
AServicemenu (Ypage 101)
R calls up display messages
(Y page 176)
R tyre pressure loss warning system
(Y page 153)
R ASSYST PLUS service interval dis-
play (Y page 167)
BSettings menu (Ypage 101)
The number of menus shown depends on the
optional equipment in the vehicle.
The Audio*, Navi* and Tel* menus are dis-
played slightly differently in vehicles with an
audio system* and vehicles with COMAND
APS*. The examples given in this Owner's Manual apply to vehicles equipped with
COMAND APS*.
Trip menu
i Reset the trip meter or trip computer
(Y page 96).
Use the buttons on the luxury multi-function
steering wheel.
Standard display
X Press and hold the %button until the
Trip menu with trip meter :and total
distance recorder ;is shown.
On-board computer (12-button multi-function steering wheel*) 95
Controls
* optional
X204_AKB; 1; 5, en-GB
wobuchh,
Version: 2.11.4
2008-10-15T13:20:56+02:00 - Seite 95Z Dateiname: 6515_0671_02_buchblock.pdf; preflight
Page 104 of 261
X
Press the 9or: button to select the
desired name or number.
X Press the 6ora button to start dial-
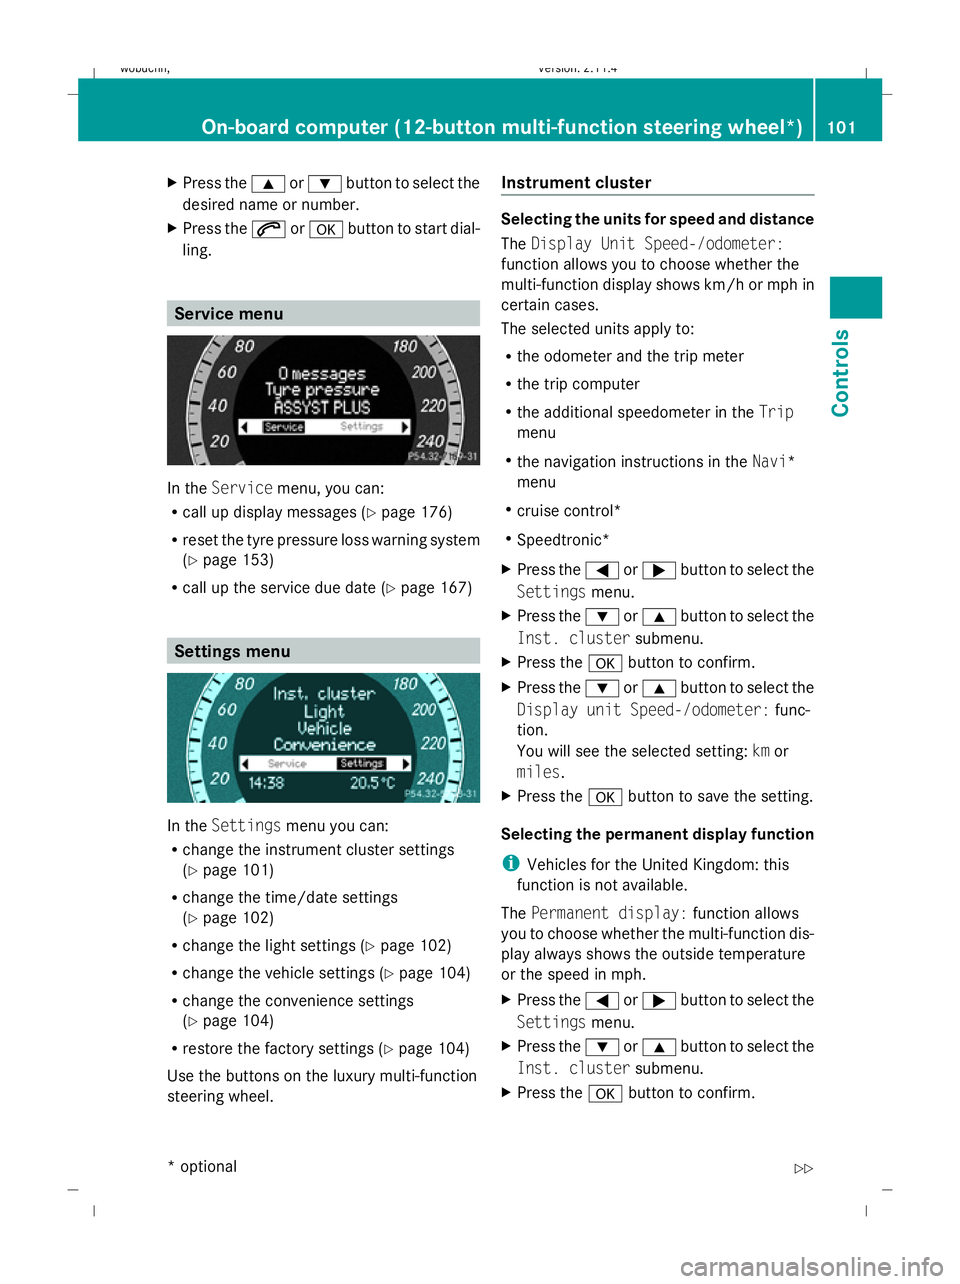
ling. Service menu
In the
Service menu, you can:
R call up display messages (Y page 176)
R reset the tyre pressure loss warning system
(Y page 153)
R call up the service due date (Y page 167)Settings menu
In the
Settings menu you can:
R change the instrument cluster settings
(Y page 101)
R change the time/date settings
(Y page 102)
R change the light settings (Y page 102)
R change the vehicle settings (Y page 104)
R change the convenience settings
(Y page 104)
R restore the factory settings (Y page 104)
Use the buttons on the luxury multi-function
steering wheel. Instrument cluster Selecting the units for speed and distance
The
Display Unit Speed-/odometer:
function allows you to choose whether the
multi-function display shows km/h or mph in
certain cases.
The selected units apply to:
R the odometer and the trip meter
R the trip computer
R the additional speedometer in the Trip
menu
R the navigation instructions in the Navi*
menu
R cruise control*
R Speedtronic*
X Press the =or; button to select the
Settings menu.
X Press the :or9 button to select the
Inst. cluster submenu.
X Press the abutton to confirm.
X Press the :or9 button to select the
Display unit Speed-/odometer: func-
tion.
You will see the selected setting: kmor
miles.
X Press the abutton to save the setting.
Selecting the permanent display function
i Vehicles for the United Kingdom: this
function is not available.
The Permanent display: function allows
you to choose whether the multi-function dis-
play always shows the outside temperature
or the speed in mph.
X Press the =or; button to select the
Settings menu.
X Press the :or9 button to select the
Inst. cluster submenu.
X Press the abutton to confirm. On-board computer (12-button multi-function steering wheel*)
101Controls
* optional
X204_AKB; 1; 5, en-GB
wobuchh, Version: 2.11.4
2008-10-15T13:20:56+02:00 - Seite 101 ZDateiname: 6515_0671_02_buchblock.pdf; preflight
Page 108 of 261
submenu is only reset if the vehicle is sta-
tionary.
X Press the =or; button to select the
Settings menu.
X Press the :or9 button to select the
Factory setting submenu.
X Press the abutton to confirm.
The Reset all settings? message is
shown.
X Press the :or9 button to select
Yes orNo.
X Press the abutton to confirm the selec-
tion.
If you have selected Yes, the multi-function
display shows a confirmation message. Off-road driving
Overview of off-road driving systems
The systems which are relevant for off-road
driving are explained on the following pages:
R 4MATIC (permanent four-wheel drive), for
optimum traction
R DSR (Downhill Speed Regulation)* (vehi-
cles with Off-Road Pro engineering pack-
age*), which assists you when driving
downhill
R Off-road driving program* (vehicles with
Off-road Pro engineering package*), which
assists you when driving off-road
You will find further information about driving
off-road in the "Operation" section
(Y page 158). 4MATIC* (permanent four-wheel
drive)
4MATIC ensures that all four wheels are per-
manently driven. Together with ESP ®
and
ETS, it improves the traction of your vehicle
whenever a drive wheel spins due to insuffi-
cient grip. G
Risk of accident
4MATIC cannot reduce the risk of an accident
if you drive too fast.
If a drive wheel spins due to insufficient grip:
R only depress the accelerator pedal as far as
necessary when pulling away.
R accelerate less when driving.
R adapt your driving style to suit road and
traffic conditions.
i In wintry driving conditions, the maximum
effect of 4MATIC can only be achieved if
you use winter tyres (M+S tyres), with snow
chains if necessary.
! When testing the parking brake, operate
the vehicle only briefly (for a maximum of
ten seconds) on a brake test dynamometer.
When doing this, turn the key to position
0 or 1in the ignition. Failure to do this can
cause damage to the drive train or the
brake system.
! A function or performance test should
only be carried out on a twin-axle dyna-
mometer. If you wish to operate the vehicle
on such a dynamometer, please consult a
Mercedes-Benz Service Centre in advance.
You could otherwise damage the drive train
or the brake system. DSR (Downhill Speed Regulation)*
(vehicles with the off-road engineer-
ing package*)
You will find information about driving off-
road in the "Operation" section
(Y page 158).
DSR is an aid to assist you when driving down-
hill. It keeps the speed of travel at the speed
selected on the on-board computer. The
steeper the downhill gradient, the greater the
DSR braking effect on the vehicle. When driv-
ing on flat stretches of road or on an uphill Off-road driving
105Controls
* optional
X204_AKB; 1; 5, en-GB
wobuchh,
Version: 2.11.4 2008-10-15T13:20:56+02:00 - Seite 105 ZDateiname: 6515_0671_02_buchblock.pdf; preflight
Page 218 of 261

X
Insert emergency key element ;into
opening in trim :.
X Turn emergency key element ;90° clock-
wise.
X Push emergency key element ;in the
direction of arrow and open the tailgate. Emergency fuel filler flap release
G
Risk of injury
The edges on the inside of the vehicle body
can be sharp. You could injure yourself when
using the fuel filler flap emergency release.
Avoid contact with the edges on the inside of
the vehicle body.
The emergency release is located in the lug-
gage compartment behind the side trim on
the right-hand side, when viewed in the direc-
tion of travel.
X Open the tailgate.
X Open the right-hand side trim panel
(Y page 219). X
Pull emergency release :.
The fuel filler flap is unlocked.
X Open the fuel filler flap. Releasing the parking lock manually
In the event of an electrical fault, it is possible
to release the selector lever lock manually to
move it out of position P, e.g. if you wish to
tow the vehicle away. X
Depress the parking brake firmly.
X Press selector lever cover :to the left and
remove it upwards.
X Press release button ;down and simul-
taneously move the selector lever out of
position P.
The selector lever can now be moved freely
until it is returned to position P. Resetting triggered NECK-PRO head
restraints
If the NECK-PRO head restraints are triggered
in an accident, you must reset the head
restraints on the driver's and front-passenger
seats. Otherwise, the additional protection
will not be available in the event of another
rear-end collision. You can recognise when
head restraints have been triggered by the
fact that they have moved forwards and can
no longer be adjusted.
Mercedes-Benz recommends that you have
NECK-PRO head restraints checked at a quali-
fied specialist workshop, e.g. a Mercedes-
Benz Service Centre, following a rear-end col-
lision.
i This work requires a lot of strength. If you
have difficulty resetting the head Resetting triggered NECK-PRO head restraints
215Practical advice
X204_AKB; 1; 5, en-GB
wobuchh,Version: 2.11.4 2008-10-15T13:20:56+02:00 - Seite 215 ZDateiname: 6515_0671_02_buchblock.pdf; preflight
Page 237 of 261
Charging and fitting the battery
G
Risk of injury
Only charge the battery in a well-ventilated
area. As the battery is being charged, gases
can escape and generate minor explosions.
This may injure you and other persons or
cause damage to the paintwork or acid cor-
rosion on the vehicle.
You can obtain information about battery
chargers which allow the battery to be
charged when still installed from a qualified
specialist workshop, e.g. a Mercedes-Benz
Service Centre. G
Risk of injury
There is a risk of acid burns during the charg-
ing process due to the gases which escape
from the battery. Do not lean over the battery
during the charging process. G
Risk of injury
Battery acid is caustic. Avoid contact with the
skin, eyes or clothing.
! Only charge the installed battery with a
battery charger which has been tested and
approved by Mercedes-Benz. These battery
chargers allow the battery to be charged
while it is still installed. However, the bat-
tery must always be disconnected first.
! Only use battery chargers with a maxi-
mum charging voltage of 14.8 V.
X Charge the battery. Observe the notes in
the operating instructions for your battery
charger.
X Refit the charged battery.
To do this, follow the steps described in
"Removing the battery" (Y page 233) in
reverse order. Reconnecting the battery
! Always reconnect the battery in the
sequence described below. Never swap the
terminal clamps. You may otherwise dam-
age the vehicle electronics.
X Switch off all electrical consumers (e.g.
radio, blower, etc.).
X Connect the positive terminal clamp and
secure the cover.
X Connect the negative terminal clamp.
X Connect the breather hose. Make sure that
a cell cap is fitted on the side of the battery.
X Close the bonnet.
i If the battery power supply has been inter-
rupted (e.g. if it has been reconnected), you
must carry out the following tasks:
R set the time (Y page 102).
R reset the panorama sliding sun-
roof* (Y page 127)
R reset the function for folding the exterior
mirrors in/out automatically* by folding
the mirrors out once (Y page 68). Jump-starting
If your vehicle's battery is discharged, the
engine can be jump-started from another
vehicle or from an external battery using jump
leads.
Observe the following points:
R jump-starting may only be performed when
the engine and catalytic converter are cold.
R do not start the engine if the battery is fro-
zen. Let the battery thaw first.
R jump-starting may only be performed from
batteries with a nominal voltage of 12 V.
R only use jump leads which have a sufficient
cross-section and insulated terminal
clamps. 234 Jump-startingPractical advice
* optional
X204_AKB; 1; 5, en-GB
wobuchh,
Version: 2.11.4 2008-10-15T13:20:56+02:00 - Seite 234Dateiname: 6515_0671_02_buchblock.pdf; preflight