transmission MERCEDES-BENZ GLK SUV 2012 Workshop Manual
[x] Cancel search | Manufacturer: MERCEDES-BENZ, Model Year: 2012, Model line: GLK SUV, Model: MERCEDES-BENZ GLK SUV 2012Pages: 381, PDF Size: 12.68 MB
Page 215 of 381
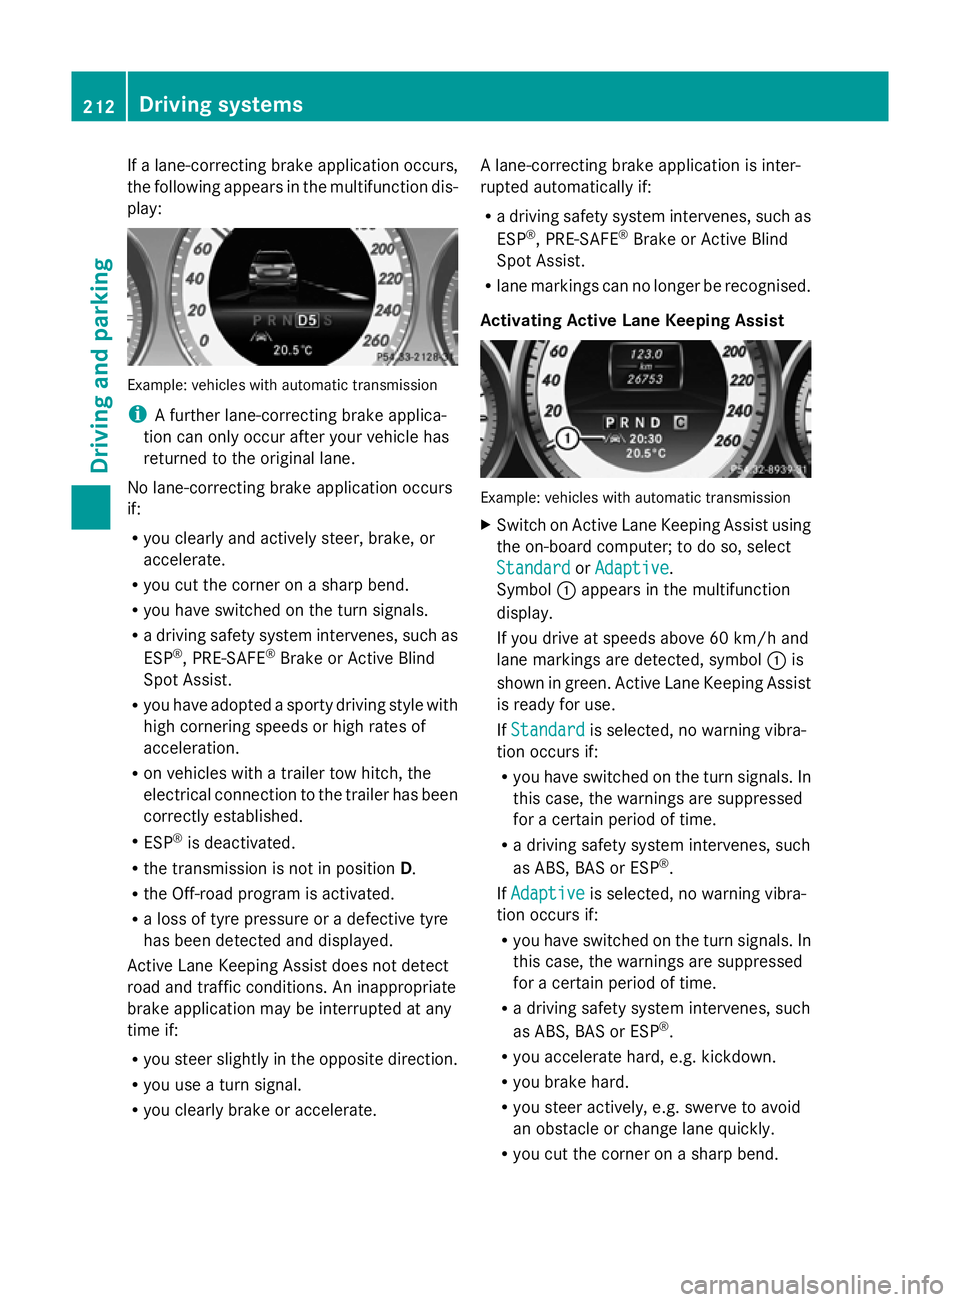
If a lane-correcting brake application occurs,
the following appears in the multifunction dis-
play: Example: vehicles with automatic transmission
i
A further lane-correcting brake applica-
tion can only occur after your vehicle has
returned to the original lane.
No lane-correcting brake application occurs
if:
R you clearly and actively steer, brake, or
accelerate.
R you cut the corner on a sharp bend.
R you have switched on the turn signals.
R a driving safety system intervenes, such as
ESP ®
, PRE-SAFE ®
Brake or Active Blind
Spot Assist.
R you have adopted a sporty driving style with
high cornering speeds or high rates of
acceleration.
R on vehicles with a trailer tow hitch, the
electrical connection to the trailer has been
correctly established.
R ESP ®
is deactivated.
R the transmission is not in position D.
R the Off-road program is activated.
R a loss of tyre pressure or a defective tyre
has been detected and displayed.
Active Lane Keeping Assist does not detect
road and traffic conditions. An inappropriate
brake application may be interrupted at any
time if:
R you steer slightly in the opposite direction.
R you use a turn signal.
R you clearly brake or accelerate. A lane-correcting brake application is inter-
rupted automatically if:
R
a driving safety system intervenes, such as
ESP ®
, PRE-SAFE ®
Brake or Active Blind
Spot Assist.
R lane markings can no longer be recognised.
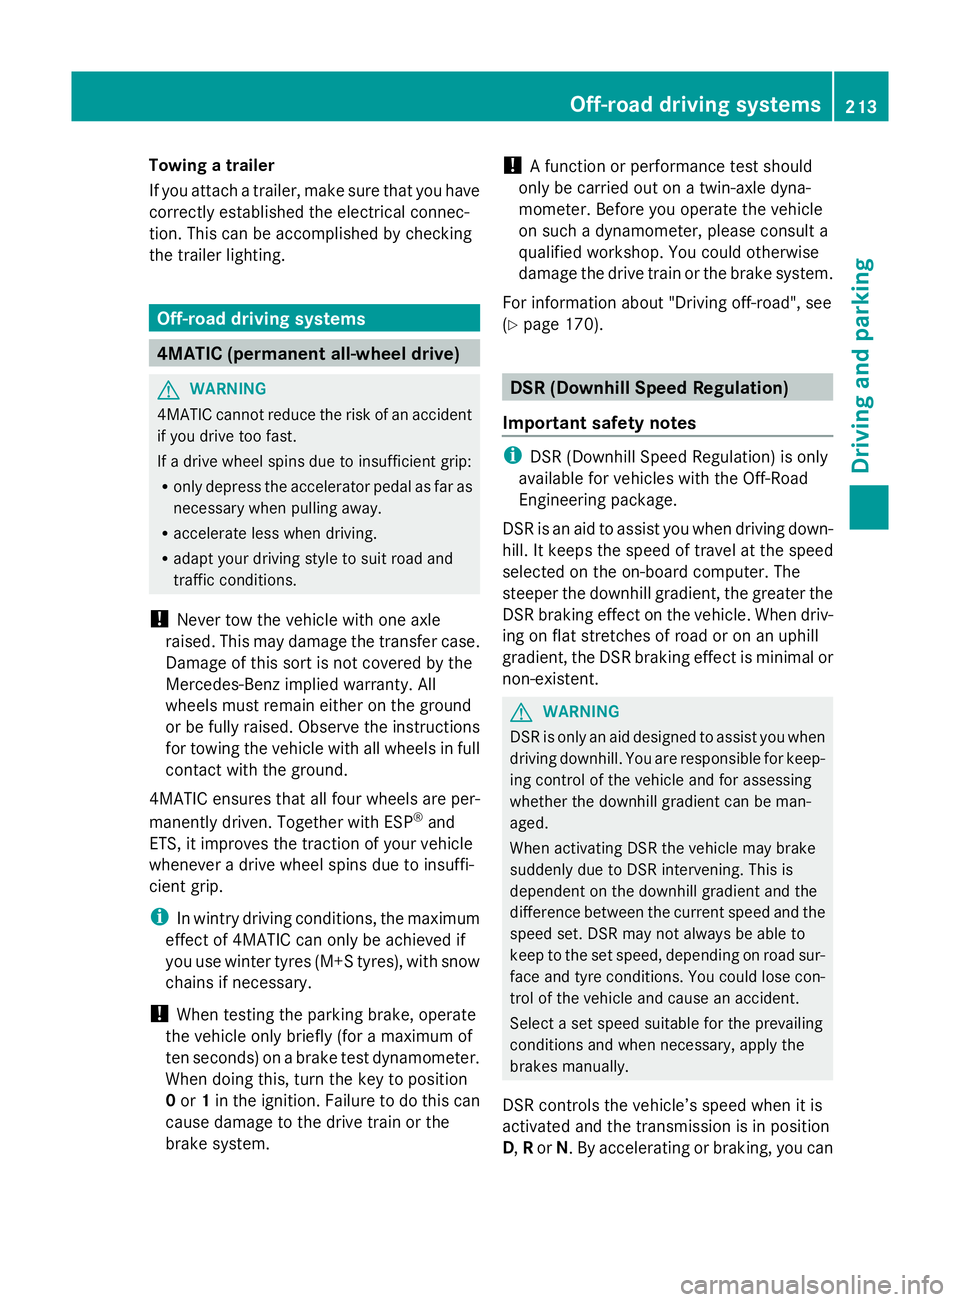
Activating Active Lane Keeping Assist Example: vehicles with automatic transmission
X
Switch on Active Lane Keeping Assist using
the on-board computer; to do so, select
Standard
Standard orAdaptive Adaptive .
Symbol :appears in the multifunction
display.
If you drive at speeds above 60 km/h and
lane markings are detected, symbol :is
shown in green. Active Lane Keeping Assist
is ready for use.
If Standard Standard is selected, no warning vibra-
tion occurs if:
R you have switched on the turn signals. In
this case, the warnings are suppressed
for a certain period of time.
R a driving safety system intervenes, such
as ABS, BAS or ESP ®
.
If Adaptive Adaptive is selected, no warning vibra-
tion occurs if:
R you have switched on the turn signals. In
this case, the warnings are suppressed
for a certain period of time.
R a driving safety system intervenes, such
as ABS, BAS or ESP ®
.
R you accelerate hard, e.g. kickdown.
R you brake hard.
R you steer actively, e.g. swerve to avoid
an obstacle or change lane quickly.
R you cut the corner on a sharp bend. 212
Driving systemsDriving and parking
Page 216 of 381
Towing a trailer
If you attach a trailer, make sure that you have
correctly established the electrical connec-
tion. This can be accomplished by checking
the trailer lighting.
Off-road driving systems
4MATIC (permanent all-wheel drive)
G
WARNING
4MATIC cannot reduce the risk of an accident
if you drive too fast.
If a drive wheel spins due to insufficient grip:
R only depress the accelerator pedal as far as
necessary when pulling away.
R accelerate less when driving.
R adapt your driving style to suit road and
traffic conditions.
! Never tow the vehicle with one axle
raised. This may damage the transfer case.
Damage of this sort is not covered by the
Mercedes-Benz implied warranty. All
wheels must remain either on the ground
or be fully raised. Observe the instructions
for towing the vehicle with all wheels in full
contact with the ground.
4MATIC ensures that all four wheels are per-
manently driven. Together with ESP ®
and
ETS, it improves the traction of your vehicle
whenever a drive wheel spins due to insuffi-
cient grip.
i In wintry driving conditions, the maximum
effect of 4MATIC can only be achieved if
you use winter tyres (M+S tyres), with snow
chains if necessary.
! When testing the parking brake, operate
the vehicle only briefly (for a maximum of
ten seconds) on a brake test dynamometer.
When doing this, turn the key to position
0 or 1in the ignition. Failure to do this can
cause damage to the drive train or the
brake system. !
A function or performance test should
only be carried out on a twin-axle dyna-
mometer. Before you operate the vehicle
on such a dynamometer, please consult a
qualified workshop. You could otherwise
damage the drive train or the brake system.
For information about "Driving off-road", see
(Y page 170). DSR (Downhill Speed Regulation)
Important safety notes i
DSR (Downhill Speed Regulation) is only
available for vehicles with the Off-Road
Engineering package.
DSR is an aid to assist you when driving down-
hill. It keeps the speed of travel at the speed
selected on the on-board computer. The
steeper the downhill gradient, the greater the
DSR braking effect on the vehicle. When driv-
ing on flat stretches of road or on an uphill
gradient, the DSR braking effect is minimal or
non-existent. G
WARNING
DSR is only an aid designed to assist you when
driving downhill. You are responsible for keep-
ing control of the vehicle and for assessing
whether the downhill gradient can be man-
aged.
When activating DSR the vehicle may brake
suddenly due to DSR intervening. This is
dependent on the downhill gradient and the
difference between the current speed and the
speed set. DSR may not always be able to
keep to the set speed, depending on road sur-
face and tyre conditions. You could lose con-
trol of the vehicle and cause an accident.
Select a set speed suitable for the prevailing
conditions and when necessary, apply the
brakes manually.
DSR controls the vehicle’s speed when it is
activated and the transmission is in position
D, Ror N. By accelerating or braking, you can Off-road driving systems
213Driving and parking Z
Page 218 of 381
up
: for a higher or down ;for a lower
set speed.
On vehicles with a 4-button multifunction
steering wheel, the set value appears in the
left-hand status indicator. On vehicles with
a luxury multifunction steering wheel (12
buttons), the set value appears in the mul-
tifunction display.
X To increase or reduce the set speed by
2 km/h increments: briefly press the
cruise control lever beyond the pressure
point up :for a higher or down ;for a
lower set speed.
On vehicles with a 4-button multifunction
steering wheel, the set value appears in the
left-hand status indicator. On vehicles with
a luxury multifunction steering wheel (12
buttons), the set value appears in the mul-
tifunction display. Off-road drive program
i The off-road drive program is only availa-
ble on vehicles with the Off-Road Engineer-
ing package.
The off-road drive program assists you in driv-
ing off-road. The engine’s performance char-
acteristics and the gearshifting characteris-
tics of the automatic transmission are adap-
ted for this purpose. ABS, ESP ®
and ETS pro-
grams especially adapted to off-road driving
are also activated.
Do not use the off-road drive program on
roads that are snow-covered or icy or if you
have fitted your vehicle with snow chains.
For information about driving off-road, see
(Y page 170). X
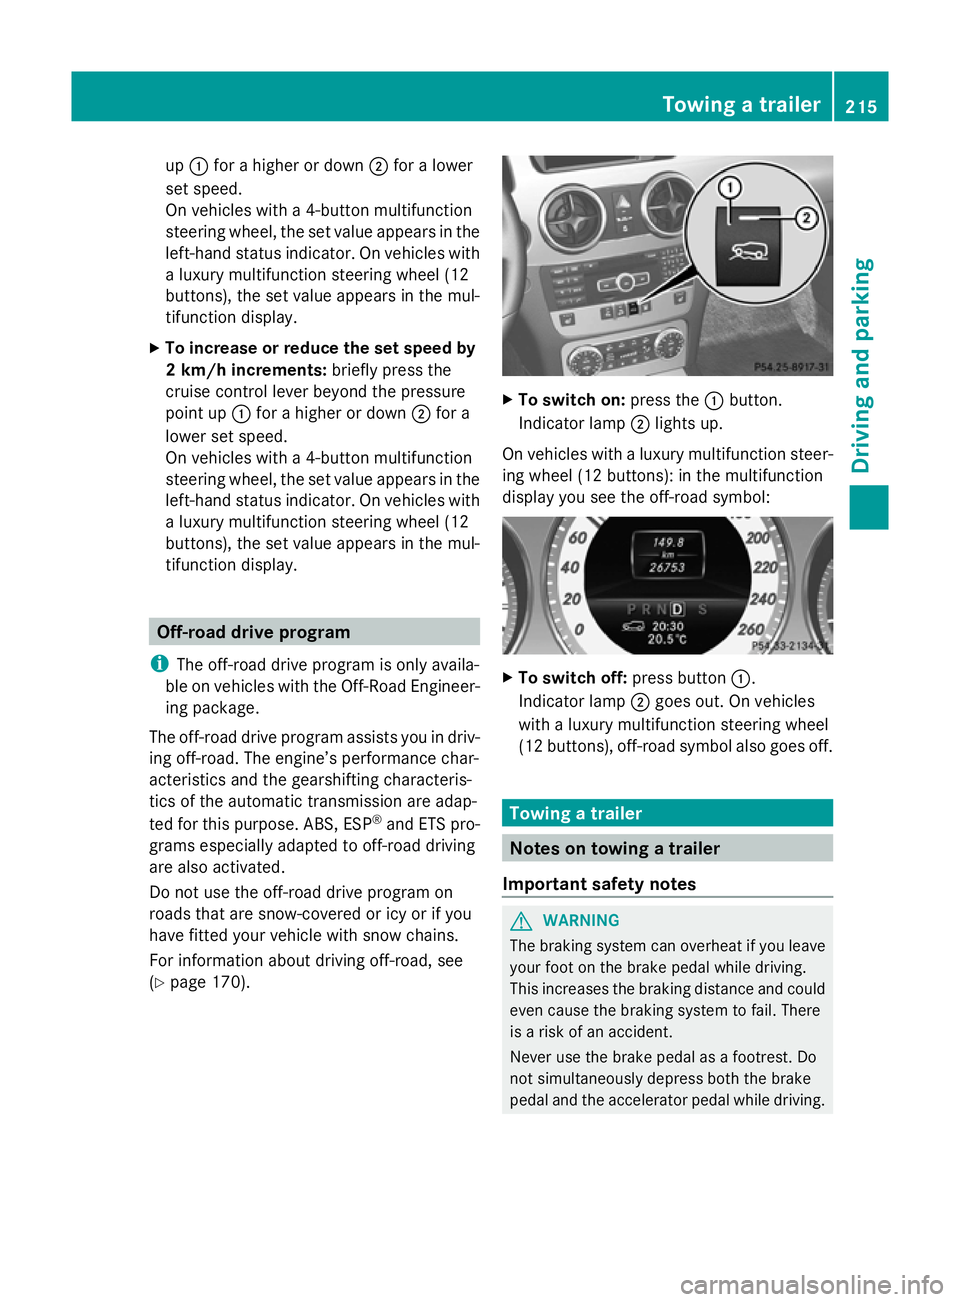
To switch on: press the:button.
Indicator lamp ;lights up.
On vehicles with a luxury multifunction steer-
ing wheel (12 buttons): in the multifunction
display you see the off-road symbol: X
To switch off: press button:.
Indicator lamp ;goes out. On vehicles
with a luxury multifunction steering wheel
(12 buttons), off-road symbol also goes off. Towing a trailer
Notes on towing a trailer
Important safety notes G
WARNING
The braking system can overheat if you leave
your foot on the brake pedal while driving.
This increases the braking distance and could
even cause the braking system to fail. There
is a risk of an accident.
Never use the brake pedal as a footrest. Do
not simultaneously depress both the brake
pedal and the accelerator pedal while driving. Towing a trailer
215Driving and parking Z
Page 220 of 381
The maximum noseweight of the trailer draw-
bar on the ball coupling is 80 kg. However,
the actual noseweight may not be higher than
the value which is given on the trailer tow
hitch or trailer identification plates. The low-
est weight applies.
! Use a drawbar noseweight as close as
possible to the maximum permissible nose-
weight. Do not use a noseweight of less
than 50kg, otherwise the trailer may come
loose.
Note that the payload and the rear axle load
are reduced by the actual payload.
i The height of the ball coupling changes
with the load of the vehicle. If necessary,
use a trailer with a height-adjustable draw-
bar.
Driving tips i
Observe the notes on ESP ®
trailer stabi-
lisation (Y page 69).
The maximum permissible speed for vehicle/
trailer combinations depends on the type of
trailer. Before beginning the journey, check
the trailer's documents to see what the max-
imum permitted speed is. Observe the legally
prescribed maximum speed in the relevant
country.
For certain Mercedes-Benz vehicles, the max-
imum permissible rear axle load is increased
when towing a trailer. Refer to the "Technical
data" section to find out whether this applies
to your vehicle. If you utilise any of the added
maximum rear axle load when towing a trailer,
the vehicle/trailer combination may not
exceed a maximum speed of 100 km/h for
reasons concerning the operating permit.
This also applies in countries in which the
permissible maximum speed for vehicle/
trailer combinations is above 100 km/h.
When towing a trailer, your vehicle's handling
characteristics will be different in comparison
to when driving without a trailer, and it will
consume more fuel. Change into a lower gear in good time on long
and steep downhill gradients. On vehicles
with automatic transmission, you have to
select shift range
1,2or 3.
i This also applies if you have activated
cruise control or SPEEDTRONIC.
This will use the braking effect of the engine,
so less braking will be required to prevent the
vehicle from gaining speed. This relieves the
load on the brake system and prevents the
brakes from overheating and wearing too
quickly. If you need additional braking,
depress the brake pedal repeatedly rather
than continuously.
Driving tips R
Maintain a greater distance from the vehi-
cle in front than when driving without a
trailer.
R Avoid braking abruptly. If possible, brake
gently at first to allow the trailer to run on.
Then, increase the braking force rapidly.
R The values given for gradient-climbing
capabilities from a standstill refer to sea
level. When driving in mountainous areas,
note that the power output of the engine,
and consequently the vehicle's gradient-
climbing capability, decrease with increas-
ing altitude.
If the trailer swings from side to side:
X Do not accelerate.
X Do not countersteer.
X Brake if necessary. Fitting the ball coupling
X Make a note of the ball coupling key num-
ber.
i You can use this number to obtain a
replacement key from a Mercedes-Benz
Service Centre. Towing a trailer
217Driving and parking Z
Page 223 of 381
Coupling up a trailer
G
WARNING
If you uncouple a trailer with an engaged over-
run brake, you could trap your hand between
the vehicle and the trailer drawbar. This poses
a risk of injury.
Do not uncouple a trailer with an engaged
overrun brake.
X Make sure that the transmission is in posi-
tion P.
X Engage the parking brake.
X Position the trailer level behind the vehicle.
X Couple up the trailer.
X Establish the electric connection between
the vehicle and the trailer.
X Check that the trailer lighting system is
working. Uncoupling a trailer
G
WARNING
Vehicles with level control:
If you disconnect the trailer cable, the vehicle
is lowered. This can cause you or others to
become trapped between the vehicle body
and tyres, or underneath the vehicle. This
poses a risk of injury.
Make sure that no-one is in the immediate
vicinity of the wheel arch or underneath the
vehicle when disconnecting the trailer cable.
! Do not disconnect a trailer with an
engaged overrun brake. Otherwise, your
vehicle could be damaged by the rebound-
ing of the overrun brake.
X Make sure that the transmission is in posi-
tion P.
X Engage the parking brake.
X Secure the trailer against rolling away.
X Remove the trailer cable and decouple the
trailer. Removing the ball coupling
X Pull the protective cap off the lock in the
handwheel.
X Use the key to unlock the lock in the hand-
wheel.
X Hold the ball coupling. Pull the handwheel
away from the ball coupling and turn it
clockwise until it engages.
The green area on the ball coupling is
aligned with the red mark on the hand-
wheel.
X Pull the ball coupling downwards to
remove.
X Clean the ball coupling if it is dirty.
Information on cleaning and care of the trailer
tow hitch can be found under (Y page 321). Storing the ball coupling
G
WARNING
Never transport an unsecured ball coupling in
the interior of the vehicle.
Otherwise, vehicle occupants could be
injured by the ball coupling being thrown if
you:
R brake sharply
R change direction suddenly
R have an accident
X Open the stowage well under the luggage
compartment floor.
X Remove the cover from the ball coupling
recess.
X Remove the protective cap from the ball
coupling recess.
X Press the protective cap into the ball cou-
pling recess until it engages.
X Make sure that the protective cap is firmly
in place.
X Store the ball coupling with the key inser-
ted in the ball coupling recess. 220
Towing a trailerDriving and parking
Page 232 of 381
9
:
Press and hold:
R
In the Audio Audio menu: selects the
previous/next station or selects
an audio track or a video scene
using rapid scrolling
R In the Tel Tel(Telephone) menu:
starts rapid scrolling if the phone
book is open a R
Confirms selection/display mes-
sage
R In the Tel
Tel(telephone) menu:
switches to the telephone book
and starts dialling the selected
number
R In the Audio Audio menu: stops the
station search function at the
desired station Right control panel
~ R
Rejects or ends a call
R Exits telephone book/redial
memory 6 R
Makes or accepts a call
R Switches to the redial memory W
X R
Adjusts the volume 8 R
Mute Back button
%
Press briefly:
R
Back
R Switches off LINGUATRONIC;
see the separate operating
instructions
R Hides display messages/calls
up the last Trip Tripmenu function
used
R Exits the telephone book/redial
memory %
Press and hold:
R
Calls up the standard display in
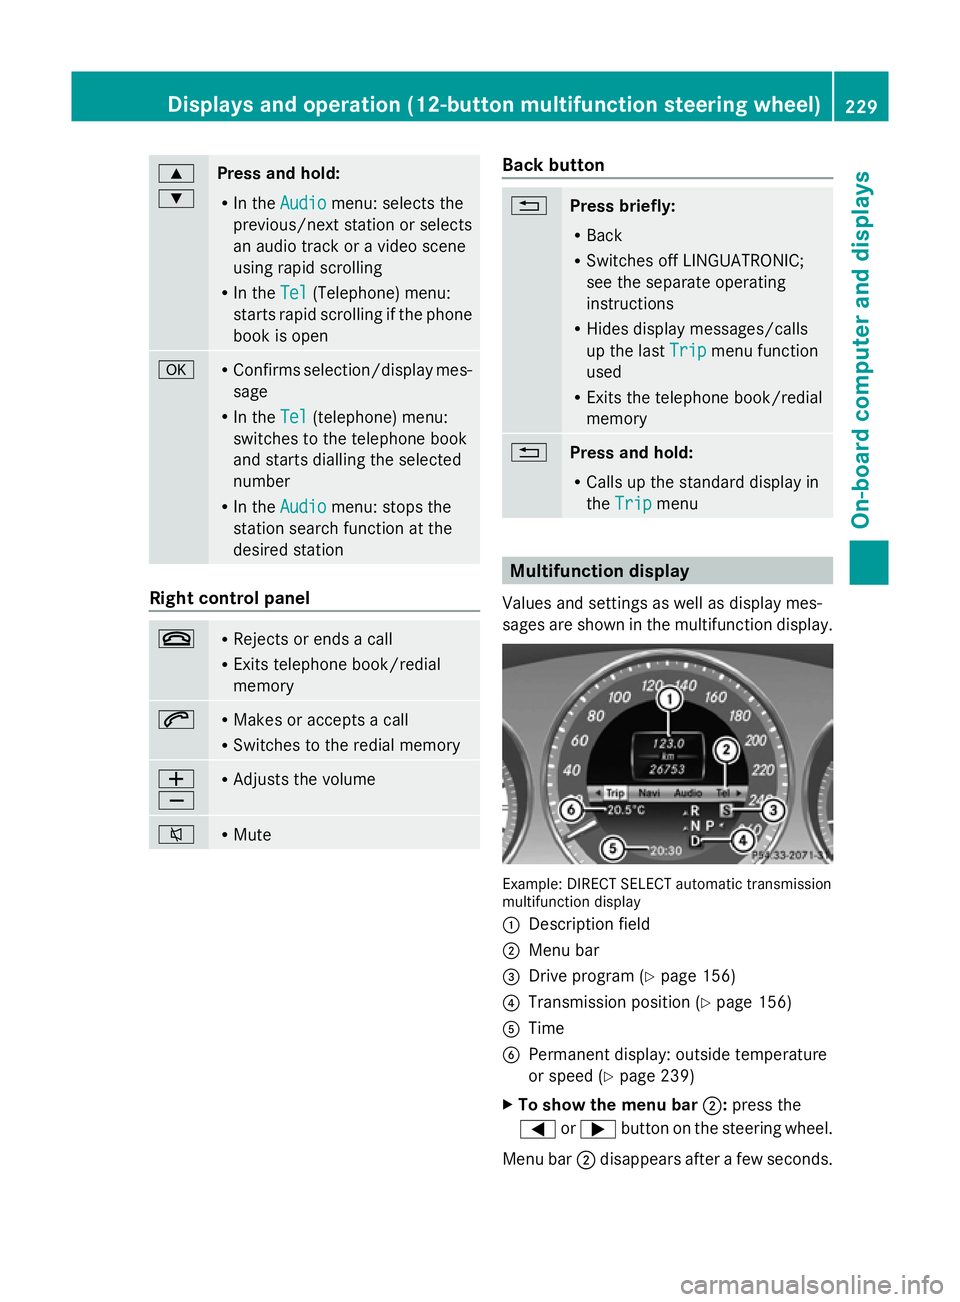
the Trip Trip menu Multifunction display
Values and settings as well as display mes-
sages are shown in the multifunction display. Example: DIRECT SELECT automatic transmission
multifunction display
:
Description field
; Menu bar
= Drive program (Y page 156)
? Transmission position (Y page 156)
A Time
B Permanent display: outside temperature
or speed (Y page 239)
X To show the menu bar ;:press the
= or; button on the steering wheel.
Menu bar ;disappears after a few seconds. Displays and operation (12-button multifunction steering wheel)
229On-board computer and displays Z
Page 233 of 381
Text field
:shows the selected menu or
submenu as well as display messages.
i You can set the time using the audio sys-
tem or COMAND Online; see the separate
operating instructions.
Vehicles with manual transmission: the
indicators in the lower part of the multifunc-
tion display differ from the display shown
here.
The following messages can appear in the
multifunction display:
Z Gearshift recommendation
(Ypage 155)
¯ Cruise control (Y page 173)
È SPEEDTRONIC (Y page 176)
è Rear window wiper
(Ypage 123)
_ Adaptive Main-beam Assist
(Ypage 116)
À ATTENTION ASSIST
(Ypage 201)
¤ ECO start/stop function
(Ypage 150)
Ä Speed Limit Assist
(Ypage 202)
à Lane Keeping Assist
(Ypage 205) or Active Lane
Keeping Assist (Y page 210)
ë HOLD function (Y page 186)
Ä PRE-SAFE®
Brake (Y page 69)
fDSR DSR DSR (Y
page 213)
120 km/h! 120 km/h! Maximum permissible speed
exceeded (only for certain coun-
tries) Menu overview
Operating the on-board computer
(Y page 228). Depending on the equipment fitted in the
vehicle, you can call up the following menus:
R
Trip Trip menu (Y page 230)
R Navi Navi menu (navigation instructions)
(Y page 232)
R Audio
Audio menu (Y page 233)
R Tel
Tel menu (telephone) (Y page 234)
R Assist.
Assist. menu (assistance)
R Serv.
Serv. menu (Y page 238)
R Settings
Settings menu (Ypage 238)
The Audio
Audio ,Navi
Navi andTel
Tel menus differ slightly
in vehicles with an audio system and in vehi-
cles with COMAND Online. The examples
given in this Owner's Manual apply to vehicles
equipped with COMAND Online. Trip menu
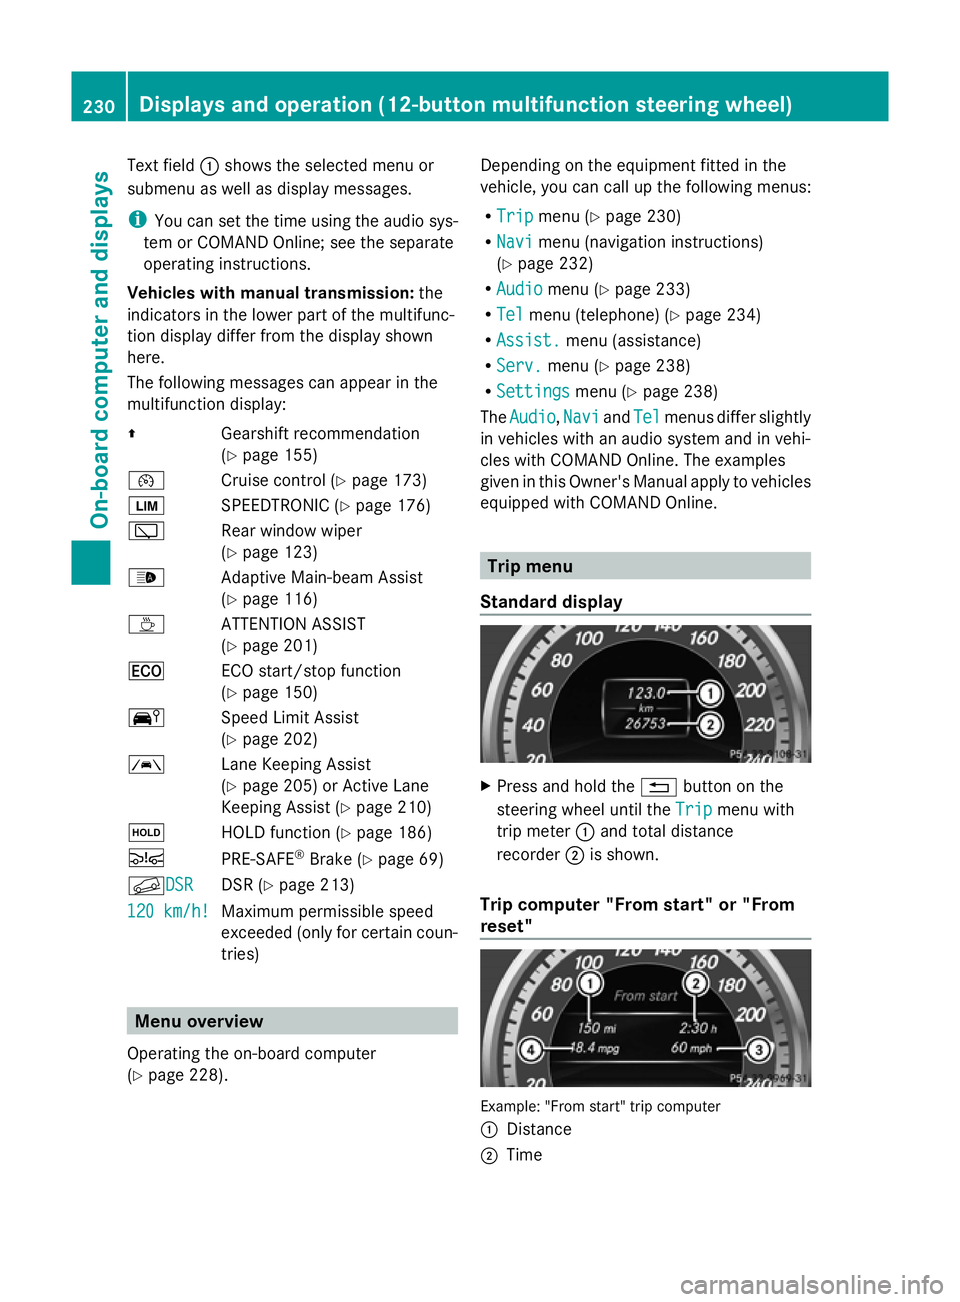
Standard display X
Press and hold the %button on the
steering wheel until the Trip Tripmenu with
trip meter :and total distance
recorder ;is shown.
Trip computer "From start" or "From
reset" Example: "From start" trip computer
:
Distance
; Time 230
Displays and operation (12-button multifunction steering wheel)On-board computer and displays
Page 242 of 381
The selected unit of measurement for dis-
tance applies to:
R the digital speedometer in the Trip
Trip menu
R total distance recorder and the trip meter
R trip computer
R current consumption and the range
R the navigation instructions in the Navi Navi
menu
R cruise control
R SPEEDTRONIC
R DISTRONIC PLUS
R ASSYST PLUS service interval display
Switching the additional speedometer
on/off
Only vehicles with manual transmission have
this function.
The Addit. Speedo [mph] Addit. Speedo [mph] function allows
you to choose whether the status area in the
multifunction display always shows the speed
in mph instead of the outside temperature.
You can determine whether the multifunction
display permanently shows your speed or the
outside temperature.
X Press the =or; button on the steer-
ing wheel to select the Settings
Settings menu.
X Press the :or9 button to select the
Inst. cluster
Inst. cluster submenu.
X Press ato confirm.
X Press the :or9 button to select the
Addit. speedo (mph)
Addit. speedo (mph) function.
You will see the selected setting: on onor
off
off.
X Press the abutton to save the setting.
i Vehicles for the United Kingdom: this
function is unavailable.
Selecting the permanent display function
Only vehicles with automatic transmission
have this function.
i Vehicles for the United Kingdom: this
function is unavailable. You can determine whether the multifunction
display permanently shows your speed or the
outside temperature.
X
Press the =or; button on the steer-
ing wheel to select the Settings
Settings menu.
X Press the :or9 button to select the
Inst. cluster Inst. cluster submenu.
X Press ato confirm.
X Press the :or9 button to select the
Permanent display:
Permanent display: function.
You will see the selected setting: outside
outside
temperature
temperature orAddit. speedo [mph]
Addit. speedo [mph] .
X Press the abutton to save the setting.
i The speed is displayed in mph.
Lights Switching the daytime driving lights on/
off
The
Day lights Day lights function can only be
switched on with the engine turned off.
X Press the =or; button on the steer-
ing wheel to select the Settings Settingsmenu.
X Press the :or9 button to select the
Light
Light submenu.
X Press ato confirm.
X Press the :or9 button to select the
Day lights
Day lights function.
If the Day lights
Day lights function has been
switched on, the cone of light and the
W symbol in the multifunction display
are shown in red.
X Press the abutton to save the setting.
Further information on daytime driving lights
(Y page 111).
Setting the brightness for the display/
switches
X Press the =or; button on the steer-
ing wheel to select the Settings
Settings menu.
X Press the :or9 button to select the
Light Light submenu.
X Press ato confirm. Displays and operation (12-button multifunction steering wheel)
239On-board computer and displays Z
Page 257 of 381
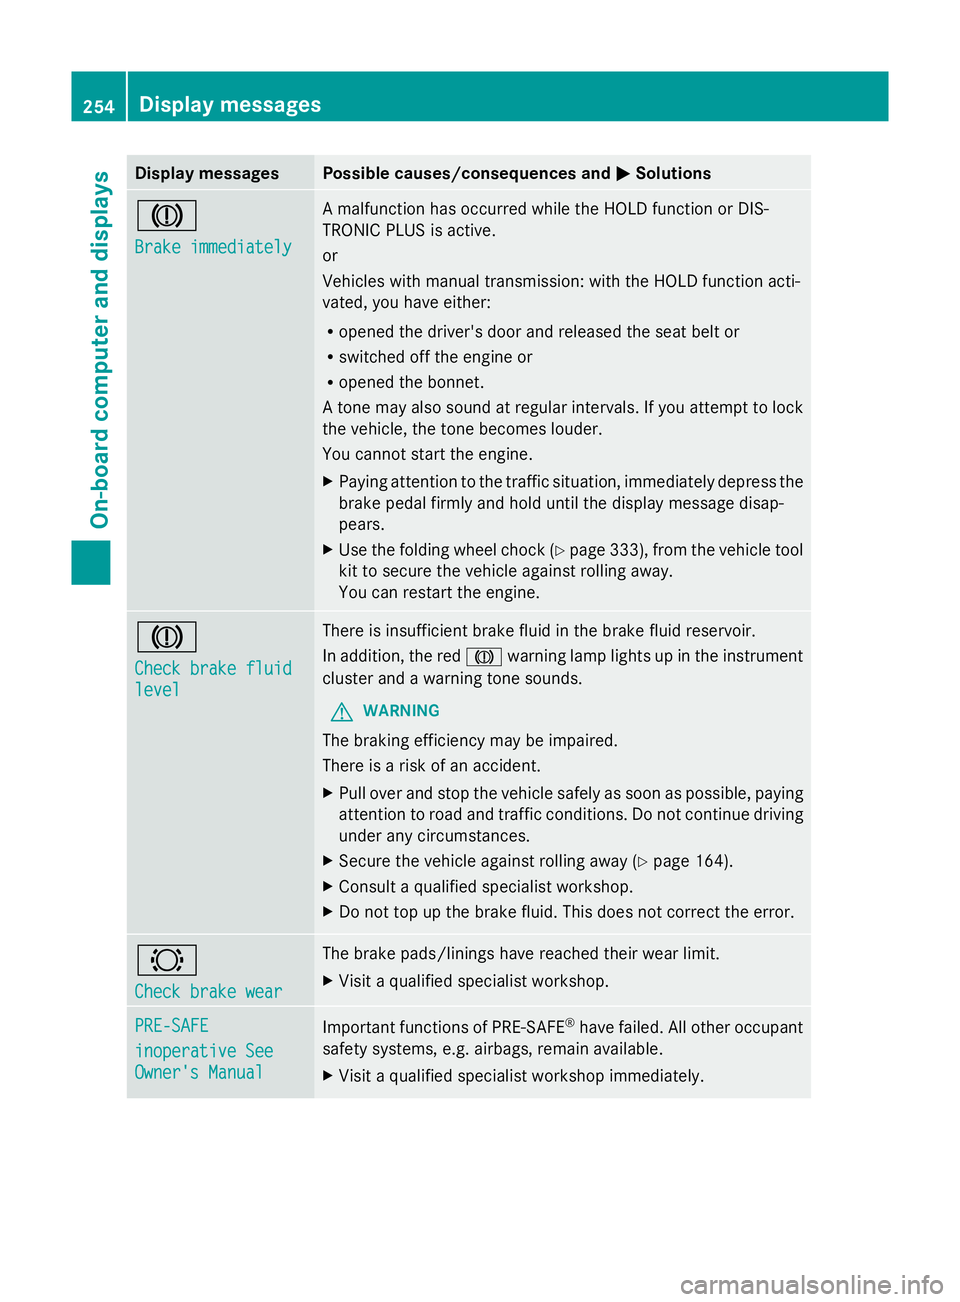
Display messages Possible causes/consequences and
M
MSolutions J
Brake immediately Brake immediately A malfunction has occurred while the HOLD function or DIS-
TRONIC PLUS is active.
or
Vehicles with manual transmission: with the HOLD function acti-
vated, you have either:
R
opened the driver's door and released the seat belt or
R switched off the engine or
R opened the bonnet.
A tone may also sound at regular intervals. If you attempt to lock
the vehicle, the tone becomes louder.
You cannot start the engine.
X Paying attention to the traffic situation, immediately depress the
brake pedal firmly and hold until the display message disap-
pears.
X Use the folding wheel chock (Y page 333), from the vehicle tool
kit to secure the vehicle against rolling away.
You can restart the engine. J
Check brake fluid Check brake fluid
level level There is insufficient brake fluid in the brake fluid reservoir.
In addition, the red
Jwarning lamp lights up in the instrument
cluster and a warning tone sounds.
G WARNING
The braking efficiency may be impaired.
There is a risk of an accident.
X Pull over and stop the vehicle safely as soon as possible, paying
attention to road and traffic conditions. Do not continue driving
under any circumstances.
X Secure the vehicle against rolling away ( Ypage 164).
X Consult a qualified specialist workshop.
X Do not top up the brake fluid. This does not correct the error. #
Check brake wear Check brake wear The brake pads/linings have reached their wear limit.
X
Visit a qualified specialist workshop. PRE-SAFE PRE-SAFE
inoperative See inoperative See
Owner's Manual Owner's Manual
Important functions of PRE-SAFE
®
have failed. All other occupant
safety systems, e.g. airbags, remain available.
X Visit a qualified specialist workshop immediately. 254
Display
messagesOn-board computer and displays
Page 281 of 381
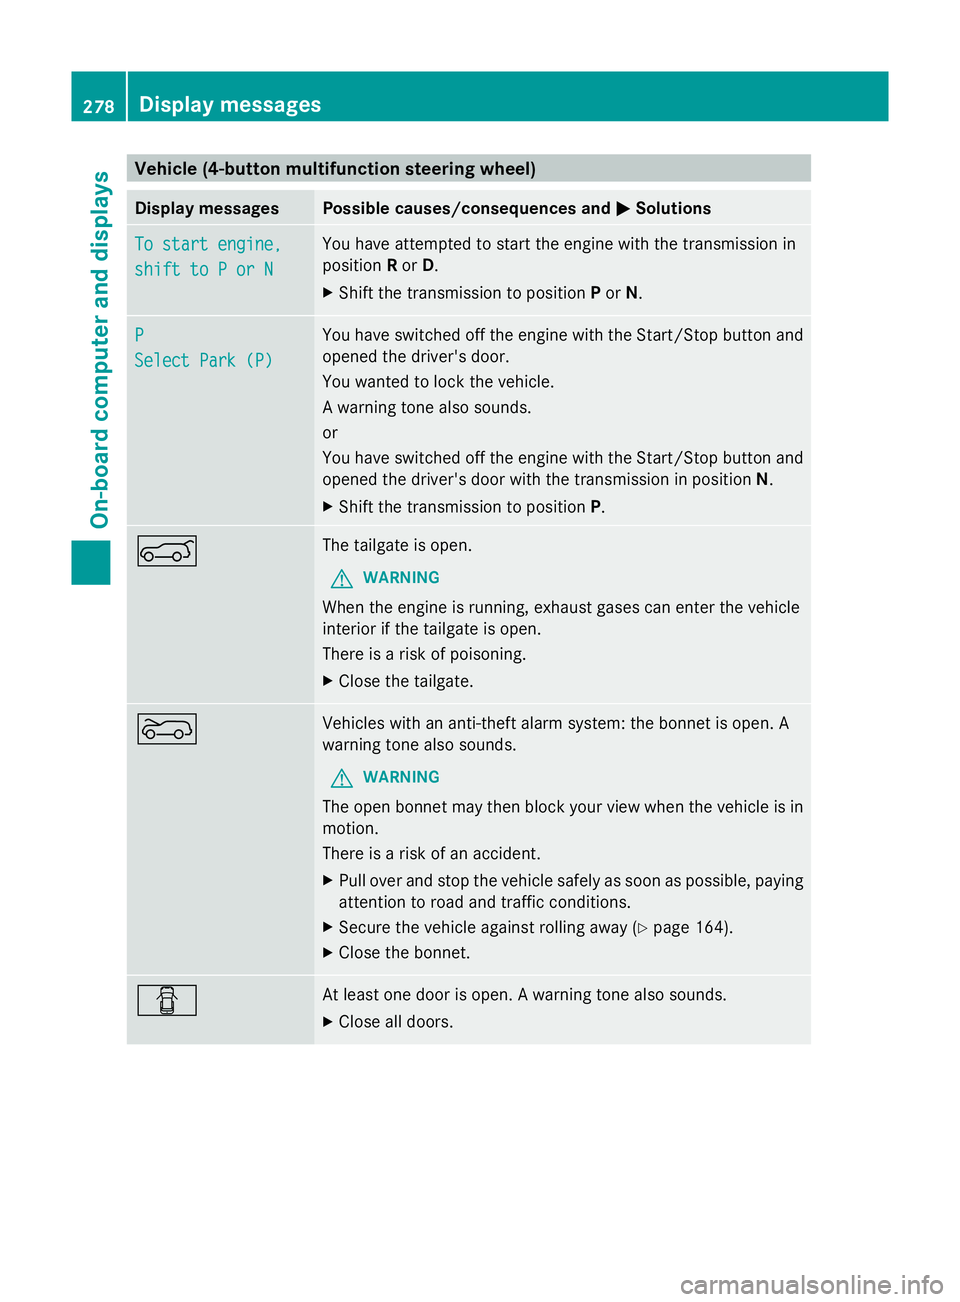
Vehicle (4-button multifunction steering wheel)
Display messages Possible causes/consequences and
M
MSolutions To start engine,
To start engine,
shift to P or N shift to P or N You have attempted to start the engine with the transmission in
position Ror D.
X Shift the transmission to position Por N. P
P
Select Park (P) Select Park (P) You have switched off the engine with the Start/Stop button and
opened the driver's door.
You wanted to lock the vehicle.
A warning tone also sounds.
or
You have switched off the engine with the Start/Stop button and
opened the driver's door with the transmission in position N.
X Shift the transmission to position P.A The tailgate is open.
G WARNING
When the engine is running, exhaust gases can enter the vehicle
interior if the tailgate is open.
There is a risk of poisoning.
X Close the tailgate. ? Vehicles with an anti-theft alarm system: the bonnet is open. A
warning tone also sounds.
G WARNING
The open bonnet may then block your view when the vehicle is in
motion.
There is a risk of an accident.
X Pull over and stop the vehicle safely as soon as possible, paying
attention to road and traffic conditions.
X Secure the vehicle against rolling away (Y page 164).
X Close the bonnet. C At least one door is open. A warning tone also sounds.
X
Close all doors. 278
Display messagesOn-board computer and displays