tire pressure MERCEDES-BENZ GLK SUV 2012 Owners Manual
[x] Cancel search | Manufacturer: MERCEDES-BENZ, Model Year: 2012, Model line: GLK SUV, Model: MERCEDES-BENZ GLK SUV 2012Pages: 381, PDF Size: 12.68 MB
Page 25 of 381
Towing
Important safety notes ..................342
With the rear axle raised ................344
Towing a trailer
Active Blind Spot Assist .................210
Active Lane Keeping Assist .... 207, 213
Active Parking Assist .....................196
Lights display message (12-but-
ton multifunction steering wheel) ..260
Lights display message (4-button
multifunction steering wheel) ........257
Towing away
Fitting the towing eye ....................343
Removing the towing eye ...............344
With both axles on the ground .......344
Tow-starting
Emergency engine starting ............345
Fitting the towing eye ....................343
Important safety notes ..................342
Removing the towing eye ...............344
Trailer coupling
see Towing a trailer
Trailer towing
7-pin connector ............................. 221
Blind Spot Assist ............................ 205
Cleaning the trailer tow hitch ......... 321
Coupling up a trailer ......................220
Decoupling a trailer .......................220
Driving tips .................................... 215
ESP ®
................................................ 69
Fitting the ball coupling .................217
Important safety notes ..................215
Mounting dimensions ....................373
Parktroni c...................................... 191
Power supply ................................. 221
Removing the ball coupling ............220
Shift range ..................................... 158
Storing the ball coupling ................220
Trailer loads ................................... 374
Transmission
see Automatic transmission
see Manual transmission
Transmission position display .........156
Transmission position display
(DIRECT SELECT lever) ......................156
Transporting the vehicle ..................345Travelling uphill
Brow of hill ..................................... 173
Driving downhill ............................. 173
Maximum gradient-climbing capa-
bility .............................................. .173
Trim pieces (cleaning instructions) .323
Trip computer On-board computer (12-button
multifunction steering wheel) ........230
On-board computer (4-button
multifunction steering wheel) ........226
Trip meter
Displaying/resetting (4-button
multifunction steering wheel) ........226
Displaying (12-button multifunc-
tion steering wheel) .......................230
Resetting (12-button multifunc-
tion steering wheel) .......................232
Turn signal
Display message (12-button mul-
tifunction steering wheel) ..............261
Display message (4-button multi-
function steering wheel) ................258
see Turn signals
Turn signals
Changing bulbs (front) ...................120
Changing bulbs (rear) ....................121
Switching on/off ........................... 113
TV
Operating (on-board computer) .....234
see Separate operating instructions
Two-way radio
Frequencies ................................... 363
Installation ..................................... 363
Transmission output (maximum) .... 363
Type identification plate
see Vehicle identification plate
Tyre pressure
Display message (12-button mul-
tifunction steering wheel) ..............277
Display message (4-button multi-
function steering wheel) ................276
Not reached (TIREFIT) ....................331
Pressure loss warning ....................355
Reached (TIREFIT) ..........................331
Recommended ............................... 353
Tyres
Checking ........................................ 351 22
Index
Page 174 of 381
R
Always keep the engine running and in gear
when driving on a downhill gradient. Acti-
vate DSR (Y page 213).
R Drive slowly and evenly, if necessary at
walking pace.
R Ensure that the wheels are in contact with
the ground at all times.
R Drive with extreme care on unknown off-
road routes where visibility is poor. For
safety reasons, get out of the vehicle first
and survey the off-road route.
R Check the depth of water before fording
rivers and streams.
R Look out for obstacles such as rocks, holes,
tree stumps and furrows.
R Always keep the side windows and the pan-
orama sliding sunroof closed during the
journey.
R Do not stray from marked routes or paths.
i Information about retrofitting special all-
terrain tyres is available from any qualified
specialist workshop.
Checklist before driving off-road X
Engine oil level: check the engine oil and
top it up if necessary.
X Tyre-change tool kit: check that the jack
is working and make sure you have the
wheelbrace, a robust tow cable and a fold-
ing spade in the vehicle.
X Wheels and tyres: check the tyre tread
depth and tyre pressure.
X Check for damage and remove any foreign
objects, e.g. small stones, from the
wheels/tyres.
X Replace any missing valve caps.
X Replace dented or damaged wheels.
Checklist after driving off-road Driving over rough terrain places greater
demands on your vehicle than driving on nor-
mal roads. After driving off-road, check the
vehicle. This allows you to detect damage promptly and reduce the risk of an accident
to yourself and other road users.
X Deactivate DSR ( Ypage 213).
X Clean the headlamps and rear lights and
check for damage.
X Clean the front and rear licence plates.
X Clean the wheels/tyres with a water jet and
remove any foreign objects.
X Clean the wheels, wheel arches and the
vehicle underside with a water jet; check
for any foreign objects and damage.
X Check whether twigs or other parts of
plants have become trapped. These
increase the risk of fire and can damage
fuel pipes, brake hoses or the rubber bel-
lows of the axle joints and propeller shafts.
X After the trip, examine without fail the
entire undercarriage, wheels, tyres, brakes,
bodywork structure, steering, chassis and
exhaust system for damage.
X After driving for extended periods across
sand, mud, gravel, water or in similarly dirty
conditions, have the brake discs, wheels,
brake pads/linings and axle joints checked
and cleaned.
X If you detect strong vibrations after off-road
travel, check for foreign objects in the
wheels and drive train and remove them if
necessary. Foreign objects can disturb the
balance and cause vibrations. Driving tips
171Driving and parking Z
Page 332 of 381
i
Fully deflating the tyre may take a few
minutes.
X Screw the valve insert back into the valve.
X Screw the valve cap back on.
X Place the valve extractor back into the vehi-
cle tool kit.
X Stow the collapsible emergency spare
wheel in the emergency spare wheel well
under the luggage compartment and fasten
in place. Flat tyre
Preparing the vehicle
Your vehicle may be equipped with:
R a TIREFIT kit
R an emergency spare wheel
X Stop the vehicle as far away as possible
from traffic on solid, non-slippery and level
ground.
X Switch on the hazard warning lamps.
X Firmly depress the parking brake.
X Bring the front wheels into the straight-
ahead position.
X Vehicles with manual transmission:
engage first or reverse gear.
X Vehicles with automatic transmission:
move the DIRECT SELECT lever to P.
X Switch off the engine.
X Vehicles without KEYLESS-GO: remove
the key from the ignition lock.
X Vehicles with KEYLESS-GO: open the
driver's door.
The on-board electronics have status 0,
which is the same as the key having been
removed.
X Vehicles with KEYLESS-GO: remove the
Start/Stop button from the ignition lock
(Y page 147). X
All occupants must get out of the vehicle.
Make sure that they are not endangered as
they do so.
X Make sure that no one is near the danger
area while a wheel is being changed. Any-
one who is not directly assisting in the
wheel change should, for example, stand
behind the barrier.
X Get out of the vehicle. Pay attention to traf-
fic conditions when doing so.
X Close the driver's door.
X Place the warning triangle (Y page 326) a
suitable distance away. Observe legal
requirements. TIREFIT kit
Using the TIREFIT kit TIREFIT is a tyre sealant.
You can use TIREFIT to seal punctures of up
to 4 mm, particularly those in the tyre tread.
You can use TIREFIT at outside temperatures
down to Ò20 †. G
WARNING
In the following situations, the tyre sealant is
unable to provide sufficient breakdown assis-
tance, as it is unable to seal the tyre properly:
R there are cuts or punctures in the tyre
larger than those mentioned above.
R the wheel rim is damaged.
R you have driven at very low tyre pressures
or on a flat tyre.
There is a risk of accident.
Do not drive any further. Contact a qualified
specialist workshop.
X Do not remove any foreign objects which
have penetrated the tyre, e.g. screws or
nails.
X Remove the tyre sealant bottle, the accom-
panying "max. 80 km/h" sticker and the
tyre inflation compressor from the stowage Flat tyre
329Breakdown assistance Z
Page 333 of 381
well underneath the luggage compartment
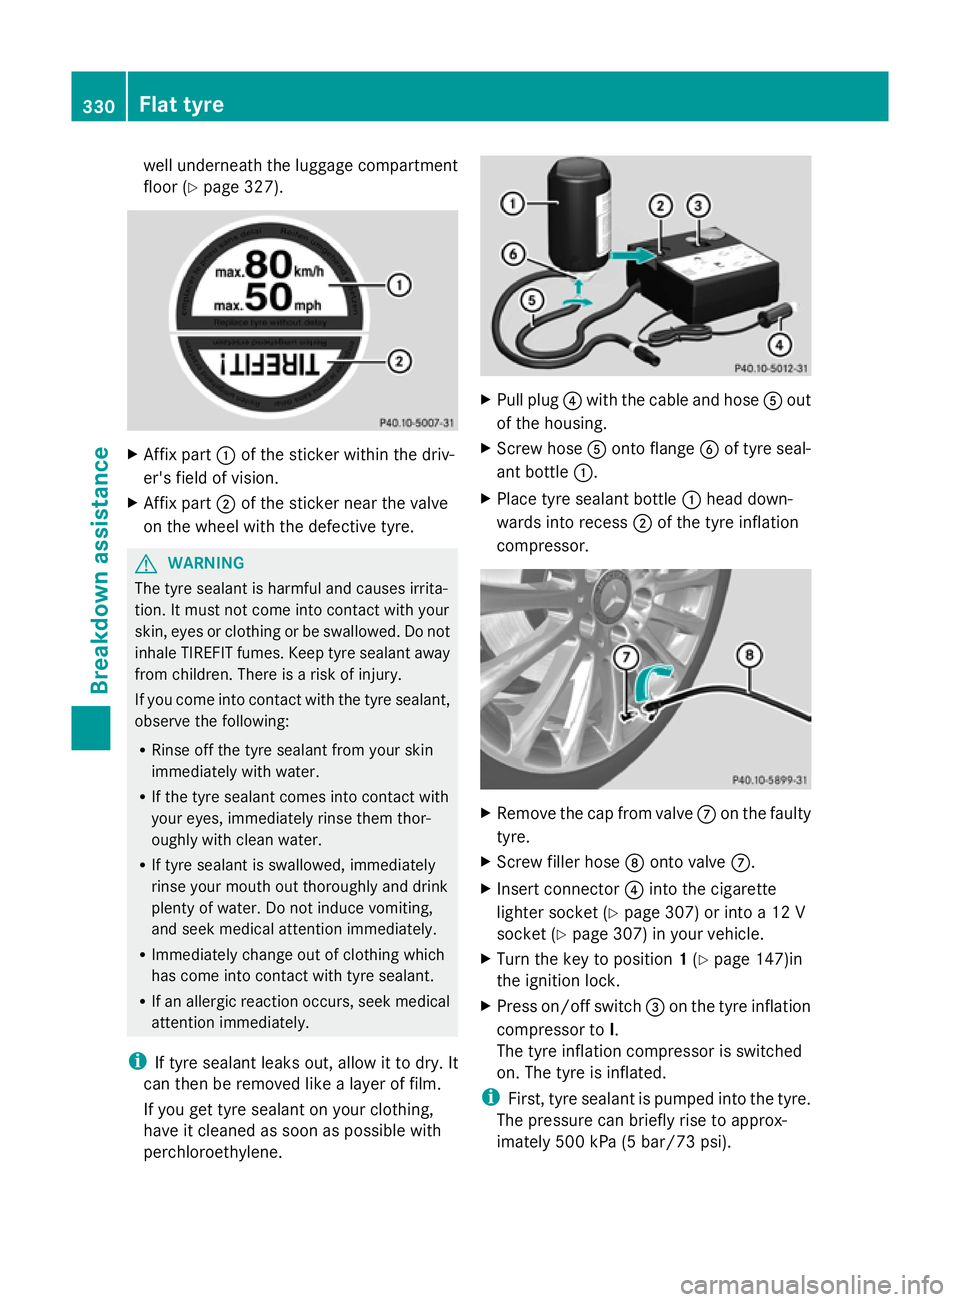
floor (Y page 327). X
Affix part :of the sticker within the driv-
er's field of vision.
X Affix part ;of the sticker near the valve
on the wheel with the defective tyre. G
WARNING
The tyre sealant is harmful and causes irrita-
tion. It must not come into contact with your
skin, eyes or clothing or be swallowed. Do not
inhale TIREFIT fumes. Keep tyre sealant away
from children. There is a risk of injury.
If you come into contact with the tyre sealant,
observe the following:
R Rinse off the tyre sealant from your skin
immediately with water.
R If the tyre sealant comes into contact with
your eyes, immediately rinse them thor-
oughly with clean water.
R If tyre sealant is swallowed, immediately
rinse your mouth out thoroughly and drink
plenty of water. Do not induce vomiting,
and seek medical attention immediately.
R Immediately change out of clothing which
has come into contact with tyre sealant.
R If an allergic reaction occurs, seek medical
attention immediately.
i If tyre sealant leaks out, allow it to dry. It
can then be removed like a layer of film.
If you get tyre sealant on your clothing,
have it cleaned as soon as possible with
perchloroethylene. X
Pull plug ?with the cable and hose Aout
of the housing.
X Screw hose Aonto flange Bof tyre seal-
ant bottle :.
X Place tyre sealant bottle :head down-
wards into recess ;of the tyre inflation
compressor. X
Remove the cap from valve Con the faulty
tyre.
X Screw filler hose Donto valve C.
X Insert connector ?into the cigarette
lighter socket (Y page 307) or into a 12 V
socket (Y page 307) in your vehicle.
X Turn the key to position 1(Y page 147)in
the ignition lock.
X Press on/off switch =on the tyre inflation
compressor to I.
The tyre inflation compressor is switched
on. The tyre is inflated.
i First, tyre sealant is pumped into the tyre.
The pressure can briefly rise to approx-
imately 500 kPa (5 bar/73 psi). 330
Flat tyreBreakdown assistance
Page 334 of 381
Do not switch off the tyre inflation com-
pressor during this phase.
X Let the tyre inflation compressor run for
five minutes. The tyre should then have
attained a pressure of at least 180 kPa
(1.8 bar/26 psi).
! Do not operate the tyre inflation com-
pressor for longer than eight minutes at a
time without a break. It may otherwise
overheat.
The tyre inflation compressor can be oper-
ated again once it has cooled down.
If a pressure of 180 kP a(1 .8 ba r/26 psi) has
been achieved after five minutes, see
(Y page 331).
If a pressure of 180 kPa (1.8 ba r/26 psi) has
not been achieved after five minutes, see
(Y page 331).
Tyre pressure not reached If a pressure of 180 kPa
(1.8 ba r/26 psi) has
not been achieved after five minutes:
X Switch off the tyre inflation compressor.
X Unscrew the filler hose from the valve of
the faulty tyre.
X Very slowly drive forwards or reverse
approximately 10 m.
X Pump up the tyre again.
After a maximum of five minutes the tyre
pressure must be at least 180 kPa (1.8 bar/
26 psi). G
WARNING
If the required tyre pressure is not reached
after the specified time, the tyre is too badly
damaged. The tyre sealant cannot repair the
tyre in this instance. Damaged tyres and a tyre
pressure that is too low can significantly
impair the vehicle's braking and driving char-
acteristics. There is a risk of accident.
Do not continue driving. Contact a qualified
specialist workshop. Tyre pressure reached X
Switch off the tyre inflation compressor.
X Unscrew the filler hose from the valve of
the faulty tyre.
! After use, excess tyre sealant may run out
of the filler hose. This could cause stains.
Therefore, place the filler hose in the plastic
bag that contained the TIREFIT kit.
X Stow the tyre sealant bottle, the tyre infla-
tion compressor and the warning triangle.
X Pull away immediately. G
WARNING
A tyre temporarily sealed with tyre sealant
impairs the driving characteristics and is not
suitable for higher speeds. There is a risk of
accident.
You should therefore adapt your driving style
accordingly and drive carefully. Do not exceed
the specified maximum speed with a tyre that
has been repaired using tyre sealant.
The maximum speed for a tyre sealed with
tyre sealant is 80 km/h. The "max. 80 km/h"
sticker must be affixed to the instrument clus-
ter within the driver's field of vision.
X Stop after driving for approximately ten
minutes and check the tyre pressure with
the tyre inflation compressor.
The tyre pressure must now be at least
130 kPa (1.3 bar/19 psi). G
WARNING
If the required tyre pressure is not reached
after driving for a short period, the tyre is too
badly damaged. The tyre sealant cannot
repair the tyre in this instance. Damaged tyres
and a tyre pressure that is too low can signif-
icantly impair the vehicle's braking and driv-
ing characteristics. There is a risk of accident.
Do not continue driving. Contact a qualified
specialist workshop.
i In your vehicle, you will find a sticker with
the Mercedes-Benz Service24h telephone Flat tyre
331Breakdown assistance Z
Page 354 of 381
wheels and tyres for damage. Hidden tyre
damage could also be causing the unusual
handling characteristics. If you find no
signs of damage, have the tyres and wheels
checked at a qualified specialist workshop.
R When parking your vehicle, make sure that
the tyres do not get deformed by the kerb
or other obstacles. If it is necessary to drive
over kerbs, speed humps or similar eleva-
tions, try to do so at an obtuse angle. Oth-
erwise, the tyres, particularly the sidewalls,
can get damaged. Notes on regularly inspecting wheels
and tyres G
WARNING
Damaged tyres can cause tyre inflation pres-
sure loss. As a result, you could lose control
of your vehicle. There is a risk of accident.
Check the tyres regularly for signs of damage
and replace any damaged tyres immediately.
R Regularly check the wheels and tyres of
your vehicle for damage (e.g. cuts, punctu-
res, tears, bulges on tyres and deformation,
cracks or severe corrosion on wheels), at
least every 14days, as well as after driving
off-road or on rough roads. Damaged
wheels can cause a loss of tyre pressure.
R Regularly check the tyre tread depth and
the condition of the tread across the whole
width of the tyre (Y page 351). If neces-
sary, turn the front wheels to full lock in
order to inspect the inner side of the tyre
surface.
R All wheels must have a valve cap to protect
the valve against dirt and moisture. Do not
fit anything onto the valve other than the
standard valve cap or other valve caps
approved by Mercedes-Benz for your vehi-
cle. Do not fit any other valve caps or sys-
tems, e.g. tyre pressure monitoring sys-
tems.
R Regularly check the pressure of all the tyres
including the emergency spare wheel or the spare wheel, particularly prior to long trips,
and correct the pressure as necessary
(Y
page 353). Tyre tread
G
WARNING
Insufficient tyre tread will reduce tyre trac-
tion. The tyre is no longer able to dissipate
water. This means that on wet road surfaces,
the risk of aquaplaning increases, in particular
where speed is not adapted to suit the driving
conditions. There is a risk of accident.
If the tyre pressure is too high or too low, tyres
may exhibit different levels of wear at differ-
ent locations on the tyre tread. Thus, you
should regularly check the tread depth and
the condition of the tread across the entire
width of all tyres.
Minimum tyre tread depth for:
R summer tyres: 3 mm
R M+S tyres: 4 mm
For safety reasons, replace the tyres before
the legally prescribed limit for the minimum
tyre tread depth is reached.. Notes on selecting, fitting and replac-
ing tyres
R Only fit tyres and wheels of the same type
and make.
R Only fit tyres of the correct size onto the
wheels.
R After fitting new tyres, run them in at mod-
erate speeds for the first 100 km, as they
only reach their full performance after this
distance.
R Do not drive with tyres which have too little
tread depth, as this significantly reduces
the traction on wet roads (aquaplaning).
R Replace the tyres after six years at the lat-
est, regardless of wear. This also applies to
the emergency spare wheel/spare wheel. Operation
351Wheels and tyres Z
Page 362 of 381
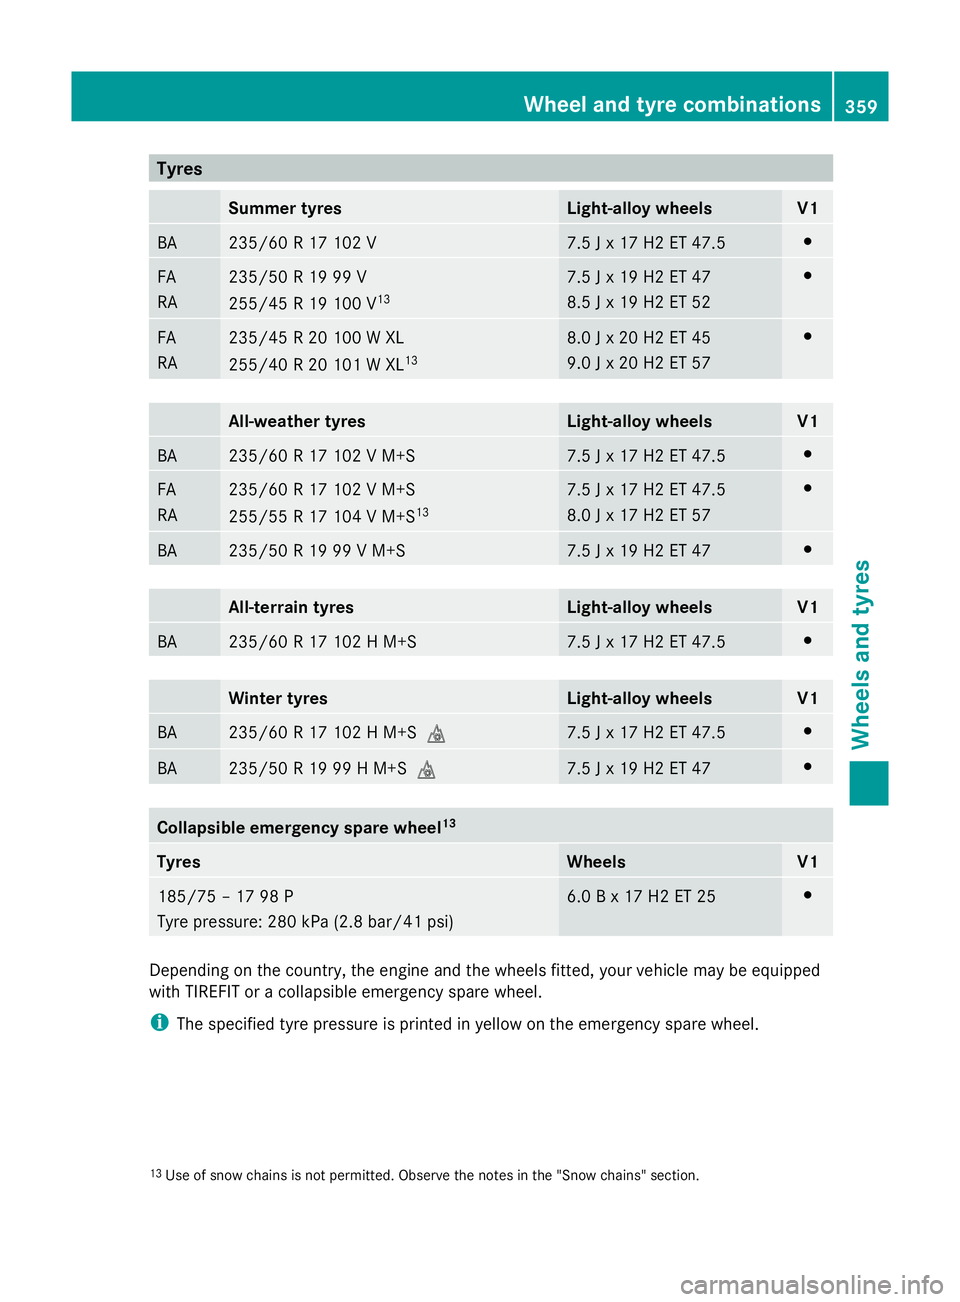
Tyres
Summer tyres Light-alloy wheels V1
BA 235/6
0 R 17 102 V 7.5 J
x 17 H2 ET 47.5 #
FA
RA 235/50 R 19 99 V
255/45 R 19 100 V
13 7.5 J x 19 H2 ET 47
8.5 J x 19 H2 ET 52 #
FA
RA 235/45 R 20 100 W XL
255/40 R 20 101 W XL
13 8.0 J x 20 H2 ET 45
9.0 J x 20 H2 ET 57 #
All-weather tyres Light-alloy wheels V1
BA 235/60 R 17 102 V M+S 7.5 J x 17 H2 ET 47.5 #
FA
RA 235/60 R 17 102 V M+S
255/55 R 17 104 V M+S
13 7.5 J x 17 H2 ET 47.5
8.0 J x 17 H2 ET 57 #
BA 235/50 R 19 99 V M+S 7.5 J x 19 H2 ET 47 #
All-terrain tyres Light-alloy wheels V1
BA 235/60 R 17 102 H M+S 7.5 J x 17 H2 ET 47.5 #
Winter tyres Light-alloy wheels V1
BA 235/60 R 17 102 H M+S
i 7.5 J x 17 H2 ET 47.5 #
BA 235/50 R 19 99 H M+S
i 7.5 J x 19 H2 ET 47 #
Collapsible emergency spare wheel
13Tyres Wheels V1
185/75 – 17 98 P
Tyre pressure: 280 kPa (2.8 bar/41 psi) 6.0 B x 17 H2 ET 25 #
Depending on the country, the engine and the wheels fitted, your vehicle may be equipped
with TIREFIT or a collapsible emergency spare wheel.
i
The specified tyre pressure is printed in yellow on the emergency spare wheel.
13 Use of snow chains is not permitted. Observe the notes in the "Snow chains" section. Wheel and tyre combinations
359Wheels and tyres Z