ignition MERCEDES-BENZ GLK350 4MATIC 2010 X204 Owner's Manual
[x] Cancel search | Manufacturer: MERCEDES-BENZ, Model Year: 2010, Model line: GLK350 4MATIC, Model: MERCEDES-BENZ GLK350 4MATIC 2010 X204Pages: 344, PDF Size: 8.45 MB
Page 12 of 344
NECK-PRO active front head
restraints ......................................... 51
Rear seat head restraints ................. 80
Height adjustment
Seat belt outlet ................................ 50
Seats ............................................... 78
High-beam flasher ............................... 90
High-beam headlamps ................ 90, 304
Replacing bulbs ............................. 304
Hill-start assist system ..................... 171
Hood ................................................... 214
Messages in the multifunction
display ........................................... 277
Hooks ................................................. 189
Horn ...................................................... 27
Hydroplaning ..................................... 246
I
Identification labels .......................... 328
Identification number, vehicle
(VIN) ................................................... 329
Ignition ........................................... 76, 99
Immobilizer .......................................... 63
Infant and child restraint systems see Children in the vehicle
Inflation pressure
see Tires, Inflation pressure
Inside door handle .............................. 70
Instrument cluster ...................... 28, 108
Illumination .................................... 109
Lamps ............................................ 288
Multifunction display .....................112
Instrument lighting
see Instrument cluster, Illumination
Instrument panel
see Instrument cluster
Instruments and controls
see Cockpit
Interior lighting
Delayed shut-off ............................ 123
Emergency lighting ..........................92
Front ................................................ 92
Front reading lamps .........................92
Rear ................................................. 92
Rear reading lamps ..........................92
Interior rear view mirror ..................... 84
Auto-dimming rear view mirrors ....... 84
Interior storage spaces see Storage compartments
Intermittent wiping ............................. 93
Rain sensor ...................................... 93
ISOFIX (Child seat anchors –
LATCH-type) see Children in the vehicle
J
Jack ..................................................... 261
Jump starting ..................................... 319
K
Key, Mechanical
Loss of ............................................. 69
Replacing ......................................... 70
Unlocking/locking manually ..........299
Key, SmartKey
Battery check lamp ..........................69
Checking batteries ...........................69
Factory setting ........................... 67, 69
Global locking (KEYLESS-
GO) .................................................. 69
Global locking (SmartKey) ................ 67
Global unlocking (KEYLESS-
GO) .................................................. 69
Global unlocking
(SmartKey) ....................................... 67
Important notes on KEYLESS-GO .....68
Locking/unlocking ........................... 66
Loss of ............................................. 69
Messages in the multifunction
display ........................................... 277
Opening and closing the
panorama roof ................................. 97
Opening and closing the windows .... 97
Remote control ................................ 66
Replacing ......................................... 70
Replacing batteries ........................302
Restoring to factory setting .......67, 69
Selective setting ........................67, 69
Starter switch positions ...................76
KEYLESS-GO
Starter switch positions ...................76
Kickdown ........................................... 105
Kilopascal (air pressure unit) ........... 240
10IndexX204_AKB; 3; 23, en-USd2ureepe,Version: 2.11.8.12009-07-16T19:16:58+02:00 - Seite 10
Page 38 of 344
Vehicle equipment
i This Operator’s Manual describes all
features, standard or optional, potentially
available for your vehicle at the time of
purchase. Please be aware that your
vehicle might not be equipped with all
features described in this manual.
Occupant safety
Introduction
In this section you will learn the most
important facts about the restraint system
components of the vehicle.
The restraint systems are:
R Seat belts
R Child restraints
R
Lower Anchors and Tethers for CHildren
(LATCH) also known as ISOFIX
Additional protection potential is provided by:
R
Supplemental Restraint System (SRS) with
- Air bags
- Air bag control unit (with crash sensors)
-
Emergency Tensioning Device (ETD) for
seat belts
- Seat belt force limiter
R NECK-PRO active front head restraints
R Air bag system components with
- Front passenger front air bag off
indicator lamp
- USA only: Front passenger seat with
Occupant Classification System (OCS)
- Canada only: Front passenger seat with
BabySmart™ air bag deactivation system
Although the systems are independent, their
protective functions work in conjunction with
each other.
GWarning!
Modifications to or work improperly
conducted on restraint system components
or their wiring, as well as tampering with
interconnected electronic systems, can lead
to the restraint systems no longer functioning
as intended.
Air bags or Emergency Tensioning Devices
(ETDs), for example, could deploy
inadvertently or fail to deploy in accidents
although the deceleration threshold for air
bag deployment is exceeded. Therefore,
never modify the restraint systems. Do not
tamper with electronic components or their
software.
i See “Children in the vehicle”
( Y page 53) for information on
R infants and children traveling with you in
the vehicle
R restraint systems for infants and children
SRS indicator lamp
The SRS system conducts a self-test when
the ignition is switched on and in regular
intervals while the engine is running. This
facilitates detection of system malfunctions.
The SRS indicator lamp 6 in the
instrument cluster comes on when the
ignition is switched on. It goes out no later
than a few seconds after the engine has been
started.
The SRS components are in operational
readiness when the SRS indicator lamp
6 is not lit while the engine is running.
36Occupant safetySafety and security
X204_AKB; 3; 23, en-USd2ureepe,Version: 2.11.8.12009-07-16T19:16:58+02:00 - Seite 36
Page 63 of 344
of the braking effort in straight-line braking
without a loss of vehicle stability.GWarning!
If the EBP malfunctions, the brake system will
still function with full brake boost. However,
the rear wheels could lock up during
emergency braking situations, for example.
You could lose control of the vehicle and
cause an accident.
Adapt your driving style to the changed
driving characteristics.
ESP ®
GObserve Safety notes, see page 60.
The Electronic Stability Program (ESP
®
) is
operational as soon as the engine is running.
It monitors the vehicle’s traction (force of
adhesive friction between the tires and the
road surface) and handling.
The ESP ®
recognizes that the vehicle deviates
from the direction of travel as intended by the
driver. By applying brakes to individual
wheels and by limiting the engine output, the
ESP ®
works to stabilize the vehicle. The
ESP ®
is especially useful while driving off and
on wet or slippery road surfaces. The ESP ®
also stabilizes the vehicle during braking and
steering maneuvers.
The ESP ®
warning lamp d in the
instrument cluster comes on when you switch
on the ignition. It goes out when the engine
is running.
The ESP ®
warning lamp d in the
instrument cluster flashes when the ESP ®
is
engaged.
GWarning!
Never switch off the ESP ®
when you see the
ESP ®
warning lamp d flashing in the
instrument cluster. In this case proceed as
follows:
R When driving off, apply as little throttle as
possible.
R While driving, ease up on the accelerator
pedal.
R Adapt your speed and driving style to the
prevailing road conditions.
Failure to observe these guidelines could
cause the vehicle to skid. The ESP ®
cannot
prevent accidents resulting from excessive
speed.
! Vehicles with 4MATIC:
Only conduct operational or performance
tests on a two-axle dynamometer. If such
tests are necessary, contact an authorized
Mercedes-Benz Center. You could
otherwise seriously damage the brake
system or the transfer case which is not
covered by the Mercedes-Benz Limited
Warranty.
! Because the ESP ®
operates
automatically, the engine and ignition must
be shut off (SmartKey in starter switch
position 0 or 1 or KEYLESS-GO start/stop
button in position 0 or 1) when
R the parking brake is being tested on a
brake test dynamometer
R towing the vehicle with the front or rear
axle raised (not permissible for vehicles
with 4MATIC)
Active braking action through the ESP ®
may otherwise seriously damage the brake
system which is not covered by the
Mercedes-Benz Limited Warranty.
! The ESP ®
will only function properly if you
use wheels of the recommended tire size
Driving safety systems61Safety and securityX204_AKB; 3; 23, en-USd2ureepe,Version: 2.11.8.12009-07-16T19:16:58+02:00 - Seite 61Z
Page 65 of 344
Adapt your speed and driving to the prevailing
road conditions and to the non-operating
status of the ESP ®
.
! Avoid spinning of a drive wheel for an
extended period with the ESP ®
switched
off. This may cause serious damage to the
drivetrain which is not covered by the
Mercedes-Benz Limited Warranty.
Switching on the ESP ®XPress ESP
®
switch : until the ESP ®
warning lamp d in the instrument
cluster goes out.
You are now again in normal driving mode
with the ESP ®
switched on.
ESP ®
trailer stabilization
If the trailer you are towing should begin to
sway, the rig can only be stabilized by
immediately applying the brakes hard.
Steering during this maneuver will not help to
stabilize the rig.
The ESP ®
will assist you in such situations.
The ESP ®
recognizes when the trailer starts
swaying.It will apply the brakes and limit
engine output and thus allow the vehicle-
trailer combination to stabilize.
The ESP ®
trailer stabilization is functional at
vehicle speeds above approximately 40 mph
(65 km/h) when the ESP ®
is switched on.
GWarning!
The system will not be able to assist when the
trailer jackknifes
R if the ESP ®
has switched off due to a
malfunction
R on wet or icy roads
R on roads with slippery surface
R in sand or gravel
Trailers with a high center of gravity may tip
over before the system recognizes swaying of
the trailer.
Anti-theft systems
Immobilizer
The immobilizer prevents unauthorized
persons from starting your vehicle.
When leaving the vehicle, always take the
SmartKey with you and lock the vehicle. The
engine can be started by anyone with a valid
SmartKey that is left inside the vehicle.
Activating
XWith SmartKey: Remove the SmartKey
from the starter switch.XWith KEYLESS-GO: Turn off the engine and
open the driver’s door.
Deactivating
XSwitch on the ignition.
i Starting the engine will also deactivate
the immobilizer.
In the event that the engine cannot be
started (yet the vehicle’s battery is
charged), the system is not operational.
Contact an authorized Mercedes-Benz
Center or call 1-800-FOR-MERCedes (in the
USA) or 1-800-387-0100 (in Canada).
Anti-theft alarm system
Once the alarm system has been armed, a
visual and audible alarm is triggered when
someone opens
R a door
R the tailgate
R the hood
The alarm will stay on even if the activating
element, a door, for example, is closed
immediately.
The alarm system will also be triggered when
R the vehicle is opened with the mechanical
key
R a door is opened from the inside
Anti-theft systems63Safety and securityX204_AKB; 3; 23, en-USd2ureepe,Version: 2.11.8.12009-07-16T19:16:58+02:00 - Seite 63Z
Page 70 of 344
iCanada only:
This device complies with RSS-210 of
Industry Canada. Operation is subject to
the following two conditions:
1. This device may not cause interference,
and
2. this device must accept any interference received, including
interference that may cause undesired
operation of the device.
Any unauthorized modification to this
device could void the user’s authority to
operate the equipment.
Important notes on using KEYLESS-GO
R You can also use the SmartKey with
KEYLESS-GO like a normal SmartKey
( Y page 66).
R You can combine KEYLESS-GO functions
with normal SmartKey functions (e.g.
unlocking with KEYLESS-GO and locking
with button &).
R Always carry the SmartKey with you.
R Never store the SmartKey together with
- electronic items such as a mobile phone
or another SmartKey
- metallic objects such as coins or metal
foil
Doing so could impair the function of the
KEYLESS-GO system.
R To lock or unlock the vehicle, the SmartKey
must be located outside the vehicle within
approximately 3 ft (1 m) of a door or the
tailgate.
R When the vehicle has been parked for more
than 72 hours, the KEYLESS-GO function is
deactivated. Pull an outside door handle
and switch on the ignition once to activate
the KEYLESS-GO function.
R If the SmartKey is positioned farther away
from the vehicle, the system may no longer
recognize the SmartKey. The vehicle
cannot be locked or the engine started via
the KEYLESS-GO system.
R If the SmartKey is removed from the vehicle
(e.g. if a passenger exits the vehicle with
the SmartKey)
- when pressing the KEYLESS-GO start/
stop button or trying to lock the vehicle
with the outside door handle the
message Key Not Detected appears in
the multifunction display
- with the engine running, the red message
Key Not Detected appears in the
multifunction display while driving off
Find the SmartKey or change its present
location immediately (e.g. place it on the
front passenger seat or insert it in shirt
pocket).
R If you have started the engine with the
KEYLESS-GO start/stop button, you can
turn it off again by
- pressing the KEYLESS-GO start/stop
button
- inserting the SmartKey into the starter
switch when the vehicle is at a standstill
and the automatic transmission is in park
position P
R The vehicle could be inadvertently
unlocked if the SmartKey is within 3 ft (1 m)
of the vehicle and
- an outside door handle is splashed with
water
or
- you attempt to clean an outside door
handle
R Remember that the engine can be started
by anyone with a SmartKey that is left
inside the vehicle.
Possibility 1 (One SmartKey in the vehicle,
one SmartKey outside the vehicle):
If you leave the SmartKey behind when
exiting and locking the vehicle, no message
appears in the multifunction display.68Locking and unlockingControls in detail
X204_AKB; 3; 23, en-USd2ureepe,Version: 2.11.8.12009-07-16T19:16:58+02:00 - Seite 68
Page 72 of 344
XHave the SmartKey deactivated by an
authorized Mercedes-Benz Center.
XReport the loss of the SmartKey or the
mechanical key to your car insurance
company immediately.
XHave the mechanical lock replaced if
necessary.
Any authorized Mercedes-Benz Center will be
glad to supply you with a replacement. For
information on replacing the SmartKey, see
“Replacing the SmartKey” (Y page 70).
Replacing the SmartKey
Only you, or someone authorized by you can
order a replacement key from any Mercedes-
Benz Center. In order to do so, the Mercedes-
Benz Center will require proof of identity and
vehicle ownership with original documents,
including the following:
If you are the current owner of the vehicle:
Rthe vehicle’s current state registration
Ra current identity card, passport, or drivers
license
If you are an authorized person:
Rthe vehicle’s current state registration
Ra current identity card, passport, or drivers
license for the authorized individual
Rsigned and dated authorization from the
owner of the vehicle for which the key is
being requested
iDuplicated or photocopied
documentation will not be accepted.
Activating the key
Once you, or an authorized person, has
provided the appropriate documents, the
Mercedes-Benz Center will need to
synchronize the key to your vehicle before it
can be used. In order to do so, the Mercedes-
Benz Center need access to your vehicle.
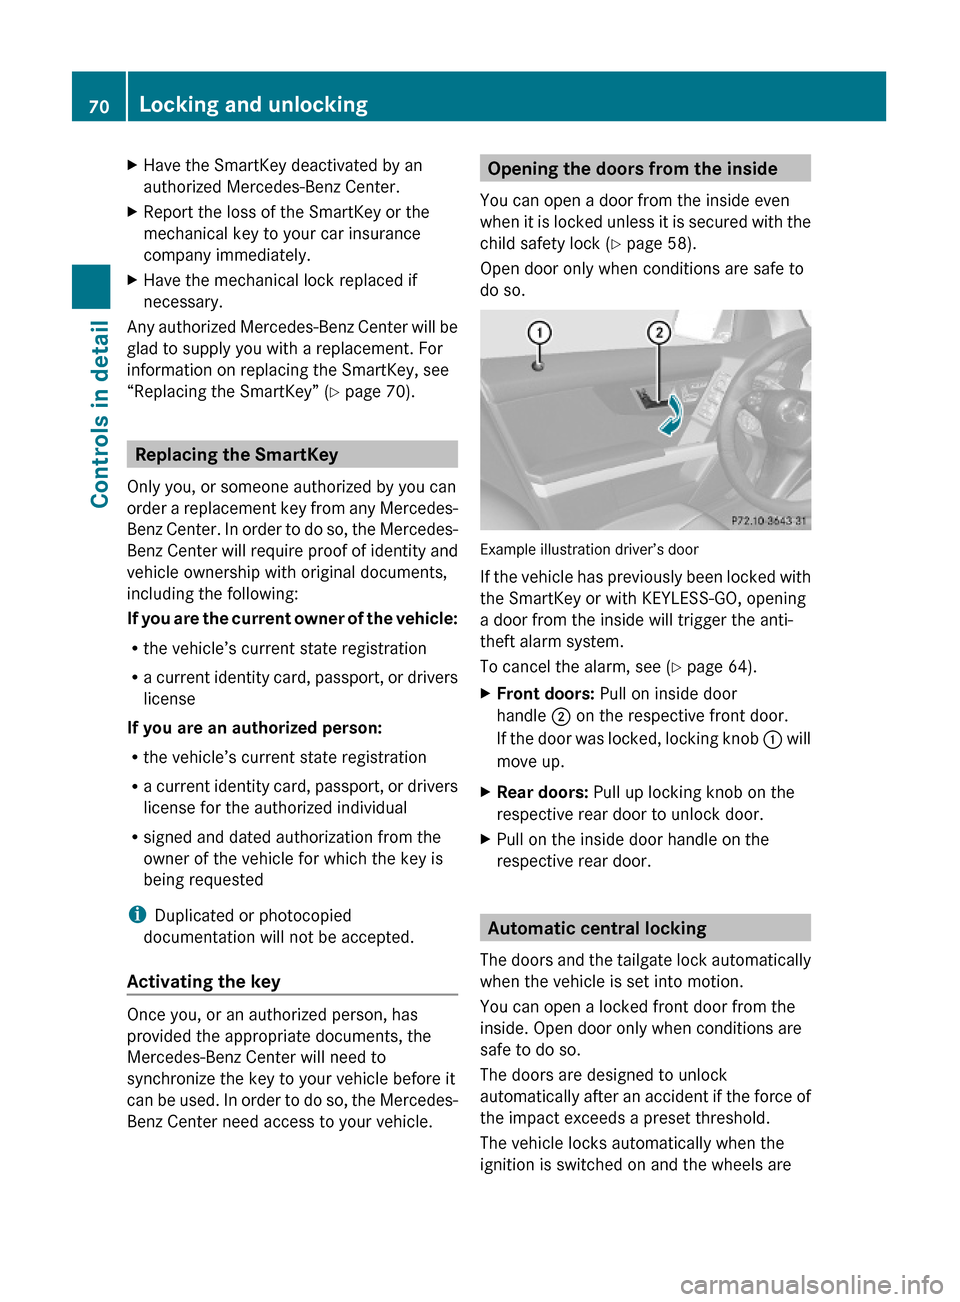
Opening the doors from the inside
You can open a door from the inside even
when it is locked unless it is secured with the
child safety lock (Y page 58).
Open door only when conditions are safe to
do so.
Example illustration driver’s door
If the vehicle has previously been locked with
the SmartKey or with KEYLESS-GO, opening
a door from the inside will trigger the anti-
theft alarm system.
To cancel the alarm, see (Y page 64).
XFront doors: Pull on inside door
handle ; on the respective front door.
If the door was locked, locking knob : will
move up.
XRear doors: Pull up locking knob on the
respective rear door to unlock door.
XPull on the inside door handle on the
respective rear door.
Automatic central locking
The doors and the tailgate lock automatically
when the vehicle is set into motion.
You can open a locked front door from the
inside. Open door only when conditions are
safe to do so.
The doors are designed to unlock
automatically after an accident if the force of
the impact exceeds a preset threshold.
The vehicle locks automatically when the
ignition is switched on and the wheels are
70Locking and unlockingControls in detail
X204_AKB; 3; 23, en-USd2ureepe,Version: 2.11.8.12009-07-16T19:16:58+02:00 - Seite 70
Page 78 of 344
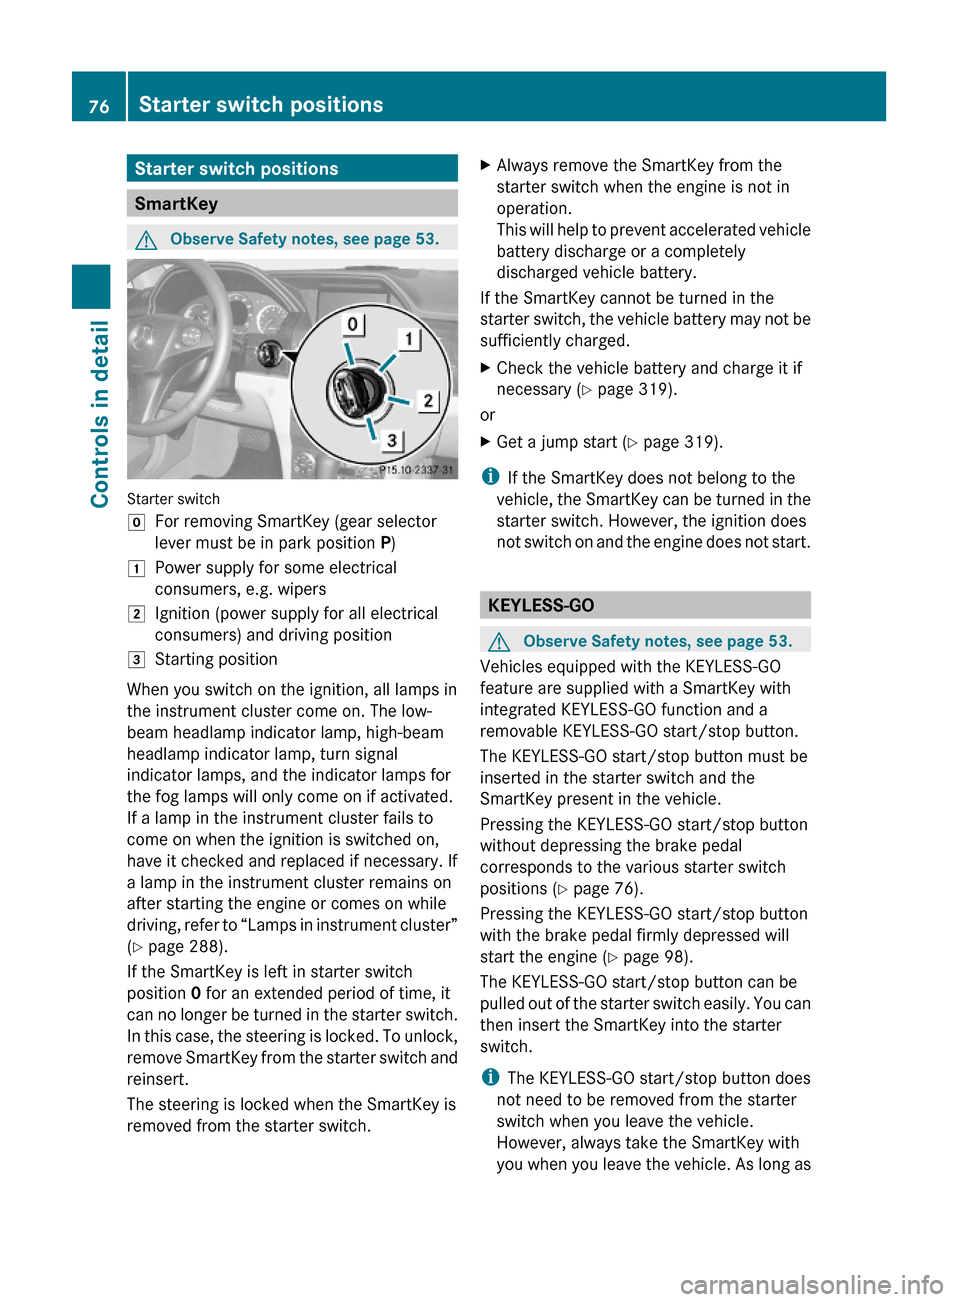
Starter switch positions
SmartKey
GObserve Safety notes, see page 53.
Starter switch
gFor removing SmartKey (gear selector
lever must be in park position P)
1Power supply for some electrical
consumers, e.g. wipers
2Ignition (power supply for all electrical
consumers) and driving position
3Starting position
When you switch on the ignition, all lamps in
the instrument cluster come on. The low-
beam headlamp indicator lamp, high-beam
headlamp indicator lamp, turn signal
indicator lamps, and the indicator lamps for
the fog lamps will only come on if activated.
If a lamp in the instrument cluster fails to
come on when the ignition is switched on,
have it checked and replaced if necessary. If
a lamp in the instrument cluster remains on
after starting the engine or comes on while
driving, refer to “Lamps in instrument cluster”
(Y page 288).
If the SmartKey is left in starter switch
position 0 for an extended period of time, it
can no longer be turned in the starter switch.
In this case, the steering is locked. To unlock,
remove SmartKey from the starter switch and
reinsert.
The steering is locked when the SmartKey is
removed from the starter switch.
XAlways remove the SmartKey from the
starter switch when the engine is not in
operation.
This will help to prevent accelerated vehicle
battery discharge or a completely
discharged vehicle battery.
If the SmartKey cannot be turned in the
starter switch, the vehicle battery may not be
sufficiently charged.
XCheck the vehicle battery and charge it if
necessary (Y page 319).
or
XGet a jump start (Y page 319).
iIf the SmartKey does not belong to the
vehicle, the SmartKey can be turned in the
starter switch. However, the ignition does
not switch on and the engine does not start.
KEYLESS-GO
GObserve Safety notes, see page 53.
Vehicles equipped with the KEYLESS-GO
feature are supplied with a SmartKey with
integrated KEYLESS-GO function and a
removable KEYLESS-GO start/stop button.
The KEYLESS-GO start/stop button must be
inserted in the starter switch and the
SmartKey present in the vehicle.
Pressing the KEYLESS-GO start/stop button
without depressing the brake pedal
corresponds to the various starter switch
positions (Y page 76).
Pressing the KEYLESS-GO start/stop button
with the brake pedal firmly depressed will
start the engine (Y page 98).
The KEYLESS-GO start/stop button can be
pulled out of the starter switch easily. You can
then insert the SmartKey into the starter
switch.
iThe KEYLESS-GO start/stop button does
not need to be removed from the starter
switch when you leave the vehicle.
However, always take the SmartKey with
you when you leave the vehicle. As long as
76Starter switch positionsControls in detail
X204_AKB; 3; 23, en-USd2ureepe,Version: 2.11.8.12009-07-16T19:16:58+02:00 - Seite 76
Page 79 of 344
the SmartKey is in the vehicle, the vehicle’s
electrical systems can be switched on or
the engine can be started using the
KEYLESS-GO start/stop button.
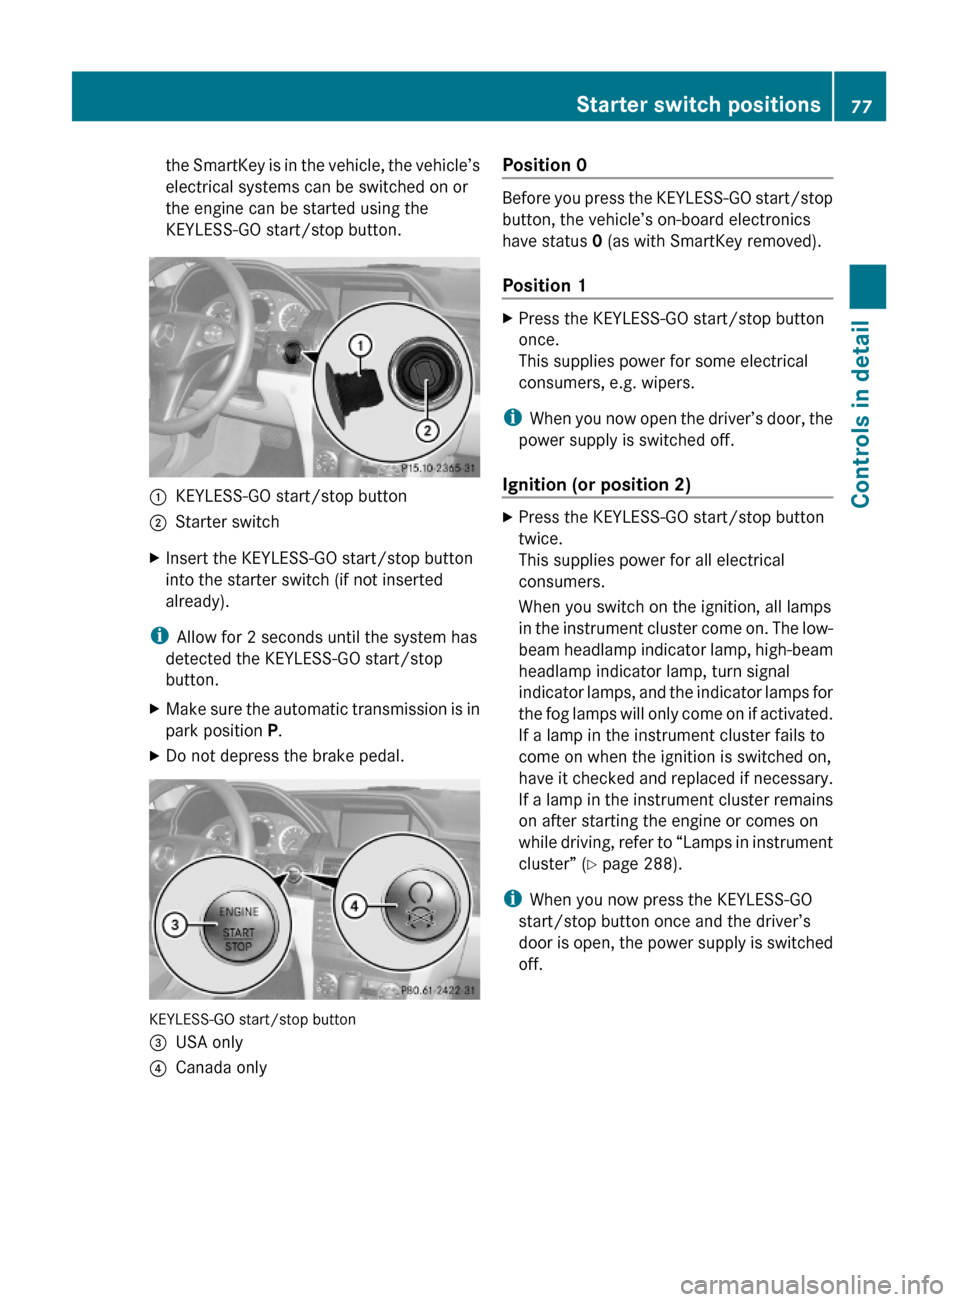
:KEYLESS-GO start/stop button;Starter switchXInsert the KEYLESS-GO start/stop button
into the starter switch (if not inserted
already).
iAllow for 2 seconds until the system has
detected the KEYLESS-GO start/stop
button.
XMake sure the automatic transmission is in
park position P.
XDo not depress the brake pedal.
KEYLESS-GO start/stop button
=USA only?Canada onlyPosition 0
Before you press the KEYLESS-GO start/stop
button, the vehicle’s on-board electronics
have status 0 (as with SmartKey removed).
Position 1
XPress the KEYLESS-GO start/stop button
once.
This supplies power for some electrical
consumers, e.g. wipers.
iWhen you now open the driver’s door, the
power supply is switched off.
Ignition (or position 2)
XPress the KEYLESS-GO start/stop button
twice.
This supplies power for all electrical
consumers.
When you switch on the ignition, all lamps
in the instrument cluster come on. The low-
beam headlamp indicator lamp, high-beam
headlamp indicator lamp, turn signal
indicator lamps, and the indicator lamps for
the fog lamps will only come on if activated.
If a lamp in the instrument cluster fails to
come on when the ignition is switched on,
have it checked and replaced if necessary.
If a lamp in the instrument cluster remains
on after starting the engine or comes on
while driving, refer to “Lamps in instrument
cluster” (Y page 288).
iWhen you now press the KEYLESS-GO
start/stop button once and the driver’s
door is open, the power supply is switched
off.
Starter switch positions77Controls in detailX204_AKB; 3; 23, en-USd2ureepe,Version: 2.11.8.12009-07-16T19:16:58+02:00 - Seite 77Z
Page 81 of 344
Do not drive the vehicle without the seat head
restraints. Head restraints are intended to
help reduce injuries during an accident.
Seat adjustment
! When moving the seats, make sure there
are no items in the footwell or behind the
seats. Otherwise, you could damage the
seats and/or the items.
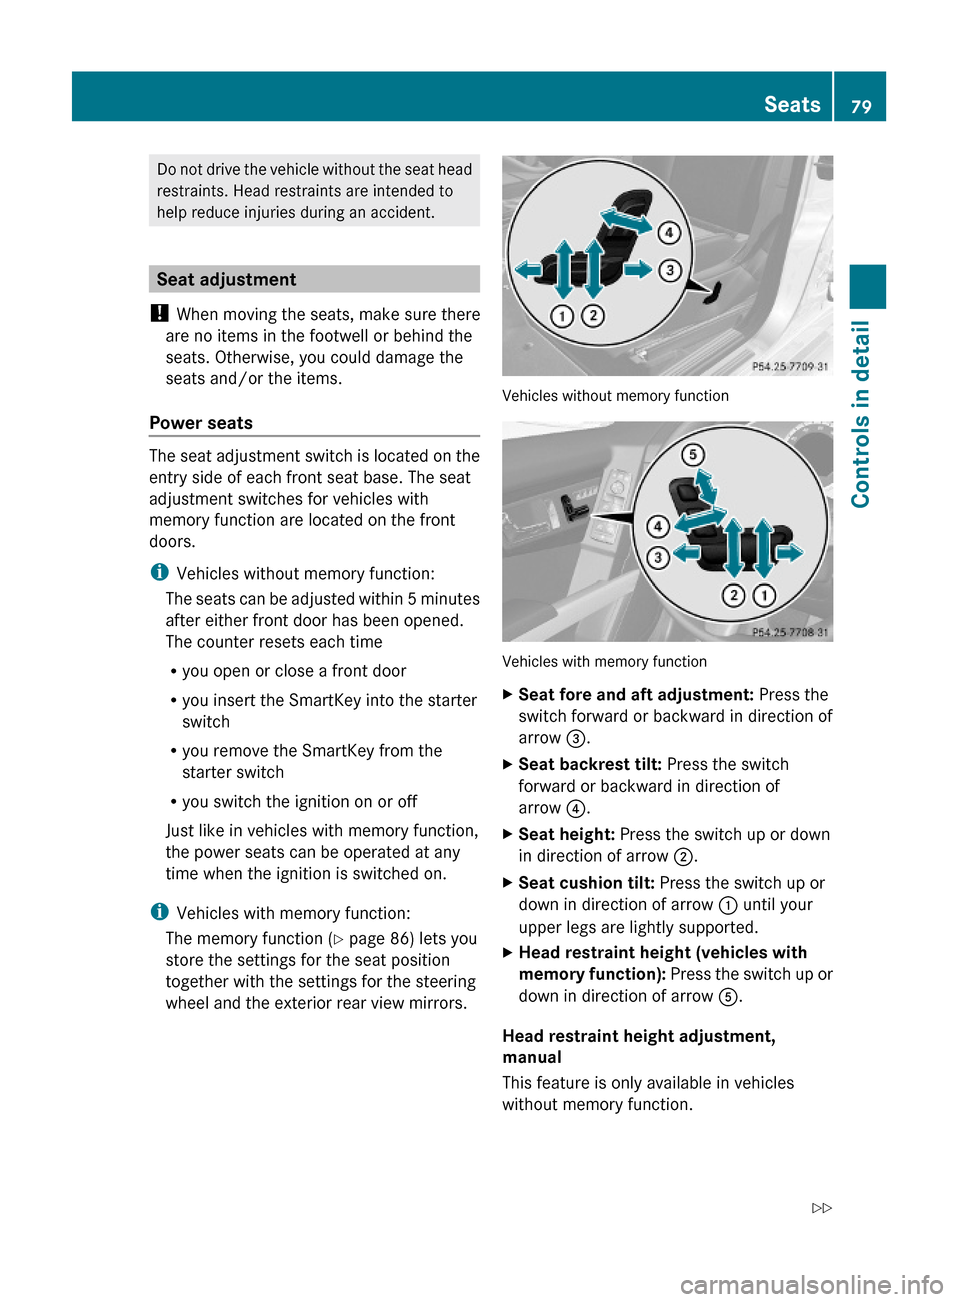
Power seats
The seat adjustment switch is located on the
entry side of each front seat base. The seat
adjustment switches for vehicles with
memory function are located on the front
doors.
iVehicles without memory function:
The seats can be adjusted within 5 minutes
after either front door has been opened.
The counter resets each time
Ryou open or close a front door
Ryou insert the SmartKey into the starter
switch
Ryou remove the SmartKey from the
starter switch
Ryou switch the ignition on or off
Just like in vehicles with memory function,
the power seats can be operated at any
time when the ignition is switched on.
iVehicles with memory function:
The memory function (Y page 86) lets you
store the settings for the seat position
together with the settings for the steering
wheel and the exterior rear view mirrors.
Vehicles without memory function
Vehicles with memory function
XSeat fore and aft adjustment: Press the
switch forward or backward in direction of
arrow =.
XSeat backrest tilt: Press the switch
forward or backward in direction of
arrow ?.
XSeat height: Press the switch up or down
in direction of arrow ;.
XSeat cushion tilt: Press the switch up or
down in direction of arrow : until your
upper legs are lightly supported.
XHead restraint height (vehicles with
memory function): Press the switch up or
down in direction of arrow A.
Head restraint height adjustment,
manual
This feature is only available in vehicles
without memory function.
Seats79Controls in detailX204_AKB; 3; 23, en-USd2ureepe,Version: 2.11.8.12009-07-16T19:16:58+02:00 - Seite 79Z
Page 84 of 344
The seat heating switches from level 3 (high)
to level 2 after approximately 5 minutes.
The seat heating switches from level 2 to level
1 (low) after approximately 10 minutes.
After approximately 20 minutes in level 1, the
seat heating switches off automatically.
XSwitch on the ignition.XSwitching on: Press seat heating
switch :.
Three red indicator lamps in seat heating
switch : come on.
XPress seat heating switch : repeatedly
until the desired seat heating level is set.
XSwitching off: Press seat heating
switch : repeatedly until all indicator
lamps go out.
If there is insufficient voltage the seat heating
switches off automatically.
The seat heating will switch back on again
automatically as soon as sufficient voltage is
available.
Multifunction steering wheel
Safety notes
GWarning!
Do not adjust the steering wheel while driving.
Adjusting the steering wheel while driving, or
driving without the steering wheel adjustment
feature locked could cause the driver to lose
control of the vehicle.
The electrical steering wheel adjustment
feature can be operated at any time.
Therefore, do not leave children unattended
in the vehicle, or with access to an unlocked
vehicle. A child’s unsupervised access to a
vehicle could result in an accident and/or
serious personal injury.
Make sure
Ryou can reach the steering wheel with your
arms slightly bent at the elbows
Ryou can move your legs freely
Rall displays (including malfunction and
indicator lamps) on the instrument cluster
are clearly visible
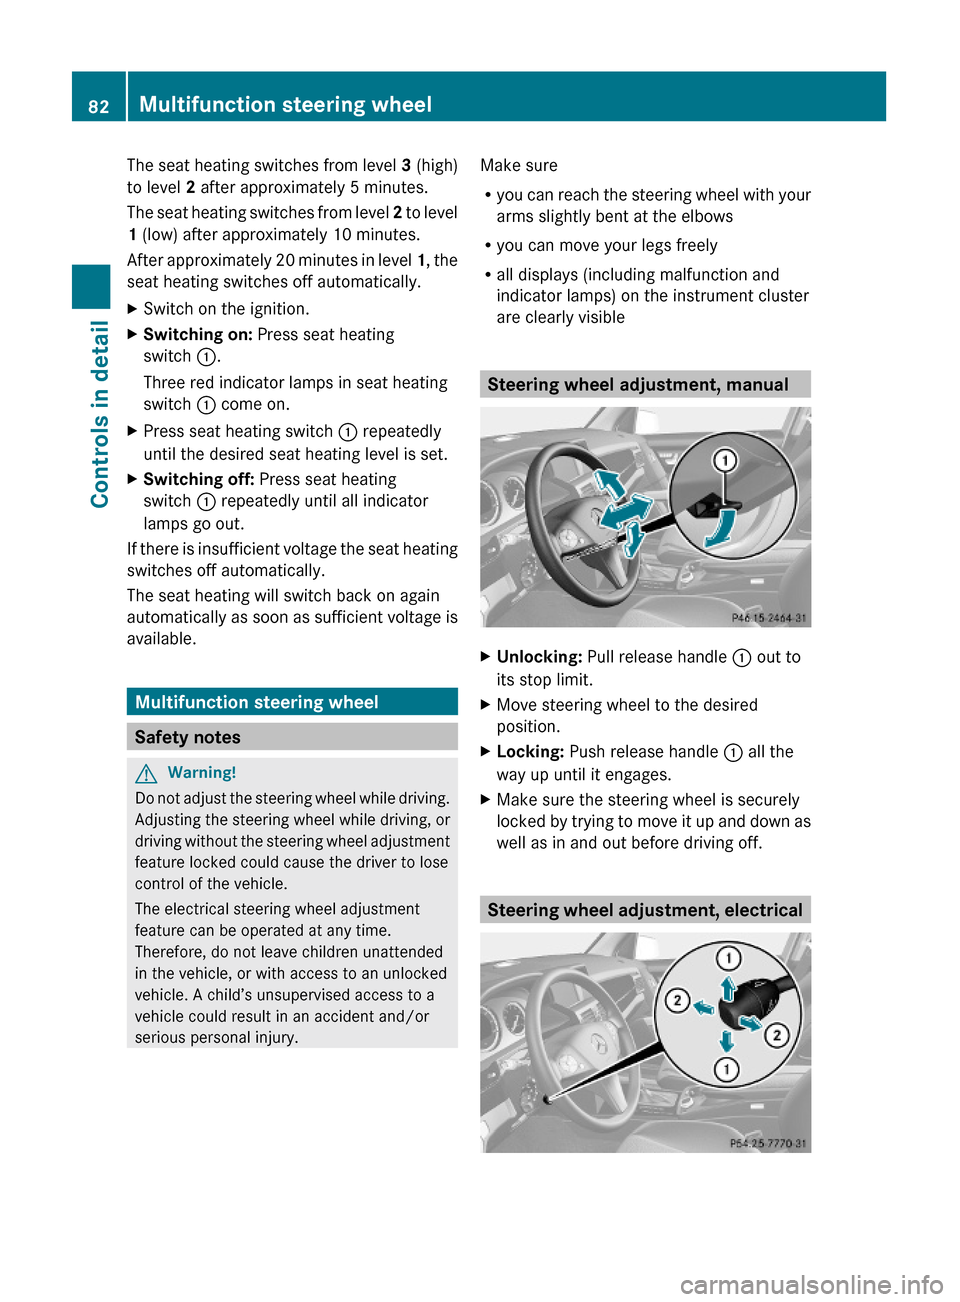
Steering wheel adjustment, manual
XUnlocking: Pull release handle : out to
its stop limit.
XMove steering wheel to the desired
position.
XLocking: Push release handle : all the
way up until it engages.
XMake sure the steering wheel is securely
locked by trying to move it up and down as
well as in and out before driving off.
Steering wheel adjustment, electrical
82Multifunction steering wheelControls in detail
X204_AKB; 3; 23, en-USd2ureepe,Version: 2.11.8.12009-07-16T19:16:58+02:00 - Seite 82