interior lights MERCEDES-BENZ GLS 2018 Owners Manual
[x] Cancel search | Manufacturer: MERCEDES-BENZ, Model Year: 2018, Model line: GLS, Model: MERCEDES-BENZ GLS 2018Pages: 398, PDF Size: 5.73 MB
Page 4 of 398
Index ....................................................... 4
Digital Operator's Manual .................. 26
Introduction .......................................... .2 6
Operation ............................................... 26
Introduction ......................................... 27
Protecting the environment .................. .2 7
Genuine Mercedes-Benz parts .............. .2 7
Operator's Manual ................................. 28
Service and vehicle operation ............... .2 8
Operating safety .................................... 30
QR codes for the rescue card ............... .3 2
Data stored in the vehicle ...................... 32
Information on copyright ....................... 35
At a glance ........................................... 36
Cockpit .................................................. 36
Instrument cluster ................................. 37
Multifunction steering wheel ................. 38
Center console ...................................... 39
Overhead control panel ........................ .4 2
Door control panel ................................. 43
Safety ................................................... 44
Panic alarm ............................................ 44
Occupant safety .................................... 44
Children in the vehicle ........................... 59
Pets in the vehicle ................................. 65
Driving safety systems ........................... 66
Protection against theft ........................ .7 5
Opening and closing ........................... 77
SmartKey ............................................... 77
Doors ..................................................... 83
Cargo compartment .............................. .8 4
Side windows ......................................... 88
Sliding sunroof ....................................... 92
Seats, steering wheel and mirrors .... 97
Correct driver's seat position ................ 97
Seats ..................................................... 97
Steering wheel ..................................... 108
Mirrors ................................................. 110 Memory function ................................. 113
Lights and windshield wipers .......... 115
Exterior lighting ................................... 115
Interior lighting .................................... 119
Replacing bulbs (vehicles with LED
headlamps) .......................................... 120
Replacing bulbs (vehicles with halo-
gen headlamps) ................................... 120
Windshield wipers ................................ 122
Climate control ................................. 125
Overview of climate control systems ... 125
Operating the climate control sys-
tems .................................................... 131
Setting the air vents ............................ 136
Driving and parking .......................... 139
Notes on breaking-in a new vehicle ..... 139
Driving ................................................. 139
DYNAMIC SELECT controller ............... 147
Automatic transmission ....................... 148
Refueling ............................................. 155
Parking ................................................ 161
Driving tips .......................................... 164
Driving systems ................................... 174
Towing a trailer .................................... 224
Bicycle rack ......................................... 230
On-board computer and displays .... 233
Important safety notes ........................ 233
Displays and operation ........................ 233
Menus and submenus ......................... 236
Display messages ............................... 248
Warning and indicator lamps in the
instrument cluster ............................... 279
Multimedia system ........................... 292
General notes ...................................... 292
Important safety notes ........................ 292
Function restrictions ............................ 292
Operating system ................................ 293
Stowage and features ...................... 300
Stowage areas ..................................... 3002
Contents
Page 8 of 398
Bag hook ............................................ 305
Ball coupling
Installing ........................................ 226
Removing ....................................... 229
BAS (Brake Assist System) ................. 67
Battery (SmartKey)
Checking .......................................... 80
Important safety notes .................... 80
Replacing ......................................... 80
Battery (vehicle)
Charging ........................................ 346
Display message ............................ 262
Important safety notes .................. 344
Jump starting ................................. 346
Overview ........................................ 344
Belt
see Seat belts
Belt warning ......................................... 48
Bicycle rack ....................................... 230
Blind Spot Assist
Activating/deactivating ................. 242
Display message ............................ 269
Notes/function .............................. 209
Trailer towing ................................. 211
see Active Blind Spot Assist
BlueTEC
Adding DEF .................................... 158
BlueTEC (DEF) .................................... 389
Bluetooth ®
Searching for a mobile phone ........ 296
Searching for a mobile phone
(device manager) ........................... 297
see also Digital Operator's Man-
ual .................................................. 292
Telephony ...................................... 296
Brake Assist
see BAS (Brake Assist System)
Brake fluid
Display message ............................ 254
Notes ............................................. 390
Brake force distribution
see EBD (electronic brake force
distribution)
Brake lamps
Display message ............................ 260
Brake linings
Display message ............................ 254 Brakes
ABS .................................................. 66
BAS .................................................. 67
Brake fluid (notes) ......................... 390
Braking assistance appropriate to
the situation ..................................... 69
Display message ............................ 249
High-performance brake system .... 168
Hill start assist ............................... 143
Important safety notes .................. 166
Maintenance .................................. 167
Parking brake ................................ 162
Riding tips ...................................... 166
Warning lamp ................................. 281
Braking assistance appropriate to
the situation
Function/notes ................................ 69
Breakdo wn
W
here will I find...? ........................ 338
see Flat tire
see Towing away
Brightness control (instrument
cluster lighting) ................................... 37
Bulbs
see Replacing bulbs
C
California
Important notice for retail cus-
tomers and lessees .......................... 28
Calling up a malfunction
see Display messages
Car
see Vehicle
Care
360° camera ................................. 334
Car wash ........................................ 330
Carpets .......................................... 337
Display ........................................... 335
Exhaust pipe .................................. 334
Exterior lights ................................ 333
Gear or selector lever .................... 336
Interior ........................................... 335
Matte finish ................................... 332
Notes ............................................. 330
Paint .............................................. 332
Plastic trim .................................... 3356
Index
Page 15 of 398
Indicators
see Turn signals
Insect protection on the radiator .... 326
Instrument cluster
Overview .......................................... 37
Warning and indicator lamps .......... .3 7
Instrument cluster lighting .............. 233
Intelligent Light System
Activating/deactivating ................ .2 43
Display message ............................ 260
Overview ........................................ 117
Interior lighting
Automatic control .......................... 120
Emergency lighting ........................ 120
General notes ................................ 119
Manual control ............................... 119
Overview ........................................ 119
Reading lamp ................................. 119
iPod ®
see also Digital Operator's Man-
ual ................................................. .2 92
J Jack
Storage location ............................ 339
Using ............................................. 376
Jump starting (engine) ..................... .3 46
K
Key positions
KEYLESS-GO .................................. 140
SmartKey ....................................... 140
KEYLESS-GO
Activating ......................................... 78
Convenience closing feature ............ 91
Deactivation ..................................... 78
Display message ............................ 278
Locking ............................................ 78
Removing the Start/Stop button ... 141
Start function ................................... 79
Start/Stop button .......................... 140
Starting the engine ........................ 142
Unlocking ......................................... 78
Kickdown
Driving tips ................................... .1 51
Manual gearshifting ....................... 154 Knee bag .............................................. 50
L Lamps
see Warning and indicator lamps
Lane Keeping Assist
Activating/deactivating ................. 242
Display message ............................ 268
Function/information .................... 211
see Active Lane Keeping Assist
Lap time (RACETIMER) ...................... 246
LATCH-type (ISOFIX) child seat
anchors ................................................ 62
Level control
AIRMATIC ...................................... 190
Level control (display message) ...... 265
Level control (vehicle with the Off-
Road Engineering package)
Basic settings ................................ 184
Function/notes ............................. 184
Important safety notes .................. 184
License plate lamp (display mes-
sage) ................................................... 260
Light function, active
Display message ............................ 260
Light sensor (display message) ....... 260
Light switch
Operation ....................................... 115
Lights
Activating/deactivating the Intel-
ligent Light System ........................ 243
Active light function ....................... 117
Adaptive Highbeam Assist ............. 118
Automatic headlamp mode ............ 115
Fog lamps (extended) .................... 118
Hazard warning lamps ................... 117
High beam flasher .......................... 116
High-beam headlamps ................... 116
Highway mode ............................... 118
Light switch ................................... 115
Low-beam headlamps .................... 116
Off-road lights ................................ 118
Parking lamps ................................ 116
Rear fog lamp ................................ 116
Standing lamps .............................. 116 Index 13
Page 47 of 398
Restraint system warning lamp The functions of the restraint system are
checked after the ignition is switched on and at
regular intervals while the engine is running.
Therefore, malfunctions can be detected in
good time.
The �u restraint system warning lamp on the
instrument cluster lights up when the ignition is
switched on. It goes out no later than a few sec-
onds after the vehicle is started. The compo-
nents of the restraint system are in operational
readiness.
A malfunction has occurred if the �u restraint
system warning lamp: R
does not light up after the ignition is switched
on R
does not go out after a few seconds with the
engine running R
lights up again while the engine is running
G WARNING
If the restraint system is malfunctioning,
restraint system components may be trig-
gered unintentionally or may not deploy as
intended during an accident. This can affect
for example the Emergency Tensioning
Device or the air bag. This poses an increased
risk of injury or even fatal injury.
Have the restraint system checked and
repaired in a qualified specialist workshop as
soon as possible.
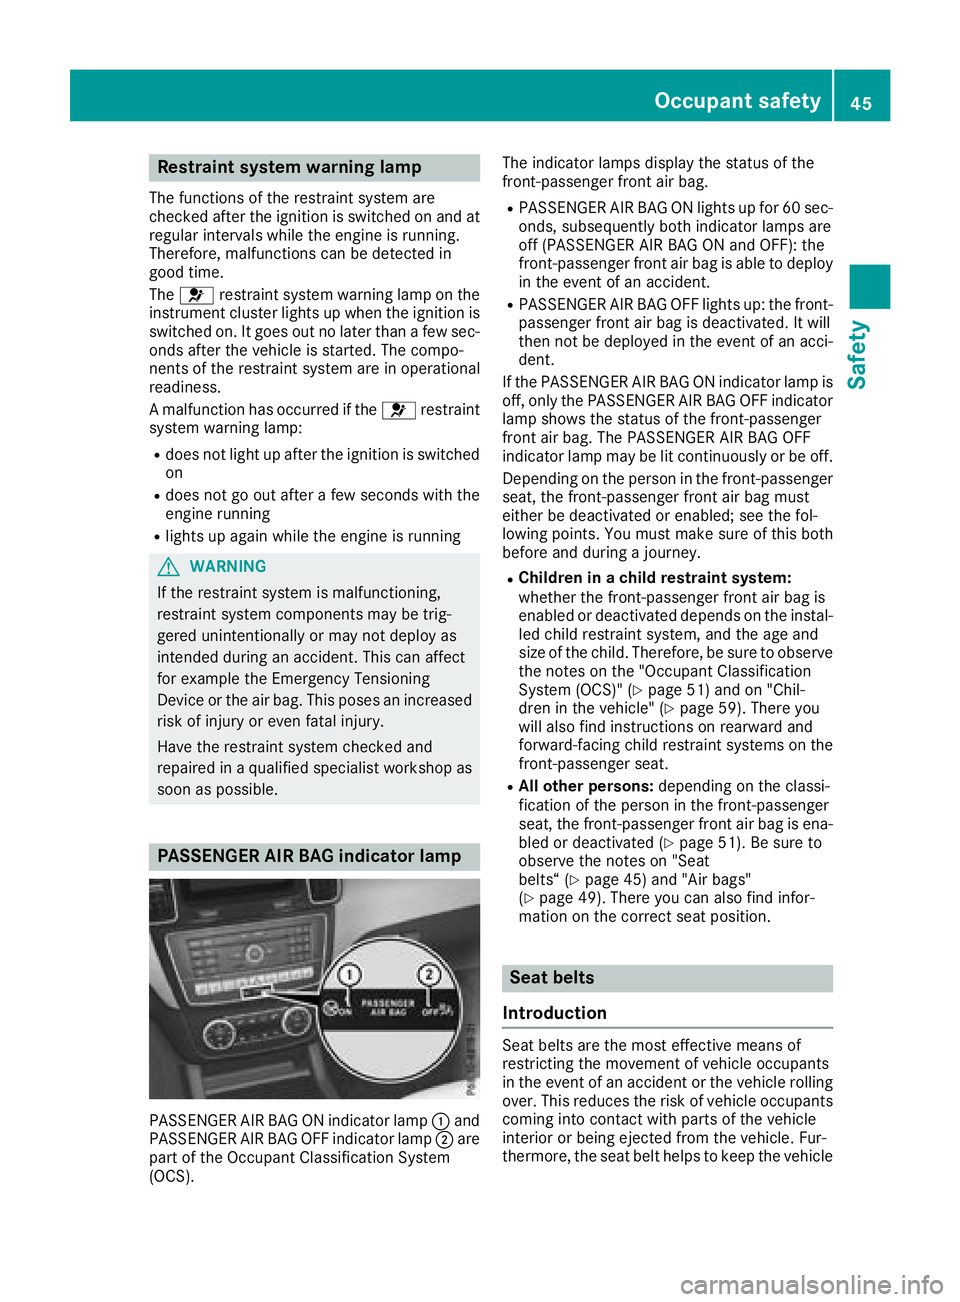
PASSENGER AIR BAG indicator lamp
PASSENGER AIR BAG ON indicator lamp �C and
PASSENGER AIR BAG OFF indicator lamp �D are
part of the Occupant Classification System
(OCS). The indicator lamps display the status of the
front-passenger front air bag. R
PASSENGER AIR BAG ON lights up for 60 sec-
onds, subsequently both indicator lamps are
off (PASSENGER AIR BAG ON and OFF): the
front-passenger front air bag is able to deploy
in the event of an accident. R
PASSENGER AIR BAG OFF lights up: the front-
passenger front air bag is deactivated. It will
then not be deployed in the event of an acci-
dent.
If the PASSENGER AIR BAG ON indicator lamp is
off, only the PASSENGER AIR BAG OFF indicator
lamp shows the status of the front-passenger
front air bag. The PASSENGER AIR BAG OFF
indicator lamp may be lit continuously or be off.
Depending on the person in the front-passenger
seat, the front-passenger front air bag must
either be deactivated or enabled; see the fol-
lowing points. You must make sure of this both
before and during a journey. R
Children in a child restraint system:
whether the front-passenger front air bag is
enabled or deactivated depends on the instal-
led child restraint system, and the age and
size of the child. Therefore, be sure to observe
the notes on the "Occupant Classification
System (OCS)" ( Y
page 51) and on "Chil-
dren in the vehicle" ( Y
page 59). There you
w ill also find instructions on rearward and
forward-facing child restraint systems on the
front-passenger seat. R
All other persons: depending on the classi-
fication of the person in the front-passenger
seat, the front-passenger front air bag is ena-
bled or deactivated ( Y
page 51). Be sure to
observe the notes on "Seat
belts“ ( Y
page 45) and "Air bags"
( Y
page 49). There you can also find infor-
mation on the correct seat position.
Seat belts
Introduction
Seat belts are the most effective means of
restricting the movement of vehicle occupants
in the event of an accident or the vehicle rolling
over. This reduces the risk of vehicle occupants
coming into contact with parts of the vehicle
interior or being ejected from the vehicle. Fur-
thermore, the seat belt helps to keep the vehicleOccupant safety 45
Safety Z
Page 55 of 398
G WARNING
If the PASSENGER AIR BAG OFF indicator
lamp is lit, the front-passenger front air bag is
disabled. It will not be deployed in the event of
an accident and cannot perform its intended
protective function. A person in the front-
passenger seat could then, for example, come
into contact with the vehicle's interior, espe-
cially if the person is sitting too close to the
dashboard. This poses an increased risk of
injury or even fatal injury.
When the front-passenger seat is occupied,
always ensure that: R
the classification of the person in the front-
passenger seat is correct and the front-
passenger front air bag is enabled or disa-
bled in accordance with the person in the
front-passenger seat R
the front-passenger seat has been moved
back as far back as possible. R
the person is seated correctly.
Make sure, both before and during the jour-
ney, that the status of the front-passenger
front air bag is correct.
G WARNING
If you secure a child in a rearward-facing child
restraint system on the front-passenger seat
and the PASSENGER AIR BAG OFF indicator
lamp is off, the front-passenger front air bag
can deploy in the event of an accident. The
child could be struck by the air bag. This poses
an increased risk of injury or even fatal injury.
Make sure that the front-passenger front air
bag has been deactivated. The PASSENGER
AIR BAG OFF indicator lamp must be lit.
NEVER use a rearward-facing child restraint
on a seat protected by an ACTIVE FRONT AIR-
BAG in front of it; DEATH or SERIOUS INJURY
to the child can occur.
If the PASSENGER AIR BAG OFF indicator lamp
stays off, do not install a rearward-facing child
restraint system on the front-passenger seat.
You can find more information on OCS under
"Problems with the Occupant Classification Sys-
tem" ( Y
page 55). G WARNING
If you secure a child in a forward-facing child
restraint system on the front-passenger seat
and you position the front-passenger seat too
close to the dashboard, the child could, in the
event of an accident: R
come into contact with the vehicle's inte-
rior if the PASSENGER AIR BAG OFF indi-
cator lamp is lit, for example R
be struck by the air bag if the PASSENGER
AIR BAG OFF indicator lamp is off
This poses an increased risk of injury or even
fatal injury.
Move the front-passenger seat as far back as
possible. Always make sure that the shoulder
belt strap is correctly routed from the vehicle
belt sash guide to the shoulder belt guide on
the child restraint system. The shoulder belt
strap must be routed forwards and down-
wards from the vehicle belt sash guide. If nec-
essary, adjust the vehicle belt sash guide and
the front-passenger seat accordingly. Always
observe the child restraint system manufac-
turer's installation instructions.
If OCS determines that: R
The front-passenger seat is unoccupied, the
PASSENGER AIR BAG OFF indicator lamp
lights up after the system self-test and
remains lit. This indicates that the front-
passenger front air bag is deactivated. R
The front-passenger seat is occupied by a
child of up to twelve months old, in a standard
child restraint system, the PASSENGER AIR
BAG OFF indicator lamp lights up after the
system self-test and remains lit. This indi-
cates that the front-passenger front air bag is
deactivated.
But even in the case of a twelve-month-old
child, in a standard child restraint system, the
PASSENGER AIR BAG OFF indicator lamp can
go out after the system self-test. This indi-
cates that the front-passenger front air bag is
activated. The result of the classification is
dependent on, among other factors, the child
restraint system and the child's stature. It is
recommended that you install the child
restraint sy stem on a suitable rear seat.Occupant safety 53
Safety Z
Page 56 of 398
R
The front-passenger seat is occupied by a
person of smaller stature (e.g. a teenager or
small adult), the PASSENGER AIR BAG OFF
indicator lamp lights up and remains lit after
the system self-test depending on the result
of the classification or, alternatively, goes out. -
If the PASSENGER AIR BAG OFF indicator
lamp is off, move the front-passenger seat
as far back as possible. Alternatively, a per-
son of smaller stature can sit on a rear seat. -
If the PASSENGER AIR BAG OFF indicator
lamp is lit, a person of smaller stature
should not use the front-passenger seat. R
The front-passenger seat is occupied by an
adult or a person of adult stature, the
PASSENGER AIR BAG OFF indicator lamp
goes out after the system self-test. This indi-
cates that the front-passenger front air bag is
activated.
If children are traveling in the vehicle, be sure to
observe the notes on "Children in the vehicle"
( Y
page 59).
When the Occupant Classification System
(OCS) is malfunctioning, the red �u restraint
system warning lamp on the instrument cluster
and the PASSENGER AIR BAG OFF indicator
lamp light up simultaneously. The front-
passenger front air bag is deactivated in this
case and does not deploy during an accident.
Have the Occupant Classification System (OCS)
checked and repaired immediately at a qualified
specialist workshop. Mercedes-Benz recom-
mends that you use an authorized Mercedes-
Benz Center for this purpose.
If the front-passenger seat, the seat cover or the
seat cushion are damaged, have the necessary
repair work carried out at a qualified specialist
workshop. Mercedes-Benz recommends that
you use an authorized Mercedes-Benz Center
for this purpose.
For safety reasons, Mercedes-Benz recom-
mends that you only use seat accessories that
have been approved by Mercedes-Benz.
If the driver's air bag deploys, this does not
mean that the front-passenger front air bag will
also deploy. The Occupant Classification Sys-
tem (OCS) categorizes the occupant on the
front-passenger seat. Depending on that result,
the front-passenger front air bag is either ena-
bled or deactivated. System self-test
G DANGER
If both the PASSENGER AIR BAG OFF and
PASSENGER AIR BAG ON indicator lamps do
not light up during the system self-test, the
system is malfunctioning. The front-
passenger front air bag might be triggered
unintentionally or might not be triggered at all
in the event of an accident with high deceler-
ation. This poses an increased risk of injury or
even fatal injury.
In this case the front-passenger seat may not
be used. Do not install a child restraint system
on the front-passenger seat. Have the Occu-
pant Classification System (OCS) checked
and repaired immediately at a qualified spe-
cialist workshop.
G WARNING
If the PASSENGER AIR BAG OFF indicator
lamp remains lit after the system self-test, the
front-passenger front air bag is disabled. It will
not be deployed in the event of an accident. In
this case, the front-passenger front air bag
cannot perform its intended protective func-
tion, e.g. when a person is seated in the front-
passenger seat.
That person could, for example, come into
contact with the vehicle's interior, especially
if the person is sitting too close to the dash-
board. This poses an increased risk of injury or
even fatal injury.
When the front-passenger seat is occupied,
always ensure that: R
the classification of the person in the front-
passenger seat is correct and the front-
passenger front air bag is enabled or disa-
bled in accordance with the person in the
front-passenger seat R
the person is seated properly with a cor-
rectly fastened seatbelt R
the front-passenger seat has been moved
as far back as possible
If the PASSENGER AIR BAG OFF indicator
lamp remains lit when it should not, the front-54
Occupant safety
Safety
Page 144 of 398
ignite if in contact with the exhaust system or
parts of the engine that heat up. There is a risk
of fire.
Carry out regular checks to make sure that
there are no flammable foreign materials in
the engine compartment or in the exhaust
system.
General notes Vehicles with a gasoline engine: the catalytic
converter is preheated for up to 30 seconds
after a cold start. The sound of the engine may
change during this time.
Automatic transmission X
Shift the transmission to position �]
( Y
page 148).
The transmission position indicator on the
multifunction display shows �]
( Y
page 149).
i You can start the engine in transmission
position �] and �\\ .
Starting procedure with the SmartKey X
To start a diesel engine: turn the SmartKey
to position �H in the ignition lock
( Y
page 140).
The �\( preglow indicator lamp in the instru-
ment cluster lights up. X
Turn the SmartKey to position �I in the igni-
tion lock ( Y
page 140) and release it as soon
as the engine is running.
i Vehicles with a diesel engine: you can
start the engine without preglow if the engine
is warm.
Using KEYLESS-GO to start the engine The Start/Stop button can be used to start the
vehicle without inserting the SmartKey into the
ignition lock. The Start/Stop button must be
inserted in the ignition lock and the SmartKey
must be in the vehicle. This mode for starting the
engine operates independently of the ECO
start/stop automatic engine start function. X
Depress the brake pedal and keep it
depressed. X
Press the Start/Stop button once
( Y
page 140).
Vehicles with a gasoline engine: the engine
starts.
Vehicles with a diesel engine: preglow is
activated and the engine starts.
Starting procedure via smartphone Observe the important safety notes on starting
the engine ( Y
page 141).
You can also start your engine via your smart-
phone from outside the vehicle. In this case, the
previously selected climate control setting is
activated. In this way you can cool or heat the
interior of the vehicle before starting the jour-
ney.
Only start the engine via your smartphone if it is
safe to start and run the engine where your vehi-
cle is parked.
Observe the legal stipulations in the area where
your vehicle is parked. Engine start via smart-
phone may be limited to certain countries or
regions.
You can execute a maximum of two consecutive
starting attempts via your smartphone. If you
insert the SmartKey into the ignition lock, you
can carry out two more starting attempts.
Once you have started the engine, you can
switch the engine off via your smartphone at any
time.
You can only start the engine via your smart-
phone if: R
the SmartKey is in the ignition lock R
park position �] is selectedR
the accelerator pedal is not depressed R
the anti-theft alarm system is not activated R
the panic alarm is not activated R
the hazard warning lamps are switched off R
the hood is closed R
the doors are closed and locked R
the windows and sliding sunroof are closed
Also make sure that: R
the fuel tank is sufficiently filled R
the starter battery is sufficiently charged142
Driving
Driving and parking
Page 147 of 398
Aut oma tic engine startThe engin e start s automatically if:R
you switch off th e ECO start/sto p function by
pressing th e ECO butto nR
in transmission position D or N th e brak e
pedal is release d and th e HOLD function is no t
active R
you depress th e accelerato r pedalR
you engage revers e gear RR
you mov e th e transmission out of position PR
you switch to th e Sport Plu s or Sport drive
program (Mercedes-AM G vehicles)R
you activat e manual gearshifting (Mercedes-
AM G vehicles)R
you switch to th e Offroa d drive program
(vehicles without Off-Road Engineering pack-
age) R
you switch to th e Offroa d or Offroa d Plu s
drive program (vehicles wit h Off-Road Engi-
neering package) R
you unfasten your seat belt or open th e driv-
er' s doorR
th e vehicl e start s to rol lR
th e brak e system require s thisR
th e temperature in th e vehicl e interior devi-
ate s from th e set rangeR
th e system detects moisture on th e wind-
shield when th e air-conditioning system is
switched on R
th e battery's condition of charge is to o low
Shifting th e transmission to position P does no t
start th e engine. Deactivating or activating the ECO
start/stop function All vehicles (excep t Mercedes-AM G veh i-
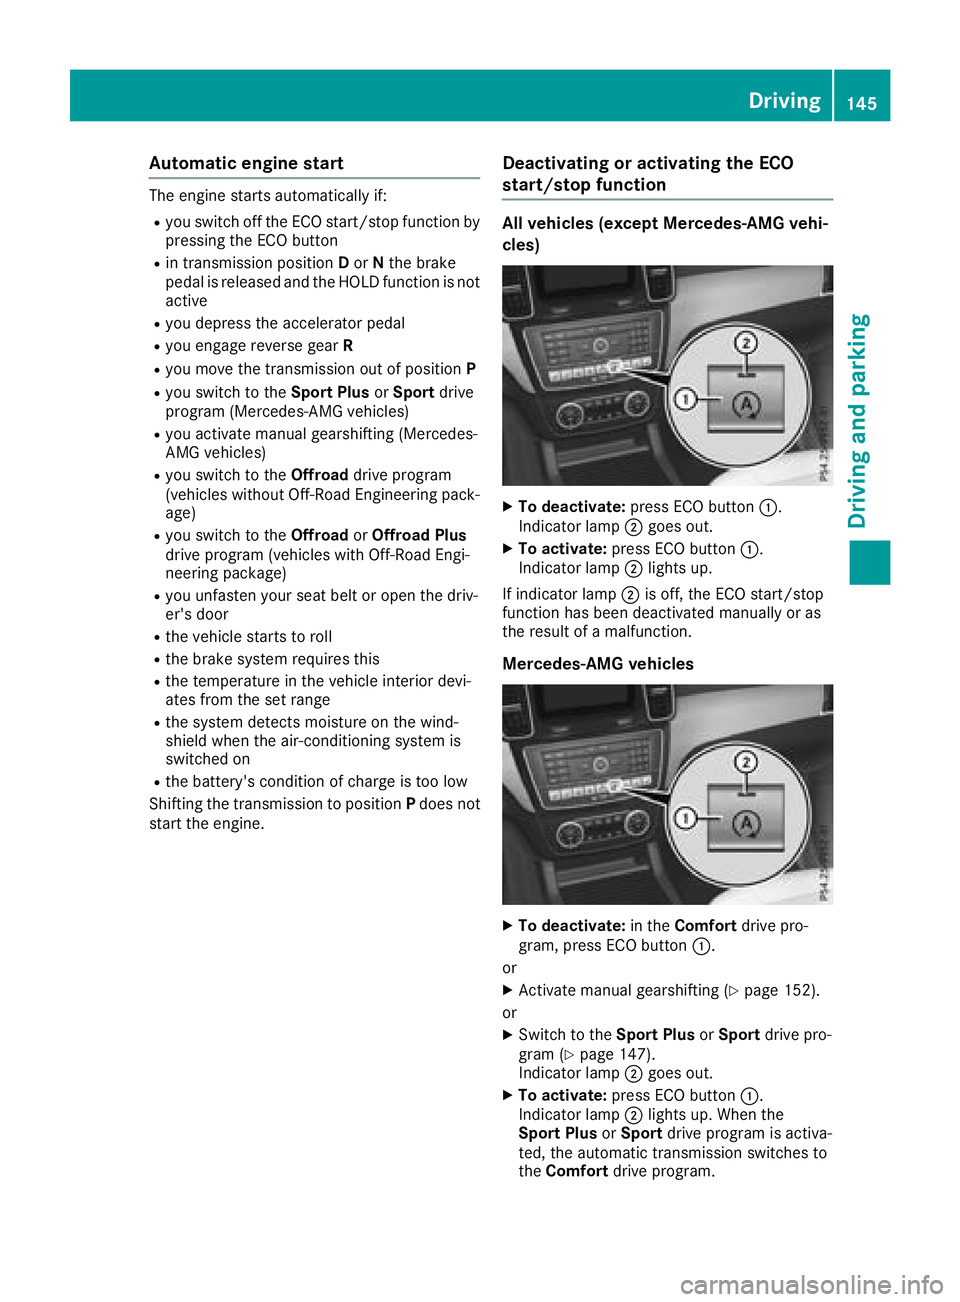
cles) X
To deactivate: press ECO butto n �C .
Indicato r lamp �D goe s out .X
To activate: press ECO butto n �C .
Indicato r lamp �D lights up.
If indicator lamp �D is off , th e ECO start/sto p
function has been deactivated manually or as
th e result of a malfunction .
Mercedes-AM G veh icles
X
To deactivate: in th e Comfor t drive pro -
gram , press ECO butto n �C .
or X
Activat e manual gearshifting ( Y
page 152).
or X
Switc h to th e Sport Plu s or Sport drive pro -
gram ( Y
page 147).
Indicato r lamp �D goes out .X
To activate: press ECO butto n �C .
Indicato r lamp �D lights up. When th e
Sport Plu s or Sport drive program is activa-
ted, th e automatic transmission switches to
th e Comfor t drive program .Driving 145
Driving and parking Z
Page 230 of 398
Most U.S. states and all Canadian provinces
require by law: R
Safety chains between the towing vehicle and
the trailer. The chains should be cross-wound
under the trailer drawbar. They must be fas-
tened to the vehicle's trailer coupling, not to
the bumper or the axle.
Leave enough play in the chains to make tight
cornering possible. R
A separate brake system for certain types of
trailer. R
Safety switch for braked trailers. Check the
specific legal requirements applicable to your
state.
If the trailer becomes detached from the tow-
ing vehicle, the safety feature triggers the
trailer brakes.
Towing a trailer There are numerous legal requirements con-
cerning the towing of a trailer, e.g. speed restric-
tions. Make sure that your car/trailer combina-
tion complies with the local regulations: R
in your place of residence R
in the location to which you are driving
The police and local authorities can provide reli-
able information.
Observe the following when towing a trailer: R
To gain driving experience and to become
accustomed to the new handling characteris-
tics, you should practice the following in a
traffic-free location: -
cornering -
stopping -
backing up R
Before driving, check: -
trailer tow hitch -
safety switch for braked trailers -
safety chains -
electrical connections -
lights -
wheels R
Adjust the exterior mirrors to provide an
unobstructed view of the rear section of the
trailer. R
If the trailer has electronically controlled
brakes, pull away carefully. Brake manually using the brake controller and check whether
the brakes function correctly. R
Secure any objects on the trailer to prevent
the cargo from slipping when the vehicle is in
motion. R
When you couple up a trailer, check at regular
intervals that the load is firmly secured. If the
trailer is equipped with trailer lights and
brakes, check the trailer to ensure that these
are working. R
Bear in mind that the handling will be less
stable when towing a trailer than when driving
without one. Avoid sudden steering move-
ments. R
The vehicle/trailer combination is heavier,
accelerates more slowly, has a decreased
gradient climbing capability and a longer
braking distance.
It is more susceptible to side winds and
requires more careful steering. R
If possible, do not brake suddenly, but instead
depress the brake pedal moderately at first so
that the trailer can activate its brakes. Then
increase the pressure on the brake pedal. R
If the automatic transmission repeatedly
shifts between gears on uphill or downhill gra-
dients, shift to a lower gear using the left-hand
steering wheel paddle shifter.
A lower gear and lower speed reduce the risk
of engine failure. R
When driving downhill, shift to a lower gear to
utilize the engine's braking effect.
Avoid continuous brake application as this
may overheat the vehicle brakes and, if instal-
led, the trailer brakes. R
If the coolant temperature increases dramat-
ically while the air-condition ing system is
switched on, switch off the air-conditioning
system.
Coolant heat can also be dissipated by open-
ing the windows and switching the ventilation
blower and the interior temperature to the
highest level. R
When overtaking, pay particular attention to
the extended length of your vehicle/trailer
combination.
Due to the length of the vehicle/trailer com-
bination, you require additional road space in
relation to the vehicle you are overtaking
before you can change back to the original
lane.228
Towing a trailer
Driving and parking